

Digital compositing is an essential part of visual effects, which are everywhere in the entertainment industry today—in feature films, television commercials, and even many TV shows. And it’s growing. Even a non-effects film will have visual effects. It might be a love story or a comedy, but there will always be something that needs to be added or removed from the picture to tell the story. And that is the short description of what visual effects are all about—adding elements to a picture that are not there, or removing something that you don’t want to be there. And digital compositing plays a key role in all visual effects.

The things that are added to the picture can come from practically any source today. We might be adding an actor or a model from a piece of film or video tape. Or perhaps the mission is to add a spaceship or dinosaur that was created entirely in a computer, so it is referred to as a computer generated image (CGI). Maybe the element to be added is a matte painting done in Adobe Photoshop®. Some elements might even be created by the compositor himself.

It is the digital compositor that takes these disparate elements, no matter how they were created, and blends them together artistically into a seamless, photorealistic whole. The digital compositor’s mission is to make them appear as if they were all shot together at the same time under the same lights with the same camera, and then give the shot its final artistic polish with superb color correction. This is a non-trivial accomplishment artistically, and there are a variety of technical challenges that have to be met along the way. Digital compositing is both a technical and an artistic challenge.

The compositor is first and foremost an artist, and works with other artists such as matte painters, colorists, CGI artists, and art directors as a member of a visual effects team. This team must coordinate their efforts to produce technically sophisticated and artistically pleasing effects shots. The great irony here is that if we all do our jobs right, nobody can tell what we did because the visual effects blend seamlessly with the rest of the movie. If we don’t, the viewer is pulled out of the movie experience and starts thinking, “Hey, look at those cheesy effects!”

So what is the difference between visual effects and special effects? Visual effects are the creation or modification of images, whereas special effects are things done on the set which are then photographed, such as pyrotechnics or miniatures. In other words, visual effects specifically manipulate images. And since manipulating images is best done with a computer, they are the tool of choice, and this is why the job is known as digital compositing.
I mentioned earlier that digital compositing is growing. There are two primary reasons for this. First is the steady increase in the use of CGI for visual effects, and every CGI element needs to be composited. The reason CGI is on the upswing is because of the steady improvement in technology which means that CGI can solve more visual problems every year, thus increasing the demand by movie makers for ever-more spectacular effects for their movies (or TV shows or television commercials). Furthermore, as the hardware gets cheaper and faster, and the software becomes more capable, it tends to lower the cost of creating CGI. However, any theoretical cost savings here are quickly overwhelmed by the insatiable appetite for more spectacular, complex, and expensive visual effects. In other words, the creative demands continuously expand to fill the capabilities of the technology.

The second reason for the increase in digital compositing is that the compositing software and hardware technologies are also advancing on their own track, separately from CGI. This means that visual effects shots can be done faster, more cost-effectively, and with higher quality. There has also been a general rise in the awareness of the film makers to what can be done with digital compositing, which makes them more sophisticated users. As a result, they demand ever-more effects be done for their movies.

In this chapter we take a wide-ranging tour of the incredible scope and scale of digital compositing in visual effects today. The first section describes digital compositing with CGI. A lot of our work is to composite CGI, so it warrants its own section. The second section reveals the many types of amazing visual effects that are done strictly with modern compositing software—no CGI required. The third section takes a brief look at the two types of compositing programs, node based and timeline based. From this point on I will refer to film in these examples, but I am also including video. It is just a bit too cumbersome to continuously refer to film (and videotape) or filming (and videotaping) or cinematographers (and videographers).
1.1 DIGITAL COMPOSITING WITH CGI
Whenever someone makes a CGI element, someone else has to composite it. In this section we will look at three general areas where CGI elements are composited. First up is straightforward CGI compositing where a CGI object has been created and needs to be composited into the scene. Next we will take a look at set extension, a rapidly expanding technique in film making. Last we will look at the match move, where separate programs are used to analyze the live action and provide terrain and camera move data for the CGI programs.
1.1.1 CGI Compositing
By far the most common application of digital compositing is to composite CGI. Whether it is for a $100,000 dollar commercial or a $100 million dollar movie, the CGI is created in a computer and composited over some kind of a background image. The background image is very often live action, meaning it was shot on film or video, but it too could be CGI that was also created in a computer, or it might be a digital matte painting. Regardless of where the background comes from, the digital compositor puts it all together and gives it the final touch of photorealism. Figure 1-1 illustrates a basic CGI composite where the jet fighter was created in the computer, the background is live action footage, and the final composite puts the jet fighter into the background.
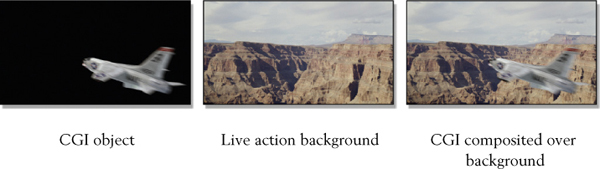
Figure 1-1 A CGI object composited over a live action background
Today, CGI goes far beyond jet fighters and dinosaurs. Recent advances in the technology have made it possible to create a very wide range of incredibly realistic synthetic objects for compositing. Beyond the obvious things such as cars, airplanes, and rampaging beasts, CGI has mastered the ability to create photorealistic hair, skin, cloth, clouds, fog, fire, and even water. It has even become common practice to use a “digital double” when you want the movie star to execute a daring stunt that is beyond even the expert stunt double. It will not be long before the first “cyber thespian” (an all-CGI character) stars in what would otherwise be a live action movie. However, after all the spaceships, beasts, water, and fire have been rendered, somebody has to composite them all together. And that somebody is the dauntless digital compositor.
1.1.2 Set Extension
If you wanted your actors to be seen standing in front of the Imperial Palace on the planet Mungo you may not want to spend the money to build the entire exterior of the Imperial Palace. Better to build a small piece of it on a movie set, place the talent in it, and then extend the set later using CGI when you need a wide shot. For this little piece of digital magic the film is digitized into the computer and the CGI folks build a 3D model of the Imperial Palace and line it up with the original film footage and its camera angle. There might even be a camera move in the live action which the CGI artists will carefully track and match. But eventually the live action and the CGI set extension must be composited and color corrected to match perfectly.
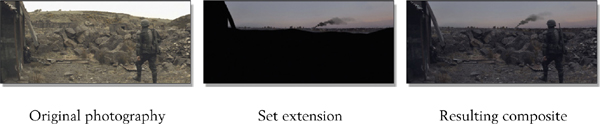
Figure 1-2 Set extension*
Figure 1-2 is a classic example of set extension that demonstrates how it can even be applied to an exterior location shot. The original photography captures the future soldier walking along an otherwise small and uninteresting rubble pit. The middle picture shows the set extension element that was an all-CGI city in the distance with smoke generated by a particle system and a matte painting for the sky. The resulting composite shows all of the elements composited together and color corrected to blend properly.
You can immediately see the enormous difficulty in trying to create this shot without using set extension and digital compositing. You would need to find a location that had the rubble pit the correct distance from a real city that had the right look and was (unhappily) on fire at the time. You would then have to wait for the right time of day to get the sunset sky, and in location shooting waiting is very expensive. If such a location could even be found you would then have to fly the entire crew out there. This amounts to a very expensive if not nearly impossible production plan.
Instead, the producer wisely chose to do a set extension. The rubble pit was easy to find and close at hand. The crew drove to the location in only half an hour. Once the film was digitized the CGI department took over and created the background city and smoke animation while the digital matte painter made the sky painting. When all was ready the digital compositor took all four elements—original photography, CGI set extension, smoke animation, and matte painting—and then composited them together and color corrected them to blend naturally. Not only was this far less expensive, but (and this is the punchline) the director got exactly the shot he wanted. What CGI and digital compositing bring to the table is creative control—the ability to make exactly the shot you want. Not just what is practical or affordable.
1.1.3 Match Move
Directors and cinematographers hate to lock off the camera. They love to swoop the camera through the scene, boom it up over a crowd, or swing it around the heroic character. This is fine if the shot is all live action, but it wreaks havoc if the shot requires CGI to be mixed with the live action. If the live action camera is moving then the CGI camera must also move so that the CGI will match the changing perspective of the live action. Not only must the CGI camera move, but it must move in perfect sync with the live action camera or the CGI element will drift and squirm in the frame and not appear to be locked to the rest of the shot. Special match move programs are needed to pull off this bit of cinematic magic. An example of a match move shot is shown in Figure 1-3 where the camera orbits around the live action soldier. The soldier is in an all-CGI environment.

Figure 1-3 Match move sequence
Match move is a two-step process. First, the live action plate is analyzed by the match move program. A plate is simply a shot that is intended to be composited with another shot. The match move program correlates as many features as it can between frames and tracks them over the length of the shot. This produces a low-detail 3D model of the terrain in the scene along with camera move data. The terrain model is low detail and incomplete, but it does provide enough information for the next step.
The second step is to give the 3D terrain information and the camera move data to the 3D animators. They use the terrain information as a guide to where to place their 3D objects. The camera move data is used by the computer camera to match the move of the live action camera in order to render the 3D objects with a matching perspective that changes over the length of the shot. If the terrain information or camera move data is off in any significant way the 3D objects will scoot and squirm rather than appear to be firmly planted on the ground.
After all the 3D elements are rendered the live action plate and the CGI come to the digital compositor for final color correction and compositing. Of course, the compositor is expected to fix any small (or large) lineup problems in the CGI or live action. There are two fundamental ways the match move game can be played. Live action can be placed in a CGI environment (like the example in Figure 1-3) or CGI can be placed in a live action environment, like King Kong in New York City. Either way you work it, match move is truly one of the great wonders of visual effects.
1.2 COMPOSITING VISUAL EFFECTS
Now we will take a look at the many diverse applications of visual effects that are done with the modern compositing program alone. None of these require any CGI. The steady advances in compositing software tools and algorithms have continuously added new capabilities for the digital compositor, which must be mastered both technically and artistically.
1.2.1 Bluescreen Compositing
There are many situations where placing an actor or actress in a scene for real would be too expensive, too dangerous, or even physically impossible. In these situations you would want to film the talent in an inexpensive and safe environment, and then later composite them into the actual expensive, dangerous, or impossible background. This is what bluescreen compositing is all about. The talent is filmed in front of a solid blue background to make it easier for the computer to isolate then composite them into the actual background like the example in Figure 1-4.

Figure 1-4 A basic bluescreen composite
Bluescreen compositing offers a completely different set of challenges to CGI compositing because the compositor must first isolate the talent from the backing color by creating a high-quality matte. This matte is then used to perform the composite, whereas with CGI a perfect matte is automatically generated by the computer and comes with the CGI image.
The backing color can also be green, in which case it is called a greenscreen, but the principle is the same in either case. The computer detects where the backing color is in each frame and generates a matte that is used to composite the actor (or actress, spaceship, animal, dazzling new consumer product, or whatever) into the background. Here is where the artistic and technical challenges for the compositor skyrocket. Not only because of the difficulty of creating a good matte but also because the various elements will not visually match the background very well so they must be heavily color corrected and processed by the digital compositor to blend them properly.
1.2.2 Motion Tracking
Motion tracking is the little brother to match move. With match move the CGI artist is tracking hundreds, sometime thousands, of points in a scene and using that data to build 3D models and a matching 3D camera move. Motion tracking usually only tracks a few points and its data is used to track one two-dimensional image onto another two-dimensional image.
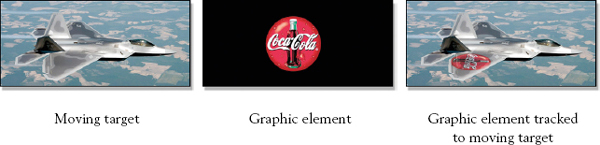
Figure 1-5 Motion tracking
Let’s say that you have been given a graphic element such as a corporate logo and the mission is to attach it to the wing of a supersonic jet fighter like the one in Figure 1-5. The motion tracking program locks onto key points on the wing of the fighter and tracks them over the length of the shot. That two-dimensional tracking data is then applied to the graphic element so it will move in perfect sync with the fighter’s wing when composited. Of course, even though the graphic element now moves with the fighter correctly but does not change its lighting as the fighter moves through the shot, this and other photo-realism issues will have to be addressed by the compositor.
Motion tracking has many applications beyond tracking logos to jet fighters. One of the most common applications is monitor replacement where a new image is tracked and composited over the face of a monitor or TV screen. When a digital matte painting is added to a shot that has a camera move, the matte painting will have to be motion tracked to lock it to the shot. Another common use is to create a mask to isolate some object in the frame, and then motion track the mask to stay on top of the object over the length of the shot. Any time one image needs to be locked onto another moving image, motion tracking is the technology that makes it possible.
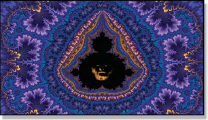
1.2.3 Warping and Morphing
Warping is one of those magical things that only a computer can do. Imagine it as attaching an image to a sheet of rubber, then pulling and stretching only those parts of the rubber sheet that you want to deform. This especially allows you to push and pull on the interior parts of the image to deform it any way you want. When is this used? Any time you want to fit one image over another but you can’t make it fit just by pulling on its corners. Figure 1-6 shows an example of warping a graphic element to fit over a curved surface. These warps can also be animated over time to maintain their warped shape over a moving surface.
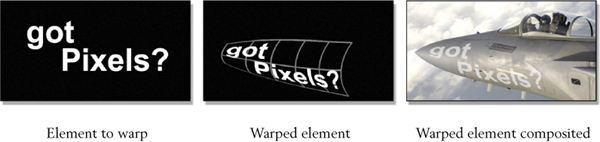
Figure 1-6 Warping an element
Morphs are the big brother to warps. It takes two warps and a dissolve to create a morph, but we will have to wait until Chapter 8 to see how this is actually done. For now, we can simply admire the fact that in the hands of a digital artist the computer can seamlessly transform one face into another, as if by magic. And it is magic—digital magic. But all magic requires a magician, and that’s the digital compositor. Most compositing software today comes with warping and morphing capabilities. There are also separate dedicated programs available that just do warping and morphing in case your compositing software doesn’t.
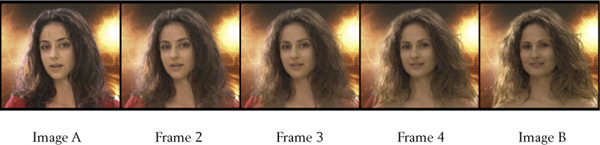
Figure 1-7 Morph sequence
Figure 1-7 illustrates a morph between image A and image B. What is not obvious from this example of a morph is that the two morphing images must be shot on bluescreen or isolated from their backgrounds in some other manner, such as a roto. The morph is performed on these isolated images, and then the results are composited over the background.
1.2.4 Bullet Time Shots
Ever since we were thrilled by the jaw-hanging spectacle of a camera flying around a suspended animation of Keanu Reeves in The Matrix, bullet time shots have become a permanent entry in the lexicon of visual effects. They present a never-before-seen view of a frozen moment in time using methods that defy imagination. Unless you are a digital compositor, of course, as this is an all-compositing effect—no CGI is required.
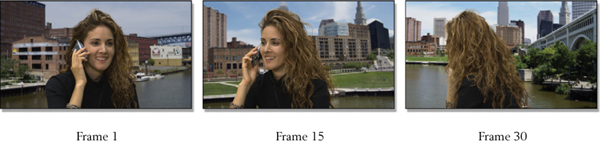
Figure 1-8 Bullet time shot
Figure 1-8 illustrates just three frames out of a bullet time shot. The setup is that a number of still cameras are arrayed in an arc around the target character like the top view diagram in Figure 1-9; they are then all triggered electronically. If they are triggered at the same instant the character is frozen in time. If they are triggered a fraction of a second apart the character moves in slow motion. Either way, the result of the photography shoot is a series of still frames, each taken from a slightly different point of view since each camera is in a different position around the character.
Now, enter the compositor. The first issue to be dealt with is that while the cameras were all pointing at the character, the alignment is not perfect, so each camera is off-center a bit. As a result, when the frames are played at speed there is some jitter, which has to be removed using image stabilization techniques. Next, each camera will have taken a slightly different exposure due to the natural variation in the cameras, lenses, and film stock (or digital sensor), so each frame must be precisely color corrected so that they all match and there is no flicker in the shot when played at speed.
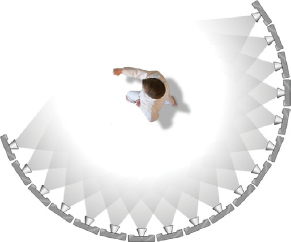
Figure 1-9 Bullet time rig of still cameras
Last, the shot needs to get a digital speed change—what we call retiming. Here’s why; let’s say we want to end up with a 4-second shot. Since film plays at 24 frames per second, we will need 4 × 24, or 96 pictures. Setting up, aligning, and triggering 96 still cameras is an arduous task. Instead, we will just set up half that many (48 cameras), and then do a speed change to “stretch” the 48 frames to 96. The technology to do this is called optical flow—more digital compositing wizardry. We will learn all about optical flow in Chapter 7, but suffice it to say that it can create beautifully interpolated in-between frames to stretch a shot.
1.2.5 Crowd Duplication
If the director wants an attacking army of 50,000 Orks, he will open his checkbook and turn to the CGI artists. They will use what is called flocking software to avoid having to personally choreograph the behavior of 50,000 angry Orks. However, if the director wants to fill a baseball stadium with cheering fans he will either have to hire 50,000 excitable extras, or you, the dauntless digital compositor.
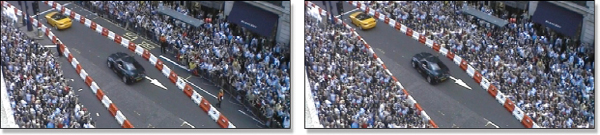
Figure 1-10 Crowd duplication*
There are two basic crowd duplication technologies—procedural and direct compositing. A procedural example is shown in Figure 1-10. The program samples nearby areas and creates similar looking pixel patterns on a frame-by-frame basis. Because the created areas are regenerated each frame they are animated and blend in naturally with the teaming crowd.
For the direct compositing approach a few hundred extras are hired, seated in the bleachers, and then filmed while they cheer on command. They are then moved to the next section of bleachers and cheer again. This process is repeated several times until there are several shots of the stands with cheering fans sitting in different sections, all surrounded by empty seats. The compositor then lifts the crowds out of each of the different shots and combines them into one shot with all of the bleachers filled with fans.
It is amazing how often crowd duplication is done. The reason it is done is simple—cost. It is a heck of a lot cheaper to hire a few hundred extras (and a good compositor) than it is to fill a stadium with 50,000 fans. The tricky bits will be that the lighting will have changed over the course of the day for outdoor shots, somebody will have bumped the camera causing the shots to be misaligned, and lens distortion will warp some of the shots as well. The digital compositor has to fix all this (and several other problems) to get a seamless crowd duplication shot. But then this is why we get the big bucks.
1.2.6 Atmospherics
Adding atmospherics to a shot is another digital compositing effect that is done all the time. What I mean by atmospherics are things like fog, snow, rain, atmospheric haze, dust, smoke, light halos, lens flares, and just about anything else that can hang in the air and block, diffuse, reflect, absorb, or refract light—which covers a lot of things. In fact, the failure to put atmospherics in a shot when they are needed can contribute to a visual effects shot looking fake.
There are several reasons to add atmospherics to a shot digitally. Take weather effects like fog, rain, and snow, for example. The film crew can either stand around waiting for it to happen, which may be never, or add the effect digitally. Another problem with the real thing is that rain and snow can be hard on cameras, crews, and sets. Sometimes the fog or smoke is required to follow a specific behavior to pull off the gag, such as twirl around the talent’s head. Not likely to happen with the real thing.

Figure 1-11 Adding atmospherics to a visual effects shot
The example in Figure 1-11 shows a digital effect shot with a heavy atmospheric element added. In this example the original shot is a matte painting that has been mixed with an atmospheric element from live action footage. A bluescreen shot may, for example, need to have an actor composited within a smoky or foggy background. In this case the smoke or fog will somehow have to be added to the actor after the composite because smoking the bluescreen shot when it is filmed will ruin it. These atmospheric elements (fog, lens flare, etc.) might come from a live action plate, created by the digital compositor using the compositing program, a painting from Adobe Photoshop, a digital photograph, or created by the CGI department. You never really know.
1.2.7 Rotoscoping
It frequently comes to pass that a character or object that was not shot on bluescreen needs to be isolated for some reason—perhaps to composite something behind it or maybe to give it a special color correction or other treatment. This situation requires the creation of a matte without the benefit of a bluescreen, so the matte must be rotoscoped, which means it is drawn by hand frame by frame. This is a slow and labor-intensive solution, but is often the only solution. Even a bluescreen shot will sometimes require rotoscoping if it was not photographed well and a good matte cannot be extracted.
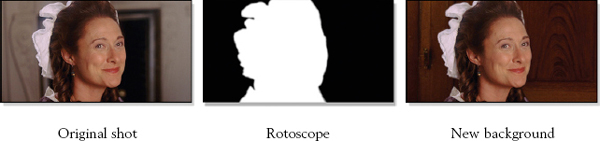
Figure 1-12 Rotoscoped shot composited over a new background
Virtually all compositing programs have some kind of rotoscoping capability, but some are more capable than others. There are also programs available that specialize in just rotoscoping. Each frame of the picture is put up on the monitor and the roto artist traces an outline around the character’s outer edge. These outlines are then filled in with white to create the familiar white matte on a black background like the example in Figure 1-12. Large visual effects studios will have a dedicated roto department, and being a roto artist is often an entry level position for budding new digital compositors.
There has even been a recent trend to use rotoscoping rather than bluescreen shots for isolating characters for compositing in big effects films. I say big effects films because it is much more labor intensive and therefore expensive to rotoscope a shot than to pull a bluescreen matte. The big creative advantage is that the director and cinematographer can shoot their scenes on the set and on location “naturally” rather than having to shoot a separate bluescreen shot with the talent isolated on a bluescreen insert stage. This allows the movie’s creators to focus more on the story and cinematography rather than the special effects. But again, this is a very expensive approach.
1.2.8 Wire Removal
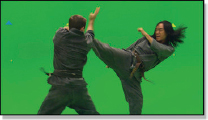
We have all seen kung-fu masters and super-heroes leaping and flying around the screen defying the laws of gravity. This is all done by suspending the stunt actors on wires with crews off-camera pulling on them at the right moment to give the hero a boost. This type of stunt is called a wire gag and is very common in action films of all kinds. However, after the film is shot someone has to remove the wires, and that someone is the digital compositor.
Figure 1-13 illustrates a classic wire gag where the rider is about to be yanked off his horse by a wire harness. Using the full library of techniques described above such as motion tracking, warping, morphing, rotoscoping, compositing, and even digital painting, the wires are removed frame by frame. The process can get very complex because the background region where the wires are removed must be replaced. If the wire removal is for a bluescreen shot this is less of an issue. It gets even more complex when the wires drape over the front of the talent, which they often do. It gets yet even more complex when the wires drape over the front of the talent onto textured surfaces such as a herringbone jacket.
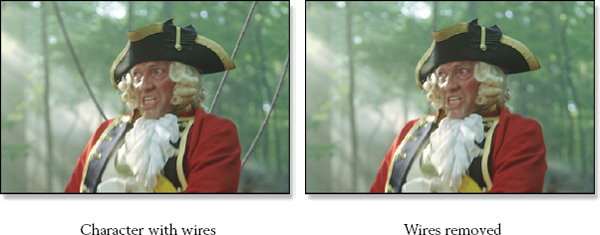
Figure 1-13 Wire removal example
Sometimes the actors or props are supported by poles or mechanical arms called rigs which must be removed as well. Wire and rig removal are also considered entry-level activities and could be your first job in digital compositing.
1.2.9 Scene Salvage
Sometimes things just go horribly wrong on the set, in the camera, or in the film lab. A light on the set flares into frame. The camera body was not closed properly and light leaked onto the raw negative. The developing lab put a huge scratch down 100 feet of camera negative. The film went through an X-ray machine and got fogged. The negative got water spots on it in the developing lab. Fixing these production nightmares is referred to as scene salvage, and can be a rich source of income as well as a technical challenge.
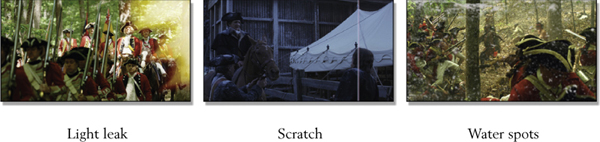
Figure 1-14 Common production problems requiring scene salvage
The reason a lot of money is paid to fix these problems is easy to understand if you simply consider the alternative—rebuilding the set and bringing Tom Cruise and the entire film crew back for an afternoon reshoot. I don’t think so. Besides, most of these problems are paid for by the production insurance company anyway, so it’s not like it’s costing real people any real money.
1.3 3D COMPOSITING
There has been a sea change in the last couple years in the world of compositing and that is the addition of 3D compositing. This does not mean compositing 3D (CGI); it means using limited 3D capabilities built into the compositing program to build 3D scenes, light them and render them with 3D cameras, and then to use the 2D results in the composite. It turns out that there are a great many things that you can do with 3D compositing.
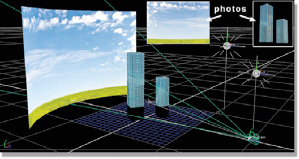
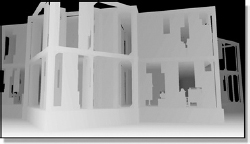
Figure 1-15 3D camera projection setup
One very important 3D compositing technique is camera projection, which is illustrated in Figure 1-15. A full 3D scene can be created with a moving camera from the two photos shown here. The building photo is projected onto the two cubes to make the skyscrapers and the sky photo is wrapped on the inside of a cylinder. The 3D camera then rephotographs the 3D scene. In fact, the main use for 3D compositing is to rephotograph live action clips or still photos.
The addition of 3D compositing to the visual effects pipeline has had the effect of shifting some of the work that used to be done in the 3D department over into the 2D department where it can be done faster and cheaper. This is an improved workflow that shortens production schedules and reduces costs, both very good things for the health of our industry.
The second effect is to dramatically increase the importance of compositing to the whole visual effects process. Taking on more roles and solving more problems means that the job is more interesting and varied than before. It requires the compositor to add to his skill set thus increasing his value to the VFX company.
1.4 STEREO COMPOSITING
The explosion in blockbuster stereo 3D movies (Avatar, Alice in Wonderland, Clash of the Titans, etc.) has obviously resulted in a similar explosion in stereo compositing. When a movie is shot in stereo there are now two plates—a left and right view (see Figures 1-16 and 1-17)—to be keyed, color corrected, motion tracked, and composited. More than just doubling the amount of work because there are two clips for every shot, there is also a whole new body of knowledge and terminology to learn in order to do stereo work correctly.
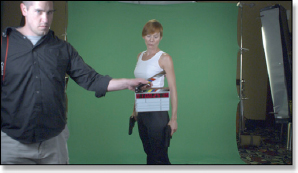
Figure 1-16 Stereo pair—left view
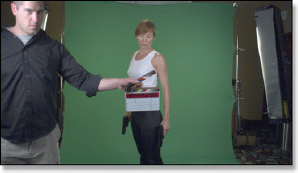
Figure 1-17 Stereo pair—right view
In addition to learning about stereo itself as an art and science, another entirely new issue looms when working with stereo compositing and that is stereo pair photographic imaging problems. While it sounds simple in theory to bolt a couple of cameras together to shoot stereo scenes, in practice it is much more complicated.
A slight tilt up or down in one camera introduces vertical shift in the stereo that is very disturbing to the viewer. A small rotation in one camera destroys the stereo registration of the two views. Small differences in the film stock or camera CCD sensitivity result in a mismatch of color or brightness or both. Because the two lenses view the scene from slightly different positions any lens flares will not match. Because one of the cameras views the scene through a half-silvered mirror the polarized reflections differ between the two cameras resulting in different exposures for the two views. And the list goes on. Fortunately there are plug-ins now available for the compositing program to fix these and other problems.
1.5 STEREO CONVERSION
While many stereo 3D movies are filmed in stereo, some are converted to stereo after the fact in a process called stereo conversion. In fact, many 3D movies are produced with some shots filmed in stereo but others converted to 3D later. This intermixing of stereo capture and stereo conversion shots in the same movie is referred to as a checkerboard production. The new terms and techniques of stereography referred to above obviously also apply to the stereo conversion process. The artists must learn the new medium.
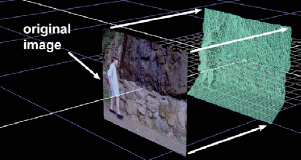
Figure 1-18 Image projected onto an extruded mesh
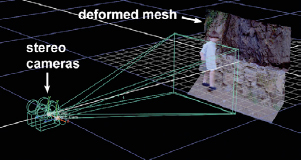
Figure 1-19 Stereo cameras rephotograph the extruded mesh
Stereo conversion is an extremely labor-intensive process requiring a huge amount of roto work because every single item in the scene needs its own mask. This must be done for every frame of an entire feature film, typically averaging 150,000 frames or more! To help control costs the vast majority of this roto work is done offshore to take advantage of lower labor costs.
After the roto work is done for a scene the job can be handed to the depth grader that sets the stereo depth of all of the objects in the scene. Not only must this depth grading adhere to the rules and art of good stereography, but the depth grading of the scenes coming immediately before and after must also be factored in to avoid an eye-jolting cut between two scenes of very different depth.
Another step in the stereo conversion process is the construction of clean plates, a common technique used in many VFX shots but requiring fairly skilled compositors to execute well. There are many situations where objects must be placed on their own separate meshes, which often results in the need for the clean plate. If a clean plate is not needed there is always the need for stereo paint to fix edge artifacts introduced by the mesh extrusion process (see Figures 1-18 and 1-19).
1.6 COMPOSITING PROGRAMS
The visual effects described above are all done using digital compositing programs, so how is it that such a large array of different effects can be done with one program? Compositing programs do much more than just composite visual effects. They are designed like a toolbox that contains a myriad of individual tools that can be used in combination to do almost anything. They all contain the basic tools for compositing, of course, such as keying, color correction, key frame animation, motion tracking, warping, and image blending operations. They all have ways to view the images as they are worked on as well as ways to preview animations and render the final shot out to disk in a variety of file formats.
Compositing programs do, however, differ greatly in how many tools they come with as well as the quality of those tools. Some have built-in morphing capability, some don’t. Some have very sophisticated mask drawing tools that can be used to do high-quality rotoscoping, others have only simple mask drawing tools. One thing they do have in common is the ability to add plug-ins. Plug-ins are additional programs that can be purchased and added to the main program and comprise new or better tools than those that come with the original program. Some plug-ins actually cost more than the original compositing program!
Compositing systems come in two basic forms—large, dedicated hardware systems such as Flame and Inferno, and desktop software-based systems such as Nuke, Digital Fusion, and After Effects. The large dedicated systems are very fast in order to emphasize interactivity and production speed, but cost hundreds of thousands of dollars per workstation. In visual effects, speed costs. The desktop variety run on small personal workstations costing only a few thousand dollars and the software may be $5000 or less. Compositing speed for the workstation can be improved by distributing the composite renders onto a “render farm” in a computer room.
While their functionality can be very similar, there are two distinctly different approaches to the design of their UI—the user interface. This is the “control panel” that the artist uses to operate the compositing program. There are two broad design philosophies here—the node-based compositor and the layer-based compositor. We will take a look at each type because they represent very different approaches to the digital compositing workflow.
1.6.1 Node-based Compositors
A node-based compositor represents each image processing operation with one “node,” represented by an icon. These nodes are then connected together into a node tree, or flowgraph that shows how each operation connects to the next. Figure 1-20 shows a node tree from the Nuke compositing program. The nodes labeled “greenscreen_HD” and “greenscreen_HD_BG” load the images from disk. The image from the background node goes into the Grade node to get color graded and from there to the Blur node to be softened. The background is now prepped for the composite with the greenscreen.
The prepped greenscreen and background images both feed into a Primatte node that pulls the matte and performs the composite. The Primatte node passes its results down to the ColorCorrect node and from there it goes to the Reformat node to get resized to the final dimensions of the shot. Just by inspecting the node tree in Figure 1-20 you can determine not only what image processing operations are being done but also their order. And in digital compositing, order is everything.
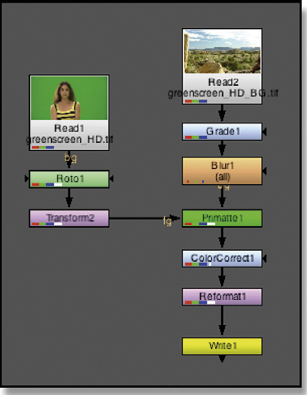
Figure 1-20 Node-based UI from Nuke
The main virtue of a node-based compositor is that you can see what you are doing for very complex shots. It is obvious that the background is being graded prior to the composite operation. The fact that the reformat operation is occurring after the composite is perfectly clear. Nothing is hidden. You can see the flow of the images as they move through the node tree from operation to operation. To be sure, each of these nodes can be opened up to reveal additional controls and settings within them, but the overall sequence of operations is abundantly clear.
The main advantage of node-based compositors is readily apparent when working on large, complex visual effects shots. An easy-to-read “roadmap” of the compositing flow becomes extremely important when working on shots with hundreds of operations because the complexity of the shot can become overwhelming without it. Troubleshooting a large composite is much more manageable with a node-based compositor.
1.6.2 Layer-based Compositors
The other UI design paradigm used by some compositing programs is the layer-based compositor represented by an example from Adobe After Effects in Figure 1-21. This presentation of the compositing workflow places the emphasis on seeing the timeline—the timing relationship between the various clips, still images, and animations in the shot. Node-based compositors have the same type of control over the timing of clips and animation, but the timing information is deemed less important and is folded away out of view until the artist calls it up. With a layer-based compositor it is always front and center and it is the image processing operations that are folded away and out of view until the artist calls them up. In the example in Figure 1-21 one of the QuickTime movie layers has been “unfolded” to reveal the animation controls and its audio tracks.
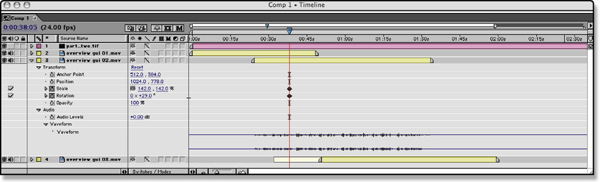
Figure 1-21 Timeline-based UI
The reason for this different design emphasis is grounded in the original intended use of these programs. For programs like Adobe After Effects the original design intent was what is called motion graphics. In its simplest form, this means making a graphic element in Adobe Photoshop, such as a logo or title artwork, and then bringing it into After Effects and flying it around. Over time, the visual effects community started using After Effects for much more than motion graphics. New features were added and plug-ins were made available until today it has become a very powerful digital compositing program that has actually been used in many feature films. The node-based compositors, by contrast, were designed from the outset for compositing complex visual effects using CGI animation and live action footage so their UI designs reflect that workflow.
The main advantage of the layer-based UI design is when working with motion graphics, but it is also possible to do fine visual effects work with them. It is more difficult, however, to see how the operations flow from one to another, so very large and complex shots become harder to work with. It is common practice to do “precomps” where a completed portion of the shot is composited and rendered to disk, and then loaded back in as a new input file to add further effects to it. This simplifies the workflow and saves processing time, but carries with it a strong penalty when the precomp has to be revised.
*Courtesy of Ruairi Robinson’s Silent City.
*Crowd duplication images courtesy of The Foundry Visionmongers Ltd.