CHAPTER 13
SOUND SYSTEM SETUP PROCEDURE
PREPARATION 
The difference between various pieces of sound equipment assembled in the same room and a sound system is the operator's speed of assembly, ability to set up and operate a series of shows on schedule, and ability to rectify faults. Touring sound systems need constant maintenance to give optimum performance.
It is essential to be prepared so that equipment can be set up quickly and efficiently on site. A sound system list is a good idea (Figure 13–1). The setup must be coordinated with lighting and other production staff so that workers are not tripping over each other and making the task of setting up a show a nightmare. Call times are necessary for setup, sound check, and show so that all crew members arrive on time and keep to a schedule.
First establish the type and number of speaker cabinets and their stacking or hanging configuration. Knowing the number of speaker cabinets allows you to identify the amplifiers, speaker cables, and rigging hardware needed. The equipment should be color coded as follows to identify its desired location at the venue:
Red: |
Stage left (public address system [PA] right) |
Yellow: |
Stage right (PA left) |
Green: |
Front of house (FOH) |
Orange: |
On stage |

Figure 13–1. Sound system list. Adequate preparation ensures smooth setup.
Use of colored tape or stickers facilitates locating the equipment. If the same equipment is used for a series of shows at different venues, the color code sends the same cabinets, amplifiers, and speaker cables to the same side each time, making it easier to identify any faults.
The number of wedge cabinets, side fills, and drum monitors determines the number of amplifiers and the number and type of speaker cables and crossovers. Check the console, graphic equalizers, and crossovers to ensure that all components function correctly.
The FOH control equipment can be lined up and marked with the channel assignment, and the gain structure can be set between console and drive electronics.
The power distribution system must be capable of handling the amount of amplifier racks being used. Have spare fuses handy so that you can replace a blown fuse quickly without interrupting a scheduled sound check or performance.
Microphone lists can be drawn up with the multicore and monitor console numbers. The FOH and monitor consoles often do not have the same channels patched in the same order. Mark the multicore numbers above the inputs of the monitor console so that the inputs can be patched automatically.
The more careful the preparation, the smoother is the setup. Because unforeseen problems often occur, it is important to have spare time in which to address them. The sound equipment should be assembled as quickly as possible so that any running repairs do not delay scheduled sound checks or rehearsals. A delayed sound check can disrupt many schedules.
For outdoor concerts, carry enough weatherproofing to cover the equipment. Tie down any speakers stacked outdoors with ropes or cargo straps.
Before attempting to load a truck, determine how many cases are the same size so that you may stack them in blocks. Pack all the larger, heavier cases on the bottom and the light ones on top. Load in logical order so that power cases, rigging cases, and chain motors end up at the rear of the truck and can come off the truck first to facilitate setting up. Mark the weight of each case on the top and bottom to avoid accidents. Because most damage to equipment sustained transit is caused by vibration in the truck, load the cases as tightly together as possible and tie them with ropes or straps. Other transit damage occurs during loading and unloading, so everyone must be careful
SETUP
Do the following to get the sound system out of the truck, set up, packed, and reloaded. The more equipment and the more crew on a show, the more complex setup becomes. It is necessary to define crew members’ areas of responsibility, because many of the setup steps can be done simultaneously.
UNLOADING THE TRUCK
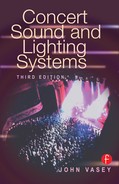
One member of the sound crew should stay in the truck to ensure that each case is leaving the truck with enough people (Figure 13–2). The other members of the sound crew should direct the cases to their destination in the venue and begin setting up. Color coding allows for a minimum of direction.
RIGGING
Chalk the position of the points on the floor clearly and correctly so that the riggers can see them clearly from the ceiling. This eliminates the need for shouting.
Motors should be positioned and all necessary rigging attached to the hook (wire rope bridles and spansets to wrap around the ceiling beams). Check two-ton motors for any twisted links by running the block the length of the chain. The block can easily become twisted in transit, and a twisted link can jam in the motor or the block. If a motor is rigged with a twisted link, the situation can be remedied by means of passing the motor between the two chains before attaching any load to the hoist.
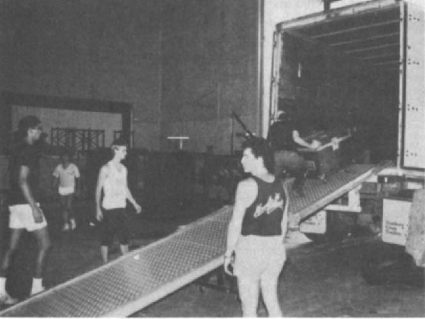
Figure 13–2. Unloading the truck. One member of the sound crew should stay in the truck to ensure that the stagehands are handling cases properly.
Check the motor power to ensure that the phasing is correct and that the motor moves up when the up button is pressed and down when the down button is depressed. Only one member of the crew should operate the motors (Figure 13–3). If the phasing is incorrect, the safety switches in the motor do not function. The motor control cables can be attached to the bar that holds the speakers (the bumper) and loomed together. The best position from which to operate the hoists is in the center between the left and right clusters. As each motor is connected to the motor control box, label it so that when it is disconnected and reconnected you do not have to move the motors to identify them. Motor 1 should be the motor closest to the center of the stage, motor 2 the next one, and so on. Each side of the speaker system has the same motor numbers starting in the center and moving outward all the way around to the cable pick.

Figure 13–3. Rigging. Only one member of the crew should operate the motors.
POWER CONNECTION
The venue electrician normally makes the three-phase power connection (Figure 13–4). You must check this service before turning on the power. Have the connection double-checked by the FOH and monitor engineers. If any trouble occurs during the show, the FOH engineer will be too far away to deal with a power failure; the monitor engineer therefore must know what to do if the power fails.
Establish the location and rating of the fuses (or breakers). Access to the fuses or breakers is crucial in the event of faults. The power distribution cables can be run out to where the power amplifiers will be situated. At outdoor concerts all power connections must be weatherproofed. Connections should never be directly on the ground but must be strung up on the scaffolding or placed inside a case. It is not good enough to wrap plastic around the connection. Heavy dew also can cause a short in power cables left exposed overnight.
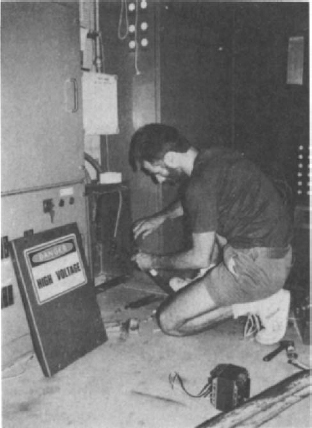
Figure 13–4. Power connection. The venue electrician normally makes the three-phase power connection.
HANGING THE SPEAKERS
As soon as the bumper is lifted, it is time to attach the speaker cabinets. While the points are being rigged, which often takes longer than you want, the speaker cables can be attached to the bumper and all the cabinets lined up in the correct order ready to be attached.
The speaker cables must be coded and a plot drawn up so that each cabinet can be easily identified through its cable number (Figure 13–5). The cables should be patched into the amplifier racks so that they are in series horizontally to enable lower cabinets to be turned down, if necessary, without affecting the higher rows. Of course there are exceptions to this practice. When the cabinets are attached to the bumper, their angles must be checked to ensure that they cover the proper venue areas. The speaker cables should be pulled out of sight lines so that they do not block the view of people sitting at the sides of the stage. It is often impossible, however, to keep the view totally clear for everyone.
STACKING SPEAKERS
Before attempting to stack speaker cabinets, make sure that the scaffold or deck that will support them is flat and capable of taking the weight. Check the scaffold during and after stacking. The weight of the speakers may force the foundations down into soft ground, and scaffold pipes may bend if not strengthened properly.
The higher and heavier a stack, the harder it can fall. If the deck is uneven to start with, the higher the stack goes, the more it will lean, which can be very dangerous. At outdoor concerts the speakers must be tied down during stacking, because a gust of wind may blow over a column of cabinets. The enemies of outdoor concerts are wind and rain, and often they come together. The best form of defense is to be prepared. Tarpaulins tied to the top of speaker stacks must be able to drain any water immediately, because a tarp full of water can easily pull down the entire stack. Keep the cabinets tied down until it is time to unstack them.
FLYING SPEAKERS
Once all speakers and speaker cables are attached, all cabinets are at the correct angles, and all rigging is firmly attached, the bumpers can be raised. The person operating the chain motors must make sure that no one is standing under them when they are moving. The bumpers should be as level as possible before being moved up to trim height. Although all the motors should move at the same speed, they do not, so when the bumpers are at trim height they should be leveled with only one person instructing the operator. Use the motor code to identify the motors for clear instructions. The motors must be watched continuously while they are moving. If one motor stops, for whatever reason, the other motors will become overloaded, with disastrous results. Motors can stop because a contact breaks in the motor or a control cable snags. A motor can become overloaded if the bumper is not level and too much weight is transferred to the other motor, although the motors are protected by an overload clutch. In short, raising and lowering the chain motors is a task that requires complete concentration.
Figure 13–5. Hanging the speakers. Speaker cables must be coded and a plot drawn up so that each cabinet can be easily identified through its cable number.
AMPLIFERS
Amplifiers must be positioned in well-ventilated, accessible areas. Amplifier racks with fans that blow air front to back should be placed in rows back to back so that the fans are not blowing hot air out the back of one rack and straight into the front of another one (Figure 13–6). Racks that draw the air in the back and also out the back should be placed in a U shape if they do not fit in a row. At outdoor concerts the amplifiers must be protected from the sun and rain but still need room to breathe. At outdoor concerts the amplifiers usually must work hard as engineers battle with the wind trying to get the sound to the audience. Signal assignment must be checked to be sure that the correct signal is being sent to the speaker cabinets; for example, horns do not last long with low frequencies. The power for the amplifier racks supplied from the power distribution system should be evenly allocated over the three phases. The FOH control equipment, monitor system, and stage instruments all must share the same phase.
FRONT OF HOUSE CONTROL EQUIPMENT
The multicore cables must be run out to where the mixer will be positioned. Before running them, check the route so that the cables do not pass through heavily trafficked areas or across fire exits. Cables running through public areas must be covered and secured to the floor. Multicore connectors should never be dragged along the ground. Before setting the mixer, check that the position does not violate any local laws, does not obstruct the view of the stage from seats behind the console, and is suitable for controlling the sound system (Figure 13–7). Specific seats often are held for the mixing positions, and these can sometimes be reshuffled to accommodate sound requirements.

Figure 13–6. Amplifiers must be positioned in well-ventilated, accessible areas.
Connect the mixer, drive rack, and effects rack and then the multicore cables and power. Turn on the system. Set the gain so that the console and crossovers are running evenly. Set a substantial show-level signal to check each amplifier channel. When the amplifier channels are being turned up, the person in control of the FOH equipment must listen for distortion. When all amplifier channels have been checked and all cabinets are functioning, the system can be tuned. After tuning from the control position, walk around the venue to check for even coverage. Any offensive area can be trimmed by means of turning down specific amplifiers.
After tuning and trimming, check the effects units, microphone set, and microphone inputs and inserts. Coordinate the microphone line check with the monitor engineer, and use a talk-to-stage microphone to direct the person in charge of input source. This person should carry a spare microphone and spare microphone cables so that any faults can be quickly determined and rectified.
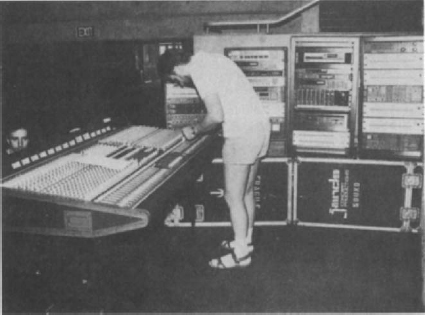
Figure 13–7. Front of house control position. Before setting the mixer, check that the position does not violate any local laws or obstruct the view of the stage from seats behind.
MONITOR SYSTEM
The monitor system can be set as soon as the lighting rig is raised and the stage is clear. Often it is possible to set the monitor control area before the lights are raised. When tuning the monitors, establish the threshold of feedback so that it can be quickly controlled during the show. All cables running around the stage should be laid flat and taped down so people cannot trip over them during the show.
MIKING UP
Before the microphones are set, place them on their stands, per the microphone list, and position the input boxes. Once the instruments are set, the microphones can be positioned and connected to the input boxes. Miking up should be a joint sound crew effort. Patching microphone cables on your own is very time consuming because the input boxes are usually tucked out of sight. When all the microphones are set, it is time for the line check. Microphones are delicate and must be treated with care, especially the highly sensitive condenser microphones.
SOUND CHECK
Once everything is working, a sound check can begin. When a suitable balance has been established at the FOH control position, check the coverage around the venue for any anomalies. The sound check should start with the rhythm section and proceed to the melody section and vocalists. Sometimes it is better to have the band start with the monitor system and settle on the sound on stage before the main speaker system is turned on. The sound check should conclude with the first song to be performed that night so that all the settings on the console are ready for that particular piece of music.
AfTER SOUND CHECK
After the sound check for the main artist, reset the consoles for the opening act. The settings on the consoles should be recorded or marked before they are tampered with. Keep the amount of resetting to a minimum. By the time the consoles are marked for the opening act, the stage should be ready to be remiked. Team effort makes this a straightforward process. Often an opening act is not as prepared as you would like, so sound checks can turn into debugging sessions or even rehearsals. These kinds of opening acts need assistance and direction. Finally, all interval tapes and disks should be cued up and ready for show time.
SHOW TIME
The sound check sets the balance to suit the room while it is empty. The sound changes when the audience is seated, as does the temperature. Monitor the gain structure of the system regularly so that it maintains its optimum performance. If the system has been lined up properly, the engineer can see at a glance the headroom available or whether there is an excessive level. Conduct a line check between any microphone repatches for opening acts. Microphone cables that must be repatched during changeovers between acts should be clearly marked so that they can be patched correctly in the difficult environment of a show.
The pressure is on to be ready for show time, and with people rushing around the stage, moving equipment, and a screaming audience, mistakes can be easily made. To avoid these mistakes, which usually take far too long to rectify, make sure there is enough light to see the markings on the cables and carry a flashlight to be sure. Mark microphone stands for their assigned positions and input numbers. Because a mispatched microphone is an engineer's nightmare, keep a spare microphone, stand, and cable near the monitor console for speedy replacement if needed. If a singer handles the microphone roughly, place a spare microphone on stage so that he or she can switch to the spare immediately.
LOAD OUT
Load out basically is the reverse of setup, only much quicker. First pack the microphones, then the mixing consoles and electronics. Loom the cables together to make packing easier. Make sure that multicore connectors are protected and not dragged along the ground. Once everything is loaded, an “idiot check” of the venue ensures that nothing. has been left behind.
DIVISION OF DUTIES
Division of duties changes with the requirements of each show, number of cabinets, number of acts, and performance schedule. To maintain teamwork, duties are divided between the two main sound crew members—the FOH engineer and the monitor engineer.
The typical responsibilities of an FOH engineer are the FOH control equipment, multicore system, rigging and motors, speaker system, and amplifiers. The responsibilities of the monitor engineer usually are the monitor system, power system, microphones, microphone stands and cables, speaker system, and amplifiers.
The speaker system is the FOH engineer's prime responsibility. Additional crew members assist with it and with the amplifiers, microphones, stands, and cables when necessary. The duties remain the same whatever the size of the crew, and the sound crew must always load and unload the sound equipment.
On a concert tour with a vast amount of equipment, the sound crew must give clear instructions to the stagehands and loaders and supervise loading and unloading. If the equipment has been marked with a location code, it is sent automatically to the desired point. Work out truck-loading plans before it is time to load the truck and tape them to the wall of the truck.
SYSTEM CHECK
The system check procedure includes attention to the power connection, power supply, mixing console, drive system, each amplifier channel, each speaker cabinet, monitor system, and all microphone lines. The power supply must be checked before any equipment is connected.
Conduct on-site maintenance whenever possible to keep abreast of minor problems. Faulty cables and microphones should be clearly marked and their ends taped over. Spare cables, diaphragms, speakers, and castors should be part of the system. Keep a record of repairs so that recurring faults can be identified. If a compression driver blows a diaphragm every second or third show, for example, the driver may be cracked and out of alignment, which becomes very costly. The date the diaphragm is changed should be recorded for this reason.