310°F / 154°C: Maillard Reactions Become Noticeable
You can thank Maillard reactions for the nice golden-brown color and rich aromas of a Thanksgiving turkey, Fourth of July hamburger, and Sunday brunch toast. Coffee, cocoa, and roasted nuts all rely heavily on Maillard reaction byproducts for their flavors. If you’re still not able to conjure up the tastes brought about by Maillard reactions, take two slices of bread and toast them—one until just before it begins to turn brown, the second until it has a golden-brown color—and taste the difference.
The nutty, toasted, complex flavors generated by the Maillard reaction are created when amino acids in proteins and certain forms of sugars (called reducing sugars) combine and then break down. Named after the French chemist Louis Camille Maillard, who first described it in the 1910s, the Maillard reaction wasn’t well understood until the 1950s. During the reaction, compounds with free amino groups undergo a condensing reaction with reducing sugars. For example, meat has a reducing sugar, glucose (which is the primary sugar in muscle tissue), and also contains amino acids like lysine; with heat, these two compounds easily react with each other to form two new molecules.
The Maillard reaction is much more complicated than the other reactions we’ve talked about so far. One of the two new molecules generated at the start of the reaction is good ol’ H2O, but the other is a complicated, unstable molecule that quickly cascades through more reactions. That cascade of reactions eventually settles down into a few hundred compounds, and it’s these compounds that create the colors and flavors we want.
To complicate matters, the molecule generated by the first condensing reaction depends on which compounds start it all off. Any compound with a free amino group—amino acids, peptides, or proteins—can combine with any carbonyl compound (usually reducing sugars), so the initial starting molecule can take many, many forms. This is why the flavor byproducts from the Maillard reaction will be slightly different if you’re grilling a hamburger or baking bread; the ratios and types of the amino acids and reducing sugars (e.g., glucose, fructose, and lactose) present in the two foods are different. In yet another wrinkle, the byproducts break down into different compounds depending on the pH of the solution they’re in, shifting the flavors as well—it’s complex!
Now that I’ve made it sound really complicated (which it is), how can you control the Maillard reaction and its aromas and colors? Fortunately, understanding the Maillard reaction from a cook’s perspective is far easier than from that of a chemist. There are four ways you can control it, and understanding them requires a simple explanation of the chemistry rules around rates of reactions.
Obviously, a lack of either amino acids or reducing sugars prevents the reaction—both have to be present. There’s a standard chemistry rule: increasing the concentration of reactants increases the rate of reaction. This is why some breads call for milk as an ingredient, and why brushing an egg wash on top of pastry crusts adds color. Both proteins and lactose in milk and the amines in eggs will increase the quantity of reactants and thus generate more Maillard reaction–based flavors and colors. Without them, no dice. If you want more Maillard reactions to occur, the first way is to up the concentration of ingredients that lead to it.
Temperature is the basis of another chemistry rule related to reaction rates. The activation energy—the amount of energy needed for a chemical reaction to occur—is based on the kinetic energy of a molecule. With higher temperatures, there’s a much better chance that a molecule will bounce over the energy barrier necessary for the reaction to happen—but it’s still a probability. At lower temperatures, the reaction can still happen, but much more slowly. (Depending on the type of reaction, there can be a minimum threshold.) Assuming you have plenty of reactants around, upping the temperature of the environment cooking the food is the easiest way to speed up the reactions.
The pH of the environment, which affects so many things in food, also changes how the Maillard reaction happens. The initial step of the reaction depends on free amino groups, but those get tied up under more acidic conditions. This is why adding baking soda to onions speeds up their browning and why dipping pretzel dough in a lye solution makes them browner. There are very few alkalizing ingredients in the kitchen—egg whites, baking soda—but fortunately they’re mostly tasteless in small quantities. If you want to speed up browning on baked goods, try brushing an egg white wash on the surface of the dough; for foods like caramelized onions (a partial misnomer), add a pinch of baking soda to speed up the reaction.
The rate of Maillard reactions also depends on water: not too much or too little. The first step in the Maillard reaction generates a compound that’s easily reversible—it can go back and forth between two states (one of those ⇌ symbols in chemistry diagrams)—and in this case it’s the water molecule from that very first step that can be reabsorbed. When the water molecule is attached to the compound, it prevents the second step in the reaction from happening. If the environment is too wet, the probability of the water molecule staying attached to the compound increases, blocking the reaction from continuing. But if the environment is too dry, then the reaction doesn’t begin either—the amino acid and sugar have to be mobile enough to connect. (The peak for reaction rate, with respect to water, is around 0.6 to 0.7 aw, if you’re familiar with water activity; more practically, about 5% water.) It’s unlikely that changing the amount of water is the fix for any Maillard reaction rate problems you see, but it does explain the difference you can see in a baking test of wetted flour and dry flour cooked on the same sheet.
Maillard reactions won’t readily happen on wet foods. If you’re about to sear meat, give it a quick pat with a paper towel to blot away surface moisture. Adding salt to a lean cut of meat right before cooking it pulls moisture toward the surface, which then takes longer to evaporate away when cooked. Either salt meats well in advance and then pat them dry before cooking, or add salt after cooking.
Accounting for all these variables, in most culinary applications the delicious flavors and pleasing colors from the Maillard reaction still require moderately hot temperatures. The 310°F / 154°C temperature given here serves as a good guideline for when Maillard reactions will begin to occur at a noticeable rate, whether you’re looking through your oven door or sautéing on the stovetop. For most cooking, 350°F / 180°C is a reasonable temperature, either in the skillet or the oven, to develop these flavors. Recipes that call for extended cooking times, like a roast kept in an oven for many hours, can be cooked at 325°F / 160°C. It’s rare to see recipes call for lower oven temperatures than this because of how slowly the Maillard reaction will happen. Avoiding the Maillard reaction—it’s not a flavor you always want, such as in meringue cookies like macaroons (see page 294)—is simple enough: make sure one of water, pH, or temperature is out of the necessary range. Most often this means setting the oven to a very low temperature (say, 250°F / 120°C), which is exactly what’s done for meringue cookies.
We’ll cover the other major browning reaction, caramelization, in the next section, but it’s worth pointing out here that caramelization can deprive the Maillard reaction of the reducing sugars it needs. Searing meats in a too-hot pan will caramelize the glucose in the meat before it has a chance to react with amino acids, so when cooking meats, use a medium-high heat, but not too hot.
Maillard reactions do happen below my 310°F / 154°C guideline—just not very rapidly. Stocks simmering at 212°F / 100°C for many, many hours and with sufficient concentration of the reactants will begin to slowly turn brown and develop the Maillard reaction flavors. (Some chefs swear by pressure cookers for making stocks; higher temperature means faster Maillard reactions!) It’s even possible for Maillard reactions to happen at room temperature, given sufficient time and reagents: some aged cheeses like Manchego and Gouda have minor amounts of some of the Maillard byproducts. It happens elsewhere, too: self-tanning products happen to work via the same mechanism!
You might be the type who prefers to let the butcher do the butchering, but it’s worth learning how to butterfly a chicken even if you’re squeamish about raw meat. Butterflying a chicken is called spatchcocking in Great Britain and crapaudine by the French—at least for small poultry that’s grilled. A butterflied chicken is much easier to cook than a whole bird! It’s economical, too, yielding four to six meals for not much money and a few minutes of surgery.
A chicken that’s been cleaned and gutted is topologically a cylinder. It’s basically a big, round piece of skin and fat (outer layer), meat (middle layer), and bone (inner layer). Cooking a whole bird intact is harder than cooking a butterflied bird, because invariably that cylinder is going to get heated from different directions at different rates—that is, unless you have a rotisserie grill, which heats the outside uniformly, cooks it uniformly, and makes it uniformly yummy.
By snipping the spine out of the chicken, you transform that cylinder into a plane of chicken—skin on top, meat in the middle, bone on the bottom. And the topology of such a surface is well suited to heat coming from a single direction (i.e., broiling or grilling), meaning it’s much easier to cook to develop a nice, brown, crispy skin.
Prepare your working space. I do this in a roasting pan, because it’s going to get dirty anyway. Unwrap the chicken, removing the organ meats (discard them or save them for something else), and fetch a pair of heavy-duty kitchen scissors. The chicken should be dry; if it’s not, pat it dry with paper towels.

Flip the bird around so that the neck flap is facing you. With the scissors, cut down to the right side of the spine (or left side, if you’re left-handed). You shouldn’t have to apply that much force. Make sure you’re not cutting the spine itself, just to the side of it.
Once you’ve made the first cut, flip the bird around again—it’s easier to cut on the outer side of the spine—and cut down the second side.
Once the spine is removed (trash it, or save it in the freezer for making stock), flip the bird over, skin side up, and using both hands—left hand on left breast, right hand on right breast—press down to break the sternum so that the chicken lies flat. You can remove the keel bone as well, but it’s not necessary. (The keel bone is what connects the two halves of the butterflied chicken together.)
Now that you have a butterflied chicken, cooking it is straightforward. Because the skin is on one side and the bone on the other, you can use two different heat sources to cook the two sides to their correct level of doneness. That is, you can effectively cook the skin side until it’s brown from Maillard reactions, and then flip the bird over and finish cooking it until a probe thermometer or manual inspection indicates that it is done.
Rub the outside of the butterflied chicken with olive oil and sprinkle it with salt. (The oil will prevent the skin from drying out while cooking.) Place the bird on top of a wire roasting tray in a roasting pan, skin side up. (The wire tray raises the bird up off the pan so that it doesn’t stew in the drippings that come out.) Tuck the wings up, over and under the breasts, so that they’re not exposed to the broiler.
Broil the chicken at medium heat for about 10 minutes, or until the skin develops a nice level of brownness. Keep a good 6” / 15 cm between the bird and the heating element of your oven. If your broiler is particularly strong and parts of the chicken begin to burn, you can create a “mini-heat shield” with aluminum foil.
Once the skin side has browned, flip the bird over (I use folded-over paper towels instead of tongs to avoid tearing the skin). Switch the oven to bake mode, at around 350°F / 177°C. Ideally, use a probe thermometer set to beep at 160°F / 71°C (carryover will take the chicken up to 165°F / 74°C). If you don’t have a probe thermometer, check for doneness after around 25 minutes by cutting off one leg and checking that the juices run clear and the flesh looks cooked. If it’s not done, set the two halves back together and return it to the oven, checking periodically.
Notes
• Some people like to brine their chickens. It adds salt into the meat, changing the flavor. Try brining the chicken in a salt solution for an hour or so (½ cup / 150g salt, 2 quarts/ 2 liters cold tap water—but really, you can just dump salt in water until it’s saturated). If you’re going to brine the chicken for longer, which will result in a saltier chicken, store it in the fridge to keep it below 40°F / 4°C while it brines.
• Alton Brown’s TV show Good Eats has an episode on butterflying a chicken. Brown creates a garlic/pepper/lemon zest paste to stuff under the skin, and roasts the chicken above a bed of cellar veggies (carrots, beets, potatoes). It’s a great recipe, as the paste brings a lot of flavor to the bird and the cellar veggies pick up the chicken drippings. For another variation, try putting chopped garlic and aromatic herbs such as rosemary under the skin.
• For further inspiration, look at Julia Child et al.’s Mastering the Art of French Cooking, Volume 2 (Knopf, 1970), which has an excellent description of Volaille Demi-Désossée—“half-boned chicken.” Child removes the breastbone (leaving the spine intact), stuffs the bird (foie gras, truffles, chicken livers, and rice), sews it back up, and roasts it. Looking at historical recipes—both recent and older—is a great way to understand food better.
Scallops are one of those surprisingly easy but often-overlooked items. Look for scallops that are dry packed—not soaked in liquid—to avoid them weeping water while cooking. High-quality frozen ones work fine (make sure the ingredient list says only “scallops” to ensure they’re dry packed too); defrost them overnight in the fridge.
Prepare the scallops for cooking by patting them dry with a paper towel and placing them on a plate or cutting board. If your scallops still have their bases attached, peel them off using your fingers and save them for some other purpose.
Not sure what to do with those little side muscles attached to the main body of the scallop (scallop bases)? Pan-fry them after you cook the scallop bodies and nibble on them when no one is looking.
Place a frying pan over medium-high heat. Once the pan is hot, melt about 1 tablespoon / 15g of butter—enough to create a thick coating—in the pan. Using a pair of tongs, place the scallops, flat side down, into the butter. They should sizzle when they hit the pan; if they don’t, turn the heat up.
Let them sear until the bottoms begin to turn golden brown, about 2 minutes. Don’t poke or prod the scallops while they’re cooking; otherwise, you’ll interfere with the heat transfer between the butter and scallop flesh. Once the first side is done cooking (you can use the tongs to pick one up and inspect its cooked side), flip the scallops to cook on the second flat side, again waiting until they’re golden brown, about 2 minutes. When you flip them, place the scallops on areas of the pan that didn’t have scallops on them before. These areas will be hotter and have more butter; you can take advantage of this to cook the scallops more readily.
Once they’re cooked, transfer the scallops to a clean plate for serving.
Notes
• Try serving these scallops on top of a small simple salad—say, some arugula/rocket tossed with a light balsamic vinegar dressing and some diced shallots and radishes.
• If you’re not sure if the scallops are done, transfer one to a cutting board and cut it in half. You can hide the fact that you checked for doneness by slicing all of the pieces in half and serving them this way. This lets you check that they’re all done as well.
• You can dredge the uncooked scallops in breadcrumbs or another light, starchy coating. If you have wasabi peas, use either a mortar and pestle or a blender to grind and transfer them to a plate for dredging the scallops.
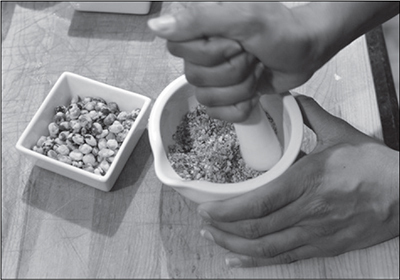
Try crushing wasabi-coated peas and dredging the scallops in them before searing.
356°F / 180°C: Sugar Quickly Caramelizes
Temperatures related to sucrose and baking.
Caramel sauce: delicious, calorie-laden, and made by the simple act of heating sugar. Unlike the Maillard reaction, which is named for the chemist who first described the reaction, caramelization is named for the end result. The word caramelization comes from the 17th-century French for “burnt sugar,” originally Late Latin for “cane” (canna or calamus) and “honey” (mel)—a good visual description of melted, browned sugar!
There are a couple of different ways to burn sugar (besides getting distracted while cooking). The simplest is with dry heat: sugar in a dry pan will thermally decompose—literally, breaking down under heat. In the case of sucrose, the molecular structure will break apart and go through a series of reactions that create over 4,000 different compounds. Some of those compounds are brown (the best-looking tasteless polymerization reactions you’ve ever seen!), while others smell wonderful (you can thank fragmentation reactions for these, as well as blaming them for some of the bitter tastes).
Heating sugar with water, as is done in wet-method caramel recipes, changes things slightly. When wet, sucrose will hydrolyze—a reaction that involves taking in water (hence “hydro”). In the case of sucrose, it hydrolyzes into glucose and fructose, called sucrose inversion. With heat, those molecules then rearrange their structure into another form that kicks off a water molecule and begins a chemical reaction journey. The hydrolysis of sucrose is a simple reaction. Even if you’re not up on your high school chemistry, you can see that the count of atoms on one side of the equation lines up with the count on the other side:
C12H22O11 |
+ |
H2O |
= |
C6H12O6 |
+ |
C6H12O6 |
Sucrose |
+ |
Water |
= |
Glucose |
+ |
Fructose |
This is how pastry chefs make invert sugar syrup! The concentration of sugar, temperature, and pH all speed up the reaction, so if you’ve ever seen a caramel recipe call for cream of tartar, that speeds up the conversion to glucose and fructose. And, because fructose has a lower caramelization temperature (more on that in a minute), a wet caramel sauce should, in theory, caramelize at lower temperatures and have a different chemical makeup than a dry one. The full chemistry of caramelization is still poorly understood—while researchers have been able to describe some of the reactions, the full pathway taken on the chemical reaction journey still has its mysteries.
Describing the temperatures for caramelization is also tricky because of the closeness between melting points and decomposition temperature ranges. Melting, a physical change, is not the same thing as decomposition, a chemical change. By definition, sucrose is a pure substance: it has a specific molecular structure. Pure sucrose melts at 367°F / 186°C, a state change where it goes from solid to liquid. Glucose, likewise, has a melting point of 294°F / 146°C; fructose comes in at a relatively cool 217°F / 103°C.
But these sugars begin to thermally decompose at temperatures lower than their melting points. The decomposition happens at a very, very slow rate at modest temperatures and begins to pick up to a noticeable rate as temperatures increase. For sucrose, that inflection point is somewhere around 338°F / 170°C—a good 30°F / 16°C below its melting point. If enough thermal decomposition happens before sucrose is heated to its melting point, granules of sugar will “apparently melt,” to use the phrase coined by the researchers. Heating a granule of table sugar—a bunch of sucrose molecules (with some impurities!) packed into a crystalline structure—to just below its melting point will cause some of the sucrose molecules to convert to other compounds via thermal decomposition. The granule of sugar is no longer a pure substance! This is why a granule of sugar “apparently” melts below its true melting point when heated slowly. Sugar, like everything else that makes up our food, is fascinating and complicated stuff.
One common technique used is differential scanning calorimetry (DSC). In DSC, scientists closely monitor the temperature of a sample in a closed environment while heating it, either recording the precise amount of energy needed to raise the temperature at a constant rate, or recording the precise change in temperature while adding energy at a constant rate. DSC picks up phase changes (e.g., solid to liquid) and chemical changes (like protein denaturation or thermal decomposition) because these changes require heat energy but don’t raise the temperature.
Take a look at the DSC graph. This graph shows how much energy was needed to heat a room-temperature sample to its melting point, raising the temperature at a constant rate over the course of about a minute. The graph noticeably ramps up around 338°F / 170°C and again around 356°F / 180°C, which is why caramelization is so often described as occurring at either of those temperatures. But notice that the line does slope up well before these temperatures! Heating sucrose at a slower rate will shift these two inflection points to lower temperatures; if it’s heated slowly enough, decomposition and melting will show up in two distinct peaks. Cooking sugar “low and slow” will still thermally decompose it; it’ll just take longer.

DSC graph for sucrose.
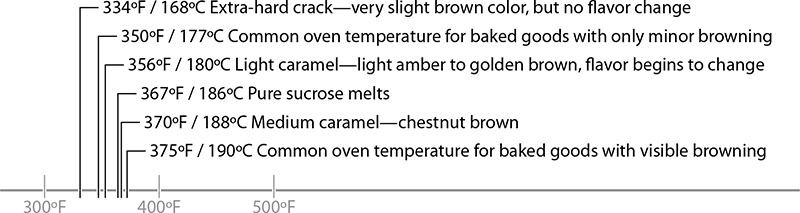
As for flavor, caramelization is like the Maillard reaction in that it generates thousands of compounds, and these new compounds result in both browning and enjoyable aromas. For some foods, these aromas, as wonderful as they might be, can overpower or interfere with the flavors brought by the ingredients. For this reason, some baked goods are cooked at 350°F / 177°C or even 325°F / 163°C so that they don’t see much caramelization, while other foods are cooked at 375°F / 191°C or higher to facilitate it. When cooking, ask yourself if what you are cooking is something that you want to have caramelized aromas, and if so, set your oven to at least 375°F / 191°C or extend the baking times out long enough for the reaction to occur. If you’re finding that your food isn’t coming out browned, it’s possible that your oven is running too cold, so adjust the temperature upward.
Does starch caramelize?
Not directly. Starch is a complex carbohydrate; caramelization is the decomposition of simple carbohydrates, a.k.a. sugars. Given time under heat, starch will break down into dextrin, which is a bunch of glucose molecules linked together. Dextrins are commonly used as adhesives—the stuff you lick on the back of an envelope—and are made by heating starch for many hours. Additional processing converts them to things like maltodextrin (see page 416), but almost all of the browning you see in cooked food comes from sugars (caramelization) and reducing sugars with amino acids (Maillard reactions). Starch can be broken down into glucose, which will caramelize, either via enzymatic reactions or hydrolysis, so there are exceptions. To see the difference, try baking a pinch of dry cornstarch, sugar, and flour alongside slightly wetted versions of each (to see how water changes things) on a lined cookie sheet at 375°F / 190°C for 10 minutes and investigating the results.
Temperatures of common baked goods, divided into those below and above the temperature at which sucrose begins to visibly brown. |
|
Foods baked at 325–350°F / 163–177°C |
Foods baked at 375°F / 191°C and higher |
Brownies |
Breads |
Chocolate chip cookies (chewy 10–12 minute cookies; see page 283) |
Peanut butter cookies |
Sugary breads: banana bread, pumpkin bread, zucchini bread |
Chocolate chip cookies (crispy 12–15 minute cookies; higher temperature means more evaporated water) |
Cakes: carrot cake, chocolate cake |
Flour and corn breads |
What’s the difference between a sugar cookie, butter cookie, and snickerdoodle? By weight, they’re all ~25% sugar, ~25% butter, ~44% flour, ~5% egg, and 1% other. It’s that “1% other” that makes all the difference. Butter cookies don’t have any rising agent, while both sugar cookies and snickerdoodles do. Snickerdoodles also have cream of tartar, giving them a tangy flavor and chewier texture.
Cookies are a perfect example of both caramelization and Maillard browning reactions. Some people like their cookies barely browned; others like them nicely toasted up. Personally, I like sugar cookies tender and barely browned and butter cookies golden medium-brown.
In a small bowl, mix 2½ cups (350g) flour and 1 teaspoon (6g) salt. Optionally add ½ teaspoon (2.5g) baking powder, skipping it if you’re making butter cookies. If you’re making snickerdoodles, also add 2 teaspoons (6g) cream of tartar. Use a whisk or fork to thoroughly mix the ingredients together.
In a large bowl, cream together 1 cup (230g) unsalted butter (room temperature) with 1 cup (200g) sugar. Add 1 large (50g) egg and 1 teaspoon (5 mL) vanilla extract and mix together. Optionally add flavorings, such as ¼ teaspoon (1 mL) almond extract or 1 teaspoon (2g) lemon zest.
Stir half of the dry ingredients into the large bowl, mixing to combine. Repeat with the rest of the dry ingredients. If you have time, chill the dough for several hours at this point—traditionally these doughs are firmed up so that they can be rolled out and cut into shapes.
If you like, prepare sugar to roll the dough balls in by pouring ¼ cup (50g) sugar onto a small plate. For snickerdoodles, add 1 tablespoon (8g) cinnamon and mix it with the sugar. For flavored sugar cookies, try adding 2 tablespoons (12g) fennel seeds to the sugar. For crinkle cookies, set out a second plate with ¼ cup (30g) powdered sugar.
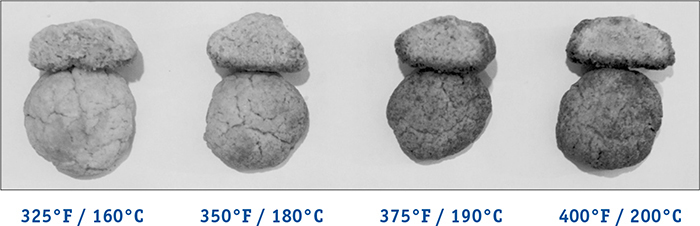
To bake, scoop the dough into ½ ounce / 15g portions, making small balls about 1” / 2.5 cm in diameter, and roll them in the sugar. (You can also roll the dough out and use cookie cutters—see page 340 for how to make your own.) Place the dough balls on a parchment-lined cookie sheet and flatten them, using either a fork for a lined surface or your palm for a flatter cookie. For tender, lighter cookies, bake at 325°F / 165°C for 10–12 minutes; for crispier, firmer cookies, bake at 375°F / 190°C for 10–12 minutes. If you like your cookies crispy brown throughout, try baking them at 325°F / 165°C for 25–30 minutes.
Notes
• If sugar cookies or butter cookies aren’t your thing, try adding flavoring to the mix, rolling the dough in sugar and chopped nuts, or dipping the baked cookies in chocolate. For chocolate-flavored cookies, replace ½ cup (70g) flour with ½ cup (40g) Dutched cocoa powder. For something festive, roll the dough balls in colored sugar. (To make your own colored sugar, mix a few drops of food coloring with ¼ cup (50g) sugar in a plastic bag, seal it, and shake well.) Or get fancy and make two batches of dough—one vanilla and one chocolate, or two batches dyed different colors—and then roll the two doughs together to form a sliceable log with one dough in the center and the other wrapping it.
• Modern-day snickerdoodles are essentially chewy sugar cookies dusted in cinnamon, but that wasn’t always the case. The earliest recipe I know of skips the flour, which was presumably useful for the 19th-century cook who found herself (rarely himself) out of it yet wanting to cook a treat. If you like your snickerdoodles old-fashioned-style, see http://cookingforgeeks.com/book/snickerdoodles/ and use small eggs (modern-day eggs are larger).
• Crinkle cookies, often made with darker doughs that include cocoa powder or molasses, get their crackled appearance from being rolled in sugar. As the cookie expands, the sugar absorbs moisture, causing the surface to dry out and set before the cookie has fully expanded. For better results, roll your dough balls twice: first in granulated sugar, then in powdered sugar.
Cookies baked at 350°F / 180°C and lower remain a lighter color because sucrose won’t caramelize at these temperatures much when baked at standard baking times. Try making two batches of cookies, one with fructose sugar instead of table sugar, to see what a difference caramelization makes!
Here’s an easy experiment to do, and the data is delicious! Everyone has their own idea of what makes a perfect cookie, and texture is a big part of perfection, at least for cookies. If you like your cookies gooey, they need to be baked so that some of the egg proteins remain unset. If you like your cookies crispy, they need to be baked so that most of the moisture in the dough evaporates away. But what if you want a cookie that’s crispy around the edges and gooey in the middle? It’s possible—with the right combination of time and temperature.
Almost all reactions in cooking are based on temperature. Different reactions occur at different temperatures, but it’s not so simple as saying, “this reaction happens at x degrees.” Reactions speed up with higher temperature, and many of the temperature ranges for different reactions overlap. For example, moisture in cookie dough will evaporate at the same time as the dough’s egg proteins are setting.
Finding your perfect cookie requires playing around to figure out what exact time and temperature combination gives you the properties you like best. Try baking cookie dough at different times and temperatures to see how the different reactions change.
• One batch of light-colored cookie dough (see page 224 for sugar cookie dough, or use store-bought dough)
• Stuff to bake the cookies: spoon, spatula, parchment paper, a cookie sheet, a timer, and an oven
• Two sheets of letter or A4 paper and something to write with
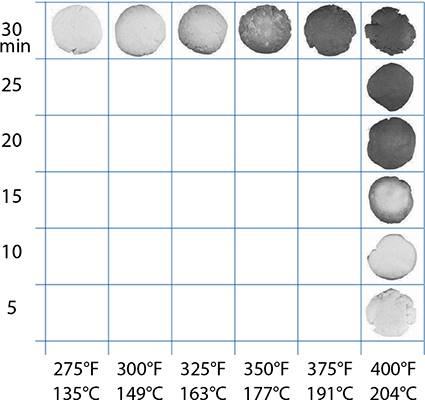
Choose what time and temperature values and intervals you want to experiment with. For example, you could choose to do a range of temperatures from 300°F / 150°C to 375°F / 190°C in 25°F / 12.5°C intervals and a time range of 6 minutes to 21 minutes in 3-minute intervals.
Create a grid on your two sheets of paper, labeling the x-axis with each of your temperatures and the y-axis with each of your times. Leave about 2.5” / 6 cm between each label.
Bake!
Set your oven to the lowest temperature you choose.
Place small scoops of dough, about ½ ounce / 15g each, onto a lined baking sheet. If you’re baking 6 different times for each temperature, then put 6 dough balls onto the sheet.
Set your timer to the beginning of the time range (e.g., 6 minutes) and begin baking the cookies.
When the timer goes off, remove one cookie and set it onto the grid at the correct spot.
Set the timer for the interval (e.g., 3 minutes), and remove another cookie when the time’s up, repeating the process until all the cookies for the current temperature are baked.
When you’re done with one temperature range, increase the oven to the next range and wait 10 minutes or so for the oven to adjust. (If you’re doing this in a group, you can split up who does each temperature, but make sure to calibrate your ovens and use cookie sheets of the same material.)
There are two different browning reactions that happen in baking: the Maillard reaction and caramelization. What do you notice about how long cookies take to bake to medium-brown at one temperature versus another temperature? Do you think you could estimate how much faster a cookie bakes with a 25°F / 12.5°C increase in temperature?
Take a look at the lowest-temperature, longest-cooked cookie and compare it to the highest-temperature, shortest-cooked cookie. What do you notice about the difference between the color of the edges and the centers? What would cause this?
What do you think would happen if you changed the ingredients in the dough, like decreasing the amount of sugar, or adding an acid like lemon juice?
Caramel sauce is one of those components that seems complicated and mysterious until you make it, at which point you’re left wondering, “Really, that’s it?” Next time you’re eating a bowl of ice cream, serving poached pears, or looking for a topping for brownies or cheesecake, try making your own.
There are two methods for making caramel sauce: wet and dry.
Wet method: This is the traditional method for making caramel sauce, and the only way to make lighter-colored caramel sauces. Adding corn syrup to the sauce prevents sucrose molecules from crystallizing into a big mess. If you don’t have corn syrup, take care to not overstir; stirring speeds up crystal formation.

Caramel sauce being made with the dry method.
Microwave version
Microwaves make quick work of caramel sauce—the microwave rapidly heats the water, which then heats the sugar. In a clear microwave-safe bowl, heat 1 cup (200g) granulated sugar and ¼ cup (60 mL) water for 1–3 minutes, paying attention to the color of the sugar. It will bubble and remain clear for a while and then suddenly begin to turn brown—stop the microwave then! You can let it go for a few seconds longer to reach a medium brown. Remove the mixture from the microwave and very slowly add ½–1 cup (120–240 mL) heavy cream (use more cream for a runnier sauce), stirring or whisking to combine as you pour.
Stovetop version
In a saucepan, heat 1 cup (200g) granulated sugar and ¼ cup (60 mL) water. Optionally add 1 tablespoon (15 mL) corn syrup. Allow the mixture to simmer for 5–10 minutes, during which time you should see most of the water bubble out and notice the sound of the bubbling change. Using a digital thermometer, heat the sugar syrup to about 350–360°F / 175–180°C, or look for it to begin to turn an amber color. You can cook it to higher temperatures for richer flavors, but for that, the dry method is easier. Remove the mixture from the heat and very slowly add ½–1 cup (120–240 mL) heavy cream (use more cream for a runnier sauce), stirring or whisking to combine as you pour.
Dry method: If you are making a medium-brown caramel sauce—above the melting point of sucrose—you can skip the candy thermometer, water, and corn syrup and take a shortcut by just melting the sugar by itself. Make sure the pan is dry—if there’s much water in it, it’ll cause the sugar to crystallize when it evaporates and the sugar won’t melt as well.
In a dry skillet or large pan over medium-high heat, heat 1 cup (200g) granulated sugar.
Keep an eye on the sugar until it begins to melt, at which point turn your burner down to low heat. Once the outer portions have melted and begun to turn brown, use a wooden spoon to stir the unmelted and melted portions together to distribute the heat more evenly and to avoid burning the hotter portions.
Once all the sugar is melted, remove it from the heat and very slowly add ½–1 cup (120–240 mL) heavy cream (use more cream for a runnier sauce), stirring or whisking to combine as you pour.
Notes
• Caramel sauce is a calorie bomb: 1,589 calories between the cup of heavy cream and cup of sugar. It’s good, though!
• Try adding a pinch of salt, or a dash of vanilla extract or lemon juice, to the resulting caramel sauce. A tablespoon or two of bourbon is delicious too!
• Different temperature points in the decomposition range yield different flavor compounds. For a more complex flavor, try making two batches of caramel sauce, one in which the sugar has just barely melted and a second where the sauce is allowed to brown a bit more. The two batches will have distinctly different flavors; mixing them together (once cooled) will result in a fuller, more complex flavor.
• Sucrose has a high latent heat—that is, the sugar molecules are able to move and wiggle in many different directions. Because of this, sucrose gives off a large amount of energy when going through the phase transition from liquid to a solid, so it will burn you much, much worse than many other things in the kitchen at the same temperature range. There’s a reason pastry chefs call this stuff “liquid Napalm.”

PHOTO USED BY PERMISSION OF AMERICA’S TEST KITCHEN
Bridget Lancaster is the executive food editor for television, radio, and media at America’s Test Kitchen. She is an original cast member of America’s Test Kitchen and Cook’s Country, both broadcast on public television. Before working at America’s Test Kitchen, she cooked in restaurants in the South and Northeast regions of the United States.
How did you get into cooking?
I got into the hobby of cooking from my mother, who is a great cook. This was the time when convenience food started coming out, prepackaged things, foods that had “Helper” at the end of the title. My mother just refused to participate in any of that. So everything was scratch—always homemade cakes, breads...
Also, my grandfather worked in the Army for years. When he was in Korea, he would ask the men in his company for different foods that were sent in care packages. They would take those foods and create a meal, something special that wasn’t just Army sanctioned. I think he always had that interest in taking something that was so humdrum, so pedestrian, and turning it into something special. I think that’s where I got interested in not settling for less, always thinking, “This could be a little bit better. This could be a little bit more.” My relationship with Cook’s [Illustrated] is all about that.
You once mentioned that you grew up not knowing that things like pasta sauce even came in a jar. As you learned more about cooking, what things surprised you that people buy instead of make?
Well, that was one of them because of the fact that a great pasta sauce takes 10 minutes to make, from scratch. Salisbury steak that’s in the frozen aisle, with frozen mashed potatoes? It was almost as if we had all turned into astronauts, and we were looking at food as a thing to consume instead of actually being a meal.
Not to say that there aren’t great ready-made things, like really good sausages and canned tomatoes. I use canned tomatoes all winter long because I don’t really like buying fresh in the winter; they’re red Styrofoam.
You mentioned that you got into the hobby of cooking from your mother. What are the things that you wish you had learned from her, that you think are hard to learn unless you’re doing it with somebody?
The simplest ingredient is just, it is what it is. The less you do to it, the better it is.
I think understanding the magic step was missing. Say you put brownies in the oven—it goes away and when it comes back, it looks completely different. What’s happening at that point? I never asked those questions. I just accepted it at kind of face value.
I think a lot of people do think that it’s a magic box. You put the cookie dough in, and you bake it, and out comes a cookie somehow. What other magic steps happen that people don’t realize are important?
Some of it happens before it even goes into the box. One is probably stirring. You think of cake batter, cookies, any kind of baked good. Before it goes into that magic box, if you stir it too much, it makes it tougher. That’s now what we know as the new villain on the street, gluten. It’s important for structure, but it can be easily activated more, so that there’s more gluten developed. So you end up with cake that’s tough instead of cake that’s tender.
With steak, the magic step is salting. My mom would call it a marinade, but now we know that soy is the primary ingredient, more like a briner-ade. It’s part salt brine with more flavor. She would let it sit for a good half-hour in mostly soy sauce, no real acid in there. That went on the grill, and when it came back, it was savory all the way through.
Our grandparents didn’t know about connective tissue and the conversion of collagen into gelatin. But they knew that if you had really tough cuts of meat, you could literally change their structure into something very different, as different as cake batter compared to a baked cake, by putting that tough cut of meat into the oven, the longer and slower, the better. You really change the structure with only temperature and time and how long it takes for that to occur.
The black box of cooking vegetables: what do people miss there?
I think if I could go back in time and get my mom to roast some vegetables, I would have been a little less picky. As children, our taste buds are very different, and we pick up on bitter first, before we pick up on other tastes.
Roasting takes away the bitter, and it converts it into sweeter and deeper flavors, but not bitter. I think that’s the best thing that ever happened to vegetables. Roasted Brussels sprouts. You see them in restaurants now too! They bring out baskets of roasted Brussels sprouts, and I just laugh because I want to take a survey, go around the restaurant and ask people, “Did you eat Brussels sprouts when you were a kid? Wasn’t that the worst thing that your parents could have threatened you with when you were a child?” Now we eat them like they’re popcorn.
Cauliflower is another one. I think this is partially thanks to the vegetarian, even vegan, crowd that wanted something that was thought of as a substantial main course. You now see cauliflower steaks: it’s treated; it’s browned. It might be high-roasted, or it might be grilled, but you’re taking the same treatments that we’ve done for meat and other things and looking at it as a way to add more flavor and turn something that was a side dish for so long into something more special.
It’s interesting that you tie that to vegetarian or vegan cuisine. Are there other subgroups that deal with food that’ve introduced the broader population to new interesting things?
Today, we see an emphasis on different grains. Not only is it vegetarianism or veganism, but people with gluten sensitivities. They can’t have barley. They can’t have wheat, obviously. So you’re seeing an exploration. Some are new things—breads made with new grains or a combination of grains—and we’re also seeing a little bit of a celebration of things that are naturally gluten-free, like Southern cornbread. Northern cornbread tends to have both flour and cornmeal in it, but southern cornbread is just cornmeal.
A lot of these trends start in restaurants because you have somebody going in and saying, “I’m allergic to dairy.” Then there are some cultures where the foods are just naturally dairy-free. Take a lot of Thai food. You don’t see a lot of cheeses in Thai food. You don’t see milk, dairy milk. You see coconut milk.
I think our culture is becoming more diverse, not only in its people, but in its cuisine. We’re seeing more of this in cookbooks and in restaurants and in home cooking. We’re trying new cuisines from around the world that just happen to be either gluten-free or dairy-free, but they weren’t engineered to be that way. You see people making oatmeal porridge with coconut milk now, instead of regular milk, or smoothies with different types of dairy.
What are the common mistakes that you see with people who are learning to cook?
Probably the number one mistake is they’re afraid of salt. They don’t know that salt added at various stages not only affects the taste, but also the texture of food. You think about adding onions to a pan that has oil or butter in it—add a little bit of salt to draw out the moisture, so you can get more caramelization and more flavor that way. The most important step, after you’ve turned off the stove, is to check the food. Adjust the seasonings at the end. Is it a little dull? Does salt brighten it?
Number two, people just are watching the clock instead of peeking under that chicken breast to see if it’s browned to the right color. That’ll tell you if it’s time to turn it over, not necessarily the recipe time.
Another thing: there’s a fear of the equipment. The safest thing to cook with is a very, very sharp knife. The most dangerous thing to cook with is a dull knife. And there’s a fear of the stove, in a certain way. I see people only turn their stovetop up to medium. They’ll wonder why, when they put food in the pan, it just steamed instead of getting a really deep, dark crust on it. You have to crank the heat up, put some oil in the pan, and let that heat until the oil just starts to smoke. Smoke is kind of a danger sign, but it’s also a great indication that you’re ready to go. I understand that fear, but the heat gives the caramelization and the browning of the food.
Where do you think this fear of the kitchen comes from?
We’re definitely afraid to fail, but I think there’s been a generation or two that fell away from the kitchen, and the microwave became another black box where almost no prep was necessary. People were able to eat quickly. I have succumbed to Stouffer’s mac-and-cheese going into the microwave a couple times in my life. Pretty darn good.
When you have a fear of something, you’re supposed to face it every day, and it goes away. I think if you’re only cooking once, twice a week, you don’t want to screw it up. Plus, if you buy really good food items, there’s sticker shock, so you really don’t want to mess it up.
I think there was a generation where cooking was seen as tethering. Not to get political, but we didn’t want to be tied to the stovetop. A couple of generations didn’t benefit from someone being in the kitchen. Think of the Italian nana, always adding something to this big magical pot and stirring it away, and you get this amazing gravy at the end of it. Not everybody had that experience. I think it’s coming back. But who would have thought that there would be food TV? I’m guilty for being a part of it. But who in the world, besides Julia Child, did you ever think would be on your TV, telling you how to cook? Maybe Justin Wilson or Graham Kerr, bless his heart.
I remember reading after 9/11 there was a big uptick in people buying kitchen equipment, because there was kind of a feeling that you needed to nest. You needed security of your home. I remember reading the article and thinking, “That’s one of those game-changers for some people.”
What aspects of cooking and science have surprised you? Things that should have been easy but were hard, or were hard and turned out to be easy?
I think knowing exactly what you just said: things that should be easy are the hardest. I now know that, but it was a surprise. One of the jobs that I went for as a cook, you had to make an omelet for the chef. Think about an omelet. An omelet should be really, really simple, and that was the point. But it’s so hard to make because there’s so little to an omelet; one minor change to a step can really change everything.
I think the biggest thing, though, is that we can always do better—as long as we don’t assume anything. Think of the old kitchen lore, “Don’t salt your beans.” That’s my favorite one because I never salted beans growing up because you were gonna just ruin the whole dish. Then we find out that actually you can salt your beans. It not only adds flavor to the dish, but it changes their structure so that they’re a little bit creamier.