Chapter 2. What Can and Should I Animate?
In This Chapter
Core Animation provides a wide array of properties that you can animate on both Core Animation layers and Cocoa windows and views. But just because you have Core Animation in your toolkit, though, doesn’t mean it should be used for everything in your app. This chapter looks at the properties you can animate and discusses whether you should animate them.
Core Animation is a great technology, but every great technology can be overused or downright abused. We make some suggestions to help you avoid the pitfalls that lead to such abuse. You’ll be thankful you took our advice and so will your users.
What Can I Animate?
Animation is something that you apply to visual things: windows, views, and layers. Animation doesn’t make sense unless there is something being changed visibly on the screen. This is why although you can use a layer as a key-value coding container for custom properties, you might not animate those properties. Animatable properties are only those properties that provide visual feedback when changed and are the only properties that are animatable according to the Core Animation specification.
The categories covered in this section help you get a better understanding of what properties are available for you to animate.
Color
Core Animation uses an internal algorithm to calculate animation of color changes. When you specify a fromValue and a toValue or byValue in a CABasicAnimation or an array of CGColorRef values in an array that you provide to the values field of a CAKeyframeAnimation, Core Animation determines and fills in all the in between colors to be used over the duration of the animation.
NOTE
Tweening
In the world of animation, this is known as tweening; where the code looks at the start and end values and automatically calculates and runs the values in between.
Listing 2-1 demonstrates how to create a basic animation that changes the background color of a layer from red to green over a period of 5 seconds.
LISTING 2-1 Animating the Background Color from Red to Green

The example code creates a basic animation object, CABasicAnimation, using the keypath backgroundColor and sets a starting value and ending value using the –setFromValue and –setToValue parameters. It sets the duration to 5 seconds by calling –setDuration:5.0. When this animation is added to a layer, the layer’s background color starts to animate immediately.
On the iPhone, this code changes slightly as colors are manipulated using the UIColor class. Listing 2-2 demonstrates how to create the same animation for the iPhone.
LISTING 2-2 Animating the Background Color from Red to Green on iPhone
Color fields that you can animate include
• backgroundColor
The layer’s background color.
• borderColor
The color of the layer’s border.
• shadowColor
The color of the layer’s shadow. At the time of this writing, the shadowColor property is not available on the iPhone.
Motion
When you want motion on the screen, Core Animation provides rectangles and points in each layer that you can animate. Motion fields you can animate include
• anchorPoint
The default anchorPoint of a layer is 0.5,0.5, which indicates the center of the layer is the anchorPoint. If you change the anchorPoint to 0.0,0.0, it will be located at the bottom-left corner.
• bounds
The bounds property animates the shape of the bounding rectangle. It does not affect the layer’s position.
• frame
The frame property is not animated in a layer. You can set this parameter and the layer’s internal value with change; however, you won’t see the actual animation. If you want to animate a layer’s bounds, that is, its bounding rectangle, use the bounds property. If you want to change the position, use the position property. On views and windows, setting frame causes the bounding frame to animate.
Use the position property to move a layer’s position. The position is dependant upon the anchorPoint property. If you want to center a layer in its parent view, leave the anchorPoint at the default of 0.5,0.5 and then calculate the center of the parent view. Listing 2-3 demonstrates how to center the layer.
LISTING 2-3 Center the Layer in Its Parent View

• zPosition
The zPosition property controls the z-index of the layer. This determines the layer’s position from front to back. It can be animated to transition one layer on top of another.
Attributes
Each visible characteristic of a layer can also be animated. These are referred to as attributes because they are the fields that affect the visible attributes of the layer.
Attribute fields that you can animate include
• borderWidth
The borderWidth property sets the width of the border that surrounds the layer.
• cornerRadius
The cornerRadius property sets the radius of the corners of the layer giving the layer a rounded rectangle look.
Visibility
Layer’s are visible components, but you can determine how visible. Sometimes, you need to see through partially or completely. You control this with the visibility fields.
Visibility fields that you can animate include the following:
• opacity
The opacity property determines the layer’s opacity. A value of 1.0 sets the layer to fully opaque, and a value of 0.0 sets the layer to fully transparent. Use values in between to set just how opaque you want your layer to be.
• hidden
In theory, the hidden property is animatable; however, it’s actually just an On or Off switch. If you want to animate the visibility of a layer, use the opacity property instead of hidden.
Filters
When used in conjunction with Core Image, Core Animation layers can have complex filters applied to them by setting one or more of the filter fields. Core Image filters are not, at the time of this writing, available on the iPhone.
Filter fields that you can animate include the following:
• filters
The filters property is an array of filters that you can apply directly to the layer’s content. It affects the entire layer, including the border and background.
• compositingFilter
Different from the filters property, the compositingFilter property uses a single filter as its parameter.
• backgroundFilters
The backgroundFilters property provides a way for you to apply filters to the layer’s background only.
Content
The content field of a layer is set using an image, specifically a CGImageRef. If you use a CAKeyframeAnimation to animate this field, you can create a simple slideshow application with a minimal amount of code. You can create an array of CGImageRef objects and set that array as your animation’s values field. When the animation is added to the layer, it transitions between each image in the order they are found in the array. You can alter the order of the images by changing the order of the array. You can also change the type of transition you use. We cover transitions in great depth in Chapter 6, “Layer Filters.”
Content fields that you can animate include
• contents
The contents property expects a CGImageRef object to display an image.
• contentsRect
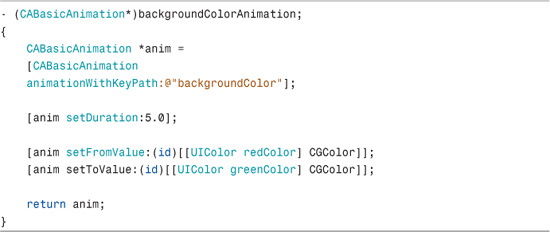
Think of the contentsRect property as a view port of the layer contents. The contents rectangle values (x, y, width, and height), are tied to the size of the layer bounds. The four values of the contentsRect rectangle, however, are proportions rather than actual points on the screen. The default is 0.0, 0.0, 1.0, 1.0. When you change the x, for example, the value is between 0.0 and 1.0. If you set x to 0.25, the view port of the content’s rect displays at pixel 100.0 of a 400.0-pixel wide layer (400.0 × 0.25), or 25 percent of the layer’s original width. If you set the width to 0.25, the width of the view port is be 100.0 pixels on a 400.0-pixel wide layer (400.0 × 0.25), or 25 percent of the layer’s original width. Figures 2-1 and 2-2 demonstrate how contentsRect works by showing what portion of the original image layer is displayed in the contentsRect.
FIGURE 2-1 One Quarter Width and One Quarter Pixel Position
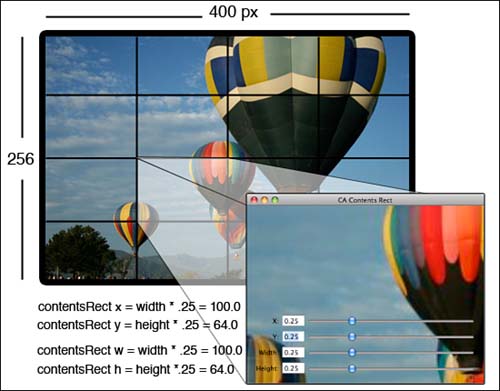
FIGURE 2-2 One Half Width and One Quarter Pixel Position
Masking
Layers provide a way to mask their contents using masking fields. Masking fields that you can manipulate include
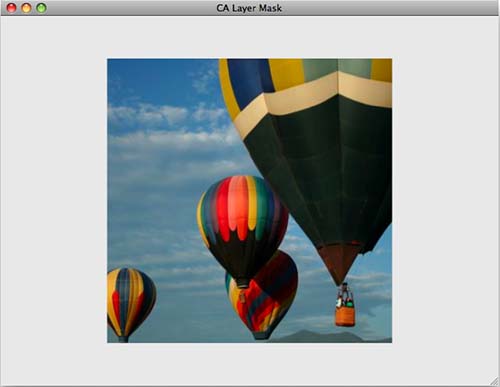
The mask property is itself a layer. The opacity of the mask layer determines how the effect renders. When you specify a mask, keep in mind that that the mask bounds determine what is allowed to show through rather than what is blocked from view. In other words, if you specify the width and height of the mask layer to be 300 × 300 pixels and specify the center of the window as the mask layer’s position property, you see a 300 × 300 portion of the containing layer show through in the center of the window. The surrounding part of the 300 × 300 square is what is actually masked, as illustrated in Figure 2-3.
FIGURE 2-3 A Simple Mask Layer
• masksToBounds
The masksToBounds property ensures that content is clipped to the bounding rectangle. It is particularly useful when you have set a corner radius on a layer with content and want to ensure that the content doesn’t spill to the outside of the content rectangle where the rounded corners are.
NOTE
At the time of this writing, there is no way to simply invert the mask. If you want to mask the surrounding area instead, you must draw and fill the appropriate path in the mask layer with –drawInContext in a derived layer or use -drawLayer:inContext if you use a delegate.
What Should I Animate?
Core Animation gives you a lot of power and flexibility enabling you to enhance your application’s user interface with ease. There are, however, principles that you should adhere to when you use Core Animation. In other words, just because you can animate something doesn’t mean you should. In this section, we talk about some overarching principles that should guide your designs, and some suggestions of things you should animate and things you should not.
Design Principles
Let’s face it; developers are not designers. There are a few exceptions to that statement, but for the majority, it is a rule. If you are a designer and you take offense to that statement, be thankful for your abilities and forgive the sentiment. For the rest of us, however, here are some helpful guidelines.
Keep It Simple
You’ve heard this one a thousand times, but you still ignore it. Most developers have to be reminded on a regular basis that just because you can add all the controls you need to a tiny little iPhone view to perform some task doesn’t mean you should. When you think of simplicity, don’t think of what will make it simplest for you to implement but what will make it simplest for your user to use. Keeping it simple is all about them—not you.
Don’t Design, Borrow
You are likely in the nondesigner engineer camp as that label applies to the majority. You should probably never, therefore, try to design a user interface from scratch. Instead, look at the other applications out there that you admire most and borrow ideas from the ones you like.
Pay a Graphic Artist
If you can afford good graphic artists, use them. I’ve seen some amazing designs that scoped out the project so well that it left little room for feature creep. Getting a proper design done is well worth the money. Build that cost into project estimates when freelancing and be prepared to pay that up front in your own applications that you intend to sell.
By the Book
When it comes to design, you should adhere to Apple’s Human Interface Guidelines (HIG). This is especially true for iPhone development where designing things another way will likely not only look bad but will also create usability issues for your end users. For example, if you try to load your views on top of the current view by adding them as subviews instead of using a navigation controller stack, your design will be difficult to maintain from a coding standpoint, and the flow of the application will disorient your end user. Instead, when you create new views, use view controllers and push and pop them on and off of the navigation stack as specified in the iPhone HIG.
When Should I Use Core Animation?
On certain online discussion forums, people often ask questions like, “I’ve heard this Core Animation thing is something I should use, but I’m not sure when to use it and when to just use standard views.” I would summarize the answer this way. Use views for user input elements and use Core Animation for design elements. In some cases, however, it makes sense to use a hybrid.
User Input
If you need to capture input from the user, use a standard control—which is based on either an NSView on the Mac or a UIView on the iPhone. If you have design skills, Core Animation layers can provide a simpler path to changing the look of your controls to suit your design, but for the rest of us, leave the views alone. Your users will recognize them and will know how to use them instinctively.
Design Elements
If your application requires some sort of animation to adorn the view, use Core Animation layers. For example, if you want to rotate a sunburst image in the background of your carnival game for the iPhone, use a Core Animation layer. Or if you want to animate an image within your view, load the image and set the layer’s contents field to display the image. Then move its position with either implicit or explicit animation.
Hybrid
Sometimes, you want to adorn your control views with layers because this visually enhances the view. For example, if you want to display an indeterminate progress indicator in a view while some data is downloading from a website, you can design the view and place the progress indicator in its center in Interface Builder. Then you can make the containing view have a border and a rounded rectangle by accessing the view’s layer and setting the cornerRadius and borderWidth properties (see Figure 2-4).
FIGURE 2-4 Activity Indicator View with Rounded Corners

What Shouldn’t I Animate?
There are no hard and fast rules, so if you have gotten this far into this chapter and are still uncertain what you should animate, you should review the principles we discussed so far. These can guide your efforts.
After months of working closely with Core Animation and learning all the ins and outs, however, it is clear that there are no absolute rules about what you should not animate. You can make a case in favor of animating nearly anything. You should not make using your interface difficult because of all the animation you add to it. For instance, don’t animate controls your user is going to need to click on or type text into. It’s fine to animate an entire view into or out of view to draw attention to it, especially on the iPhone, but don’t move buttons and text fields around on the screen for visual effect. This is just annoying and will seem more like a practical joke to your user than anything. But in the end, you need to decide what you shouldn’t animate in your application. If you are not certain whether an animation makes sense, have someone use it and see how she reacts to the animation. That will get you much farther than any design rule this book offers.
Summary
What you can animate is limited to what Core Animation provides. Fortunately, it provides everything you need and probably nearly everything you would want. What you should animate, well, let’s face it—that is entirely up to you. We hope that you’ll adhere to the simple principles we’ve discussed, but we trust that whatever you build you’ll build because you’re inspired to make beautiful and useful software.