Chapter 1. What Is Core Animation?
In This Chapter
• Animation and the Cartesian Plane
• Math? I Was Told There Would Be No Math
• Core Animation and the iPhone
Core Animation enables you to develop complex animations for many different types of applications. You can simply animate your views within a window, or you can create a thousand sprites represented by layers on the screen for that next killer game. In this chapter, we introduce you to the basic concepts behind Core Animation. We take a look at views and layers to ensure you understand what you can do with animation in each. We start with a discussion about animation and the coordinate plane and then move on to getting well acquainted with the Core Animation base class, CALayer, and its related protocols.
Animation and the Cartesian Plane
When you have become familiar with Core Animation and start using it in your applications, you will see that animation is easy on both Mac OS X and the iPhone. The fact is, though, that animation has not always been easy. Prior to Core Animation, you needed to understand some fairly complex subjects such as double buffering and more complicated mathematics such as plane geometry—especially if you wanted to give your animations any sense of depth. Core Animation abstracts all of that away. If you wanted to move a sprite across the screen doing it the old way, you needed to create an off-screen graphics context, draw your sprite to that context, swap out that context with one currently on the screen, move the sprite position, and then draw to the swapped out off-screen graphics context. Lather, rinse, repeat.
Although this process isn’t terribly difficult, it can present some challenges to the developer that Core Animation completely eliminates. The Core Animation way to do the exact same thing is to create a layer that contains your sprite and simply call –setPosition. As you learn in chapters to come, the position of a layer is represented by a single point on the screen. By default, a layer’s position is the center point of the layer within its parent’s coordinate space. So what does that mean?
Core Animation uses the standard Cartesian coordinate system you remember from geometry and trigonometry. The values for x are on the horizontal axis, and the values for y are on vertical axis. When naming a point, the x is always the first value, so a value of 25,35 means x = 25 and y = 35. Different from a standard Cartesian coordinate plane, however, is that you are only ever using the upper-right portion of the plane where the numbers are all positive. This means that the bottom-left corner of the screen is at point 0,0. The upper-right portion of the screen then is the width (x) and height (y) depending on the resolution of the screen you use. On a 15-inch MacBook Pro, this value is 1440,900. For example, if you created a sprite on a layer and wanted to animate it from coordinate 0,0 on this MacBook Pro, you could set the position of the sprite to 0,0 when it is created and then call –setPosition(CGPointMake(1440,900)) and the sprite layer would animate to the upper-right corner of the screen. Of course, this assumes that the sprite is in a view that covers the entire screen, as layers cannot display without being backed by a view.
Your Free Lunch
They say that there is no such thing as a free lunch, but when it comes to animating with Core Animation, you don’t just get lunch, you get a drink and desert as well. For example, all the drawing going on is happening behind the scenes using OpenGL. Yet, you don’t need to know anything about OpenGL to take advantage of the hardware acceleration offered by your video card. This is fully abstracted by Core Animation. If you do want to get to the more nuts-and-bolts level of OpenGL, though, you can do so by using the CAOpenGLLayer on OS X. As of this writing, things aren’t quite as easy on the iPhone for OpenGL, but they are not too far off. The layers and layer-backed views on the iPhone also give you great performance benefits.
Another freebie in Core Animation is that all the animation happens on a background thread. This means that the user interface isn’t blocked when the animation runs. And you don’t need to be a multithreading expert to take advantage of it! In fact, if you’ve never worked with multiple threads, you won’t notice a thing. Just set the animatable property on your layer or view and watch the action happen.
NOTE
To learn more about how to use Core Animation in your iPhone apps, see Chapter 13, “Core Animation on the iPhone.”
What Is a Layer?
The layer, represented by the CALayer class and its derivatives, is the most basic fundamental building block you will use for your all your Core Animation-based applications. All Core Animation layers provide a lightweight layer within a view that enables you to display visual content. Here is how Apple describes a CALayer in the API documentation:1
1From p. 7 of Apple’s CALayer Class Reference: http://developer.apple.com/mac/library/documentation/GraphicsImaging/Reference/CALayer_class/CALayer_class.pdf.
CALayer is the model class for layer-tree objects. It encapsulates the position, size, and transform of a layer, which defines its coordinate system. It also encapsulates the duration and pacing of a layer and its animations by adopting the CAMediaTiming protocol, which defines a layer’s time space.
Notice how it says that it is the “model class.” This might be confusing if you are familiar with the Model-View-Controller (MVC) design pattern, as you might more naturally think that because Core Animation is of a visual nature, the View part of MVC might make more sense. Ultimately, it is the NSView on the OS X side and the UIView on the iPhone side in which the layer is stored that does the drawing. The CALayer simply contains the data (model) that is relevant to all the layer’s attributes such as background color, border width, position, size, transform, and such.
Core Animation provides a slew of different layers that help you achieve different functions based upon your application needs. If you need to play a movie, for example, you wouldn’t want to try to grab the movie frames manually and display them in the content field of the layer as this would create a lot of overhead, and your movie wouldn’t play smoothly. Instead, you would simply want to use a QTMovieLayer, which abstracts movie playback very well. All you need to provide to a QTMovieLayer is a path to a movie file on disk, and it handles the rest. Figure 1-1 shows the hierarchy of Core Animation layers and the frameworks to which each of them belong.
NOTE
See Chapter 2, “What Can and Should I Animate?,” to see a list of the animatable properties of a layer.
FIGURE 1-1 Core Animation Layers
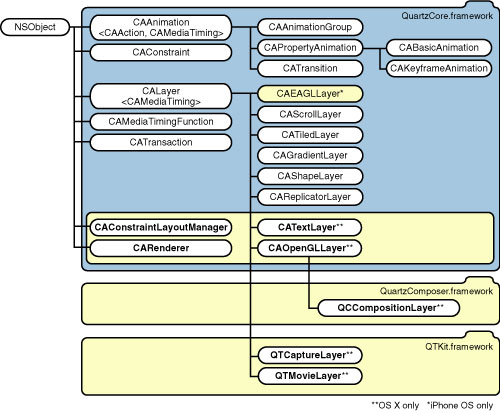
As Figure 1-1 shows, there are numerous layers available in the Core Animation toolbox. Here is a brief explanation of each layer type:
• CALayer
This is the base class from which all Core Animation layers derive.
This layer provides a convenient way to display a string in your layer tree. You specify all the layout information as with any other layer, but you can also specify the text, font, font size, and foreground color that the layer uses for the text provided. If you specify an NSAttributedString, these other fields with be ignored. This layer is only available on OS X.
• CAScrollLayer
This layer enables you to scroll content that is larger than the viewport of the containing view.
• CATiledLayer
This layer enables zooming and panning of content that is larger than the viewport of the containing view.
• CAOpenGLLayer
This layer provides a convenient way to do OpenGL rendering in your application. We cover this layer is greater depth in Chapter 8, “OpenGL Layer.” This layer is only available on OS X.
• CAEAGLLayer
This layer provides a way to perform OpenGL rendering on the iPhone. This layer is only available on the iPhone.
• QTMovieLayer
This layer enables you to simply play back QuickTime movies in your Core Animation-based application. Because it is a Core Animation layer, you can add additional layers to its sublayers property and composite other visuals on top of a playing movie. We cover this layer in greater depth in Chapter 7, “QuickTime Layers.” This layer is only available on OS X.
• QTCaptureLayer
This layer takes advantage of a camera connected to your computer for the purpose of video capture and real-time playback. You can use your iSight camera or a muxed device such as a DV camera to capture video. The actual capturing is done via other QuickTime classes available, but the QTCaptureLayer enables you to see current frames from your connected camera in real time. We cover this layer in greater depth in Chapter 7. This layer is only available on OS X.
• QCCompositionLayer
This layer enables you to play back a Quartz composition as part of your Core Animation-based application. It also enables you to control the Quartz composition using key-value coding. We cover this layer in greater depth in Chapter, 9 “Quartz Composer Layer.” This layer is only available on OS X.
As of Mac OS X 10.6 Snow Leopard and iPhone OS 3.0, these additional layers are also available:
• CAShapeLayer
This layer enables you to create an arbitrary shape based upon a path that you define. We cover this layer in detail in Chapter 10, “Other Useful Layers.”
• CAGradientLayer
This layer provides a convenient way to display a linear gradient. You can define multiple colors and stops at which points the display shifts to the different colors you have specified. We cover this layer in detail in Chapter 10.
• CAReplicatorLayer
This layer replicates the sublayers you add to it according to the parameters you specify. We cover this layer in detail in Chapter 10.
What’s a Layer For?
Layers provide a discreet component or building block for creating complex animations. There are actually two basic categories for animation:
• View animation, which is primarily used when you want to give your user interface some visual cues.
• Layer animation, which is more commonly used for application content and functionality.
You will at times want to use layers for your user interface. However, it is not as common to use it that way because layers do not receive events such as clicks and key presses. You need to capture the event at the backing view level and then pass it on to the layer if you want to do something with that information in the layer.
Imagine a Space Invaders game for the iPhone. You create a ship sprite that moves along the bottom of the view when you tilt the device side to side. This sprite is drawn on its own layer. When an accelerometer event is received in the backing view, you pass along the event to the layer and call –setPosition on the layer to move it where it should be according to the accelerometer event. You might also want to receive tap events, so you can fire the ship’s photon torpedoes at the invaders; these are also sprites, each in their own discreet layers.
You can see how quickly the number of layers you would need for a game would accumulate. Layers are the right choice in this kind of application as they are lightweight and perform well. Views also perform well, and you could certainly use them instead of layers; however, you gain performance when using layers over views when the number of items (either layers or views) on the screen reaches a certain count. This is less of an issue on OS X than on the iPhone of course, but keeping your application lean and efficient is always a good idea.
Animation and Layers
In Core Animation, timing is everything. When you animate a layer property, you have to decide how long the animation should take, how it should move (easing), whether it should return to its starting value, and how many different values the property should have during its run (basic animation versus keyframe animation). You specify each of these attributes by setting values for the animation properties. However, these values are not specified in the layer itself, but rather in the CAAnimation animation object and its derivatives, CABasicAnimation and CAKeyframeAnimation.
Once again, the layer is a model object, not a view object in the MVC design pattern. The layer contains attributes that describe the layer: position, frame, colors, and so on. Similarly, an animation describes the animation itself, but the properties you set relate to the layer you are animating. You cause a layer to animate by adding the animation object to the layer object with a call to –addAnimation:forKeyPath. Similarly, you stop a layer from animating by removing the animation from the layer with a call to –removeAnimation:forKeyPath, although the default behavior is for an animation to be removed automatically after it has run.
NOTE
Basic animation and keyframe animation are covered in great detail in their respective chapters: Chapter 3, “Basic Animations,” and Chapter 4, “Keyframe Animation.”
Animation Pacing
As previously mentioned, Core Animation gives you a lot of functionality for free. When you perform animation without Core Animation, you iterate a property value using a loop. Doing so produces an animation that changes in a linear fashion. This is to say that the animation animates at a constant rate. Each step in the animation is reached in an exactly subdivided increment of the total duration. In Core Animation, however, the default animating functionality causes an animation to ease in and ease out. This means that the animation starts out slow, speeds up in the middle, and then slows again when it gets close to its destination value. This concept of easing causes an animation to appear more natural and organic—whereas a linear animation has a more static feel because the property changes at an exact and rigid constant rate.
NOTE
The default animating functionality is ease in/ease out, but this is not obvious because if you check the value of the timingFunction parameter of your animation, you will find that it is set to nil, which might indicate to you that the animation is using linear animation as the default. This is not the case.
Core Animation gives you a great level of flexibility when it comes to animation pacing. For the vast majority of applications, you will be satisfied with the built-in pacing functions. These include
• Linear, for when you do want that more static feel.
• Ease in, where your animation starts out slowly and then reaches full speed.
• Ease out, where your animation starts out at full speed and then slows as it reaches its destination value.
• Ease in, ease out, where your animation starts out slow, speeds up in the middle, and then slows down again as it reaches its destination value; this is the default behavior.
All the calculations are done for you automatically, you simply specify which pacing function you want to use. If you decide, however, that you want to have more control over the pacing of your animation, you can specify an array of timing functions and times in a keyframe animation that will give you the control you are looking for. You learn more about animation pacing in Chapter 4.
Math? I Was Told There Would Be No Math
When you first start using Core Animation, you might assume you need to use trigonometric equations to do complex calculations for effects such as scaling and rotation. Fortunately, this is not the case. The scale and rotation, and a slew of other properties, are animatable with little code. You simply specify start and stop values along with the property you want to animate, and Core Animation handles the rest.
In one of our earliest blog posts2 on Core Animation, we explain how to scale a cluster of layers. We referred to the effect as the Dashboard Effect. We later realized that when people think of an effect in Dashboard, they are usually thinking of the ripple effect you see when you add a new widget to the Dashboard. What we mean by Dashboard Effect, however, is the effect you see when you initiate the Dashboard with a key-press or a hot corner, depending on how you have it configured in the Mac OS. The widgets appear to fade and fly in from outside of your screen when you open Dashboard. And when you close it, they fade and fly out.
2Core Animation Tutorial: Dashboard Effect http://www.cimgf.com/2008/03/15/core-animation-tutorial-dashboard-effect/.
At first, we tried to figure out the equations for scaling each layer manually, but then it became clear that Core Animation layers use a tree hierarchy and automatically cascade effects to child layers. What this means in essence is that all you need to do is add the cluster of layers to one large parent layer and simply scale that parent layer, and all the child layers will automatically scale with it. You can achieve this effect with the code in Listing 1-1.
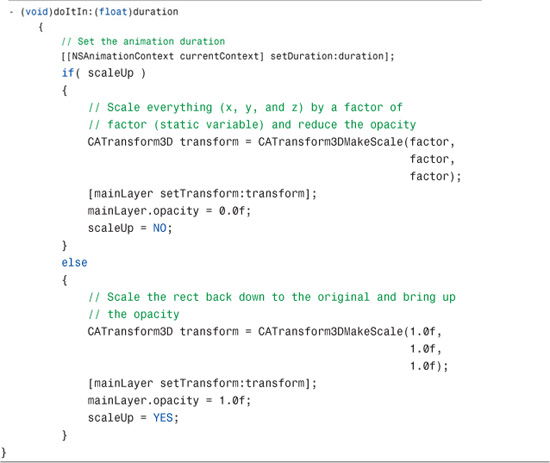
Listing 1-1 shows only the transform of the main parent layer. Adding the child layers is fairly simple, and we have provided the code from that blog post as a resource for this chapter, so take a look at it to see the complete code and how to implement this effect.
NOTE
The sample project that demonstrates this effect is called, simply, Dashboard Effect.
For many people, using more complex mathematics is daunting, but again, as part of your free lunch from Apple, you don’t need to know much in the way of mathematics to effectively use Core Animation. Basic arithmetic is really all you need to know. It is that simple.
Core Animation and the iPhone
You might be reading this book because you want to use Core Animation for an iPhone app you’re working on. We have dedicated an entire chapter to using Core Animation on the iPhone to help you understand some of the basic differences. The differences are small, and often you can use the exact same code on the iPhone that you would use on the desktop. In subsequent chapters, you learn about all the different aspects of Core Animation, and we try to discuss the differences that are relevant to the iPhone where it makes sense to do so. In some of the layer-specific chapters, we don’t discuss the iPhone because these layers are not yet available for the iPhone.
Notes on Sample Projects
All the sample projects we provide in this book have a main application delegate class. In the case of sample code on OS X, we create an application delegate class that we always name AppDelegate. In iPhone projects, the project template automatically creates an application delegate class named using the format <project_name>AppDelegate, in which <project_name> is the name you give your project.
NOTE
If you use Xcode 3.2 or later, the project template automatically creates an application delegate for OS X projects the same way it does for iPhone projects. If you use anything earlier, however, you need to use the steps in the next section to set up your own AppDelegate class.
On OS X, the majority of the code is placed in the AppDelegate class. On the iPhone, the majority of the code is placed in the view controller class for the view being developed, whereas the application delegate class provides basic setup and boostrapping of the application. It’s a subtle difference, although an important one.
Setting Up Xcode Projects for OS X (Xcode 3.1 and Earlier)
When you create a new project in Xcode 3.1 or earlier for OS X development, the project template does not automatically create the application delegate class for you as it does in iPhone projects or OS X projects in Xcode 3.2 and later. Adding one is not difficult, but you need to know how to do it if you set up your own projects from scratch rather than simply relying on the sample code. When you create a project for OS X development, use the following steps to add an application delegate and the QuartzCore framework, the framework that provides the Core Animation classes.
1. In Xcode, press Shift-![]() -N and select Cocoa Application in the Project Templates dialog.
-N and select Cocoa Application in the Project Templates dialog.
2. Name the project and click Save.
3. Expand the Frameworks group, Control-click the Linked Frameworks subgroup, and select Add > Existing Frameworks.
4. In the resulting dialog, navigate to /System/Library/Frameworks and select QuartzCore.framework. Click Add and then Add again when prompted.
5. Control-click the Classes group and select Add > New File.
6. In the New File template dialog, select Objective-C class under the Cocoa group and click Next.
7. Name the file AppDelegate.m and make sure Also Create “AppDelegate.h” is checked. Click Finish.
8. Select AppDelegate.h to open the file in the code editor and add the following code to import the QuartzCore framework and to create an outlet to the window in your XIB:
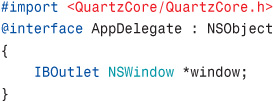
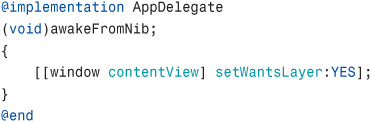
9. Select AppDelegate.m to open the file in the code editor and add the following code to turn on layer backing for your window’s contentView:
10. Under the Resources group in your project, double-click MainMenu.xib to open the XIB in Interface Builder.
11. From the Library palette, drag an NSObject object into MainMenu.xib and rename it AppDelegate. You need to be in icon view to rename the object. Click once to select the object. Pause and then click it again to place it in edit mode. Then you can rename the object.
12. Make sure your AppDelegate object is selected. In the object inspector, click the Identity tab and change the Class field to AppDelegate.
13. In MainMenu.xib, control-click on File’s Owner and drag the connection to the AppDelegate object. Select delegate in the ensuing context menu.
14. In the MainMenu.xib, control-click on AppDelegate and drag the connection to the Window object. Select window in the ensuing context menu.
15. Save the XIB file and return to Xcode.
This setup is the foundation for all the projects we create on OS X. From this template, you can add actions and outlets that connect your controls in the XIB to a reference in your AppDelegate class. We refer to these steps for setting up your OS X-based projects throughout this book.
Summary
Core Animation is a huge evolutionary step for the Mac OS. Other OSs will continue to try to mimic what Apple has done but will likely continue to fall short. The Core Animation framework is quite amazing for all it provides for free. With just a little effort and some good ideas, you can produce some incredibly compelling and useful applications. Core Animation gives you more than you might expect, and we would bet that in each subsequent version we will see even more exciting capabilities.