Chapter 11. Event Handling
Event handling is of fundamental importance to programs with a graphical user interface. To implement user interfaces, you have to master the way in which Java handles events. This chapter explains how the Java AWT event model works. You will see how to capture events from user interface components and input devices. We will also show you how to work with actions, which represent a more structured approach for processing action events.
11.1 Basics of Event Handling
Any operating environment that supports GUIs constantly monitors events such as keystrokes or mouse clicks. The operating environment reports these events to the programs that are running. Each program then decides what, if anything, to do in response to these events. In languages like Visual Basic, the correspondence between events and code is obvious. One writes code for each specific event of interest and places the code in what is usually called an event procedure. For example, a Visual Basic button named “HelpButton” would have a HelpButton_Click event procedure associated with it. The code in this procedure executes whenever that button is clicked. Each Visual Basic GUI component responds to a fixed set of events, and it is impossible to change the events to which it responds.
On the other hand, if you use a language like raw C to do event-driven programming, you need to write the code that constantly checks the event queue for what the operating environment is reporting. This is usually done by encasing your code in a loop with a massive switch statement. This technique is obviously ugly and, in any case, much more difficult to code. Its advantage is that the events you can respond to are not as limited as in the languages which, like Visual Basic, go to great lengths to hide the event queue from the programmer.
The Java programming environment takes an approach somewhere in between the Visual Basic and the raw C in terms of power and the resulting complexity. Within the limits of the events that the AWT knows about, you completely control how events are transmitted from the event sources (such as buttons or scrollbars) to event listeners. You can designate any object to be an event listener—in practice, you pick an object that can conveniently carry out the desired response to the event. This event delegation model gives you much more flexibility than is possible with Visual Basic, in which the listener is predetermined.
Event sources have methods that allow you to register event listeners with them. When an event happens to the source, the source sends a notification of that event to all the listener objects that were registered for that event.
As one would expect in an object-oriented language like Java, the information about the event is encapsulated in an event object. In Java, all event objects ultimately derive from the class java.util.EventObject. Of course, there are subclasses for each event type, such as ActionEvent and WindowEvent.
Different event sources can produce different kinds of events. For example, a button can send ActionEvent objects, whereas a window can send WindowEvent objects.
To sum up, here’s an overview of how event handling in the AWT works:
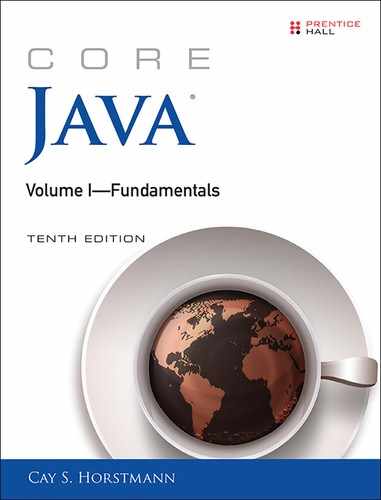
• A listener object is an instance of a class that implements a special interface called (naturally enough) a listener interface.
• An event source is an object that can register listener objects and send them event objects.
• The event source sends out event objects to all registered listeners when that event occurs.
• The listener objects will then use the information in the event object to determine their reaction to the event.
Figure 11.1 shows the relationship between the event handling classes and interfaces.
Here is an example for specifying a listener:
ActionListener listener = . . .;
JButton button = new JButton("OK");
button.addActionListener(listener);
Now the listener object is notified whenever an “action event” occurs in the button. For buttons, as you might expect, an action event is a button click.
To implement the ActionListener interface, the listener class must have a method called actionPerformed that receives an ActionEvent object as a parameter.
class MyListener implements ActionListener
{
...
public void actionPerformed(ActionEvent event)
{
// reaction to button click goes here
...
}
}
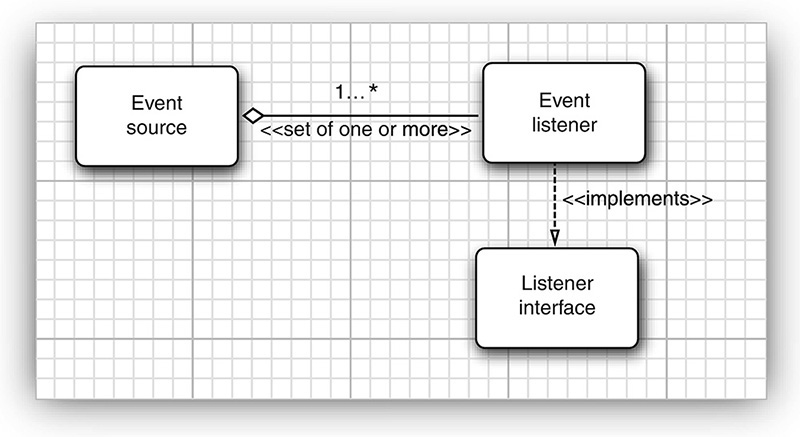
Whenever the user clicks the button, the JButton object creates an ActionEvent object and calls listener.actionPerformed(event), passing that event object. An event source such as a button can have multiple listeners. In that case, the button calls the actionPerformed methods of all listeners whenever the user clicks the button.
Figure 11.2 shows the interaction between the event source, event listener, and event object.
11.1.1 Example: Handling a Button Click
As a way of getting comfortable with the event delegation model, let’s work through all the details needed for the simple example of responding to a button click. For this example, we will show a panel populated with three buttons. Three listener objects are added as action listeners to the buttons.
With this scenario, each time a user clicks on any of the buttons on the panel, the associated listener object receives an ActionEvent that indicates a button click. In our sample program, the listener object will then change the background color of the panel.
Before we can show you the program that listens to button clicks, we first need to explain how to create buttons and how to add them to a panel. (For more on GUI elements, see Chapter 12.)
To create a button, specify a label string, an icon, or both in the button constructor. Here are two examples:
JButton yellowButton = new JButton("Yellow");
JButton blueButton = new JButton(new ImageIcon("blue-ball.gif"));
Call the add method to add the buttons to a panel:
JButton yellowButton = new JButton("Yellow");
JButton blueButton = new JButton("Blue");
JButton redButton = new JButton("Red");
buttonPanel.add(yellowButton);
buttonPanel.add(blueButton);
buttonPanel.add(redButton);
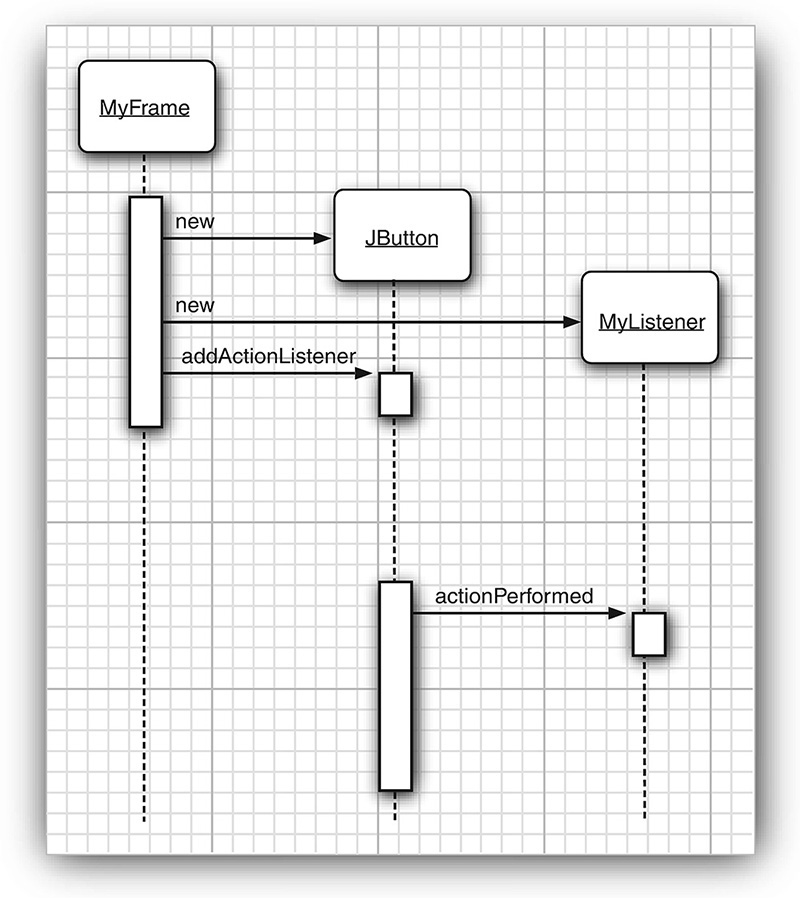
Figure 11.3 shows the result.
Next, we need to add code that listens to these buttons. This requires classes that implement the ActionListener interface, which, as we just mentioned, has one method: actionPerformed, whose signature looks like this:
public void actionPerformed(ActionEvent event)
![]() Note
Note
The ActionListener interface we used in the button example is not restricted to button clicks. It is used in many separate situations:
• When an item is selected from a list box with a double click
• When a menu item is selected
• When the Enter key is pressed in a text field
• When a certain amount of time has elapsed for a Timer component
You will see more details in this chapter and the next.
The way to use the ActionListener interface is the same in all situations: The actionPerformed method (which is the only method in ActionListener) takes an object of type ActionEvent as a parameter. This event object gives you information about the event that happened.
When a button is clicked, we want the background color of the panel to change to a particular color. We store the desired color in our listener class.
class ColorAction implements ActionListener
{
private Color backgroundColor;
public ColorAction(Color c)
{
backgroundColor = c;
}
public void actionPerformed(ActionEvent event)
{
// set panel background color
...
}
}
We then construct one object for each color and set the objects as the button listeners.
ColorAction yellowAction = new ColorAction(Color.YELLOW);
ColorAction blueAction = new ColorAction(Color.BLUE);
ColorAction redAction = new ColorAction(Color.RED);
yellowButton.addActionListener(yellowAction);
blueButton.addActionListener(blueAction);
redButton.addActionListener(redAction);
For example, if a user clicks on the button marked “Yellow,” the actionPerformed method of the yellowAction object is called. Its backgroundColor instance field is set to Color.YELLOW, and it can now proceed to set the panel’s background color.
Just one issue remains. The ColorAction object doesn’t have access to the buttonPanel variable. You can solve this problem in two ways. You can store the panel in the ColorAction object and set it in the ColorAction constructor. Or, more conveniently, you can make ColorAction into an inner class of the ButtonFrame class. Its methods can then access the outer panel automatically. (For more information on inner classes, see Chapter 6.)
We follow the latter approach. Here is how you place the ColorAction class inside the ButtonFrame class:
class ButtonFrame extends JFrame
{
private JPanel buttonPanel;
...
private class ColorAction implements ActionListener
{
private Color backgroundColor;
...
public void actionPerformed(ActionEvent event)
{
buttonPanel.setBackground(backgroundColor);
}
}
}
Look closely at the actionPerformed method. The ColorAction class doesn’t have a buttonPanel field. But the outer ButtonFrame class does.
This situation is very common. Event listener objects usually need to carry out some action that affects other objects. You can often strategically place the listener class inside the class whose state the listener should modify.
Listing 11.1 contains the complete frame class. Whenever you click one of the buttons, the appropriate action listener changes the background color of the panel.
Listing 11.1 button/ButtonFrame.java
1 package button;
2
3 import java.awt.*;
4 import java.awt.event.*;
5 import javax.swing.*;
6
7 /**
8 * A frame with a button panel
9 */
10 public class ButtonFrame extends JFrame
11 {
12 private JPanel buttonPanel;
13 private static final int DEFAULT_WIDTH = 300;
14 private static final int DEFAULT_HEIGHT = 200;
15
16 public ButtonFrame()
17 {
18 setSize(DEFAULT_WIDTH, DEFAULT_HEIGHT);
19
20 // create buttons
21 JButton yellowButton = new JButton("Yellow");
22 JButton blueButton = new JButton("Blue");
23 JButton redButton = new JButton("Red");
24
25 buttonPanel = new JPanel();
26
27 // add buttons to panel
28 buttonPanel.add(yellowButton);
29 buttonPanel.add(blueButton);
30 buttonPanel.add(redButton);
31
32 // add panel to frame
33 add(buttonPanel);
34
35 // create button actions
36 ColorAction yellowAction = new ColorAction(Color.YELLOW);
37 ColorAction blueAction = new ColorAction(Color.BLUE);
38 ColorAction redAction = new ColorAction(Color.RED);
39
40 // associate actions with buttons
41 yellowButton.addActionListener(yellowAction);
42 blueButton.addActionListener(blueAction);
43 redButton.addActionListener(redAction);
44 }
45
46 /**
47 * An action listener that sets the panel's background color.
48 */
49 private class ColorAction implements ActionListener
50 {
51 private Color backgroundColor;
52
53 public ColorAction(Color c)
54 {
55 backgroundColor = c;
56 }
57
58 public void actionPerformed(ActionEvent event)
59 {
60 buttonPanel.setBackground(backgroundColor);
61 }
62 }
63 }
11.1.2 Specifying Listeners Concisely
In the preceding section, we defined a class for the event listener and constructed three objects of that class. It is not all that common to have multiple instances of a listener class. Most commonly, each listener carries out a separate action. In that case, there is no need to make a separate class. Simply use a lambda expression:
exitButton.addActionListener(event -> System.exit(0));
Now consider the case in which we have multiple related actions, such as the color buttons of the preceding section. In such a case, implement a helper method:
public void makeButton(String name, Color backgroundColor)
{
JButton button = new JButton(name);
buttonPanel.add(button);
button.addActionListener(event ->
buttonPanel.setBackground(backgroundColor));
}
Note that the lambda expression refers to the parameter variable backgroundColor.
Then we simply call
makeButton("yellow", Color.YELLOW);
makeButton("blue", Color.BLUE);
makeButton("red", Color.RED);
Here, we construct three listener objects, one for each color, without explicitly defining a class. Each time the helper method is called, it makes an instance of a class that implements the ActionListener interface. Its actionPerformed action references the backGroundColor value that is, in fact, stored with the listener object. However, all this happens without having to explicitly define listener classes, instance variables, or constructors that set them.
![]() Note
Note
In older code, you will often see the use of anonymous classes:
exitButton.addActionListener(new ActionListener()
{
public void actionPerformed(new ActionEvent)
{
System.exit(0);
}
});
Of course, this rather verbose code is no longer necessary. Using a lambda expression is simpler and clearer.
Some programmers are not comfortable with inner classes or lambda expressions and instead make the container of the event sources implement the ActionListener interface. Then, the container sets itself as the listener, like this:
yellowButton.addActionListener(this);
blueButton.addActionListener(this);
redButton.addActionListener(this);
Now the three buttons no longer have individual listeners. They share a single listener object—namely, the frame. Therefore, the actionPerformed method must figure out which button was clicked.
class ButtonFrame extends JFrame implements ActionListener
{
...
public void actionPerformed(ActionEvent event)
{
Object source = event.getSource();
if (source == yellowButton) . . .
else if (source == blueButton) . . .
else if (source == redButton ) . . .
else . . .
}
}
We do not recommend this strategy.
![]() Note
Note
Before lambda expressions were available, there was another mechanism for specifying event listeners whose event handler contains a single method call. Suppose, for example, that a button listener needs to execute the call
frame.loadData();
The EventHandler class can create such a listener with the call
EventHandler.create(ActionListener.class, frame, "loadData")
This is now only of historical interest. With lambda expressions, it is much easier to use
event -> frame.loadData();
The EventHandler mechanism is also inefficient and somewhat error-prone. It uses reflection to invoke the method. For that reason, the second argument in the call to EventHandler.create must belong to a public class. Otherwise, the reflection mechanism will not be able to locate and invoke the target method.
11.1.3 Example: Changing the Look-and-Feel
By default, Swing programs use the Metal look-and-feel. There are two ways to change to a different look-and-feel. The first is to supply a file swing.properties in the jre/lib subdirectory of your Java installation. In that file, set the property swing.defaultlaf to the class name of the look-and-feel that you want. For example:
swing.defaultlaf=com.sun.java.swing.plaf.motif.MotifLookAndFeel
Note that the Metal and Nimbus look-and-feels are located in the javax.swing package. The other look-and-feel packages are located in the com.sun.java package and need not be present in every Java implementation. For example, for copyright reasons, the Windows and Macintosh look-and-feel packages are only shipped with the Windows and Macintosh versions of the Java runtime environment.
![]() Tip
Tip
Lines starting with a # character are ignored in property files, so you can supply several look-and-feel selections in the swing.properties file and move around the # to select one of them:
#swing.defaultlaf=javax.swing.plaf.metal.MetalLookAndFeel
swing.defaultlaf=com.sun.java.swing.plaf.motif.MotifLookAndFeel
#swing.defaultlaf=com.sun.java.swing.plaf.windows.WindowsLookAndFeel
You must restart your program to switch the look-and-feel in this way. A Swing program reads the swing.properties file only once, at startup.
The second way is to change the look-and-feel dynamically. Call the static UIManager.setLookAndFeel method and give it the name of the look-and-feel class that you want. Then call the static method SwingUtilities.updateComponentTreeUI to refresh the entire set of components. You need to supply one component to that method; it will find all others.
Here is an example showing how you can switch to the Motif look-and-feel in your program:
String className = "com.sun.java.swing.plaf.motif.MotifLookAndFeel";
try
{
UIManager.setLookAndFeel(className);
SwingUtilities.updateComponentTreeUI(frame);
pack();
}
catch(Exception e) { e.printStackTrace(); }
To enumerate all installed look-and-feel implementations, call
UIManager.LookAndFeelInfo[] infos = UIManager.getInstalledLookAndFeels();
Then you can get the name and class name for each look-and-feel as
String name = infos[i].getName();
String className = infos[i].getClassName();
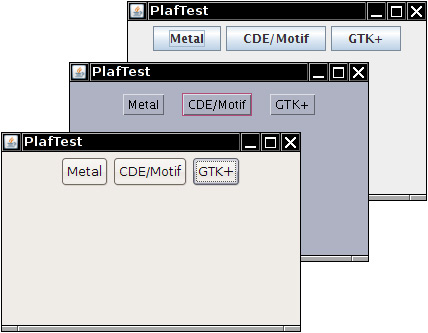
Listing 11.2 is a complete program that demonstrates how to switch the look-and-feel (see Figure 11.4). The program is similar to Listing 11.1. Following the advice of the preceding section, we use a helper method makeButton and a lambda expression to specify the button action—namely, to switch the look-and-feel.
public class PlafFrame extends JFrame
{
...
private void makeButton(String name, String className)
{
JButton button = new JButton(name);
buttonPanel.add(button);
button.addActionListener(event -> {
...
UIManager.setLookAndFeel(className);
SwingUtilities.updateComponentTreeUI(this);
...
});
}
}
In previous editions of this book, we used an anonymous inner class to define this listener. At that time, we had to be careful to pass PlafFrame.this (and not the this reference of the inner class) to SwingUtilities.updateComponentTreeUI:
public class PlafFrame extends JFrame
{
...
private void makeButton(String name, final String className)
{
...
button.addActionListener(new ActionListener()
{
public void actionPerformed(ActionEvent event)
{
...
SwingUtilities.updateComponentTreeUI(PlafFrame.this);
...
}
});
}
}
This problem goes away with lambda expressions. Inside a lambda expression, this refers to the enclosing object.
Listing 11.2 plaf/PlafFrame.java
1 package plaf;
2
3 import javax.swing.JButton;
4 import javax.swing.JFrame;
5 import javax.swing.JPanel;
6 import javax.swing.SwingUtilities;
7 import javax.swing.UIManager;
8
9 /**
10 * A frame with a button panel for changing look-and-feel
11 */
12 public class PlafFrame extends JFrame
13 {
14 private JPanel buttonPanel;
15
16 public PlafFrame()
17 {
18 buttonPanel = new JPanel();
19
20 UIManager.LookAndFeelInfo[] infos = UIManager.getInstalledLookAndFeels();
21 for (UIManager.LookAndFeelInfo info : infos)
22 makeButton(info.getName(), info.getClassName());
23
24 add(buttonPanel);
25 pack();
26 }
27
28 /**
29 * Makes a button to change the pluggable look-and-feel.
30 * @param name the button name
31 * @param className the name of the look-and-feel class
32 */
33 private void makeButton(String name, String className)
34 {
35 // add button to panel
36
37 JButton button = new JButton(name);
38 buttonPanel.add(button);
39
40 // set button action
41
42 button.addActionListener(event -> {
43 // button action: switch to the new look-and-feel
44 try
45 {
46 UIManager.setLookAndFeel(className);
47 SwingUtilities.updateComponentTreeUI(this);
48 pack();
49 }
50 catch (Exception e)
51 {
52 e.printStackTrace();
53 }
54 });
55 }
56 }
11.1.4 Adapter Classes
Not all events are as simple to handle as button clicks. In a non-toy program, you will want to monitor when the user tries to close the main frame because you don’t want your users to lose unsaved work. When the user closes the frame, you want to put up a dialog and exit the program only when the user agrees.
When the user tries to close a window, the JFrame object is the source of a WindowEvent. If you want to catch that event, you must have an appropriate listener object and add it to the frame’s list of window listeners.
WindowListener listener = . . .;
frame.addWindowListener(listener);
The window listener must be an object of a class that implements the WindowListener interface. There are actually seven methods in the WindowListener interface. The frame calls them as the responses to seven distinct events that could happen to a window. The names are self-explanatory, except that “iconified” is usually called “minimized” under Windows. Here is the complete WindowListener interface:
public interface WindowListener
{
void windowOpened(WindowEvent e);
void windowClosing(WindowEvent e);
void windowClosed(WindowEvent e);
void windowIconified(WindowEvent e);
void windowDeiconified(WindowEvent e);
void windowActivated(WindowEvent e);
void windowDeactivated(WindowEvent e);
}
![]() Note
Note
To find out whether a window has been maximized, install a WindowStateListener and override the windowStateChanged method.
As is always the case in Java, any class that implements an interface must implement all its methods; in this case, that means implementing seven methods. Recall that we are only interested in one of these seven methods, namely the windowClosing method.
Of course, we can define a class that implements the interface, add a call to System.exit(0) in the windowClosing method, and write do-nothing functions for the other six methods:
class Terminator implements WindowListener
{
public void windowClosing(WindowEvent e)
{
if (user agrees)
System.exit(0);
}
public void windowOpened(WindowEvent e) {}
public void windowClosed(WindowEvent e) {}
public void windowIconified(WindowEvent e) {}
public void windowDeiconified(WindowEvent e) {}
public void windowActivated(WindowEvent e) {}
public void windowDeactivated(WindowEvent e) {}
}
Typing code for six methods that don’t do anything is the kind of tedious busy-work that nobody likes. To simplify this task, each of the AWT listener interfaces that have more than one method comes with a companion adapter class that implements all the methods in the interface but does nothing with them. For example, the WindowAdapter class has seven do-nothing methods. This means the adapter class automatically satisfies the technical requirements that Java imposes for implementing the associated listener interface. You can extend the adapter class to specify the desired reactions to some, but not all, of the event types in the interface. (An interface such as ActionListener that has only a single method does not need an adapter class.)
Let us make use of the window adapter. We can extend the WindowAdapter class, inherit six of the do-nothing methods, and override the windowClosing method:
class Terminator extends WindowAdapter
{
public void windowClosing(WindowEvent e)
{
if (user agrees)
System.exit(0);
}
}
Now you can register an object of type Terminator as the event listener:
WindowListener listener = new Terminator();
frame.addWindowListener(listener);
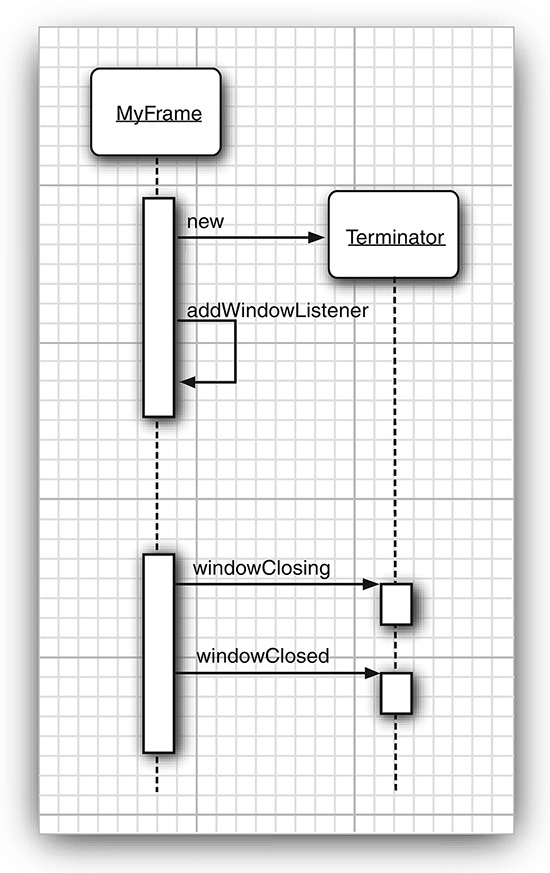
Whenever the frame generates a window event, it passes it to the listener object by calling one of its seven methods (see Figure 11.5). Six of those methods do nothing; the windowClosing method calls System.exit(0), terminating the application.
![]() Caution
Caution
If you misspell the name of a method when extending an adapter class, the compiler won’t catch your error. For example, if you define a method windowIsClosing in a WindowAdapter class, you will get a class with eight methods, and the windowClosing method will do nothing. Use the @Override annotation (which was described in Chapter 5) to protect against this error.
Creating a listener class that extends the WindowAdapter is an improvement, but we can go even further. There is no need to give a name to the listener object. Simply write
frame.addWindowListener(new Terminator());
But why stop there? We can make the listener class into an anonymous inner class of the frame.
frame.addWindowListener(new
WindowAdapter()
{
public void windowClosing(WindowEvent e)
{
if (user agrees)
System.exit(0);
}
});
This code does the following:
• Defines a class without a name that extends the WindowAdapter class
• Adds a windowClosing method to that anonymous class (as before, this method exits the program)
• Inherits the remaining six do-nothing methods from WindowAdapter
• Creates an object of this class; that object does not have a name, either
• Passes that object to the addWindowListener method
Again, the syntax for using anonymous inner classes takes some getting used to. The payoff is that the resulting code is as short as possible.
![]() Note
Note
Nowadays, one would implement do-nothing methods of the WindowListener interface as default methods. However, Swing was invented many years before there were default methods.
11.2 Actions
It is common to have multiple ways to activate the same command. The user can choose a certain function through a menu, a keystroke, or a button on a toolbar. This is easy to achieve in the AWT event model: link all events to the same listener. For example, suppose blueAction is an action listener whose actionPerformed method changes the background color to blue. You can attach the same object as a listener to several event sources:
• A toolbar button labeled “Blue”
• A menu item labeled “Blue”
• A keystroke Ctrl+B
The color change command will now be handled in a uniform way, no matter whether it was caused by a button click, a menu selection, or a key press.
The Swing package provides a very useful mechanism to encapsulate commands and to attach them to multiple event sources: the Action interface. An action is an object that encapsulates
• A description of the command (as a text string and an optional icon); and
• Parameters that are necessary to carry out the command (such as the requested color in our example).
The Action interface has the following methods:
void actionPerformed(ActionEvent event)
void setEnabled(boolean b)
boolean isEnabled()
void putValue(String key, Object value)
Object getValue(String key)
void addPropertyChangeListener(PropertyChangeListener listener)
void removePropertyChangeListener(PropertyChangeListener listener)
The first method is the familiar method in the ActionListener interface; in fact, the Action interface extends the ActionListener interface. Therefore, you can use an Action object whenever an ActionListener object is expected.
The next two methods let you enable or disable the action and check whether the action is currently enabled. When an action is attached to a menu or toolbar and the action is disabled, the option is grayed out.
The putValue and getValue methods let you store and retrieve arbitrary name/value pairs in the action object. A couple of important predefined strings, namely Action.NAME and Action.SMALL_ICON, store action names and icons into an action object:
action.putValue(Action.NAME, "Blue");
action.putValue(Action.SMALL_ICON, new ImageIcon("blue-ball.gif"));
Table 11.1 shows all predefined action table names.

If the action object is added to a menu or toolbar, the name and icon are automatically retrieved and displayed in the menu item or toolbar button. The SHORT_DESCRIPTION value turns into a tooltip.
The final two methods of the Action interface allow other objects, in particular menus or toolbars that trigger the action, to be notified when the properties of the action object change. For example, if a menu is added as a property change listener of an action object and the action object is subsequently disabled, the menu is called and can gray out the action name. Property change listeners are a general construct that is a part of the “JavaBeans” component model. You can find out more about beans and their properties in Volume II.
Note that Action is an interface, not a class. Any class implementing this interface must implement the seven methods we just discussed. Fortunately, a friendly soul has provided a class AbstractAction that implements all methods except for actionPerformed. That class takes care of storing all name/value pairs and managing the property change listeners. You simply extend AbstractAction and supply an actionPerformed method.
Let’s build an action object that can execute color change commands. We store the name of the command, an icon, and the desired color. We store the color in the table of name/value pairs that the AbstractAction class provides. Here is the code for the ColorAction class. The constructor sets the name/value pairs, and the actionPerformed method carries out the color change action.
public class ColorAction extends AbstractAction
{
public ColorAction(String name, Icon icon, Color c)
{
putValue(Action.NAME, name);
putValue(Action.SMALL_ICON, icon);
putValue("color", c);
putValue(Action.SHORT_DESCRIPTION, "Set panel color to " + name.toLowerCase());
}
public void actionPerformed(ActionEvent event)
{
Color c = (Color) getValue("color");
buttonPanel.setBackground(c);
}
}
Our test program creates three objects of this class, such as
Action blueAction = new ColorAction("Blue", new ImageIcon("blue-ball.gif"), Color.BLUE);
Next, let’s associate this action with a button. That is easy because we can use a JButton constructor that takes an Action object.
JButton blueButton = new JButton(blueAction);
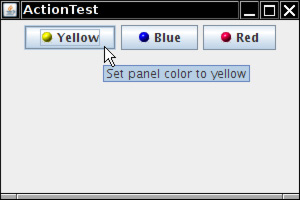
That constructor reads the name and icon from the action, sets the short description as the tooltip, and sets the action as the listener. You can see the icons and a tooltip in Figure 11.6.
As we demonstrate in the next chapter, it is just as easy to add the same action to a menu.
Finally, we want to add the action objects to keystrokes so that an action is carried out when the user types a keyboard command. To associate actions with keystrokes, you first need to generate objects of the KeyStroke class. This is a convenience class that encapsulates the description of a key. To generate a KeyStroke object, you don’t call a constructor but instead use the static getKeyStroke method of the KeyStroke class.
KeyStroke ctrlBKey = KeyStroke.getKeyStroke("ctrl B");
To understand the next step, you need to understand the concept of keyboard focus. A user interface can have many buttons, menus, scrollbars, and other components. When you hit a key, it is sent to the component that has focus. That component is usually (but not always) visually distinguished. For example, in the Java look-and-feel, a button with focus has a thin rectangular border around the button text. You can use the Tab key to move the focus between components. When you press the space bar, the button with focus is clicked. Other keys carry out different actions; for example, the arrow keys can move a scrollbar.
However, in our case, we do not want to send the keystroke to the component that has focus. Otherwise, each of the buttons would need to know how to handle the Ctrl+Y, Ctrl+B, and Ctrl+R keys.
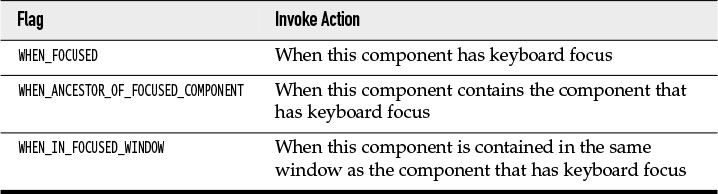
This is a common problem, and the Swing designers came up with a convenient solution. Every JComponent has three input maps, each mapping KeyStroke objects to associated actions. The three input maps correspond to three different conditions (see Table 11.2).
Keystroke processing checks these maps in the following order:
1. Check the WHEN_FOCUSED map of the component with input focus. If the keystroke exists, execute the corresponding action. If the action is enabled, stop processing.
2. Starting from the component with input focus, check the WHEN_ANCESTOR_OF_FOCUSED_COMPONENT maps of its parent components. As soon as a map with the keystroke is found, execute the corresponding action. If the action is enabled, stop processing.
3. Look at all visible and enabled components, in the window with input focus, that have this keystroke registered in a WHEN_IN_FOCUSED_WINDOW map. Give these components (in the order of their keystroke registration) a chance to execute the corresponding action. As soon as the first enabled action is executed, stop processing. This part of the process is somewhat fragile if a keystroke appears in more than one WHEN_IN_FOCUSED_WINDOW map.
To obtain an input map from the component, use the getInputMap method. Here is an example:
InputMap imap = panel.getInputMap(JComponent.WHEN_FOCUSED);
The WHEN_FOCUSED condition means that this map is consulted when the current component has the keyboard focus. In our situation, that isn’t the map we want. One of the buttons, not the panel, has the input focus. Either of the other two map choices works fine for inserting the color change keystrokes. We use WHEN_ANCESTOR_OF_FOCUSED_COMPONENT in our example program.
The InputMap doesn’t directly map KeyStroke objects to Action objects. Instead, it maps to arbitrary objects, and a second map, implemented by the ActionMap class, maps objects to actions. That makes it easier to share the same actions among keystrokes that come from different input maps.
Thus, each component has three input maps and one action map. To tie them together, you need to come up with names for the actions. Here is how you can tie a key to an action:
imap.put(KeyStroke.getKeyStroke("ctrl Y"), "panel.yellow");
ActionMap amap = panel.getActionMap();
amap.put("panel.yellow", yellowAction);
It is customary to use the string "none" for a do-nothing action. That makes it easy to deactivate a key:
imap.put(KeyStroke.getKeyStroke("ctrl C"), "none");
![]() Caution
Caution
The JDK documentation suggests using the action name as the action’s key. We don’t think that is a good idea. The action name is displayed on buttons and menu items; thus, it can change at the whim of the UI designer and may be translated into multiple languages. Such unstable strings are poor choices for lookup keys, so we recommend that you come up with action names that are independent of the displayed names.
To summarize, here is what you do to carry out the same action in response to a button, a menu item, or a keystroke:
1. Implement a class that extends the AbstractAction class. You may be able to use the same class for multiple related actions.
2. Construct an object of the action class.
3. Construct a button or menu item from the action object. The constructor will read the label text and icon from the action object.
4. For actions that can be triggered by keystrokes, you have to carry out additional steps. First, locate the top-level component of the window, such as a panel that contains all other components.
5. Then, get the WHEN_ANCESTOR_OF_FOCUSED_COMPONENT input map of the top-level component. Make a KeyStroke object for the desired keystroke. Make an action key object, such as a string that describes your action. Add the pair (keystroke, action key) into the input map.
6. Finally, get the action map of the top-level component. Add the pair (action key, action object) into the map.
Listing 11.3 shows the complete code of the program that maps both buttons and keystrokes to action objects. Try it out—both clicking the buttons and pressing Ctrl+Y, Ctrl+B, or Ctrl+R changes the panel color.
Listing 11.3 action/ActionFrame.java
1 package action;
2
3 import java.awt.*;
4 import java.awt.event.*;
5 import javax.swing.*;
6
7 /**
8 * A frame with a panel that demonstrates color change actions.
9 */
10 public class ActionFrame extends JFrame
11 {
12 private JPanel buttonPanel;
13 private static final int DEFAULT_WIDTH = 300;
14 private static final int DEFAULT_HEIGHT = 200;
15
16 public ActionFrame()
17 {
18 setSize(DEFAULT_WIDTH, DEFAULT_HEIGHT);
19 buttonPanel = new JPanel();
20
21 // define actions
22 Action yellowAction = new ColorAction("Yellow", new ImageIcon("yellow-ball.gif"),
23 Color.YELLOW);
24 Action blueAction = new ColorAction("Blue", new ImageIcon("blue-ball.gif"), Color.BLUE);
25 Action redAction = new ColorAction("Red", new ImageIcon("red-ball.gif"), Color.RED);
26
27 // add buttons for these actions
28 buttonPanel.add(new JButton(yellowAction));
29 buttonPanel.add(new JButton(blueAction));
30 buttonPanel.add(new JButton(redAction));
31
32 // add panel to frame
33 add(buttonPanel);
34
35 // associate the Y, B, and R keys with names
36 InputMap imap = buttonPanel.getInputMap(JComponent.WHEN_ANCESTOR_OF_FOCUSED_COMPONENT);
37 imap.put(KeyStroke.getKeyStroke("ctrl Y"), "panel.yellow");
38 imap.put(KeyStroke.getKeyStroke("ctrl B"), "panel.blue");
39 imap.put(KeyStroke.getKeyStroke("ctrl R"), "panel.red");
40
41 // associate the names with actions
42 ActionMap amap = buttonPanel.getActionMap();
43 amap.put("panel.yellow", yellowAction);
44 amap.put("panel.blue", blueAction);
45 amap.put("panel.red", redAction);
46 }
47
48 public class ColorAction extends AbstractAction
49 {
50 /**
51 * Constructs a color action.
52 * @param name the name to show on the button
53 * @param icon the icon to display on the button
54 * @param c the background color
55 */
56 public ColorAction(String name, Icon icon, Color c)
57 {
58 putValue(Action.NAME, name);
59 putValue(Action.SMALL_ICON, icon);
60 putValue(Action.SHORT_DESCRIPTION, "Set panel color to " + name.toLowerCase());
61 putValue("color", c);
62 }
63
64 public void actionPerformed(ActionEvent event)
65 {
66 Color c = (Color) getValue("color");
67 buttonPanel.setBackground(c);
68 }
69 }
70 }
• boolean isEnabled()
• void setEnabled(boolean b)
gets or sets the enabled property of this action.
• void putValue(String key, Object value)
places a name/value pair inside the action object.

• Object getValue(String key)
returns the value of a stored name/value pair.
javax.swing.JComponent 1.2
• ActionMap getActionMap() 1.3
returns the map that associates action map keys (which can be arbitrary objects) with Action objects.
• InputMap getInputMap(int flag) 1.3
gets the input map that maps key strokes to action map keys.
11.3 Mouse Events
You do not need to handle mouse events explicitly if you just want the user to be able to click on a button or menu. These mouse operations are handled internally by the various components in the user interface. However, if you want to enable the user to draw with the mouse, you will need to trap the mouse move, click, and drag events.
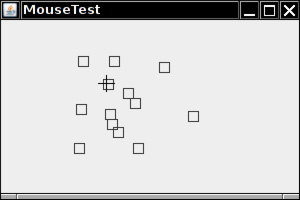
In this section, we will show you a simple graphics editor application that allows the user to place, move, and erase squares on a canvas (see Figure 11.7).
When the user clicks a mouse button, three listener methods are called: mousePressed when the mouse is first pressed, mouseReleased when the mouse is released, and, finally, mouseClicked. If you are only interested in complete clicks, you can ignore the first two methods. By using the getX and getY methods on the MouseEvent argument, you can obtain the x and y coordinates of the mouse pointer when the mouse was clicked. To distinguish between single, double, and triple (!) clicks, use the getClickCount method.
Some user interface designers inflict mouse click and keyboard modifier combinations, such as Ctrl+Shift+click, on their users. We find this practice reprehensible, but if you disagree, you will find that checking for mouse buttons and keyboard modifiers is a mess.
Use bit masks to test which modifiers have been set. In the original API, two of the button masks equal two keyboard modifier masks, namely
BUTTON2_MASK == ALT_MASK
BUTTON3_MASK == META_MASK
This was done so that users with a one-button mouse could simulate the other mouse buttons by holding down modifier keys instead. However, as of Java SE 1.4, a different approach is recommended. There are now masks
BUTTON1_DOWN_MASK
BUTTON2_DOWN_MASK
BUTTON3_DOWN_MASK
SHIFT_DOWN_MASK
CTRL_DOWN_MASK
ALT_DOWN_MASK
ALT_GRAPH_DOWN_MASK
META_DOWN_MASK
The getModifiersEx method accurately reports the mouse buttons and keyboard modifiers of a mouse event.
Note that BUTTON3_DOWN_MASK tests for the right (nonprimary) mouse button under Windows. For example, you can use code like this to detect whether the right mouse button is down:
if ((event.getModifiersEx() & InputEvent.BUTTON3_DOWN_MASK) != 0)
. . . // code for right click
In our sample program, we supply both a mousePressed and a mouseClicked methods. When you click on a pixel that is not inside any of the squares that have been drawn, a new square is added. We implemented this in the mousePressed method so that the user receives immediate feedback and does not have to wait until the mouse button is released. When a user double-clicks inside an existing square, it is erased. We implemented this in the mouseClicked method because we need the click count.
public void mousePressed(MouseEvent event)
{
current = find(event.getPoint());
if (current == null) // not inside a square
add(event.getPoint());
}
public void mouseClicked(MouseEvent event)
{
current = find(event.getPoint());
if (current != null && event.getClickCount() >= 2)
remove(current);
}
As the mouse moves over a window, the window receives a steady stream of mouse movement events. Note that there are separate MouseListener and MouseMotionListener interfaces. This is done for efficiency—there are a lot of mouse events as the user moves the mouse around, and a listener that just cares about mouse clicks will not be bothered with unwanted mouse moves.
Our test application traps mouse motion events to change the cursor to a different shape (a cross hair) when it is over a square. This is done with the getPredefinedCursor method of the Cursor class. Table 11.3 lists the constants to use with this method along with what the cursors look like under Windows.

Here is the mouseMoved method of the MouseMotionListener in our example program:
public void mouseMoved(MouseEvent event)
{
if (find(event.getPoint()) == null)
setCursor(Cursor.getDefaultCursor());
else
setCursor(Cursor.getPredefinedCursor(Cursor.CROSSHAIR_CURSOR));
}
![]() Note
Note
You can also define your own cursor types through the use of the createCustomCursor method in the Toolkit class:
Toolkit tk = Toolkit.getDefaultToolkit();
Image img = tk.getImage("dynamite.gif");
Cursor dynamiteCursor = tk.createCustomCursor(img, new Point(10, 10), "dynamite stick");
The first parameter of the createCustomCursor points to the cursor image. The second parameter gives the offset of the “hot spot” of the cursor. The third parameter is a string that describes the cursor. This string can be used for accessibility support. For example, a screen reader program can read the cursor shape description to a user who is visually impaired or who simply is not facing the screen.
If the user presses a mouse button while the mouse is in motion, mouseDragged calls are generated instead of mouseMoved calls. Our test application lets a user drag the square under the cursor. We simply update the currently dragged rectangle to be centered under the mouse position. Then, we repaint the canvas to show the new mouse position.
public void mouseDragged(MouseEvent event)
{
if (current != null)
{
int x = event.getX();
int y = event.getY();
current.setFrame(x - SIDELENGTH / 2, y - SIDELENGTH / 2, SIDELENGTH, SIDELENGTH);
repaint();
}
}
![]() Note
Note
The mouseMoved method is only called as long as the mouse stays inside the component. However, the mouseDragged method keeps getting called even when the mouse is being dragged outside the component.
There are two other mouse event methods: mouseEntered and mouseExited. These methods are called when the mouse enters or exits a component.
Finally, we explain how to listen to mouse events. Mouse clicks are reported through the mouseClicked procedure, which is part of the MouseListener interface. Many applications are only interested in mouse clicks and not in mouse moves; with the mouse move events occurring so frequently, the mouse move and drag events are defined in a separate interface called MouseMotionListener.
In our program we are interested in both types of mouse events. We define two inner classes: MouseHandler and MouseMotionHandler. The MouseHandler class extends the MouseAdapter class because it defines only two of the five MouseListener methods. The MouseMotionHandler implements the MouseMotionListener and defines both methods of that interface. Listing 11.4 is the program listing.
Listing 11.4 mouse/MouseFrame.java
1 package mouse;
2
3 import javax.swing.*;
4
5 /**
6 * A frame containing a panel for testing mouse operations
7 */
8 public class MouseFrame extends JFrame
9 {
10 public MouseFrame()
11 {
12 add(new MouseComponent());
13 pack();
14 }
15 }
Listing 11.5 mouse/MouseComponent.java
1 package mouse;
2
3 import java.awt.*;
4 import java.awt.event.*;
5 import java.awt.geom.*;
6 import java.util.*;
7 import javax.swing.*;
8
9 /**
10 * A component with mouse operations for adding and removing squares.
11 */
12 public class MouseComponent extends JComponent
13 {
14 private static final int DEFAULT_WIDTH = 300;
15 private static final int DEFAULT_HEIGHT = 200;
16
17 private static final int SIDELENGTH = 10;
18 private ArrayList<Rectangle2D> squares;
19 private Rectangle2D current; // the square containing the mouse cursor
20
21 public MouseComponent()
22 {
23 squares = new ArrayList<>();
24 current = null;
25
26 addMouseListener(new MouseHandler());
27 addMouseMotionListener(new MouseMotionHandler());
28 }
29
30 public Dimension getPreferredSize() { return new Dimension(DEFAULT_WIDTH, DEFAULT_HEIGHT); }
31
32 public void paintComponent(Graphics g)
33 {
34 Graphics2D g2 = (Graphics2D) g;
35
36 // draw all squares
37 for (Rectangle2D r : squares)
38 g2.draw(r);
39 }
40
41 /**
42 * Finds the first square containing a point.
43 * @param p a point
44 * @return the first square that contains p
45 */
46 public Rectangle2D find(Point2D p)
47 {
48 for (Rectangle2D r : squares)
49 {
50 if (r.contains(p)) return r;
51 }
52 return null;
53 }
54
55 /**
56 * Adds a square to the collection.
57 * @param p the center of the square
58 */
59 public void add(Point2D p)
60 {
61 double x = p.getX();
62 double y = p.getY();
63
64 current = new Rectangle2D.Double(x - SIDELENGTH / 2, y - SIDELENGTH / 2, SIDELENGTH,
65 SIDELENGTH);
66 squares.add(current);
67 repaint();
68 }
69
70 /**
71 * Removes a square from the collection.
72 * @param s the square to remove
73 */
74 public void remove(Rectangle2D s)
75 {
76 if (s == null) return;
77 if (s == current) current = null;
78 squares.remove(s);
79 repaint();
80 }
81
82 private class MouseHandler extends MouseAdapter
83 {
84 public void mousePressed(MouseEvent event)
85 {
86 // add a new square if the cursor isn't inside a square
87 current = find(event.getPoint());
88 if (current == null) add(event.getPoint());
89 }
90
91 public void mouseClicked(MouseEvent event)
92 {
93 // remove the current square if double clicked
94 current = find(event.getPoint());
95 if (current != null && event.getClickCount() >= 2) remove(current);
96 }
97 }
98
99 private class MouseMotionHandler implements MouseMotionListener
100 {
101 public void mouseMoved(MouseEvent event)
102 {
103 // set the mouse cursor to cross hairs if it is inside
104 // a rectangle
105
106 if (find(event.getPoint()) == null) setCursor(Cursor.getDefaultCursor());
107 else setCursor(Cursor.getPredefinedCursor(Cursor.CROSSHAIR_CURSOR));
108 }
109
110 public void mouseDragged(MouseEvent event)
111 {
112 if (current != null)
113 {
114 int x = event.getX();
115 int y = event.getY();
116
117 // drag the current rectangle to center it at (x, y)
118 current.setFrame(x - SIDELENGTH / 2, y - SIDELENGTH / 2, SIDELENGTH, SIDELENGTH);
119 repaint();
120 }
121 }
122 }
123 }
java.awt.Toolkit 1.0
• public Cursor createCustomCursor(Image image, Point hotSpot, String name) 1.2
creates a new custom cursor object.

11.4 The AWT Event Hierarchy
Having given you a taste of how event handling works, we finish this chapter with an overview of the AWT event-handling architecture.
As we briefly mentioned earlier, event handling in Java is object oriented, with all events descending from the EventObject class in the java.util package. (The common superclass is not called Event because that is the name of the event class in the old event model. Although the old model is now deprecated, its classes are still a part of the Java library.)
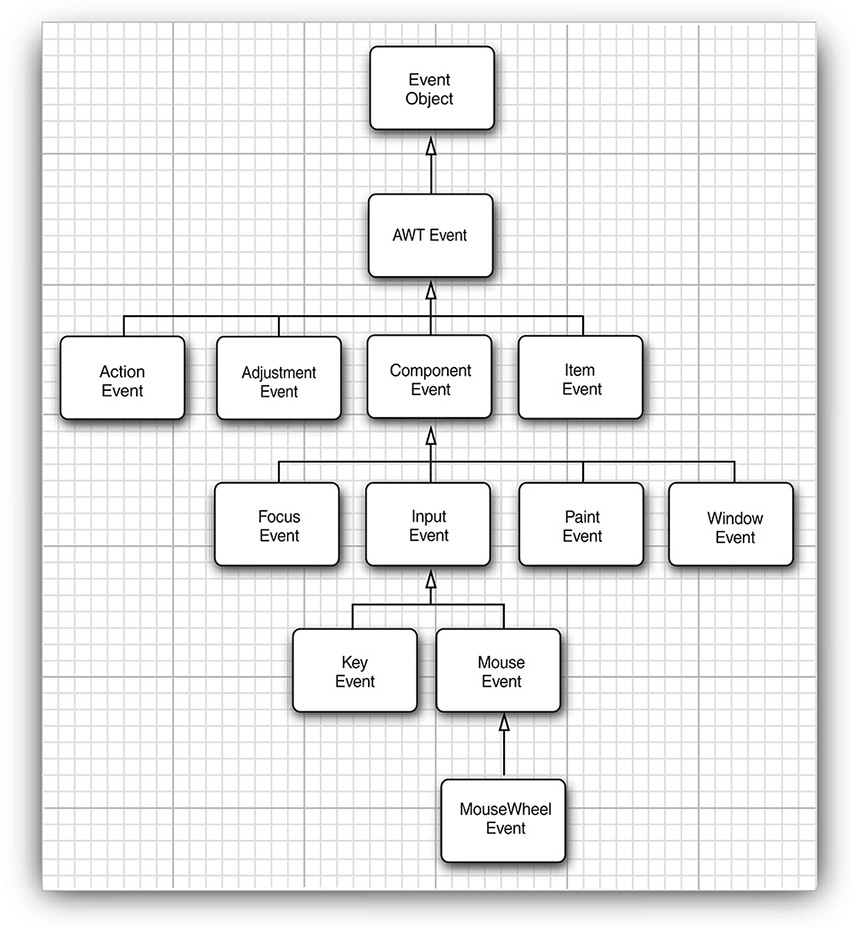
The EventObject class has a subclass AWTEvent, which is the parent of all AWT event classes. Figure 11.8 shows the inheritance diagram of the AWT events.
Some of the Swing components generate event objects of yet more event types; these directly extend EventObject, not AWTEvent.
The event objects encapsulate information about the event that the event source communicates to its listeners. When necessary, you can then analyze the event objects that were passed to the listener object, as we did in the button example with the getSource and getActionCommand methods.
Some of the AWT event classes are of no practical use for the Java programmer. For example, the AWT inserts PaintEvent objects into the event queue, but these objects are not delivered to listeners. Java programmers don’t listen to paint events; instead, they override the paintComponent method to control repainting. The AWT also generates a number of events that are needed only by systems programmers, to provide input systems for ideographic languages, automated testing robots, and so on. We do not discuss these specialized event types.
11.4.1 Semantic and Low-Level Events
The AWT makes a useful distinction between low-level and semantic events. A semantic event is one that expresses what the user is doing, such as “clicking that button”; an ActionEvent is a semantic event. Low-level events are those events that make this possible. In the case of a button click, this is a mouse down, a series of mouse moves, and a mouse up (but only if the mouse up is inside the button area). Or it might be a keystroke, which happens if the user selects the button with the Tab key and then activates it with the space bar. Similarly, adjusting a scrollbar is a semantic event, but dragging the mouse is a low-level event.
Here are the most commonly used semantic event classes in the java.awt.event package:
• ActionEvent (for a button click, a menu selection, selecting a list item, or Enter typed in a text field)
• AdjustmentEvent (the user adjusted a scrollbar)
• ItemEvent (the user made a selection from a set of checkbox or list items)
Five low-level event classes are commonly used:
• KeyEvent (a key was pressed or released)
• MouseEvent (the mouse button was pressed, released, moved, or dragged)
• MouseWheelEvent (the mouse wheel was rotated)
• FocusEvent (a component got focus or lost focus)
• WindowEvent (the window state changed)
The following interfaces listen to these events:
ActionListener
AdjustmentListener
FocusListener
ItemListener
KeyListener
MouseListener
MouseMotionListener
MouseWheelListener
WindowListener
WindowFocusListener
WindowStateListener
Several of the AWT listener interfaces, namely those that have more than one method, come with a companion adapter class that implements all the methods in the interface to do nothing. (The other interfaces have only a single method each, so there is no benefit in having adapter classes for these interfaces.) Here are the commonly used adapter classes:
FocusAdapter
KeyAdapter
MouseAdapter
MouseMotionAdapter
WindowAdapter
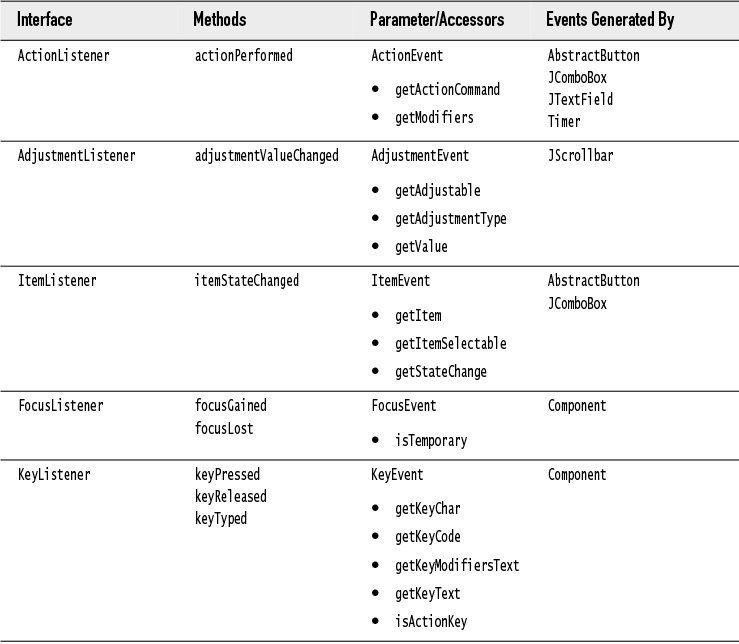
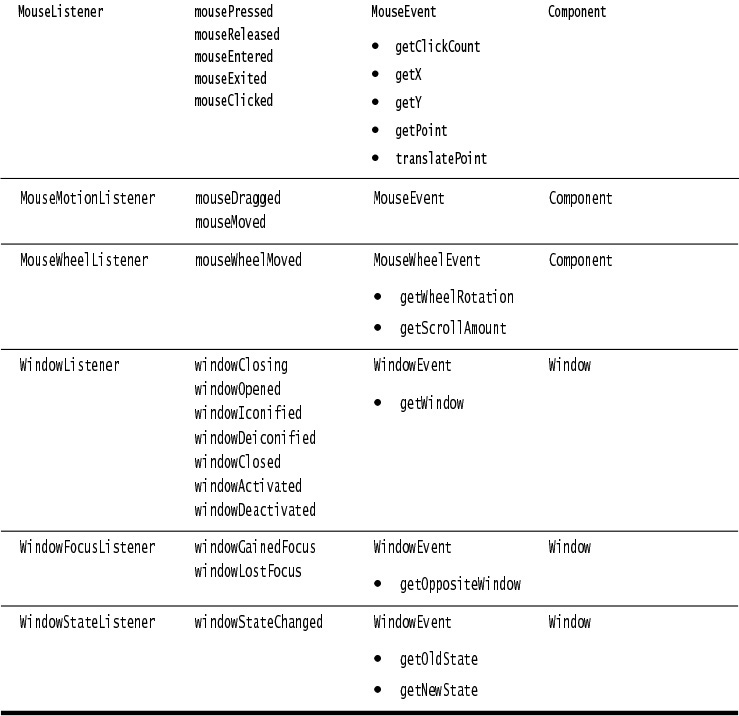
Table 11.4 shows the most important AWT listener interfaces, events, and event sources.
The javax.swing.event package contains additional events that are specific to Swing components. We cover some of them in the next chapter.
This concludes our discussion of AWT event handling. The next chapter shows you how to put together the most common Swing components, along with a detailed coverage of the events they generate.