Chapter 7: Skills and Incentives
Modern talent management is aligned with skills and competency mapping. Skills and incentives are two key ingredients for any human resource strategy. Both concepts are closely tied to intrinsic and extrinsic motivation. The former is driven by internal rewards or self-fulfillment, while the latter is driven by external rewards or to avoid punishment.
Moodle Workplace provides several tools that support both intrinsically and extrinsically motivated tasks, namely certificates, competencies, and badges.
First, we are going to provide an overview of skills and incentives in Moodle Workplace, which includes an overview of the typical processes that occur once certain goals have been achieved. We are also going to differentiate between the covered tools in terms of related activities for formative and summative assessments.
The focus of this chapter is on certificates since they are unique to Moodle Workplace. You will learn how to manage certification templates and how to construct them using static, dynamic, and validation elements. We will also look at the different means of issuing certificates to users, namely via dynamic rules, manually, or using the new Course certificate activity.
Next, we'll briefly introduce competencies, which describe the learner's proficiency or level of understanding in specific subject-related skills. After a brief overview, you will learn how to manage and issue competencies.
Finally, we will cover the basics of badges, which are a good way of celebrating achievement and showing learning progress. After a short overview, you will learn how to manage and issue badges.
In this chapter, you will become familiar with the following tools to help you facilitate skills acquisition and to model different types of incentives:
- Introducing Moodle skills and incentives
- Exploring the certificates tool
- Exploring competencies
- Exploring badges
Let's get started!
Introducing Moodle skills and incentives
Skills and incentives are at the heart of each human resource strategy, and since Moodle Workplace is a strategic building block of a modern learning environment, we feel that the two concepts deserve a dedicated chapter.
Important note
A skill is the ability to perform a certain action to solve a given problem. Skills are represented in Moodle as competencies.
An incentive is a motivator to acquire a skill. Incentives are represented in Moodle as grades, feedback, badges, and – new in Moodle Workplace – certificates.
Moodle's initial target audiences were educational institutions, such as schools, colleges, and universities, as well as other training and learning organizations. In addition to learning per se, assessment is a critical requirement in educational settings, and Moodle offers a wide range of tools to facilitate both formative as well as summative assessment. In fact, most assessment activities cover the full spectrum, from formal to informal assessment.
A good example of this is the Quiz activity, where the author or trainer can choose when and if hints, feedback, and correct answers are shown to learners. The various review options control when information is displayed to the user (during the attempt, immediately after the event, later, while the quiz is open, and after the quiz is closed) and what type of information is shown; for instance, correct/incorrect marks or textual feedback.
In most workplace settings, the emphasis shifts for compulsory learning from exams to compliance or onboarding training, and for optional learning from monitoring progress to skill acquisition. However, the underlying principle of intrinsic and extrinsic motivation remains the same, and thus the full range of available Moodle tools can potentially be applied to workplace environments. Examples of how to track progress include the Quiz activity, which was mentioned in the previous paragraph, SCORM modules for performance checks, and submitting Assignments from trainees, either in individual or group mode. SCORM stands for Shareable Content Object Reference Model and is the de facto standard for interchangeable learning content.
We are not going to cover any standard Moodle course activities since they are beyond the scope of this book. The same holds for grades, outcomes, and scales; you can find excellent documentation on all these topics at docs.moodle.org/en/Grades. Instead, we are going to focus on three key tools that are continually being used in workplace settings, as depicted in the following diagram:
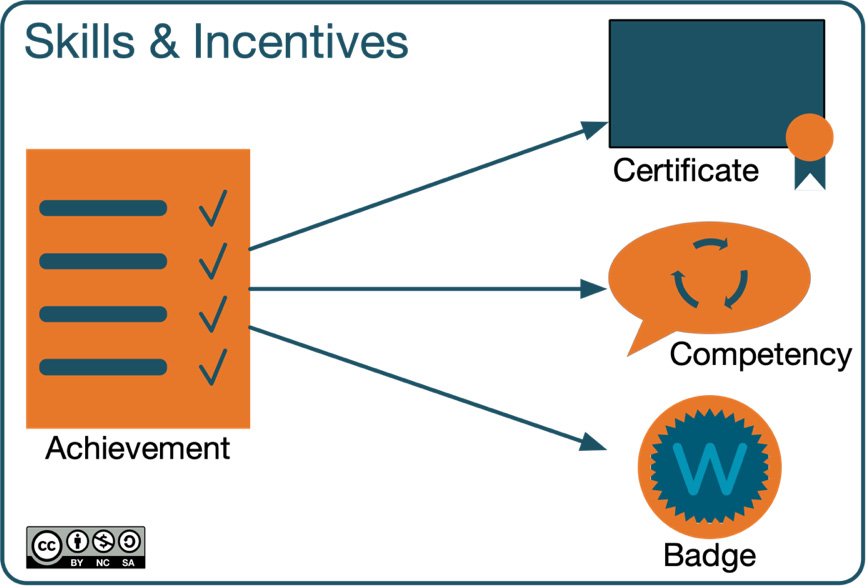
Figure 7.1 – Moodle skills and incentives
The left-hand side of the preceding diagram covers achievements in the form of completions at different levels, such as activity, course, program, or certification. Various components support a range of award mechanisms; for instance, issuing a badge when completing a course, attaching a competency once a certain number of points have been achieved in a quiz, or awarding a certificate via dynamic rules after successfully completing a program.
The focus of this chapter is on Moodle Workplace certificates, while the other described components – completions, competencies, and badges – will only be covered briefly since they are part of the standard Moodle experience. To get started, we'll explore the powerful certificates tool and its associated course certificate activity.
Exploring the certificates tool
Certificates are a great incentive for both formal and informal training. Moodle Workplace allows you to design engaging certificates and then award them to users in different ways. Both aspects will be dealt with in great detail so that you can fully support different motivation strategies in your organization.
Moodle Workplace comes with a built-in certificate generator that lets you design templates so that you can issue diplomas or certificates of participation. The basic workflow for this is shown in the following diagram:

Figure 7.2 – Basic certificate workflow
Certificate templates act as blueprints and contain static elements (such as company name or logo), dynamic elements (such as username or certification title), and verification elements (such as code or digital signature). Based on the template, individual certificates are generated and assigned to users. This can take place automatically via dynamic rules, manually, or via the course certificate activity.
The certificate tool has been contributed to the public plugin database so that it can be used in standard Moodle. This tool, called the Workplace certificate manager, can be downloaded from moodle.org/plugins/tool_certificate. Its main difference compared to the Workplace version is the lack of capabilities relevant to workplace tenants.
OK; that's enough of the abstract concepts. Let's get started with managing certificates before we look at the various ways of how to issue documents to learners.
Managing certificates
Before we get started, let's have a look at what a Moodle Workplace certificate (template) may look like once it has been designed. We are going to use this specimen as our working sample for the remainder of this section:

Figure 7.3 – Sample certificate template
You can manage certificate templates via Site administration | Certificates | Manage certificate templates or directly via the Certificates icon in the Workplace launcher, as shown here:

Figure 7.4 – Certificate templates launcher
You will see a list of certificate templates. In our demo instance, we have already created four certificate templates. On the right of each item, you will see several actions, some of which are the usual Workplace icons (Edit, Details, Preview, Duplicate, and Delete), while others are specific to certificates (Certificates issued and Issue certificates). We will discuss these in detail in due course:
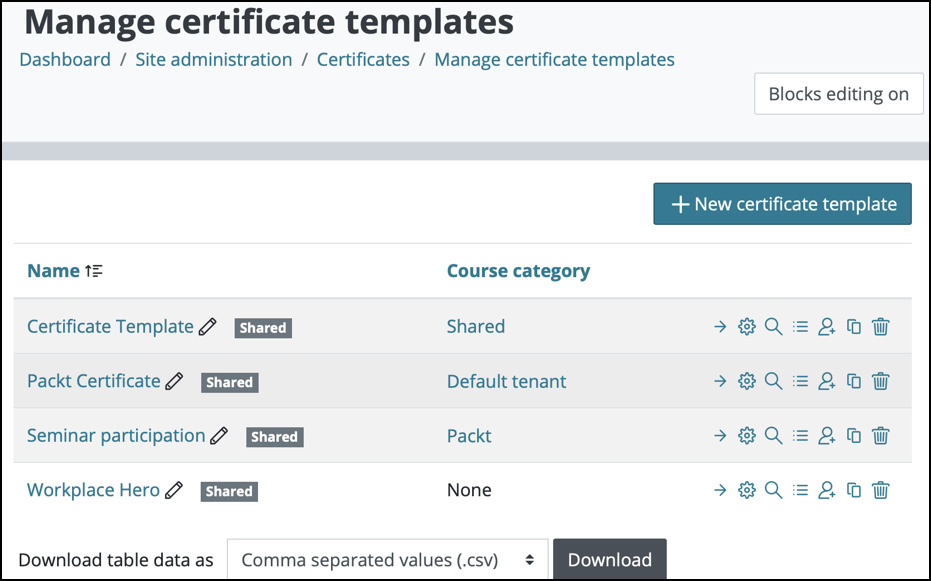
Figure 7.5 – Certificate templates
To create a new certificate template, select the + New certificate template button; you will then be greeted with a pop-up screen and a range of settings, as shown in the following screenshot:
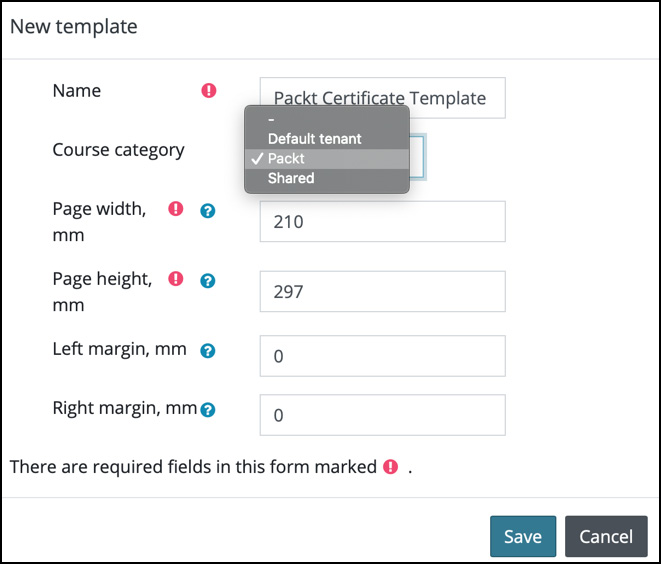
Figure 7.6 – Certificate templates
The following are mostly self-explanatory settings that must be configured:
- Name: This doesn't have to be unique, but it is recommended not to use the same name more than once.
- Course category: The certificate is available in the tenant that uses the selected course category, as defined in the tenant settings (see Chapter 4, Tenants, Organizations, and Teams, for details). When no course category is selected, the certificate is shared across all tenants.
- Page width and Page height: The default values depend on your server locale. In our example, we have swapped the width and height values since we want to create a certificate in A4 portrait format rather than landscape format. For reference, the dimensions of A4 are 297 mm x 210 mm; the ones for letter size are 279 mm x 216 mm, respectively.
- Left margin and Right margin: These are for the edge width on the left and right in mm. The default is 0.
As soon as you save the certificate template, you will be directed to Moodle Workplace's powerful certificate designer, which we are going to work with next.
Certificate designer
The certificate designer lets you create multi-page certificate templates that include static elements, such as text or images, and dynamic elements, such as the date of issue, the username, and the course title. Initially, you will see a blank canvas with the following user interface:

Figure 7.7 – Certificate designer I
The following controls are available in the certificate designer:
- Adding elements to the certificate template. These will be covered in great detail in the subsequent pages.
- Adding a new page. You will have to set the page height and width, as well as the page margins. The default values are the ones for the current page.
- Expand and collapse the current page.
- Page actions, which includes Move up and down (only multi-page certificates), Settings (dimensions of the page), and Delete (only multi-page certificates).
- Certificate canvas, which fully supports dragging and dropping elements.
Once some elements have been added to a template, each item will be listed on the left, as shown in the following example screenshot:
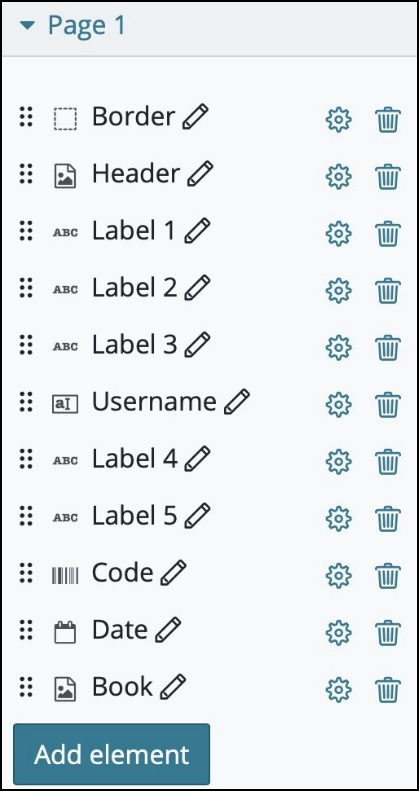
Figure 7.8 – Certificate designer II
The order of these items can be rearranged via the standard Move icon, though this has no relevance to the layout of the certificate template itself. Each item can be renamed via the Inline Editing option besides the element name or by simply clicking the label. The Settings symbol opens the parameters pop-up window for each item, while the Delete icon removes the entry.
Now, let's go through the different elements that can be added to a certificate template. For didactical reasons, we aren't going to cover the elements in the same order as they're shown in the pull-down menu; instead, we are going to group them into the following three categories:
- Static elements
- Dynamic elements
- Validation elements
Let's start by adding some static elements to our certificate template.
Adding static elements
Static elements are fixed for every certificate that will be issued from the certificate template. They will be identical on every certificate that will be generated. The three static elements that are available are Border, Image, and Text.
Static element – Border
The first element we are going to add is a Border element. Each item has an Element name, and this will be used to identify this element when you're editing a certificate. Note that this will not be displayed on the certificate. Type is displayed for information only and cannot be changed. These two fields exist for every certificate template element, no matter what type.
The Width element of the border is specified in mm. The default is 1 mm – we have changed it to 4 mm here. The default Colour is black (#000000), which we modified to Workplace blue (#215972):

Figure 7.9 – Certificate element – Border
As soon as you save the element, it will be automatically placed on the certificate template.
Important note
To modify the element values, simply click the element on the canvas.
The border is the only element that cannot be moved around on the canvas. This is different for all other items, such as images, which we are going to cover next.
Static element – Image
The second element we are going to add to our certificate is of the Image type. You will need to upload an image that has been prepared elsewhere. Here, we will use our header image, which you already saw in the sample certificate earlier on. The image file types that are supported are GIF, JPG, JPEG, PNG, SVG, and SVGZ. The configuration options for the image elements are shown in the following screenshot:
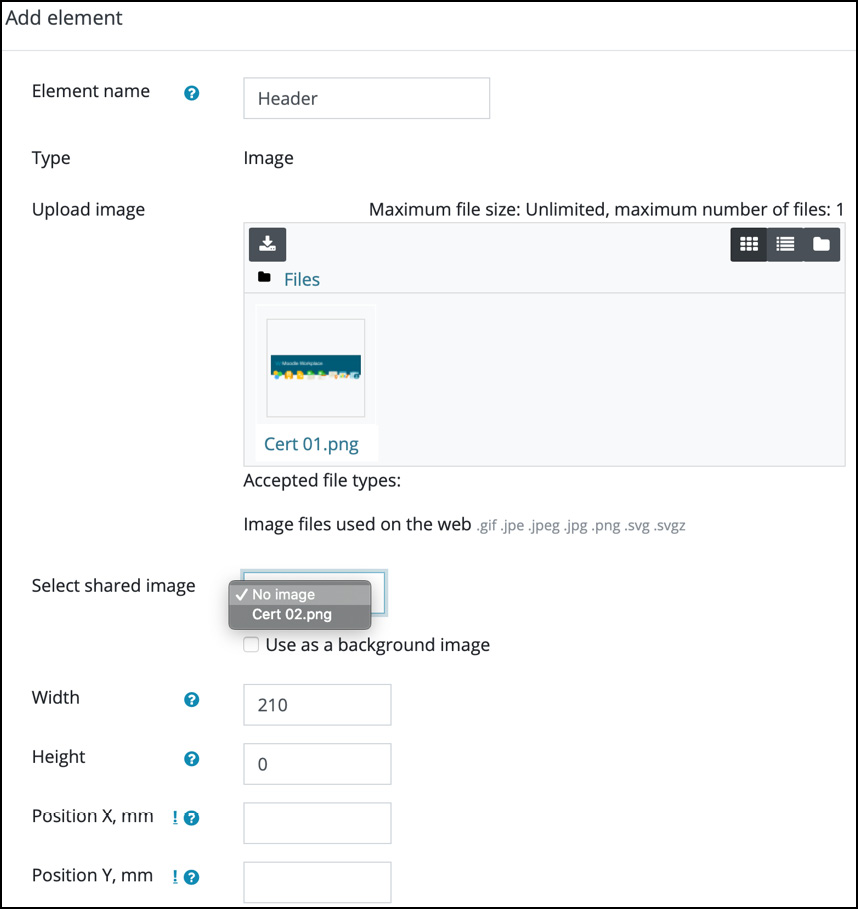
Figure 7.10 – Certificate element – Image
Alternatively, you can select a shared image. Shared images are managed centrally and act as simple repositories for assets that will be used on multiple certificates; for instance, your company logo or the signatures of certificate signees. You can manage shared images in Site administration | Certificates | Certificate images, as shown in the following screenshot:

Figure 7.11 – Shared certificate images
If you tick the Use as a background image box, the picture will be stretched across the entire certificate and shown behind all other elements. It is recommended that you use an image with added transparency when using one as a background.
The next two settings – Width and Height – are useful if you wish to scale your image to a particular size. In our case, we specified the width as 210 mm to cover the full width of the page. The height will remain at the default value of 0 and will be calculated automatically. When you select Show more…, two more settings – Position X and Position Y – will be shown, with the apex at the top-left of the certificate template. Usually, you position your image by dragging and dropping it onto the canvas; however, sometimes, it is useful to position elements manually, especially when you need to align multiple items horizontally or vertically.
Now that we have added the border and the header, we'll add some text elements to the certificate template.
Static element – Text
The last static element type is Text, which is effectively a label that can be placed freely on the canvas. In addition to the text to be displayed, you can configure the Font, Size (in pt), and Colour elements. You also have three Text alignment options, namely Left, Centre, and Right. Right alignment of the text means that the element coordinates' Position X and Position Y will refer to the top-right corner of the textbox; in center alignment, they will refer to the top middle, and in left alignment, they will refer to the top-left corner, respectively. The Width setting specifies the size of the textbox; if it's left at the default value of 0, there will be no width constraint; that is, the text can run over the margins of the page. All these settings are shown in the following screenshot:
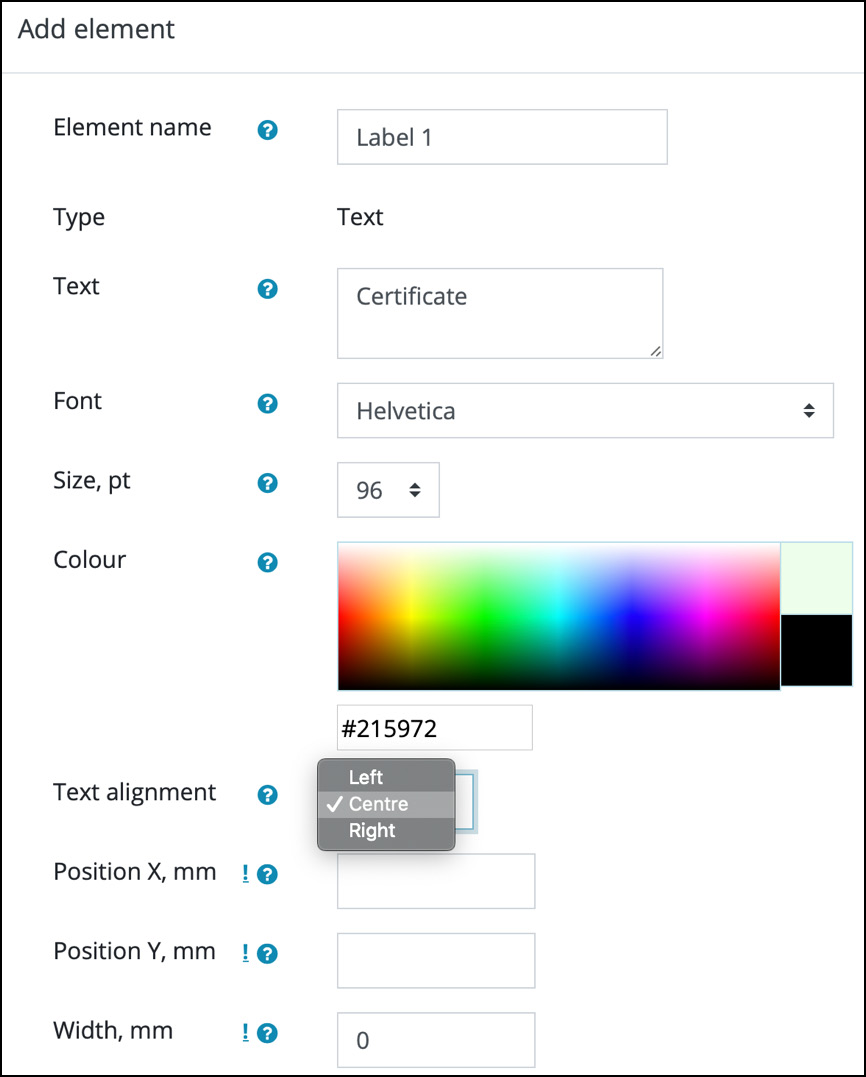
Figure 7.12 – Certificate element – Text
Here, we have added three more Text elements to the certificate template. By now, the certificate, with all our added static items, should look something like this:

Figure 7.13 – Sample certificate after adding some static elements
Now that we have added all the required static elements, namely Border, Image, and Text, let's look at the different dynamic elements that can be placed on a certificate template.
Adding dynamic elements
Dynamic elements are going to be replaced with specific data for every certificate that will be issued from the certificate template. Thus, each dynamic element acts as a mini placeholder on the certificate template. Typical dynamic values include the name of the receiver, the title of a program, or simply the date when the certificate will be issued. The four dynamic elements that are available are Date, Dynamic rule data, User field, and User picture.
Dynamic element – Date
As the name suggests, the Date element adds a date field to the certificate template. This can either be the Issued date field (when the PDF will be generated) or the Expiry date field (when the validity of the certificate ends). You can also choose from one of the seven available Date format options. Please note that the Date format options will be adjusted according to the active language pack while you're editing the certificate template. In the following screenshot, you can see the values for English and Spanish, respectively:

Figure 7.14 – Certificate element – Date (English and Spanish)
While there is no limit to the number of date elements you can put on a certificate template, usually, one item is placed on the document. The same cannot be said for our next dynamic element: rule data.
Dynamic element – Dynamic rule data
There are three ways certificates can be issued: manually, in courses (both to be discussed later in this chapter), and automatically via dynamic rules, which we covered in Chapter 5, Automation and Dynamic Rules. The Dynamic rule data element type supports this automatic issuing process by providing a number of fields, as shown in the following screenshot:
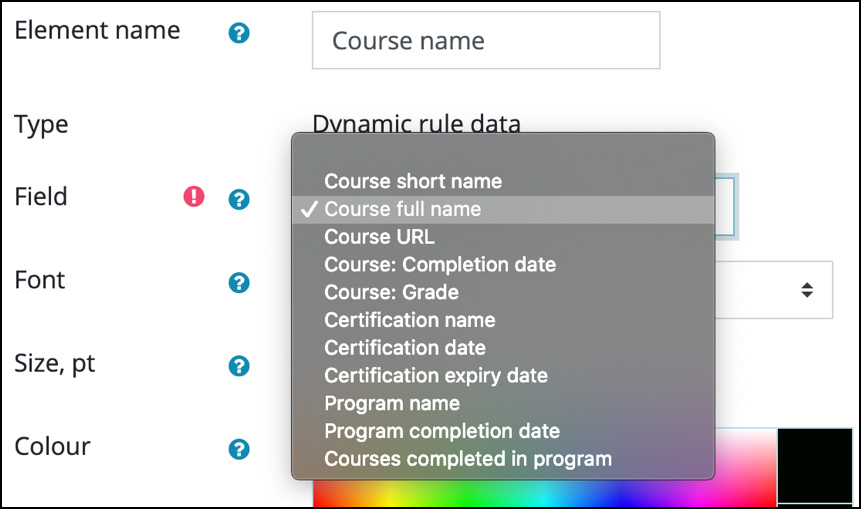
Figure 7.15 – Certificate element – Dynamic rule data
Currently, there are three types of fields that are on offer:
- Certifications: Name, date, and expiry date
- Courses: Short name, full name, URL, completion date, and grade
- Programs: Name, completion date, and courses completed in the program
In our example, we have selected Course full name, which will be displayed on the PDF once it has been generated. If you want to select multiple related fields – for instance, all three certification fields – you will need to add a separate element for each field.
Dynamic elements – User field and User picture
The final two related dynamic elements are of the User field and User picture types. The former displays textual information on the certificate, while the latter adds the image of the user to the template.
The User field type supports all plain text fields (that is, no rich text/HTML text fields) in the user profile. This also includes custom profile fields (here, CPD_Points represents a continuing professional development score and DOB), as displayed in the following screenshot:
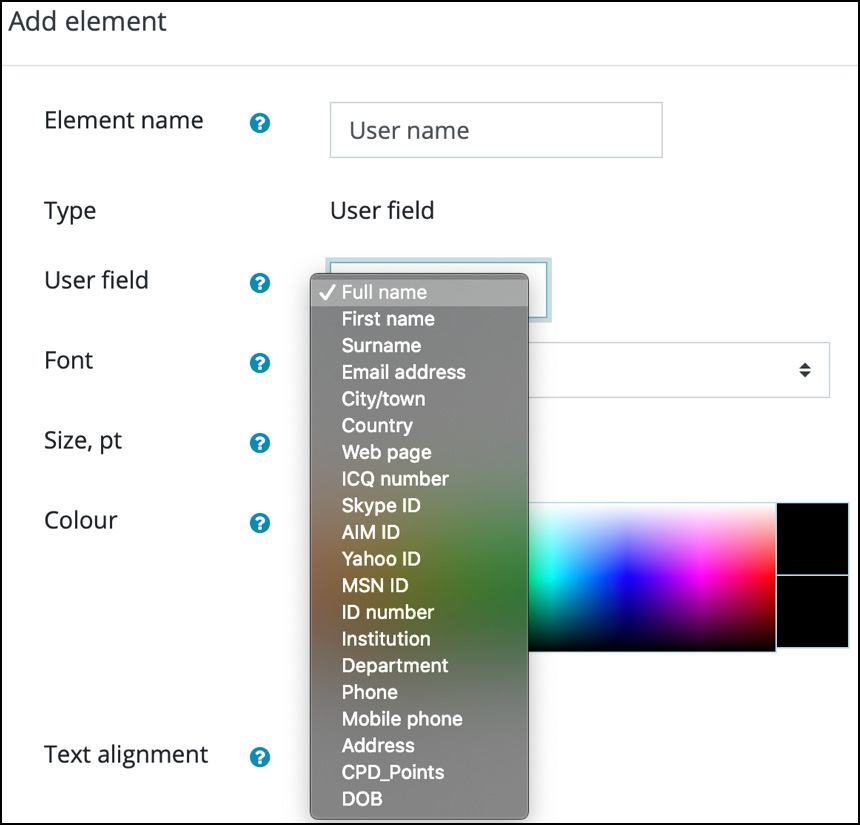
Figure 7.16 – Certificate element: User field
For our certificate, we have added the full name of the user, which is almost always part of a personalized certificate. As we did previously, you will need to add a separate element for each field.
The User picture element only contains the four location settings we have already come across: Weight, Height, Position X, and Position Y. User pictures are handled in the same way as elements of the Image type; the only difference is that the picture cannot be selected since it has already been set in the user profile.
This concludes this subsection on dynamic certificate elements, where we covered Date, Dynamic rule data, User field, and User picture. Next up is validation elements.
Adding validation elements
Certificates are regularly issued in settings where their validity is critical. Examples include diplomas, compliance documents, and qualification credentials. To ensure that the certificates have been generated by the Moodle Workplace system, two validation mechanisms are offered:
- Every certificate that is issued contains a unique code, which is made up of 10 digits plus two uppercase letters; for instance, 0123456789AB. The last two letters are the initials of the user.
- Digital signatures can be added to a certificate (template). These are based on self-signed CRT certificates that follow the X.509 standard.
Both types can be added as elements to a certificate template. We will be dealing with this in this following two subsections.
Validation element – Code
As we mentioned previously, every generated certificate has a unique code that is recorded in the Moodle Workplace database. This Code can be displayed on the certificate in four different formats, as demonstrated in the following screenshot:

Figure 7.17 – Certificate element – Code
The Display options are as follows:
- Code only (default): The code is displayed as plain text.
- Code with link: The code links to the verification page (more on this shortly).
- Verification URL: Only the link to the verification page will be displayed, but it won't be linkable. This option should be used on printed certificates where it is not possible to click the link.
- QR Code: A QR code is displayed that redirects the user to the verification page.
To verify the validity of the certificate (code), Moodle Workplace offers a dedicated form that can be reached via one of the four described display options. It is also possible to enter codes manually via Site administration | Certificates | Verify certificates, as shown in the following screenshot:
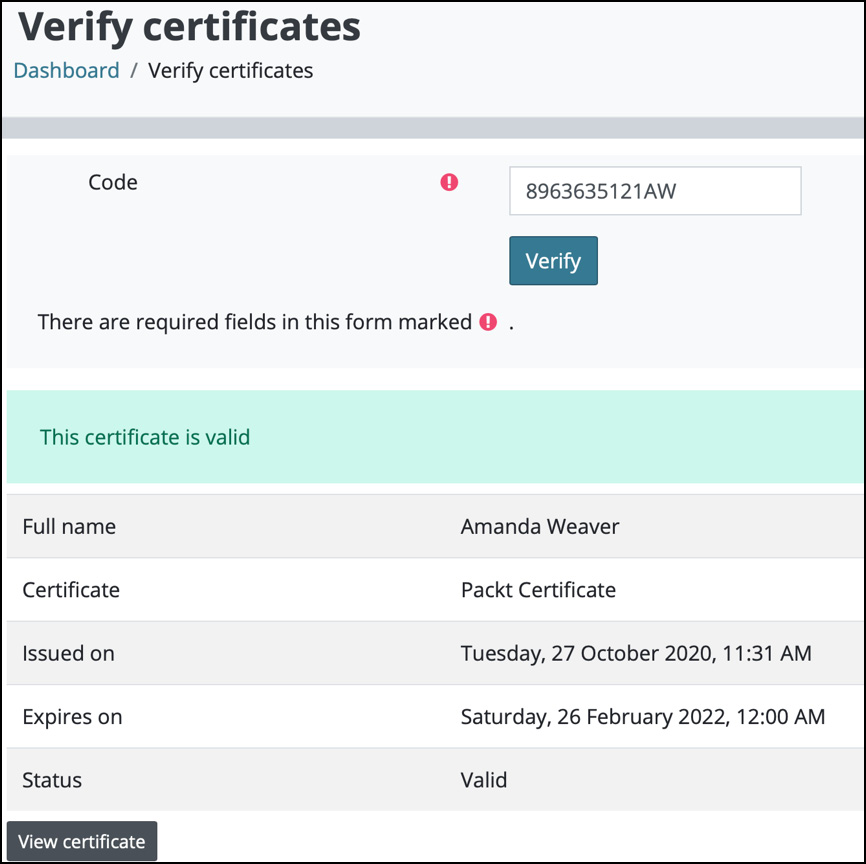
Figure 7.18 – Certificate validation
Once you select Verify, information regarding the certificate's metadata is displayed. You also have the option to access the PDF version of the document by selecting the View certificate link at the bottom.
The code element is a secure option that's used to minimize the fraudulent generation of certificates. However, it is insufficient for certain organizations or qualifications where a higher degree of security is required. This has been addressed by digital signatures, which we are going to look at next.
Validation element – Digital signature
The second validation element that can be added to certificate templates is a digital signature. When a certificate is issued (see the next subsection), a PDF document is generated. Files in PDF format can be signed with a self-signed certificate in order to prevent forgery and falsification of certificates. To simplify this mechanism, a dedicated element has been created, which you can add like any other element.
It is common to sign an image in a document using a logo, a signature, or a seal, although it is possible to create signed PDFs with no in-document visualization. We are going to attach the digital signature to an image. Since the image parameters are identical to the Image element we covered earlier, we are going to focus on the digital signature parts, as shown in the following overlapping screenshots:
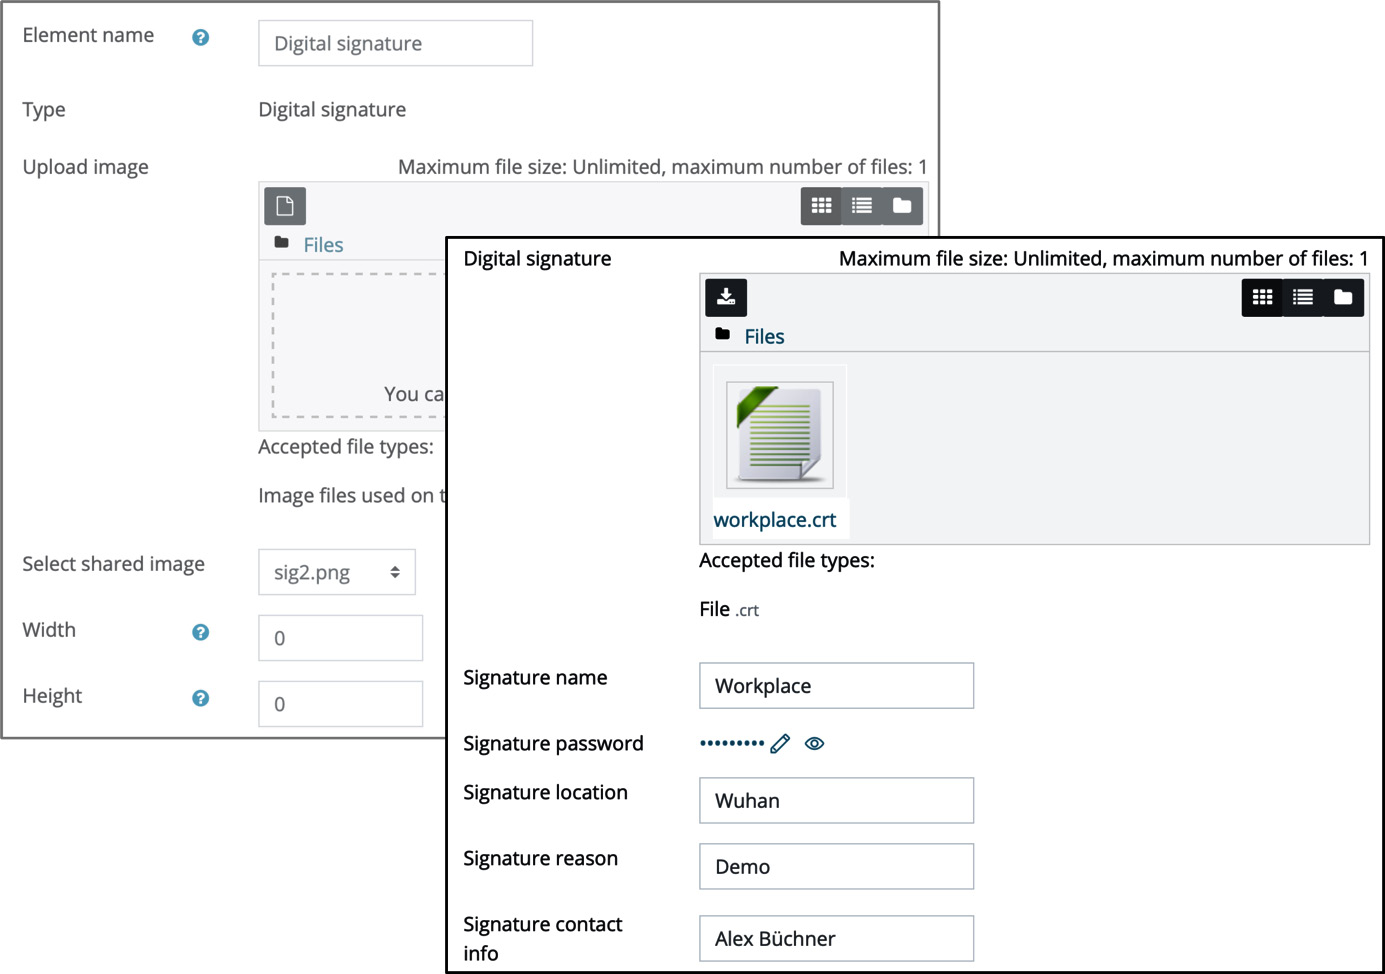
Figure 7.19 – Certificate element – Digital signature
The only compulsory field is the digital signature itself, which is a CRT file. You will either have to use an existing CRT file from your organization or generate a self-signed certificate. Follow these three steps via the Linux command line:
openssl req -x509 -nodes -days 365000 -newkey rsa:1024 -keyout workplace.crt -out workplace.crt
openssl pkcs12 -export -in workplace.crt -out workplace.p12
openssl pkcs12 -in workplace.p12 -out workplace.crt -nodes
The first command creates a self-signed signature that's valid for 10 years (365,000 days) and is RSA-encrypted with 1,024 bytes. It contains both the private key and the certificate part. The second step is to export the CRT file in P12 format before converting it into a PEM file. You will need to provide the CRT file – here, workplace.crt – to the digital signature on your certificate, which is using the standard key part to tag the certificate as being valid and verifiable. Internally, the PDF generator uses functionality available in the TCPDF library.
The other fields (Signature name, Signature password, Signature location, Signature reason, and Signature contact info) provide information about the CRT file. While they are all optional, it is recommended to provide these.
Managing certificate element plugins
By default, all available certificate plugins are shown in alphabetical order in the certificate designer menu. If you wish to either change the order of the elements or hide any elements that are not in use in your organization, go to Site administration | Plugins | Admin tools | Manage certificate element plugins and configure the list as required:

Figure 7.20 – Managing certificate element plugins
It is also possible for a developer to create new certificate element plugins. Once this add-on has been installed, it will also appear in this list and will be treated like a core element.
This concludes this section on static, dynamic, and validation elements that can be placed on certificates. Hopefully, you have been able to create an engaging certificate template, either by following our design, which we used as an example, or by coming up with your own visual. Now that we have created our first certificate template, let's learn how generated certificates are issued in Moodle Workplace.
Issuing certificates
The key objective of certificates is that they are awarded to users once they have successfully completed a certain task or solved a given problem; for instance, they've completed a course, achieved a competency, or attended a webinar. There are three ways certificates can be awarded in Moodle Workplace:
- Automatically via dynamic rules
- Manually
- Course certificate activity
We will cover all three modes of issue during the following three subsections, starting with dynamic rules.
Issuing certificates via dynamic rules
Certificates can be issued automatically via dynamic rules (see Chapter 5, Automation and Dynamic rules). A simple but representative example is shown in the following set of screenshots, where the condition states that if the Moodle Workplace Challenge course has been completed, the certificate we created in this section will be issued and a notification will be sent to the user:
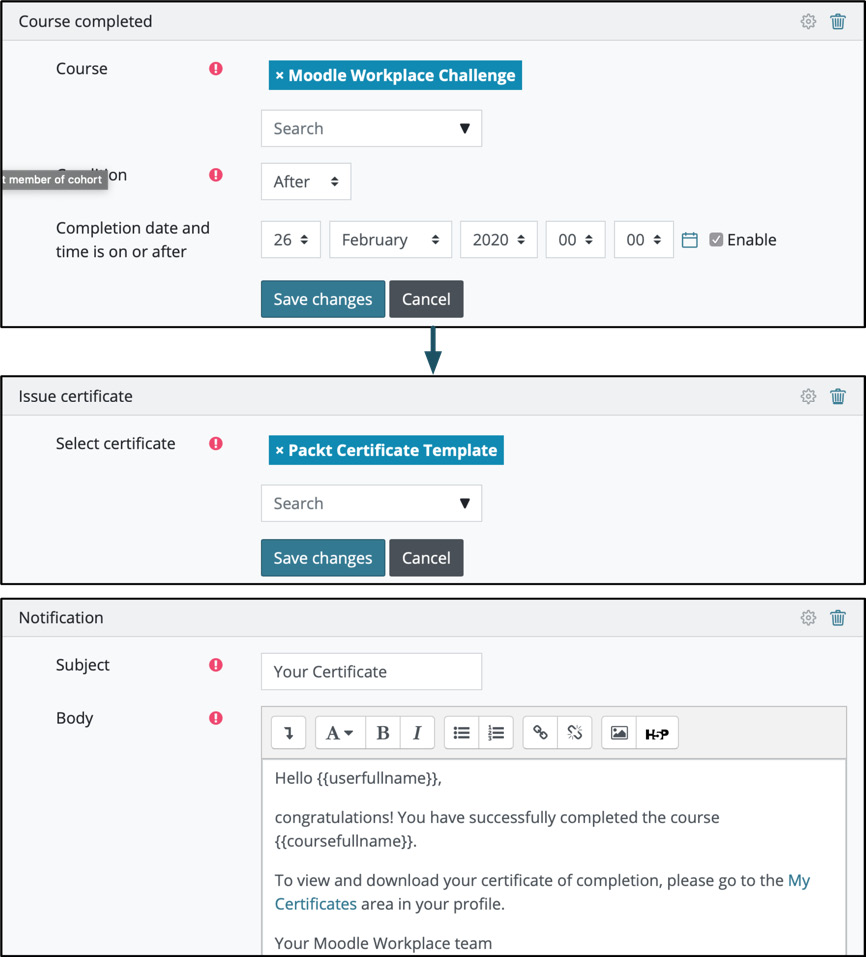
Figure 7.21 – Dynamic rule to automatically issue certificates
In the notification, you might have spotted the reference to the My certificates section in the user profile. A generic link to this area is <URL>/admin/tool/certificate/my_certificates.php. This is where all the certificates of a user are listed, including a PDF view of them and a download option.
Issuing certificates manually
There are scenarios where a certificate has to be issued manually; for example, if the number of recipients is too low to justify a dynamic rule or if recognized prior learning of individual users leads to issuing a certificate. To manually issue a certificate, you have to select the Issue new certificate from this template icon to the right of the certificate template. This will open a pop-up form where you have to choose at least one user and, optionally, specify an expiry date. In the following screenshot, two users have been selected:

Figure 7.22 – Manually issuing certificates
For every issued certificate, no matter how it has been generated, metadata will be stored in the underlying Moodle database. To view this data, select the Certificates issued icon beside the respective certificate template. This will show the following data:
- Full name: First and last name of the user.
- Awarded on: Date and time when the certificate was awarded.
- Expires on: Expiry date and time when the validity ends.
- Code: The code of the certificate and a link to the verification page.
- Preview: The generated PDF file will be displayed.
- Regenerate issue file: The PDF file will be regenerated on the fly and re-issued to the user. However, the award date and time will remain unchanged.
- Delete: Used to revoke the certificate.
A sample list of issued certificates is shown in the following report. There is currently no way to distinguish between which certificates have been issued via dynamic rules and which ones have been issued manually:

Figure 7.23 – List of issued certificates
This report can be reproduced using the Certificates issues data source. A second data source related to certificates is called Certificate templates. It contains data fields for the templates on your system. Data sources will be discussed in more detail in Chapter 8, Generating Custom Reports.
Issuing certificates via the Course certificate activity
Moodle Workplace has introduced a new course activity that lets you issue certificates from within courses:

Figure 7.24 – Course certificate activity
Like the Workplace Certificate Manager add-on we mentioned previously, the course activity has also been contributed to the public Moodle plugin database. To make use of this activity in a standard Moodle system, you will need to install mod_coursecertificate from moodle.org/plugins/mod_coursecertificate.
Once the Course certificate activity has been selected from the activity chooser, the following configuration options become available:
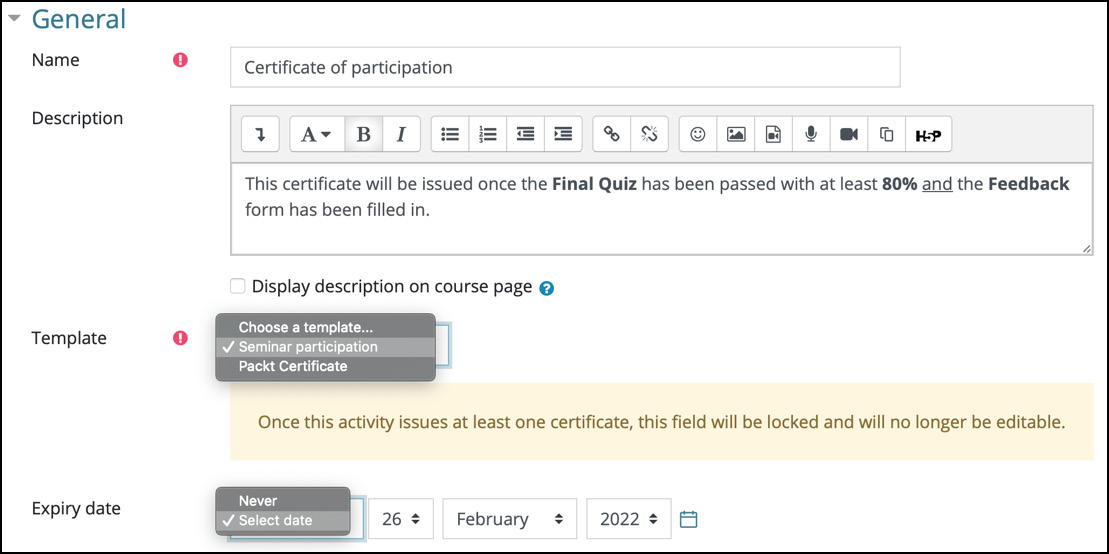
Figure 7.25 – Course certificate settings
There are only two certificate-specific settings:
- Template: Select one of the certificate templates that you created earlier. As the note on the screen indicates, this field will be locked once a certificate has been issued via this activity.
- Expiry date: This is an optional setting that indicates when the validity of the issued certificate runs out.
The Course certification activity is mostly used in combination with other activities. In the following example, the certificate will only be available to learners when the final quiz has been passed and the feedback questionnaire has been filled in. These are configured in the standard Restrict access section of the Course certificate activity:

Figure 7.26 – Restrict access clauses
There are two ways learners can be issued with their certificate once they have access to the activity:
- When automatic sending is enabled, the certificate will be issued automatically once users have access to it. All learners will receive a PDF copy of the certificate as soon as they meet the activity's access restrictions.
- When automatic sending is disabled, learners can manually issue the certificate themselves. Learners won't automatically receive a PDF copy of the certificate; instead, they will need to click on the activity link displayed on the course page to receive the certificate once they have met this activity's access restrictions.
As a trainer (or any user with the mod/coursecertificate:viewreport capability), you can toggle between the two certificate sending modes when selecting the Course certificate activity. Here, you can also view a list of course participants who have already been issued with a certificate. This displays the familiar columns Email address, Status, Expiry date, Date issued, and Code, as well as the Preview and Delete actions:
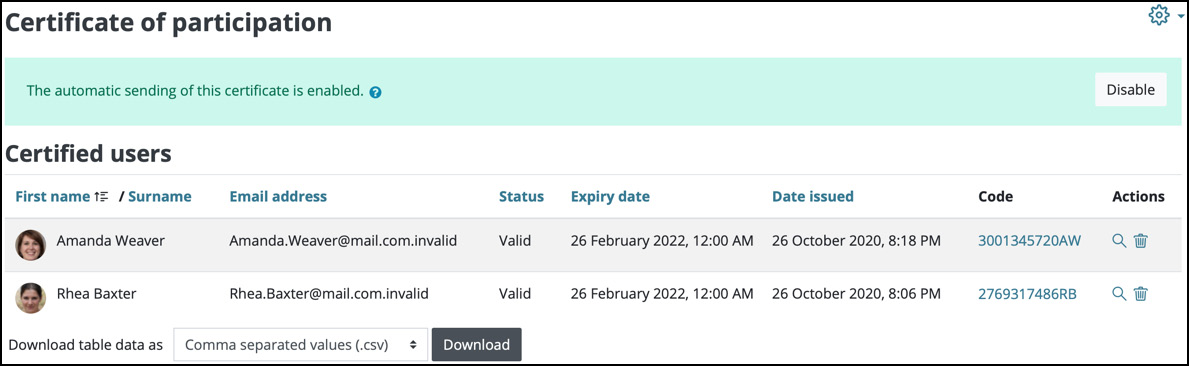
Figure 7.27 – Course certificate report
Certificates issued at the course level will be treated exactly the same as certificates issued via dynamic rules or manually. They will appear in the user's My certificates profile section and also show up in any custom reports.
This concludes this comprehensive section on certificates, the first type of incentive in Moodle Workplace. Here, we covered creating certificate templates with static, dynamic, and validation elements, as well as issuing them via dynamic rules, manually, or inside courses. Next, we will look at the competencies you can use to model the skill sets of your staff.
Exploring competencies
Competencies describe the learner's proficiency or level of understanding in certain subject-related skills. Moodle has a powerful competency management system that fully supports modeling and awarding competencies. In this section, we will cover the basics of competency management. The main components and issuing mechanisms of competencies have been depicted in the following diagram:
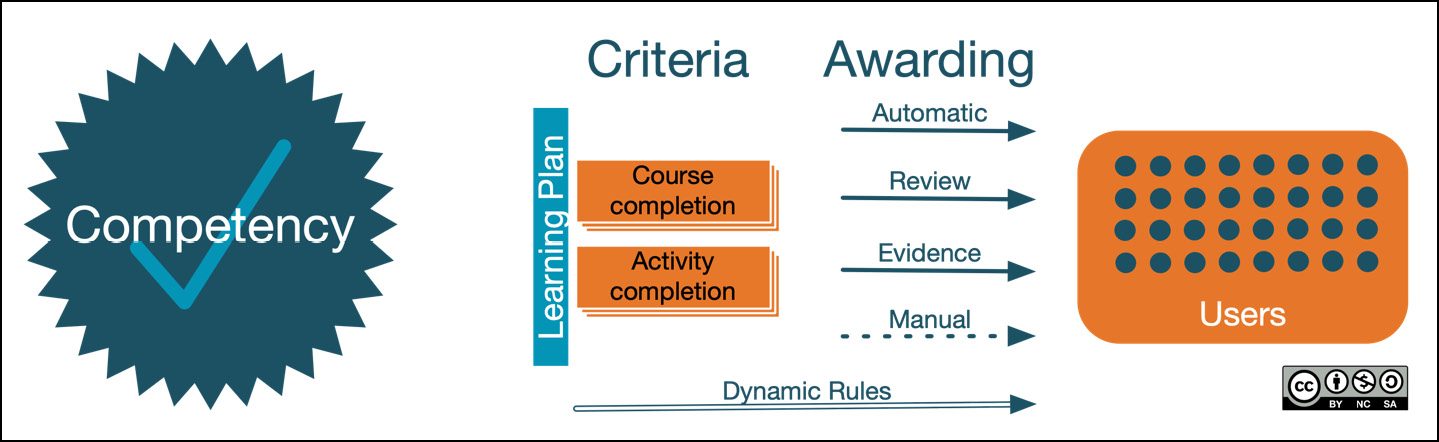
Figure 7.28 – Moodle competencies
A competency has certain properties, such as a name, scale (for instance, not competent, competent with supervision, and competent), a competency framework it belongs to, and a parent to model competency hierarchies. A competency is usually tied to course and/or activity completions. Competencies can be part of a Learning Plan (template) so that they can be assigned to users or cohorts. Moodle supports different awarding mechanisms, namely Automatic upon completion, following a review process after providing additional Evidence, or Manual. Alternatively, competencies can be awarded via dynamic rules where competencies can be configured via the rule action.
Detailed information on competencies can be found at docs.moodle.org/en/Competencies. We will now focus on the main mechanisms of how to manage and award competencies in a workplace setting. Modern talent management is aligned with skills and competency mapping. This is the focus of the next section.
Managing competencies
Speaking a foreign language is a universal skill that is desirable in most – and essential in some – jobs. We are going to use the Common European Framework of Reference for Languages (CEFR) as a competency framework since it is used across Europe and, increasingly, in other countries for measuring the language skill sets of a learner.
First, you need to create a competency framework at Site administration | Competencies | Competency frameworks, as shown in the following screenshot:
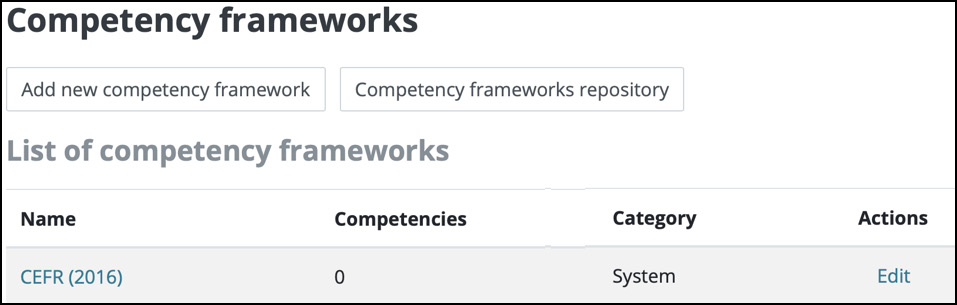
Figure 7.29 – Moodle competency frameworks
For the sake of simplicity, we have imported the CEFR framework from the public Moodle Competency framework's repository (via the respective button at the top). The result of the framework and its competencies (A1, A2, B1, B2, C1, and C2), along with its sub-competencies, can be seen in the following screenshot:

Figure 7.30 – CEFR competency framework
Once a competency framework is in place, there are different ways to award competencies to learners, all of which will be introduced briefly in the next subsection.
Awarding competencies
Once competencies have been modeled in a competency framework, the next step is to configure how to award competencies to users once they are proficient in the skill to be acquired.
There are three options regarding how to award a competency to learners. Two are available in standard Moodle, while the other is (currently) only available in Moodle Workplace:
- Via course and activity completion, where proficiency is achieved by completing certain tasks
- Via learning plans, to ensure that groups of users achieve competency; for instance, all data protection officers
- Via dynamic rules, to award competency based on flexible criteria, such as cohort membership
Let's start with course and activity completion.
Course and activity competencies
Awarding a competency can be tied to the successful completion of an activity or a course. You need to be inside a course and select the Competencies option in the drawer menu on the left so that you can add course competencies. In the following screenshot, we have added all the sub-competencies of competency A1 to the course. One out of four of the competencies has already been achieved, as indicated by the progress bar at the top:
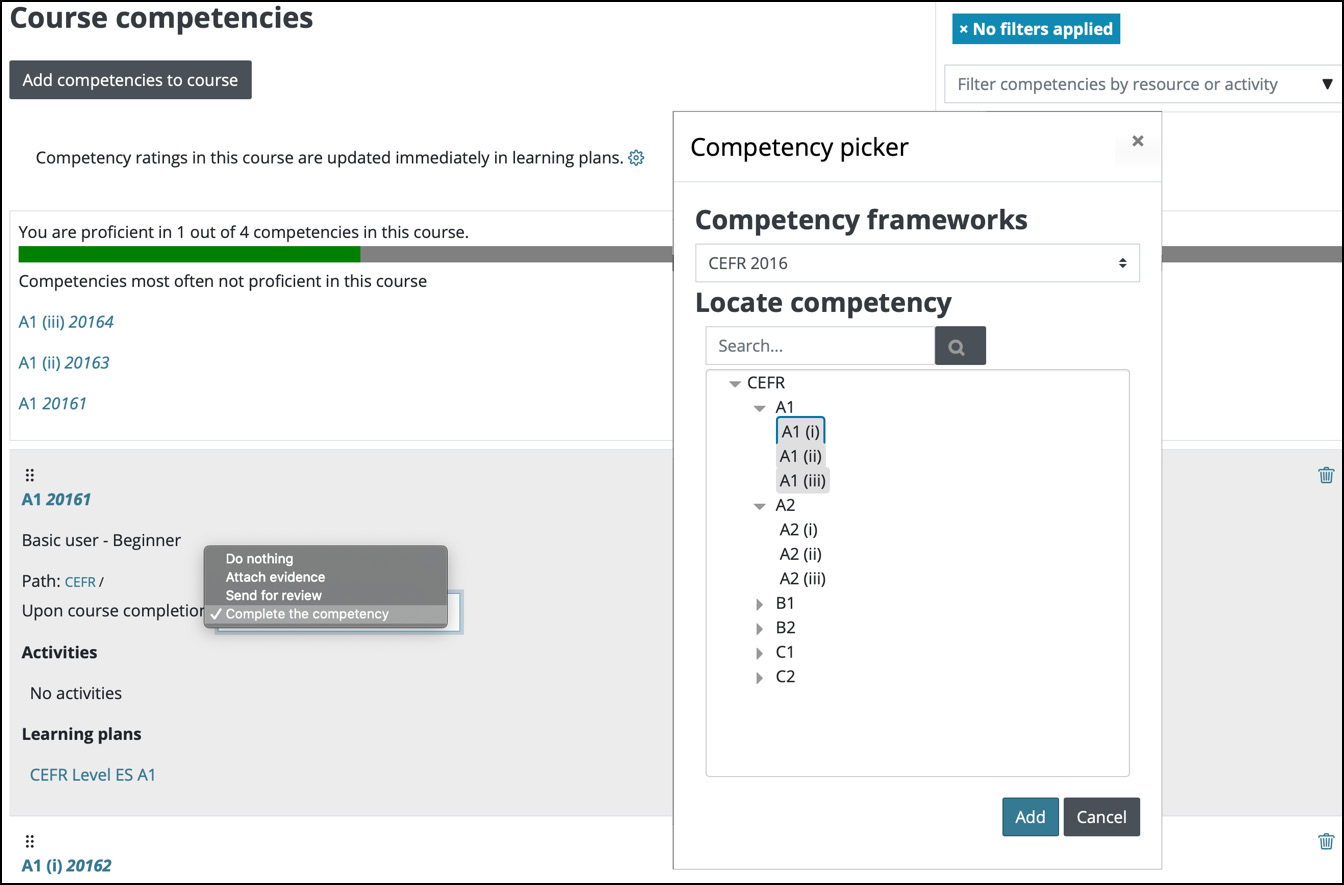
Figure 7.31 – Course competencies
Similar to course competencies, you can also specify activity competencies, for instance, when a test has been completed with at least 80% success. Within the settings of an activity, you can find the Competencies section, where at least one competency has to be selected, alongside an action that is triggered upon the activity's completion (Do nothing, Attach evidence, Send for review, or Complete the competency):
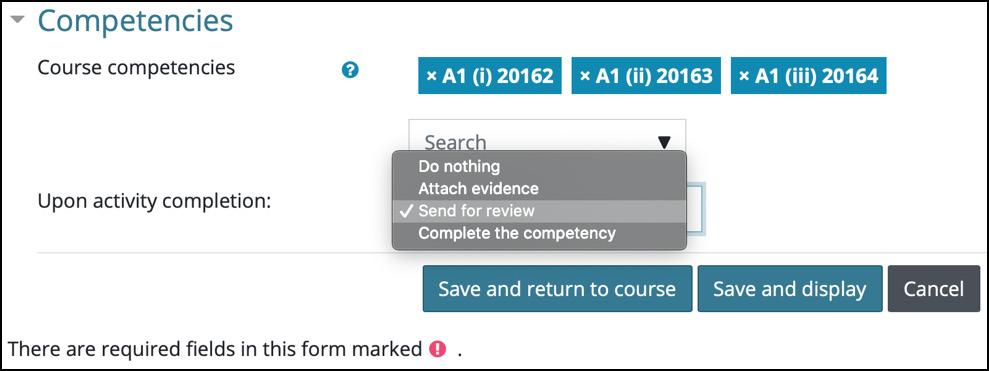
Figure 7.32 – Activity competencies
The most straightforward option is competency completion, which concludes the user's process of achieving the competency. Attaching evidence allows users to submit a testimony of training that's been received outside of Moodle; for instance, a link to a public webinar or a certificate of participation to an external seminar. The last option is for the learner to request a review by the instructor. This leads nicely to learning plans, which support an even more sophisticated multi-stage review process.
Competencies and learning plans
Learning plans are a means of ensuring that all of your learners have targeted learning based on their goals and training needs, and that it has been delivered in a structured way based on learning plan templates, which themselves are based on competencies. Based on the learning plan template, you can create learning plans, either manually for individual users or automatically via cohorts.
Important note
A learning plan template defines a set of competencies that's assigned to users.
To add a learning plan template, go to Site administration | Competencies | Learning plan templates and select the Add new learning plan template button. We have already created a number of templates, as shown in the following screenshot:

Figure 7.33 – Learning plan template I
When you select a learning plan template, you will see the already familiar competency view and also have the option to add more competencies via the Add competencies to learning plan template button:
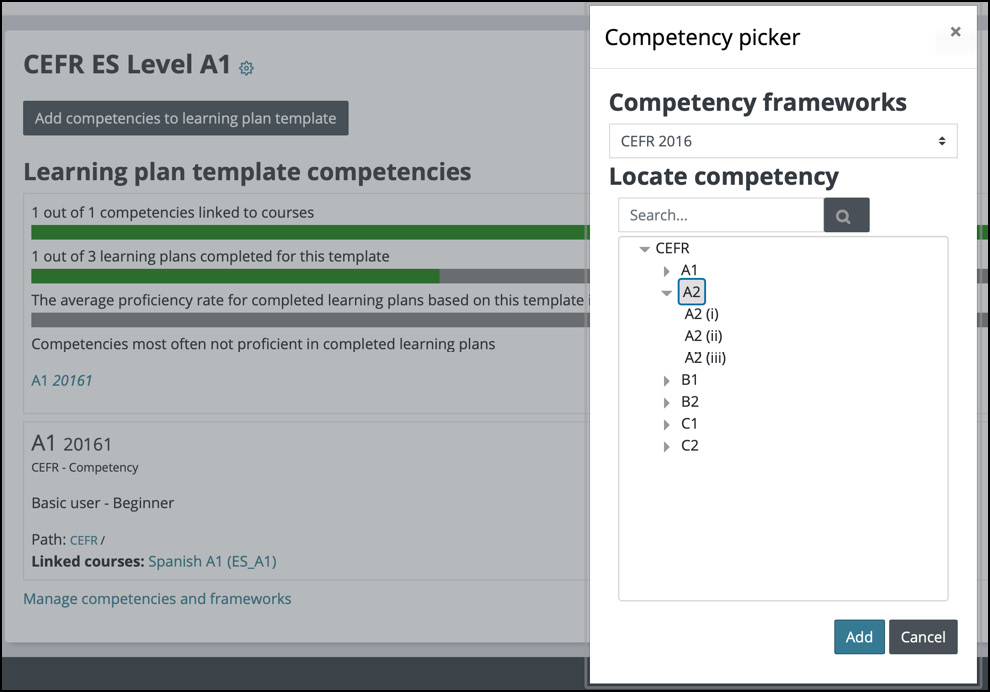
Figure 7.34 – Learning plan template II
Once a learning plan template has been finalized, you can create individual learning plans one by one via the Create learning plans option in the Edit menu, or automatically via Add cohorts to sync. Users can view their learning plans via the Learning plans link in their respective user profiles, where they also have the option to provide evidence of prior learning; for instance, documentation of previous activities.
Competencies and dynamic rules
We covered awarding competencies via dynamic rules in Chapter 5, Automation and Dynamic Rules. Award competency is an action in the General category where you need to select a competency. To award multiple competencies, you have to set up multiple actions. As we described previously, the Moodle competency mechanism mainly focuses on the successful completion of courses and activities. To support other constructs, such as certifications, programs, or cohort membership, you will need to make use of dynamic rules.
This concludes our quick rundown of Moodle's powerful and flexible implementation of competencies, which included modeling competency frameworks and awarding certificates via activity and course completion via learning plans and dynamic rules. We have used CEFR to run through the basics of competencies. Another good example of core competencies and work-based skill and behavior structuring is the ICE competency framework (www.theice.com/publicdocs/ICE_Competency_Framework.pdf). Next up is the third incentive type: badges.
Exploring badges
Badges are a good way of celebrating achievement and showing learning progress. Moodle supports the management of badges, as well as different ways to award badges. Both mechanisms will be dealt with in this section. Moodle badges are fully compatible with Open Badges and can be published in any Open Badges-compatible backpack.
Badges are awarded based on a variety of chosen criteria and will be displayed on a user's profile. The main components and issuing mechanisms of badges are depicted in the following diagram:
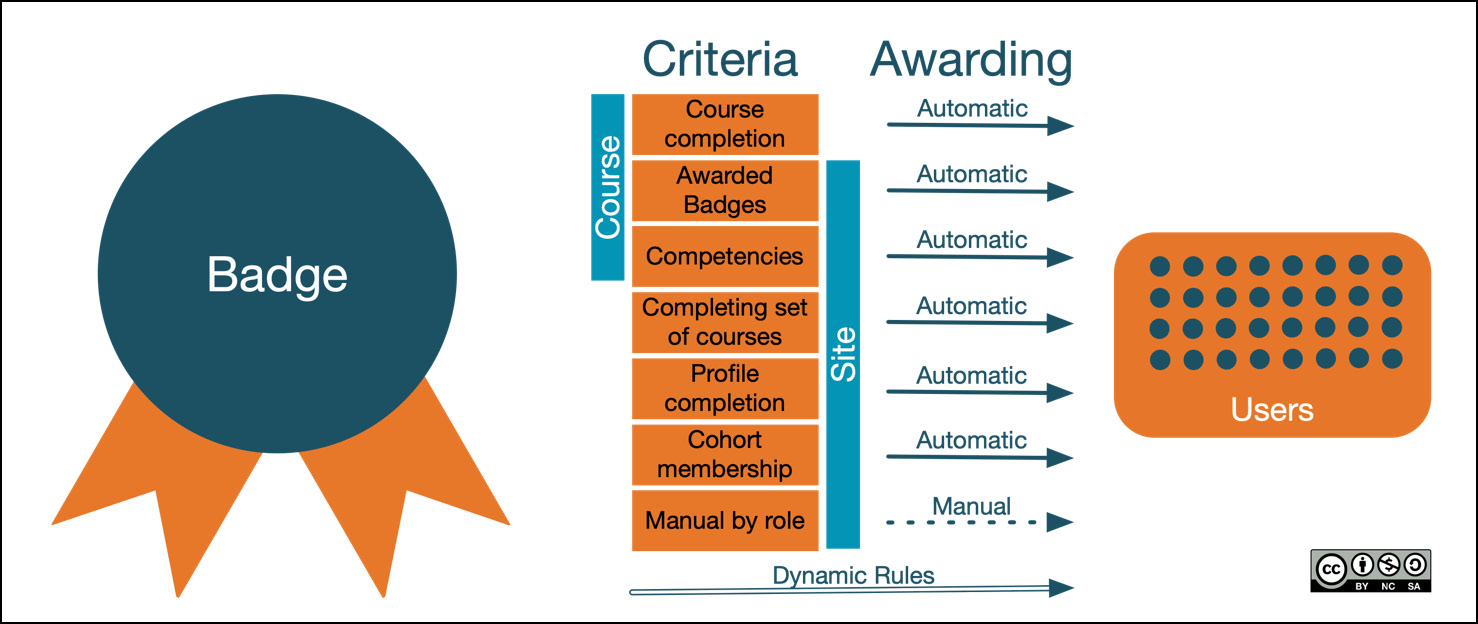
Figure 7.35 – Moodle badges
A badge has certain properties, such as a name, expiry date, and issuer. Additionally, badges have one or many criteria that have to be fulfilled to trigger it being awarded. Some criteria only exist at the course level, while others exist at the site level. The awarding process itself is usually automatic, with the exception of manual assignment. Alternatively, badges can be awarded via dynamic rules, where badges can be configured via the rule action.
Detailed information on badges can be found at docs.moodle.org/en/Badges. We are now going to focus on the main mechanisms of how to manage and award badges in a typical workplace setting.
Managing badges
Once you or some creative whiz kid in your marketing department has created the badges to be awarded to your learners, you will need to add and manage these in your learning management system. In Moodle, there are two types of badges:
- Course badges are assigned at the course level and are related to the activities and completions that take place inside a course.
- Site badges are assigned site-wide and are related to site-wide achievements, such as completing a program or certification.
Awarding a course badge can be tied to the successful completion of an activity or other achievements. You need to be inside a course and select the Badges option from the drawer menu on the left, where you can add badges via the Add new badge button. In the following screenshot, we have already added two badges with different awarding criteria for our Spanish courses:
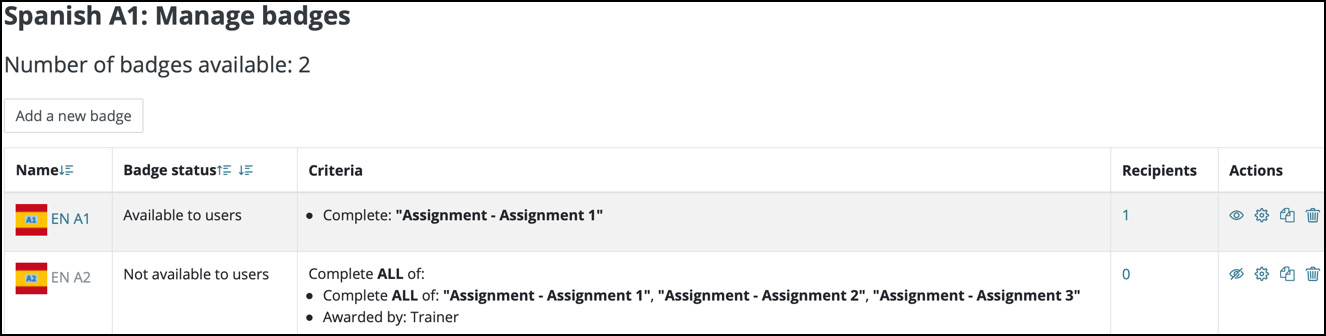
Figure 7.36 – Course badges
Site badges are managed under Site administration | Badges | Manage Badges. How we handle them is identical to course badges but with a single exception: there are two types of award badge criteria, as shown in the following screenshot comparison:

Figure 7.37 – Course badge criteria versus site badge criteria
The following badge criteria are available:
- Course completion (course): User has completed the current course.
- Awarded badges (both): User has been awarded the selected badge(s).
- Competencies (both): User has been awarded the selected competencies.
- Manual issue by role (site): To be awarded manually by users who have a particular role within the site or a course.
- Completing set of courses (site): User has completed the selected course(s).
- Profile completion (site): User has completed the selected user profile field(s).
- Cohort membership (site): User is a member of the selected cohort(s).
These criteria lead us nicely to the next subsection, which deals with awarding badges.
Awarding badges
As with competencies, there are three options regarding how to award a badge to a learner. Two are available in standard Moodle, while the other is (currently) only available in Moodle Workplace:
- Automatic: All of the preceding criteria, except Manual issue by role, trigger awarding a badge to the users who have successfully fulfilled the respective criteria.
- Manual: When the Manual issue by role criterion has been selected (site badges only), a user with the correct permissions can award a badge to another user.
- Via dynamic rules: We already covered awarding badges via dynamic rules in Chapter 5, Automation and Dynamic Rules. Award badge is an action in the General category. Here, you need to select a badge.
Users can view their awarded badges in the Badges section of their user profile. A sample view is shown here, which contains three different badges. When you select a badge, details such as the issuer appear:

Figure 7.38 – Badges in the user profile
This completes our brief introduction to badges. Here, we covered the management and awarding mechanisms available in Moodle. This also completes our look at the trio of skills and incentives that we aimed to cover in this chapter.
Summary
In this chapter, you learned how to manage and award different types of incentives in Moodle Workplace, namely certificates, competencies, and badges.
First, we provided an overview of the skills and incentives that are available in Moodle Workplace, which included an overview of the typical processes that occur once specific goals have been achieved. Next, you learned how to manage certification templates and how to construct them using a range of static, dynamic, and validation elements. We then looked at different means to issue certificates to users, namely via dynamic rules, manually, and using the course certificate activity.
Second, we briefly introduced competencies, which dealt with managing competency frameworks and competencies per se. We then covered three awarding options, namely via course and activity completion, via learning plans, and via dynamic rules.
Third, we covered the basics of course and site-wide badges. After a short overview, you learned how to manage badges and different award criteria. We then covered three awarding options, namely automatic, manual, and via dynamic rules.
Skills and incentives cover a broad spectrum of topics, ranging from formal assessments and exams, to summative evaluations and CPD points, all the way to various types of gamification. Depending on the type of setting and learning goal, a combination of different assessment tools, progress tracking mechanisms, and incentives must be applied.
We briefly mentioned two report sources – Certificate templates and Certificate issues – that can be used to create custom reports containing data regarding certificates and certificate templates. The powerful report generator is the topic of the next chapter.