Chapter 9: Seminar Management
Face-to-face training is still a key component in most organizations' staff development strategies. This can either be purely in classroom-based setups—for instance, in the form of seminars and one-on-one training sessions—in blended settings where in-person activities are accompanied by online learning, or synchronous virtual sessions, such as webinars. In this chapter, we will look at Moodle Workplace's appointment facility to organize and manage face-to-face training activities, also known as seminar management.
First, you will learn about Workplace's unique approach to seminars, which is based on the Appointment booking activity, comprising appointments and sessions.
Second, we will be dealing with the management of appointments, where you will be adding appointment bookings, appointments, and sessions. You will further manage the appointment workflow, which covers steps such as signing up to and canceling an appointment, handling waitlists, taking attendance, and customizing notifications.
Third, we will be looking at reporting on appointments, where you will put the skills acquired in the previous chapter into action by creating reports on face-to-face training.
So, by the end of this chapter, you will know how to organize and manage classroom-based and one-to-one training for your organization. This chapter comprises the following three main sections:
- Understanding Workplace's approach to seminars
- Managing appointments
- Reporting on appointments
Understanding Workplace's approach to seminars
So far, all the Moodle Workplace-specific features have been modeled using dedicated tools, such as multi-tenancy, certification, and reporting. The approach Moodle has taken with seminars is slightly different—an activity called Appointment booking has been adopted, which supports face-to-face learning. The following diagram attempts to visualize the structure of appointment bookings and how they are embedded in courses:
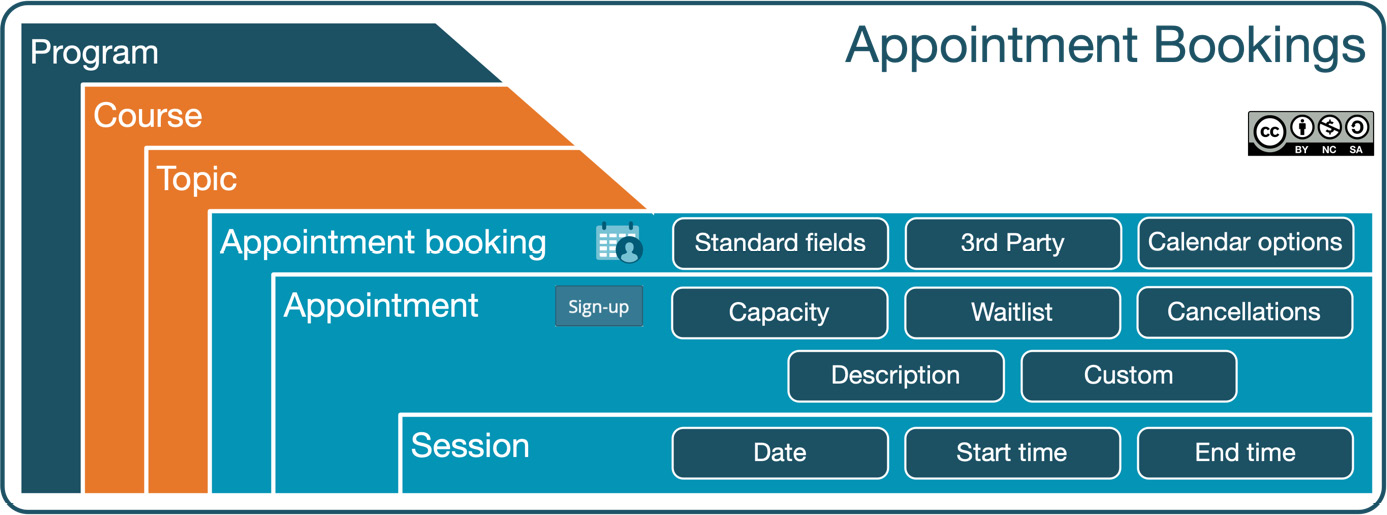
Figure 9.1 – Appointment bookings in Moodle Workplace
As we saw in Chapter 3, Moodle Courses, Users, and Roles, courses are organized into topics. Courses can also be part of programs or certifications, which we covered in Chapter 6, Onboarding and Compliance. Appointment booking is a module that is placed within a course like any other Moodle activity or resource.
Important Note
An appointment booking comprises one or many appointments, and each appointment consists of one or many sessions.
An appointment booking contains all the standard fields and settings, such as the name, description, access restrictions, activity completion criteria, tags, and so on. However, there are two appointment booking-specific features—namely, the handling of third parties to support external trainers and calendar options, where calendar display settings can be configured.
The appointment itself contains a range of settings to configure each face-to-face meeting:
- Capacity: The maximum number of participants
- Waitlist: The handling of participants on standby
- Cancellations: Support for self-withdrawals
- Description: Information and appointment details
- Custom: User-defined fields, such as location or cost
- Attendance: The users signed up to the appointment and their attendance status
Important Note
Sign-up always takes place at the appointment level.
A session comprises a date, a start time, and an end time. Moodle sometimes refers to these as appointment sessions; in this book, we will stick to the term session to avoid confusion.
Details of all three levels—appointment booking, appointments, and sessions—will be dealt with in the latter half of the chapter.
What is the advantage of modeling seminars as part of courses, instead of having a dedicated seminar tool? The main benefit of a course activity is the ability to easily model and implement blended learning setups. Let's have a look at a basic example seminar course in the following diagram:
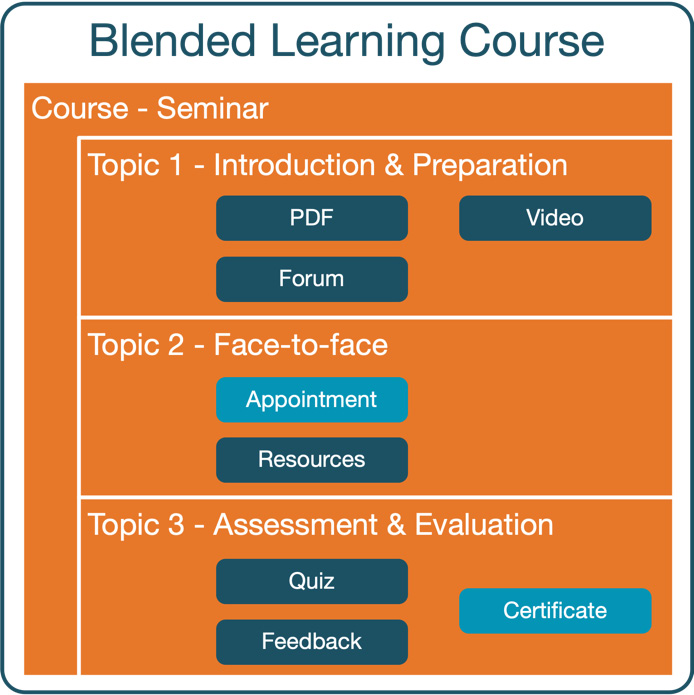
Figure 9.2 – A sample blended learning course
The course has been split into three topics:
- Introduction and preparation: This includes some up-front reading material as PDFs as well as an introductory video. This section also contains a forum where all participants are asked to introduce themselves.
- Face to face: The actual appointment booking activity plus resources made available by the coach.
- Assessment and evaluation: After the face-to-face appointment, participants need to take a quiz and are asked to provide feedback. Once this has been completed, a certificate of participation will be issued (either via dynamic rules or via the new Certificate activity).
OK, enough of the theory. Let's get started with the aforementioned Appointment booking activity and how to set up your first in-house seminar, which is the first step of managing appointments.
Managing appointments
In this section, we will introduce the Appointment booking activity and look at its various options to model seminars and person-to-person training in your organization. This will comprise the following sub-sections:
- Adding appointment bookings
- Adding appointments and sessions
- Managing the appointment workflow (signing up, canceling, waitlists, and attendance)
- Customizing notifications
Let's start by creating our first appointment booking.
Adding appointment bookings
To add an appointment booking, you need to be in editing mode within a course. For demonstration purposes, we are going to use the standard Workplace list course format; if you have applied another course format or theme to your site, some visual elements may differ from the ones shown here. Select Add an activity or resource and then pick the Appointment booking activity from the activity chooser:

Figure 9.3 – Adding an Appointment booking activity
Once the activity has been added, you will be presented with the settings screen of the appointment booking, as in the following screenshot. We are only focusing on the parameters unique to the Appointment booking activity; that is, we are not dealing with common settings such as restricting access, tags, or competencies:
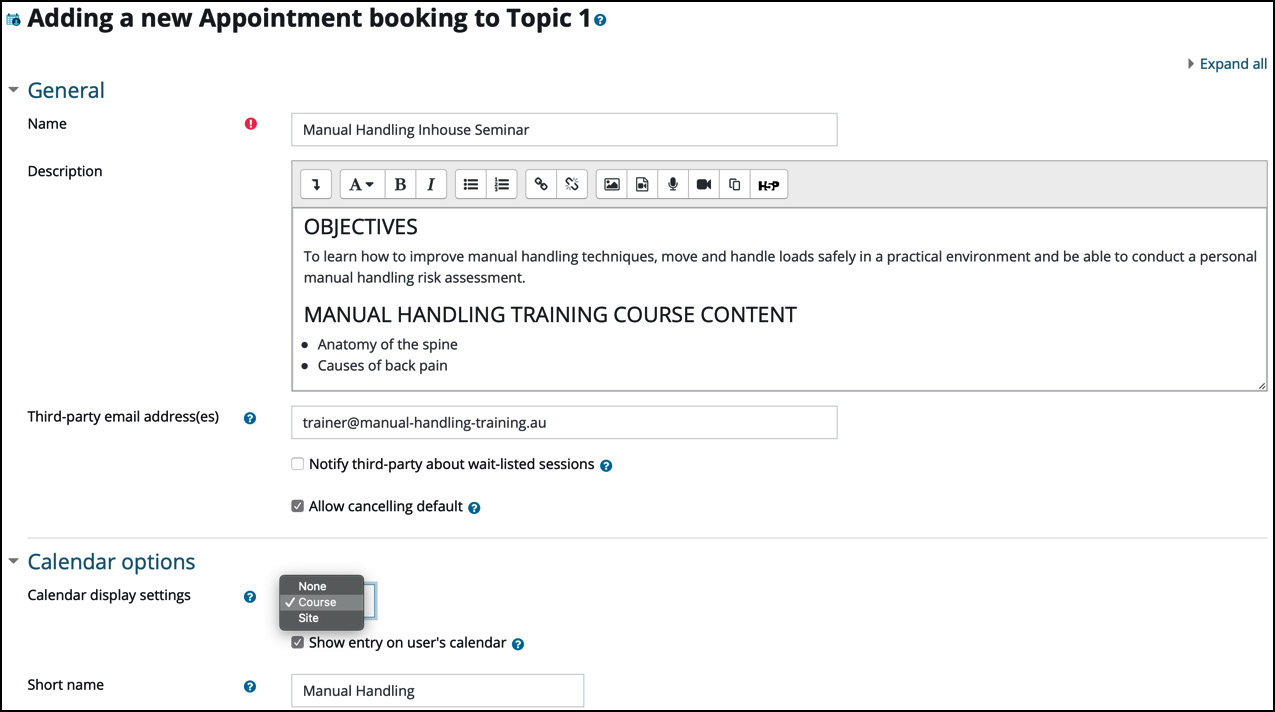
Figure 9.4 – The Appointment booking activity settings
Once you have provided the standard fields, including a name and an optional description, you can include details for Third-party email address(es), with each email address separated by a comma. You will need to add these if you wish to notify external people who are not on your Moodle Workplace system about the appointment—for instance, external instructors. Typically, notifications are sent out when a user signs up to a seminar or cancels their participation. If Notify third-party about wait-listed sessions is ticked, the specified third parties will also be sent a message when a learner signs up to a waitlisted appointment. If the Allow cancelling default option remains selected, the default setting when creating new appointments will be to allow sign-up cancelations.
The dates and times of sessions will be added automatically to a user's standard Moodle calendar. The Calendar display settings option lets you select which event type will be used for calendar entries. The three choices are as follows:
- None: The session details will be displayed as user events on the attendees' calendars, provided the Show on user's calendar option remains selected.
- Course: The session details will be presented as a course event on the course calendar, as well as on the site calendar. They will be visible to all users who are enrolled on the course.
- Site: The session details will be shown as global events on the site calendar and will be visible to all users.
By default, the Name field of the activity will be used as the calendar entry. You can override this via the Short name setting, which will be applied as the session description instead.
Now that we have created and configured the Appointment booking activity, the next step is to add appointments and sessions.
Adding appointments and sessions
At the beginning of this chapter, we described the structure of an appointment booking, which consists of appointments, which themselves comprise sessions. On our example site, we offer manual handling training every first Wednesday of the month. In the following screenshot, you can see five entries; the first two have already taken place, and the last one is fully booked:

Figure 9.5 – Appointments and sessions
Each row represents an appointment. The first two columns display session-related information—namely, the date and time. An appointment can comprise either one or multiple sessions. For each appointment, the Capacity limit is displayed (this takes the format of the number of users signed up/the total number of seats), as well the Status field (displaying either Open, Finished, or Full). If the status is set to Open, users can sign up to the appointment via the Book button; if the status is set to Full, a waitlist can be joined if it has been enabled. Both processes are described in more detail later on in this chapter. Selecting the Details button will show the same data in a pop-up window, plus information on the appointment's description and any custom fields, should they exist. In our example Details window, shown in the following screenshot, there are two custom fields—namely, Cost and Discount:
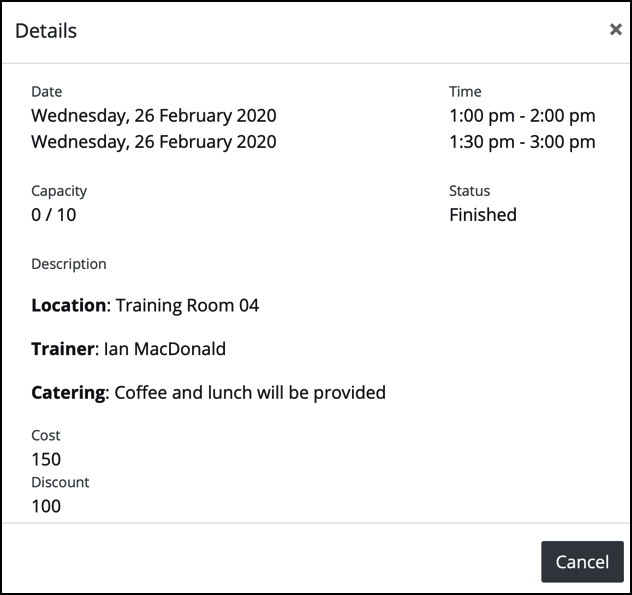
Figure 9.6 – Appointment details
Now, we are going to add additional appointments to our Appointment booking activity. There are two variants, which we are going to cover in the subsequent sub-sections:
- Adding a single appointment
- Adding multiple appointments
OK, let's start with single appointments as they also form the basis for adding multiple appointments afterward.
Adding a single appointment
To add a single appointment, select Appointment from the Add menu at the top right. You will see a pop-up screen, where the first section deals with sessions. A session is created automatically with the following default values:
- Date: Today's date
- Start time: The next full hour
- End time: 1 hour after the start time
You will need to adjust these three values to the date and times of your actual session. In the following screenshot, we have already created a second session:

Figure 9.7 – Adding a single appointment
If your appointment contains multiple sessions—for instance, on consecutive days or one in the morning and one in the afternoon—you need to add more sessions via the Add session button. Be aware that there are no consistency checks for overlapping sessions. You have to ensure that the times that are set are correct to avoid inconsistencies.
It is also possible to create an appointment with no session (you need to remove the initially created session via the Delete session button). Any users signing up for this appointment will be put on the waiting list, which we will deal with shortly. Session-less appointments are a good way to mimic an interested-in feature; once there is sufficient interest, the session information can be added to the appointment.
The second part of the appointment's settings screen is labeled Advanced, shown in the following screenshot:
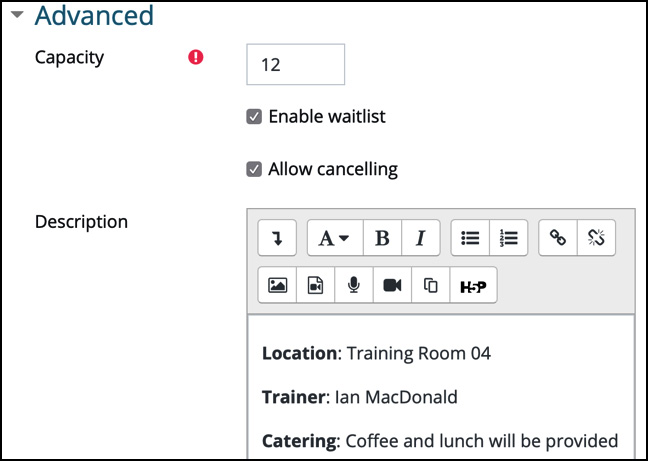
Figure 9.8 – Appointment settings
The Advanced section contains the following appointment parameters:
- Capacity: The maximum number of participants who can sign up for the appointment.
- Enable waitlist: If ticked, sign-up will remain open once the capacity limit has been exceeded. Potential participants will be put on a waiting list.
- Allow cancelling: If enabled, users can withdraw after they have signed up. The first user on the waiting list will automatically be given the available seat.
- Description: Add free-text details about the appointment. In our training example, we have provided information about the location, the trainer, and catering arrangements.
The last part of the appointment settings covers Custom fields. Here, you can specify any parameters that are relevant for your context—for example, seminar fees, such as the cost and discount, as shown:
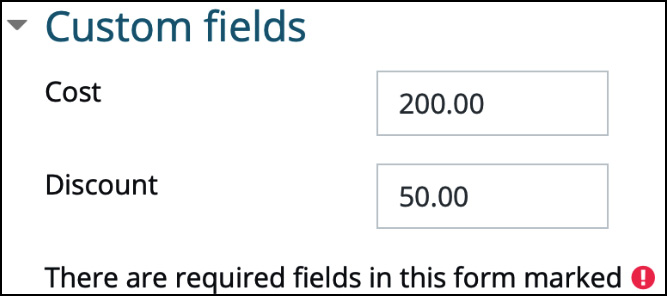
Figure 9.9 – Appointment custom fields I
To manage user-defined appointment fields, you can either go to Site administration | Plugins | Activity modules | Appointment custom fields or select the Manage custom fields link underneath the Description text box. Appointment custom fields work in precisely the same as any other custom fields in Moodle—for instance, as they do for courses (for more details, see the Moodle docs at docs.moodle.org/en/Course_settings#Course_custom_fields). In our example, you can see the Cost and Discount fields grouped in a section labeled Seminar fees:
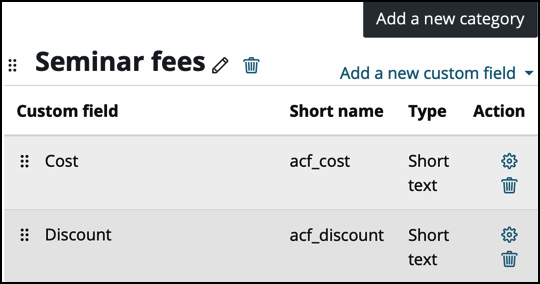
Figure 9.10 – Appointment custom fields II
So far, we have added single appointments, which is sufficient when organizing an event with a small number of sessions. If you run a seminar twice or more frequently, you can use the standard Duplicate functionality in the settings menu of each appointment. In addition to this cloning functionality, Moodle Workplace also offers a shortcut to add multiple appointments, which we will cover in the subsequent sub-section.
Adding multiple appointments
The primary use case for adding multiple appointments is to set up recurring one-on-one sessions with all your team members. For example, if you lead a team of six and you wish to have individual review meetings spread across a day, you could tediously create six separate appointments manually, as described previously, or you can make use of Timeframes, as in the following screenshot:

Figure 9.11 – Adding multiple appointments
A timeframe is effectively a one-off template specifying how appointments are created automatically. In our example, we have created two timeframes—one for the morning and one for the afternoon—with three appointments each. In the specified Date field, you need to provide a start time and an end time. Within this timeframe, the Automatic split and Break time values are distributed equally. This mechanism is shown in the following diagram:
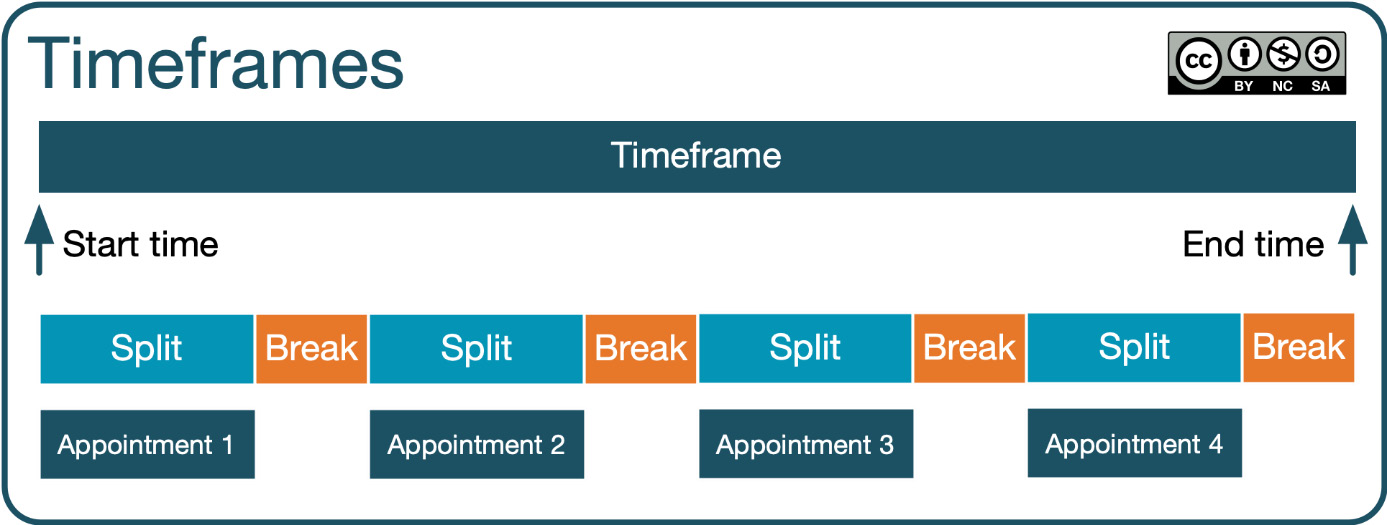
Figure 9.12 – Appointment timeframes
The start time and end time specify the beginning and the end of the timeframe.
Important Note
Each split defines the duration of each appointment within the timeframe. The break is the pause between splits.
If the split is set to 0, a single appointment will be created, covering the full timeframe. If the break is set to 0, appointments will be created back to back. It is not possible to have appointments with multiple times/dates when adding multiple appointments.
If a split-break combo doesn't exactly fit in the timeframe, Workplace lets the last appointment run over, as long as it commences within the timeframe. For example, if you have a timeframe from 10:00 to 11:00 with an automatic split of 15 minutes and a break time of 10 minutes, the first appointment will be from 10:00 to 10:15, the second slot from 10:25 to 10:40, and the last one from 10:50 to 11:05.
Now that we have created appointments and sessions, the next step is to manage the appointment workflow, which we will deal with in the next sub-section.
Managing the appointment workflow
Once an appointment is available for a course, potential attendees can view details and initiate the appointment workflow outlined in the following flowchart:
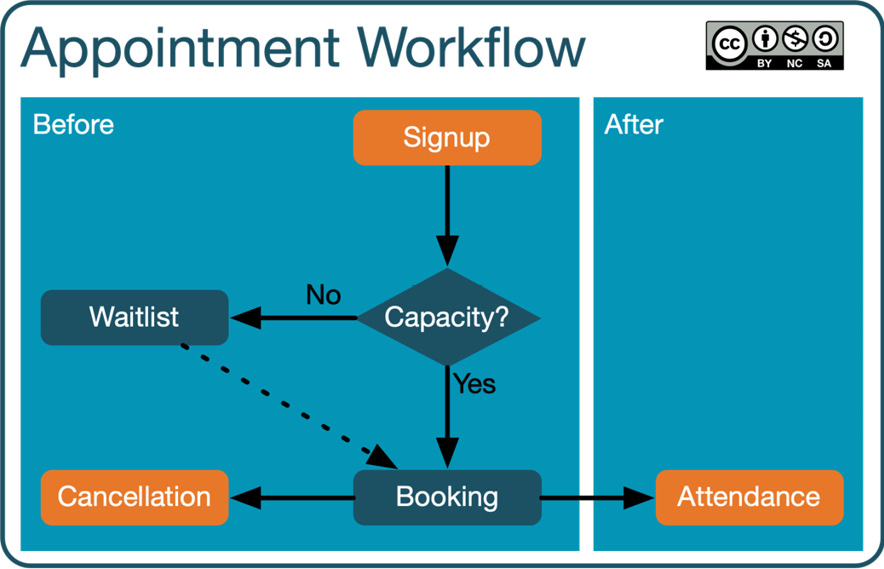
Figure 9.13 – Appointment workflow
If there is spare capacity, users can either sign up for the appointment or be signed up by somebody with appropriate permissions—for instance, a manager. If the capacity limit has been reached and the waitlist has been enabled, users will be added to the back of the queue; otherwise, the booking will be successful. Once a participant's seat is canceled, the first user on the waitlist will be moved to the list of attendees. After the event has passed, the trainer can take the attendance of all participants. Each of these steps will be described in the following four sub-sections:
- Signing up for an appointment
- Canceling an appointment
- Handling waitlists
- Taking attendance
We are going to start with the first step in the overall process—signing up for an appointment.
Signing up for an appointment
There are two ways that users can become attendees for an appointment:
- Signing up via the booking option
- Being signed up by somebody else
We are going to cover both options in the following section.
Signing up via the booking option
Signing up to an appointment takes place within a course. This might seem counter-intuitive since often, signing up for a seminar takes place within a course catalog or similar. Moodle Workplace takes an alternative approach to also facilitate person-to-person meetings.
Important Note
A user has to be enrolled in a course to be able to sign up for an appointment.
When learners access the course, they will see the number of available seats for all appointments and each appointment activity. Accessing the appointment activity displays the list of available appointments and the Book button to sign up. After the user has signed up for an appointment, the status will change from Open to Booked, and the course page will now show the date of the next session, rather than the number of available seats. If the date is not set, the user will just see the Booked status. This sign-up process is shown in the following cascade of screenshots:
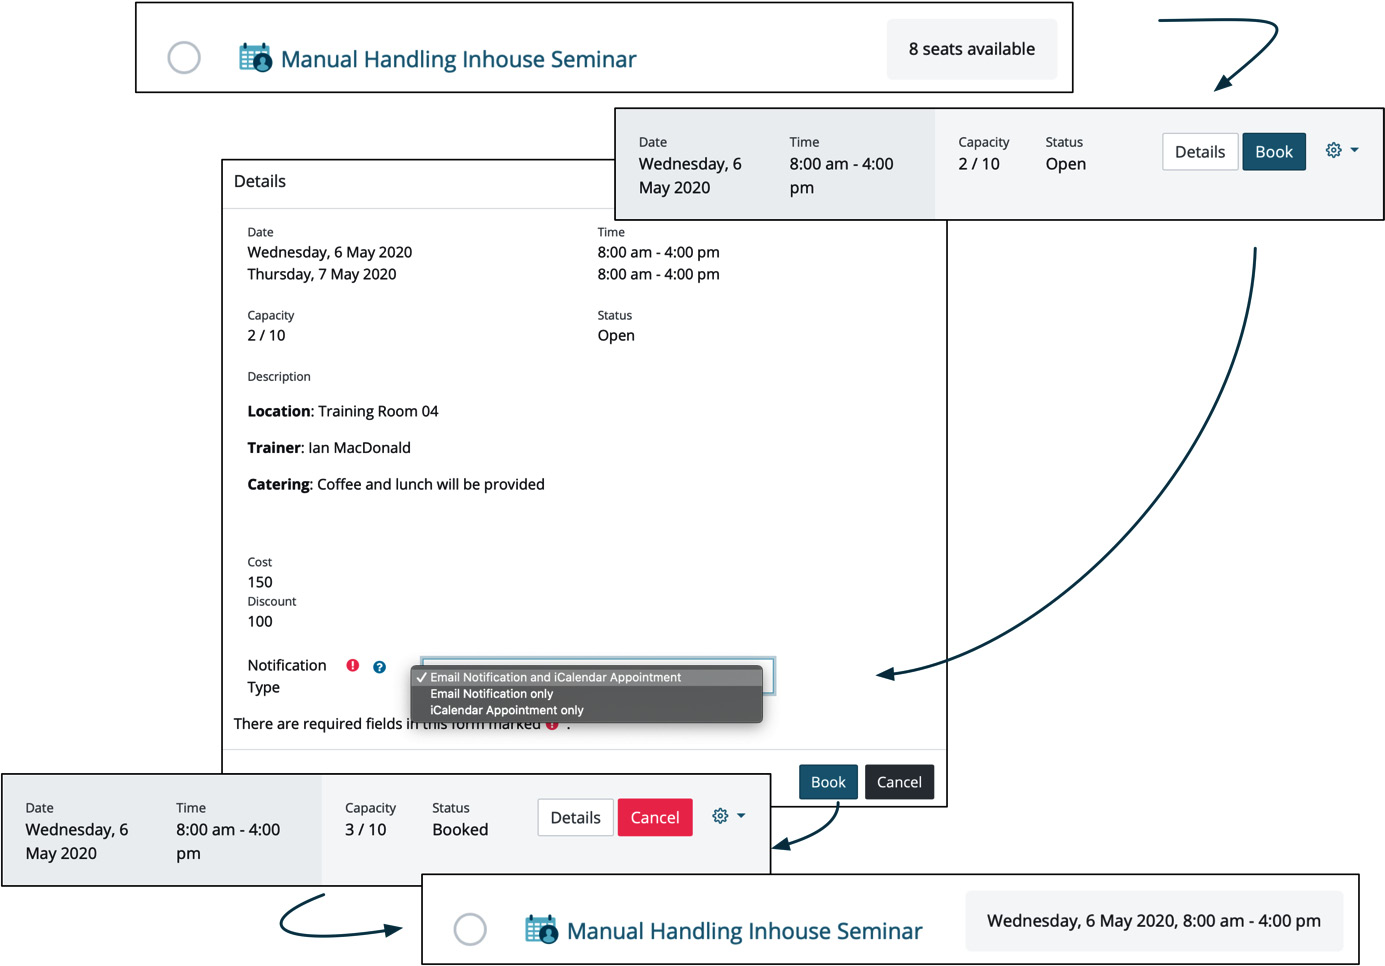
Figure 9.14 – Signing up for an appointment
The booking form is identical to the Details screen we saw earlier, with an additional Notification Type selection that allows the user to select how they would like to be notified about their booking. The options are as follows:
- Email Notification and iCalendar Appointment: Sends the appointment information via email and sends an iCalendar invitation
- Email Notification only: Sends the appointment information via email
- iCalendar Appointment only: Sends an iCalendar invitation
Notifications will be covered later in this section when we deal with messaging customization.
Signing up other users
In addition to the described self-sign-up process, Moodle Workplace also supports a workflow where a user with the correct permissions can sign other users up for a seminar. A typical example where this takes place is when a manager books a team member onto a session, or a seminar administrator books an appointment on behalf of a customer who signed up via email. The steps to do so are demonstrated in the following series of screenshots:
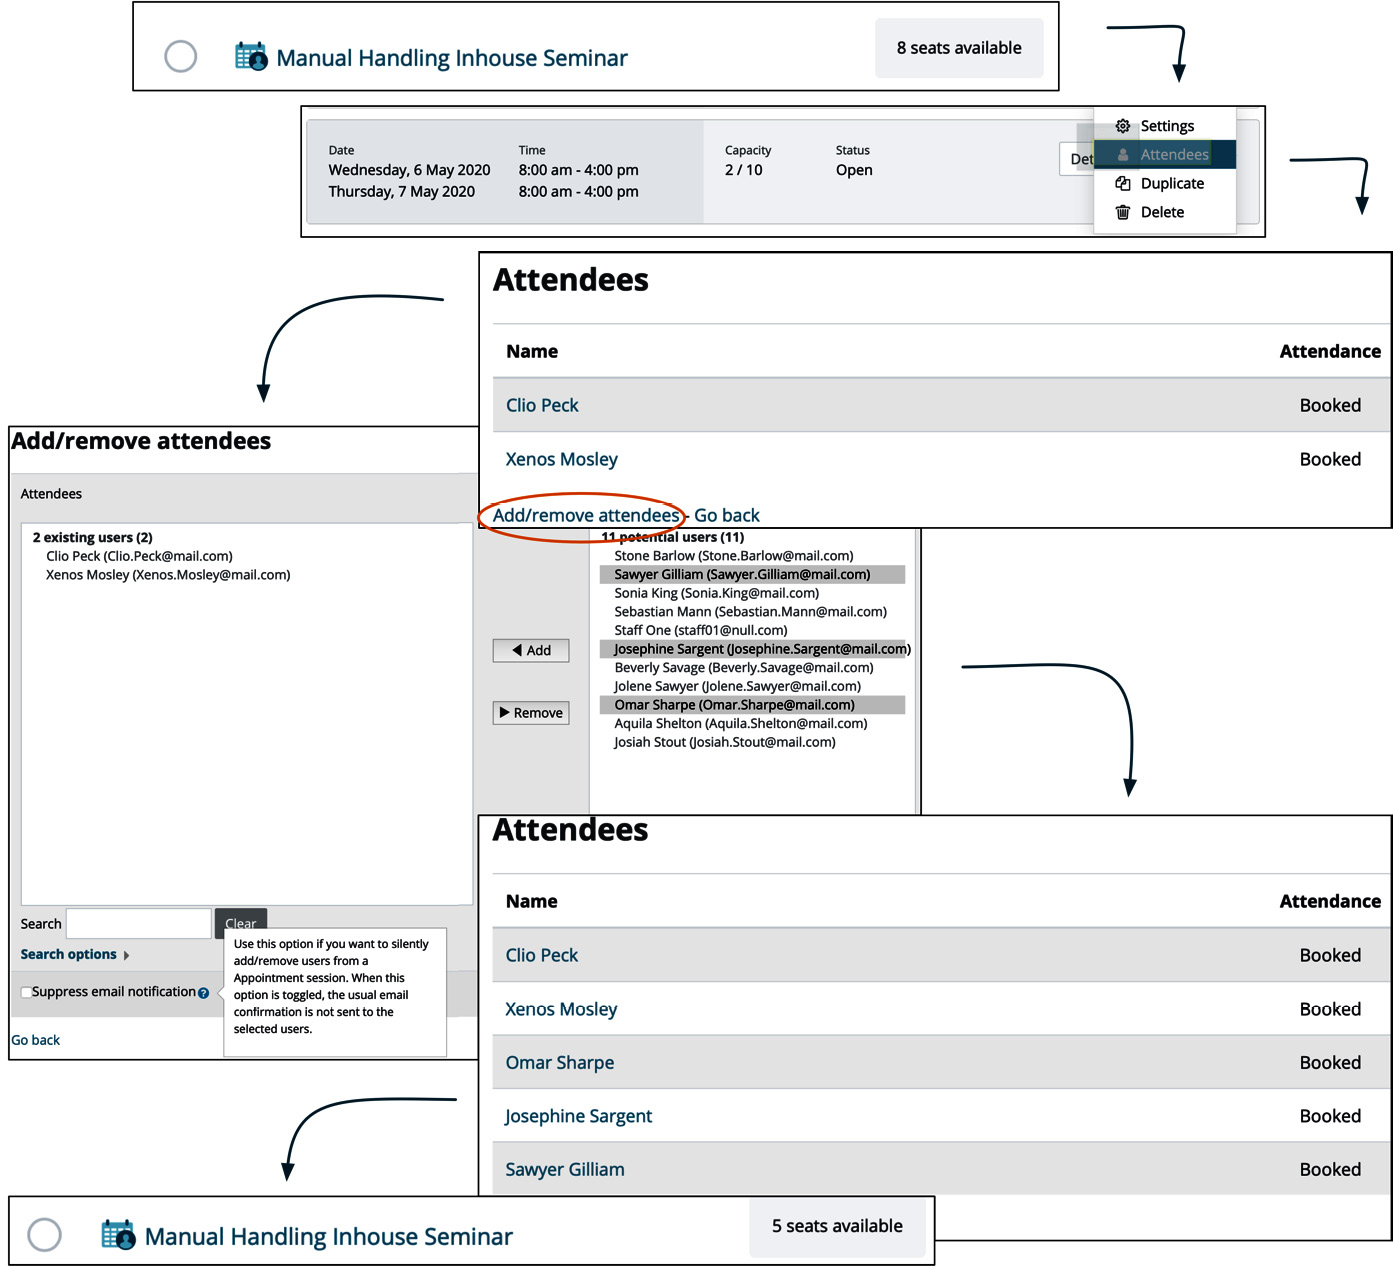
Figure 9.15 – Signing up attendees
As before, the appointment activity displays the number of available spaces for all appointments. To sign up users, you will need to select the Attendees option from the menu to the right-hand side of the appointment. This will direct you to a screen that displays the list of all the participants already signed up—in our case, two—and an option at the bottom labeled Add/remove attendees.
Once you select this link, you will see the standard Moodle user-selection screen. All users of the current tenant are available for selection, not just users who are already enrolled in the course. Any selected users will be enrolled in the course automatically before they are signed up for the appointment.
There is an option at the bottom left called Suppress email notifications, which should be enabled if you wish to add or remove participants from an appointment silently. If this option is toggled, no email confirmation will be sent to the newly selected users. Once you have added users and you navigate back, you can see that the list of participants has been amended accordingly and the number of seats has been updated.
Now that we have signed up users to appointments, let's see how to reverse this process and look at cancelations.
Canceling an appointment
Canceling appointments is a standard feature of any seminar management process. As soon as a user has (been) signed up for an appointment, the booking can be canceled if cancelations are permitted in the advanced settings, as described earlier. The two-step process to do this is shown in the following screenshots:
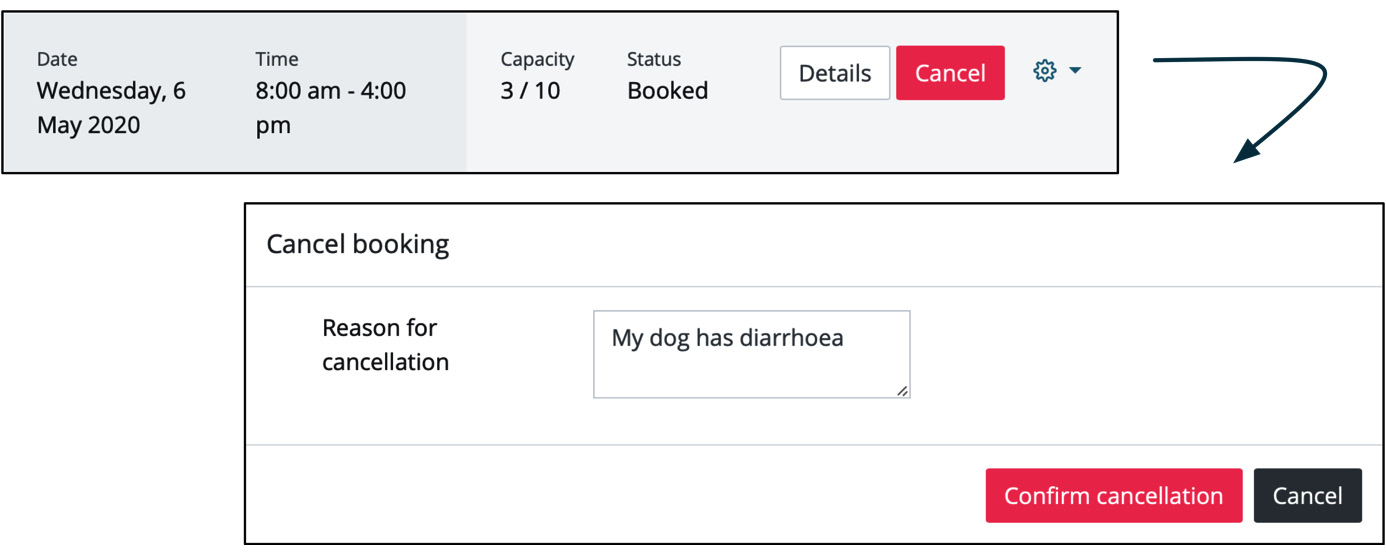
Figure 9.16 – Canceling attendance
When the Cancel button has been hit, the participant can provide an optional Reason for cancellation message and then click on Confirm cancellation. The user will then be removed from the list of attendees. If a waitlist is in place, the next user will take the freed-up spot; the handling of waitlists is described in the next sub-section.
To cancel other users, you need to follow this same process, but instead of adding users to the list of participants, you need to select participants and remove them from the list.
Currently, there is no way to see all the users who have canceled their attendance. However, this feature is currently on the roadmap and is likely to arrive shortly in Moodle Workplace.
Handling waitlists
A waitlist is a queue of users who wish to sign up for an appointment, where its capacity limit has already been reached. If the waitlist facility has been enabled at the appointment level, potential attendees can add themselves to the waiting list via the Join waitlist button. This option is only available when the appointment status is Full:

Figure 9.17 – Joining a waitlist
Interestingly, when a user signs up other users via the mechanism described previously, it is possible to overbook an appointment; the capacity might then show as 12/10. This might be necessary when a compulsory training session has to be completed by a specific number of staff, exceeding the usual capacity, or when a senior manager has to be squeezed in at the last minute.
Important Note
The waitlist operates on a first-in, first-out basis.
The first person who joins the waitlist will be at the top of the queue. Once a place becomes available, this first user will be moved to the list of attendees and all users on the waitlist move up a spot. This mechanism is depicted in the following diagram:
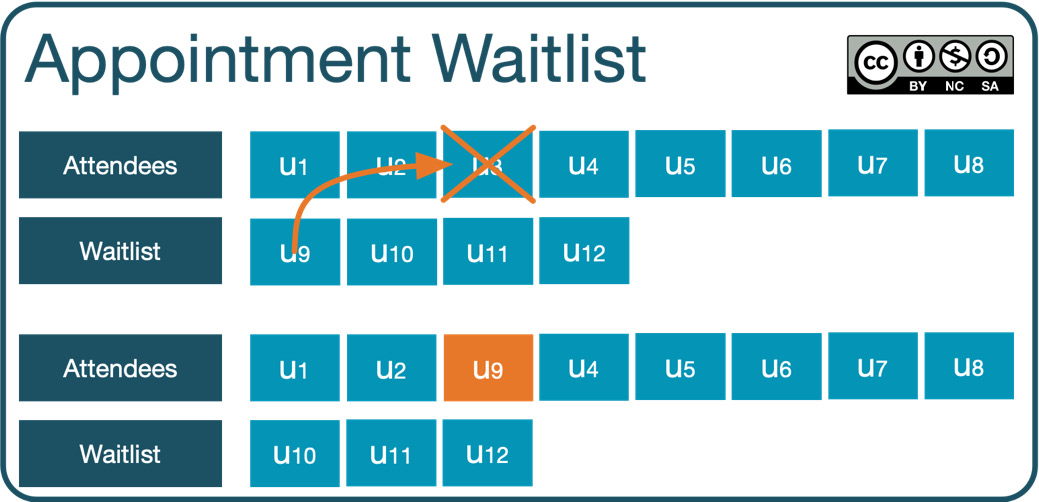
Figure 9.18 – Waitlist handling
Initially, the list of attendees contains eight users, which is the maximum capacity that has been set for the appointment. Four more users are on the waitlist, with user u9 in the top spot. If user u3 cancels the appointment, user u9 will take the free spot, and the waitlist will only contain three remaining users.
This concludes our look at the part of the attendance workflow before the in-person meeting takes place. Next up is taking attendance, which takes place during or after the actual event.
Taking attendance
Once a session has started, the trainer of the course has permission to take attendance. First, go to the Attendees option in the menu to the right of the appointment. If the status of the appointment has changed to Finished, a new option called Take attendance will appear at the bottom left of the screen. Once you select this, you will be shown the list of all the signed-up users, as well as options to specify the attendance status, as in the following screenshot:
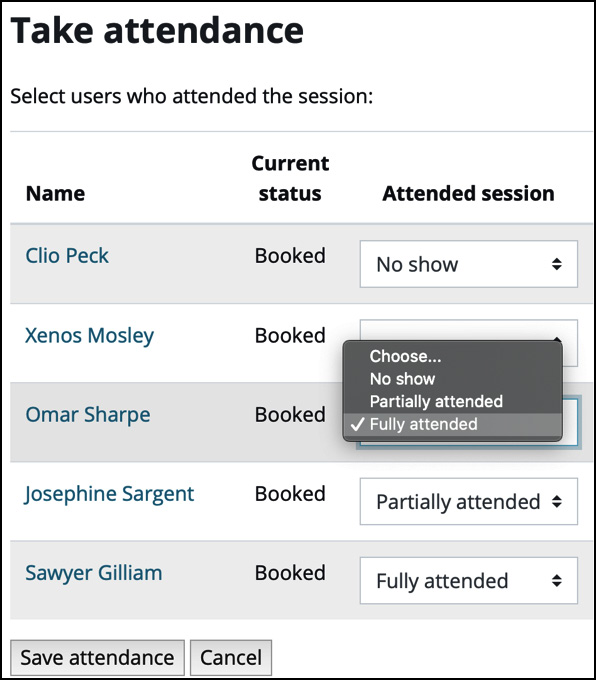
Figure 9.19 – Taking attendance
The three self-explanatory attendance options to choose from are No show, Partially attended, and Fully attended. Once saved, the current status of each participant will change to the selected value.
At the time of writing, the attendance status is for informational use only. What is missing is an activity completion criterion that makes use of the status, which would allow us to specify whether an appointment has to be fully attended to complete a course. This feature is expected to be implemented very shortly.
Phew, that was a very vast section with a lot of intertwined processes. To recap, we have dealt with the various workflows that are currently supported by Moodle Workplace's Appointment booking activity, which were divided into the setup (managing appointments, sessions, and date/time slots) and the participants (sign-up, waitlist, cancelation, and attendance taking). The last element of the Appointment booking facility that we will cover is customizing notifications.
Customizing notifications
A feature that has been mentioned a few times in this chapter is sending out notifications to participants and external users. You have the option to customize the content of these messages via the Customised notifications activity option:

Figure 9.20 – Customizing notifications
There are four messages that can be configured:
- Confirmation message: Sent out when signing up for the appointment takes place.
- Reminder message: Sent out a number of days prior to the session start date. The number of days is defined in the Days before message is sent setting.
- Wait-listed message: Sent out when a user is added to the waitlist.
- Cancellation message: Sent out when a user's participation is canceled.
Each message contains a subject (notification title) and the message itself (notification body), which has to be in plaintext—that is, HTML text is currently not supported. Placeholders are a flexible means to customize each message. The following placeholders are available for all four message subjects and bodies:
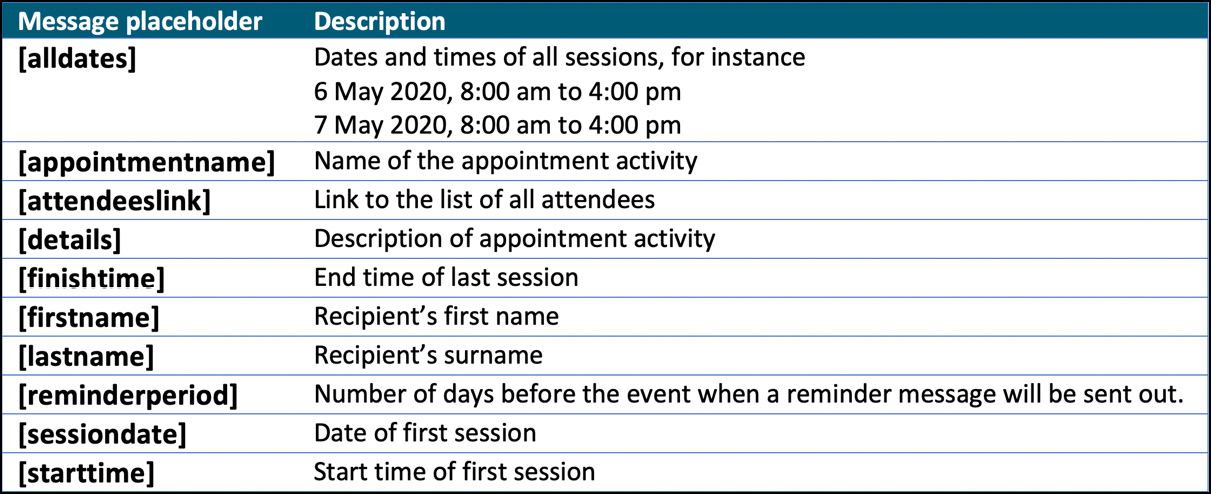
Figure 9.21 – Message placeholders
Appointment messaging can be configured from Site administration | Plugins | Activity modules | Appointment. There are a number of parameters that have an impact on how appointment messages are sent out. These are listed in the following table:
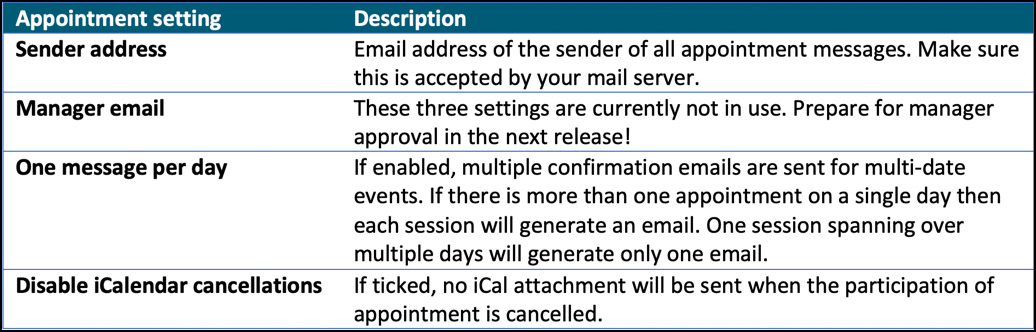
Figure 9.22 – Global appointment settings
Please bear in mind that these work in tandem with the standard messaging settings in Moodle core. This completes the section on appointment activity. To complete this chapter, let's have a look at the Appointments report source provided by Workplace's report builder, which takes into account any user- and appointment-related data that we have dealt with so far in this chapter.
Reporting on appointments
In the previous chapter, you learned how to generate custom reports using the built-in report generator. One report source that we only mentioned briefly but didn't go into great detail about is Appointments, which deals with the face-to-face training covered in this chapter. The Appointments report source is unique in that it provides data from an activity, rather than users and courses.
First of all, you need to create a report using the Appointments report source. It is best to add the default configuration, as in the following screenshot:
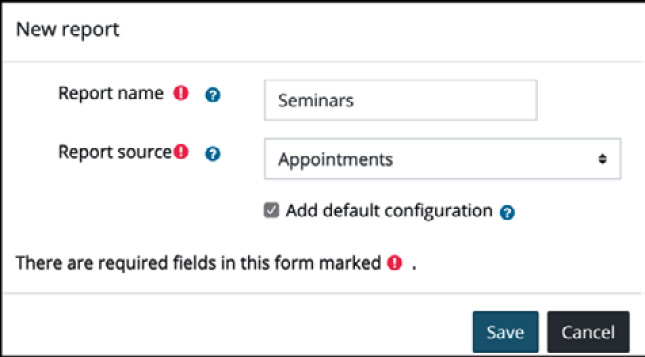
Figure 9.23 – Creating an appointment report
In addition to the fields we find in most report sources (such as relating to the course, course enrollment, course completion, and job assignments), the attendance report source provides fields on all three appointment levels (Appointment activity, Appointment, and Appointment sessions), as well as on Attendees, as shown in the following field selectors:
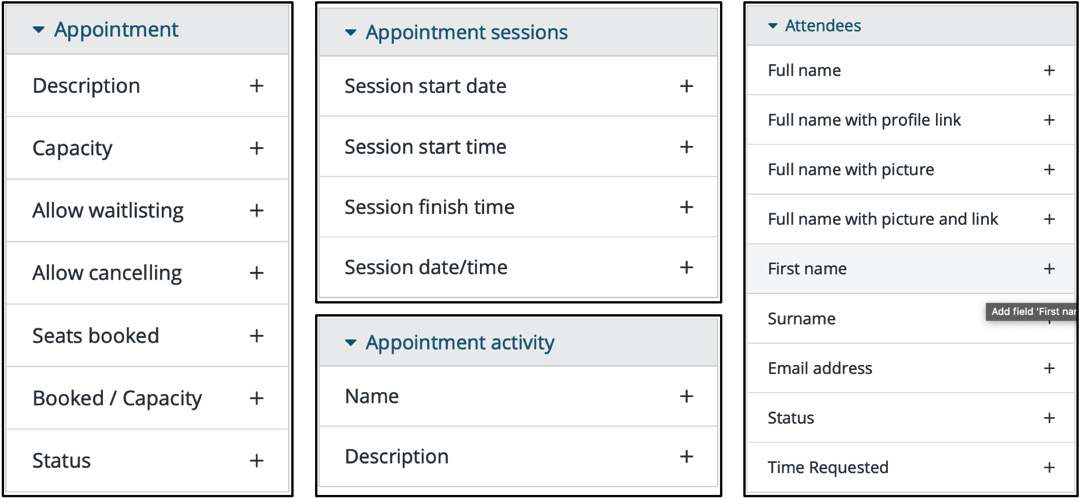
Figure 9.24 – The Appointments report source fields
The interesting aspect of the attendance report source is the fact that the data from course activities can be consolidated in a single report, which allows the creation of seminar status reports. The key elements of the report source are the following three data fields to be used in conditions and filters, respectively:
- Capacity (appointment): The number of users registered versus the total seats available
- Session availability (appointment): Full, Empty, or Partially full
- Status (participant): User Cancelled, Waitlisted, Booked, No show, Partially attended, or Fully attended
The following example report shows the name of the seminar (the course name could have been displayed, too), the date and time of all the sessions, the Booked / Capacity pair, and the session's status:
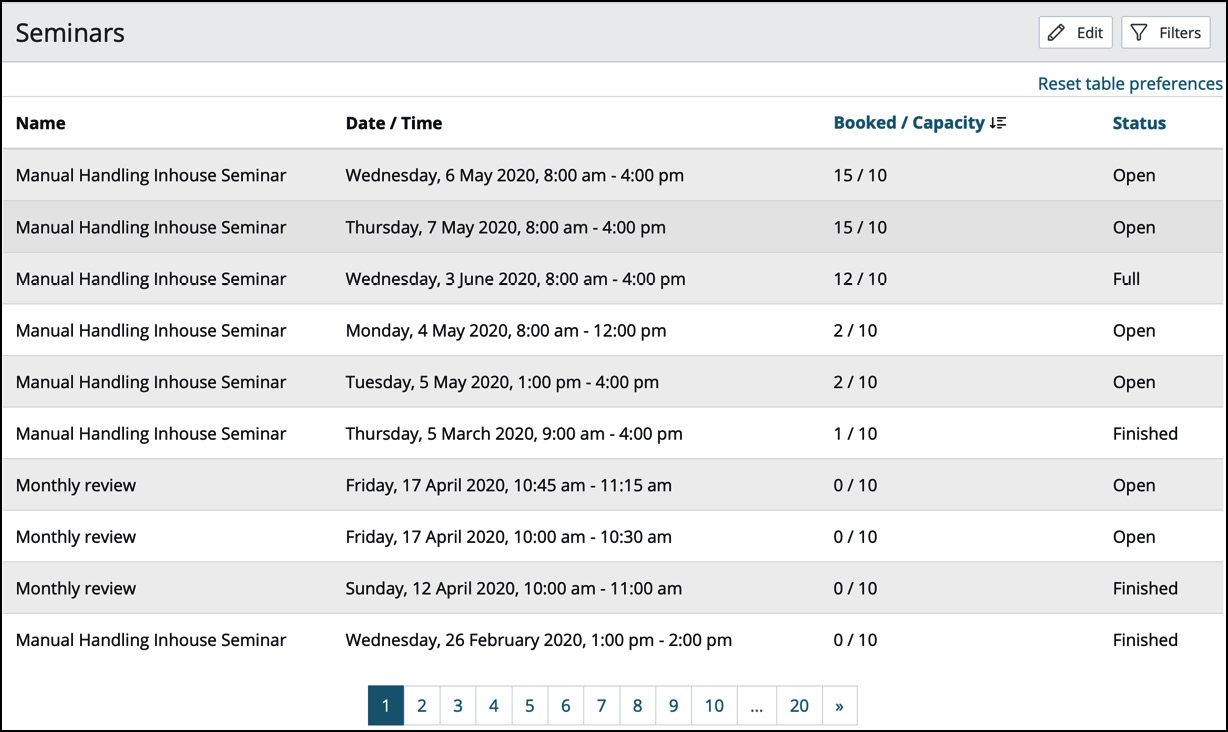
Figure 9.25 – Sample appointment report I
Using the aforementioned filters, the same report can easily be modified to provide information on all the Full sessions or any sessions with a waitlist:

Figure 9.26 – Sample appointment report II
The list of fields available for the report itself and for use as conditions and filters will be extended in future versions. For instance, once we have the option to directly link to an appointment activity, it will be possible to mimic a basic seminar catalog. Until then, we will have to make do with the elements available in the attendance report source.
Summary
In this chapter, you have learned how to organize and manage seminars and other face-to-face training using Moodle Workplace's attendance activity. These can also be applied for blended settings as well as pure online setups, such as webinars.
First, we dealt with Workplace's unique approach to classroom-based settings, which is based on the Appointment booking activity, comprising appointments and sessions.
Next, we dealt with the management of appointments, where we added appointment bookings, appointments, and sessions. We then looked at different aspects of the appointment workflow, namely signing up to and canceling an appointment, handling waitlists, taking attendance, and customizing notifications.
Lastly, we covered the reporting of appointments, where some sample reports on classroom-based training were created.
If face-to-face training is a crucial component of your organization's staff development strategy, you should now be familiar with the tools available in Moodle Workplace to set up and manage the required workflows. The Appointment booking activity is certainly a first step in the right direction toward full-blown seminar management. Expected enhancements in future releases will close the gap to implement more aspects of classroom-based and blended setups.
This concludes the last chapter that deals with a Moodle Workplace-specific feature, of this book. Next, we will look at the various options for aligning the learning management system with your corporate identity and corporate design.