Chapter 10: Mobile Learning
In most organizations, mobile learning is becoming the norm for e-learning and forms a crucial part of the learning and development strategy. Mobile learning gives your team more flexibility whenever and wherever learning takes place; it offers self-directed and independent learning, supports on-the-job training, boosts micro-learning, and engages with the millennials in your team. Mobiles are typically used for consumption and communication, rather than authoring and administration.
Moodle has released an app for iOS and Android that allows users to interact with a Moodle Workplace system. The app is best suited for learners and supports key functionality for participants to access course content, receive notifications, upload data, monitor progress, and interact with other users. The Workplace app is an alternative to accessing Moodle via a web browser on a mobile device (smartphone or tablet) and has the advantage of being specifically designed for mobile usage, both online and offline.
Firstly, you will learn about any preparatory steps that your learners should take to start using the Workplace app. We will distinguish between accessing Moodle Workplace from mobile browsers and through the app, which is the focus of this chapter. We will then go through the centrally managed settings to enable the app and configure different authentication types. We will also briefly look at installing the app on mobile devices.
Secondly, we will briefly explore the Moodle Workplace app, which is based on its Moodle counterpart. As always, we will focus on Workplace-specific features, namely programs and certifications, appointment bookings, and the Teams dashboard. The latter is only available on the branded app, which we will also briefly introduce.
Lastly, we will look through options of how the Workplace app can be configured to provide your colleagues with a suitable mobile learning experience. This includes mobile features and mobile notifications.
So, by the end of this chapter, you will know how to prepare, configure, and use the Moodle Workplace app. This chapter comprises the following three main sections:
- Preparing to use the Moodle Workplace app
- Exploring the Moodle Workplace app
- Configuring the Moodle Workplace app
Preparing to use the Moodle Workplace app
Before users can learn new content, cooperate with colleagues, or monitor progress from a mobile device, there are several things to consider. First, a decision has to be made on how to access the learning management system, either from a mobile web browser or a dedicated app. The focus of this chapter is on the mobile app, which has to be enabled centrally. Users will have to download and install the app before the first login takes place. All these items will be covered in this section, starting with a short introduction about the two ways to access the Moodle Workplace app from a mobile device.
Accessing Moodle Workplace from mobile devices
Generally, there are two ways that a learner can access Moodle Workplace via a mobile device—directly via a web browser on a cell phone or a tablet, or via Moodle's app for iOS and Android.
The web browser view is effectively the same as we have seen throughout the book, only it is optimized via responsive design for smaller screen sizes. There are three main arguments relating to using Moodle Workplace via a mobile browser—users have the same functionality available as on a desktop device, the handling is identical, and users won't have to install an extra app onto their mobile device.
The Moodle Workplace app provides an alternative view of the same data, and interactions have been optimized for mobile usage. Furthermore, offline usage and synchronization are supported, which is indicated by a little cloud symbol. Another advantage of the mobile app over the browser view is the support of push notifications, which we have all become accustomed to.
The following two screenshots show the difference between the two usage types when accessing the same dashboard:

Figure 10.1 – Browser view versus app view
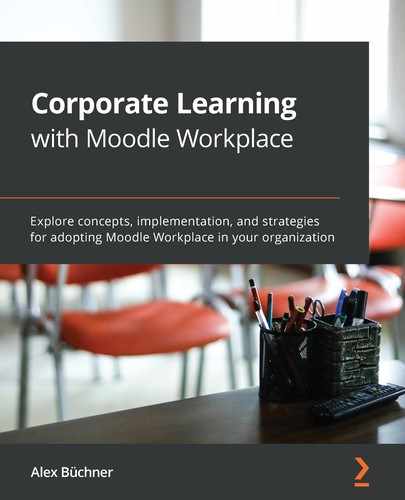
The following diagram shows a simplified process of what happens when Moodle Workplace is accessed from a mobile device (details for the web browser are at the top and for the app are at the bottom):
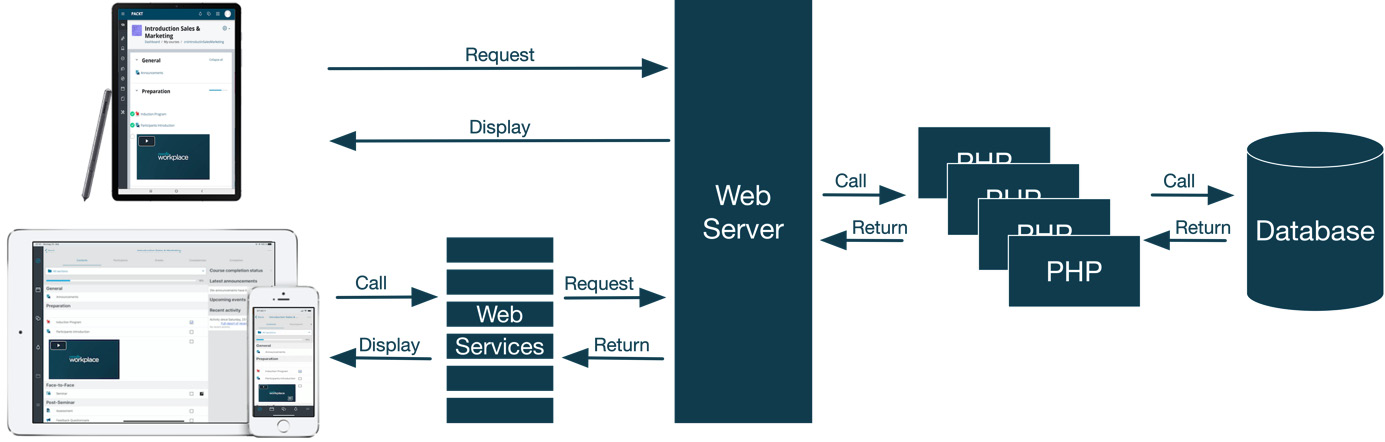
Figure 10.2 – Accessing Moodle Workplace via the browser and app
Let's go through the preceding diagram from left to right and back again. When a user makes requests via the web interface, the browser passes the request to the web server, which calls the PHP module responsible for the call. The PHP module calls the database with an action (a query, update, insert, or delete operation), which returns the requested data. Based on this information, the PHP module returns data (usually in the form of HTML or JavaScript code) to the web server, which passes the information to be displayed back to the user's browser.
When accessing a Moodle Workplace instance via the app, the process is precisely the same, except for the first step, which involves calling web services, which request data from the web server. The same applies to the returning information, which is also passed through web services. Web services are the standard communication protocol between web and mobile applications. More information on web services can be found in Appendix A, Moodle Workplace Web Services.
We will be exclusively focusing on the Moodle Workplace app in this chapter. Before your learners can use the app, however, the following prerequisites must be fulfilled:
- App usage must be enabled on your site.
- Users must download and install the app on their mobile device.
- Users must authenticate via the app.
We are going to run through all three steps before exploring the Workplace-specific features of the app itself. Let's start by enabling the app.
Enabling the app
The process of enabling the Moodle app to interact with your Moodle site has been greatly simplified. Go to Site administration | Mobile app | Mobile settings and tick the Enable web services for mobile devices option, as in the following screenshot:
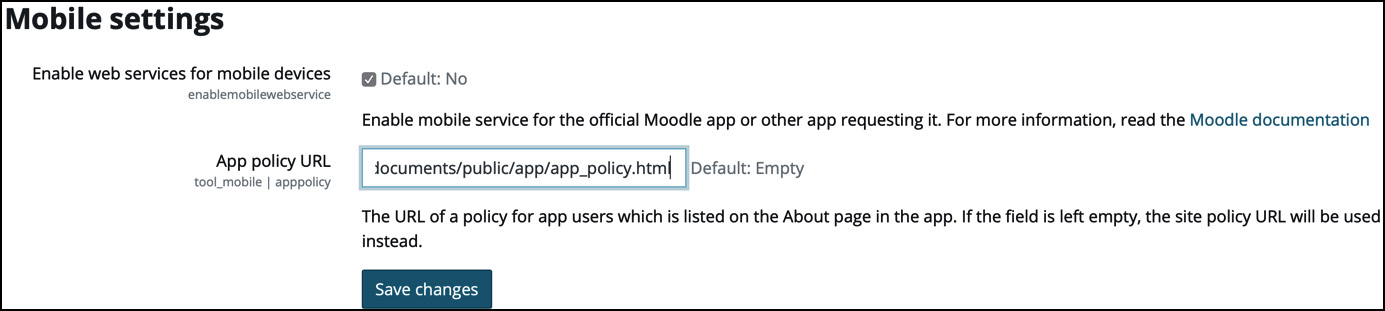
Figure 10.3 – Enabling the Workplace app
That's it. No other steps are required. Well, almost. You should also enable the Mobile notification option, which you can find under Site administration | Messaging | Notification settings. We are going to cover the settings of the mobile notifications plugin later on in the section on customization.
The second configuration option is App policy URL. If set, this page will be listed on the app's about page; if left empty, the main site policy will be used instead.
Important Note
It is highly recommended that you enable HTTPS with a valid certificate. The Workplace app will always try to use a secured connection first.
Now that the app usage has been enabled, let's look at how your workforce can install the app on their snazzy mobile devices.
Installing the app
Your learners will need to download and install the app from Apple's app store or Google Play. There is no charge for the app. Screenshots of both of these apps on the Apple app store (on a tablet) and Google Play (on a phone) are shown as follows:
Figure 10.4 – The Workplace app for iOS and Android
To install the app, users need to follow the usual steps on their mobile devices (starting with GET on iOS and Install on Android).
The Moodle Workplace app is based on the official Moodle app. It has the same functionality plus some extra features to cater for programs and teams (branded version only). It is expected that more Workplace-only tools will be supported in future releases of the Workplace app.
Important Note
The Moodle Workplace app only works with Moodle Workplace. The Moodle app only works with standard Moodle.
Don't be discouraged about any negative reviews since almost all poor feedback comes from users who expected the app to work standalone without access to an existing Moodle Workplace system. This leads nicely to the final enablement step—accessing your Moodle Workplace system via the app and authentication.
Authenticating on the Moodle Workplace app
Once the app has been installed and launched for the first time, each user will have to authenticate with the Workplace instance. Moodle Workplace supports three different login types, which have to be selected by the administrator at Site administration | Mobile app | Mobile authentication, as in the following screenshot:

Figure 10.5 – Authentication types
The Type of login field provides the following three options:
- Via the app (default): This is the default authentication mechanism that applies to all manual accounts.
- Via a browser window (for SSO plugins): If your site uses an SSO authentication method, such as MS-AD, LDAP, or OAuth, this mechanism opens a separate browser window where the login credentials have to be provided.
- Via an embedded browser (for SSO plugins): This is effectively the same as the previous option but provides a better user experience. However, not all authentication plugins will work in an embedded browser—for instance, when JavaScript popups are required.
QR code access is an alternative way to let your users access the site by scanning the matrix barcode. This mode can be configured with a site URL (users will have to enter their credentials) or with automatic login. The latter option may be restricted depending on your app subscription plan.
If your organization uses a custom branded app and Type of login is set to one of the two SSO types, then the URL scheme option can be set. This will result in only the custom branded app working for the site, whereas the official Moodle Workplace app will not work.
The Minimum app version required option can usually be left empty and should only be set if you want or need to force users to update to an up-to-date version of the Moodle Workplace app.
The three different login types will show up for the users differently, as shown in the following sequence of screenshots:

Figure 10.6 – Different login types and authentication
During the initial launch, the URL must be entered; on subsequent launches, this will already be pre-filled. The same applies to the login credentials unless the admin has enforced logout in Site administration | Mobile App | Mobile features.
On the branded app, no URL has to be entered since it is hardcoded into the app. Also, the branding of the app will (obviously) look different from the ones shown in this chapter.
Logging in via the app displays a login window as part of the app. When logging in via a browser, a notification will be displayed telling the user that the default browser on the mobile device will be opened before the redirection takes place. Once the credentials have been entered, Moodle Workplace re-directs the user back to the app. The embedded browser view effectively looks the same, but no external browser will be opened.
This concludes the section on the preparatory steps that have to be taken before the Moodle Workplace app can be used. We first discussed two options on how to access your Workplace system from a mobile device, before focusing on the mobile app for iOS and Android. Next, we enabled the app and configured authentication. We also briefly covered the installation of the app on users' devices. Now that this has been done, your learners are ready to use the Workplace app, which we are going to explore in the following section.
Exploring the Moodle Workplace app
The Moodle Workplace app is based on the standard Moodle app and comes with some extra features to cater to the Workplace-specific functionalities, as well as another color scheme. The objective of this section is to list the key features of the Moodle app, before covering the features that are unique to the Moodle Workplace app in more detail.
This section comprises the following two sections:
- The standard Moodle app
- The Moodle Workplace app features
The standard Moodle app
While the standard Moodle app only supports a sub-set of learner-centric features, it has the advantage of being specifically designed for mobile usage and also supports offline content. The Workplace app is based on the Moodle app and contains all its functionality, as well as some Workplace-specific elements. Here is a short list of highlights of the features provided by the Moodle app (derived from docs.moodle.org/en/Moodle_app):
- Access the course dashboard.
- Browse the content of courses, both online and offline.
- Connect with course participants and quickly find and contact other people on courses.
- Receive instant notifications of messages and other events, such as being allocated to an onboarding program or being awarded a badge.
- Upload images, audio, video, and other files from mobile devices.
- Track progress by checking the course completion progress.
- Browse learning plans and competencies.
- Complete activities anywhere and at any time and attempt quizzes, post in forums, play SCORM packages, or edit wiki pages.
A full list of the Moodle app's features and links to other Moodle app-related pages can be found on the Moodle docs at docs.moodle.org/en/Moodle_app_features. Now that we have briefly covered the Moodle app, let's have a closer look at the Workplace-specific features.
The Moodle Workplace app features
This app has been designed with learners and managers in mind; that is, it is neither intended nor possible to create or modify courses, set up or configure workflows, or carry out administrative tasks. A vast majority of Moodle Workplace-specific features, such as managing tenants, setting up job positions based on organizations and positions, or creating dynamic rules, fall in the latter two categories. So, what are Workplace-specific features that are relevant to learners and managers on a mobile app? The following table lists the key features and how the Moodle Workplace app supports them:

Figure 10.7 – Workplace-specific learner features
In the remainder of this section, we will briefly present the following features directly supported in the app:
- Programs and certifications
- Appointment bookings
- The Teams dashboard
The Workplace features that are currently only supported via custom menu items will be dealt with in the next section, where we will cover the customization of the app. Let's get started with programs and certifications.
Programs and certifications
Programs allow you to establish learning pathways for your employees by adding a combination of courses or a hierarchical sequence of courses. From a learner perspective, programs contain several courses that have to be completed. The app provides insight into programs via the Programs view of the dashboard. The first screenshot in the following figure shows an example of a dashboard tile, indicating the program's name, due date, and completion progress. The download icon indicates that the program's content is available offline:

Figure 10.8 – Programs in the app
If you select the See content button, you will navigate to the first level of the program. Here, there are two sets, called Q1 and Q2. When you choose an available level, you will be directed to a level further down; in our case, the one that contains the courses. Once you select a course, you will be at the familiar course-level view.
Certifications are based on programs, as we learned in Chapter 6, Onboarding and Compliance. Right now, certifications are not explicitly supported by the app; that is, meta-information about issuing and expiry are not displayed. Instead, programs that are contained in certifications are presented and handled as described previously.
Depending on the program's status, the following will be displayed on the right button on the program tile:
- Open or Overdue: The Continue button jumps straight to the last course that the user has been working on. If the program hasn't been started, the button is labeled Start and will jump to the first course in the program.
- Completed: This button will be inactive and will be labeled Completed next to a checkbox.
- Future allocation or Suspended: The program will be hidden from the app dashboard.
Within a course, all standard Moodle activities are fully supported, both for viewing as well as contributing activities. The only Workplace-specific activity is Appointment booking, which we are going to deal with next.
Appointment booking
The standard behavior of the Moodle app is to open the default web browser when a third-party or unsupported plugin is selected in a course. All core Moodle activity and resource types are fully supported in the Moodle app, both online and offline. The same holds for Moodle Workplace, with one exception—the Appointment booking activity, containing data on seminars. At the time of writing (version 3.9.2), appointment bookings can only be viewed in the web browser, as shown in the following screenshot:

Figure 10.9 – Appointment bookings
It is expected that the Appointment bookings plugin will be supported in the mobile app in an upcoming release. The same holds for the Course certificate activity, which is currently not supported natively. However, the associated notifications are fully mobile-aware; that is, when a certificate is issued, the user will be notified accordingly.
The Teams dashboard
The Teams dashboard is central for managers to monitor the progress of their subordinates. The branded Moodle Workplace app supports a dedicated dashboard that contains all their team members, as well as information about active, overdue, and completed programs and certifications. An example of the Teams dashboard can be seen in the following screenshot:

Figure 10.10 – The Teams dashboard
As mentioned before, the manager dashboard is currently only available in the Moodle Workplace branded app, which is the topic of the next sub-section.
The Moodle Workplace branded app
Moodle offers an attractive service, called the Moodle Workplace branded app. As the name suggests, its main aim is to provide you with an app where the look and feel are in line with your corporate brand, which we will look at in Chapter 11, Corporate Identity. However, on top of supporting your brand itself, the branded Moodle Workplace app comes with several additional advantages:
- A separate entry in the Apple and Google Play app stores.
- The URL is already fixed in the app, so there is no need for your users to add the web address.
- Separate hosting space in Moodle's GDPR-compliant push notifications infrastructure.
- Tracks mobile engagement analytics to better understand behaviors and improve your mobile-friendly learning experience. It also gets insights into how your learners use your app with personalized access to mobile engagement data.
- Supports the Teams tab as mentioned previously.
Bear in mind that the branded Moodle Workplace app is a subscription service provided by Moodle. For more details, contact your local Premium Moodle Partner or check out more details at moodle.com/app.
This concludes the section on the standard features of the Moodle Workplace app. Next up are options to centrally customize the app from within your Workplace instance.
Configuring the Moodle Workplace app
The beauty of the Moodle Workplace app is that it can be customized "from the outside"—that is, by configuration only. In this chapter, you will learn how to tailor the app to your learners' needs. The two main areas of customization are as follows:
- Mobile features
- Mobile notifications
It is also possible to extend the functionality of the mobile app via development. However, that is beyond the scope of this book since programming skills are needed. More details can be found at docs.moodle.org/dev/Mobile_support_for_plugins. Let's get started with the mobile app features.
Mobile features
The Moodle app lets you customize some features that can also be harnessed in Moodle Workplace. You will find the two relevant settings under Site administration | Mobile app | Mobile features, as in the following screenshot:

Figure 10.11 – Mobile features
The Disabled features list lets you remove features from the mobile app. In most commercial setups, some standard Moodle tools are not used since they are targeted at educational institutions. Typical features that are disabled are grades, blogs, and notes. It is recommended that you remove any features that are not being used to reduce the app's complexity and, therefore, improve your learners' learning experience.
The opposite of removing features is adding additional items to the app's main menu. These items have to be specified with Custom menu items. The format of each entry is as follows (all entries have to be separated by the pipe symbol):
item text|link|opening method|[language code]
item text is the label that will appear in the app. The link field sets the URL that the user will be directed to. The app supports four different opening methods:
- app: For linking to items supported by the app. For instance, on our site, the link to My badges is supported since badges can also be accessed via the user's profile.
- inappbrowser: For opening the link in a browser without leaving the app.
- browser: For opening the link in the device default browser outside the app.
- embedded: For displaying the link in an iframe in a new page on the app (no scrolling possible).
The following is a screenshot from the Workplace app, where grades, the site blog, and tags have been removed and the three custom menu items have been added. The before and after screenshots demonstrate the impact on a user's menu on the app:
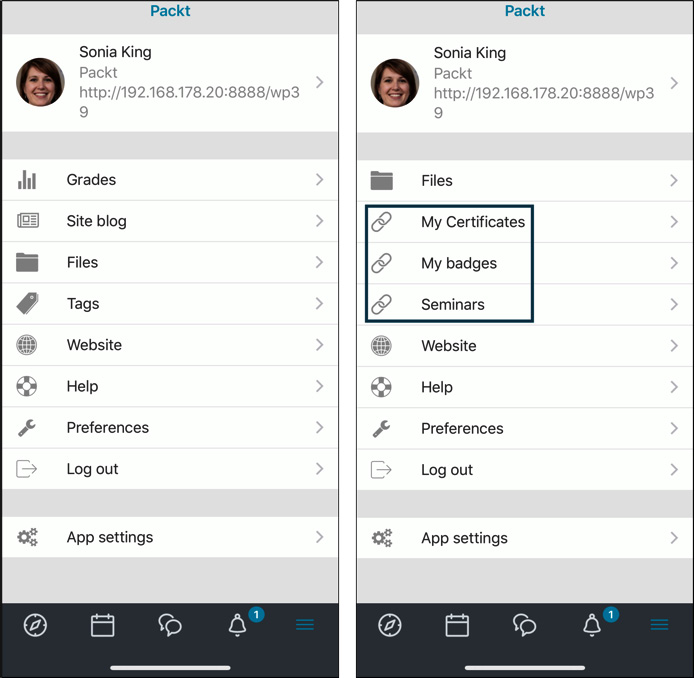
Figure 10.12 – Mobile custom menus
The optional language parameter displays the item to users of the specified language only. In our sample, the link to my certificates has also been provided in German.
The Custom language strings setting provides a further language-related configuration option. Since the Workplace app is based on the Moodle app, some terminology is aimed at educational establishments, which isn't suitable for a commercial setting. For instance, you might want to change the term student to learner or course to module, as in the following screenshot:

Figure 10.13 – Custom language strings
Words and phrases displayed in the app can be customized by adding a separate line for each entry using the following notation:
string identifier|custom string|language code
The full list of string identifiers can be found under the Custom language strings section at docs.moodle.org/en/Moodle_app_guide_for_admins. The custom string is the replacement text for the language set via the language code.
Make sure you sync the app to apply the configured changes (Menu | App settings | Synchronization).
We already mentioned the built-in push notifications mechanism that has to be activated, which we will cover in the next sub-section.
Mobile notifications
The Moodle Workplace app supports push notifications for different mobile platforms. We already enabled mobile notifications from Site administration | Messaging | Notification settings when we activated the app in the first section. To configure the mobile notifications, navigate to the form shown in the following screenshot by going to Site administration | Messaging | Mobile:

Figure 10.14 – Mobile messaging settings
The default values connect to the public Moodle messaging server. All you need to do is click on Request an access key (the link at the bottom). This requires your site to be registered with moodle.org (via Site administration | Registration).
The following is a schematic overview of how push notifications work. Apple Push Notification Service (APNS) and Google Cloud Messaging are the respective gateways for relaying push notifications on iOS and Android devices:

Figure 10.15 – AirNotifier
Moodle's messaging server is a public AirNotifier system and, therefore, carries a (small) degree of risk. For some privacy-conscious organizations, this approach will not be acceptable, so it is possible to set up your own notification infrastructure, which involves setting up a local Airnotifier server. You will find instructions on how to do this and links to related resources at docs.moodle.org/en/Moodle_app_notifications.
This concludes the section on customizing the Moodle Workplace app, which dealt with various mobile features and setting up mobile notifications.
Summary
In this chapter, you learned how to prepare, use, and configure the Moodle Workplace app.
Firstly, we dealt with any preparatory steps to take before your learners can commence using the Workplace app. We showed the pros and cons of accessing Moodle Workplace from mobile browsers and through the app, which was the focus of this chapter. We then went through centrally managed settings to enable the app and configured different authentication types.
Secondly, we briefly explored the Moodle Workplace app, which is based on its Moodle counterpart. We focused on the Workplace-specific features, namely programs and certifications, appointment bookings, and the Teams dashboard. We briefly introduced the branded Workplace app service offered by Moodle.
Lastly, we look through options on how the Workplace app can be customized, which included the configuration of mobile features and mobile notifications.
You might have spotted one administrative area of the mobile app administration section we left out, namely Mobile appearance, which deals with the look and feel of the app. How to bring Moodle Workplace visually in line with your corporate design, both in a web browser and on the app, is the topic of the next chapter.