Chapter 4: Tenants, Organizations, and Teams
Tenants, organizations, and teams are three notable features of Moodle Workplace and are the first of many key differences from Moodle core. This chapter is all about setting up and managing the structure of your user-related data.
Tenants are entirely isolated entities with their own look and feel, structure, users, and learning entities. They are critical for when you wish to represent multiple self-contained business entities in your enterprise. You will learn about the fundamentals of tenants and how to manage them in Moodle Workplace.
Each tenant is modeled using organizations with multiple hierarchical department and position frameworks. Departments and positions are vital to defining reporting lines and assigning jobs to your staff. You will gain knowledge of all the aspects of organizations, including departments, positions, and job positions.
Teams are a key feature that let managers see the learning progress of their staff. You will learn how to set up teams within Workplace and how to represent different types of structures, including matrix organizations.
In this chapter, we will cover the following three topics:
- Managing tenants
- Managing organizations
- Managing teams
Let's get started with the feature that most Moodle aficionados have been waiting for a very long time: tenants.
Managing tenants
One of the masterpieces of Moodle Workplace is the introduction of multi-tenancy and its consistent application throughout. We define multi-tenancy as a single instance of Moodle that serves multiple client organizations (tenants), where its data and configuration are virtually partitioned and each client organization works with a customized virtual application instance.
In the context of Moodle Workplace, this means the ability to enable the configuration for multiple tenants with different themes and permissions, keeping them separated so that users in one tenant cannot see the users in another. Each tenant has its own users (an admin, supervisors, and employees), hierarchies, roles, dynamic rules, theme settings, reports, and learning entities (courses, programs, and certifications).
Not all the elements in Workplace are multi-tenant-aware; that is, some features can only be configured globally and not at the tenant level. For example, at the time of writing, plugins can only be configured site-wide and cannot be customized at the tenant level. As a consequence of this limitation, it is, for instance, not possible to authenticate users in different tenants against different authentication sources. However, it has been announced that some critical features, such as authentication, will be supported by Workplace very shortly, so watch this space.
Important Note
As a rule of thumb, all tools in the Workplace launcher can be configured at the tenant level. All other features cannot (yet).
For demonstration purposes, we will use a hypothetical company (tenant = Packt) in this chapter, as well as two sub-contracting businesses (tenant1 = imPackt and tenant2 = comPackt).
Let's get started with setting up our first tenants in Moodle Workplace.
You can access the management of tenants via Site administration | Users | Manage tenants or directly via the Tenants icon in the Workplace launcher, shown here:
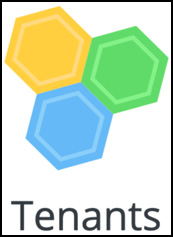
Figure 4.1 – Tenants in the Workplace launcher
In this comprehensive section, we will be covering the following topics:
- Understanding tenant basics
- Tenant settings
- Adding new tenants
- Configuring tenants
- Archiving and deleting tenants
- Limiting the number of tenants
- Allocating users to tenants in batch mode
- Sharing content across tenants
First of all, let's deal with the basics of tenants.
Understanding tenant basics
You can already see a default tenant that has been created during installation and at least one user has already been assigned to it (your admin account). There are two critical rules—some may call them restrictions—when dealing with users and tenants in Workplace:
Important Note
A user is always assigned to a tenant; that is, an account cannot be tenantless.
A user cannot be assigned to more than one tenant; an account always belongs to a single tenant and a single tenant only.
When a new user account is created, whether by self-registration, manual entry, batch upload, or via web services, it is always attached to the default tenant, unless specified otherwise. The following diagram illustrates how users are assigned to tenants:
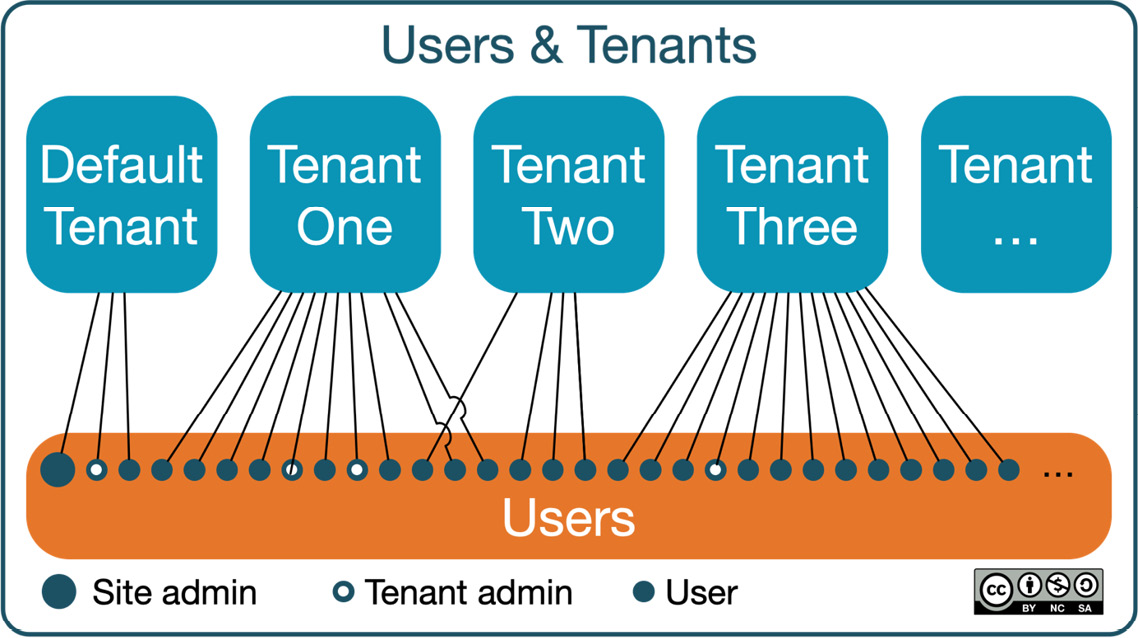
Figure 4.2 – Users and tenants
You can see, in the diagram, that each user belongs to exactly one tenant. Each tenant can have zero, one, or many tenant administrators. By default, a tenant admin has permission to manage tenant users, manage tenant roles, and adjust the tenant theme settings. These will be discussed in more detail later.
You can also see a Default tenant item in the list of active tenants. Each tenant can have a course category attached to it, which has to be a top-level course category.
Important Note
A course category can only be attached to a single tenant.
If a course category is selected, the tenant administrator is automatically assigned the tenant manager role in this category; this means they have permission to create courses, assign roles, and so on. Each user in this tenant is automatically assigned a tenant User role in this category.
Tenant settings
Now that you are equipped with the basics of tenants, let's edit the default tenant (using the cogwheel on the right) and change the settings according to your setup. The tenant parameters can be seen here:

Figure 4.3 – Tenant settings
There are a couple of things to consider when configuring a tenant.
Tenant name is precisely that—the name of the tenant. While it is possible for multiple tenants to have the same name, it is highly recommended that you use different names for different tenants.
Site name and Site short name are effectively the same as the full site name and the short name for the site settings used for the front page in Site administration | Front page settings. Once a tenant is active (either by selecting it via the tenant switcher or when a user belongs to a tenant), the tenant settings will override the site settings.
ID number is a unique name for your tenant and has the following three purposes:
- Matches against external systems—for instance, connecting to your HR system via web services (see Appendix A, Moodle Workplace Web Services).
- Uses the upload user tool (see the Provisioning your users section in Chapter 12, Migrations).
- Is used as a parameter for Login URL. As you can see in the preceding screenshot, there are two selections available: one containing the ID number and the other an internal numeric tenant ID (the default tenant always has ID=1).
When users log in using the login URLs, the theme settings are applied to the login screen. This is not the case for the main URL, which uses the branding of the default tenant.
As seen in the Understanding tenant basics section, each tenant can have multiple tenant administrators that have to be chosen via the Administrators search, which only contains tenant users.
Courses that belong to a particular tenant have to be located in a tenant category. There are three options for the Course category choice:
- No category: No tenant category is selected (this is the default).
- Create a new category: A top-level course category with the same name as the tenant name is created.
- Choose an existing category: All top-level categories that are not already assigned to any other tenants are available for selection.
Moodle Workplace supports courses that are shared across tenants. We will deal with this special case at the end of this section.
Adding new tenants
Once you select the +New tenant button, you will be presented with the same screen as in the previous screenshot, but with two notable differences:
- The internal tenant ID is not available during tenant creation. As a consequence, the login URLs are displayed as tenantid={ID} and tenant={IDNUMBER}, respectively.
- The choice to select tenant administrators is not available, which makes sense since no users have been assigned to the tenant yet.
Important Note
Moodle Workplace does not support sub-tenants.
Once you have created one or more tenants, you will see a list of all the active tenants. The following is a sample of my three tenants: Packt, comPackt, and imPackt:
Figure 4.4 – Tenant listing
Now that we have created some tenants, let's look at how we configure them.
Configuring tenants
As a site administrator, you can configure tenants using the right-arrow icon. As a tenant administrator, you can get to the same screen via Workplace launcher | Tenant. Once selected, you have the following four tabs at your disposal:
- Users: Manages tenant users
- Roles: Manages tenant roles
- Appearance: Configures the tenant's look and feel
- Details: Displays tenant information
Let's go through them one by one.
Managing users
You can manage (that is, modify and delete) all tenant users and also add new users to the tenant in the Users tab. The required capability is tool/tenant:manageusers. Using the drop-down menu at the bottom, a tenant administrator can suspend or unsuspend users. The site administrator is presented with the ability to assign or unassign selected users with the tenant administrator role:

Figure 4.5 – Tenant user management
If multiple tenants exist on your site, a user with the tool/tenant:allocate capability can move selected users to another tenant. None of their data, such as courses or certification completion, will be affected by this.
As a tenant administrator, you can also batch upload users via the standard Upload users Moodle feature, by going to Site administration | Users | Accounts | Upload users. The new users will be added automatically to the current tenant.
The manual enrollment method has been modified in Moodle Workplace, so the user picker only displays users from the current tenant.
Managing roles
The Roles tab is where the available roles and their assignment to users in the current tenant are displayed. Three roles are created automatically during the Workplace installation and are assigned automatically to the following users:
- Tenant administrator: Assigned to the tenant administrator (in the system context).
- Tenant administrator in the course category: Assigned to the tenant administrator (in the context of the course category of the tenant). Also known as tenant manager.
- Tenant user: Assigned to all tenant users (in the context of the course category of the tenant).
You cannot delete these three roles, nor can you change their assignments. However, as a site administrator, you can modify these roles if necessary.
Customizing appearance
The Appearance tab lets you customize the look and feel of the tenant (the required capability is tool/tenant:managetheme). The three main categories are Images, Colours, and Advanced. We will deal with appearance and design issues in Chapter 11, Corporate Identity.
Displaying details
In the Details tab, the meta-information about the tenant is displayed. Tenant administrators do not have access to the main tenant list, so this is the place where they can view data about the following fields: ID number, Site name, Site short name, Login URL, Administrators, and Course category.
Archiving and deleting tenants
Moodle Workplace supports the archiving of tenants via the corresponding icon. Archiving a tenant performs the following two actions:
- All users are moved to the default tenant.
- The tenant is made unavailable throughout the site.
Important Note
The default tenant cannot be archived or deleted.
The Archived tenants tab gives you access to all non-active tenants. Here, you can either restore or irrevocably delete a tenant. A restored tenant keeps all its settings, roles, and theme variables. It even moves users back from the default tenant to the restored tenant! This reallocation does not apply to users who have already been moved out of the default tenant:

Figure 4.6 – Archived tenants
Next up is the option to limit the number of tenants, which also includes archived tenants.
Limiting the number of tenants
By default, you can create as many tenants in Moodle Workplace as you wish. You can change the limit, however, using the Tenant limit (tool_tenant_tenantlimit) setting in Site administration | Advanced features. First, you have to enable the Tenant limit feature via the tool_tenant_tenantlimitenabled setting:

Figure 4.7 – Tenant limit
Your system administrator can also fix the tenant limit using the following two variables in config.php, located in the main directory of your Moodle system ($CFG->dirroot):
$CFG->tool_tenant_tenantlimitenabled = true|false;
$CFG->tool_tenant_tenantlimit = <VALUE>;
Important Note
The maximum number of tenants allowed includes both active and archived tenants.
By default, Moodle Workplace is prepared for multi-tenants. The moodle/category:viewcourselist capability is removed from the roles of Authenticated user and Guest. If you disable the multi-tenancy functionality, you may consider allowing this capability.
For completeness, there are two more tenant-related limitation settings that can only be set in config.php:
- The number of custom reports (see Chapter 8, Generating Custom Reports) can be restricted per tenant via the $CFG->tool_reportbuilder_tenantlimit setting.
- The number of dynamic rules (see Chapter 6, Onboarding and Compliance) can be restricted per tenant via the $CFG->tool_dynamicrule_tenantlimit setting.
The next part of the tenant section explains how to allocate users to tenants in batch mode using CSV files.
Allocating users to tenants in batch mode
Once you have created tenants manually, you can specify them in the user CSV file. A tenant is matched by its tenant ID number.
The following is a sample CSV file, adding three users to two different tenants (in bold):
username,firstname,lastname,email,tenant
cogea,Aileen,Cogé,[email protected],imPackt
bittnerh,Helmut,Bittner,[email protected],imPackt
henrickl,Lea,Henrick,[email protected],comPackt
The user who uploads the file has to be able to use the Upload user tool. If the user also has the tool/tenant:allocate capability, they will be able to specify a tenant when uploading users (both when creating new users and updating existing ones). If the user does not have this capability, users can only be created and updated in their own tenant.
Since a user cannot be tenantless, it is impossible to remove tenant allocation. However, you can move a user from one tenant to another by replacing the old tenant in the CSV file with the new value.
The final part of the tenant section deals with sharing content across tenants.
Sharing content across tenants
So far, all Workplace-only tools, such as programs, certifications, dynamic rules, and reports, have been tied to a single tenant. Also, it was emphasized that users belong to one tenant and one tenant only. So, how can you share content across tenants?
There are two ways that content sharing across tenants can be facilitated:
- Shared courses
- Shared space
We are going to cover these two options next.
Shared courses
As described earlier in this section, each tenant has its own course category and hence its own courses. However, there are scenarios where an enterprise might want to have courses shared among tenants—for instance, an introductory course providing an overview of the business.
To guarantee full compatibility with standard Moodle, the following constraint has been imposed on sharing courses: all users (learners and trainers) enrolled in a course will see users from other tenants while browsing the course. This behavior applies to all activities—core or third-party—that contain user data, such as forums, the gradebook, or the list of course participants.
Important Note
Multi-tenancy does not apply to course content. When enrolling users from multiple tenants to a course, this course effectively becomes a shared course.
While this approach might appear very restrictive, it actually gives you a high degree of flexibility when sharing courses across tenants:
- By enrolling users from multiple tenants, you decide who can access the content and who cannot. That is, if only users from two tenants should get access to a course, you only enroll those users. Users from other tenants are not even aware of the existence of the course.
- If the organization wants staff from different entities to learn together or a trainer from one tenant to be the trainer for all learners regardless of their tenant, no additional configuration is needed, as this is supported as the default behavior.
- If the organization wants staff from different entities to learn independently, the users must belong to different groups in separate group mode (preferably forced). Make sure any trainer roles in the course do not have the accessallgroups capability, and trainers are also allocated to the relevant groups. Allocation to separate groups is done automatically when a shared course is part of a program or certification. We will deal with this scenario in Chapter 6, Onboarding and Compliance.
Shared courses provide you with a powerful vehicle to share content with users from different tenants. Let's compare this to its big sibling: shared space.
Shared space
Shared space enables the sharing of entities across all tenants. It works like a special tenant where users can create supported entities to be available in other tenants. At the time of writing, supported entities are programs, certifications, and certificates.
Important Note
Shared space is a special tenant to share Moodle Workplace entities and content among all tenants.
The site administrator has to enable the shared space feature once using one of these two options:
- Choose Shared space from the tenant switcher and select Enable Shared space. If you select the Not now button, the option will be removed from the tenant switcher, and enabling the feature will only be possible from the tenant menu (as follows).
- Go to the tenant menu (via the Workplace launcher) and select Enable Shared space. As before, the shared space will be created, and the option will reappear in the tenant switcher.
Important Note
Enabling the Shared space feature cannot be undone. Once enabled, always enabled!
So, what happens when you switch to shared space? Any supported entities created will be available in all tenants. For instance, when you create an onboarding program to welcome new staff, this will be available in the list of programs in every tenant. We will deal with shared programs and certificates in more detail in Chapter 6, Onboarding and Compliance.
When you are in the shared space, the following features are unavailable and have also been removed from the Workplace launcher: report builder, dynamic rules, and organization structure. It wouldn't be a big surprise, however, if the former two will be supported by the Shared space feature in the not-too-distant future.
Shared space is a special tenant and does count toward the number of tenants. You need to consider this if you have activated the tenant limit in the previous sub-section.
This concludes the first part of this chapter, and hopefully, you have gathered a good understanding of how to make use of tenants in your setup. Now that you are equipped with the knowledge of how to handle tenants, let's move on to the second key feature in Workplace: organizations.
Managing organizations
Organization structure is a combination of three Moodle Workplace features: departments, positions, and jobs. You deploy department and position hierarchies to represent your organization structure and define reporting lines by assigning job assignments to employees in any department with any position.
Once created, a site or tenant administrator can utilize an organization structure to perform the following operations:
- Create dynamic rules to automate specific steps based on a user's position or department; for instance, all employees who belong to the R&D department will be enrolled in the newly introduced ethics course.
- Create custom reports that show the data of a specific department or position as their audience; that is, the same report only displays data depending on where in an organization the viewer is based.
- Create team managers by assigning jobs with different types of positions to users, effectively creating reporting lines.
- Filter and/or search lists of users within a company based on their position and department, thereby allowing certain drill-down operations.
Important Note
An organization structure always belongs to a tenant and cannot spawn across tenants.
The following diagram provides a high-level overview of the three Workplace components—departments, positions, and job assignments:

Figure 4.8 – Organization structure – high level
We will spend the remainder of this section dealing with department frameworks, position frameworks, and job assignments. For now, let's get a feel for Workplace's approach to model organizations by looking at the two users, a and b, in the preceding high-level diagram:
- User a has been assigned to job assignment C. Job assignment C is linked to Department 3.1.1 and Position 2.2. So, user a works in Department 3.1.1 and has Position 2.2.
- User b, on the other hand, has been assigned to two job assignments: A and B. A is linked to Department 2.1 and Position 1.1; B is linked to Department 3.1.1 and has position Position 2. User b not only has two jobs in the organization but is also likely to be the manager of user a! Do you see why this is the case? They both work in the same department and the position of user a is located below the position of user b in the position framework.
To shed more light on the abstract example just given, let's take a more detailed look at departments, positions, and job assignments. By default, these three areas can be managed by users within the admin, tenant admin, or organization structure manager roles, respectively.
You access the management of organizations via Site administration | Users | Organisation structure or directly via the Organisation structure icon in the Workplace launcher, shown here:
Figure 4.9 – Organisation structure in the Workplace launcher
In this section, we will be covering the following topics:
- Departments and department frameworks
- Positions and position frameworks
- Job assignments
First, let's deal with departments and department frameworks, which are managed via the Departments tab.
Departments and department frameworks
Departments are organized into department frameworks. A framework is effectively a container that related departments are grouped in. In most settings, a single framework is sufficient, but some scenarios justify multiple department frameworks. They are as follows:
- Frameworks can represent sub-divisions of large organizations with a high degree of autonomy—for example, at a regional or country level.
- Frameworks can be used when you have external organizations as customers. For instance, a training provider might want to offer a personalized learning environment to different clients and also offer client tools to manage their own users and pull individual reports.
- When representing a matrix organization, you can create completely isolated sets of departments; for example, one framework could be based on physical location and another one on a product team within the organization. We will look more at matrix organizations when we have a closer look at teams.
Department structures can be hierarchical; however, it is more likely that only one of the structures in an organization is hierarchical and the others are flat.
When adding a department framework (via the usual + New framework button), you are required to give it a descriptive name. The ID number and Description fields are optional, but it is recommended that you fill those in:

Figure 4.10 – Adding a department framework
Once you have created a department framework, you should start populating the structure with departments, sub-departments, and so on. Select the + icon to the right-hand side of the framework to create your first department. The input screen is identical to the one for adding department frameworks; only the heading is different.
Once you have created some departments, you can create sub-departments by selecting the + icon next to a department; alternatively, use the built-in drag-and-drop functionality. In our demonstration system, we created two separate department frameworks: one hierarchical (by region) and one flat (by function), which are shown in the following side-by-side screenshots:
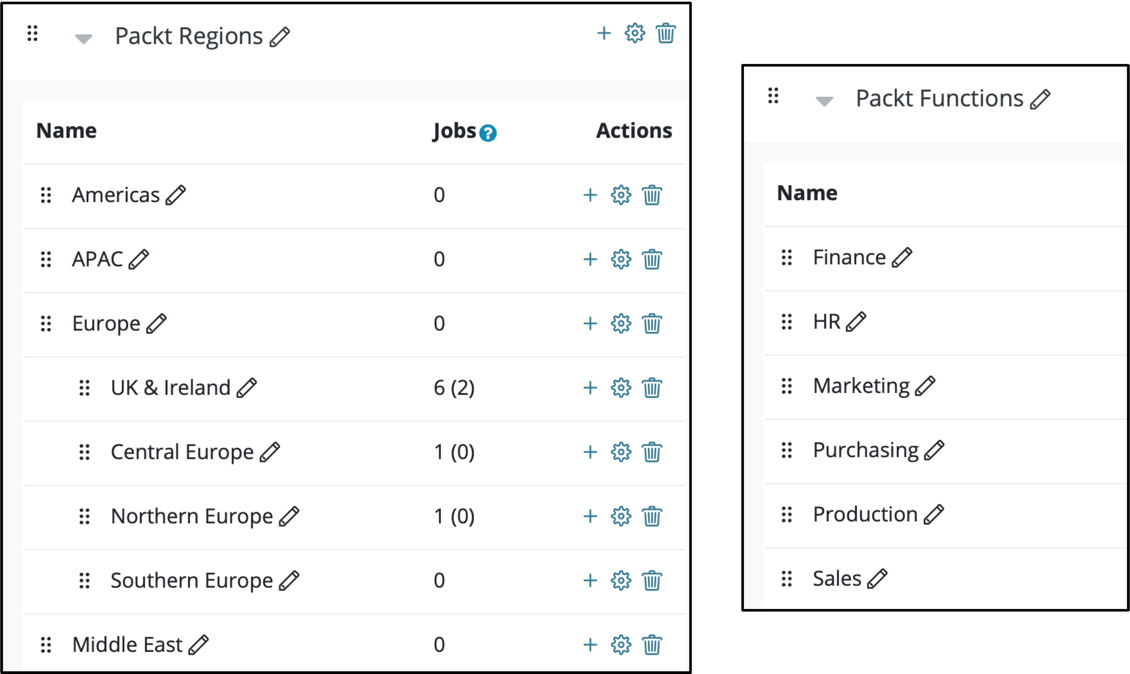
Figure 4.11 – Two department frameworks – one hierarchical and one flat
The Jobs column displays the number of active and, in parentheses, the number of past job assignments. This will become clearer when we deal with jobs later in this chapter. On the right-hand side, you will see the familiar Actions options for each department. Be careful when deleting a department as all sub-departments will also be removed—this action cannot be undone!
Important Note
A department can only be deleted when no jobs are assigned to it.
Departments (where in the organization a user is operating) are complemented by positions (what a user's function is), which we will cover next.
Positions and position frameworks
Positions and position frameworks are managed via the Positions tab, which we will cover in this section.
Positions are organized into position frameworks. A framework is effectively a container that related positions are grouped in. Positions are structured in the same way as departments but have two additional properties, called Manager and Department lead. These are effectively permissions that are tied to their respective positions:
- Manager: This is the manager of anyone in a lower position, regardless of their department. This is not to be confused with Moodle's manager role.
- Department lead: This is the manager of anyone in a lower department or sub-department(s), regardless of their position.
When you add a new position using the standard + button, you will be presented with the following pop-up screen:
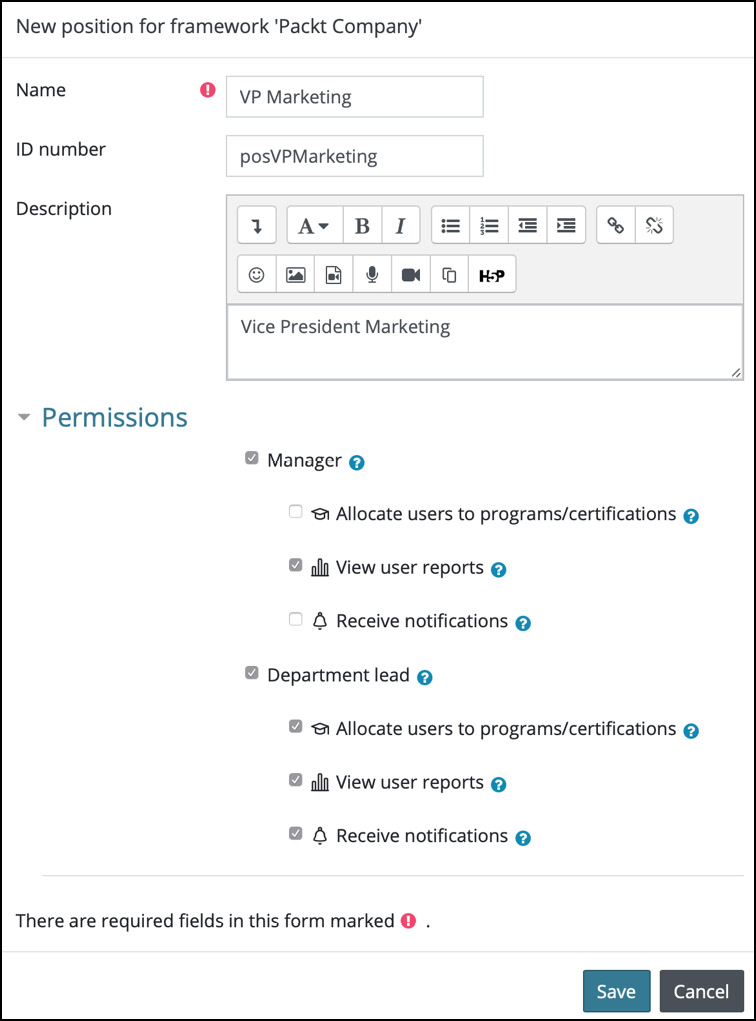
Figure 4.12 – Creating a new position
For both the Manager and Department lead options, the following three permissions are available:
- Allocate users to programs/certifications: This setting grants permission to assign users to programs and certifications. This feature will be used in Chapter 6, Onboarding and Compliance.
- View user reports: Workplace contains a powerful built-in reporting tool. This option allows managers to view reports containing progress data about their staff. Reporting will be dealt with in depth in Chapter 8, Generating Custom Reports.
- Receive notifications: Various Workplace features support features that notify managers or leads—for instance, when the due date has passed for a compliance training or when a colleague has been booked onto a face-to-face seminar. If this option is selected, managers will receive alerts when configured appropriately.
Once you have created your position hierarchy (or flat list), a tree-like structure is displayed, as follows:

Figure 4.13 – Position hierarchy
You can see the familiar layout (displaying the Name, Jobs, and Actions columns), which is identical to its departments counterpart. What is different is the additional Roles column, which shows the manager permissions with icons, as we have just discussed.
Now that we have set up our departments and positions, let's bring everything together and cover Workplace's job assignments.
Job assignments
A job assignment, or job for short, connects a department and a position to a user and adds some auxiliary data—namely the start and end dates.
Important Note
Departments and positions need to be created to proceed with job assignments.
For each job, you have the Select users, Position, and Department options. If you select multiple users, you effectively create multiple jobs with the same position, department, start date, and end date for each employee.
The default Start date option is today's date. It is not possible to leave Start date empty. This is slightly controversial since this piece of information is not always available. However, the Start date and optional End date options are used to decide whether a job is current or whether it is a past job.
When you add a new job assignment, using the standard + New job button, you will be presented with the following pop-up screen:
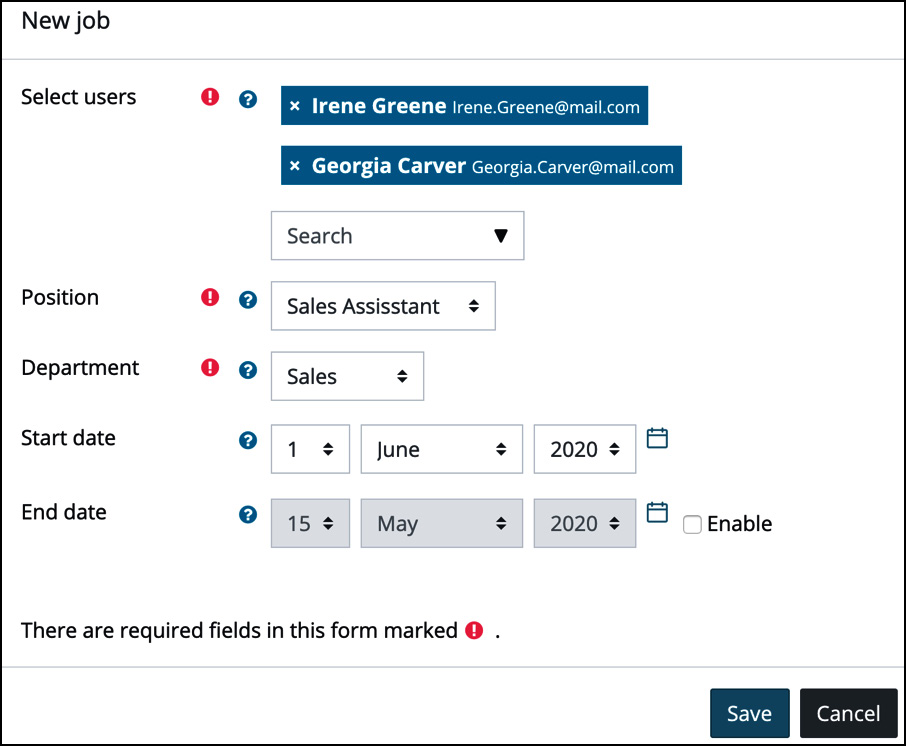
Figure 4.14 – Adding a new job assignment
Moodle Workplace deliberately does not perform any checks on overlapping jobs. This is to facilitate scenarios where one employee holds two or more positions in the same company. If you need to create a second job for a user, you can use the + icon beside the user entry to perform this operation without having to select the user again. This is a small but useful shortcut, especially when you have to create multiple entries manually.
Note that once you have created a job assignment for a user, you cannot change the position nor the department. You can only modify the start and end date. If you entered an incorrect position or department, you have to delete the job assignment and re-create it.
Important Note
It is not recommended that you delete job assignments unless they were created by mistake. Instead, you should set the end date of the current job and create a new job in the new position or department to guarantee a complete and consistent job and learning history of all users.
In the following example, you can view a number of job assignments in the marketing department, both present and past. The latter entries are grayed out. Unfortunately, it is currently not possible to sort this table by department or position, but you can apply filters to narrow down the number of entries displayed:
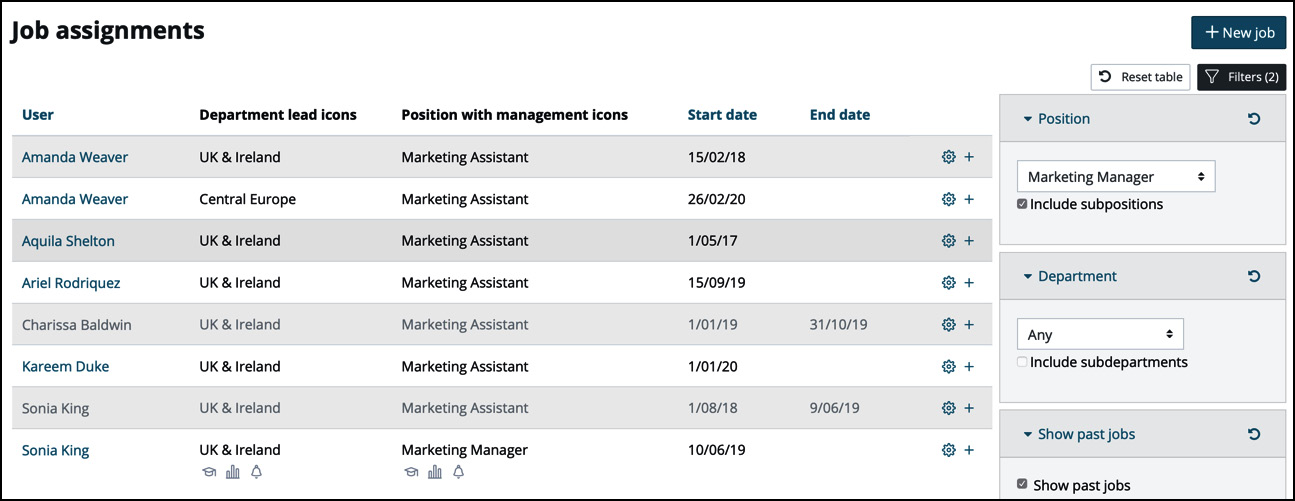
Figure 4.15 – Job assignments
The preceding screenshot shows users holding different jobs and demonstrates how several features in Moodle Workplace handle job assignments. Here, we have narrowed down the number of displayed employees to marketing positions only and also listed past jobs. Charissa Baldwin and Sonia King both no longer work as marketing assistants, which is indicated by the end date and the grayed-out font. Unless Charissa Baldwin has moved on to a non-marketing position, she must have left the organization. Sonia King, on the other hand, has been promoted to the position of marketing manager in the same department. Amanda Weaver holds two positions simultaneously in two different regions (departments).
Sonia King is the manager of anyone in her department and any department underneath, regardless of their position. She has permission to allocate users to programs and certifications, view user reports, and receive notifications, as indicated by the three icons underneath the department name.
Important Note
Managers are assigned indirectly via positions, not directly to an employee.
What exactly does this mean? Well, instead of stating that Sonia King is the manager of Amanda Weaver and three others, we assign all five staff to the UK & Ireland department. Since Sonia King is the department manager, she is automatically the manager of the other four staff. So, every user that belongs to the same department is reporting to the manager in charge and is automatically part of the same team.
Unless you are modeling a hippie commune, there will be managers who are in charge of a department at different levels of the organizational hierarchy. All staff belonging to a department or jointly working on a product/service are represented by Moodle Workplace as teams. Managing teams will be the topic of the third section of this chapter. But first, let's close off the section by looking at assigning jobs in batch mode via CSV files.
Assigning jobs in batch mode
By working your way through this section, you might have realized that manually assigning job assignments is a daunting task and potentially prone to errors. While this approach might be acceptable in small institutions, it is untenable in larger and more complex organizations.
In addition to adding tenants via CSV files, assigning jobs is also supported by Moodle Workplace. Job assignments are supported via the following four new self-explanatory variables:
- jobdepartment
- jobposition
- jobstartdate (optional)
- jobenddate (optional)
Each variable has to have a numeric postfix to support multiple job assignments. Just like tenants, departments and positions are matched by their respective ID numbers. For any date field, use the YYYY-MM-DD ISO standard format, which will then be properly localized during the upload process.
In addition to permission to upload users, the tool/organisation:assignjobs capability is required to create jobs for users or to modify existing ones.
The following is a sample CSV file, adding two job assignments and changing an existing one (in bold). When a user already has a job in a department and position, the dates will be modified without creating a new job:
username,firstname,lastname,email,jobdepartment1,jobposition1,jobstartdate1,jobenddate1
cogea,Aileen,Cogé,[email protected],depCentralEurope,posMarketingManager,2020-02-26,
bittnerh,Helmut,Bittner,[email protected],depCentralEurope,posMarketingAssistant,,2020-12-31
henrickl,Lea,Henrick,[email protected],depUKIRE,posMarketingManager,2020-01-01,
The example CSV file demonstrates nicely the importance of providing meaningful ID numbers for departments and positions, respectively. Bear in mind that it is not possible to delete a job assignment via the user upload feature.
Let's recap what tools we have added to our toolbox in this section. You are now able to represent the structure of your organization in Moodle Workplace. This includes departments (where users are located in the organizational hierarchy) and positions (what functions users have). Job assignments link individual users to departments and positions to effectively represent both current and past employment. Superiors are assigned via manager and department lead permissions, respectively, implicitly creating teams, which is the next section's topic.
Managing teams
You might recall the Teams tab on the dashboard, which we mentioned in the overview chapter. Now that we have dealt with departments, positions, and job assignments, we can look at the different facets of how Moodle Workplace handles teams.
In this section, we will be covering the following topics:
- Managerial rights and responsibilities
- Teams versus cohorts
- Modeling different types of organizations
Managerial rights and responsibilities
With great power comes great responsibility. As we have already seen in the Job assignments section, users with managerial positions can do the following:
- Allocate team members to programs and certifications.
- View custom reports on team members (according to configured report audience settings).
- Receive notifications about completions and activities that are overdue.
Having a manager position further means that the team list is displayed on the dashboard. The Teams tab displays information about all the team members of a manager or department lead. Let's zoom in on the Teams tab from Chapter 2, Working with Moodle Workplace, where we briefly looked at the dashboard while logged in as the superior of the following two marketing managers:
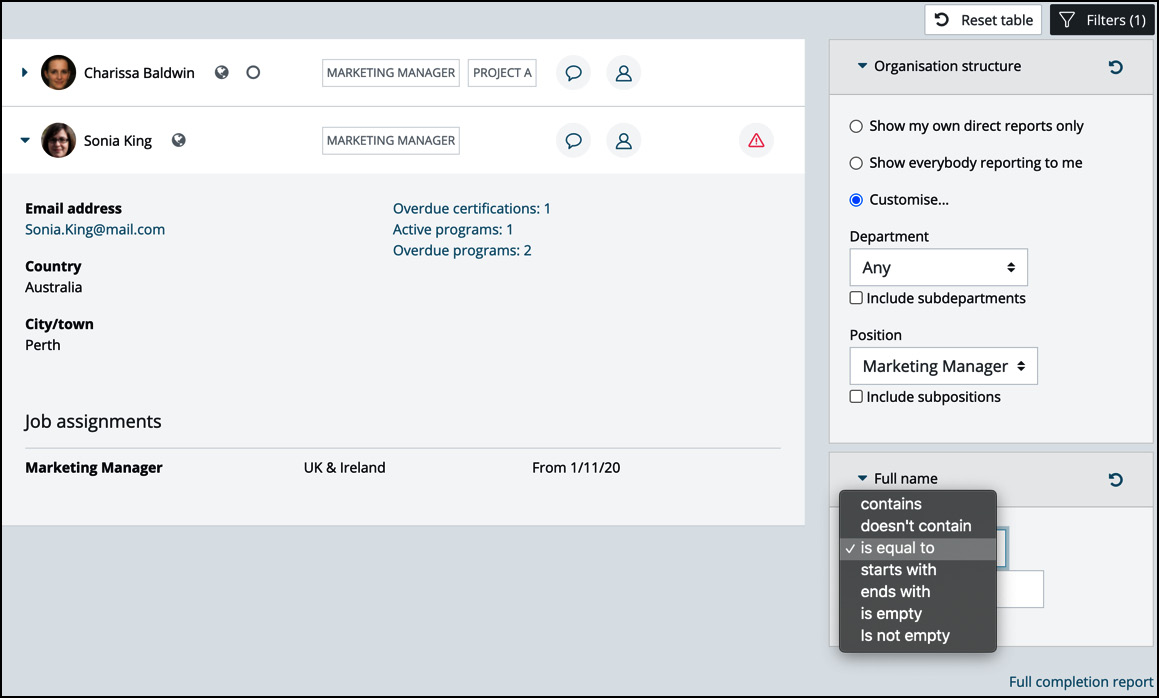
Figure 4.16 – The Teams dashboard
The Teams tab provides the following information and actions for each team member, respectively:
- Their full name
- An indicator, in the shape of a globe, if the colleague is a manager
- An indicator, in the shape of a circle, if the colleague is a department lead
- The position(s) the team member holds
- An action icon to send a direct message to the person
- An action icon to view the user's profile
- A warning icon if a program or a certification is overdue
You can expand and collapse the view for each user to display the following additional data:
- An email address (if allowed in the user profile), the country, and the city (if specified in the user profile).
- Job assignment details.
- Certified, expired, or overdue programs and certifications, including links to the progress report, which provides detailed information about the user's current progression (see Chapter 6, Onboarding and Compliance). At the bottom of the page, you can also navigate to a full completion report.
If a team comprises more than 10 members, the standard pagination is shown below the table. Alternatively, you can apply filters to Organisation structure and Full name. The former lets you choose between the following three options:
- Show my direct reports only
- Show everybody reporting to me
- Customise…, where you can select departments and positions including their sub-elements
In our example, only marketing managers have been selected without sub-positions. We could have achieved the same by only showing direct reports.
We will come across teams and managers every so often throughout this book—for example, when dealing with programs, certifications, or reporting. For now, let's look at the difference between teams and cohorts.
Teams versus cohorts
One question that comes up regularly is whether teams replace cohorts. The answer depends on how cohorts have been used so far.
If you have grouped users belonging to the same department or position as a cohort, it is strongly recommended that you replace these with teams as they offer more flexibility in terms of dynamic allocation and support for hierarchical organization. For instance, if you have organized all the users of a particular division into a cohort, it is more logical to model the division as a department and assign its staff via job positions. They'll automatically become a team with one or more managers.
If, on the other hand, you have used cohorts for global groups of users related to a subject that is not reflected by either departments or positions, then it makes sense to retain those cohorts. An example may be all the first aiders in the organization; they belong to a single group but are not represented in any organizational hierarchy.
The beauty of Moodle Workplace is that teams and cohorts can happily co-exist side by side. Being a member of a team does not prevent you from being a member of a cohort and vice versa.
Modeling different types of organizations
Different companies are structured in different ways. While there might be similarities, there are almost always some idiosyncrasies, depending on the size, geographical spread, industry, and personal preferences of the executive team. We are going to cover three types of organization structures, which are representative of most organizations out there:
- Organization structure hierarchy based on departments
- Organization structure hierarchy based on positions
- Matrix organizations
Let's kick things off with a department-based topology.
Organization structure hierarchy based on departments
An organization structure based on departments is modeled around where in the business staff are located, as opposed to what their function is. In this type of organization, departments represent different divisions and teams inside the company. Their structure is almost always hierarchical.
The Regions department framework shown earlier was an example of such an organization structure. The department hierarchy is then accompanied by a position framework with staff and department leads. When users get assigned jobs in different departments, the manager(s) will be able to see everybody from their department as their team.
Organization structure hierarchy based on positions
An organization structure based on positions is modeled around what the functions of staff are, as opposed to where in the business they are located. In this type of organization, the company chooses to store its hierarchy in a position tree.
In the position hierarchy shown earlier on, the CEO has the top position, and underneath are the VPs for sales, marketing, operations, finance, and HR, respectively. The managers of several teams are located under the marketing VP and the members of these teams are positioned under these managers. This means that there might be marketing managers operating in different parts of the company, but while they are all part of a (different) local team, they are reporting to the (same) marketing VP.
In this structure, all positions that have sub-positions have manager permissions. This allows users who hold jobs in these positions to see everybody in the positions below them as their team. In our scenario, the CEO does not need to receive notifications from their subordinates, but they need to see reports on them.
Matrix organizations
In a matrix organization, some individuals report to more than one supervisor or manager. A data scientist might report to the R&D manager for their day-to-day activities but also report to a project manager for a particular project they are working on. Conversely, a manager might be responsible for multiple cross-functional or cross-business teams.
Moodle Workplace fully supports multi-dimensional arrangements, as depicted in the sample matrix organization here:
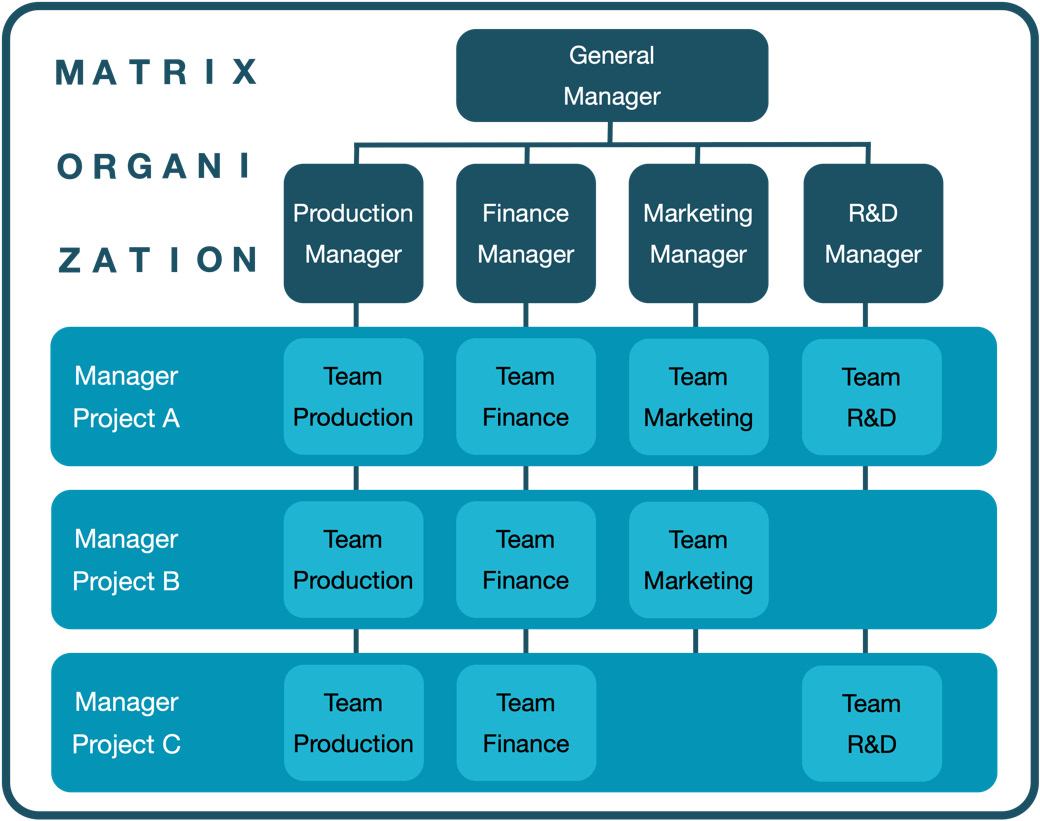
Figure 4.17 – Matrix organization
This diagram shows a typical matrix and is a combination of the two organizational structures just described, one based on departments (production, finance, marketing, and R&D) and one based on positions (creatively named Project A, Project B, and Project C).
So, what is needed to model the described matrix organization? We already have the department and position structure in place for the vertical dimension of the matrix, representing production, finance, marketing, and R&D, as well as any associated positions (such as Packt Functions). What is missing is the horizontal dimension representing projects and all that is required are two additional flat structures: a department framework (Packt Projects) with the three departments (Project A, Project B, and Project C) and a position framework (Packt Teams) with the two positions (Team Member and Team Lead). In our case, the team lead is a department manager with the related permissions. The two small frameworks are shown here:
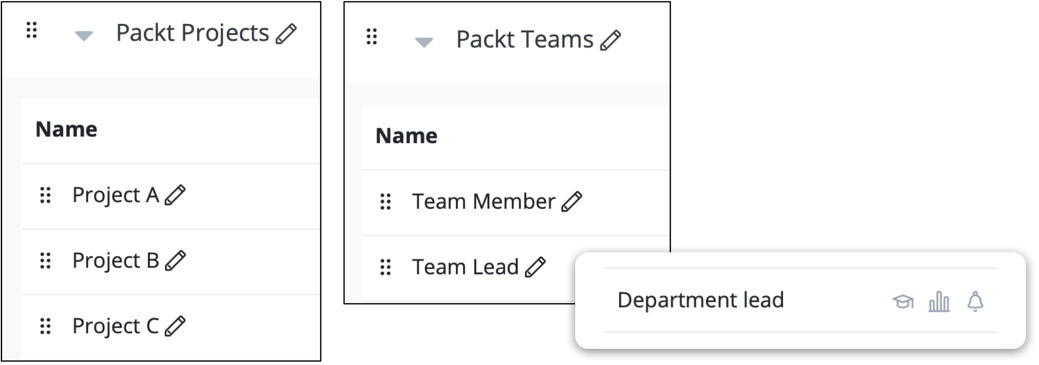
Figure 4.18 – Project departments and team positions
Once you have assigned the respective job assignments to a project, a team might comprise a team lead (in our example, Irene Greene) and some team members (here, five current and one past). We have also ring-fenced the project by time and set the end date of all job assignments to December 31, 2020, except Wallace Montoya, who already left the project on January 31, 2020. The job assignments of Project A are shown here:
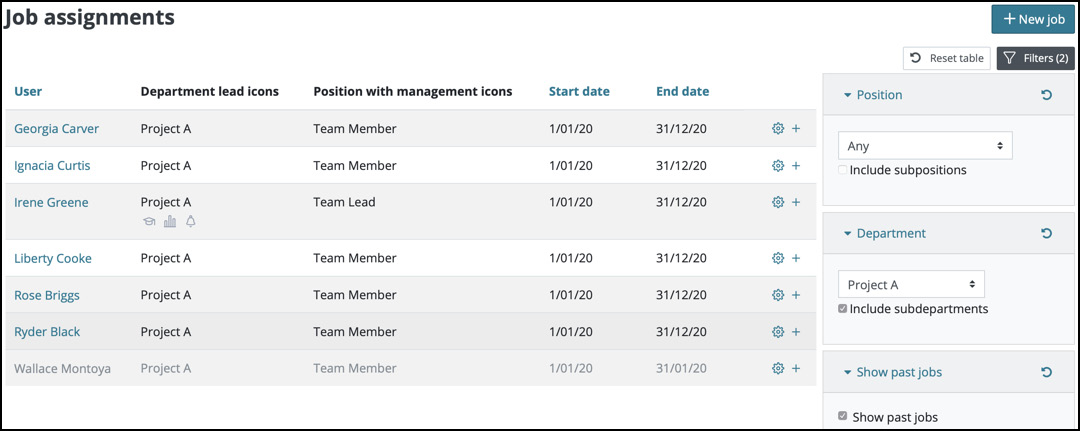
Figure 4.19 – Job assignments of Project A
The beauty of this approach is that there is no limit in terms of dimensions and the matrix is effectively created automatically. For example, let's take a closer look at Irene Greene, who is Team Lead of Project A. In her day job, she is also Project Manager in the Production unit (department). Her start date was back in 2018, and no end date has been set. The job assignments of Irene Greene are shown here:

Figure 4.20 – Job assignments of a team lead
The two job assignments illustrate nicely how multiple dimensions of a matrix organization can be modeled and concludes this exciting part about handling organizations. If your organizational setup requires more complexity, it is possible to create even more intricate structures with hierarchies in both positions and departments and also positions that are both managers and department leads.
Summary
Phew, that was a lot to take in! In this chapter, we covered three fundamental concepts, namely tenants, organizations, and teams.
You first learned how to manage different facets of multi-tenancy. You then became familiar with organization structures, which covered departments, positions, and job assignments. Finally, you acquired new knowledge about managers and teams, as well as different types of organization structures, including matrix organizations.
You might still be unsure about when to model a business entity as a tenant, as a framework, or as a department. While there are no clear-cut rules about when to use which structural elements, there are the following rules of thumb:
- Tenants represent self-contained business units with a high degree of autonomy, an individual look and feel, and separate structural elements.
- Frameworks act as containers for departments and positions and are usually part of the same business entity, managed centrally.
- Departments are individual units, organized either hierarchically or as a flat list.
This chapter was all about setting up and managing the structure of your organization. In the next chapter, we want to focus on processes in the form of dynamic rules.