
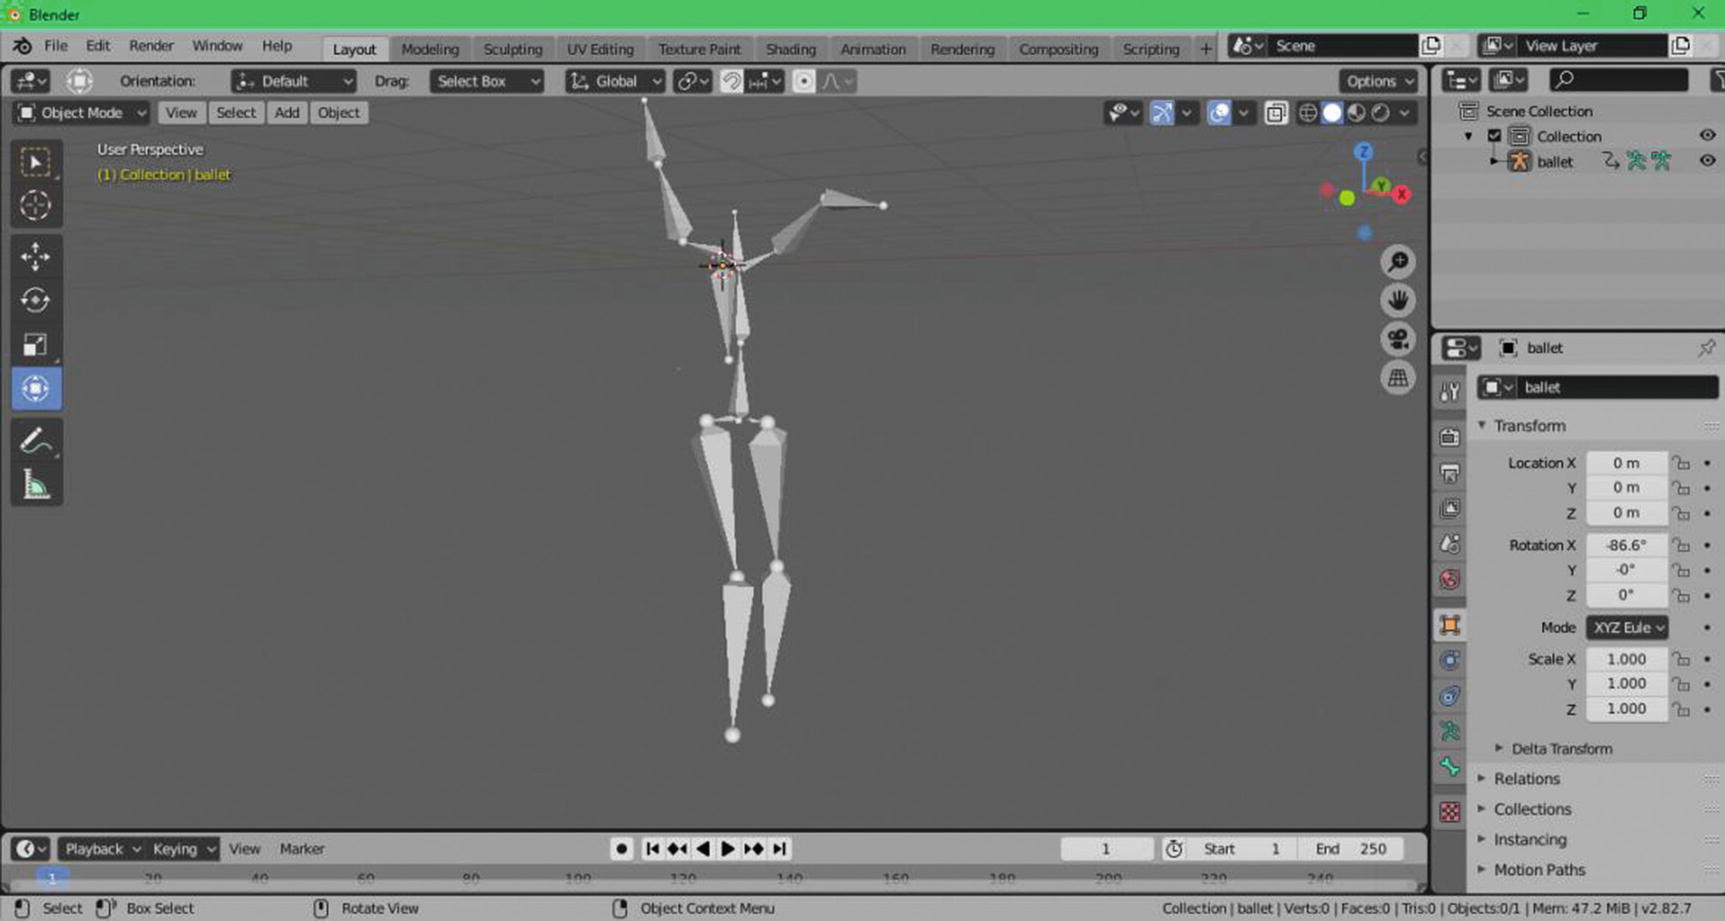
We’re now in the final chapter of our book. Are you still having fun? I hope you are.
In this chapter, we are going to talk about the process of importing and exporting game assets in Blender 3D. We will also talk about some open source game engines available there that will work with our game assets and how to import our assets into these game engines. We will also talk a bit about some commonly used 3D file formats.
So, without any delay, let’s get started!
Importing Game Assets in Blender
Let’s start Chapter 5 with the process involving how to import game assets in Blender. Of course, before we import a game asset, we need first to take a look at file formats that our program supports.
For Blender, we have 10 file formats that are supported: Collada (.dae), Alembic (.abc), Motion Capture (.bvh), Scalable Vector Graphics (.svg), Stanford (.ply), Stl (.stl), FBX (.fbx), glTF 2.0 (.glb/.gltf), Wavefront (.obj), and X3D Extensible 3D (.x3d/.wrl).
Let’s have a little discussion about each of these file formats.
.DAE file format is a 3D interchange file format used for exchanging digital assets between multiple graphics programs. It is based on the Collada or Collaborative Design Activity XML Schema, which is now owned by Autodesk. Collada was originally developed by Sony and is now jointly supported by Sony and the Khronos Group.
.ABC file format is an interchangeable computer graphics, open source file format developed by Sony Pictures Imageworks and Industrial Light & Magic. It supports the common geometric representations used in the industry, including polygon meshes, subdivision surfaces, parametric curves, NURBS patches, and particles. Alembic also has support for transforming hierarchies and cameras.
.BVH file format is an ASCII file format developed by Biovision as a standard format to save biped character motion data that contains motion capture data for three-dimensional characters. It is used by 3D animation programs to import rotational joint data. BVH files also store animation data for characters in Second Life and other various 3D video games.
.SVG file format is a graphics file that uses a two-dimensional vector graphic format created by the World Wide Web Consortium (W3C). It describes images using a text format that is based on XML. SVG files are developed as a standard format for displaying vector graphics on the web.
.PLY file format is a three-dimensional image file created using the polygon file format, which is an open standard that describes objects as a collection of polygons. It contains a header followed by a list of vertices that specify the shape of each polygon. Since the PLY file format was developed at Stanford University, it is also known as the Stanford Triangle Format.
.FBX file format is a 2D or 3D drawing saved in the Autodesk FBX format. It maintains the full fidelity and functionality of the original file and can be manipulated by multiple programs. It is used for creating interoperability between 3D applications.
.GLTF 2.0 (Graphics Library Transmission Format) is a file format developed by the Khronos Group for 3D scenes and 3D models using the JSON standard. It stores a full scene description in JSON format, which includes node hierarchies, cameras, and materials. GLTF files also contain descriptor information about animation and meshes.
GLTF files can be used to save and share digital assets between different 3D modeling tools, like .DAE files. However, they are also optimized for download speed and load time at runtime, which makes it easier to use in mobile and web-based 3D modeling programs. It is also a more streamlined format for uploading and downloading from online digital asset databases.
.GLB is a binary form of gltf that includes textures instead of referencing them as external images.
.OBJ file format is a standard 3D image format that can be exported and opened by various 3D image editing programs. It contains a three-dimensional object that includes 3D coordinates, texture maps, polygonal faces, and other object information. This format is considered to be a universal 3D model format since it is widely supported by 3D image editing applications. The format is simple and text-based, which is one reason why many programs use it. Since the OBJ format is widely supported, many users export their models as OBJ files when transferring them from one 3D program to another or when sharing a 3D model with a coworker.
.X3D file format is an ISO-ratified file format and runtime architecture to represent and communicate 3D scenes and objects. This file format was developed by the Web3D Consortium and has evolved from its beginning as the Virtual Reality Modeling Language (VRML) to the considerably more mature, refined ISO X3D standard. It provides a system for the storage, retrieval, and playback of real-time 3D scenes in multiple applications.
.WRL file format is a virtual world created in VRML and can be navigated in three dimensions. WRL files are saved in an ASCII text format, which can be edited with a text editor.
Now, we have at least a basic idea about our file formats. So let’s take a look at how to import our game assets using some of these file formats.
Importing Using .DAE Format
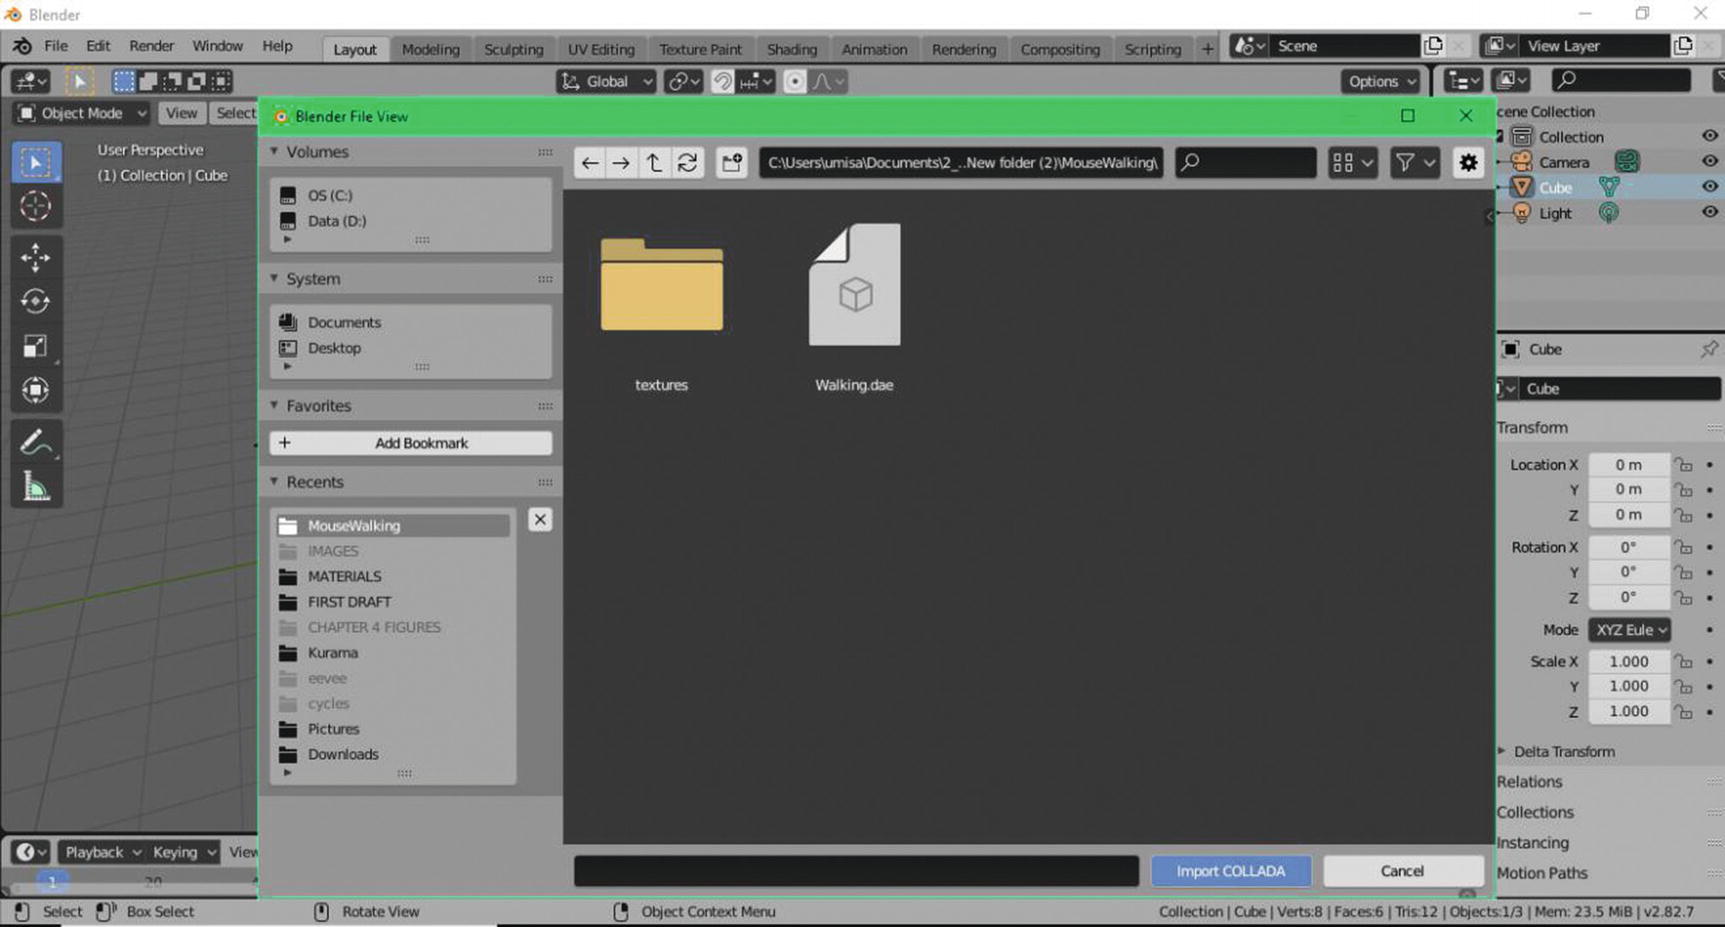
Process of Importing .Dae part 1
Of course, the first part will be to go to File menu ➤ Import ➤ choose COLLADA .dae ➤, then browsing to the folder where your .Dae file is located.
Usually, this file is downloaded in a compressed format like Zip. You can uncompress it using programs like Winrar or Winzip.
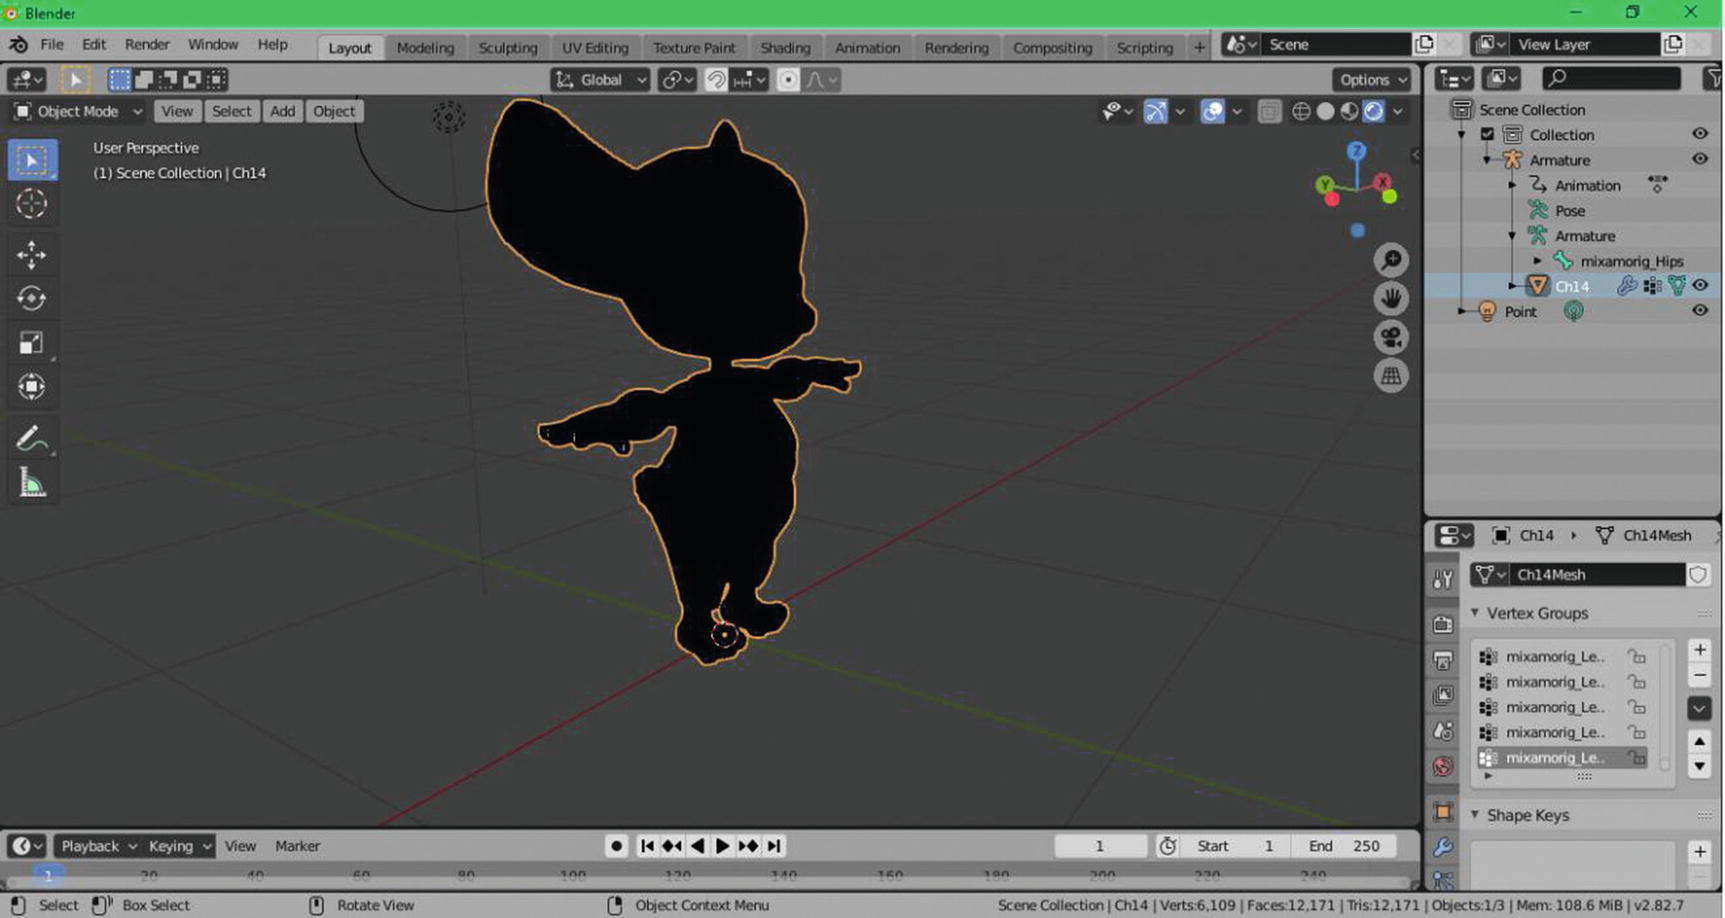
Process of Importing .Dae part 2

Process of Importing .Dae part 3

Process of Importing .Dae part 4

Process of Importing .Dae part 5
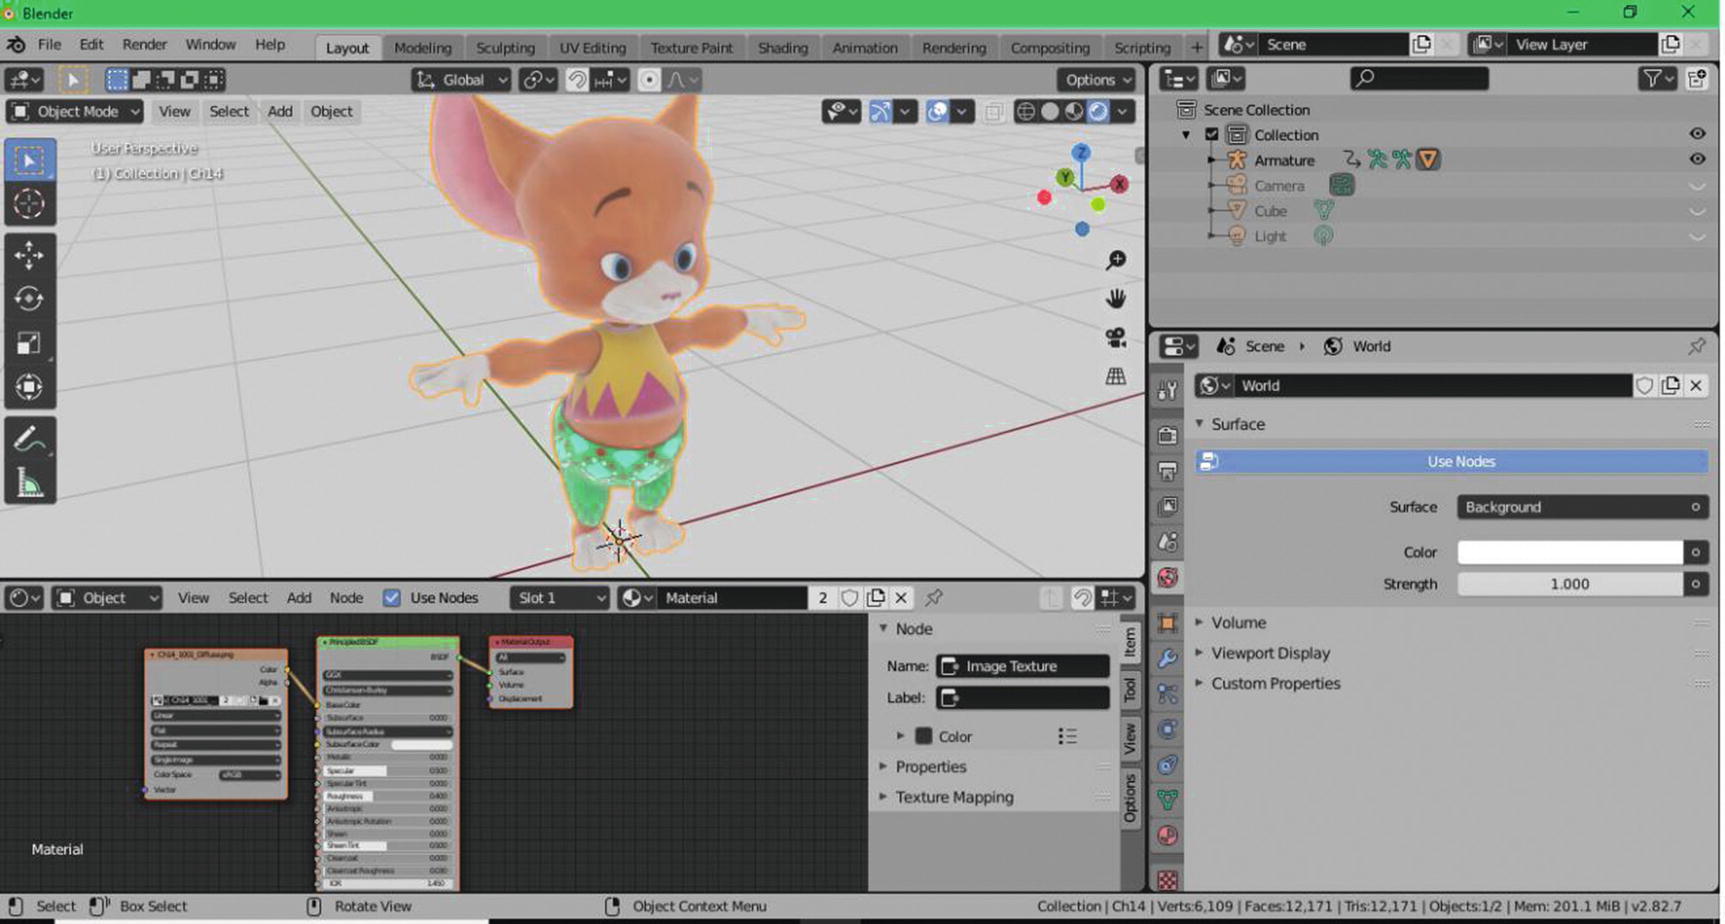
Process of Importing .Dae part 6
After fixing some things, as you can see in Figure 5-6, you are looking at our textures in a render view.
Let’s proceed to our next file format.
Importing Using .ABC Format
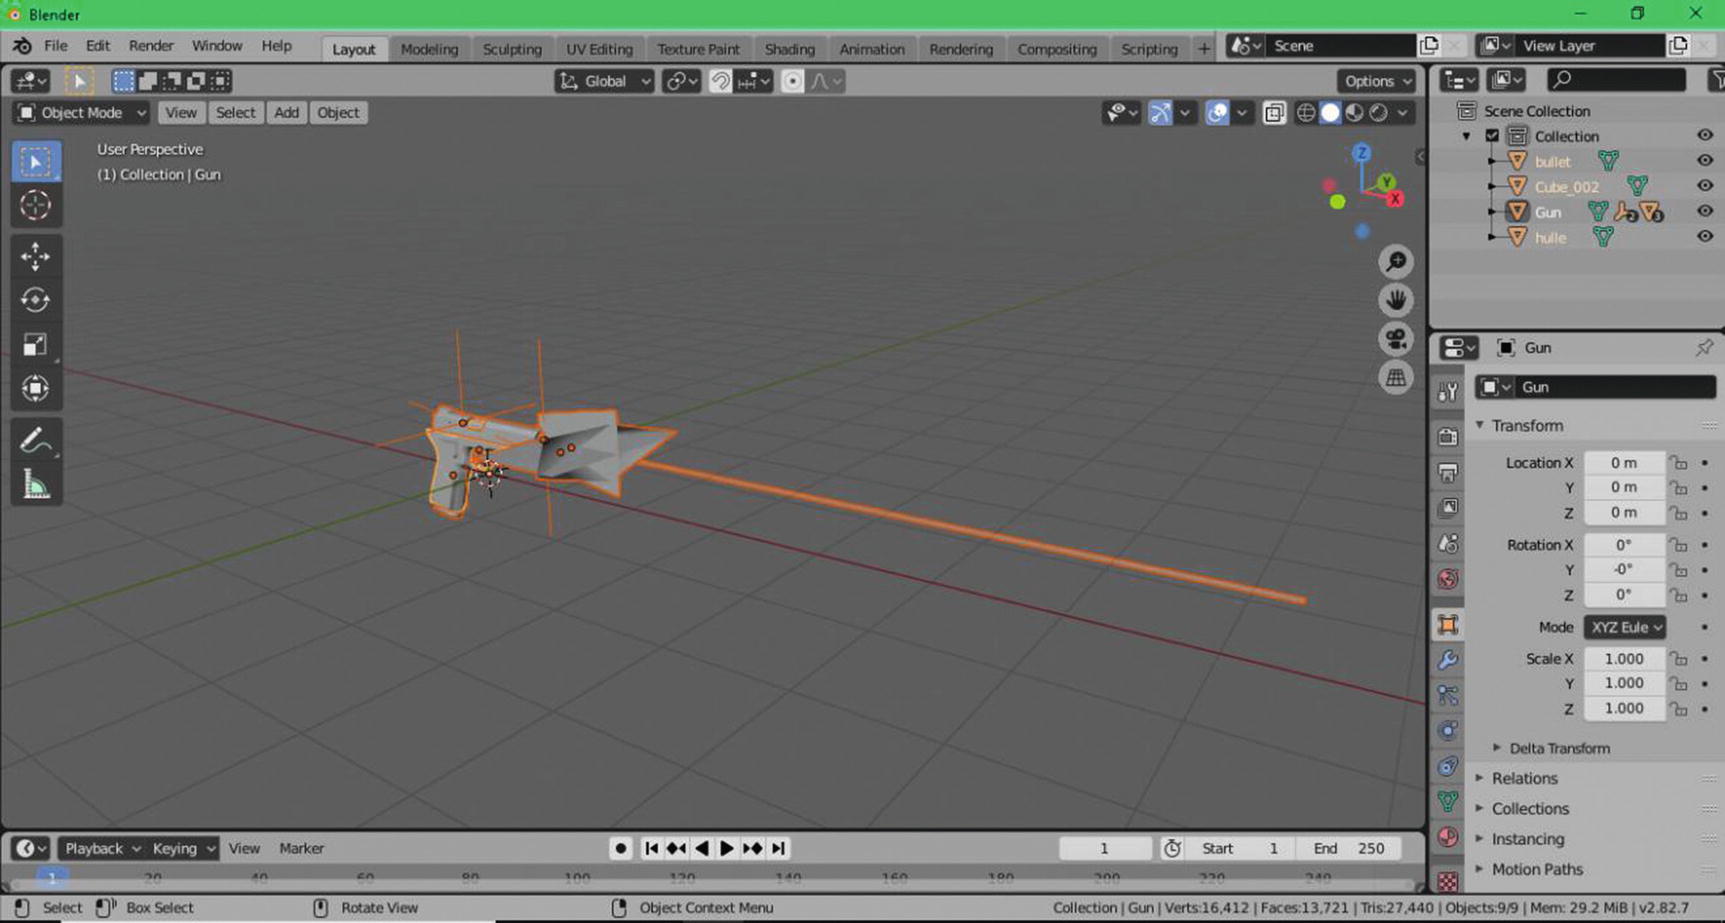
Process of Importing .ABC file part 1
Of course, the process will be the same as the first part. We will go to File menu ➤ Import ➤ Choose Alembic (.abc) ➤ Browse to the file location of our file to be imported, and then import.
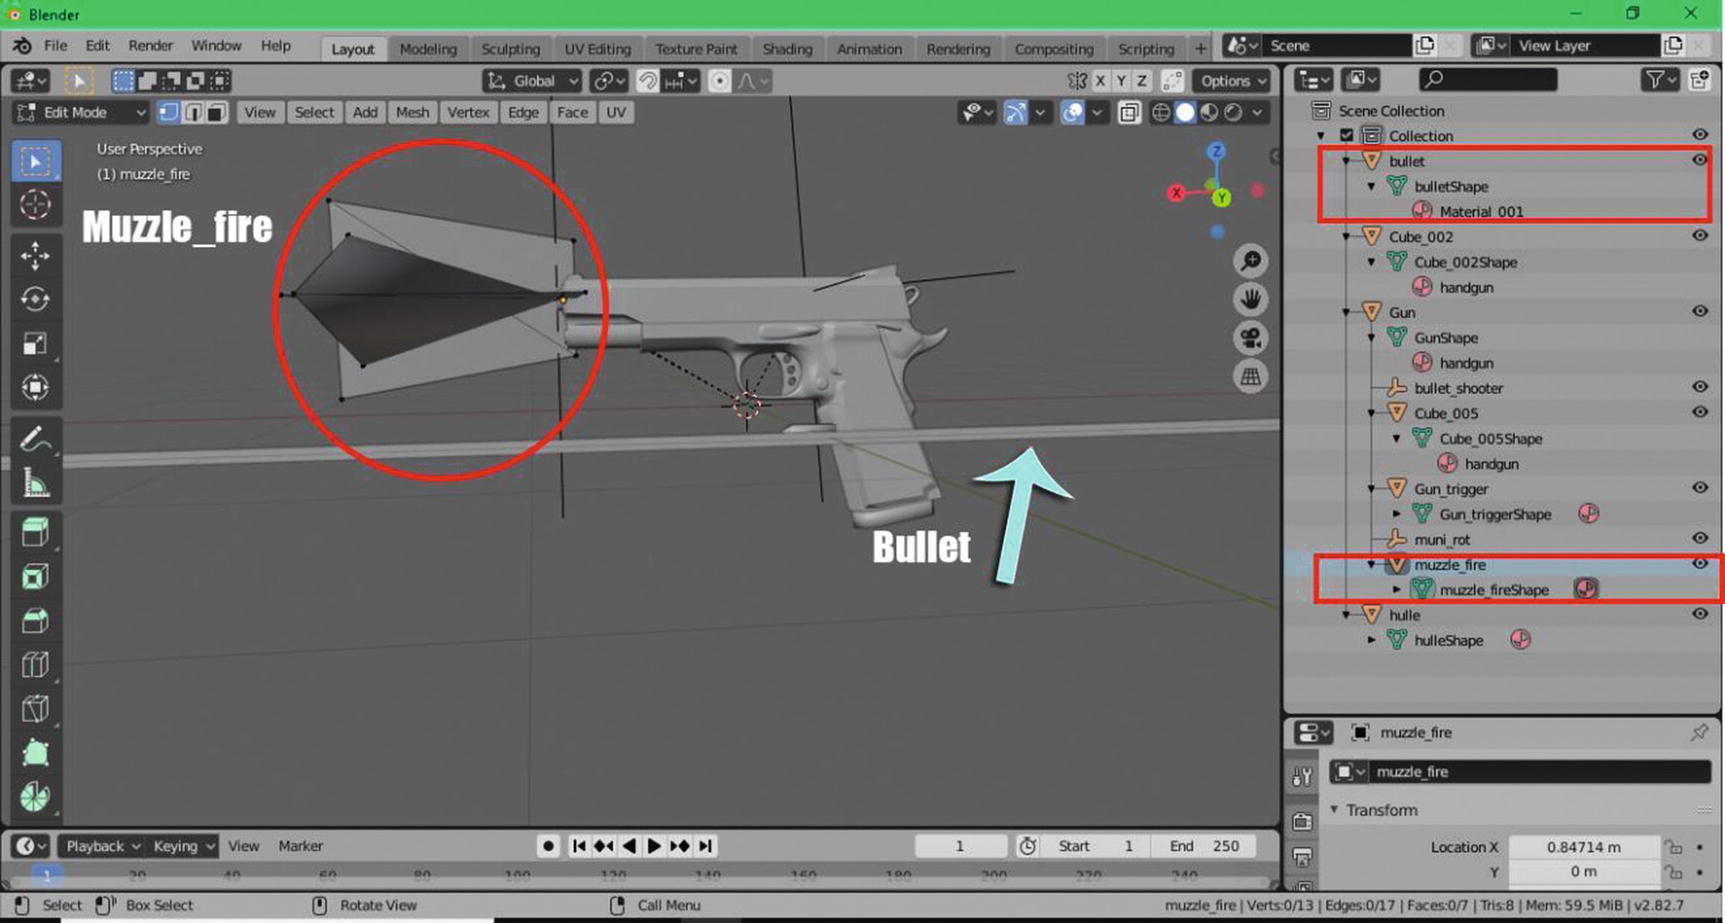
What we can see in Figure 5-7 is the view of our game asset after being imported. Our texture for this one is separated so if we look at the render view, we can only see a diffuse color white as a material shade of the gun. Let’s add the texture of the gun.
Process of Importing .ABC file part 2
You can see that the named muzzle_fire object in our outliner refers to that mesh encircled in our gun, and the bullet refers to the long line. If you don’t want to see these parts in your render or you feel that you don’t need those parts of your imported game asset, all you need to do is to go to your outliner and hide those unwanted parts of your game assets by filtering it out.

Filtering

Process of Importing .ABC file part 3
Process of Importing .ABC file part 4

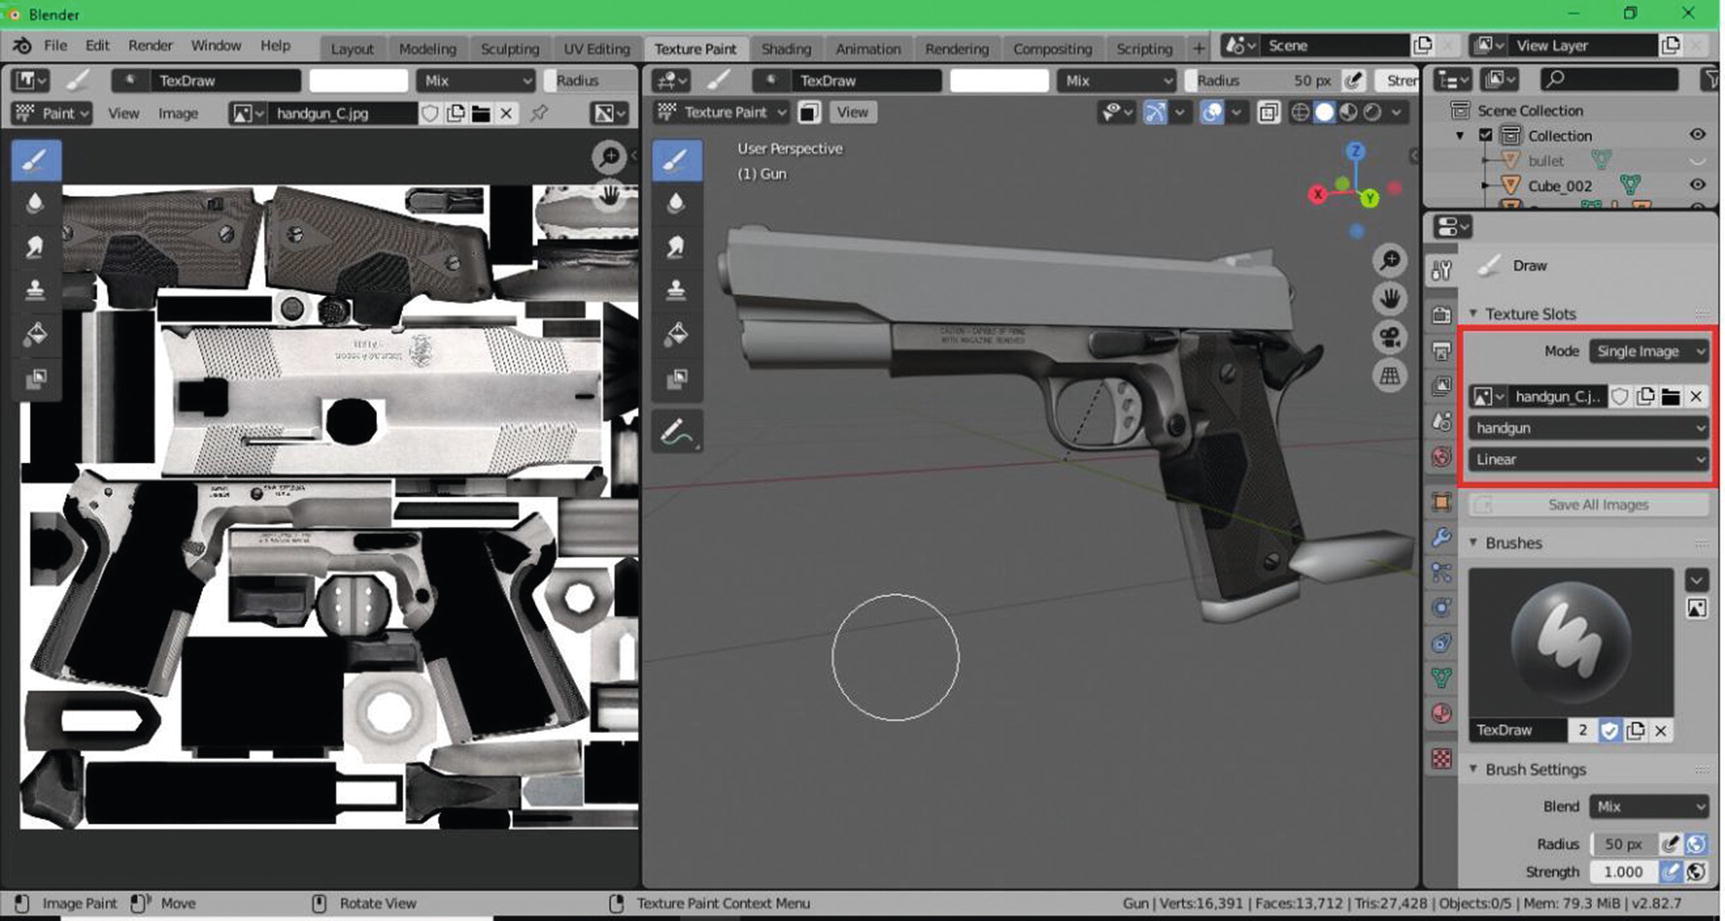
Material settings

Render View
This is now how our game asset looks like in render view.

Process of importing .Obj file part 1
Importing Using .OBJ Format
.OBJ file format comes with an .Mtl file format; it’s the file format that contains data about the materials of the object.
Let’s now take a look at Figures 5-14 to 5-17 to see the process of importing an .OBJ file.
The first part of the process is of course the same: File Menu ➤ Import ➤ Wavefront (.obj) ➤ browse your file ➤ then import.
Again, we will filter out what part of our game asset we want to be seen and rendered.
Process of importing .Obj file part 2

Process of importing .Obj file part 3

Render View
Here is the rendered view of our game asset imported from the .Obj file.
The process of importing an FBX file is the same with .DAE and .ABC. You just need to go to File menu ➤ import ➤ browse the .FBX file and import. That’s it. If there is a need to do something with textures, just look at the material settings like what we did in the .DAE and .ABC files, but if you have an .FBX file with textures in it, it will be easier. You just need to import it and everything is already done.
It’s the same thing with a .PLY file. You just need to go File Menu ➤ Import ➤ Stanford (.Ply) ➤ Browse .Ply file ➤ import your file and then that’s it. It’s the same for both .STL and .WRL files but with the same set of concerns. If your mesh is something like our gun with some added meshes that aren’t necessary, you might need to edit something before you can use it.
Even for .glTF files, you just need to go to File Menu ➤ Import ➤ glTF 2.0 (.gltf/.glb) ➤ browse a glTF file ➤ import your file and that’s it. When you render, you can even see your materials in it even the textures are created in a separated folder.
For .SVG files, it is the same process. The only difference will be is that when you import .SVG files, they will end up as curve objects since they were originally 2D images.
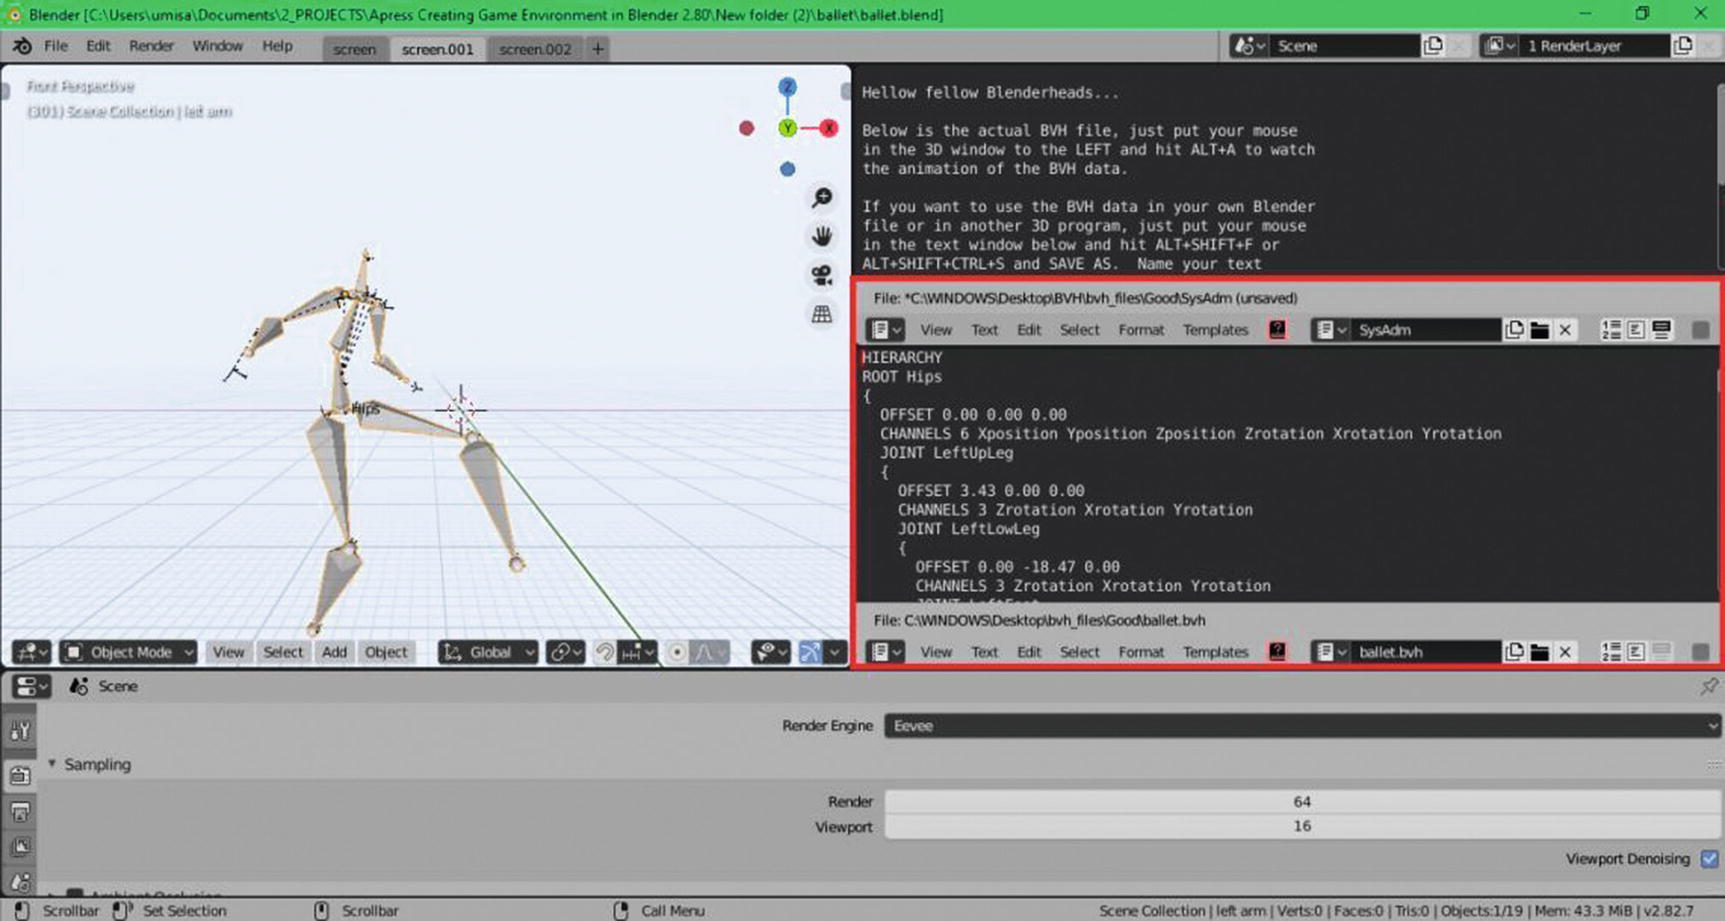
Creation of .BVH data in Blender. Credit to centralsource.com
Imported .BVH File
In Figure 5-19, this is how it looks like after you import a .BVH file. This is the same as the one in Figure 5-18.
Now, we’re done discussing the process of importing our game assets in Blender. Let’s now talk about exporting our game assets from Blender.
Exporting Game Assets in Blender
For exporting game assets, we also have 10 available file formats, which are COLLADA (.dae), Alembic (.abc), Universal Scene Description (.usd, .usdc, .usda), Motion Capture (.bvh), Stanford (.ply), Stl (.stl), FBX (.fbx), glTF 2.0 (.glb/.gltf), Wavefront (.obj), and X3D Extensible 3D (.x3d)
We already know .dae, .abc, .bvh, .ply, .stl, .fbx, .glb/.gltf, .obj, and .x3d file formats. What’s left here are the .usd, .usdc, and .usda, which are Universal Scene Descriptions. Let’s have a little discussion about this file format.
.USD is a file format that can be both ASCII and binary-encoded. It was developed by Pixar in a Universal Scene Description, which is a framework for interchange in 3D computer graphics data. This characteristic of .USD files are advantageous in certain scenarios like if one has a USD file that contains references to plain .usd assets, those assets can be converted between binary and ASCII without changing the sources that refer to them.
Now, let’s talk about the process of exporting files. The process of exporting in all file formats in Blender are the same. You just need to go to File Menu ➤ Export ➤ file format you wanted ➤ to export the game assets. The only difference lies after you export the file and for some file formats, there are some settings available in case you want only to export some parts of your project.
For Collada (.Dae) files, you only have the simple exportation process. There are no other settings available. Its difference is that the textures are separated to the .dae file that contains the information about the geometry, etc., of the object.
For Alembic (.abc) files, it also only has the simple exportation process and no other settings available; in addition, it only has the .abc file and no other separated file for its textures.
For Wavefront (.obj) files, we have the file that handles the information for our object, which is the .obj file and a file that handles the information for our materials, which is the .mtl file. It also has other export settings available.

Exporting with .usd file format
You can see in Figure 5-20 that we have options to include the animation, hair, UV maps, normals, and materials. We also have an option to just export those currently selected objects in the scene or project, and we can do this by toggling the selection only. You can also choose which settings it will be based on, in the settings of your project in the render mode or in the viewport mode. By default, exporting UV maps, normals, and materials are enabled.
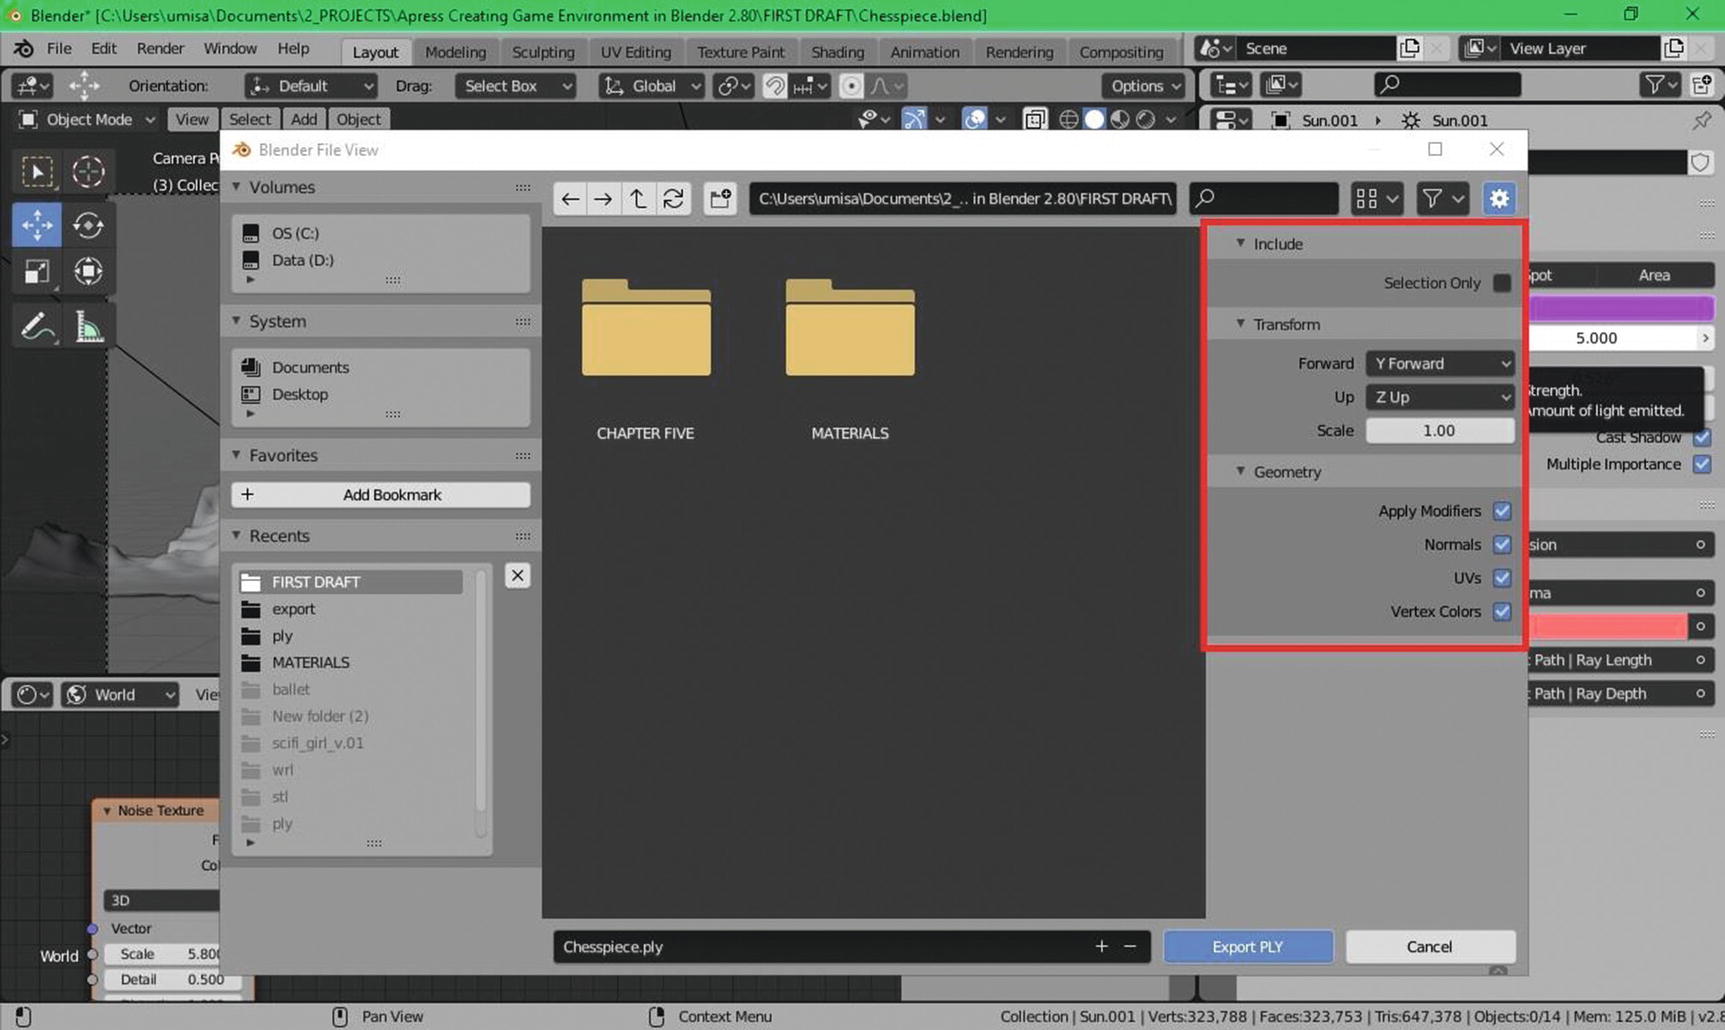
Exporting with .ply file format
As you can see in Figure 5-21, we have options for including modifiers’ settings, normals, UVs, and vertex colors in exportation. We also have an option if we want only those that are currently selected in the project to be the ones that will be exported; and we can do this by toggling the selection only under the include panel. In transform, this part will help you set your game assets’ positions differently from what it is in the project. The forward and up refers to the axis while the scale refers to the size of the game assets after you export them.

Exporting with .stl file format
For .STL format, we have an option to include modifiers’ settings. We also have the option to transform our game assets’ positioning after the exportation just like what we have in .PLY file format; and an option if we want to export only the current selected objects in our project by toggling the selection only.
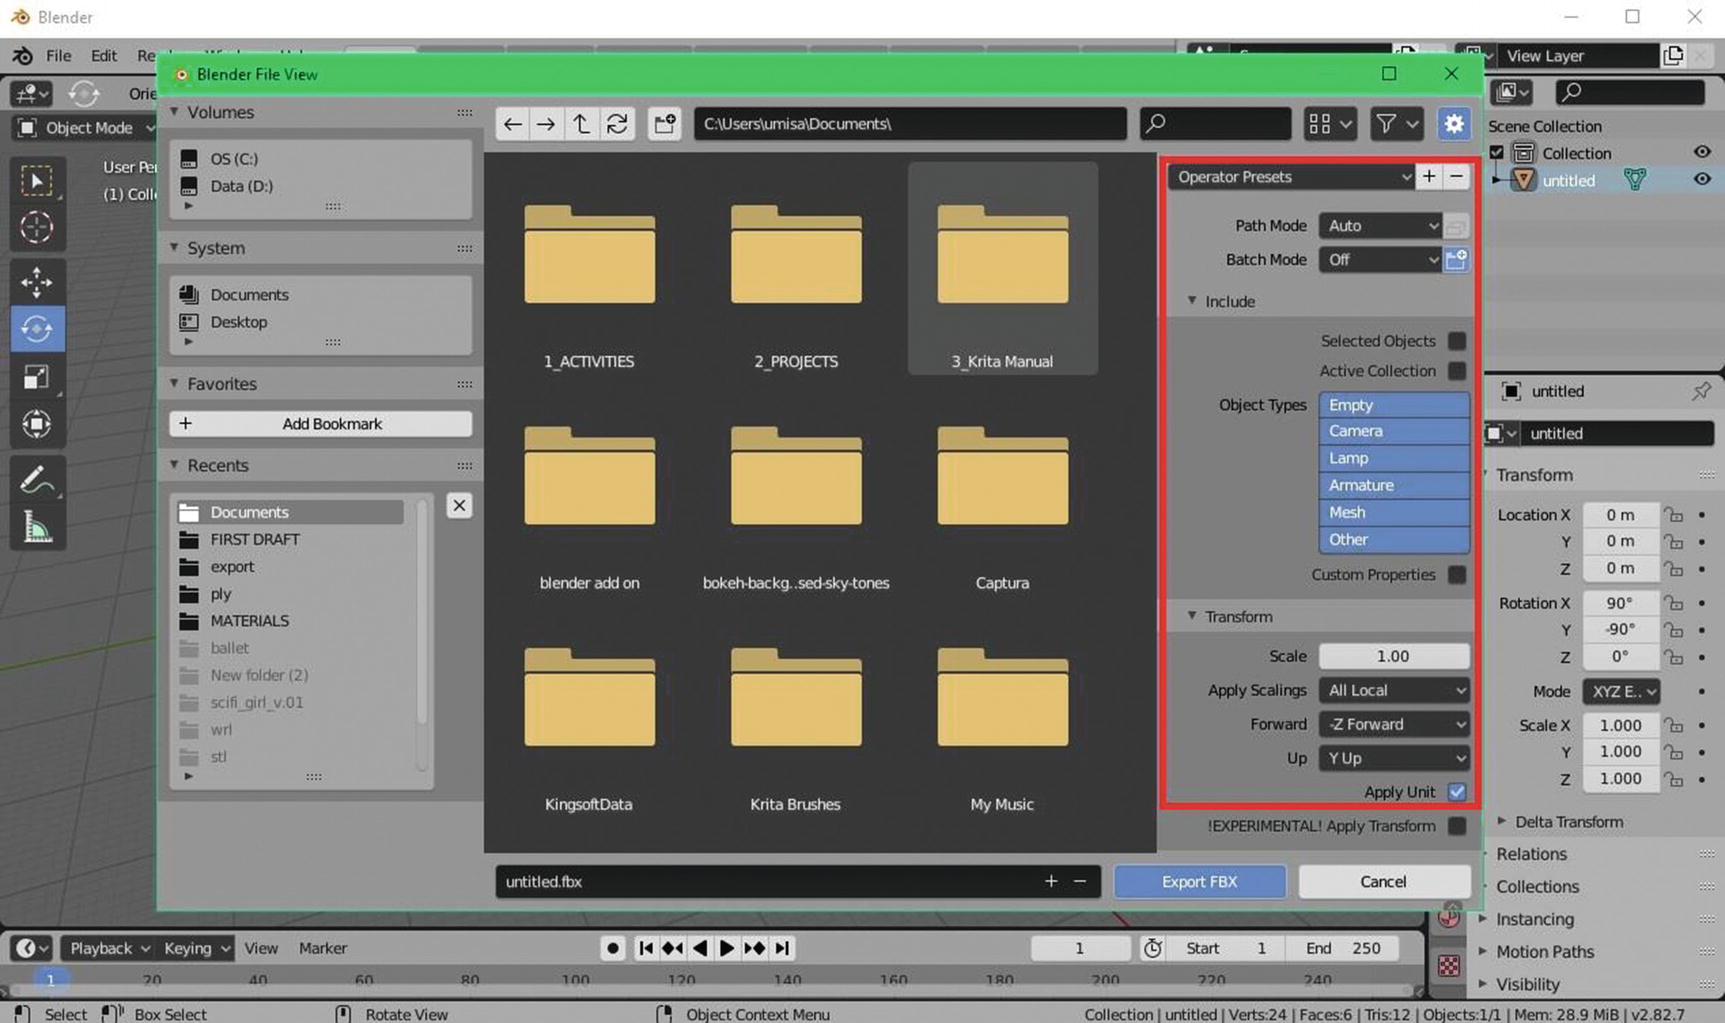
Exporting with .fbx file format
For .fbx file format, we have more specific options for exporting our game assets. For object types, we can choose if we want to export empties, cameras, lamps or light objects, armatures or the bones that we use for animation or rigging, mesh, and other object types like curves. We still have the option if we want only to export those that are currently selected in the project, and we can do this by toggling the selected objects. We also have another option if we only want to export those that are part of the active collection and we can do this by toggling active collection. We have here the transform panel, which gives us option if we want to change the position in the axis or scale the game assets after exportation. There are other options there that are for geometry of the mesh (under the geometry panel), armature and animation.
Under the geometry panel, you can decide about the smoothing information: if it will be only normals, faces, or edges. You also have the option here to export the subdivision surface, loose edges, and tangent space.
Under the armature panel, you can set the axis for the primary and the secondary bones. There is also this option called Only Deform Bones, which enable you to export only the deformed Bones and the Non-deformed bones that have a deformed children(bones).
Exporting with .glb file format
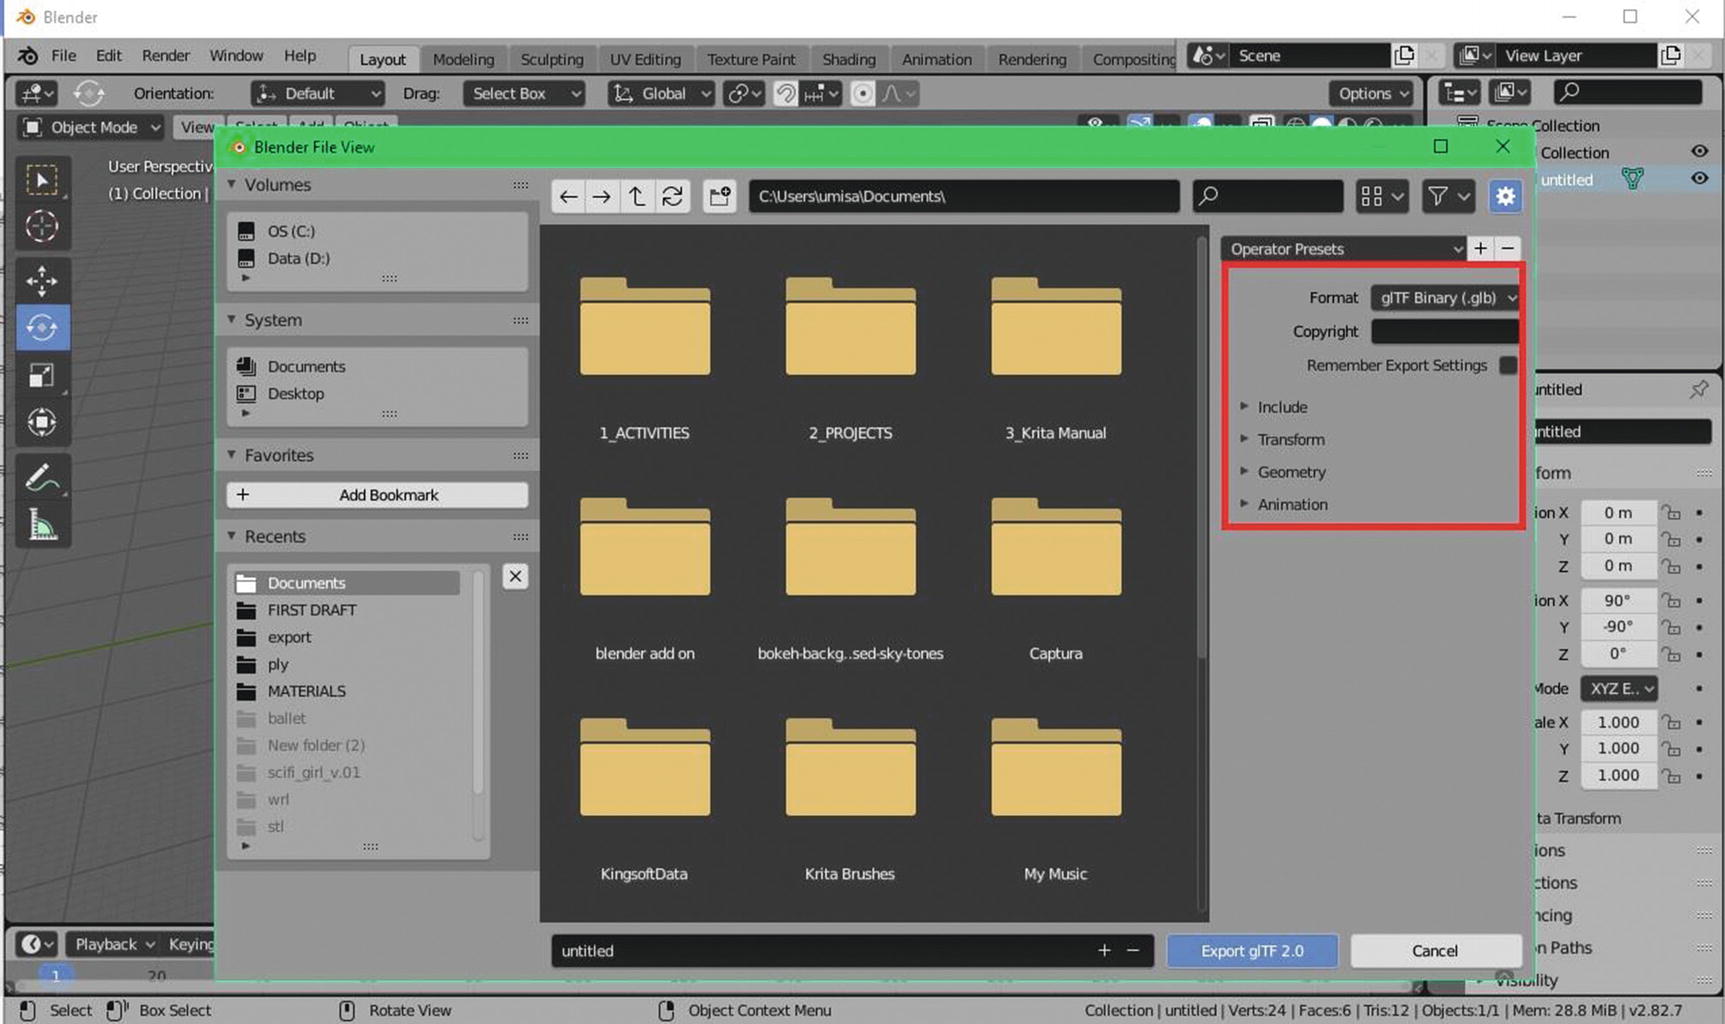
Hmmm. As for .glb format, you can see in Figure 5-24 that we have remember export settings. As what it says, if you toggle this up, whatever settings you have, they will be saved and that will be the one Blender uses as export settings the next time you export a game asset unless you change it again. And another thing, we have here copyright where you can place a copyright setting.
There are still options for which objects you wanted to be exported, and that was under the include panel. Also, the option for the positioning of your game assets after exportation was under the transform panel. You also have options if you want to include modifiers’ settings, UVs, normals, tangents, vertex colors, and materials, and these are all under the geometry panel. What you can see under the animation panel are options if you want to export information related to shape keys, skinning, and, of course, animation.
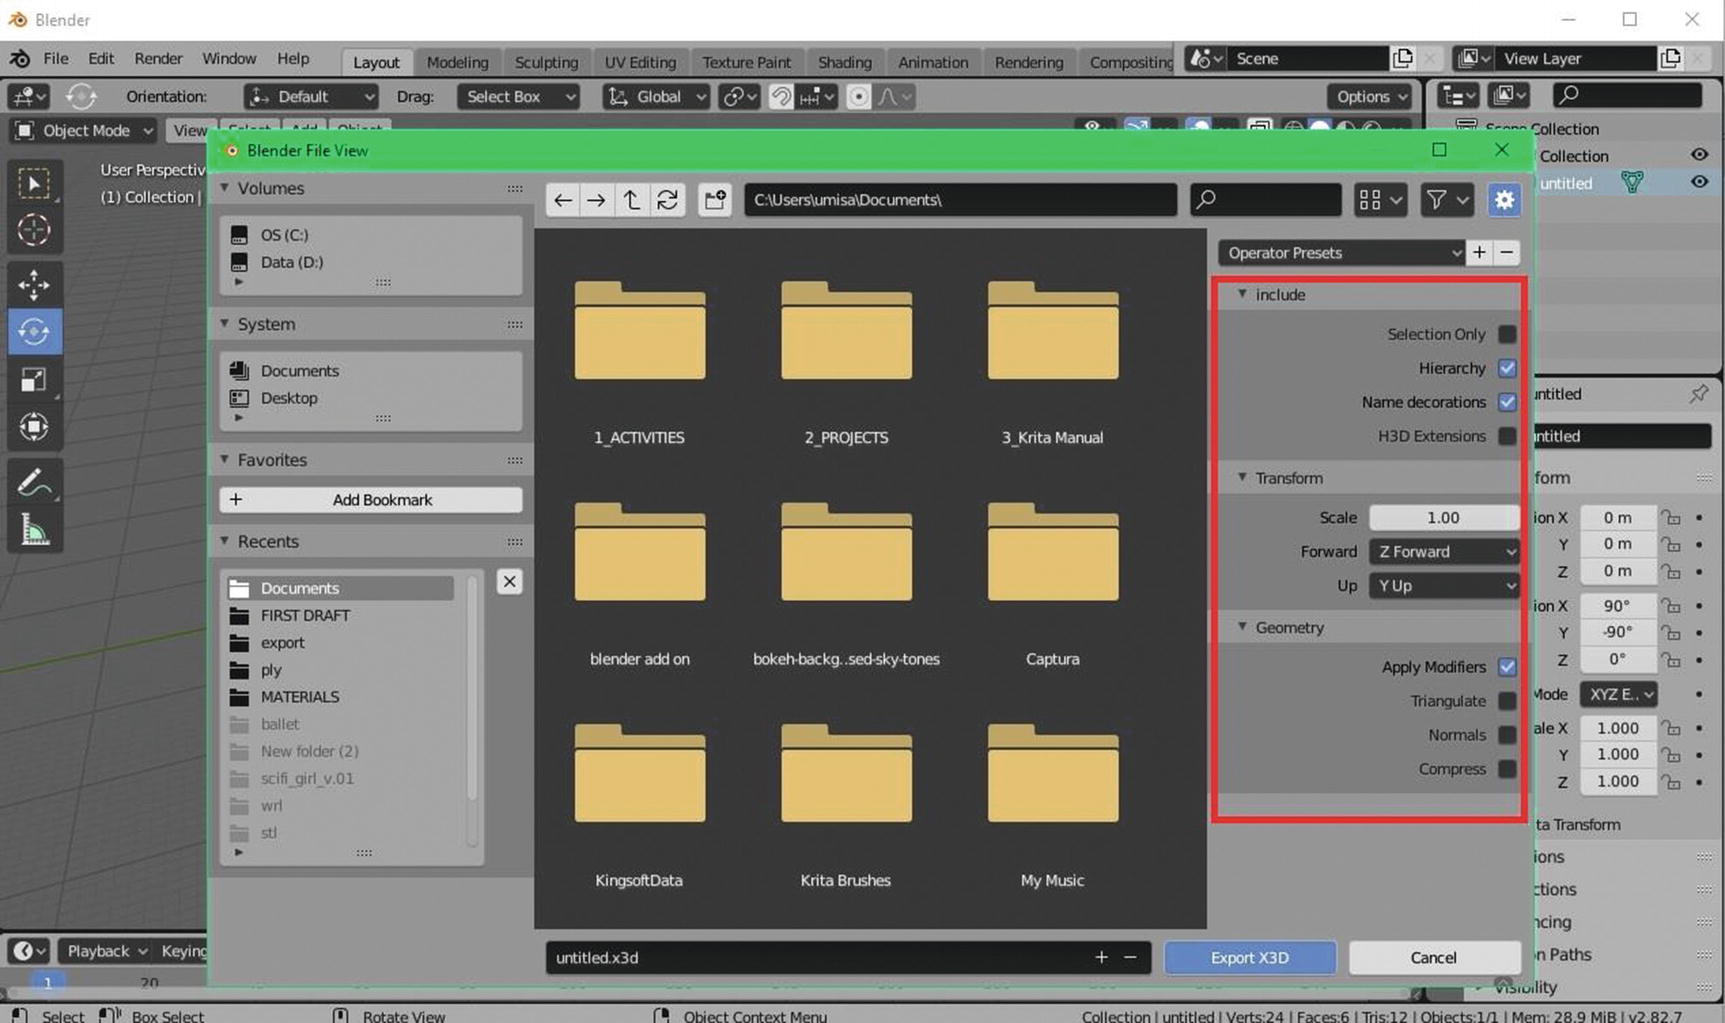
Exporting with .X3D file format
As for .X3D file format, still, we have an option to include modifiers’ settings, triangulate, normals, and compress. We also have the option to change the position and size of our game assets after exportation through the settings under the transform panel. We still have this selection only, which gives us the option to only export those objects that are currently selected in the project. We also have this hierarchy that when enabled exports parent–child relationships of the objects while name decoration adds prefixes to the names of exported nodes to indicate their type.

Exporting with .OBJ file format
For .OBJ file format, we have selection only , which gives us the options to export only the currently selected objects in the project; objects as OBJ objects, which gives us the option to exports objects in objects under OBJ file format; objects as OBJ groups that give us the option to export objects in groups under OBJ file format; material groups that give us the option to export our game assets’ materials in the group; and animation, which gives us the option to write out an .OBJ for each frame.
We also have options here for adjusting the size and position of our game assets in the axis after exporting under the transform panel. And we also have options here if we want to include modifiers’ settings, normals, UVs, materials, triangulate faces, curves, etc., and this is under the geometry panel.
Now that we’re already discussed how our game assets can be exported in different file formats, let’s start discussing how we can import our game assets in a game engine that is compatible with Blender.
Open Source Game Engine
The earlier version of Blender, until the 2.7x version, has its own game engine; but when 2.80 came, Mr. Ton Roosendaal decided to discontinue it. He stated that the future of the Blender game engine will integrate the system into Blender as an interaction mode for game prototypes, architectural walkthroughs, and scientific simulation. Now, Blender is working to be a good support for external open source game engines.
Now, let’s start our brief discussion about one of the open source game engines that we can use together with Blender, the Godot Engine.
Godot Engine (godotengine.org)
Godot is a 2D and 3D game engine released under an MIT license. It’s both a free and open source game engine. Its development was started by Juan ‘reduz’ Linietsky and Ariel ‘punto’ Manzur in 2007. Godot aims to offer a fully integrated game development environment. It allows developers to create a game from scratch, needing no tools beyond those used for content creation like art assets, music, etc.
Godot engine is a feature-packed, cross-platform game engine to create 2D and 3D games from a unified interface. It provides a comprehensive set of common tools, so users can focus on making games without having to reinvent the wheel. Games can be exported in one click to a number of platforms, including the major desktop platforms (Linux, masOS, and Windows) as well as mobile (Android, iOS) and web-based (HTML5) platforms.
Godot is a free and open source software under the OSI-approved MIT licensed. In short, you are free to download and use it for any purpose, personal, nonprofit, commercial, or otherwise. You are also free to modify, distribute, redistribute, and remix Godot for any reason, both noncommercially and commercially.
The official supported languages for Godot are GDScript, Visual Scripting, C#, and C++. If you are just starting out with either Godot or game development in general, GDscript is the recommended language to learn and use since it is native to Godot. While scripting languages tend to be less performant than lower-level languages in the long run, for prototyping, developing Minimum Viable Products (MVPs) and focusing on Time-To-Market (TTM) , GDScript will provide a fast, friendly, and capable way of developing your games.
Godot also includes a script editor with a real-time parser, syntax highlighting, and code completion. It also features a built-in debugger that helps you explore and modify your project while it’s running, a built-in profiler with graph plotting and time seeking, and an error logger with full stack traces.
Godot also has support for physical-based rendering with full MSAA support, full-principled BSDF with subsurface scattering, reflection, refraction, anisotropy, clear coat, transmittance, etc. It also uses global illumination for real-time gorgeous graphics, easy-to-use shader language based on GLSL with a built-in editor and code completion, and mid- and post-processing effects including a new tonemapper that supports HDR, multiple standard curves and auto-exposure, screen space reflections, fog, bloom, and depth of field.
Godot importing process 1
I export our game assets in Blender in a .gITF file format. The only file formats you can import in Godot engine are .OBJ, glTF 2.0, .DAE, ESCN, and .FBX, but there are problems with .FBX since it is a proprietary file format and .OBJ is pretty limited because there is no support for pivots, skeletons, etc. And for .DAE, the supported ones are more of the older versions. The most recommended file format would be the glTF 2.0. So, for our project, I will also use the glTF 2.0 format.
Godot importing process 2
Godot User Interface

Project folder for Godot
Godot importing process 3
Godot importing process 4
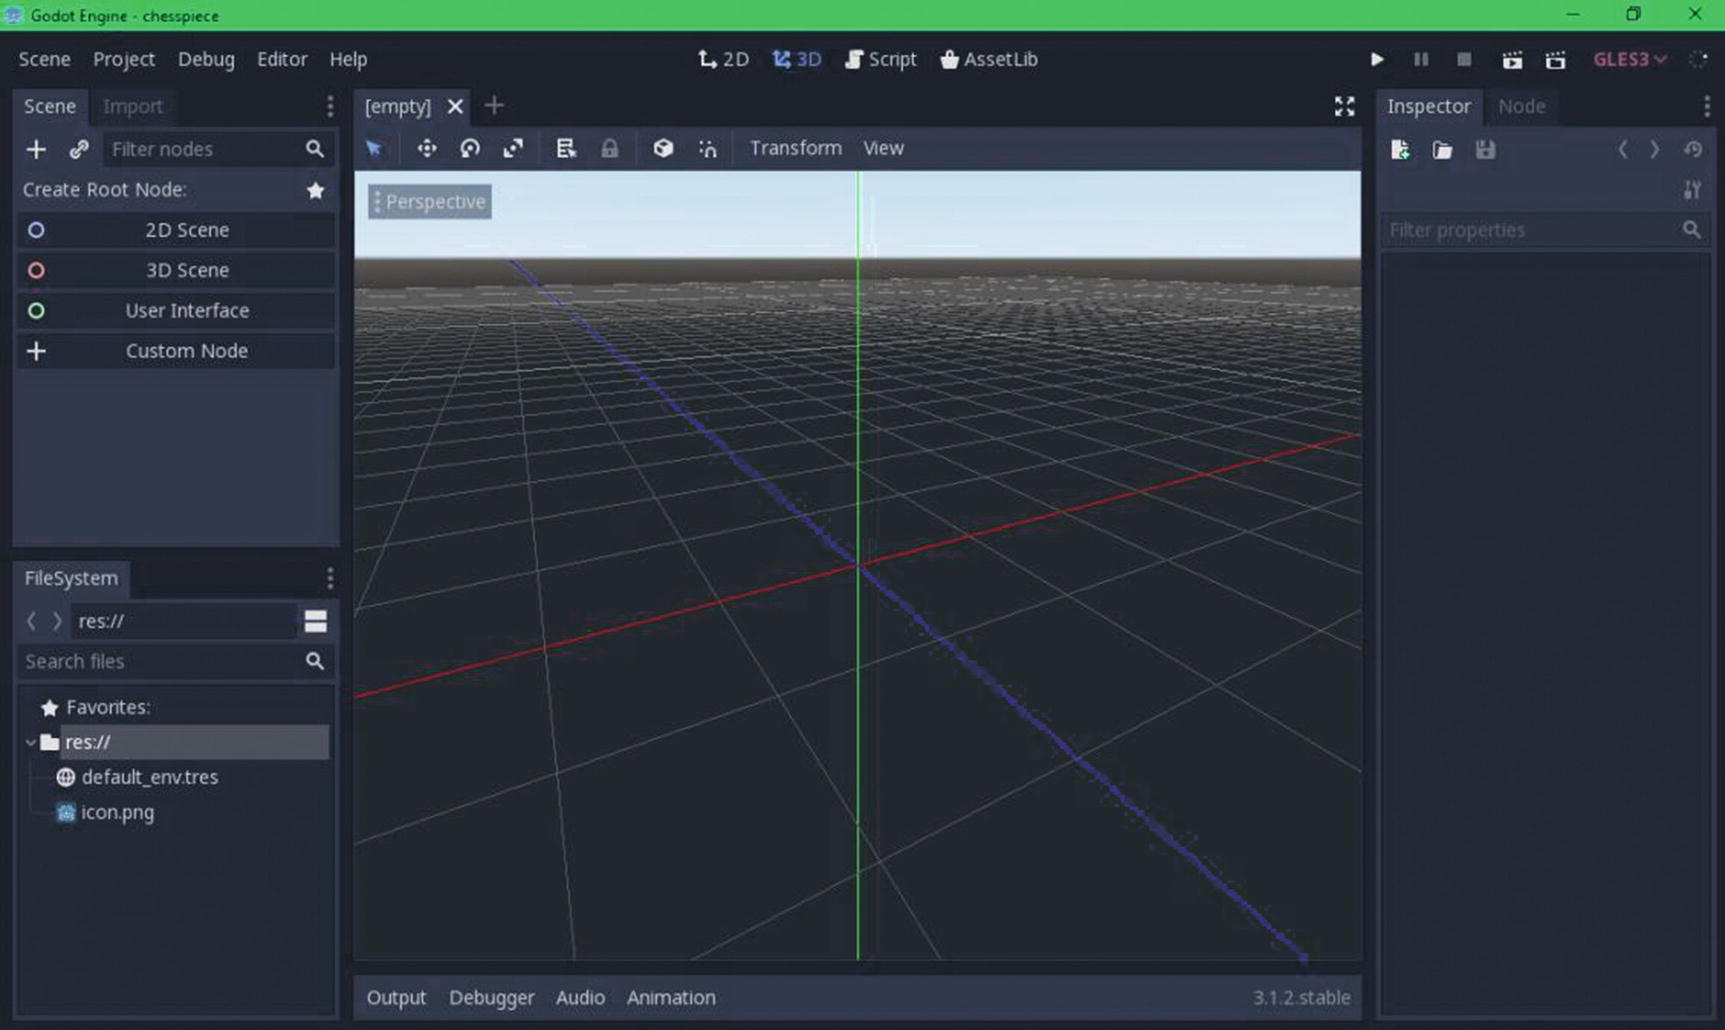
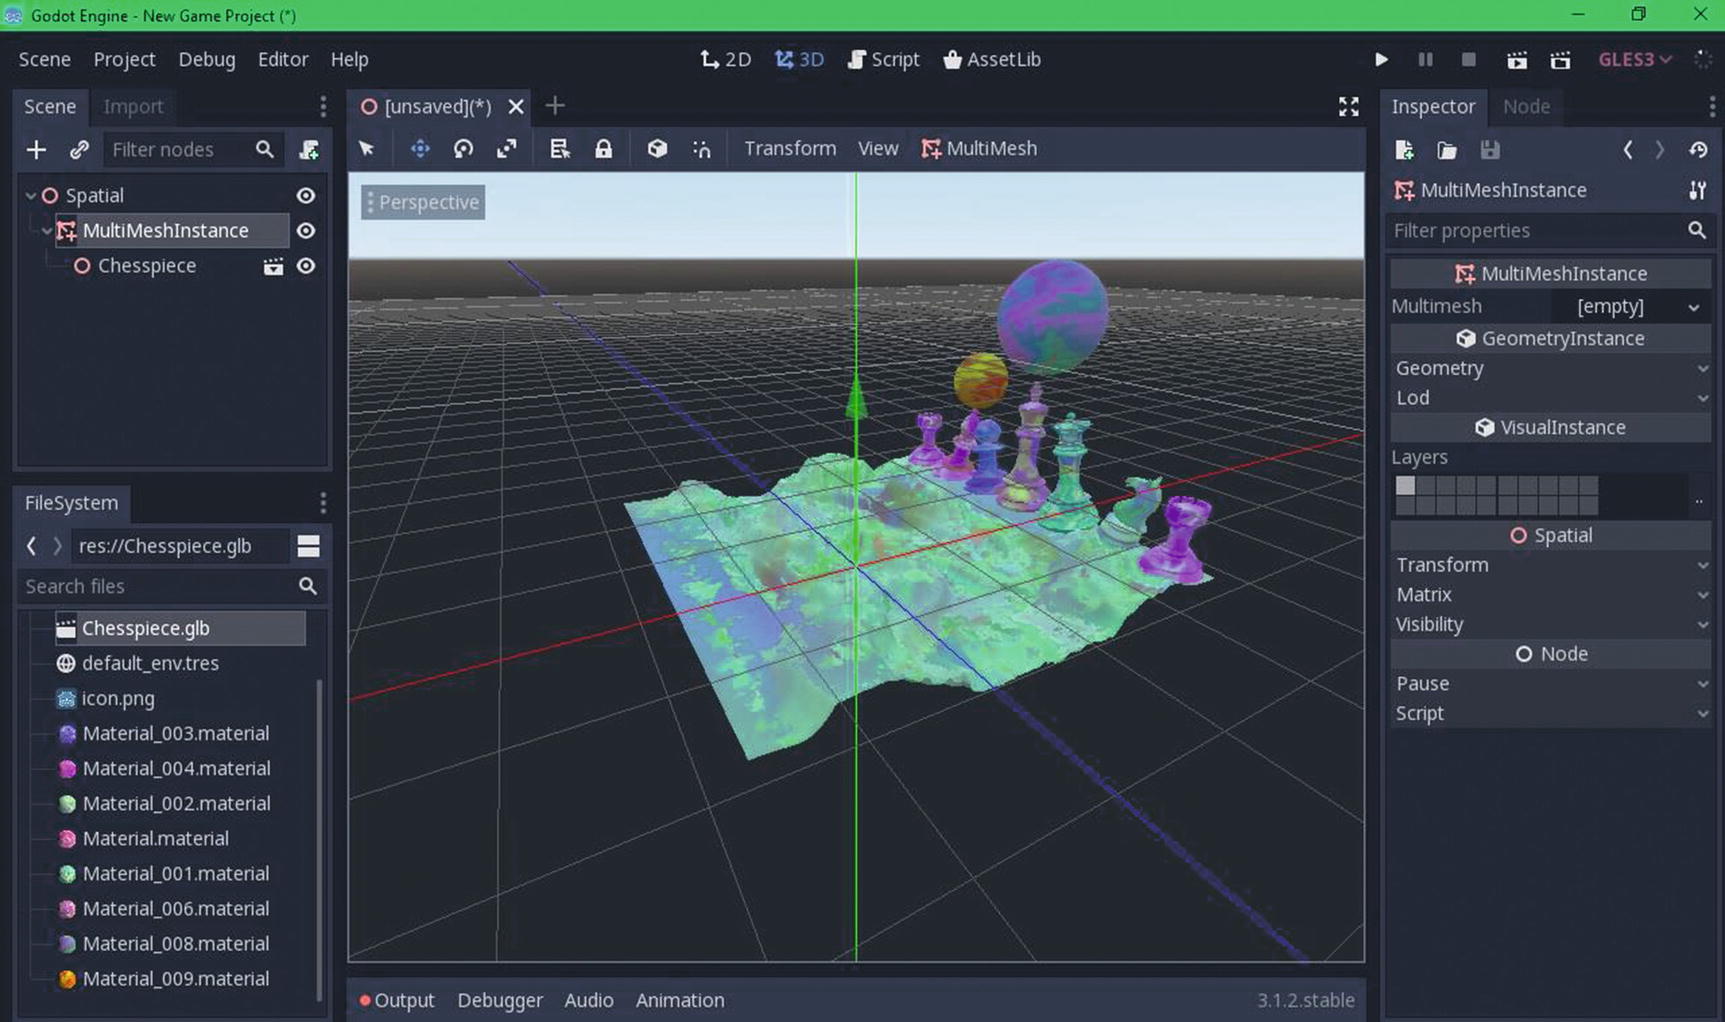
In order to use our imported game assets, we need to use so-called instances. To do this, you first need to create a root node in the scene panel. Godot gives four options there: 2D scene, 3D scene, user interface, and custom node. Since we’re doing 3D, we will choose 3D scene. After clicking 3D scene, you will see “Spatial” created. Next, you will click the plus icon to choose instances or nodes for our object to work on. Since we want to create a mesh one, we will click MultiMeshInstance. After adding the instance, you can just drag your game asset to the viewport and voilà! Your game asset will already appear in the scene.
These are the processes on how we import our game assets from Blender to a Godot game engine.
There are other open source game engines out there that can be used together with Blender. Here are some of those to help you find other options.
Stride (stride3d.net)
Stride, which is formerly known as Xenko, is a free and open source, highly modular, and super versatile game engine. It was originally developed by Silicon Studio and can be used to create mobile, PC and VR games, or as a high-end rendering engine for non-gaming applications such as architecture, medical, and engineering visualization software, training simulation, and so on.
Stride comes with a robust toolchain that enables you to intuitively and efficiently create, manage, and modify all assets of your game. The suite editors simplify and automate common development workflows. Its nested prefab and archetype systems scale along all editors and assets.
Stride’s PBR materials, light probes, post effects, multi-threading, and next-gen graphics API support deliver realistic graphics with outstanding performance. The flexible pipeline, accessible low-level APIs, and customizable shaders let you tweak the rendering as much as you need.
It comes with a full set of modules dedicated to editing every part of your game. Each is provided out of the box and integrated into the engine. Modern C# scripting with shader and script hot reload lets you build prototypes and iterate fast.
Stride uses a single API for every device, with native support for Oculus and HTV Vive, and also, Stride’s HRTF binaural audio greatly improves VR immersion.
Armory3D (armory3D.org)
Armory3D is an open source software with full Blender integration, which turns it into a complete game development tool. It offers a unified workflow from start to finish, making your work faster. There is no more jumping between different applications to constantly export data.
Behind the scenes, Armory3D is powered by open source technology. Utilizing Kha, a multimedia framework, and Haxe, a cross-platform toolkit, it provides first-class performance and portability.
Armory3D is based on the cycles nodes. Materials are precompiled into shaders suitable for real-time rendering. Every scene in Armory3D is renderable as-is in cycles using path tracing. This makes it possible to use cycles for light baking with no separate setup. Everything is bundled to provide ultimate game prototype templates. The code editor has integrated debugging support. You can use nodes, write scripts in Haxe, or embed WebAssembly code. You can also create live scenes and export them to desktop, web, and mobile consoles so everyone can experience them. A binary data format and asset robust animation system are employed, with support for GPU skinning, action blending, and events. On top of that, each node can be animated in a timeline using keyframes, just like you are used to.
Now, this concludes Chapter 5 as well as this book. I do hope that you learned something with this book. So, let’s keep on learning!