
Your presentation is nearly complete. You’ve written the content, chosen a design, set the layout of each slide, and added images and media files. The last major task before you give the presentation is to give it some movement, by adding slide transitions and slide effects.
Slide transitions are the animated effects the audience sees when you switch from one slide to the next in the presentation. PowerPoint provides many different transition effects, and you’ve probably seen them all (even the really tasteless ones). Slide effects are animations that occur within a slide. For example, you can have each bullet point fade onto the screen as you get to it, and then dim to gray text as you move to the next point. Or you can have an image, graph, or diagram glide onto the screen.
In this chapter, you’ll rearrange the order of your slides in the Slide Sorter View and then set slide transitions and effects.
rearrange slides
As you’ve been developing your presentation, you’ve seen how the topic of one slide flows into the next, and perhaps that flow is perfect for your show. But maybe the presentation would be a bit better, a touch tighter, if you moved that slide there, and moved that other slide over here. PowerPoint’s Slide Sorter View shows you many slides at once, and allows you to drag one or more slides to other places in the presentation. Slide Sorter View also offers a convenient way to apply slide transitions and slide effects to multiple slides in one operation (you’ll see how to do that in the next section).
To enter Slide Sorter View, choose View > Slide Sorter, or click the Slide Sorter View button at the bottom of the PowerPoint window.
In Slide Sorter View, you see thumbnail views of the slides; the currently selected slide shows a darker border around it.
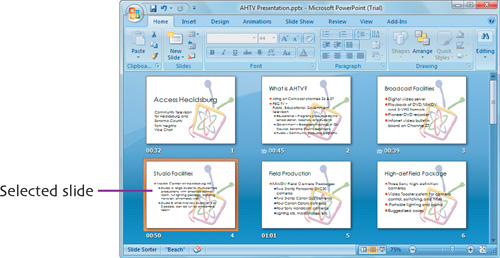
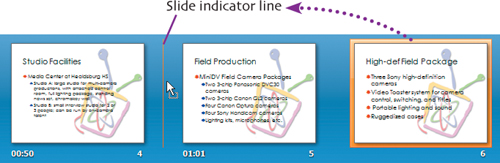
To move a slide, click the slide you want to move, then drag it to the new location. As you drag, an indicator line will show you where the slide will go when you release the mouse button.
set slide transitions
Transitions between slides can enhance your presentation’s message and add visual interest to your show. You can add transitions to one or more slides at one time in either the Normal or Slide Sorter View (though I find it’s usually easier to use Slide Sorter View). PowerPoint includes dozens of transition effects to choose from, ranging from subtle to the polar opposite of subtle. With slide transitions, as with any animation in PowerPoint, you should live by the principle “less is more” when choosing transitions, because the flashier they are, the more quickly your audience will become tired of them.
![]() Switch to Slide Sorter View to begin setting the transition; click the Slide Show View button at the bottom of the PowerPoint window, or choose View > Slide Sorter.
Switch to Slide Sorter View to begin setting the transition; click the Slide Show View button at the bottom of the PowerPoint window, or choose View > Slide Sorter.
![]() Select the slides to which you want to apply the transitions. To select multiple slides, click the first slide, hold down the Shift key, and click the last slide. Those slides and all slides in between are selected.
Select the slides to which you want to apply the transitions. To select multiple slides, click the first slide, hold down the Shift key, and click the last slide. Those slides and all slides in between are selected.
![]() Click the Animations tab on the Ribbon. Let’s look at the Transition to This Slide group:
Click the Animations tab on the Ribbon. Let’s look at the Transition to This Slide group:
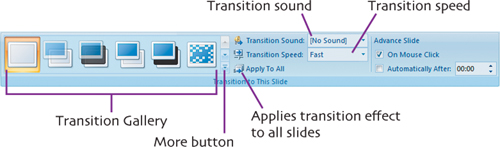
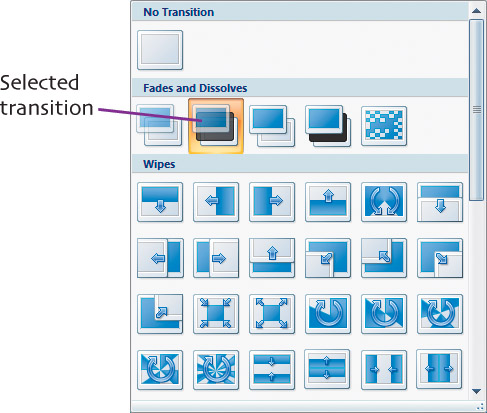
![]() Choose a transition effect from the Transition Gallery, which applies the effect. As usual with galleries, you’ll see a preview of the effect on the slide as you hover your mouse over effect thumbnails in the gallery. To expand the gallery and see more effects, click the gallery’s More button.
Choose a transition effect from the Transition Gallery, which applies the effect. As usual with galleries, you’ll see a preview of the effect on the slide as you hover your mouse over effect thumbnails in the gallery. To expand the gallery and see more effects, click the gallery’s More button.
![]() Choose the speed of the transition by selecting it from the Transition Speed pop-up menu. Your choices are Slow, Medium, and Fast.
Choose the speed of the transition by selecting it from the Transition Speed pop-up menu. Your choices are Slow, Medium, and Fast.
![]() If you want, choose a sound from the Transition Sound pop-up menu. This sound will play between each of the selected slides. Use this sparingly; many audiences hate sound effects in presentations.
If you want, choose a sound from the Transition Sound pop-up menu. This sound will play between each of the selected slides. Use this sparingly; many audiences hate sound effects in presentations.
![]() By default, the transition you chose is applied only to the slides you selected in Step 2. Click the Apply To All button to add the transition to the entire presentation.
By default, the transition you chose is applied only to the slides you selected in Step 2. Click the Apply To All button to add the transition to the entire presentation.
set slide effects
You’ve seen slide effects in most presentations; these are the effects that are responsible for titles, bulleted text, charts, or diagrams that fade, wipe, or animate onto the screen when the presenter clicks the mouse button. PowerPoint for Windows has two ways to apply animation to objects on your slides. The first way is to use animation schemes, which are preset animations that are easy to apply. The other way is to create a custom animation, where you’re in complete control of each of the elements on the slide.
To apply an animation scheme, first switch to Normal View, then display the slide to which you want to apply the animation scheme. Next, click the Animations tab on the Ribbon.
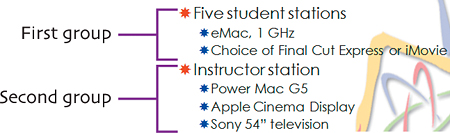
On your slide, click and select the object you want to animate. Then make a choice from the Animate pop-up menu in the Animations group on the Ribbon, which may have a different appearance than shown here, depending on what you have selected. The Slide pane shows you a live preview of the animation as you hover over each choice. To play the preview again, just move the mouse to another menu choice, then back to your original one. When you’re happy with the effect, choose it from the menu.

In the menu, All At Once makes the entire selected object appear on the slide. By 1st Level Paragraphs applies the effect a bulleted group at a time. For example, in this picture, the first group and its subtopics will appear first, then the second group and its subtopics will appear.
add custom animation
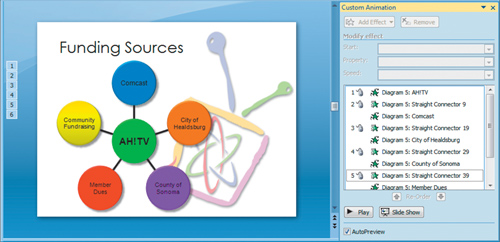
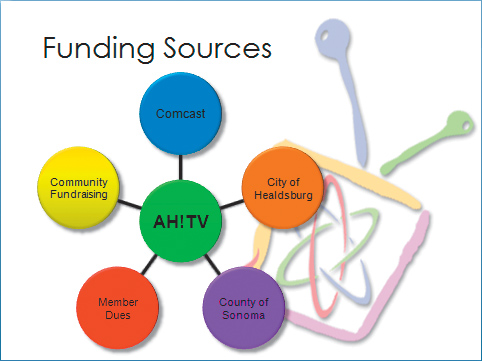
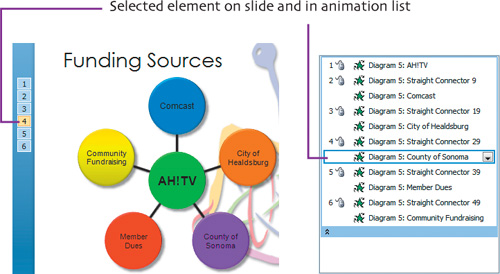
Sometimes animation schemes don’t really do the trick; you need more control over moving items on or off the screen, or you want to apply an animated effect to a particular part of the slide. For example, in the Access Healdsburg presentation, the Funding Sources slide contains a diagram that can be enhanced with a little animation. PowerPoint 2007 has a terrific custom animation capability.
I’ve begun with one of the Cycle SmartArt diagrams (see Chapter 6 for more about SmartArt). Because I’m going to talk about each of the funding sources, I’ll build up the diagram a bubble at a time, starting with the green center bubble (which will appear on the screen first), then adding each of the source bubbles, beginning at the top and moving clockwise. Each bubble will appear after I click the mouse.
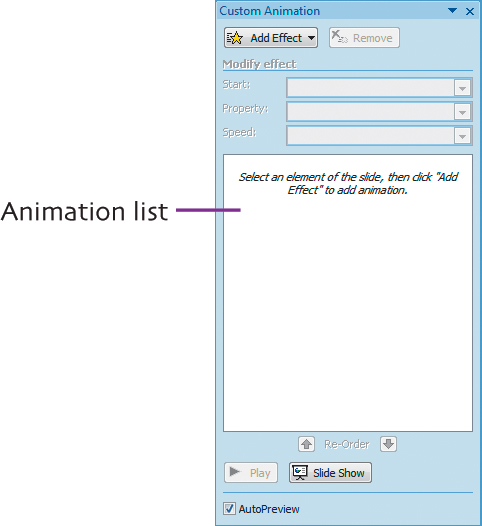
Begin by choosing Animations > Custom Animation, which opens the Custom Animation Task Pane.
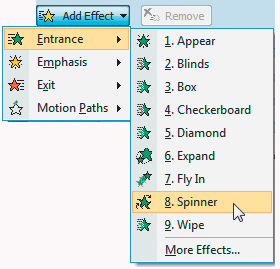
On the slide, select the first element you want to animate; I chose the center bubble in the diagram.

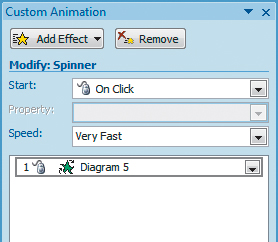
The Add Effect button in the Task Pane is really a pop-up menu; choose an effect from the Entrance category (because you’re animating how the element will be entering the slide; if you want the element to fly off the screen later, you can add an effect from the Exit category). I chose Spinner, which fades up the element while spinning it.
The effect preview shows that the entire diagram spins onto the screen, which isn’t what we want; we want each bubble in the diagram to appear separately. A look at the animation list shows that there is only one item in it, which means that the whole diagram is set to animate as a group.
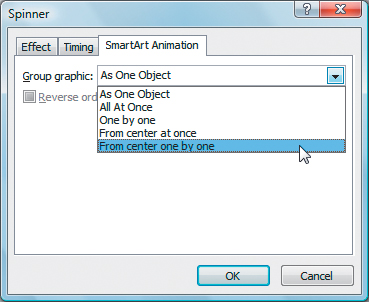
To split the elements of the diagram so that we can animate each one separately, right-click the item in the animation list, and choose Effect Options.
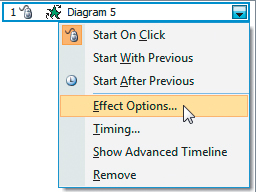
In the resulting Spinner dialog, click the SmartArt Animation tab, then make a choice from the drop-down menu. I want the center bubble to appear first, followed by each bubble moving clockwise, so I chose From center one by one. Click OK.
Each element of the diagram is now numbered separately, and the animation list contains an entry for each element. If you want, you can now add a separate animation effect for each element. Just right-click each element in the animation list and make changes.
extra bits
rearrange slides p. 80
• If you want to move a group of slides at one time, in Slide Sorter View, click the first slide, hold down the Shift key, and click the last slide. Those two slides and all slides in between will be selected, and you can drag and drop them as a group.
• You can also select multiple slides in the Slide Sorter by clicking in a blank space between slides, then dragging over the slides you want.
set slide transitions p. 82
• By default, PowerPoint is set so that the transition is triggered when you click the mouse during your presentation. But you can use the settings in the Advance Slide section of the Transition to This Slide group to set the slide to automatically change to the next slide after a given number of seconds.
set slide effects p. 84
• If you’re having problems controlling when images on your slides appear, it’s probably because the image is using an image placeholder. The placeholder is part of the slide’s master, and it can’t be changed with the animation controls. The solution is to select the image, then choose Edit > Cut. The picture will disappear, and the placeholder will appear. Select the placeholder, then press Backspace (Delete) to get rid of it. Finally, choose Edit > Paste to bring back the picture. Now the picture is in the same layer as the rest of the slide elements, and it will respond to the animation controls.
add custom animation p. 85
• Usually when you bring up a dialog in PowerPoint, it has the name of the command you used to get there. For example, when you choose Save As, the Save As dialog appears. Makes sense, right? So when you right-click on an item in the animation list and choose Effect Options, you would expect that the Effect Options dialog will appear. That’s what happens, but the name at the top of the dialog will be the name of the effect that you’re modifying. That’s why the Spinner dialog appears in the example. If the effect had been Wipe, that would have been the dialog name.
• The choices in the Effect Options dialog will be different, depending on what you have selected. For example, if you’re animating bulleted text, there will be a Text Animation tab in the dialog.
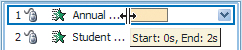
• You can change the timing for each element in the animation list separately. The orange bar in the list is the length of the animation for that element.
To change the length of the element’s animation, point at the orange bar. The cursor will change to a double-headed arrow. Click and drag the bar to the desired length.
• Custom animations created in older versions of PowerPoint must be converted to SmartArt for them to work in PowerPoint 2007. PowerPoint will offer to convert the old animation, but the conversion isn’t always perfect. Chances are you will have to tweak the converted animation to make it work the way it did in the older presentation.