
9. deliver your presentation
Finally, you’re ready to give your presentation. You’ve arrived at the room where you’ll give the talk, and perhaps the audience is beginning to arrive. You need to connect your notebook computer to the projector, set up your computer so that it recognizes the two displays (the notebook screen and the projector), and run the show.
If you don’t have a notebook, and you know that the presentation venue will have a computer and projector waiting for you, you can burn your presentation to a CD and just bring that. See Chapter 10 for how to burn a CD of your presentation.
During the presentation, you can use PowerPoint’s Presenter Tools, which allow you to control your show and to display your Speaker Notes as you present, using an interface that only you see. You can also annotate your slides and make additional notes during the presentation.
set up the projector
You’ll typically want to deliver a presentation with a notebook computer connected to a projector or large monitor. Your computer must support multiple monitors. To use multiple monitors on Windows, you must be running Windows Vista, Windows XP, or Windows 2000 SP3. Your notebook must also have a VGA video output (most do). You’ll view the presentation on your notebook screen, and your audience will view the projected screen.
Hook the projector (if you don’t have a projector, you can use another external display, such as a monitor) up to the notebook. Most PC notebooks have a VGA port, but some require an adapter; check the documentation for your notebook.
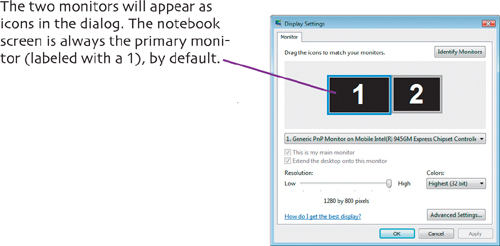
The notebook should recognize the existence of a second display. To configure your computer for multiple monitors in Windows Vista, right-click the desktop, then choose Personalize from the shortcut menu. The Personalize control panel appears. Click Display Settings, and the Display Settings dialog opens. If you’re using Windows XP, right-click the desktop, and choose Properties. The Display Properties dialog appears. Click the Settings tab.
If the projector or second display isn’t recognized, turn off the projector and computer, then start the projector first, then the computer, then open Display Settings. You usually don’t have to do this, especially with Vista, but this solves most issues.
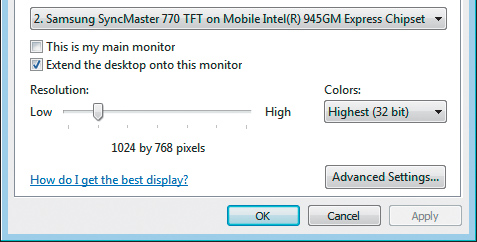
Click the icon for the second monitor, click “Extend the desktop onto this monitor” (on Windows XP, click “Extend my Windows desktop onto this monitor,”) and then click Apply. The second monitor should now show your desktop wallpaper. Using the Resolution slider, choose the screen resolution that matches the resolution of the projector. It will typically be either 800 X 600 or 1024 X 768. Click OK to save your settings.
prepare yourself
So now you have created a terrific presentation, your notebook and the projector are set up, and your audience is beginning to drift into the room, eager for the show. But what about you? What about your needs? If you’re like most people, you’re feeling a little stage fright at this point. Dealing with your butterflies is what this section is about. Here are some tips that can help you keep your presentation running smoothly, before and after you get up on the stage.
• Before the presentation, get a friend or coworker to read through your presentation. You’ll be surprised how often they’ll find a typo or awkward grammar that you missed.
• Things do go wrong; your notebook could die before you give your show, or it could have video problems with the venue’s projectors. Make sure that you keep a backup copy of your presentation file on something other than your notebook. I prepare two backup copies of important presentations; one on a USB drive, and another on either an iPod or burned to a CD. That way, if I get to the venue and my notebook goes south, I can borrow a computer and still go on with the show.
• If you can, get to the presentation venue early. Sit or stand where you will be speaking, and make sure that your seating (or the podium) is adjusted the way that you want it. Take a moment to adjust the microphone (if any) and work with the venue’s audio technician to get the levels right before the audience arrives. Make sure you have a spot to place a cup of water. Getting comfortable with the physical space and facilities helps a lot.
• If you have the opportunity to greet some of the audience members as they enter the room, you should do so. It’s easier to speak to people you know, even if all you’ve done is said hello.
• If you are speaking at a conference and you are wearing a conference badge or pass around your neck, take it off before you begin your talk. It will often reflect stage lights back at the audience, which can be distracting.
• Before you begin, visualize yourself giving a successful presentation. Imagine that you’ve spoken very well, and hear your audience’s applause. Picture audience members coming up to congratulate you after the show. It sounds a bit silly, but visualizing success works.
• Concentrate on your message, not on the audience. If you focus on what you’re saying, you will distract yourself from being nervous.
• If you are nervous, never apologize for it. Except in extreme cases, most audiences don’t notice that speakers are nervous, and it doesn’t help your case to point it out.
• Always keep in mind that your audience wants you to succeed. People don’t go to a presentation thinking, “I sure hope this guy gives a lousy talk and wastes my time.” They want to get something out of your presentation as much as you do.
• Unless you are a professional comedian, keep the jokes to a minimum, or skip them altogether. A joke that falls flat isn’t a good way to start a show.
• Never read straight from a script. Very few people can read from a script without putting their audience to sleep; we call those few people actors.
• Don’t read your slides aloud word for word. Your slides should be signposts and reminders of what you want to say. Using your slides as a teleprompter is another way to lose audience interest. If you need prompting for your topics, use your Speaker Notes (see Chapter 8 for how to enter Speaker Notes).
• It’s a good idea to put a summary slide at the end of your presentation. It brings your talk to a natural close, and it helps to once again drive your argument home to your audience.
• After the presentation is over, thank your audience and make yourself available for questions. Make sure to get feedback from them so that you can improve your next show.
run the presentation
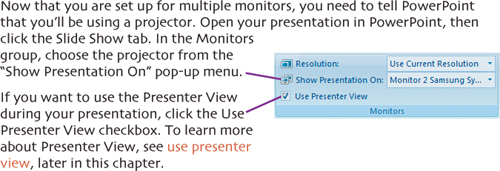
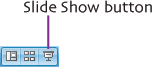
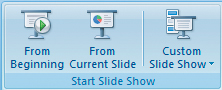
To run the presentation, click the Slide Show button at the bottom of the PowerPoint window, or click the Slide Show tab and click From Beginning or From Current Slide. You can also press F5 on your keyboard.
The presentation appears on the screen. If you are using a projector or external monitor, the presentation appears on whichever screen you selected during setup.
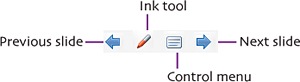
During the presentation, if you’re not using the Presenter View, PowerPoint provides some onscreen tools that you can use to control your show. They include ways to move to the previous and next slides, a menu that allows you to jump to any slide or custom show in your presentation, and a way to pause your presentation or turn the screen black for a moment.
These controls appear at the bottom-left corner of the screen when you move the pointer over them. They are unobtrusive icons, so as not to attract too much audience attention.
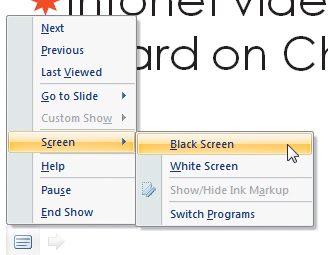
Clicking the Control Menu icon brings up the pop-up menu. Of particular note in this menu is the Go to Slide choice, which has a submenu listing all of the slides in your presentation, allowing you to instantly jump to any point in your show. Another useful menu is Screen, which lets you turn the screen Black or White; you might want to do that to pause your presentation to handle a question from the audience, for example.
To advance to the next slide or slide effect, click the mouse button, or press the Right Arrow key on the keyboard. To return to a previous slide, press the Left Arrow key.
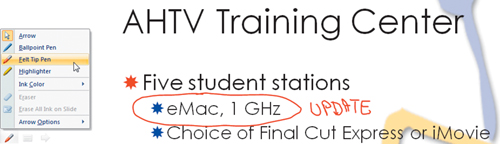
The Ink tool allows you to annotate your presentation while you are giving it; you can use three different types of on-screen pens (ballpoint, felt tip, or highlighter), and your choice of colors. You can use the mouse or trackpad for these annotations, or if you are presenting from a Tablet PC, you can use the stylus.
At the end of the show, by default PowerPoint will go to a black screen; click the mouse button to leave Slide Show mode and go back to the PowerPoint window. To end the slide show manually, press the Esc key on your keyboard.
use presenter view
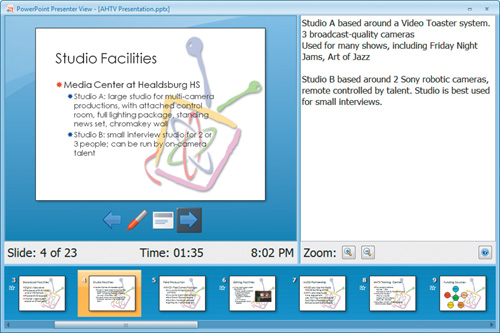
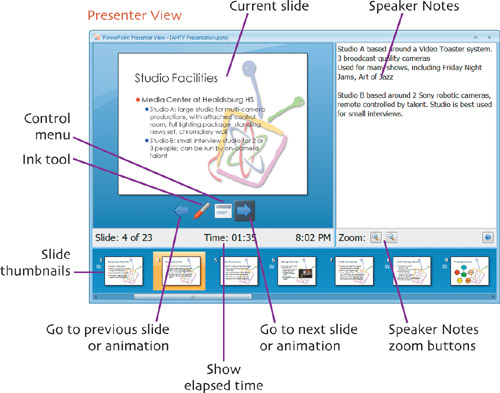
Presenter View is a feature that gives you more control over the presentation as you are giving it. It gives you a control panel that you see on your notebook’s screen, while the audience sees the regular slide show on the projector. This mode is only available when you are using multiple monitors.
In Presenter View, you get a scrolling list of your slide thumbnails, a large view of the current slide, buttons for Previous Slide and Next Slide, your Speaker Notes, and best of all, an onscreen timer that tells you the elapsed time of your presentation. This timer is a great tool to help you stay on track; by knowing how long you have been talking, you can speed up or slow down to keep within your allotted speaking time.
To jump ahead to any slide in your presentation, scroll the list of slide thumbnails, then click the slide you want. If there is a slide transition associated with the slide you clicked, it will trigger and the slide will appear on the projector.
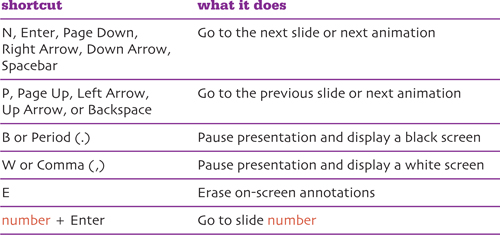
During the presentation, you can also get some additional features from the keyboard.
extra bits
set up the projector p. 102
• If you’re not sure which monitor is which, click the Identify Monitors button in the Display Settings dialog. Large numbers will appear on each monitor.
prepare yourself p. 104
• If you want to become a better presenter, there are some terrific online resources. I’m a fan of the Beyond Bullets weblog (www.beyondbullets.com), written by Cliff Atkinson. It’s full of practical tips and information that will help you think about using PowerPoint in a different way.
• The best PowerPoint presentation I’ve ever seen didn’t use a single bullet point. It was performed by Scott McCloud, who wrote Understanding Comics (1993, Perennial Currents), a brilliant, essential book that will help you understand all forms of visual communications, including PowerPoint. And it’s mostly done as comics! Trust me on this one.
run the presentation p. 106
• I usually use the spacebar to advance slides or slide animations when I present, because it’s the biggest and easiest to find by touch while I’m talking.
• There are a few great hardware accessories that can help almost any presentation. The first is an inexpensive laser pointer. These are essential for drawing your audience’s attention to a part of your slide. I have a fancy (and pricey) laser pointer with a bright green beam, but that’s because I’m a presentation geek. You can find the standard models with red beams for as little as $10. You can also benefit from a remote control for your computer, because they allow you to wirelessly roam anywhere on the stage, rather than being tied to your notebook. These units usually consist of a handheld control and a receiver that connects to your notebook via the USB port. Some of them, such as units from Keyspan (www.keyspan.com) and Targus (www.targus.com), have a built-in laser pointer.
• You may already have a perfectly good remote control for your PC without even knowing it: it’s your mobile phone or PDA. Yes, that’s right. If your supported phone or PDA and laptop both have Bluetooth, you can control PowerPoint with it, as long as you pick up a software package called Salling Clicker, from Salling Software (www.salling.com). Clicker breaks the shackles that tie you to your laptop; you can roam up to 30 feet away, still control the laptop, and for most handheld devices, even have your speaker’s notes on the handheld’s screen. Clicker controls a wide range of programs on your PC, including PowerPoint, iTunes, Windows Media Player, and more.
use presenter view p. 108
• Use the Speaker Notes zoom buttons to make the notes larger or smaller, so they are more comfortable to read.
• You can’t type new notes or change your Speaker Notes during the show, even though you can click in the Speaker Notes field and get an insertion point. This may be a bug that will be fixed in the future.
• Those Previous Slide and Next Slide buttons in Presenter View are nice, but I find that it’s easier to click on the much bigger current slide to move forward, or to keep a finger on the spacebar or Right Arrow key on the keyboard.