
1. explore powerpoint
Before you get started on your presentation, you need to see the tools that PowerPoint 2007 for Windows gives you. Let’s take a look.


When PowerPoint starts, it creates a new presentation document. In this chapter, you’ll create your presentation file, set it up for subsequent chapters, and save the file. You’ll add text and graphics to this new document as you build the presentation throughout the rest of the book.
look at powerpoint
PowerPoint 2007 has a main document window where you’ll write your presentation and dress up your slides. In the picture (opposite), the PowerPoint window is in the Normal view.
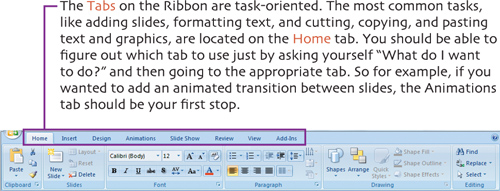
If you’ve used previous versions of PowerPoint, you’ll see that things have changed in a big way in Office 2007. The first thing you’ll notice is that the menu bar and toolbars are gone. In their place is the Ribbon, which contains the tools and commands you’ll use to build your presentation.
The idea behind this big change is a good one. Microsoft was forever being asked to add features to the Office programs. But most of the time, those features were already in the programs; they just couldn’t be found in the jumble of menus and toolbars (PowerPoint 2003 had 9 menus and 20 toolbars!). So the big makeover (shared by Word 2007, Excel 2007, and Outlook 2007) is designed to make the program’s features more discoverable; that is, to make them easier to find and use.
![]() The Office Button replaces the File menu. This is where you create, open, close, save, and print documents. It is also how you access PowerPoint’s preferences, now renamed PowerPoint Options.
The Office Button replaces the File menu. This is where you create, open, close, save, and print documents. It is also how you access PowerPoint’s preferences, now renamed PowerPoint Options.
![]() The Ribbon has eight tabs, each with groups of buttons and pop-up menus with commands and features. More about the Ribbon in the next section.
The Ribbon has eight tabs, each with groups of buttons and pop-up menus with commands and features. More about the Ribbon in the next section.
![]() The customizable Quick Access Toolbar allows you to place frequently used commands just a click away. By default, it contains buttons for Save, Undo, and Redo.
The customizable Quick Access Toolbar allows you to place frequently used commands just a click away. By default, it contains buttons for Save, Undo, and Redo.
![]() The Normal View Pane has two tabs. The Slides tab that is shown here displays thumbnails of the presentation’s slides, including the slide’s graphics. The Outline tab shows you just the text on each slide; you’ll learn more about how to use this tab in Chapter 2.
The Normal View Pane has two tabs. The Slides tab that is shown here displays thumbnails of the presentation’s slides, including the slide’s graphics. The Outline tab shows you just the text on each slide; you’ll learn more about how to use this tab in Chapter 2.

![]() The Slide Pane shows you what the current slide looks like. In this case, the slide is showing placeholders for text that you’ll put on the slide later.
The Slide Pane shows you what the current slide looks like. In this case, the slide is showing placeholders for text that you’ll put on the slide later.
![]() This is the Task Pane, which only appears in specialized circumstances, and changes its contents depending on what you are doing. It probably isn’t open on your computer; I’ve opened it here for illustration. If it is open, you don’t need to use it at this point in the project, so close it by clicking the X in its upper-right corner, or by pressing Control-F1.
This is the Task Pane, which only appears in specialized circumstances, and changes its contents depending on what you are doing. It probably isn’t open on your computer; I’ve opened it here for illustration. If it is open, you don’t need to use it at this point in the project, so close it by clicking the X in its upper-right corner, or by pressing Control-F1.
![]() The Notes Pane is where you can type speaker notes for each slide. These notes will appear on printed handouts, but not in the onscreen presentation.
The Notes Pane is where you can type speaker notes for each slide. These notes will appear on printed handouts, but not in the onscreen presentation.
![]() The View Buttons let you switch between three different ways to look at your presentation.
The View Buttons let you switch between three different ways to look at your presentation.
![]() The Zoom slider allows you to make your view of the slide bigger or smaller, from 10% to 400%.
The Zoom slider allows you to make your view of the slide bigger or smaller, from 10% to 400%.
explore the ribbon
The Ribbon is the main new part of the Office 2007 interface, so let’s go into some detail on how it works.
Groups are areas on each tab that gather together related commands. For example, here is a blowup of the Home tab’s Font group:

Commands within a group are usually buttons (as in the Bold and Italic commands above) or pop-up menus (the Font and Font Size commands). In this book, when I tell you to use a command in PowerPoint, I’ll use the name of the tab, followed by the group, then the command. For example, to make some text bold, I’ll say, “Select the text, then choose Home > Font > Bold.”
When you click on some objects to select them, a new tab or tabs may appear on the Ribbon. These contextual tabs appear to add additional commands to modify the object you have selected, and go away when you deselect that object. For example, let’s say that you’ve put a table on a slide. When you click on the table, the Table Tools contextual tab appears at the right end of the Ribbon, and it brings along two subtabs: Design and Layout. The idea is that you only get the tools to work with the table while you are modifying it, and when you no longer need them, the table tools are whisked out of your way.

Hovering over a thumbnail in the gallery applies a live preview of that design to the selected object (in this case the table). You can easily try out a variety of looks for the object just by moving your mouse, and when you find one that you like, simply click the gallery thumbnail to apply that style to the object.
powerpoint views
PowerPoint 2007 has three view buttons.

You saw the Normal View earlier in this chapter.

The Slide Show View starts the slide show, allowing you to preview your presentation full-screen. This is also the view you use to actually give the presentation.

Next to the view buttons are the Zoom controls, which control the size of the slide in the Slide Pane. The current zoom magnification is shown. To change it, move the Zoom slider to the left to zoom out, and to the right to zoom in on the slide. To make the slide grow to fill the Slide Pane, click the Fit slide to current window button.
anatomy of a slide
To make it easier to create your slides, PowerPoint provides placeholders on its slides into which you can put text, graphics, or charts. These placeholders are arranged into preset slide layouts, and every slide in your presentation is based on one of these layouts. Besides the slide layout, each presentation also has a single theme, which provides the visual look of the slide, including things like the background image for the slides and the style and color of the text you put on the slides. You’ll learn more about using themes in Chapter 4.


extra bits
anatomy of a slide p. 7
• Not shown on page 3 are a slide’s header or footer. You can have one or both of these on each slide. Headers (at the top of each slide) and footers (at the bottom) can contain slide numbers, the date and time, a copyright notice, or any other information you want to include.
save the presentation p. 8
• Save all of the files used in the project in a single folder you create inside your My Documents folder. That way, everything you need for the presentation is in one place.
• The Office 2007 programs, by default, use new file formats that are not compatible with previous versions of Microsoft Office for Windows or Macintosh. You can tell the difference between the new file format and the old one by the file extension. The new one for PowerPoint is .pptx, and the old one that is compatible with PowerPoint 97-2003 for Windows and PowerPoint 98-2004 for Mac is .ppt. If you need to share your PowerPoint 2007 files with friends who haven’t upgraded, you can choose the older format from the Save as type pop-up menu in the Save As dialog. By doing so, you may lose some aspects of your presentation, because the older programs can’t accept some of the new features in PowerPoint 2007. Microsoft is also making file format converters available for older versions on both Mac and Windows, so that they can read the newer format.