3. Productivity Application Architecture
Throughout the rest of this book, we will focus on developing a single application. Chapter by chapter, we will cover every step required to build and test this application, from creating the initial project to prepping it for sale.
In this chapter, we will focus on our application’s overall architecture. We will define the user’s flow through the application, connecting our basic views and the transitions between them. We will also build our application’s model and link it to our view controllers. Finally, we will touch on a number of smaller topics: enabling compiler warnings to produce cleaner code, implementing the methods that control vital aspects of our app, running our application on iOS devices, and even exploring the inner workings of nib files.
Understanding Productivity Apps
The original iPhone Human Interface Guidelines (HIG) organized applications into three general categories: utility, productivity, and immersive applications. Utility applications provide a single view of the data with little or no interaction. Productivity applications manage and organize complex data. Immersive applications use custom views and controls, taking over the entire screen to provide a rich, interactive user experience.
Apple has since dropped these categories from the iOS HIG, and that makes a certain amount of sense. As the platform continues to mature, developers naturally push against these boundaries. Few modern applications fit cleanly into one of these categories. Even back when the iPhone first came out, many applications used a hybrid approach. Look at the iPod app. Its Cover Flow interface injects an immersive element into an otherwise straightforward productivity app.
However, there seems to be some benefit to at least thinking about these categories, especially when you are designing a new application. They can help you identify your application’s core features and then focus your design to maximize those features.
We looked at a simple utility application in Chapter 1. Honestly, there’s not a lot to say about them. Utility apps provide a quick way to access relatively simple information. One screen, a few settings—if you’re thinking of anything more complicated than that, you should probably consider a different approach.
Over the next few chapters, we will look at productivity applications. These apps manage and organize complex data. While you may provide some custom user interfaces, you should focus heavily on usability. Work to create a clean, streamlined solution that helps the user to move through the data in an unobtrusive and intuitive manner.
Productivity applications typically use three tools to organize and interact with your data: UITabBarController, UINavigationController, and UITableView. You may not need all three, but these are the primary built-in tools for sifting through data.
The UITabBarController lets the user easily switch between different tasks or different groups of data. For example, the Clock application lets the user choose between the different time-related tasks: World Clock, Alarm, Stopwatch, and Timer. The iPod app, on the other hand, allows the user to select different views of their data: Albums, Artists, Genres, Songs, Playlists, Videos, and so on. The App Store mixes both approaches, displaying three data groups (Features, Categories, and Top 25) and two tasks (Search and Updates).
The tab bar can support any number of tab items. However, it can only show five tabs at a time. UITabBarController automatically manages any extra tab items by providing a More button and letting the user customize the items that appear on the tab bar. Note that if you have more than five tabs, the tab bar will display only four of them, since the More button takes up one of the spaces.
Next, the UINavigationController lets users move from general to more specific views. This controller maintains a stack of views. When a new view is added to the top of the stack, that view slides in from the right while the old view slides off to the left. When the top view is popped from the top of the stack, the animation is reversed. This provides a very intuitive interface for moving through a hierarchy of views.
While both UITabBarController and UINavigationController manage navigation between views, UITableView handles the actual display of data. Tables are often used to present lists. For example, the list of email accounts, the list of mailboxes within a single account, or even the list of messages within a single mailbox. UITableView displays a single column of cells. Individually, each cell can be quite complex, combining images, icons, and formatted text. In general, a single cell type is used throughout the table. Each cell represents a different entry from a list of similar items.
However, UITableView has a secondary use as well. We can create a static table to organize a fixed set of heterogeneous pieces of data. In this case, the entire table is used to represent a single entry. Each row has its own unique formatting, displaying some aspect of this entry. As we change entries, the number and type of rows remain the same, only the data changes. We often use static tables to display detailed information about a selected leaf object in our data hierarchy.
A productivity application combines some or all of these tools into a user interface that naturally matches the application’s data. In general, UITabBarController provides the coarsest organization, defining our broadest groups. Within each group, UINavigationController lets the user move from general to specific, while UITableView displays the information available at each level of detail.
If you’re like me, you spend much of your day sitting in front of a computer. This has led to an ongoing battle to lose weight. To help in this fight, let’s build an application that will let users track their weight over time.
Health Beat will have three main tasks: Users can enter new weights, they can view a graph showing how their weight changes over time, and they can bring up the complete history showing all their weight entries. We will use a tab view to navigate between these tasks. In addition, we will use a table view/navigation controller combination to manage our history view.
This chapter will focus on the overall architecture of the application, on building a storyboard that connects our tab bar, table view, and navigation controllers, and on building and attaching our application’s model. We will flesh out this design and cover additional topics, such as saving and loading the data and drawing custom views, in later chapters.
Creating the Project
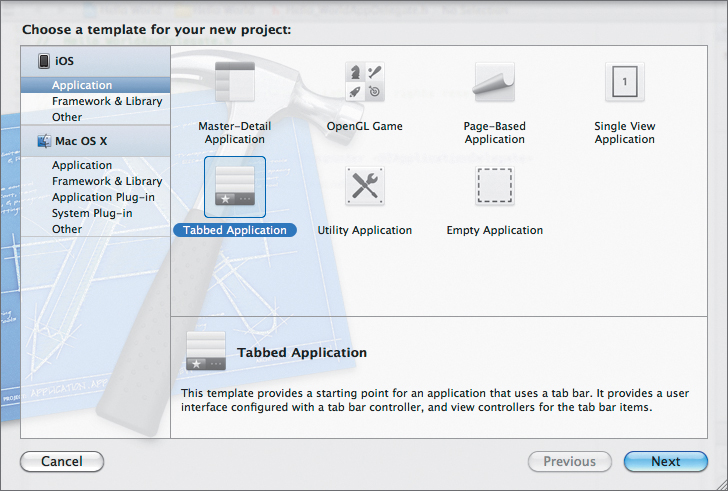
Open the iOS Development workspace we created in Chapter 1. It should contain our Hello World project. Add a new project by selecting File > New > New Project from the menu. Then select iOS > Application > Tabbed Application and click the Next button (Figure 3.1).
Figure 3.1 Select the Tabbed Application template
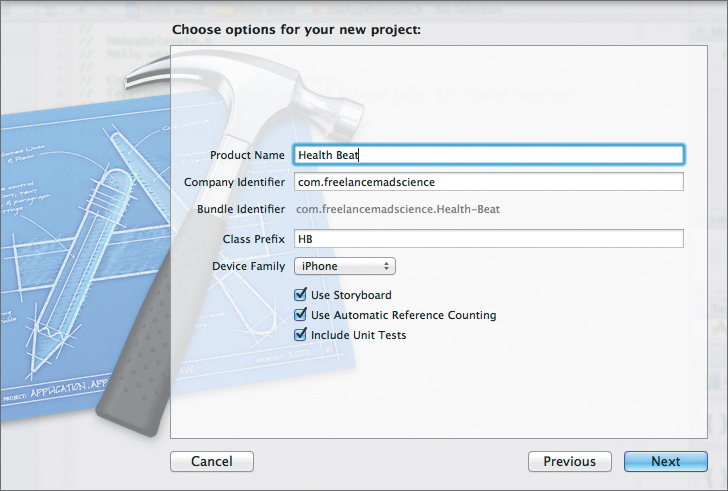
In the “Choose options” panel, name the project Health Beat, and set the Class Prefix to HB. Make sure that the Device Family pop-up menu is set to iPhone and that the Use Storyboard, Use Automatic Reference Counting, and Include Unit Tests checkboxes are all selected. Then click Next (Figure 3.2).
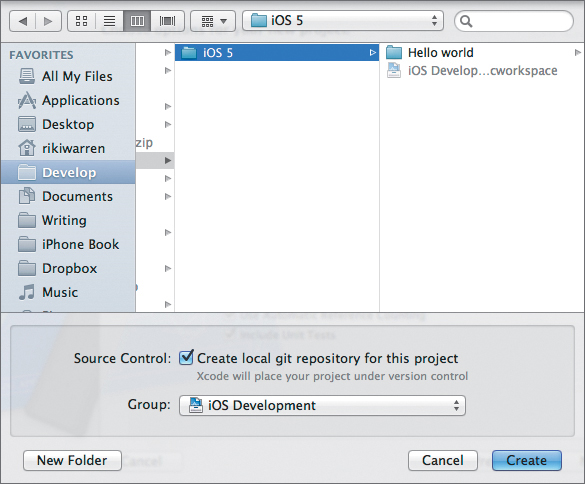
In the final panel, select the location for the project. Make sure the “Create local git repository for this project” checkbox is selected, and that the Group drop-down is set to our iOS Development workgroup. Then click Create (Figure 3.3).
Figure 3.3 Selecting the project’s location
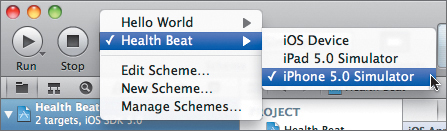
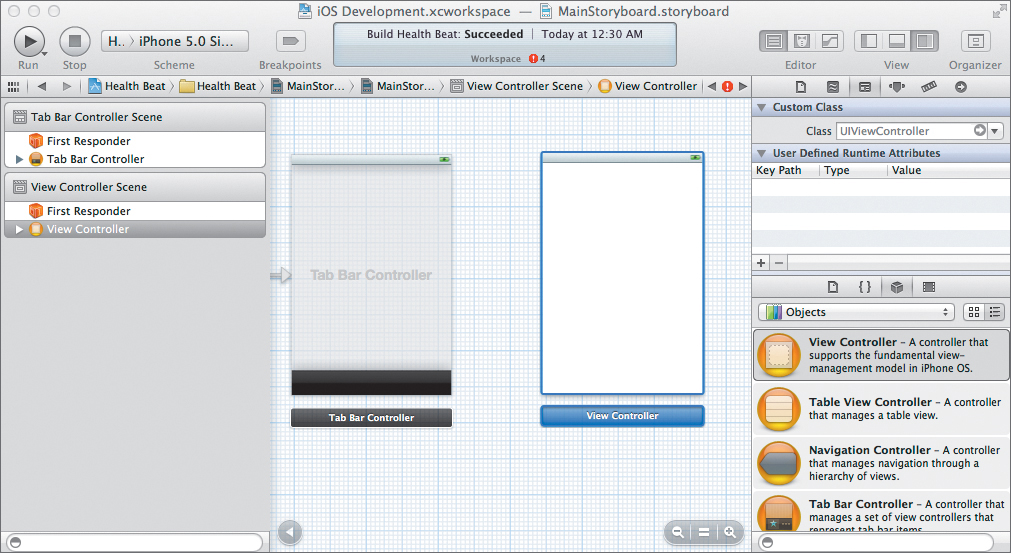
This creates a basic tabbed application. In Xcode’s toolbar, change the scheme to Health Beat > iPhone 5.0 Simulator (Figure 3.4) and run the application.
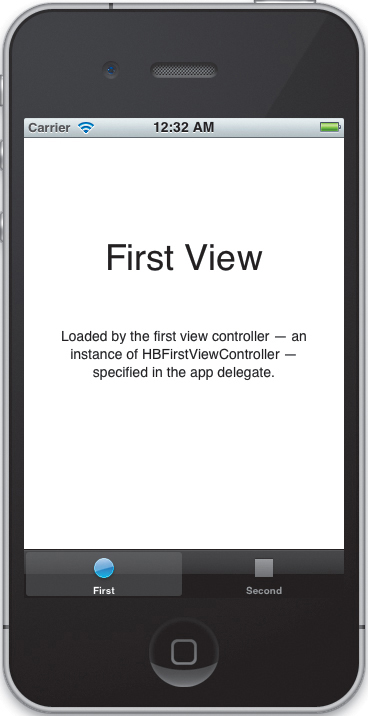
As you can see, the application template gives us a simple two-tab application (Figure 3.5). You can press the tab buttons to switch between the first and second views.
Figure 3.5 Running the template
Looking at the code, our template created an app delegate (HBAppDelegate), two view controllers (HBFirstViewController and HBSecondViewController), the storyboard (MainStoryboard.storyboard), our tab-bar icons (first.png, [email protected], second.png, [email protected]), and our supporting files. We also have a new group for our unit tests.
Initial Housecleaning
Before we start building our application, let’s tidy things up. First, while we could modify the existing controllers and storyboard elements, it will be easier to just create our own from scratch. So, let’s delete them. Delete HBFirstViewController.h, HBFirstViewController.m, HBSecondViewController.h, HBSecondViewController.m, and all four .png files. This should leave just HBAppDelegate, MainStoryboard.storyboard, and the support files in our Health Beat group.
Now, open the storyboard and delete the first view controller and the second view controller. This should remove both of their scenes, leaving us with just the tab view.
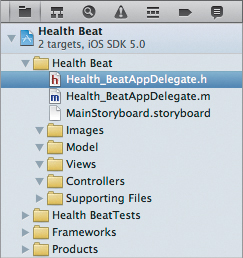
Next, let’s add some organization. We want to add four groups to our Project Navigator: Images, Model, Views, and Controllers. right-click the Health Beat group, select New Group, and then give it an appropriate name. When you’re done, move the groups around so they match Figure 3.6.
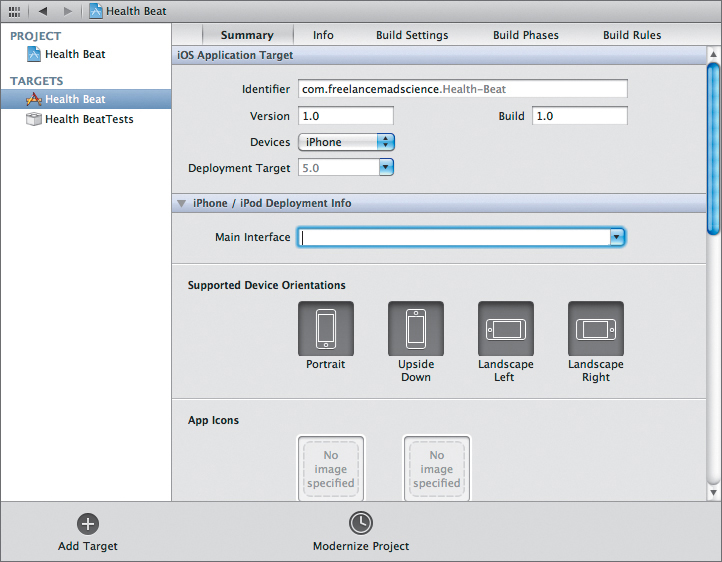
Now, click the Health Beat project icon (blue icon at the top). This allows us to edit numerous project and target settings. Make sure the Health Beat target and the Summary tab are selected. This lets us edit the version number, device type, and other settings. Right now, our primary concern is the Supported Device Orientations setting. We want our app to rotate freely into any orientation, so make sure all four buttons are selected (Figure 3.7).
Figure 3.7 Setting the supported device orientations
Note

The Supported Device Orientations setting determines the allowable orientations. This setting (in combination with the application’s current orientation) will determine the initial orientation when your application launches. However, we still need to modify the individual view controllers to enable autorotations at runtime.
Setting Additional Warnings
Xcode can perform sophisticated analysis and provide quite a bit of feedback on your code, helping to avoid a great number of common programming errors. Unfortunately, many of these settings are turned off by default. Let’s fix that.
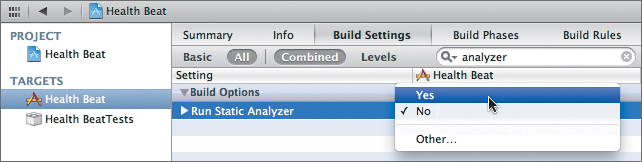
With the Health Beat project icon still selected, click the Build Settings tab in the Editor area. Make sure the All and Combined buttons are pressed, and then type analyzer in the search bar. This will bring up the Run Static Analyzer setting. Change this value to Yes. This will force the compiler to run the static analyzer every time you build your application (Figure 3.8).
Figure 3.8 Enabling the static analyzer
Running the static analyzer on every build provides a great sanity check; however, it can significantly slow down compile time. You may find that you need to turn it off when working on very large projects or when developing on slower computers. In my experience, however, it can take such a long time to upload a new copy of the application onto the device (or even onto the simulator) that a little extra compile time is hardly noticeable. Still, your mileage may vary.
Next, clear the search bar, and scroll down until you find the section labeled Apple LLVM compiler 3.0 – Warnings (it should be near the bottom). These settings let us configure the warnings that the compiler generates. Xcode already has a number of useful warnings enabled; however, I highly recommend turning on all of the following:
1. Check Switch Statements (on by default)
2. Hidden Local Variables
3. Implicit Conversion to 32 Bit Type
4. Incomplete Objective-C Protocols (on by default)
5. Initializer Not Fully Bracketed
6. Mismatched Return Type (on by default)
7. Missing Braces and Parentheses (on by default)
8. Missing Fields in Structure Initializers
9. Missing Function Prototypes
10. Missing Newline At End Of File
11. Overriding Deprecated Objective-C Methods
12. Pointer Sign Comparison (on by default)
13. Sign Comparison
14. Strict Selector Matching
15. Suspicious Implicit Conversions
16. Treat Warnings as Errors
17. Typecheck Calls to printf/scanf (on by default)
18. Undeclared Selector
19. Unused Functions
20. Unused Labels
21. Unused Values (on by default)
22. Unused Variables (on by default)
23. Warn About Deprecated Functions (on by default)
24. Warn About Undefined Use of offsetof Macro (on by default)
Now, I’m not going to lie to you. In the short run, turning these warnings on may force you to do some extra typing—sometimes a lot of extra typing. You will occasionally have to add unnecessary steps to your methods just to keep the compiler happy. Some developers prefer to turn these warnings off when focusing on rapid build-test-modify cycles; then they turn them back on when polishing up the code. Of course, there’s a risk that you might never have time to come back and fix things. I recommend leaving them on as much as possible. One of these days they will save you from an embarrassing bug and you will thank me.
Of all these warnings, the most important is undoubtedly Treat Warnings as Errors. This forces you to clean up your code and get rid of all your warnings. This is a very good habit to get into. As frustrating as it may be, you really want to clear out all warnings. Otherwise, you may overlook something truly important one day.
Trust me, nothing’s worse than compiling someone else’s code and watching a steady stream of warnings scroll by. You get that sinking feeling in the pit of your stomach. Are these serious issues that need to be resolved, or are they trivial matters that you can simply ignore? Do everyone a favor and fix your warnings.
This brings up another point. Not all developers will follow this advice. You will find that some third-party libraries may trigger hundreds of warnings. As always, it’s better to be pragmatic and finish a project than to be dogmatic and proud of yourself. If you have to turn off one of the warnings to move forward, then turn off the warning.
Adding Images
We will need icons for our tab buttons. These are a little odd. They need to be 30 by 30 PNG files (60 by 60 @2x.png files for phones with the Retina display). The actual color of the image does not matter; the tab-bar icons just use their alpha level. For this reason, I find it easiest to draw the icons in black on a transparent background. If I want shading, I change the opacity of the black ink. That way, the image I see in my graphics application will at least be close to what I get when I load the icon.
Feel free to create your own icons. Alternatively, you can just download the source code from www.freelancemadscience.com/source and copy over the artwork. Right-click the Images group, and select Add Files to “Health Beat.” Make sure the “Copy items into destination group’s folder (if necessary)” checkbox is selected. Then select graph.png, [email protected], plus.png, and [email protected] from the downloaded code. Click Add.
The plus icon will be used on our tab for entering new weights. The graph tab will be used for our graph view (surprise, surprise). We will use a built-in icon for the history view, so it doesn’t need any additional artwork.
Configuring the Tab Bar
Now that our house is in order, let’s start building the app. We will begin with the tab bar. To do that, we need the controllers for our three main views: EnterWeightViewController, HistoryViewController, and GraphViewController.
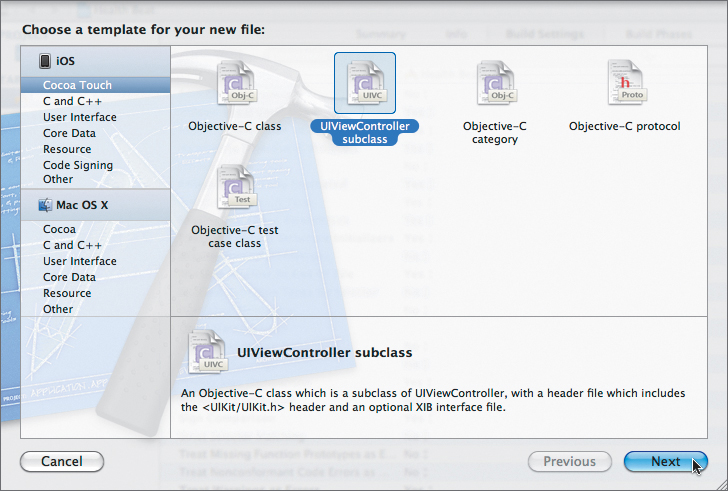
Right-click the Controllers group and select New File from the pop-up menu. In the panel, select iOS > Cocoa Touch > UIViewController subclass and click the Next button (Figure 3.9).
Figure 3.9 Creating a new UIViewController subclass
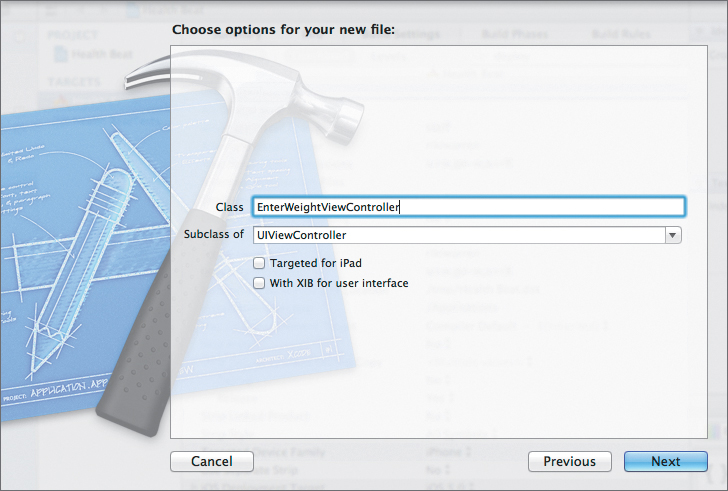
In the “Choose options” panel, type EnterWeightViewController in the class field. The “Subclass of” setting should be set to UIViewController. The “Targeted for iPad” and “With XIB for user interface” checkboxes should be unselected. Once you verify the settings, click Next (Figure 3.10).
Figure 3.10 Configuring the UIViewController subclass
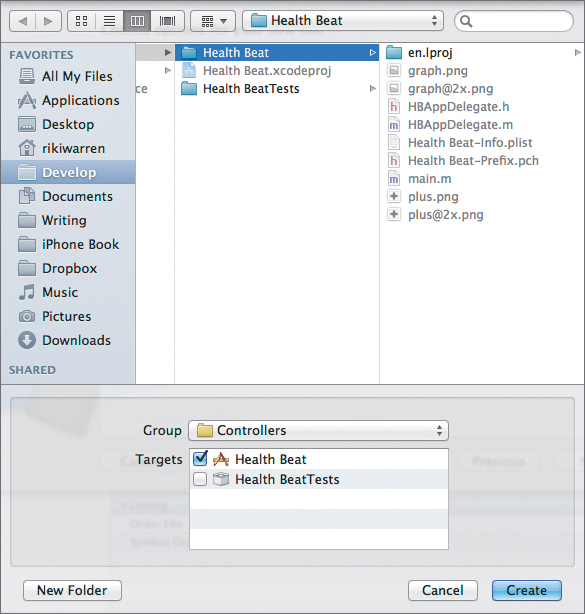
The last panel lets us set the save location. Here, the default settings should be fine. We want to save it in the Health Beat directory. It should be part of the Controllers group, and we want to add it to the Health Beat target (Figure 3.11). Click Create.
Figure 3.11 Saving the EnterWeightViewController
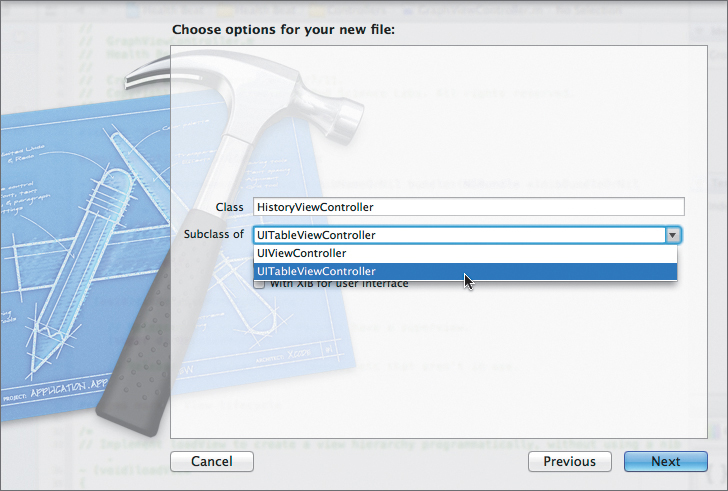
Repeat this procedure for the GraphViewController. When you create the HistoryViewController, there is one slight change. In the “Choose options” panel, change “Subclass of” to UITableViewController (Figure 3.12).
Figure 3.12 Selecting the UITableViewController subclass
While we’re here, let’s make a second UITableViewController, but name this one DetailViewController. We will use this to display a detailed view of any items selected from our history view. Our Controllers group should now contain eight files—a header file and an implementation file for each of our four view controllers. Let’s start linking them together.
Open the MainStoryboard.storyboard file, and zoom out a bit. We want to add new scenes for our four new controllers. First, drag a view controller from the Object library and place it next to our tab bar controller (Figure 3.13). In the Identity inspector, change its class to EnterWeightViewController.
Figure 3.13 Adding a new scene
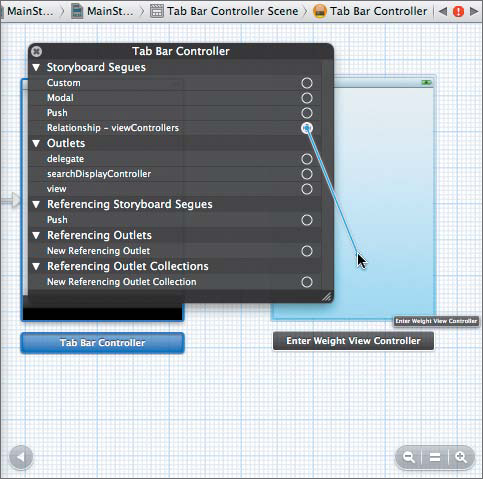
Now, Control-click the tab bar controller to bring up its connections pop-up. Drag a connection from the Relationship - viewControllers storyboard segue to the new view controller. This will add that scene to the tab bar (Figure 3.14).
Figure 3.14 Adding our scene to the tab bar
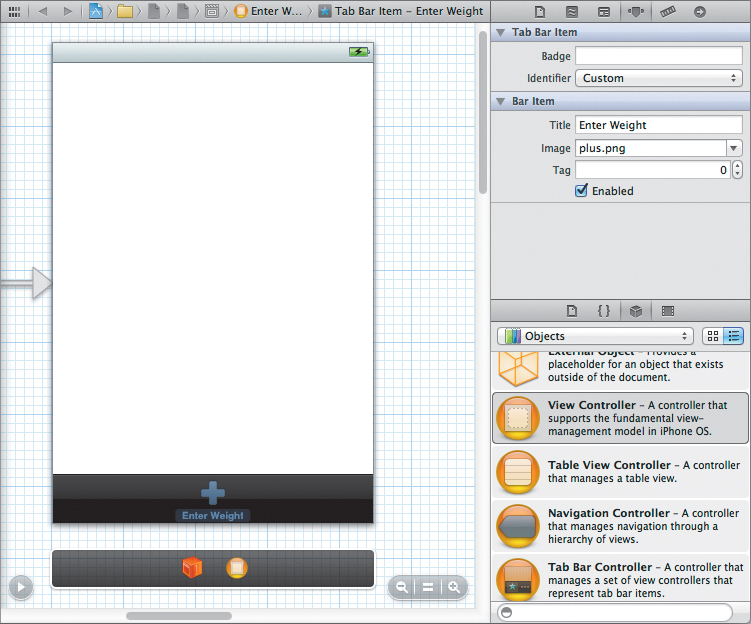
Zoom in on our new view and select its tab bar item. In the Attributes inspector, set the Title attribute to Enter Weight and the Image attribute to plus.png. These set the tab’s label and icon, respectively (Figure 3.15).
Figure 3.15 Setting the tab’s icon and title
Note
When we add a view controller to the tab bar’s viewControllers storyboard segue, Interface Builder draws a segue-like connection between our two view controllers. However, this connection is technically a relationship—not a segue. We cannot change its attributes, and it does not trigger the prepareForSegue:sender: method.
Next, add the graph view. Just repeat the previous steps. Drag out a view controller. Set its class to GraphViewController. Connect it to the tab bar’s viewControllers storyboard segue; we can connect viewControllers to as many view controllers as we need. Then set the tab bar item’s Title attribute to Graph and its Image attribute to graph.png.
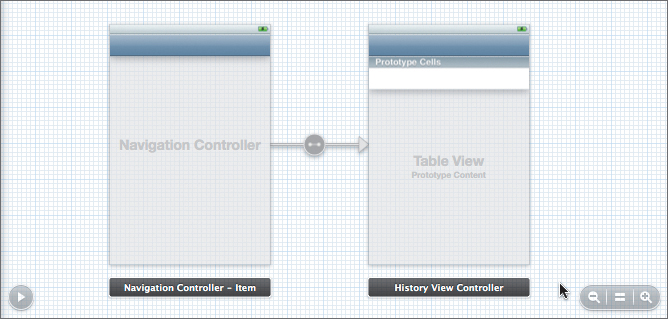
Lastly, we need to add our history view; however, we want this view to be embedded in a navigation controller. Start by dragging out a table view controller and set its class to HistoryViewController. Now, select the controller and choose Editor > Embed In > Navigation Controller. This will add a navigation controller to our view and connect our HistoryViewController to it (Figure 3.16).
Figure 3.16 Embedding the history view controller in a navigation controller
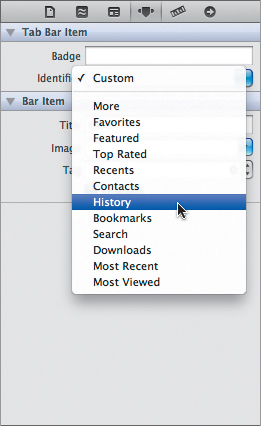
Now we just connect the tab bar controller’s viewControllers segue to our new navigation controller. Be sure to connect it to the navigation controller—not to our history view controller. Also, instead of setting the tab bar item’s Title and Image attributes, we will use one of Xcode’s preset tabs. Simply change its Identifier attribute from Custom to History (Figure 3.17). This will automatically set the icon and label text.
Figure 3.17 Setting a preset tab bar item
As you can see, Xcode provides a number of preset tab bar items. You should use these whenever possible. This helps provide consistency across applications. When the user sees these tab bar items, they will recognize them and instantly understand their intended use.
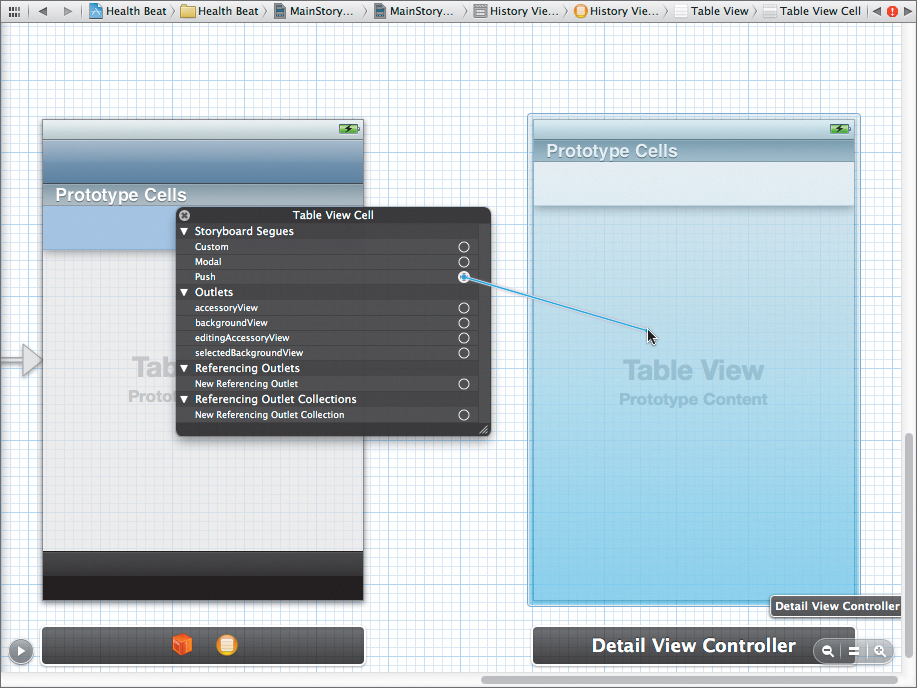
We still need to link in our DetailViewController. Drag out another table view controller and place it next to our history view controller. Set its class to DetailViewController. Our history view will display a running list of weight entries sorted by date. We want to open a detailed view for an entry whenever the user selects it from the list, but how do we link it up in our storyboard?
Zoom in on our two table views. As you can see, each view controller contains a single prototype table-view cell. We can use these prototype cells to lay out custom rows for our table views. We can also draw connections to and from these cells.
Right-click our history view controller’s prototype cell. Draw a connection from its Push storyboard segue to our detail view controller (Figure 3.18). That’s it. As long as we create all our history view’s table cells using that prototype, they will automatically launch the detail view when selected.
Figure 3.18 Connecting a segue from the cell prototype
You may also notice that interface builder automatically adds the navigation bar to all the views linked to our navigation controller. However, these bars look a little bit plain. Let’s add custom titles to them. In our history view controller scene, double-click the navigation bar and set its title to History (alternatively, select the navigation bar and set the Title attribute). Do the same for the detail view controller, but set the title to Weight Entry.
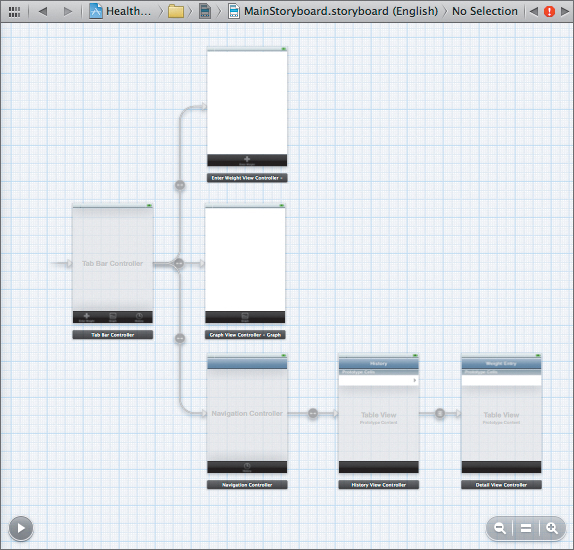
That’s it. Take a few seconds to zoom out and organize your storyboard. When you’re done, it should look like Figure 3.19.
Figure 3.19 The completed storyboard
Let’s take our new user interface out for a spin. Unfortunately, there are a few loose threads we need to tie off before it will compile. Zoom in on our history view controller again, and select its prototype cell. We need to set the cell’s reuse identifier. We’ll discuss reuse identifiers in detail in the “Showing Weight History” section of Chapter 4. For now, open the Attributes inspector, and set the Identity attribute to History Cell.
Do the same thing for the detail view controller, but set its cell identifier to Detail Cell.
Next, open HistoryViewController.m and navigate to the numberOfSectionsInTableView: method. We need to get rid of the #warning directive before our code will compile. Also, if we want to be able to open the detail view, we need to have at least one section and one row. To do this, modify the method as shown here:
- (NSInteger)numberOfSectionsInTableView:(UITableView *)tableView
{
// TODO temporary code to get the interface to run
// Return the number of sections.
return 1;
}
We need to do something similar in tableView:numberOfRowsInSection:. This method should return the number of rows for a given section. Let’s give ourselves a single row, so we can test out our connections.
- (NSInteger)tableView:(UITableView *)tableView
numberOfRowsInSection:(NSInteger)section
{
// TODO temporary code to get the interface to run
// Return the number of rows in the section.
return 1;
}
Finally, we need to tell our controller to use our reuse identifier. Navigate to tableView:cellForRowAtIndexPath:. This method returns the cell for a given row—reusing cells where possible, creating new ones when necessary. Again, we will discuss this in more detail in Chapter 4. For now, just change the cell identifier to History Cell.
- (UITableViewCell *)tableView:(UITableView *)tableView
cellForRowAtIndexPath:(NSIndexPath *)indexPath
{
static NSString *CellIdentifier = @"History Cell";
UITableViewCell *cell =
[tableView dequeueReusableCellWithIdentifier:CellIdentifier];
if (cell == nil) {
cell = [[UITableViewCell alloc]
initWithStyle:UITableViewCellStyleDefault
reuseIdentifier:CellIdentifier];
}
// Configure the cell...
return cell;
}
Finally, switch to DetailViewController.m. We need to make the same changes, but this time we set the cell identifier to Detail Cell.
Run the application. The tab bar will appear with our three tabs (Figure 3.20). You can tap the tabs to switch between views. Also, if you tap the top row in the history view, you will navigate to the detail view. Tapping the History button takes us back to the history view. Notice how our navigation controller automatically sets the back button’s name using the titles from our previous views.
Figure 3.20 Our skeletal user interface
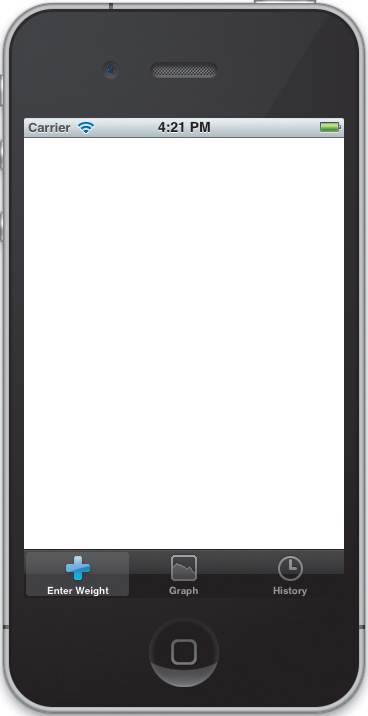
It’s a little boring, what with all the views and table cells being empty. Also, since nothing’s labeled, it can be a bit hard to tell what’s going on. Still, it works—and that’s all that matters at this point. We’ll fill in all the details later.
We have the skeleton for our application. Now we need to add some meat. Let’s sketch out the model layer for our application and then wire it in to our view controllers.
Building the Model
As we discussed in Chapter 2, most iOS applications can be divided into three main sections: the model, the view, and the controller. So far, we’ve been laying out and linking our controllers and views. However, we still need the model—the repository that will manage and store our data.
For this project, our model will consist of two separate classes. A WeightEntry object will represent a single entry, while the WeightHistory class will manage the entire set of entries.
WeightEntry Class
The data for Health Beat is relatively simple. We will have a number of entries. Each entry will have a date and a weight. Let’s start by building an object to represent a single entry. Right-click the Model group, and select New File. Select an iOS > Cocoa Touch > Objective-C class, and make it a subclass of NSObject. Name the class WeightEntry, and save it.
We need to add two properties to this class, one for the weight and one for the date. For simple data-storage classes like these, I like to make my classes immutable—once you set the value, you cannot change it. This helps keep the code simple and clean.
Open WeightEntry.h, and declare our properties as shown here:
@interface WeightEntry : NSObject
@property (nonatomic, assign, readonly) CGFloat weightInLbs;
@property (nonatomic, strong, readonly) NSDate* date;
@end
Here, I’ve chosen to store the weight as a simple float value, and the date (and time) using the NSDate object. As the property name suggests, we will store the weight in pounds. Also, even though these are readonly properties, we still need to give an ownership attribute to the date property. I’ve also added the assign attribute to the weightInLbs property. It’s not strictly necessary, since properties use assign ownership by default, but I like to make it clear.
Switch to the WeightEntry.m implementation file and add the lines to synthesize these properties inside the @implementation block:
@implementation WeightEntry
@synthesize weightInLbs = _weightInLbs;
@synthesize date = _date;
Weights, currency, date formats—all these simple-seeming concepts tend to get overly complicated whenever you want to support multiple countries or cultures. For the purpose of this project, we will want to support both pounds and kilograms. To keep the code as streamlined as possible, we will use pounds as the canonical weight internally. We will then add helper functions to convert from pounds to kilograms and from kilograms to pounds as needed.
Let’s start by defining an enumeration of our weight units. Switch back to the header file and add the following code right before the @interface declaration:
#import <Foundation/Foundation.h>
typedef enum {
LBS,
KG
} WeightUnit;
@interface WeightEntry : NSObject {
Now, declare our designated initializer right after the @property declarations:
@property (nonatomic, assign, readonly) CGFloat weightInLbs;
@property (nonatomic, strong, readonly) NSDate* date;
- (id) initWithWeight:(CGFloat)weight
usingUnits:(WeightUnit)unit
forDate:(NSDate*)date;
@end
This will take a weight, the unit type for our weight, and a date and initialize our WeightEntry object. Switch back to the implementation file. We need to implement both our designated initializer and our superclass’s designated initializer.
// Designated initializer.
- (id) initWithWeight:(CGFloat)weight
usingUnits:(WeightUnit)unit
forDate:(NSDate*)date {
self = [super init];
if (self) {
if (unit == LBS) {
_weightInLbs = weight;
}
else {
_weightInLbs = [WeightEntry convertKgToLbs:weight];
}
_date = date;
}
return self;
}
// Must override the superclass's designated initializer.
- (id)init {
NSDate* referenceDate =
[NSDate dateWithTimeIntervalSince1970:0.0f];
return [self initWithWeight:0.0f
usingUnits:LBS
forDate:referenceDate];
}
If our weight value is already in pounds, we simply assign it to the _weightInLbs variable. If not, we convert it to pounds first and then assign it. Finally, we assign our date object. The init method is included for completeness. Here, we create an object with no weight and with a zero-valued time stamp. This won’t be particularly useful, but we should always override the superclass’s designated initializer, even if we just throw an exception.
Adding Helper Methods
You may have noticed that there is a problem with our designated initializer. The class method [WeightEntry convertKgToLbs:weight] does not actually exist. Let’s fix that. Switch back to the header file and declare the following two class methods:
@interface WeightEntry : NSObject {
}
@property (nonatomic, assign, readonly) CGFloat weightInLbs;
@property (nonatomic, strong, readonly) NSDate* date;
+ (CGFloat)convertLbsToKg:(CGFloat)lbs;
+ (CGFloat)convertKgToLbs:(CGFloat)kg;
- (id) initWithWeight:(CGFloat)weight
usingUnits:(WeightUnit)unit
forDate:(NSDate*)date;
@end
Go back to the implementation file. Just before the @implementation block, add the following static variables. LBS_PER_KG will be used to convert from pounds to kilograms and back, while formatter will be used to provide a standard format for all weight values, using the proper number formatting for your current locale. Yes, number formatting changes from country to country as well.
static const CGFloat LBS_PER_KG = 2.20462262f;
static NSNumberFormatter* formatter;
Now, in the @implementation block, add our class methods:
+ (CGFloat)convertLbsToKg:(CGFloat)lbs {
return lbs / LBS_PER_KG;
}
+ (CGFloat)convertKgToLbs:(CGFloat)kg {
return kg * LBS_PER_KG;
}
Converting the float values is fine, but we will also want to standardize how our weights are displayed. Let’s add some helper methods to create standardized strings from our weights. Back in the header file, declare the following class methods:
+ (NSString*)stringForUnit:(WeightUnit)unit;
+ (NSString*)stringForWeight:(CGFloat)weight
ofUnit:(WeightUnit)unit;
+ (NSString*)stringForWeightInLbs:(CGFloat)weight
inUnit:(WeightUnit)unit;
Now switch back to WeightEntry.m and add the implementations:
+ (void)initialize {
formatter = [[NSNumberFormatter alloc] init];
[formatter setNumberStyle:NSNumberFormatterDecimalStyle];
[formatter setMinimum:[NSNumber numberWithFloat:0.0f]];
[formatter setMaximumFractionDigits:2];
}
+ (NSString*)stringForUnit:(WeightUnit)unit {
switch (unit) {
case LBS:
return @"lbs";
case KG:
return @"kg";
default:
[NSException raise:NSInvalidArgumentException
format:@"The value %d is not a valid WeightUnit",
unit];
}
// This will never be executed.
return @"";
}
+ (NSString*)stringForWeight:(CGFloat)weight
ofUnit:(WeightUnit)unit {
NSString* weightString =
[formatter stringFromNumber:
[NSNumber numberWithFloat:weight]];
NSString* unitString = [WeightEntry stringForUnit:unit];
return [NSString stringWithFormat:@"%@ %@",
weightString,
unitString];
}
+ (NSString*)stringForWeightInLbs:(CGFloat)weight
inUnit:(WeightUnit)unit {
CGFloat convertedWeight;
switch (unit) {
case LBS:
convertedWeight = weight;
break;
case KG:
convertedWeight = [WeightEntry convertLbsToKg:weight];
break;
default:
[NSException raise:NSInvalidArgumentException
format:@"%d is not a valid WeightUnit",
unit];
}
return [WeightEntry stringForWeight:convertedWeight
ofUnit:unit];
}
The initialize method is a special method that the Objective-C runtime calls once when the class is first loaded. You can implement it to perform class-level configurations. Here we use it to format our static format variable. This one variable will be used for all our number formatting needs. It will format decimal-styled numbers with up to two digits after the decimal place (rounding weights to the closest hundredth).
We are also limiting it to positive numbers. By default, the NSNumberFormatter uses our current locale to determine how decimal numbers should be formatted. For example, here in the United States I use a period for the decimal point. However, in some parts of Europe you would use a comma instead. NSNumberFormatter transparently manages those details, letting us automatically localize our application.
Next, the stringForUnit: method uses a switch statement to evaluate the value of the unit argument. If unit equals LBS, it returns @"lbs". If unit equals KG, it returns @"kg". For anything else, it throws an exception.
Exceptions should be familiar to anyone with a Java background. They are raised when something has gone wrong in your application. If the exception is left uncaught, the application will crash, printing an appropriate message to the console. However, there is a significant difference in philosophy between Java and Objective-C.
In Java, exceptions are caught and processed as a regular part of executing the program. They are often used to manage the flow of control whenever relatively common errors occur (for example, trying to open a file that doesn’t exist).
In Objective-C, exceptions are reserved for things that are truly exceptional. Or to put it another way, they are reserved for problems that should never occur during the regular operation of our application. As a result, exceptions are usually caused by developer errors (in our example here, by passing in an invalid WeightUnit value). As a result, we rarely write code to catch exceptions in Objective-C. Instead, when we see a raised exception during testing, we look for the error in our code and fix it.
The stringForWeight:ofUnit: method takes a weight value and a unit value and combines them into a single string. We start by creating a string from our number. We wrap the float-valued weight in an NSNumber object and then pass that to the formatter’s stringFromNumber: method. This will produce a correctly formatted, localized decimal string. Next, we get the unit string. We then combine the two with a space in between.
Finally, stringForWeightInLbs:inUnit: takes a weight value in pounds and converts it to the proper unit (if necessary). Then it builds a properly formatted string. Notice that each of these methods build upon the previous ones: stringForWeightInLbs:inUnits: calls stringForWeight:ofUnit: to format the weight string, while stringForWeight:ofUnit: calls stringForUnit: to get the proper unit string.
Now, let’s add a couple of instance methods that will leverage these class methods. Remember, class methods are called using the class name. They don’t have any access to an individual instance’s internal values. They often deal with class-level details (like providing convenience methods for allocating and initializing objects). In this case, we are simply using the class as a convenient location for storing a set of related helper methods.
Instance methods, on the other hand, will be called on objects directly. They will have access to the object’s internal values. Switch back to the header file, and declare the following methods:
- (CGFloat)weightInUnit:(WeightUnit)unit;
- (NSString*)stringForWeightInUnit:(WeightUnit)unit;
The weightInUnit: method will return the weight value for the given WeightEntry object in the specified unit. The stringForWeightInUnit: method will return a string containing the weight value (rounded to the nearest hundredth) followed by the unit label for the specified unit. Let’s look at the implementation:
- (CGFloat)weightInUnit:(WeightUnit)unit {
switch (unit) {
case LBS:
return self.weightInLbs;
case KG:
return [WeightEntry convertLbsToKg:self.weightInLbs];
default:
[NSException raise:NSInvalidArgumentException
format:@"The value %d is not a valid WeightUnit",
unit];
}
// This will never be executed.
return 0.0f;
}
- (NSString*)stringForWeightInUnit:(WeightUnit)unit {
return [WeightEntry stringForWeight:[self weightInUnit:unit]
ofUnit:unit];
}
The weightInUnit: method simply uses a switch statement to evaluate the unit argument, just as we saw before. If the unit is LBS, it returns the object’s weight in pounds. For KG units, it converts the object’s weight before returning it. For anything else, it throws an exception.
The stringForWeightInUnit: method simply gets the object’s current weight value in the specified unit and calls the stringForWeight:ofUnit: class method to generate the properly formatted string.
The WeightHistory Class
Now we need a class to manage all of our WeightEntries. Internally we will use an NSMutableArray to manage the list of entries; however, we don’t want anything outside the model to modify it. Instead, let’s wrap it up a bit, giving us more control over its use.
Create a new class inside the Model group. This should be a subclass of NSObject. Name the class WeightHistory. Now open WeightHistory.h. The first thing we want to do is import our WeightEntry class. While we’re at it, let’s add a few string constant keys. Our controllers will use these later to observe changes within the WeightHistory class. Add the highlighted code as shown:
#import <Foundation/Foundation.h>
#import "WeightEntry.h"
static NSString* const WeightHistoryChangedDefaultUnitsNotification =
@"WeightHistory changed the default units";
static NSString* const KVOWeightChangeKey = @"weightHistory";
@interface WeightHistory : NSObject {
}
Normally, I prefer to avoid putting #import directives in my header files. You can often use forward declarations for any unknown object pointers and then import the actual header file in your implementation files. This reduces the number of dependencies between headers and can greatly reduce the amount of time it takes to compile large projects.
Here, however, we will need access to the WeightUnit type in our WeightHistory.h header. Remember, WeightUnit is an enum, not an object, so we cannot use forward declarations. If we wanted to be really anal, we could move WeightUnit to its own header file and just import that, but importing WeightEntry.h works well enough.
Now let’s add our properties to the @interface block:
@interface WeightHistory : NSObject {
}
// This is a virtual property.
@property (nonatomic, readonly) NSArray* weights;
@property (nonatomic, assign, readwrite) WeightUnit defaultUnits;
@end
As the comment indicates, the weights array is a virtual property. Unlike most properties, weights will not simply provide accessors to an instance variable. Instead, the value returned by weights will be dynamically generated during runtime. As we will see, this requires some extra work on our part.
Now let’s add two instance methods to this class. Place these below the @property declarations.
- (void)addWeight:(WeightEntry*)weight;
- (void)removeWeightAtIndex:(NSUInteger)index;
This declares a method to add a new WeightEntry and a method to remove any specified WeightEntry. That’s it, the interface is done, at least for now. We’ll come back and add a few more methods in Chapter 6, when we start saving and loading the model.
Now let’s switch to the implementation file (WeightHistory.m). We will start by using an extension to declare a private property. This property should only be accessed inside WeightHistory’s implementation. Add the following code right before the @implementation block:
@interface WeightHistory()
@property (nonatomic, strong) NSMutableArray* weightHistory;
@end
Next, let’s synthesize our properties. Since weights is a virtual property, we don’t need to synthesize it. We will implement its getter manually. This also means our compiler won’t create an instance variable for us—which is exactly what we want. Both defaultUnits and weightHistory should be synthesized.
@implementation WeightHistory
@synthesize weightHistory = _weightHistory;
@synthesize defaultUnits = _defaultUnits;
@end
Now let’s add support for the weights virtual property. We need to do two things. First, we need a getter that returns our weightHistory property cast as an immutable NSArray. Second, we need to ensure that key-value observing (KVO) will work properly—anyone observing our virtual property needs to be alerted whenever the underlying data changes.
Note

The rest of this section includes a discussion of advanced topics. Don’t worry if you do not follow all of it the first time. Go ahead and type in the code as written, then come back and review it once the project is complete. It should make more sense once you see it in action. You can also find more information in Apple’s Key-Value Coding Programming Guide and Key-Value Observing Programming Guide.
To get started, add the highlighted code shown here:
@implementation WeightHistory
@synthesize weightHistory = _weightHistory;
@synthesize defaultUnits = _defaultUnits;
#pragma mark - virtual weights property
// This ensures key-value observing works for weights.
+ (NSSet *)keyPathsForValuesAffectingWeights {
return [NSSet setWithObjects:@"weightHistory", nil];
}
// Virtual property implementation.
- (NSArray*) weights {
return self.weightHistory;
}
@end
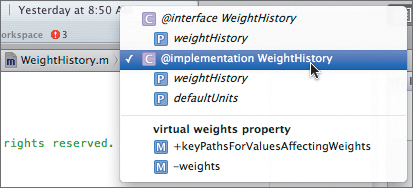
First things first, the #pragma mark directive is a convenient technique for organizing your code. The compiler ignores it completely; however, Xcode will use the #pragma mark directives to add labels and dividing lines when displaying your class’s details in the jump bar. For example, after entering the code, click the @implementation WeightHistory item in the editor’s jump bar (or whatever the last item in the jump bar happens to be). It will now have a line and header separating our new methods from the rest of the class (Figure 3.21).
Figure 3.21 Using the #pragma mark directive to organize your code
Next, we have a method named keyPathsForValuesAffectingWeights. Whenever KVO is used to observe a value, the runtime looks for a method named keyPathsForValuesAffecting<key>, where <key> is the name of the value being observed. This method, if it exists, should return an NSSet containing all the keys that the observed value depends upon. Anyone observing <key> will be notified whenever any of the listed values are changed. In our case, anyone using KVO to monitor the weights property should receive notifications whenever weightHistory changes.
Then we have the accessor itself. Here we just return a reference to our weightHistory object. This isn’t the most bulletproof approach. We could create an immutable copy and return that, or we could remove the weights property entirely, creating additional indexed accessors as needed. However, this approach is fast, and it does communicate our intent. The weightHistory array should never be modified outside the WeightHistory class. Given Objective-C’s dynamic nature, a determined developer can always find ways to break encapsulation and monkey with our internal data, so this is probably good enough.
We still need to initialize our object. Simply override the init method, as shown:
#pragma mark - initialization
- (id)init
{
self = [super init];
if (self) {
// Set initial defaults.
_defaultUnits = LBS;
_weightHistory = [[NSMutableArray alloc] init];
}
return self;
}
Here we simply set up reasonable initial defaults—creating an empty history list and setting the default units to pounds.
OK, let’s look at our accessor methods. The @synthesize directive automatically creates a default implementation for setDefaultUnits:, but we want to do some additional custom processing. Let’s implement our own version.
#pragma mark - accessor methods
- (void)setDefaultUnits:(WeightUnit)units {
// If we are setting the current value, do nothing.
if (_defaultUnits == units) return;
_defaultUnits = units;
// Send a notification.
[[NSNotificationCenter defaultCenter]
postNotificationName: WeightHistoryChangedDefaultUnitsNotification
object:self];
}
The setDefaultUnits: method is straightforward. First, we check to see if the unit argument is the same as our current default units. If they are different, we set the default units and post a notification to the notification center.
This raises an interesting question. Why would we use notifications instead of key-value observing? Well, the simplest answer is that I wanted to show you both approaches. However, KVO and notifications both have unique strengths and weaknesses.
As long as we are observing KVO-compliant values, KVO doesn’t require any actions on the part of the observed object. All the notifications are posted automatically. However, on the receiving side, everything is routed through the observeValueForKeyPath:ofObject:change:context: method. As you can imagine, if you start observing a large number of values, this method can quickly become long and hard to read.
The notification framework, on the other hand, gives us more flexibility. Any object registering to receive notifications can specify a selector that is called whenever the notification is received. Yes, we have to manually post our notifications, but that also gives us the freedom to design exactly when and why our notifications are posted.
Next, look at our implementation of addWeight: and removeWeightAtIndex:.
- (void)addWeight:(WeightEntry*)weight {
// Manually send KVO messages.
[self willChange:NSKeyValueChangeInsertion
valuesAtIndexes:[NSIndexSet indexSetWithIndex:0]
forKey:KVOWeightChangeKey];
// Add to the front of the list.
[self.weightHistory insertObject:weight atIndex:0];
// Manually send KVO messages.
[self didChange:NSKeyValueChangeInsertion
valuesAtIndexes:[NSIndexSet indexSetWithIndex:0]
forKey:KVOWeightChangeKey];
}
// This will be auto KVO'ed.
- (void)removeWeightAtIndex:(NSUInteger)weightIndex;{
// Manually send KVO messages.
[self willChange:NSKeyValueChangeRemoval
valuesAtIndexes:[NSIndexSet indexSetWithIndex:weightIndex]
forKey:KVOWeightChangeKey];
// Add to the front of the list.
[self.weightHistory removeObjectAtIndex:weightIndex];
// Manually send KVO messages.
[self didChange:NSKeyValueChangeRemoval
valuesAtIndexes:[NSIndexSet indexSetWithIndex:weightIndex]
forKey:KVOWeightChangeKey];
}
These should be relatively straightforward wrappers, letting us add objects to and remove objects from the private weightHistory array. However, we also need to make these methods key-value observing compliant.
Key-value observing’s automatic notification only works if you modify variables using KVO-compliant accessor methods. Most of the time, this is automatic. When we define a property, the synthesized accessors are (by default) KVO compliant.
However, collections are a little trickier. First of all, collection notifications not only alert you to changes but also pass on information about what has changed, such as whether you added, removed, or replaced a value, as well as the index of the change. To support these, you must have the proper indexed accessor methods: insertObject:in<Key>AtIndex:, replaceObjectIn<Key>AtIndex:, and (optionally) removeObjectFrom<Key>AtIndex:.
This means that if we replace addWeight: and removeWeightAtIndex: with insertObject:inWeightHistoryAtIndex: and removeObjectFromWeightHistoryAtIndex:, we would gain automatic KVO compliance. However, the KVO-compliant methods don’t quite do what we want.
We want our weight entries to appear in reverse chronological order, so the most recent entry is always the first in the list. We can enforce this by always adding WeightEntry objects to the front of the weightHistory array.
We could use a KVO-compliant method for just the removals, but that doesn’t help either. We must implement both the insert-indexed and the remove-indexed accessors to generate automatic notifications. Implementing removeObjectFromWeightHistoryAtIndex: by itself does nothing.
So, instead, I have chosen to use slightly more informative method names (in my opinion, at least) and to manually send out KVO messages. We do this by calling willChange:valuesAtIndexes:forKey: before the change is made and then calling didChange:valuesAtIndexes:ForKey: afterwards.
For more information on key-value observing, I highly recommend reading through both the Key-Value Coding Programming Guide and the Key-Value Observing Programming Guide in Apple’s documentation.
Connecting the Model
Now we need to connect our model objects to our controllers. This often causes some confusion—after all, the controllers are created by our storyboard. How do we get our data objects into them?
In theory, we could add our model objects to the storyboard and let it create them as well. This isn’t a bad approach; however, we lose some control over our objects. Any objects in the storyboard will be created when the scene is loaded. If our data object is loaded as part of our initial scene, it could cause a delay when launching our application—especially when loading a particularly large file or loading resources from the network.
More importantly, we cannot connect the outlets in one scene to objects in another. If we could add our model to our initial scene and then connect it to outlets in all our other scenes, I would be strongly tempted to add objects to storyboards. As it is, there are probably better solutions.
Another common approach involves creating a singleton class for our model or storing our model in the app delegate (which effectively does the same thing). Personally, I find the app delegate approach a little sloppy, and I try to avoid the dark temptation of singleton classes whenever possible.
Instead, let’s use lazy initialization to create our model in our initial scene’s controller, and then pass the data to our new scenes when they are loaded.
Let’s start by creating a custom UITabBarController subclass. Right-click the Controllers group and select New File > UIViewController subclass. In the options panel, UITabBarController is not one of the options in the “Subclass of” dropdown menu. Instead, we have to type it directly into the field. Then name the controller TabBarController and create it.
Now open TabBarController.h. We also need to add a property to hold our WeightHistory object. Modify the header as shown here:
@class WeightHistory;
@interface TabBarController : UITabBarController
@property (nonatomic, strong) WeightHistory* weightHistory;
@end
Most of this should be self-explanatory. The only real trick is the first line—@class WeightHistory; is a forward declaration for the WeightHistory class. As mentioned earlier, forward declarations let us avoid importing other classes in our header files. It tells the compiler that we have a class named WeightHistory but that the compiler doesn’t need to know the details right away.
Now, switch to the implementation file. Let’s start by importing WeightHistory.h and synthesizing our weightHistory property.
#import "TabBarController.h"
#import "WeightHistory.h"
@implementation TabBarController
@synthesize weightHistory = _weightHistory;
Now, navigate down to the viewDidLoad method stub. It is currently commented out. Uncomment it and add the following:
- (void)viewDidLoad
{
[super viewDidLoad];
self.weightHistory = [[WeightHistory alloc] init];
// Create a stack and load it with the view controllers from
// our tabs.
NSMutableArray* stack =
[NSMutableArray arrayWithArray:self.viewControllers];
// While we still have items on our stack
while ([stack count] > 0) {
// pop the last item off the stack.
id controller = [stack lastObject];
[stack removeLastObject];
// If it is a container object, add its controllers to
// the stack.
if ([controller respondsToSelector:
@selector(viewControllers)]) {
[stack addObjectsFromArray:
[controller viewControllers]];
}
// If it responds to setWeightHistory, set the weight
// history.
if ([controller respondsToSelector:
@selector(setWeightHistory:)]) {
[controller setWeightHistory:self.weightHistory];
}
}}
We start by creating a new WeightHistory object and assigning it to our weightHistory property. Then things get interesting. We create a mutable array and fill it with the controllers for our tabs. We then use this array as a stack, taking each controller off the stack and processing it in turn.
If the controller acts as a container for other controllers (i.e., navigation controller, tab bar controller, split view controller, or page view controller), we add its controllers to our stack. Finally, if the controller has a setWeightHistory: method, we call it, passing in our newly created WeightHistory object.
For our current project, we will assign the weight history directly to our EnterWeightViewController and GraphViewController objects. However, when we get the navigation controller, we grab the HistoryViewController from our navigation controller and add it to our stack. Then when the HistoryViewController is popped off the stack, we assign our weight history to it as well.
We could have simply hard-coded paths to our three main controllers and passed the data objects directly, but this approach gives us additional flexibility for future enhancements. We can easily add new view controllers, and our system will handle them appropriately. We can even handle most view controller containers without any modification to this code.
This is also an excellent example of how Objective-C’s dynamic nature can greatly simplify our code. We pull an object from the viewControllers array. We don’t need to know its class—or really anything about it. If it responds to the methods we’re interested in, we call those methods. If not, we simply move on to the next object in our stack.
We still need to tell our application to use this class. Open up the storyboard and zoom in on the tab bar controller. Change its class to our new TabBarController class. Good. Now we just need to add the weightHistory property to our view controllers. Let’s start by opening EnterWeightController.h. Modify the interface as shown here:
@class WeightHistory;
@interface EnterWeightViewController : UIViewController
@property (nonatomic, strong) WeightHistory* weightHistory;
@end
This should look familiar. It’s almost exactly what we did to the TabViewController. Again, we simply create a forward declaration for our WeightHistory class and then declare a weightHistory property. Now, switch to the implementation file. As before, we need to import the WeightHistory class and then synthesize our weightHistory property.
#import "EnterWeightViewController.h"
#import "WeightHistory.h"
@implementation EnterWeightViewController
@synthesize weightHistory = _weightHistory;
That’s it. That’s all we have to do. Repeat these steps for our GraphViewController and HistoryViewController classes.
That just leaves the DetailViewController class. This class is different for two reasons. First, it’s not connected directly to our tab bar controller. Instead, our detail view controller scene is loaded when the user selects a row in our history view controller. Second, we want to pass both the WeightHistory and the index of the currently selected row.
Open DetailViewController.h and modify it as shown here:
@class WeightHistory;
@interface DetailViewController : UITableViewController
@property (nonatomic, strong) WeightHistory* weightHistory;
@property (nonatomic, assign) NSUInteger selectedIndex;
Now, switch to the implementation file, import our WeightHistory, and synthesize both properties.
#import "DetailViewController.h"
#import "WeightHistory.h"
@implementation DetailViewController
@synthesize weightHistory = _weightHistory;
@synthesize selectedIndex = _selectedIndex;
Next, we need to assign values to these properties. To start with, we need to give our segue an identifier so we can recognize it in our code. Open MainStoryboard.storyboard. Select the segue connecting the history view controller and the detail view controller. Set its Identifier attribute to Push Detail View.
Now open HistoryViewController.m. Import our DetailViewController class and add a string constant containing our segue identifier.
#import "HistoryViewController.h"
#import "WeightHistory.h"
#import "DetailViewController.h"
static NSString* const DetailViewSegueIdentifier =
@"Push Detail View";
@implementation HistoryViewController
@synthesize weightHistory = _weightHistory;
Then add the following method:
- (void)prepareForSegue:(UIStoryboardSegue *)segue
sender:(id)sender {
if ([segue.identifier isEqualToString:
DetailViewSegueIdentifier]) {
NSIndexPath* path =
[self.tableView indexPathForSelectedRow];
DetailViewController* controller =
segue.destinationViewController;
controller.weightHistory = self.weightHistory;
controller.selectedIndex = path.row;
}
}
Here, we simply verify that we have a segue opening a detail view, and then we get the index path to the selected row and a reference to our destination view controller. We then assign both the weightHistory and selectedIndex properties for our new DetailViewController.
That’s it. We can verify that our data is making it all the way to our detail view by opening DetailViewController.m and navigating to the viewDidApepar: method. Modify this method as shown:
- (void)viewDidAppear:(BOOL)animated
{
[super viewDidAppear:animated];
NSLog(@"Weight History = %@", self.weightHistory);
NSLog(@"Selected Index = %d", self.selectedIndex);
}
Now run the application. Navigate to the history view, and tap the top row. The following message should appear in the console (of course, the WeightHistory’s memory address will probably change).
2011-07-21 00:58:39.059 Health Beat[760:207] Weight History = <WeightHistory: 0x6a1e690>
2011-07-21 00:58:39.061 Health Beat[760:207] Selected Index = 0
You can remove the NSLog() calls once you’ve verified that everything works.
Wrapping Up
Our app builds and launches. We can switch between the three tabs. Yes, it’s just a skeleton—but the next few chapters will put some meat on these bones. In Chapter 4, we will flesh out the EnterWeightView and HistoryView. In Chapter 5, we will look at drawing custom views with the GraphView, and in Chapter 6, we will save both the application data and the user defaults. Finally, in Chapter 7, we will replace Health Beat’s current model using Core Data.
One last step before we go. Let’s commit our changes to the git repository. It’s best to get into the habit of committing changes early and often. That way we can compare our current files with any of the previously committed versions, and if we have to roll back our changes, we can minimize the amount of work we’re undoing. It’s always better to have a large number of small, incremental steps than to have a few giant strides. Besides, the more commits you have, the more useful version control becomes.
To commit all our changes, go to File > Source Control > Commit. Enter Chapter 3 as the commit message, and click Commit. That’s it. Xcode should take care of the rest.