6Keys to Great Photos
Aerial snapshots are easy to create and fun to do. You may be an experienced shooter adding drone photography to your repertoire. Or, you may be a neophyte attempting to learn photography and drone operation at the same time. In either case, the ability to send an aircraft skyward as an aerial camera platform can be exhilarating. It’s almost a given that your first hundred or so still photos will be views of your house from an altitude of 100 feet or so, followed by shots of your town’s major (or minor) tourist attractions. Go ahead, enjoy random snapshooting. There’s plenty of time to get serious about your drone-based photography.
Random snapshooting can sometimes yield lucky shots—happy accidents that look good and prompt you to say, “Actually, I meant to do that!” (even if it wasn’t the case). Some Pulitzer Prize–winning photos have resulted from a photographer instinctively squeezing off a shot at what turned out to be a decisive moment in some fast-breaking news event. However, lacking a Pulitzer-winner’s intuition, most photographers end up with a larger percentage of pleasing photos only when they stop to think about and plan their pictures before pressing or tapping the shutter release button or screen icon.
In this chapter, I’m going to help you take your aerial still photography to the next level, setting you on the road to taking great pictures. I’ll introduce all the basic elements of good composition, such as selecting what to include in and what to leave out of a well-designed photograph. You’ll find out some basic rules, such as the Rule of Thirds, and most importantly, when you should ignore these rules in order to get dramatic effect.
The very best photos are usually not accidents; they are carefully planned and composed. That is, such pictures display good composition, which is the careful selection and arrangement of the photo’s subject matter within a frame. Planning can be challenging for drone photographers, who must pack a lot of activity into roughly 30 minutes of battery life. We can’t wait for hours—à la Ansel Adams—in anticipation of the universe settling into exactly the right arrangement. Instead, simply understanding how good composition works and keeping that in mind on the fly when you shoot can make a world of difference. The following list gives you an overview of some elements in planning a great photo with your drone. I’ll address the most important of these in more detail later in the chapter.
These are the keys to great photos:
- ■Selecting the picture orientation. Some subjects look best when shown in a tall, vertically oriented frame. Some look best in a wide, horizontal format. A few need a square composition. To make the most of your camera’s resolution, choose an orientation when you take the photo rather than cropping it later in an image editor.
- ■Choosing your subject matter. This isn’t as easy as it appears to be. Your aerial vantage point and the wide-angle perspective of your drone’s lens means the frame might be filled with interesting things to look at covering a broad range of the landscape below, but you need to decide which should be the subject of the picture.
- ■Deciding on a center of interest. One point in the picture should naturally draw the eye as a starting place for the viewer’s exploration of the rest of the image. With a center of interest, the photo becomes focused and not simply a collection of objects.
- ■What does your picture say? A scenic photo can be composed in different ways, depending on what you want the image to say. For example, a photo taken in a park can capture the grandeur of nature showcasing a dramatic skyline with purple mountains’ majesty and amber waves of grain. On the other hand, you might be tempted to make a statement about the environmental impact of humans by focusing on trash left behind by careless visitors or perhaps desiccated amber mountain majesties and chemically tainted waves of purple grain.
- ■Directing the eye within the frame. Use lines and curves to provide a guided tour of your image, directing the viewer from one portion to another to finally focus on the main center of interest. Balance the composition to keep the eye from wandering to “lopsided” parts of the image.
- ■Planning for action. If your subjects are moving, you need to anticipate where they will be and how they will be arranged when you take the picture.
- ■Working with the foreground and background. Objects and textures in the foreground and background can work for you or against you. The area surrounding your main subject is an important part of the composition.
Orientation
New photo enthusiasts using conventional cameras often fall into the trap of shooting all their photos at eye level and with the camera held in horizontal or “landscape” orientation. The first affliction isn’t necessarily a problem for drone still images, which tend to be captured at various altitudes, and very seldom at what we would consider “eye” level. However, a dependence on horizontal compositions does plague aerial photographers, though, simply because the cameras built into the Mavic Air 2 and Air 2S are oriented horizontally and limited to aspect ratios of 4:3 and 3:2, respectively, when not shooting panoramas.
The most common panorama images, too, are generally taken in landscape format. But just because a wide perspective is forced on you by the drone’s camera, that doesn’t mean all your images must use that format. One of the keys to making an artistic image is using creative cropping to carve a well-designed image out of the area encompassed by the entire frame. Many times, the original image captured with your drone is just the raw material you work with in an image editor to create a compelling final image. Now, I’m not a fan of heavily processed images, and you won’t find long chapters on using Photoshop or Lightroom in this book. (There are plenty of general-purpose image-editing books which do that more effectively.) But using an application to crop your drone images should be a regular part of your toolkit.
The orientation of a photo, in particular—whether it’s a wide or tall picture—affects how you look at the image. When you see a landscape-oriented photo, you tend to think of panoramas and horizontal sprawl. A vertically oriented photo, on the other hand, provides expectations of height. Most subjects fit into one of these orientations; very few photos are actually composed within a perfectly square frame. Square photos are often static and uninteresting and are usually put to work only with subject matter that suits them, such as circular objects or images that have important horizontal and vertical components. If you fly the Mavic Air 2, you’ll need to keep the limitations of square images in mind, because your drone’s 4:3 aspect ratio is inherently more square, compared to the Mavic Air 2S’s more distinctly horizontal 3:2 layout.
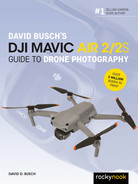
Because of this built-in bias, many photographers unconsciously slip into the trap of viewing every potential photo in a horizontal mode. They consider a vertical orientation only when confronted by subject matter that simply can’t be photographed in any other way, such as a tall structure or towering cliff. Figure 6.1, captured by Cleveland photographer Kolman Rosenberg, actually has a nice composition in default horizontal mode. The diagonal lines of the spit of land draw attention to the lighthouse at its tip. However, you can see that cropping the same picture to create a vertical image draws the eye from the foreground out to the lighthouse even more strongly. (See Figure 6.2.)
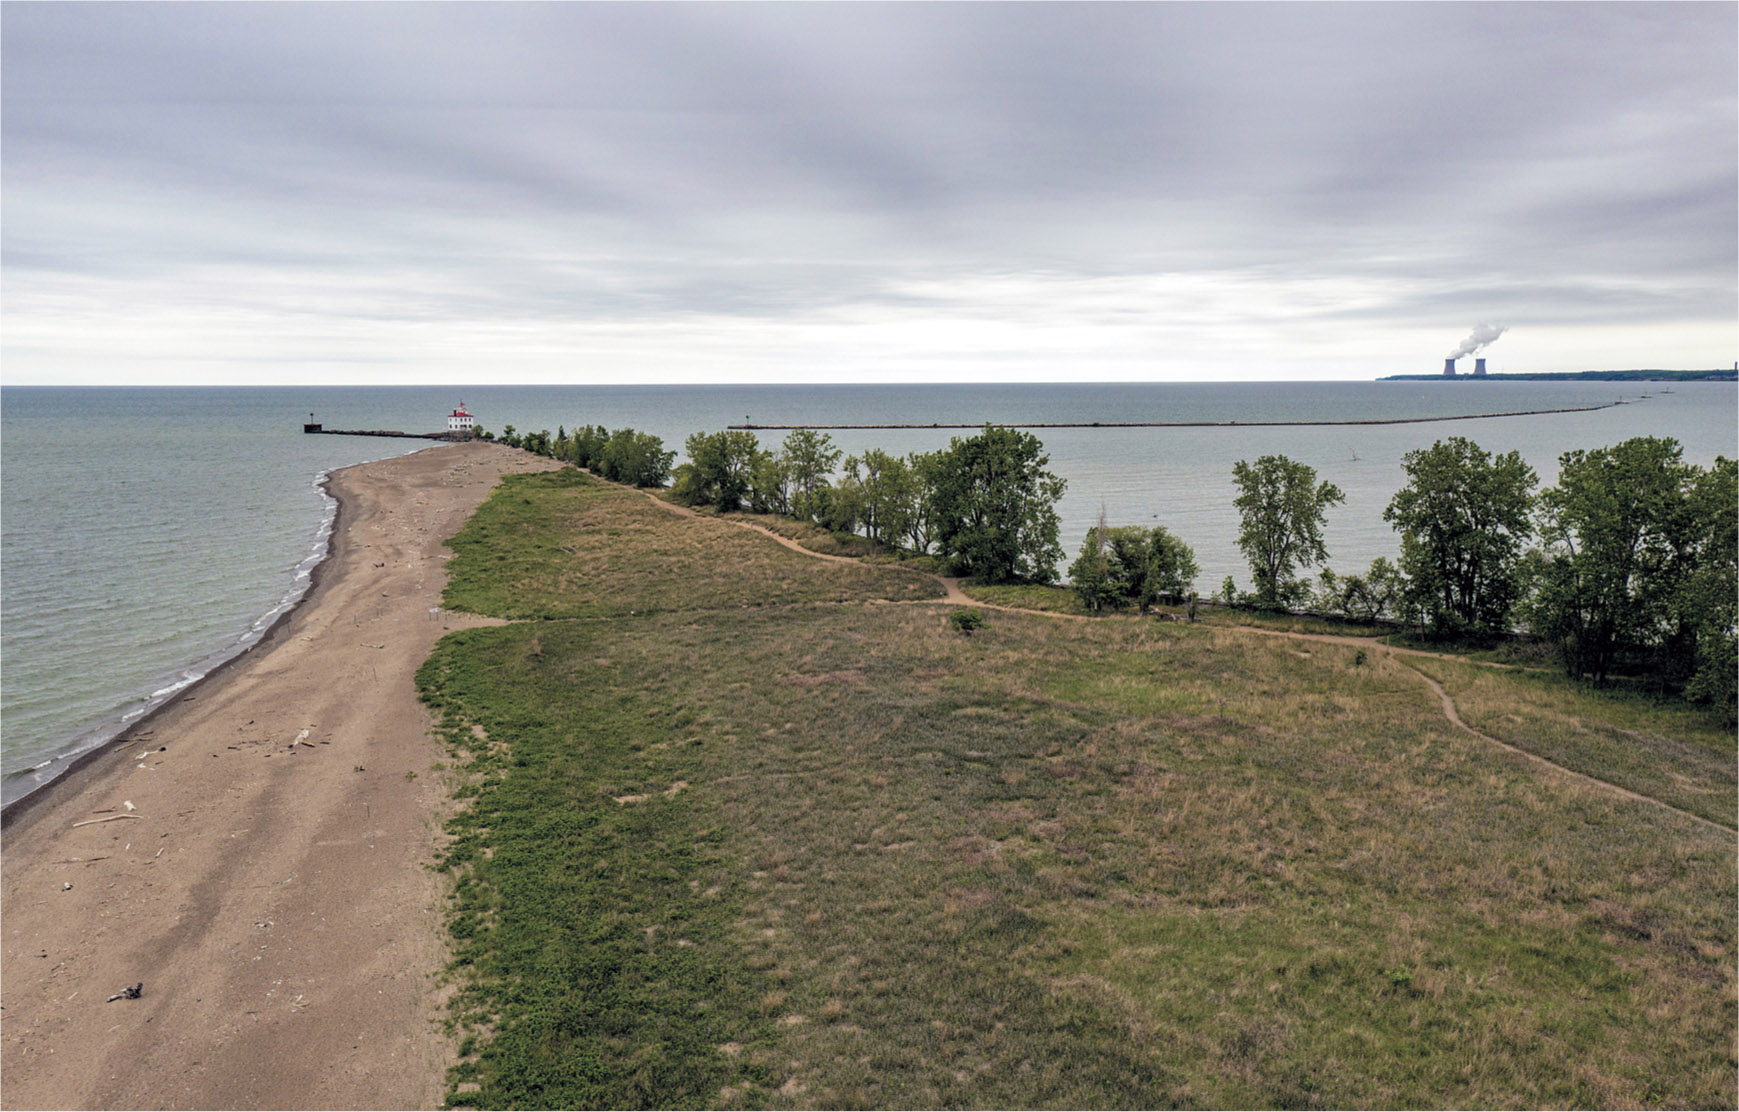
Figure 6.1 This horizontally oriented photo has strong compositional elements.
Because your drone produces horizontally oriented images by default, you’ll need to think about the possibilities for vertical images as you shoot, so you can adjust the drone’s height or viewing angle to get the best image for the eventual vertical shot. Don’t hesitate to make the decision to crop to a vertical image as you’re reviewing your photos on your computer, too. Here are some tips that will help you decide when it’s appropriate to use a vertical composition—and when you should think horizontal instead.
- ■If you’re taking pictures specifically for a slide show or for a computer presentation, stick with horizontal pictures. Slide show images are seen sequentially and should all have the same basic frame that is often sized to fill up the horizontal screen as much as possible. Inserting a vertical picture might mean that the top and bottom of your photograph is cut off or appears odd on-screen.
- ■If your subject has dominant horizontal lines, use a horizontally composed image. Landscapes and seascapes that feature a prominent horizon, photos of sprawling buildings, or bridges spanning a waterway look their best in horizontal mode.
- ■If your subject has strong vertical lines, use a vertical composition. The tall buildings and towers, trees, and other lofty subjects all call for a vertical orientation.
- ■Consider cropping to a square composition if vertical and horizontal objects in your picture are equally important and you don’t want to emphasize one over the other. A building that is wide but that has a tall tower at one end might look good in a square composition. The important vertical element at one end would keep the image from being too static. Circular objects lend themselves to square compositions because the round form fits comfortably inside a square “frame.”
- You may also find yourself boxed into a square format when you need to crop to eliminate distracting features outside the boundaries of your main subject. I captured a few aerial views of a Division III college football game from an adjacent vacant soccer field. My drone was never directly over any of the participants and spectators, and there were no temporary flight restrictions in the area.
- But, as you might expect, the playing field was flanked at two ends with parking lots. By cropping the left and right sides of the image, I ended up with a square-ish picture. Cropping at top and bottom to produce a rectangular image would have eliminated the small-town flavor of this 1,300-student college. (Back in my day, I took a Sociology 101 course that packed more freshmen than that into an auditorium for its lectures.) (See Figure 6.3.)

Figure 6.2 A vertical crop adds depth.
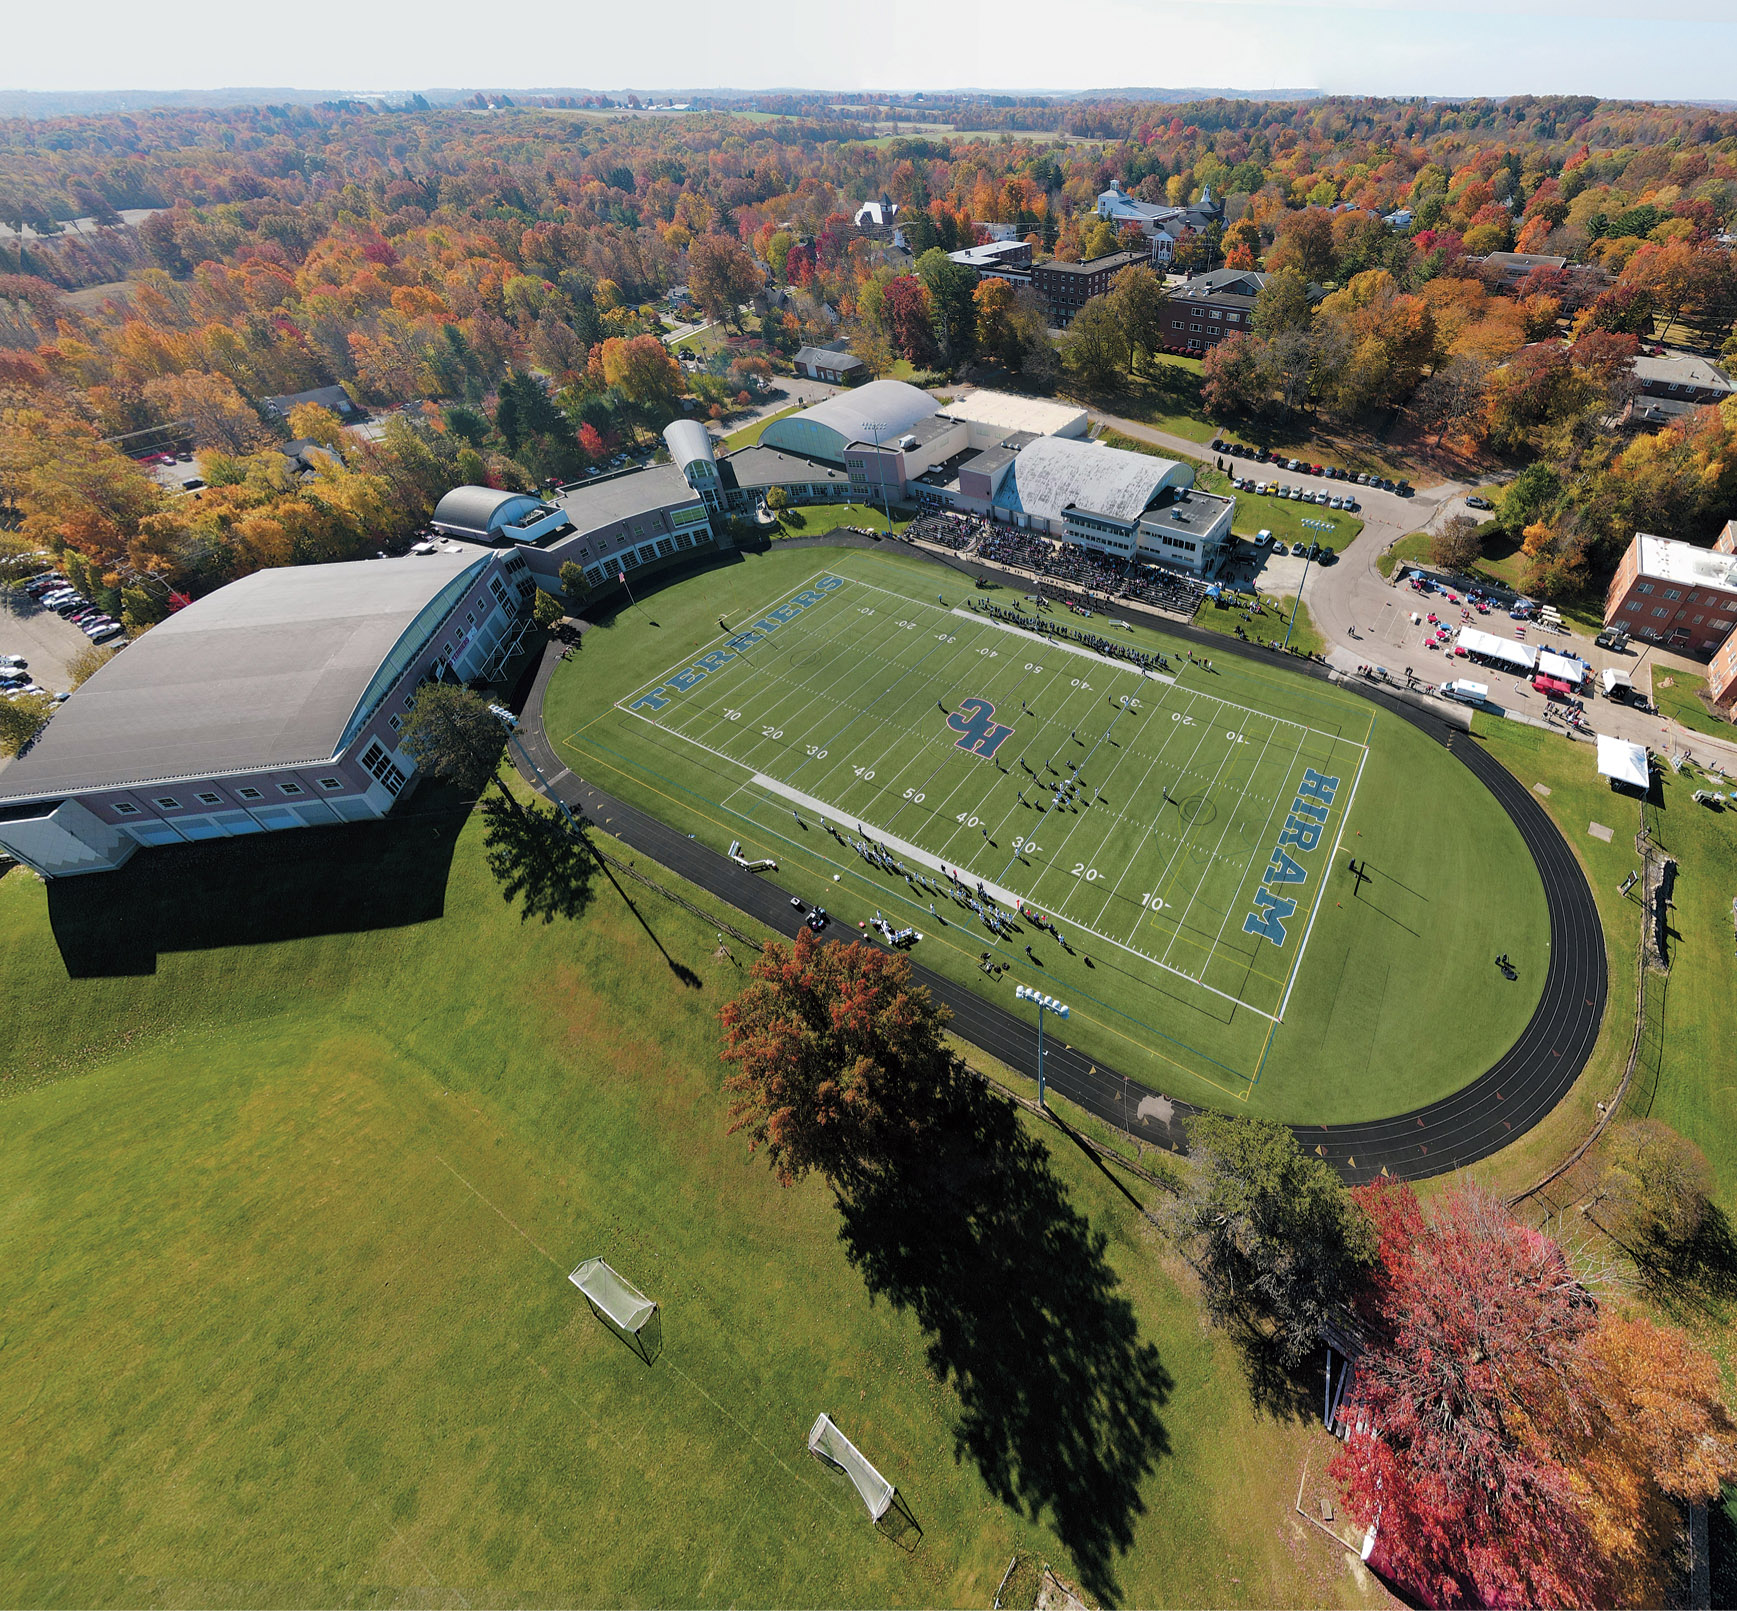
Figure 6.3 Go ahead and crop to a square to eliminate distracting image content.
Change Your Perspective
Earlier I mentioned the trap that enthusiasts of conventional cameras fall into: shooting everything at eye level. Stooping down or climbing a ladder can give you a whole new perspective for otherwise mundane snapshots. Drone photographers obviously seldom take photos from anywhere near eye level. However, there’s no reason to shoot everything from an altitude of 400 feet, either.
One key to capturing more pictorial aerial photos is to stop thinking of them as aerial photos. Think like a ground-based photographer who happens to have the world’s most versatile tripod platform at their disposal. I’ve been at several events where elevated work platforms (such as bucket trucks, “cherry pickers,” or boom lifts) have been rented to allow taking photos of large groups of people from an angle that allows looking down on every smiling face. Today, you can take the same photo with a drone much more inexpensively and with less disruption.
Traditional aerial photos have their place, of course. The images of the high school shown in Figure 6.4 provide a decent overall perspective of the layout of the building. The version on top is a standard aerial view that really shows little of the building’s character, although you get an excellent inspection of the structure’s roofs. Taken from a lower elevation, the bottom image provides more detail about the high school’s architectural style. Even so, it’s still not something you’d want to put in the school yearbook.
Figure 6.5, in contrast, was taken the same day using the same drone, but directly in front of the high school’s main façade at an elevation of about 40 feet—much higher than any tripod I might have had available. The image doesn’t scream “aerial photo.”
When I discovered this “versatile tripod” concept, it was a revelation. Even if an aerial view is not needed, your flying camera platform can take you places you couldn’t easily venture to without superpowers. Like many beginners, when I got my first drone, I was initially leery about flying over water, because any sort of emergency incident or unplanned landing could easily result in a total loss of the aircraft. After a few months I realized that a dunk in the water wasn’t any more likely than a crash in a forest or other inaccessible location and I became more daring.
I’m now fairly unconcerned sending my Mavic out over water, capturing aerial shots like the one shown at left in Figure 6.6. But I also don’t hesitate to send my drone mounted on its virtual tripod up close for shots like the one seen at right in the figure. Some 30–40 feet in the air, I’m able to capture images from a vantage point I’d need a boat to obtain. Unless you happened to see this pair of images together, you might not guess that both were taken with a drone.
Figure 6.4 Aerial shots provide good overall views.
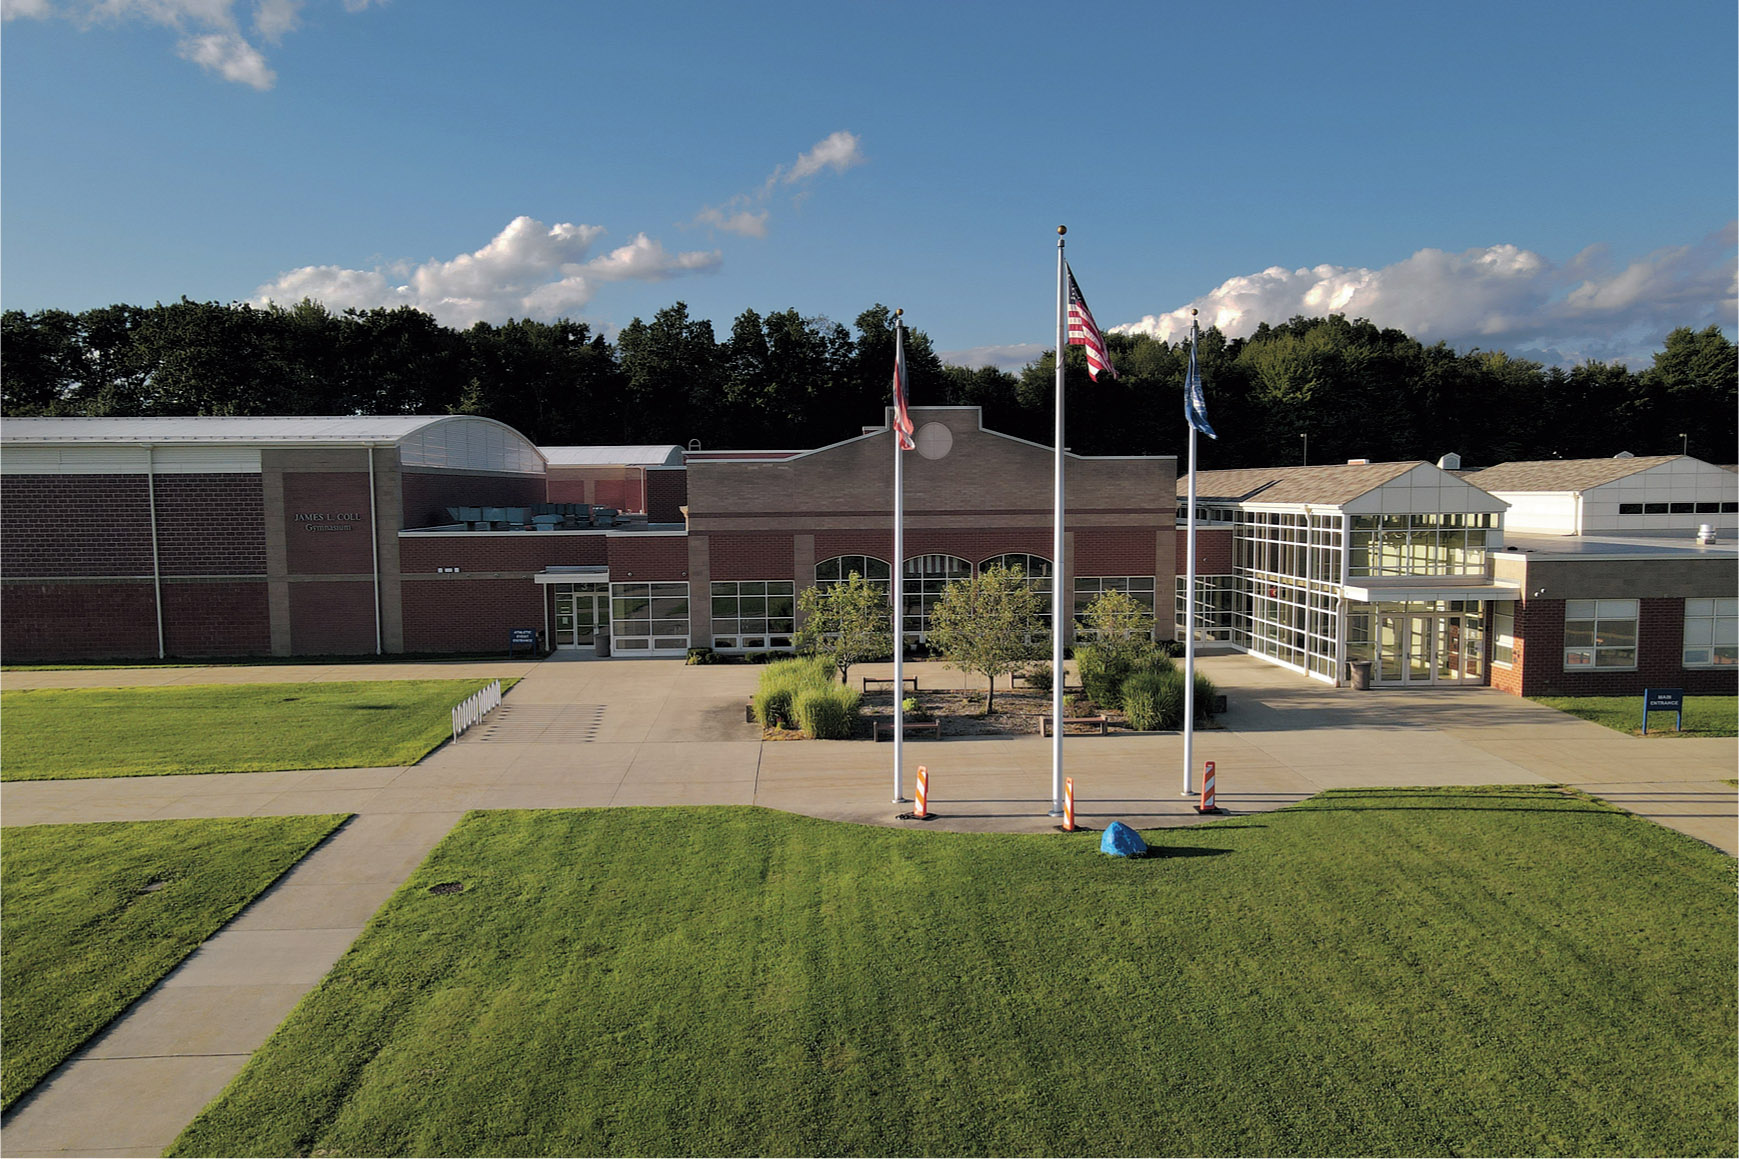
Figure 6.5 Shooting from a lower elevation provides a more conventional perspective.
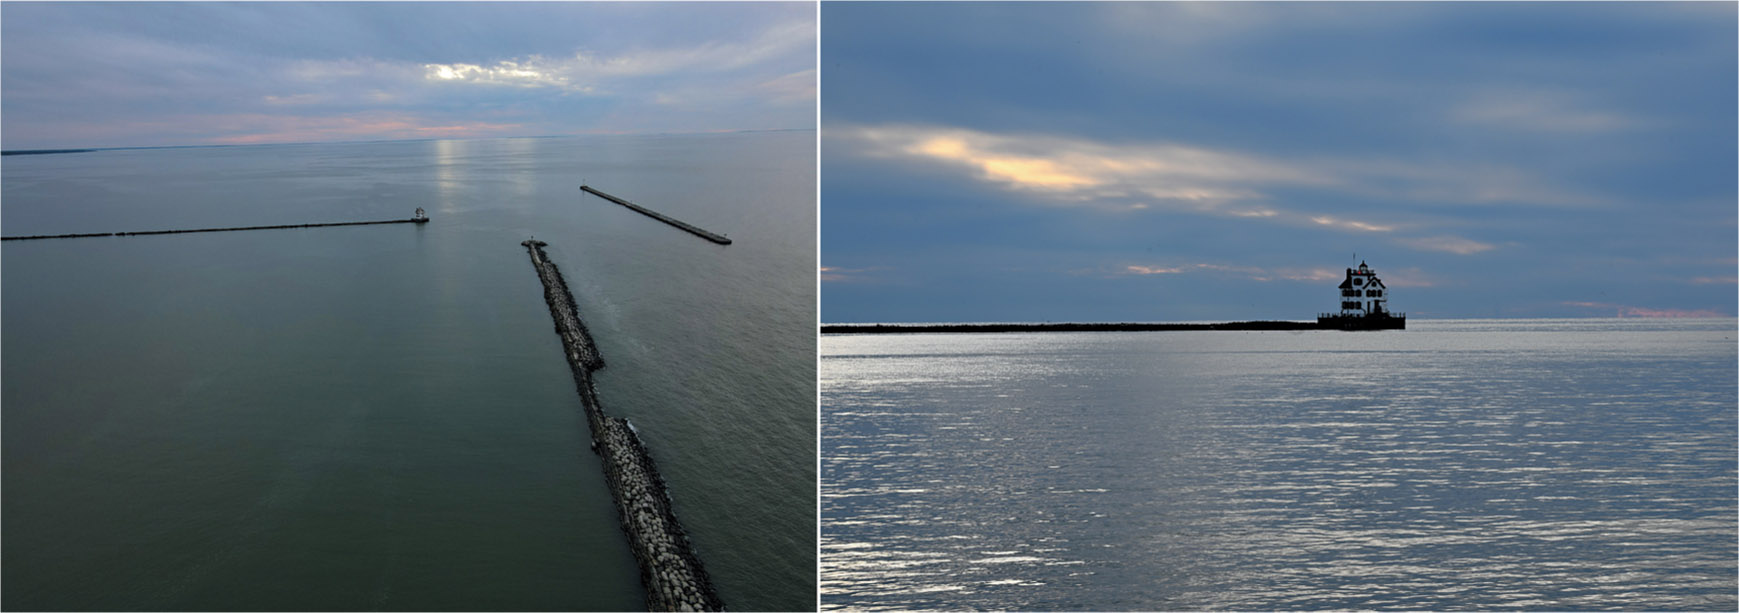
Figure 6.6 High vantage point (left); shooting from a lower altitude (right).
Center of Interest
Photographs shouldn’t send the person looking at them on a hunting expedition. As interesting as your subject is to you, you don’t want viewers puzzling over what’s the most important part of the image or perhaps conducting a vote by secret ballot to see who has successfully guessed your intent. Every picture should have a single, strong center of interest. You want to narrow down your subject matter: rather than include everything of interest in a photo, choose one main subject. Then, if you can, find secondary objects in the picture that are also interesting (giving the photo depth and richness) but which are still clearly subordinate to the main subject.
On first glance, viewers might find it difficult to locate the center of interest in Figure 6.7, which shows an abandoned shack, photographed from a distance. The perspective of the 22mm (equivalent) lens emphasizes the isolation of the shack. A wide-angle lens will always convey a feeling of space and depth. The foreground area becomes more prominent, adding to the feeling of space. The lower angle takes in more of the sky and other surrounding area, giving additional depth. However, you may not want your subjects to appear too small; they should still be large enough to be interesting. Too much distance is the most common mistake amateur photographers make. If you’re showing wide-open spaces in your picture, be certain that it’s because you want to. But don’t move so far back that the center of interest isn’t obvious.
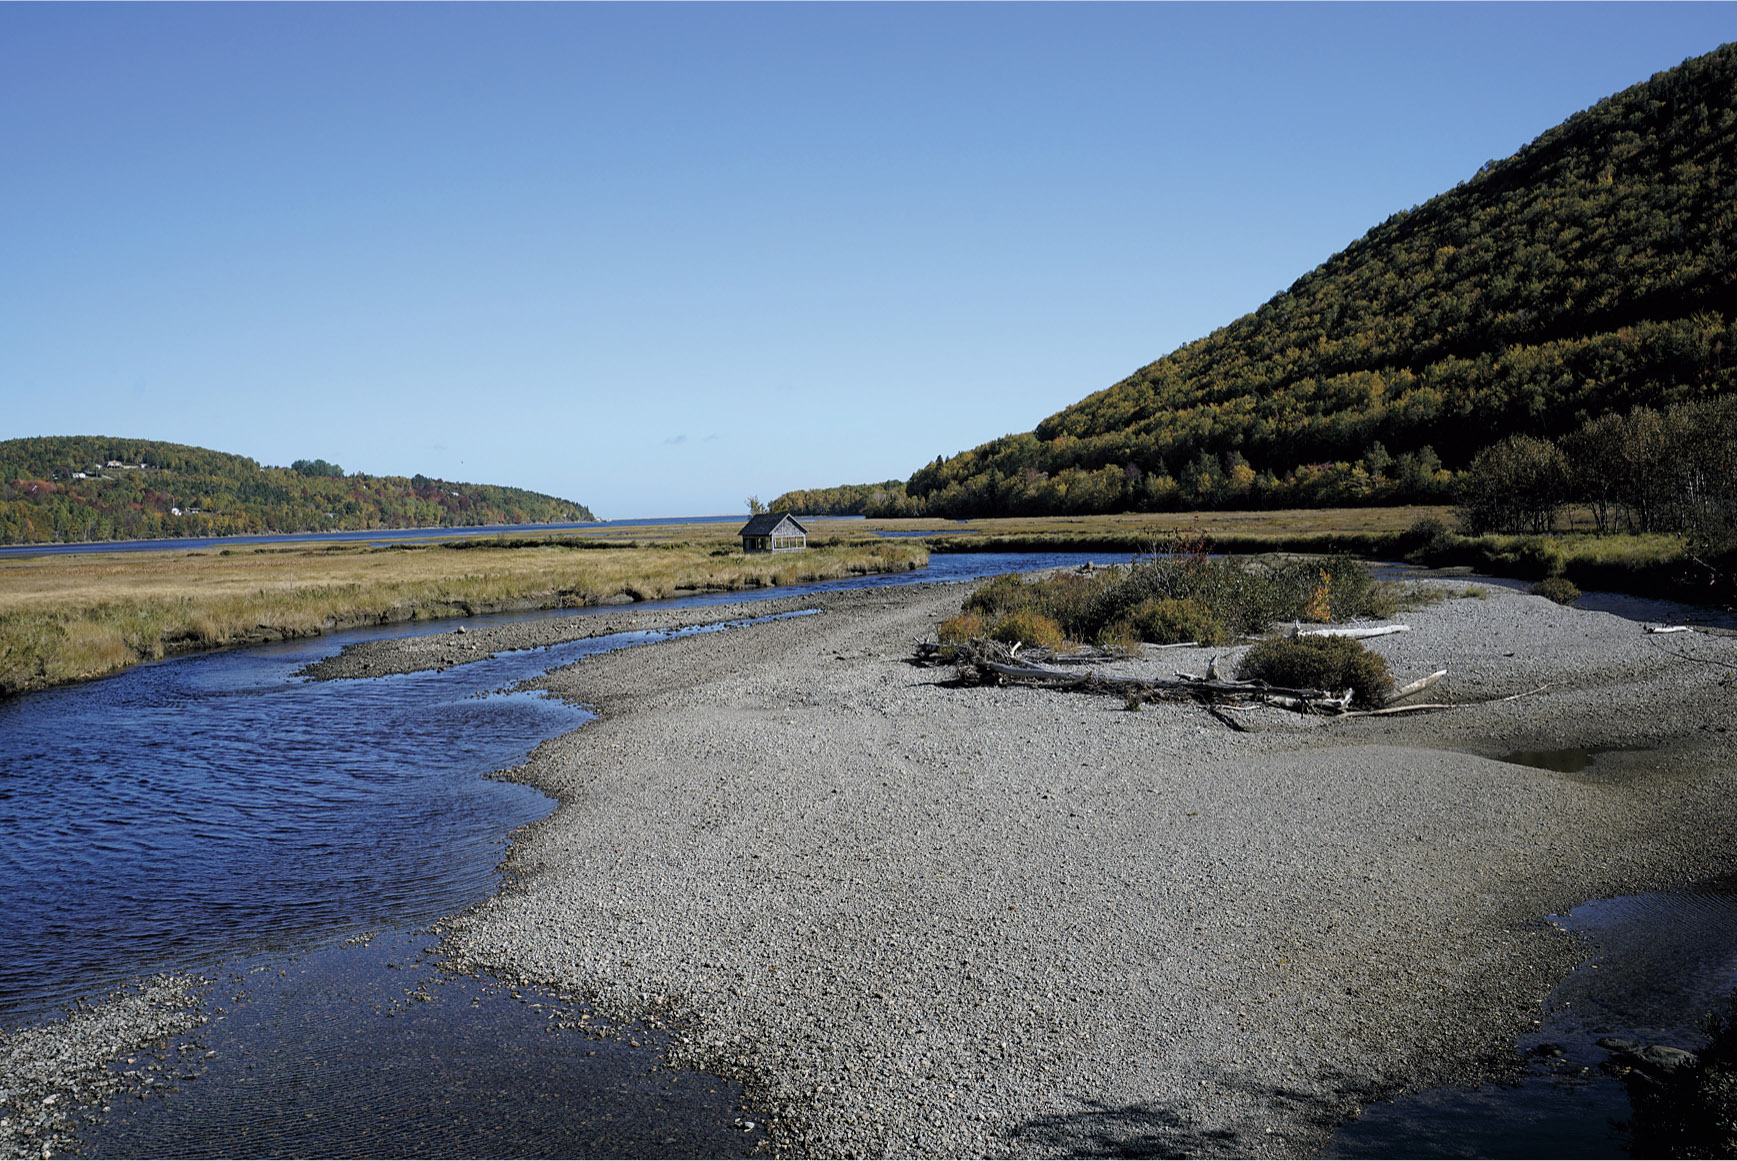
Figure 6.7 Too much distance may make your center of interest difficult to find.
A closer viewpoint, as seen in Figure 6.8, can make the center of interest easier to locate, and can add intimacy and show details and textures of a subject that can’t be seen at greater distances. However, both examples highlight some other important considerations you should keep in mind.
- ■Make sure that your composition has only one dominant center of interest. Is the shack really the center of interest, or does the eye focus first on the driftwood at lower-center right and its surrounding foliage? Having more than one center of interest is confusing. Other things in a photo can be engaging, but they must clearly be subsidiary to the main center of interest. If you really have several things of importance in a single picture, consider taking several separate photos of each and using them to tell a story. Successful secondary subjects are clearly subordinate to your main center of interest.
- ■Large, bright, colorful. The center of interest is either the brightest or more vividly colored object in the photo or at least is one not overpowered by a brighter/more colorful object. Gaudy colors or bright shapes anywhere else in the image can distract viewers from your main subject. Some elements—such as a reflection of the sun on water—become part of the environment and aren’t necessarily distracting. Other parts of a photo—such as a bright sail on a boat—can interfere with your carefully planned composition.
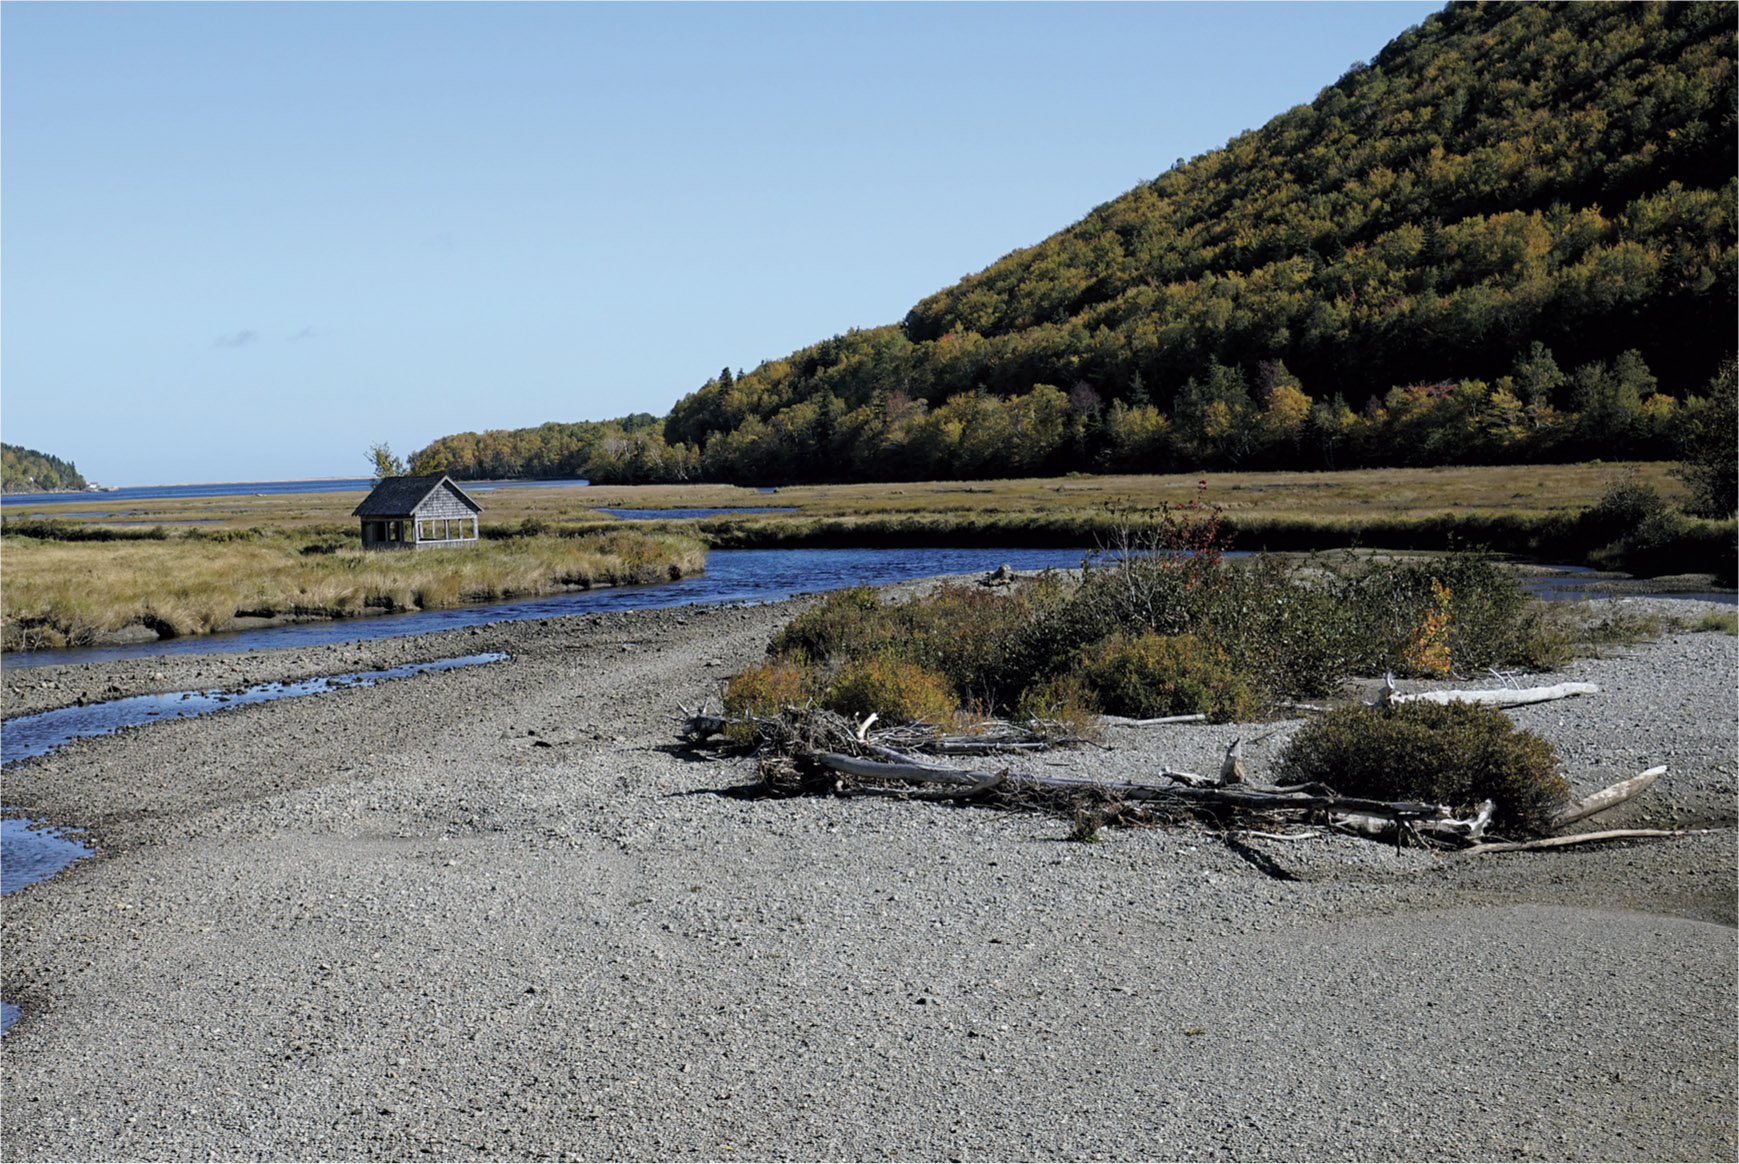
Figure 6.8 A closer shot helps reveal your main subject.
- ■Avoid placing the center of interest in the exact center of the photograph. There are many conventional occasions when it’s okay to center your subject, such as for close-ups or portraits, but you won’t be shooting many of those with your drone. But most of the time, you want to locate the important subject to either side and a little toward the top or bottom of the frame. Don’t take “center” literally in all cases.
- Tennessee photographer Rick Murray kept that in mind when he shot the image shown in Figure 6.9. He lifted off from the parking lot of the Tennessee Titans football stadium, across the Cumberland River from the Nashville skyline captured in the photo. The largest buildings were positioned in the upper left of the frame, with the diagonal of the river itself leading the eye from the left to right to take in the entire scene.
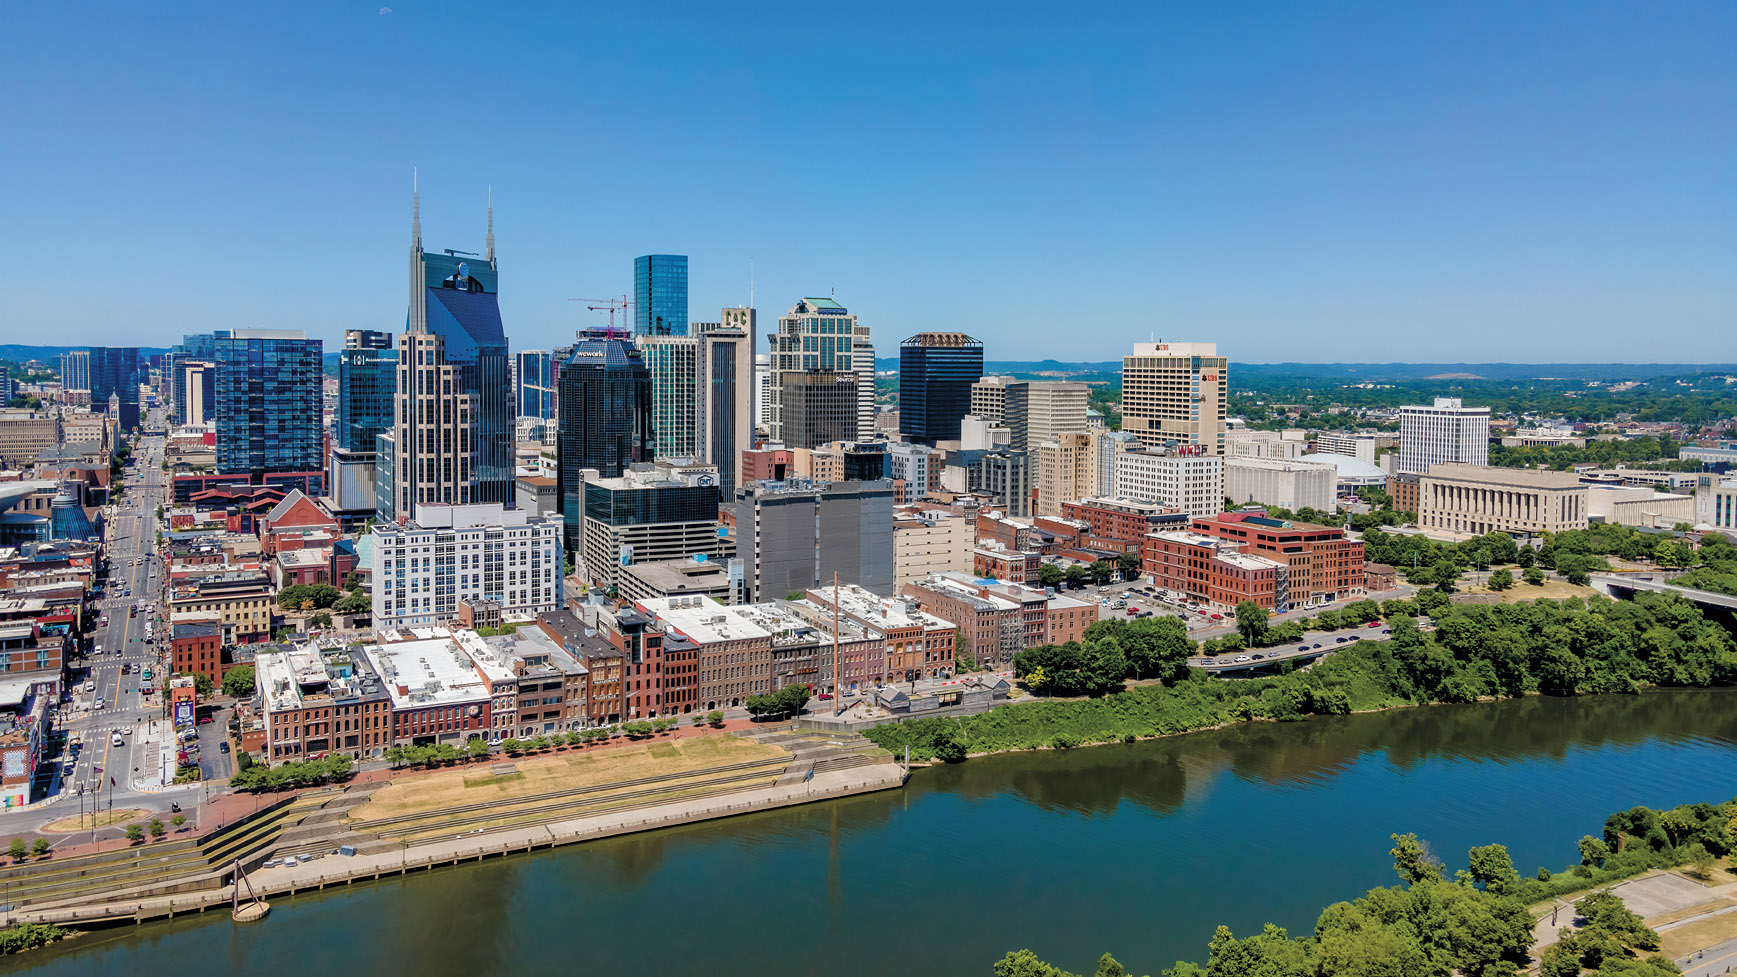
Figure 6.9 Position the center of interest outside the center of the photograph.
The Rule of Thirds and Composition
Photographers often consciously or unconsciously follow a guideline called the Rule of Thirds. It’s simply a way of dividing your picture horizontally and vertically into thirds. An excellent place to position important subject matter is often at one of the points located one-third of the way from the top or bottom and sides of the frame. The Mavic Air 2 and Air 2S each can overlay a Rule of Thirds grid over the frame using the Camera > Gridlines entry of the System Settings menu. (See Figure 6.10.)
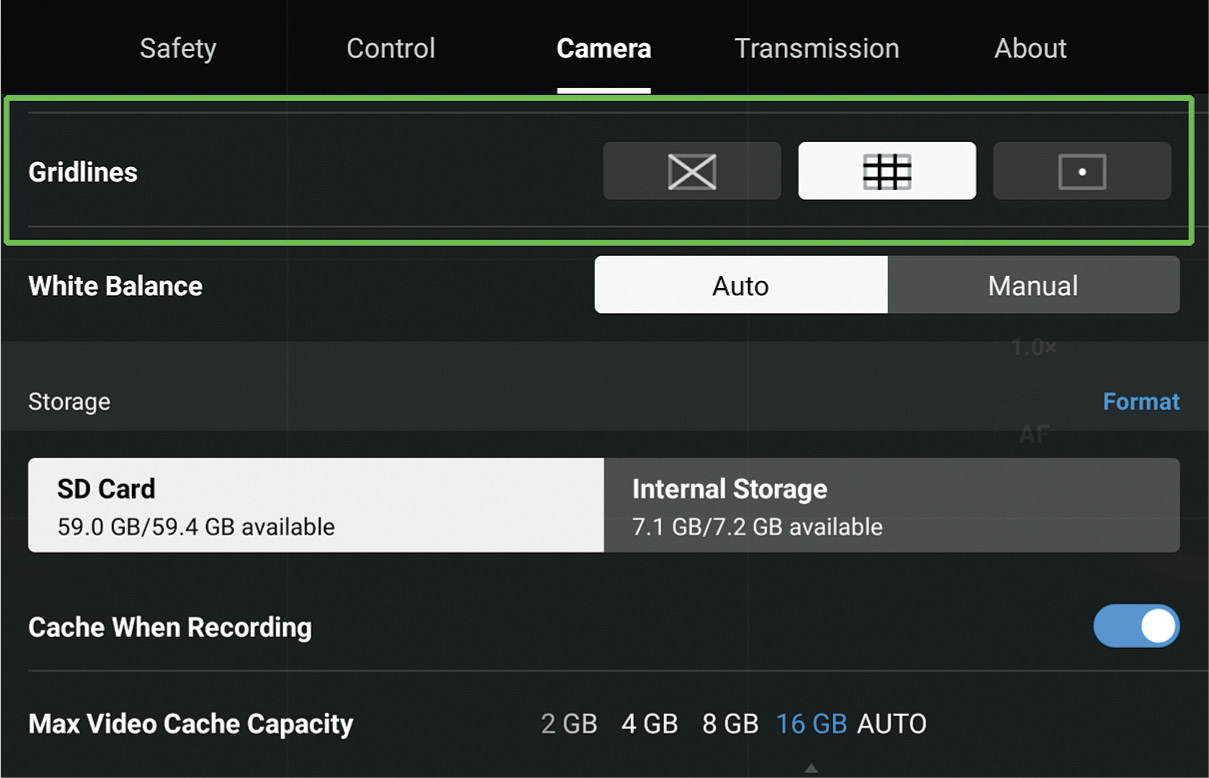
Figure 6.10 Activate an on-screen grid in the Systems Settings menu.
Typical grids are shown for the Air 2 (Figure 6.11) and Air 2S (Figure 6.12). Note that their proportions are different, because the two aircraft use different aspect ratios for still photos. Use these guidelines to compose your pictures effectively using the Rule of Thirds:
- ■Divide the frame into thirds horizontally and vertically. Use the Mavic’s built-in grid as an aid. Above all, you want to avoid having your subject matter centered. By visualizing the frame in thirds, you automatically begin thinking of those ideal, off-center positions.
- ■Use intersections. Try to have important objects, particularly your center of interest, at one of the four intersections of the imaginary lines that divide the picture.
- ■Be aware of edges. Avoid having objects at the edge of a picture unless the part that isn’t shown isn’t important. Subjects with distinct “front” and “rear” components should be facing into the frame, rather than out it.
- ■Portray motion. Placing the subject at one of the intersection points implies motion or direction. A subject in the center is static and may appear motionless.
- ■Use with other aspect ratios, too. Don’t get locked into the 4:3 and 3:2 default aspect ratios of the Air 2 and Air 2S. You can use the Rule of Thirds with images shot using panorama or 16:9 proportions, too.
Often, you’ll want to break the Rule of Thirds. There are almost as many exceptions to the rule as there are good reasons to apply it, which is why the rule should be considered only a guideline. Think of the Rule of Thirds as a lane marker on a highway. Sometimes you want to stay within the markers; other times, like when you see an obstruction in the road, you want to wander outside the lines. (If you happen to move from the United States to the United Kingdom, you’ll find that it’s wise to swap sides and use the lane markers on the opposite side of the road.)
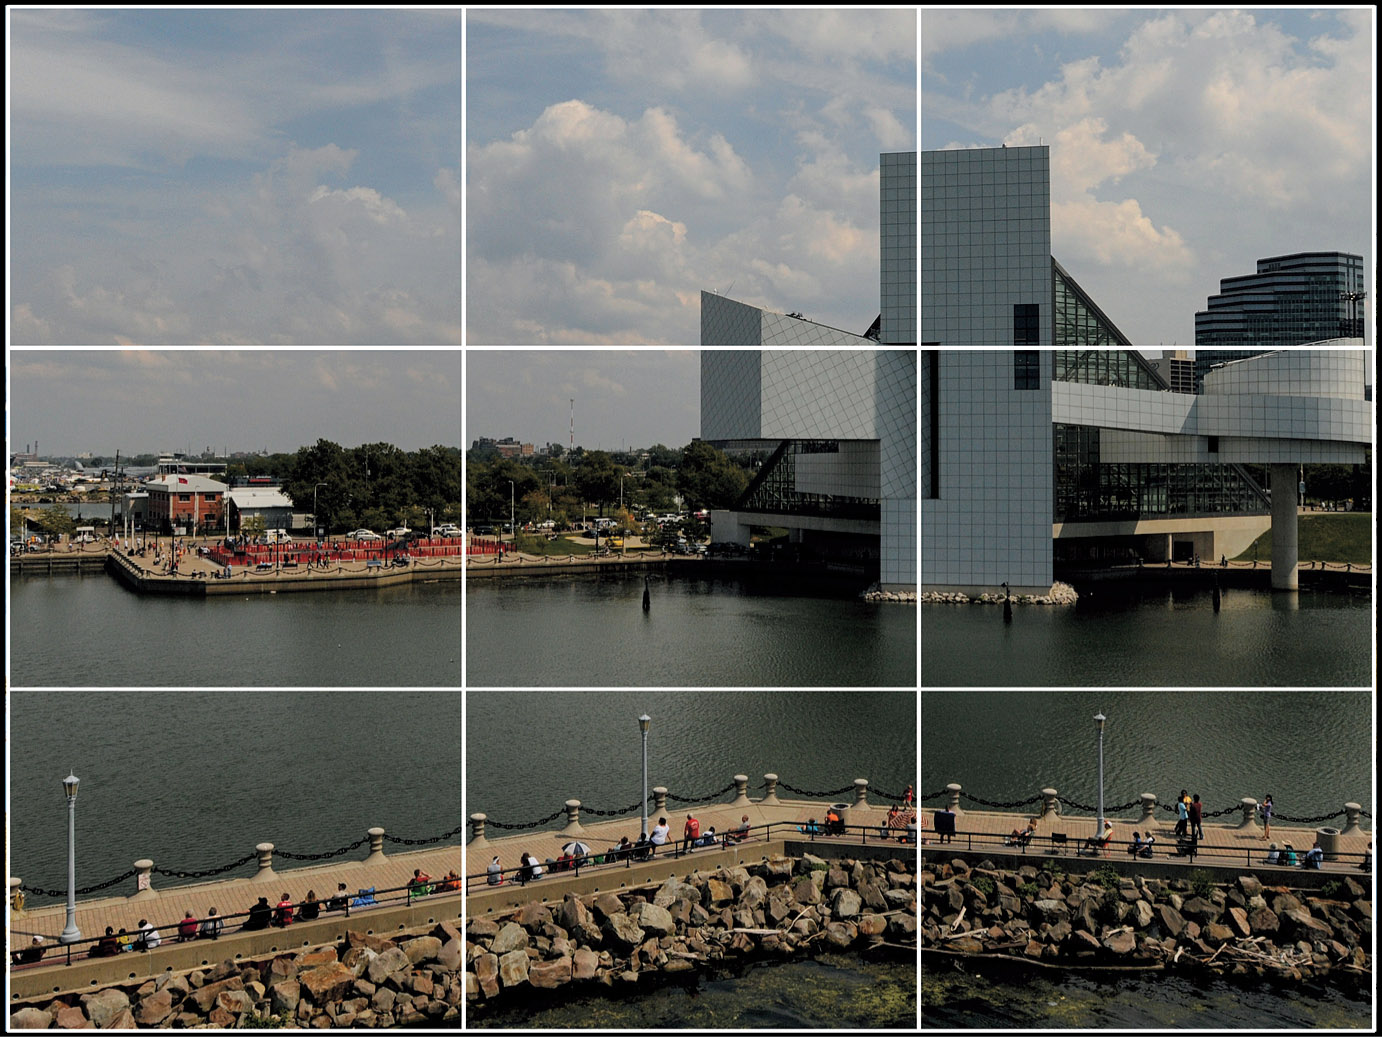
Figure 6.11 Rule of Thirds grid for the Mavic Air 2.
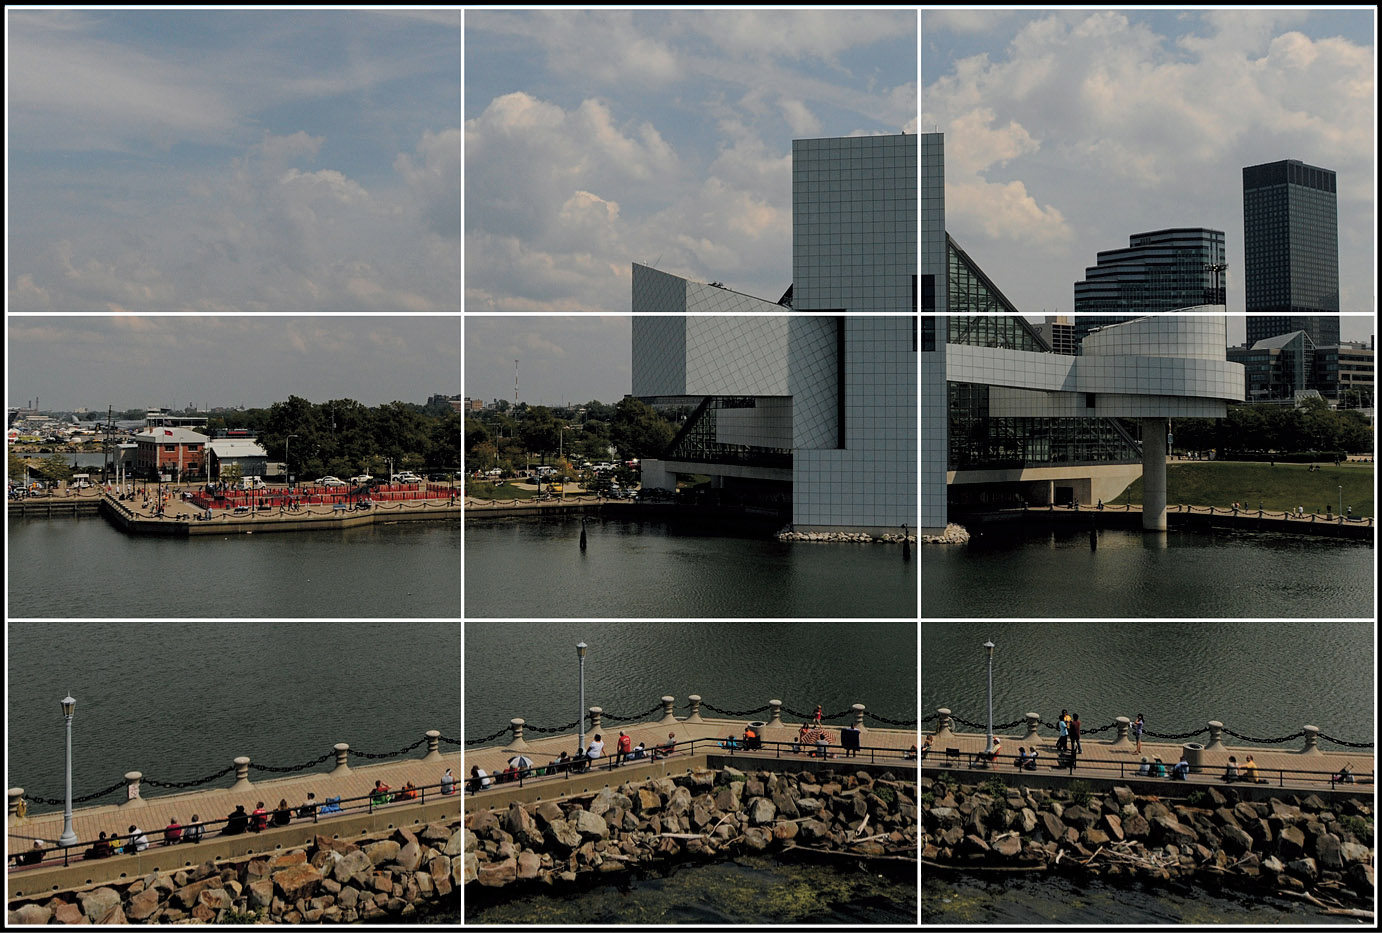
Figure 6.12 Rule of Thirds grid for the Mavic Air 2S.
You might want to ignore the handy Rule of Thirds when:
- ■Subjects are large. Your main subject matter is too large to fit comfortably at one of the imaginary intersection points. You might find that positioning an object at the “correct” location crops it at the top, bottom, or side. Move it a bit to another point in your composition if you need to see the whole thing.
- ■Convey an idea. Centering the image would help illustrate a concept. Perhaps you want to show your subject surrounded on all sides by adversity or by a threatening environment. Say you’re photographing an area that has been devastated by a forest fire. A clump of trees that survived the fire, perhaps with a human dwelling in its midst, surrounded by scorched stumps can deliver a powerful message.
- ■Isolate a subject. As I noted, placing the subject at one of the intersecting lines intersection points can mean movement, as if the subject were about to flee the picture entirely. However, putting the center of interest in the middle of the picture gives the subject nowhere to go, nowhere to hide.
- ■Show symmetry. Centering a symmetrically oriented subject that’s located in a symmetrically oriented background can produce a harmonious, geometric pattern that is pleasing, even if it is a bit static.
Incorporating Movement and Passage of Time
While video easily portrays movement and the passage of time, still photography must use other techniques to capture these changes. A still image can embody a feeling of motion through visual cues, while the passage of time can be represented by a series of shots taken at different moments that highlight the differences that have taken place between the first and last photos. The progression of the seasons throughout the year, or a collection of shots documenting a construction project are among the most common examples.
Motion and Direction
A photo composition creates an entire world for the viewer to explore. You don’t want to destroy the illusion by calling attention to the rest of the universe outside the frame, or, even, something as mundane as the parking lot adjacent to the football field shown earlier. Here’s how to orient your subjects in a picture:
- ■Point of view. If your subjects are people, animals, statues, or anything that you think of as having a point of view, make sure they are either facing the camera or facing into the frame rather than out of it. If the people in your image, whether individuals or a crowd, seem to be looking out of a picture, rather than somewhere within it, viewers will spend more time wondering what they are looking at than examining the actual scene. Your subjects don’t actually have to be fixated on any object in particular, as long as they are looking somewhere within the picture.
- ■Sense of direction. A windmill, a palm tree bent over by a strong wind, stationary automobile, or anything with a sense of direction, such as the boat shown in Figure 6.13, should be facing into the frame for the same reason that a person should be looking into it. That’s why the image at top in the figure looks “wrong.” Even though the boat is at anchor, it looks more natural pointed into the frame, as in the version at bottom in the figure.
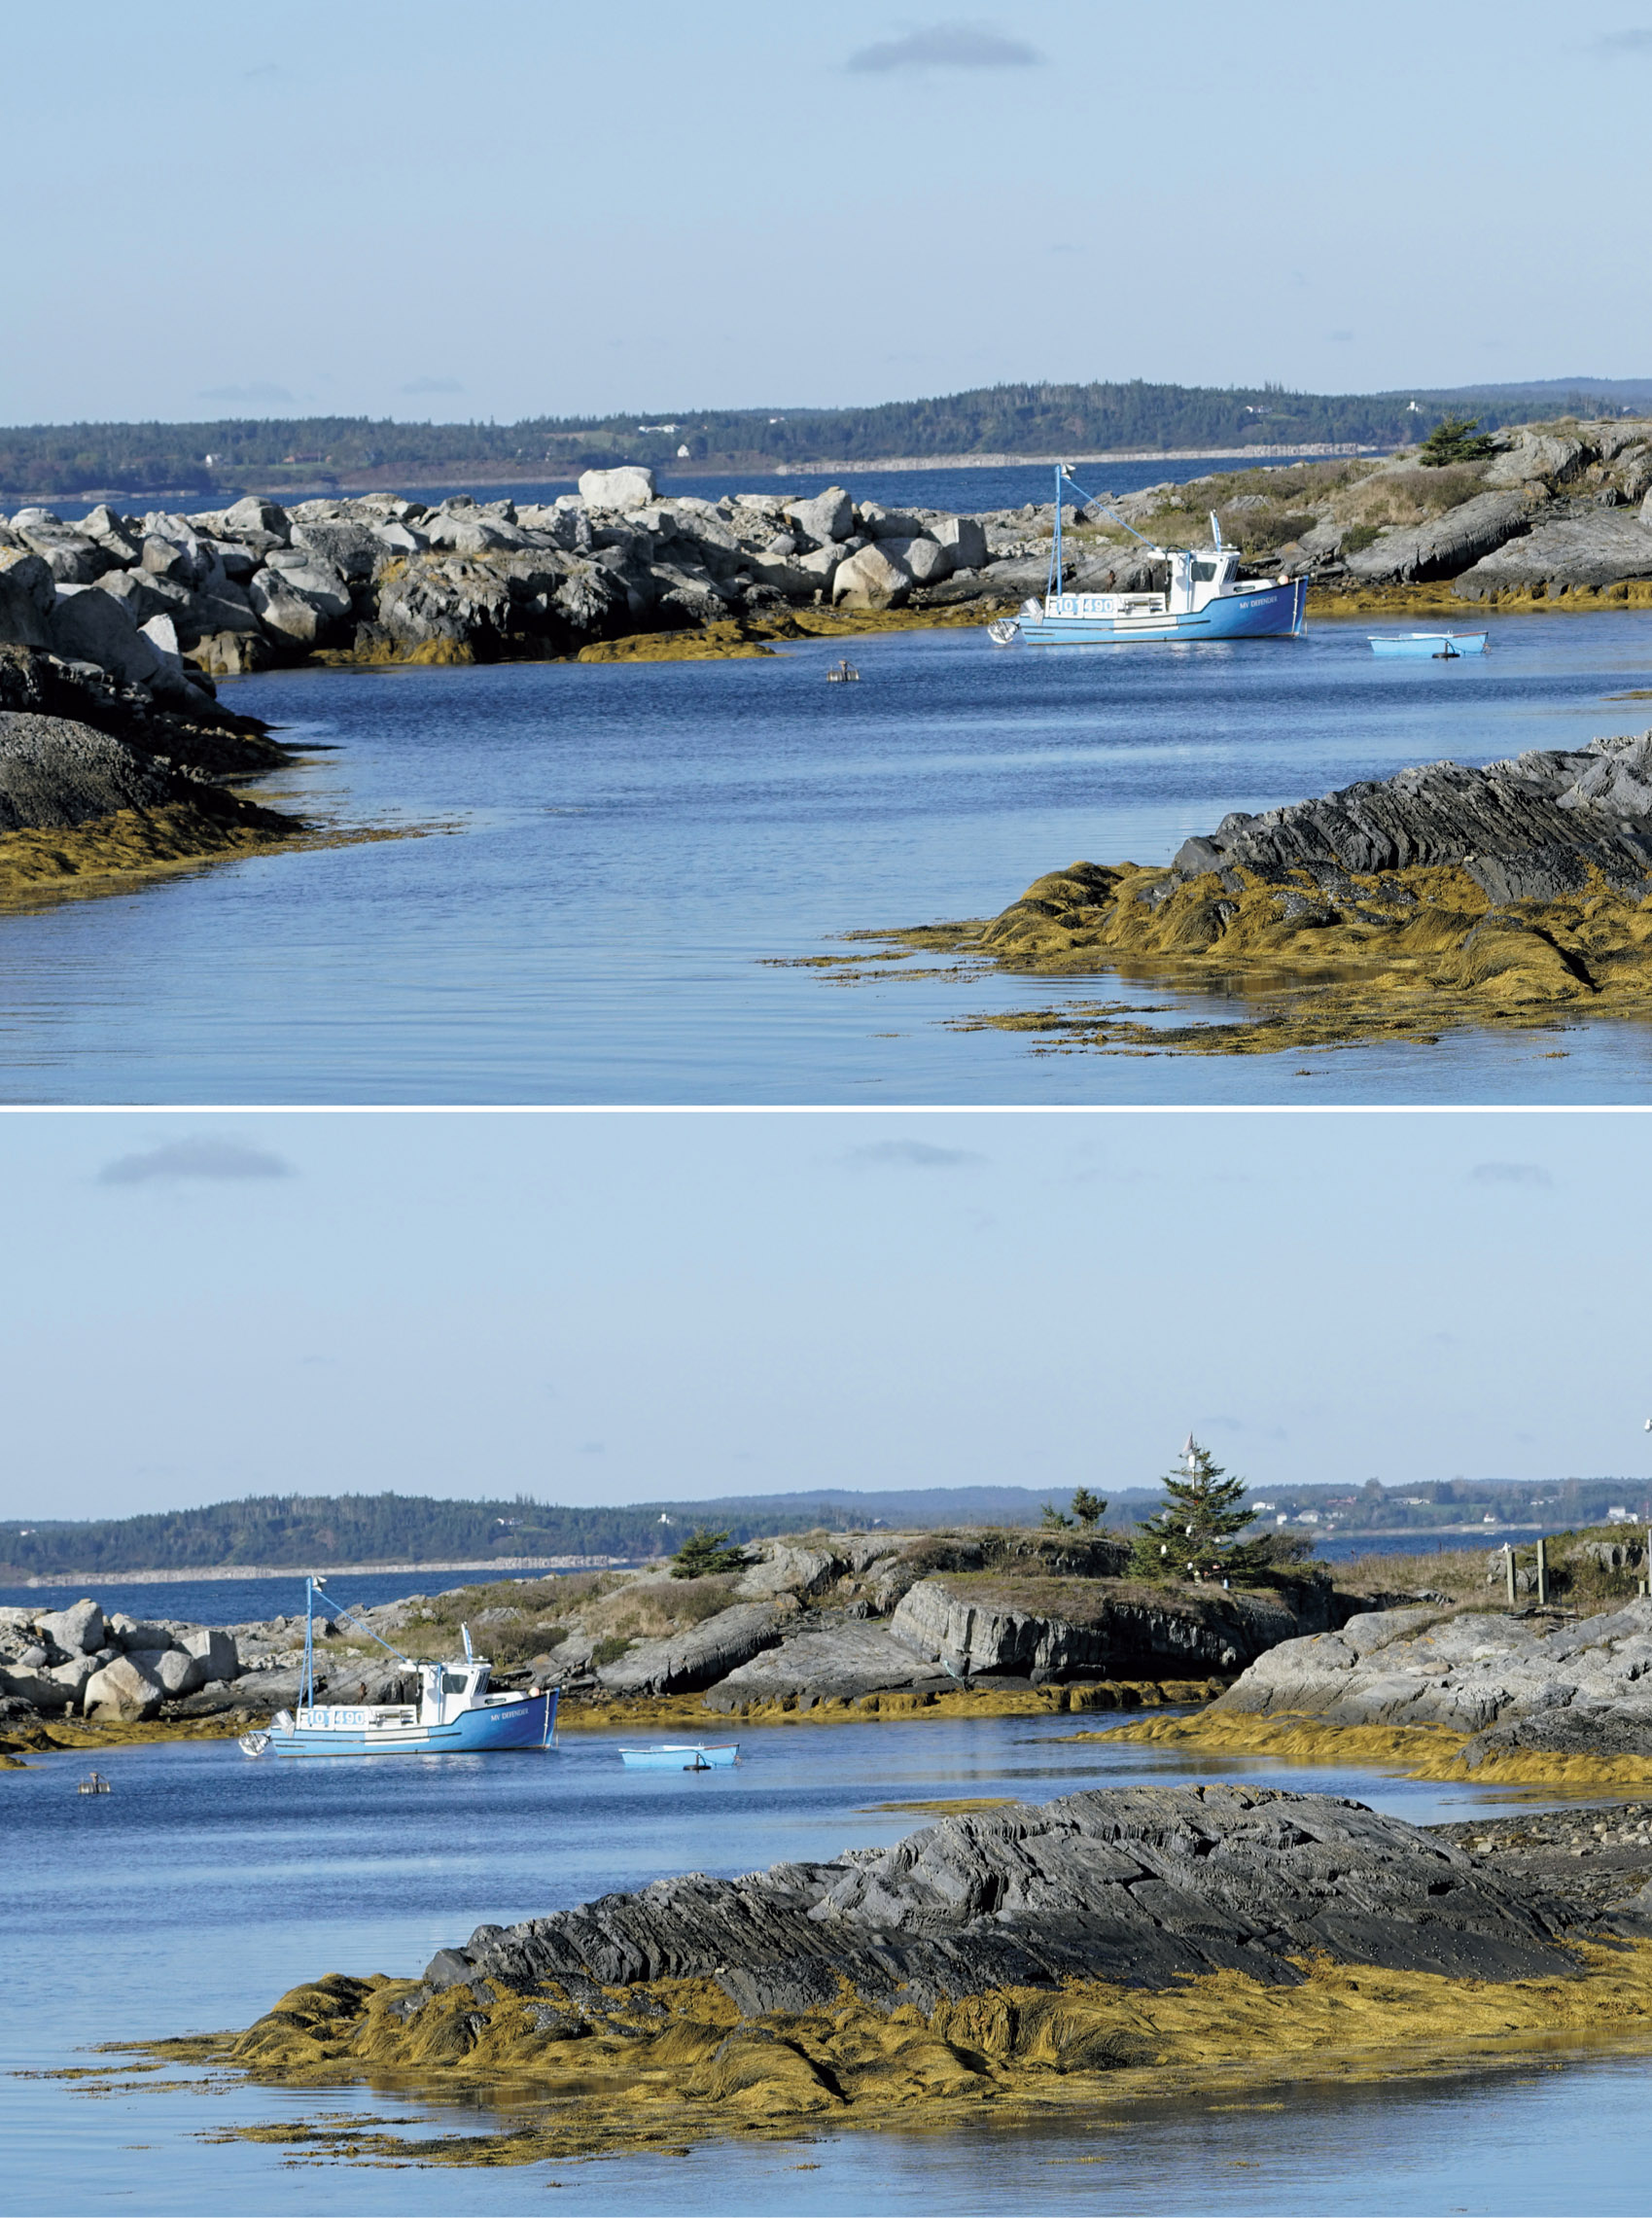
Figure 6.13 Objects should appear to be pointing into the frame.
- ■Movement. If objects in the frame are moving or pointed in a particular direction, make sure they are heading into the frame rather than out of it. Add extra space in front of any fast-moving object so that the object has somewhere to go while remaining in the frame, and it doesn’t give the impression that it’s on its way out of view.
- Your cropping can actually create an artificial feeling of speed. Compare the top and bottom versions of the image shown in Figure 6.14. Both include enough space in front of the boat to form acceptable compositions. However, in the lower version the craft actually seems to be moving faster, because of the longer wake stretching out behind it.
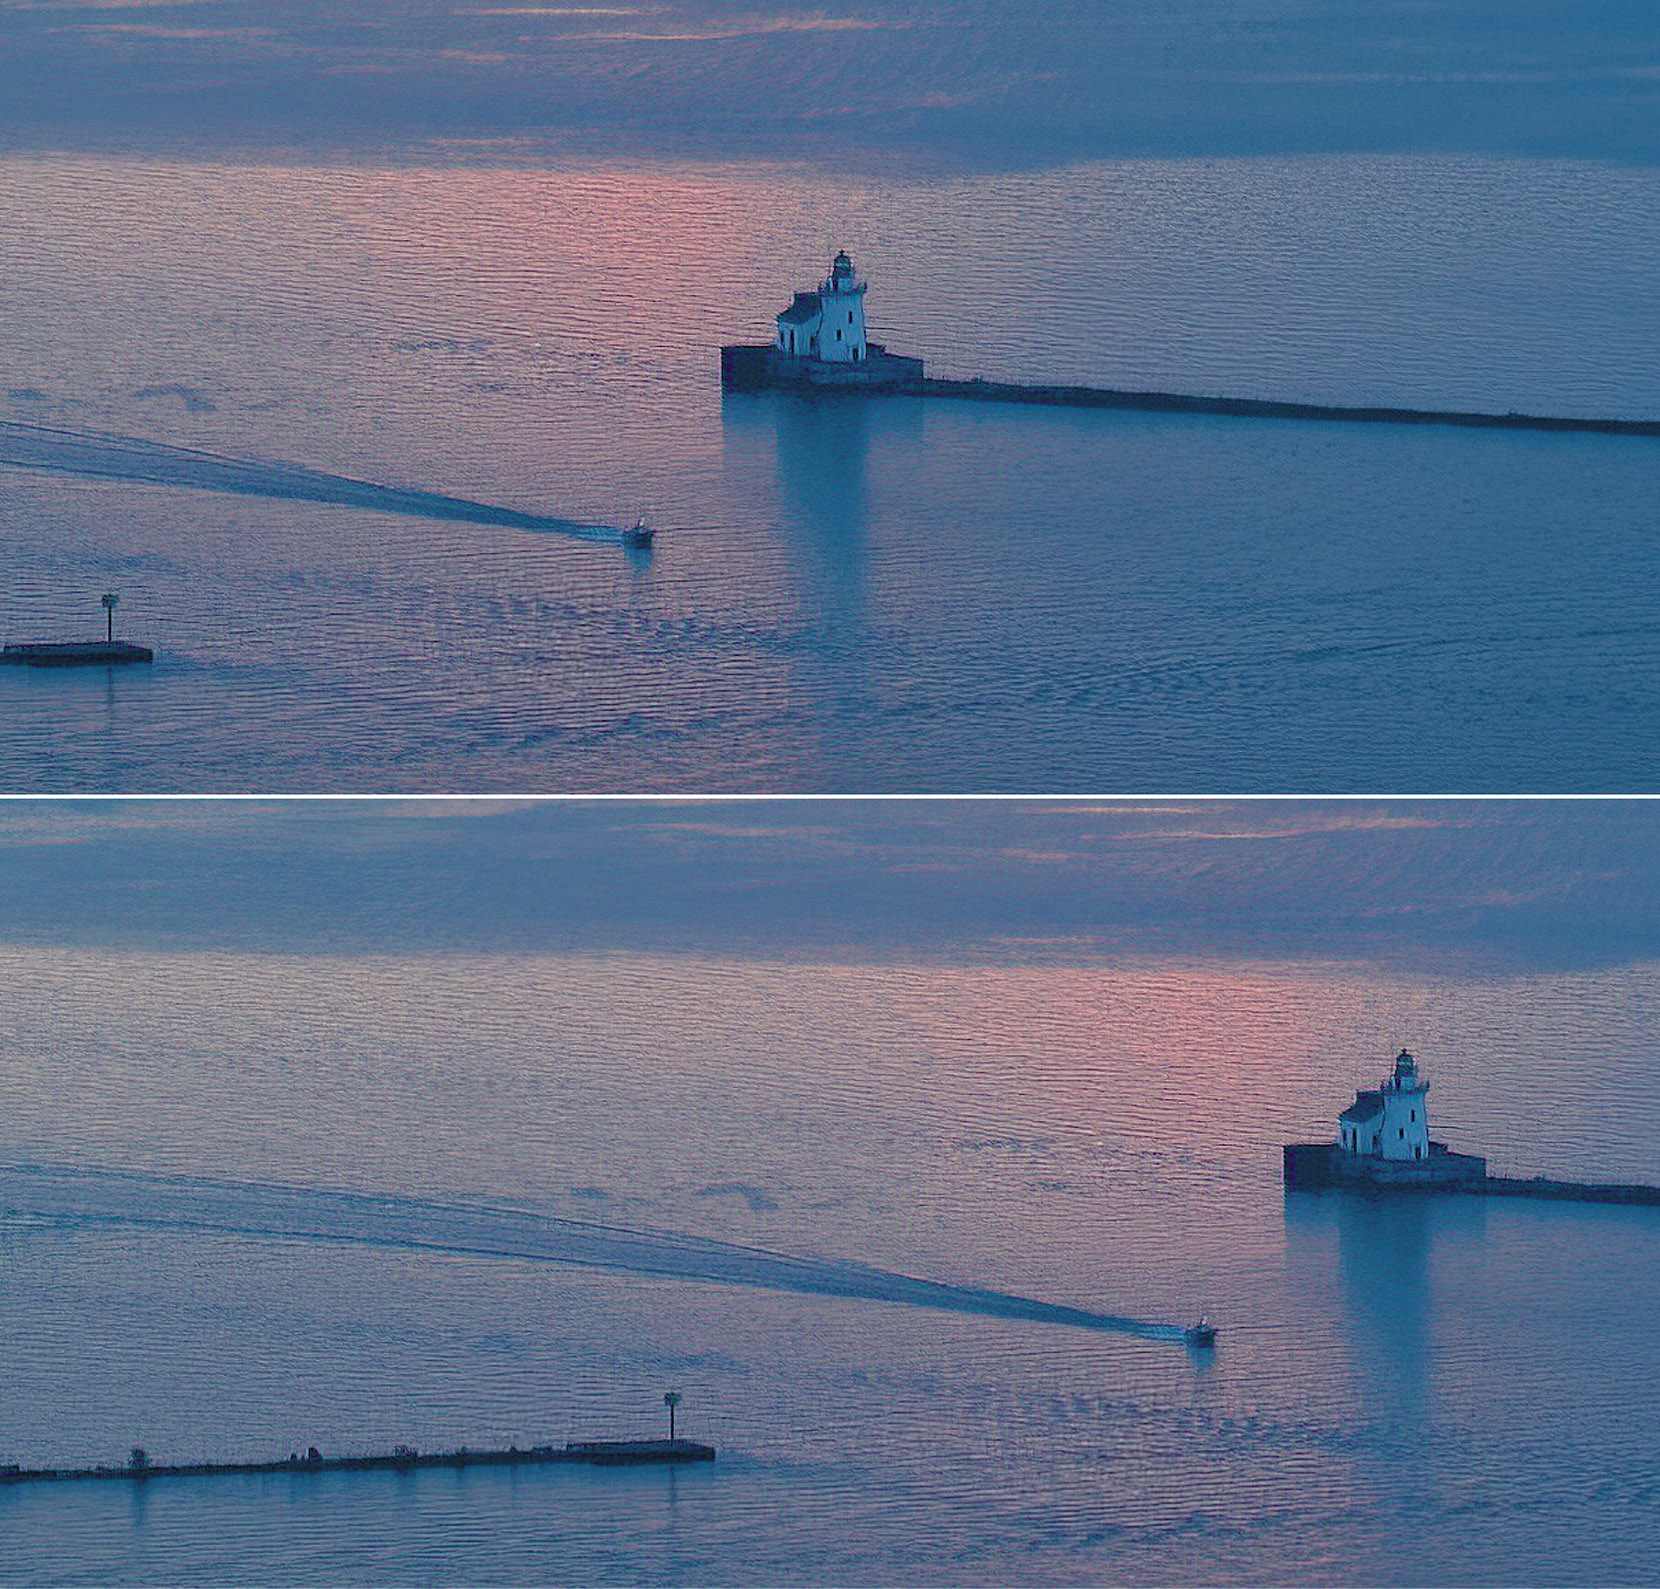
Figure 6.14 Cropping can add an artificial feeling of rapid motion.
Passage of Time
Still images can be used to illustrate the passage of time through the capture of multiple images. The Photo modes of the Mavic Air 2 and Air 2S include Burst and Timed shot modes, which each provide you with a series of images you can use to illustrate different moments in time. Here’s the difference:
- ■Burst mode. The drone will capture multiple images, one after another, as a series of stills. You can choose bursts of 3, 5, or 7 images at resolutions of 12MP (Air 2) and 20MP (Air 2S). You’ll find this facility useful when you want to grab a sequence of images of some action that is happening fairly rapidly, say, when shooting overhead coverage of motor sports. (I’m assuming you are following all the rules, such as not hovering over people or flying in any restricted air spaces.)
- ■Timed Shots. This mode provides a type of interval photography, with the individual images captured automatically over a specified time at a desired interval. With both Mavics you can choose to take these sequences using intervals of 2, 3, 5, 7, 10, 15, 30, or 60 seconds.
In addition to these automatic modes, you can also shoot sequences at even longer intervals. In fact, if you have the patience and motivation, you can take individual photos from approximately the same location at intervals of days, weeks, or months. One project I’ve started is to take photos at different times of the year, creating a series of landscape images that show the same scene in spring, summer, fall, and winter. So far, I’ve captured summer and fall images, and will complete the sequence next year with winter and spring images.
Construction sites make interesting subjects for shots captured manually to document the work. They can move at a snail’s pace for large structures, or quite quickly in the case of home construction. Figure 6.15 shows a series of images I shot of a house being built, illustrating the builder’s progress from laying the foundation (at upper left) to completion of roofing (at lower right), over the course of several months.
Here are some tips for getting an interesting set of construction progress images:
- ■Consistent viewpoint. It’s likely you’ll want a set of images taken from the same perspective so you can easily compare the progress of the construction. That can be tricky, and require some planning. It helps if you always take off from the exact same spot. Ascend straight up, and make a record of your altitude, heading, and degree of gimbal tilt so you can more or less repeat that perspective at a later date. (See Figure 6.16.)
- ■Appropriate time of day. Sunny weather at midday will provide the best contrast, with shadows helping to make the details of the construction clearly visible. Avoid early morning and late afternoon shots, as long shadows can be distracting. However, the weather may not cooperate, which was the case with my home construction series. At times, there were no sunny days at critical points in the construction, so some of my images have less contrast.
- ■Shoot various angles. Once you’ve captured your basic shot each time, go ahead and try different angles, using lower altitudes and/or positions to get a variety of views.
- ■Add video. Even if a series of still photos is your goal, as long as you’re already aloft at the construction site, shoot some video using your drone’s QuickShots feature, as described in Chapter 7. These clips will make a nice complement to the still images at some point.
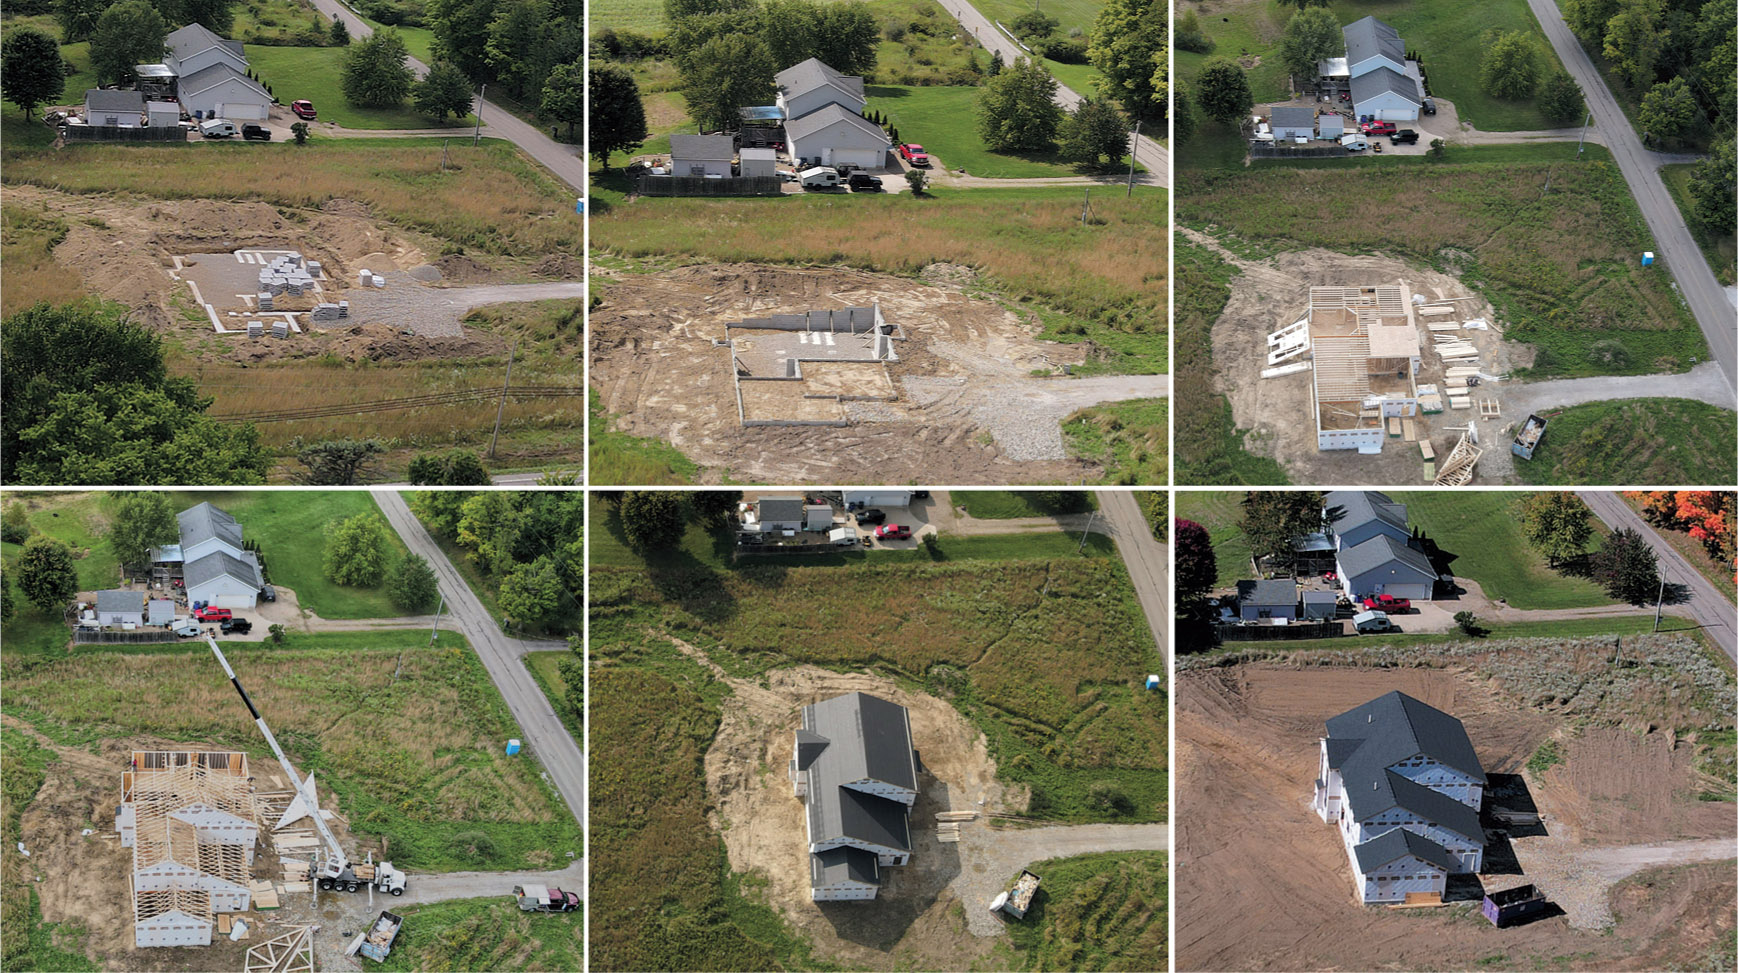
Figure 6.15 Construction progress shots.
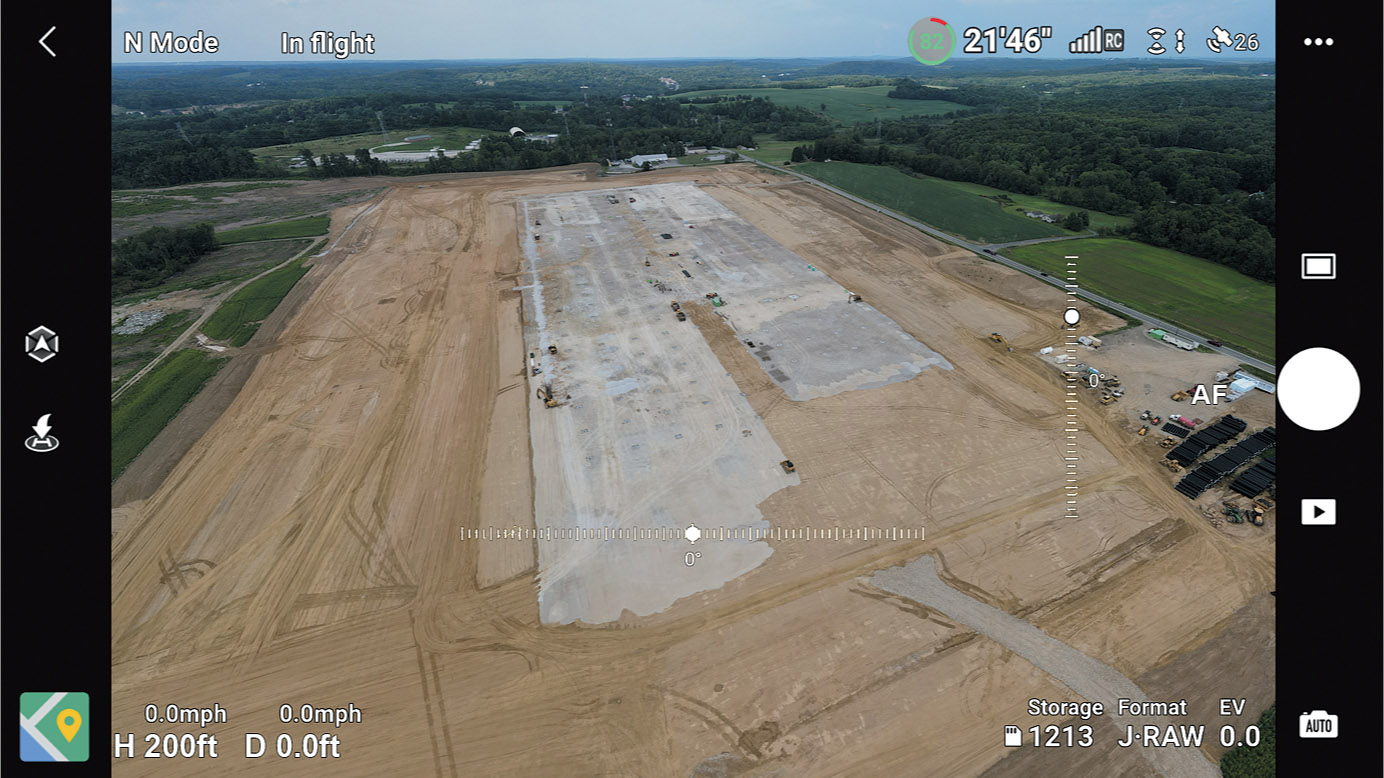
Figure 6.16 Take note of your flight’s altitude, gimbal setting, and heading so you can repeat them.
Time-Lapse Movies
Humans have been capturing still photos as documentation for ages. Combining all those stills into time-lapse movies is relatively new. They are nothing more than a series of still photo images taken at specific intervals and then displayed continuously as a motion picture that shows in a few seconds or minutes of action that actually takes place over the course of hours, days, or months. Invented in the early 1950s by John Ott, the technique caught the public eye when he used it for a sequence in an Academy Award-winning nature film by Walt Disney. A film documenting the building of Disneyland in California was probably the first use of time-lapse to picture construction progress. Your Mavic drone can automatically apply a version of this concept during a single flight with its Hyperlapse feature, which I’ll describe in Chapter 7.
Using Straight Lines and Curves
After you have the basics out of the way, progressing to the next level and creating even better compositions is easy. All you need to know is when to apply or break some simple rules. Just remember that one of the key elements of good composition is a bit of surprise. Viewers like to see subjects arranged in interesting ways rather than lined up in a row.
Lines within your image can help your compositions by directing the eye toward the center of interest. The lines don’t have to be explicit; subtle shapes can work just as well. Try these techniques:
- ■Leading lines. Look for lines in your image and try to use them to lead the eye to the main subject area. Some lines are obvious, such as roads, fences, or a seashore leading off into the distance. These kinds of lines are good when you want a dramatic composition.
- ■Diagonals. Find diagonal lines to direct the attention to the center of interest. Diagonal lines are better than horizontal or vertical straight lines, which are static and not particularly interesting. Figure 6.17 features the diagonal line of the Smolen-Gulf Bridge over the Ashtabula River in Ohio, at 613 feet, the longest covered bridge in the United States and the fourth-longest covered bridge in the world.
- I needed to fly at an altitude of 100 feet to capture the full length of the bridge, so I ended up with a typical aerial shot. The strong diagonal line did add some interest.
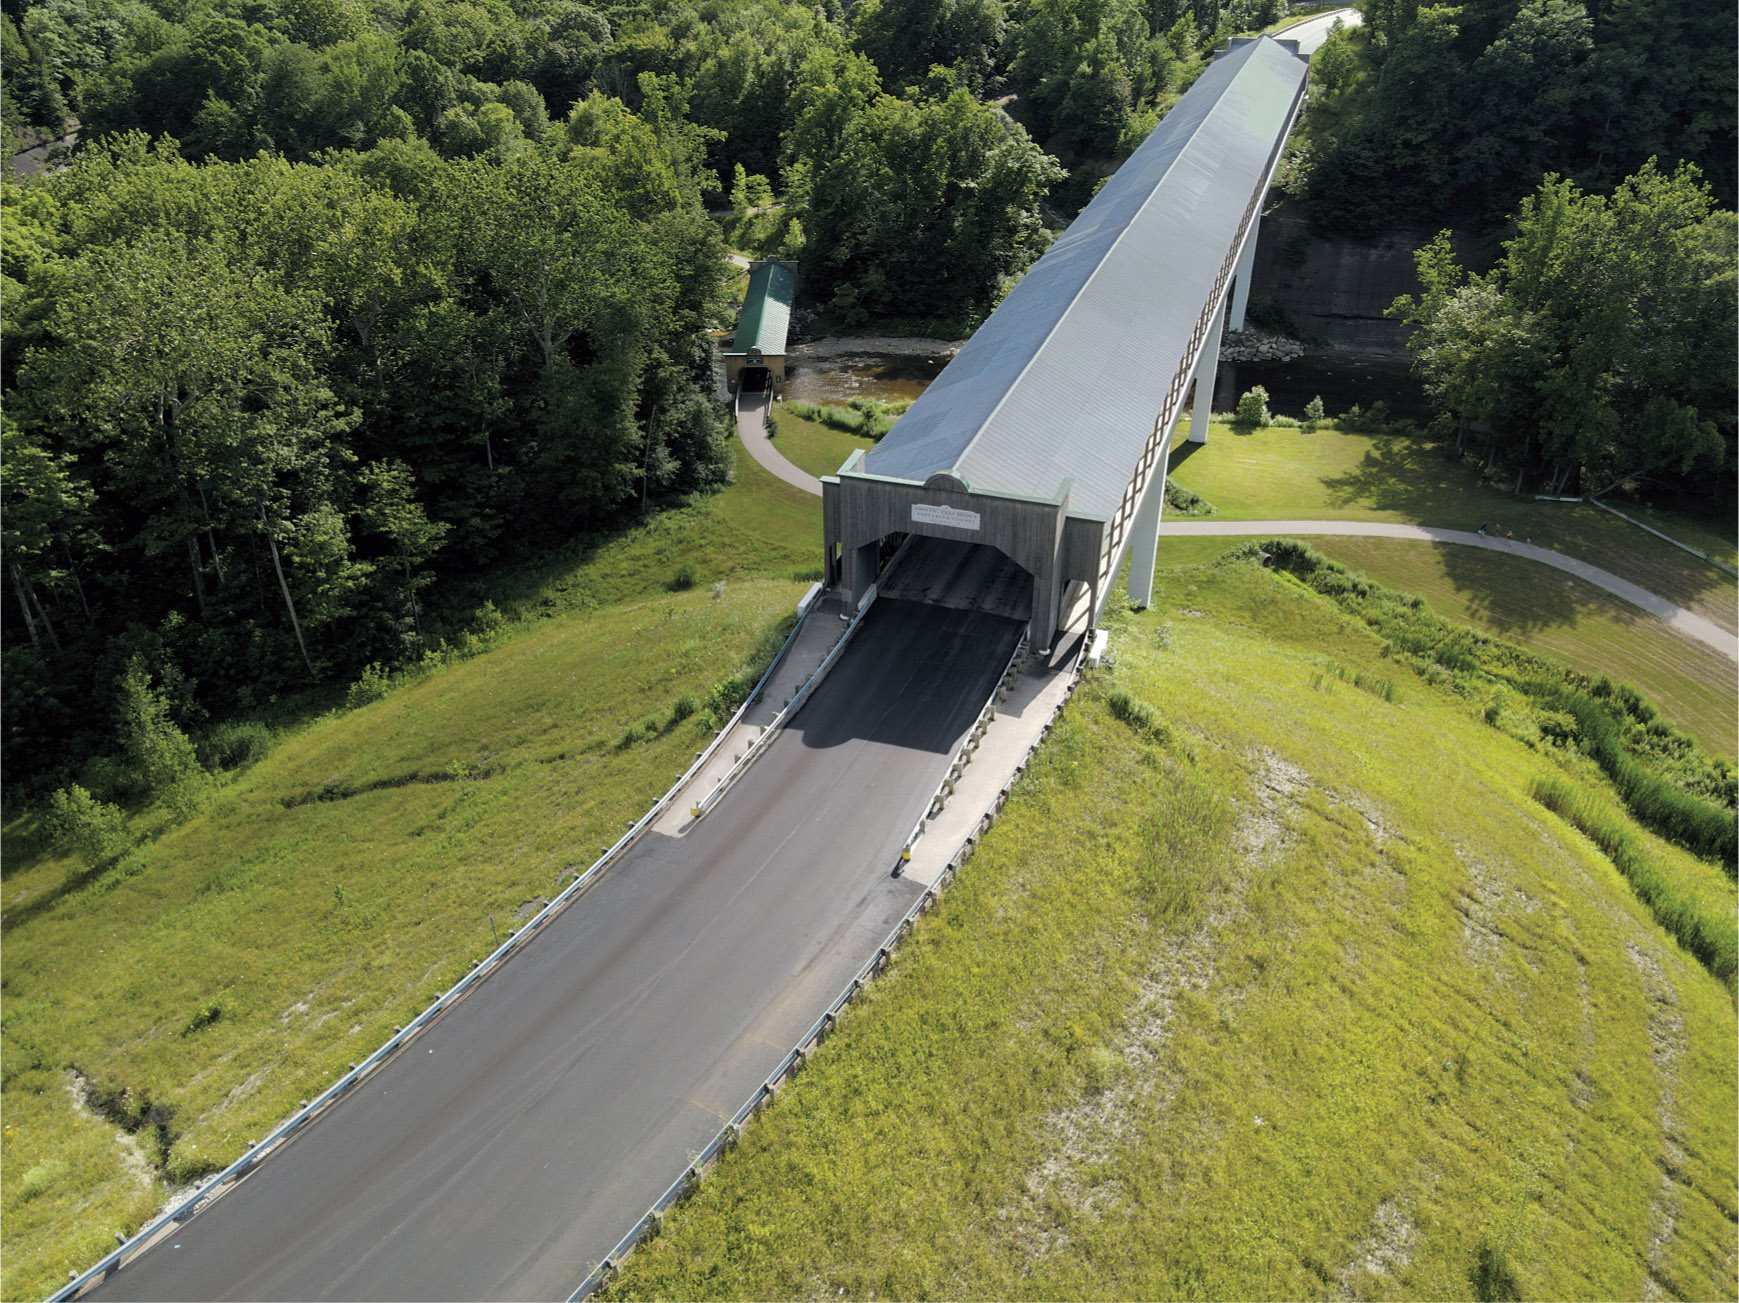
Figure 6.17 Diagonal lines can be more interesting than horizontal or vertical lines.
- ■Curves. Curved lines, which are more graceful than straight lines, can lead the viewer gently from one portion of the composition to another. Curving roads are a good example of arcs and bends that can contribute to a composition. Figure 6.18 shows the same Smolen-Gulf bridge a few hours later from an altitude of just 25 feet. The reduced elevation and curve of the road provides a much improved composition.
- ■Use repetitive lines or shapes to create an interesting pattern. Repetitive lines or shapes could be multiple lines within a single object, such as the grout lines in a brick wall. Repetitive lines could also be several different parallel or converging objects, such as a road’s edges, the centerline of the road, and the fence that runs along the road.
- Figure 6.19 is Cleveland photographer Kolman Rosenberg’s shot of the aftermath of a sandcastle-building competition. A week after the contest, only sad lumps of flattened sand remains at lower right in the photo, with a few of the larger sculptures retaining their shape. The lines of the canvas walking path and sole human walking past add interest. The patterns formed by strong repetitive lines and shapes can become a pleasing composition in themselves.
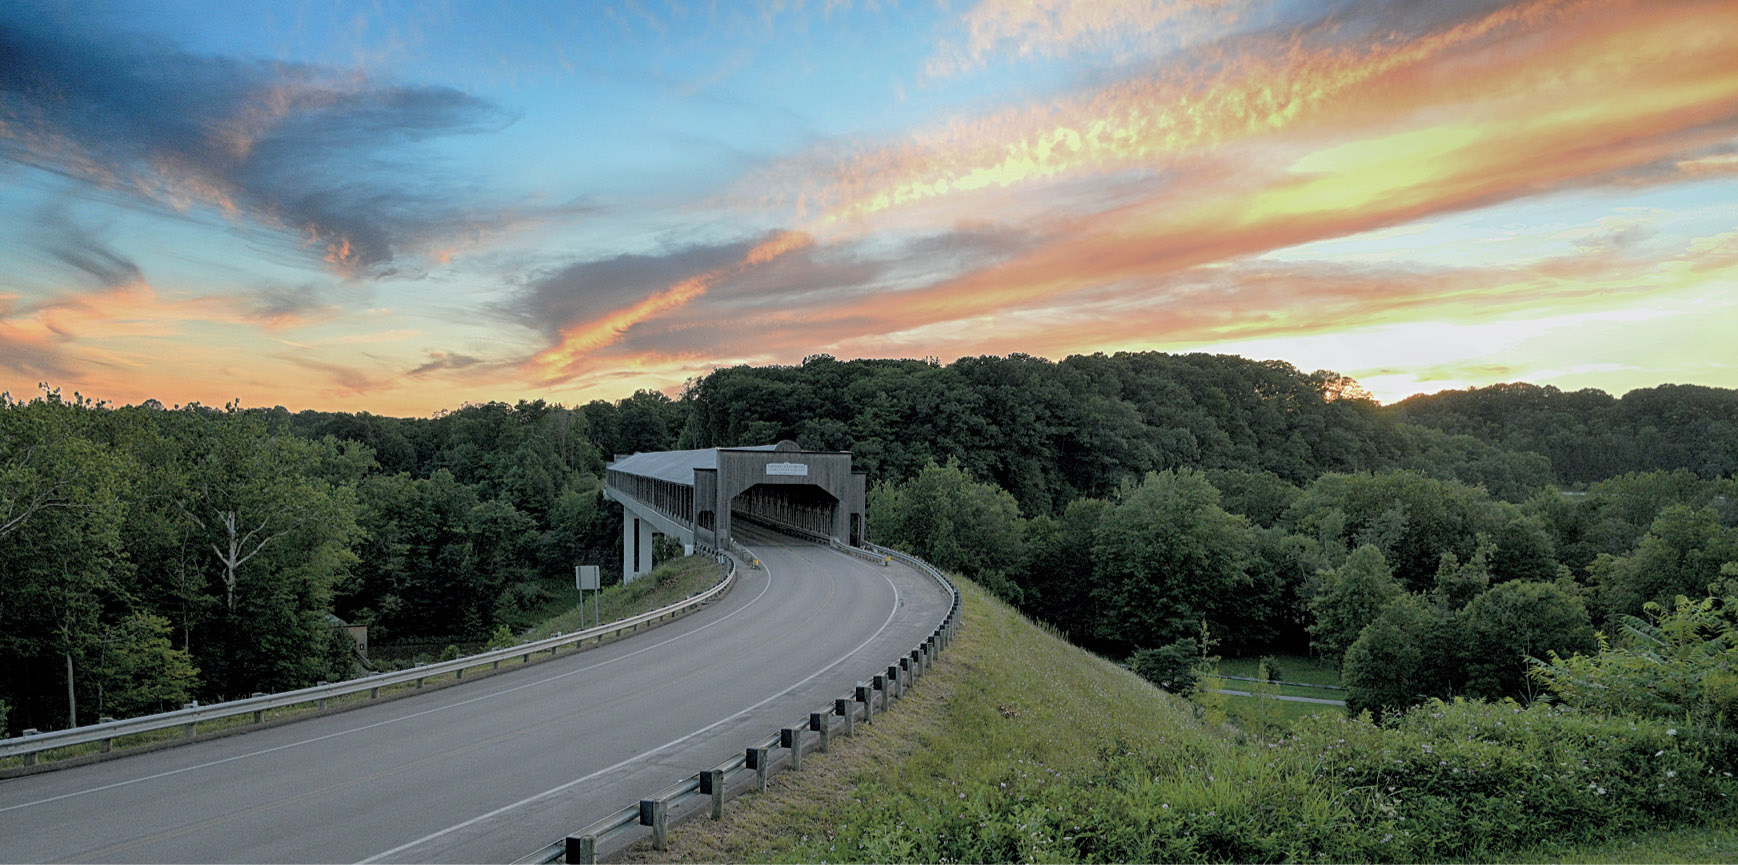
Figure 6.18 Curved lines are more graceful.
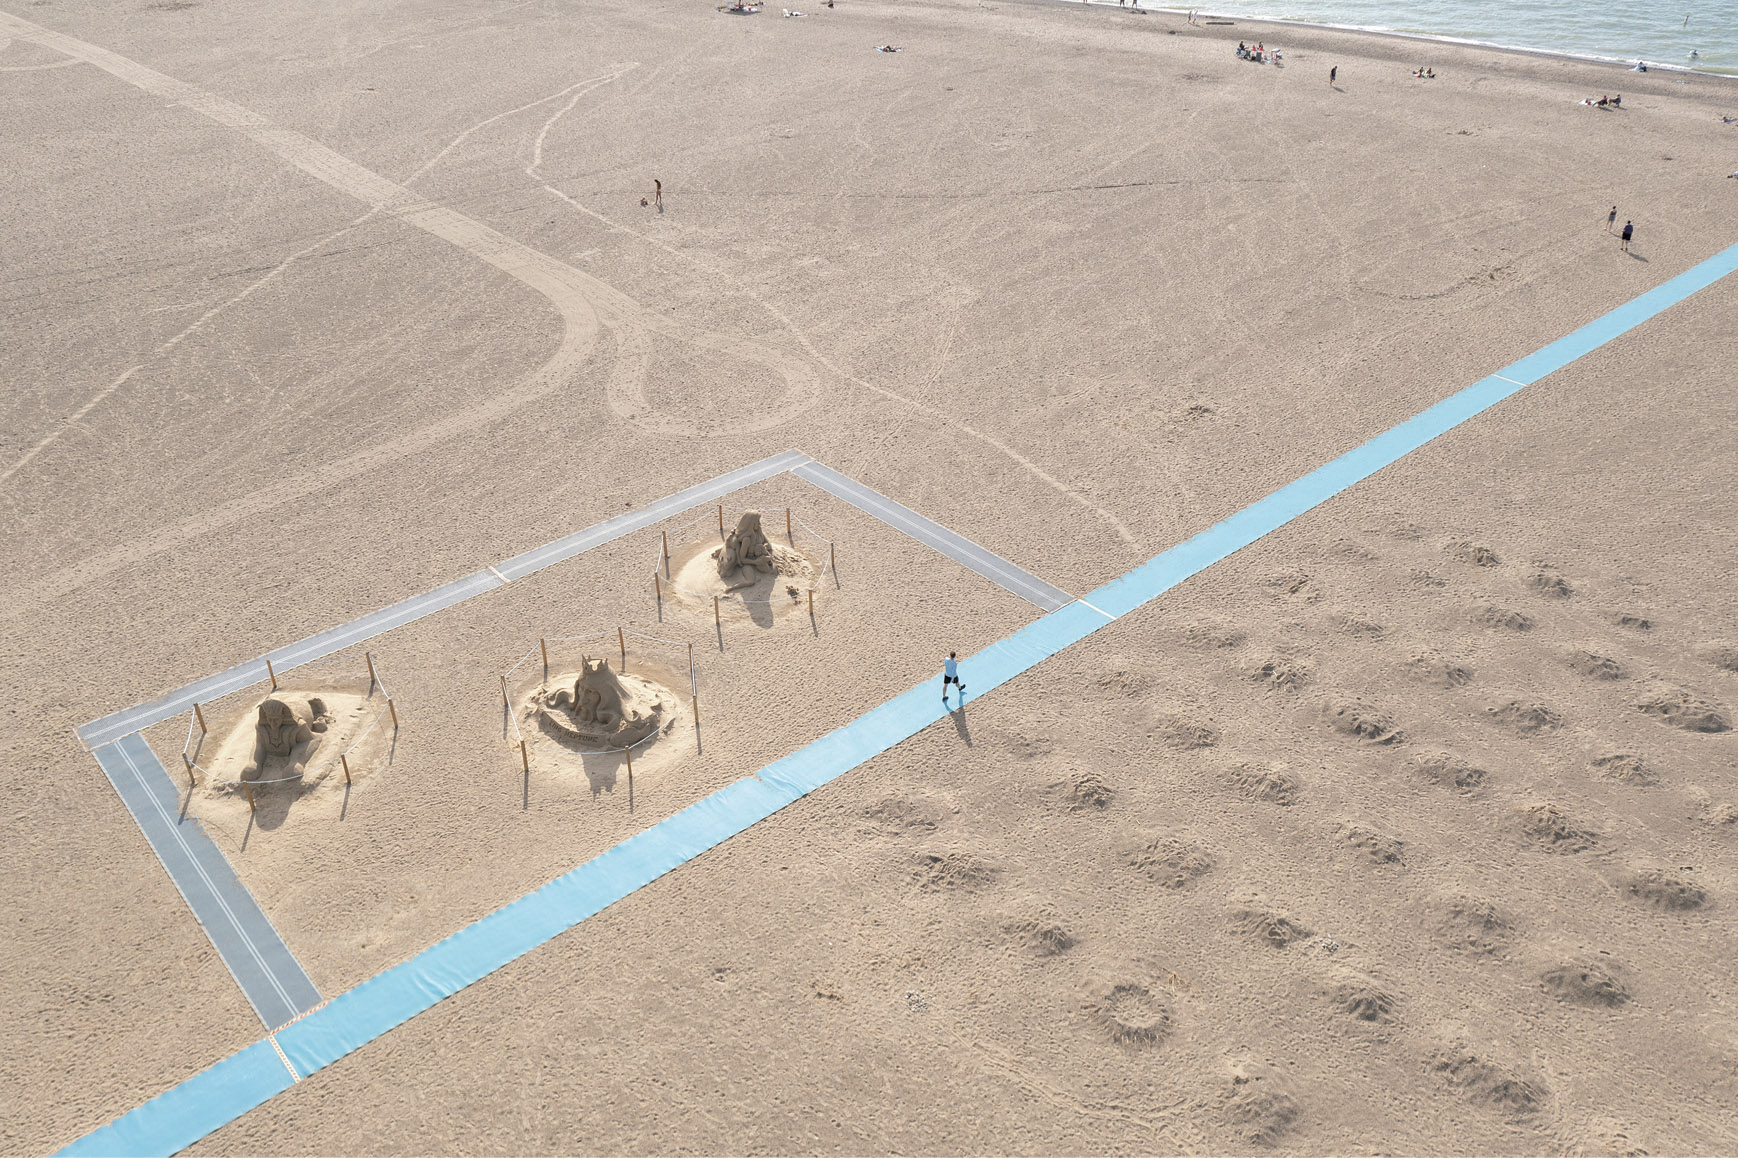
Figure 6.19 Using repetitive shapes.
Working with Shapes
Interesting shapes can attract the eye, too, as long as the shapes are dynamic. For example, three objects arranged in a triangle make a picture inherently more interesting than if the objects form a square shape. Your eye naturally follows the lines of the triangle toward each of the three points, or apexes, whereas squares or rectangles don’t point anywhere.
The next three figures show how you can approach a subject from different angles, so to speak. Figure 6.20 is an aerial panorama, using the Mavic’s 3328 × 8000-pixel vertical panorama mode, taken from an altitude of 70 feet. The vertical orientations provide an image slice that includes a healthy chunk of sky, a Great Lake, some breakwalls, and a spit of sand that’s punctuated by tire tracks that have carved out repetitive lines. The shapes combine to form an interesting composition.
I used “tall tripod” mode to shoot the image shown in Figure 6.21, taken at a height of just 11 feet. The curve of the beach and white-on-brown pattern of the gulls and sand was interesting. This particular flock had grown accustomed to ignoring my drone, which I kept at a safe distance. I do not recommend trying this at home. You don’t want to annoy them and set off an erratic retreat that could damage your drone or, much worse, injure a bird. For Figure 6.22, I moved the drone up to 25 feet, oriented so I could capture the triangular shape of the beach, the horizon, and the flock of gulls. I like this shot the best.
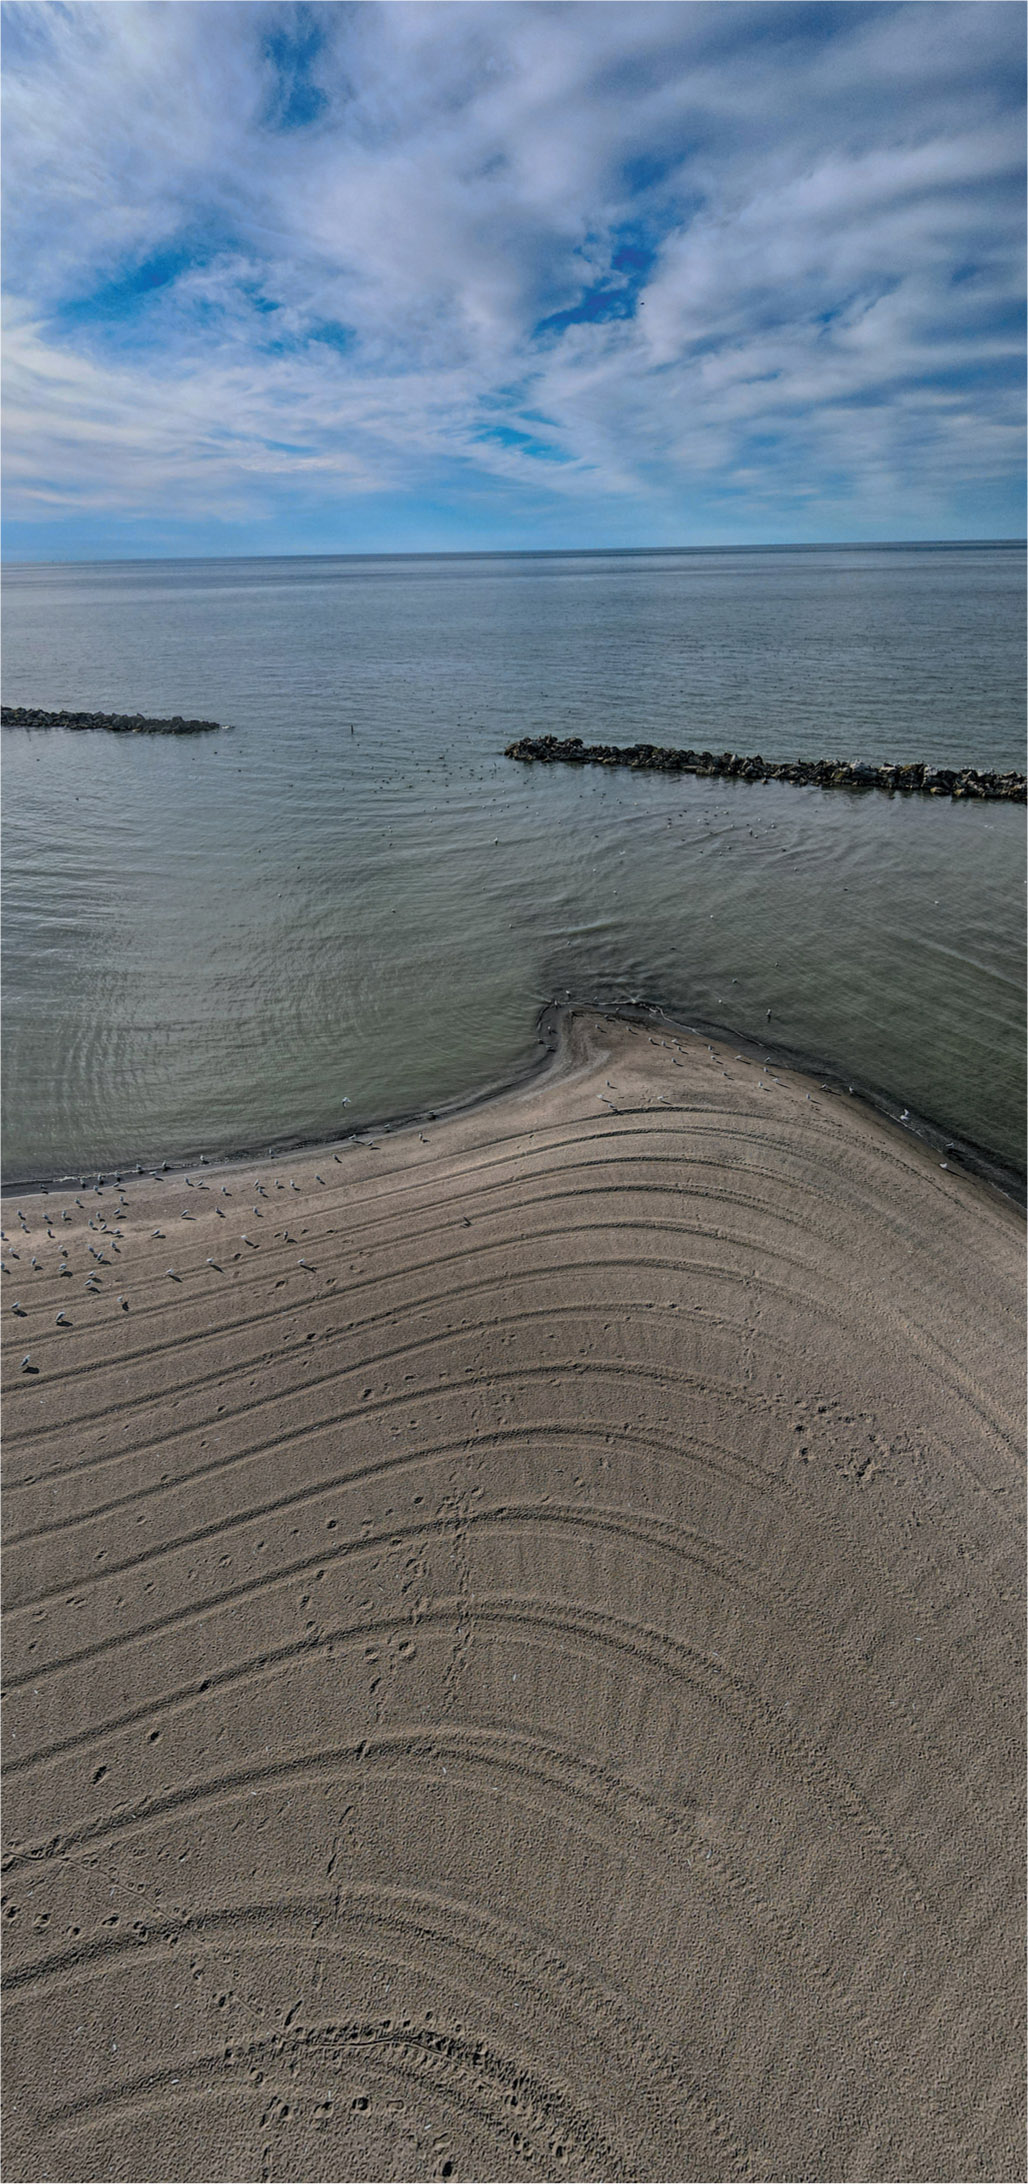
Figure 6.20 A vertical panorama.
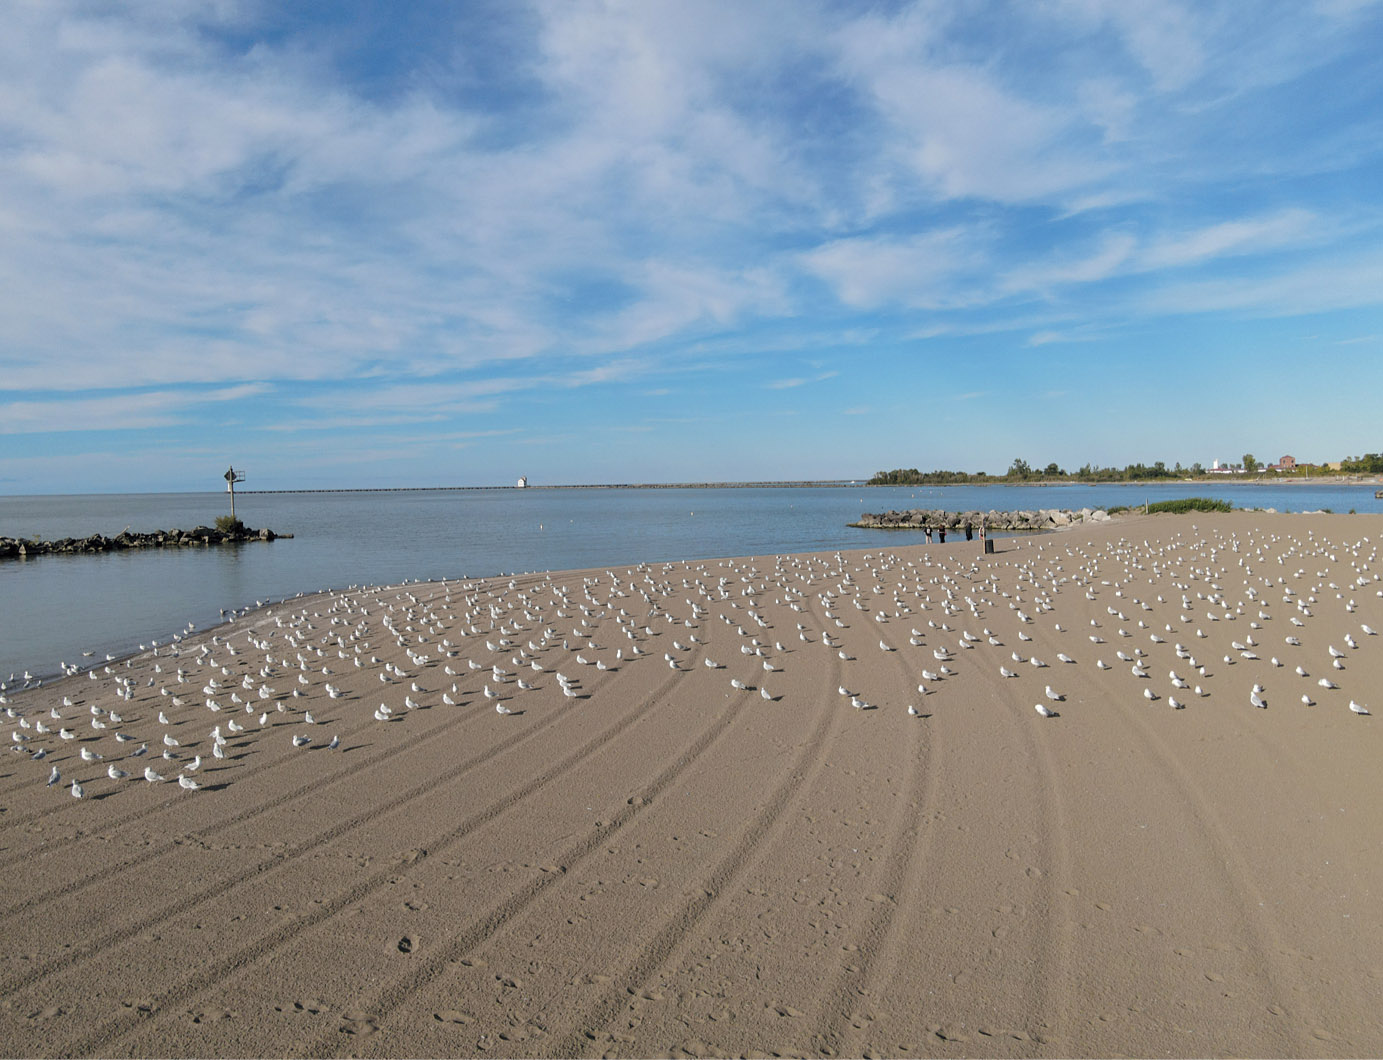
Figure 6.21 Shooting in “tall tripod” mode.
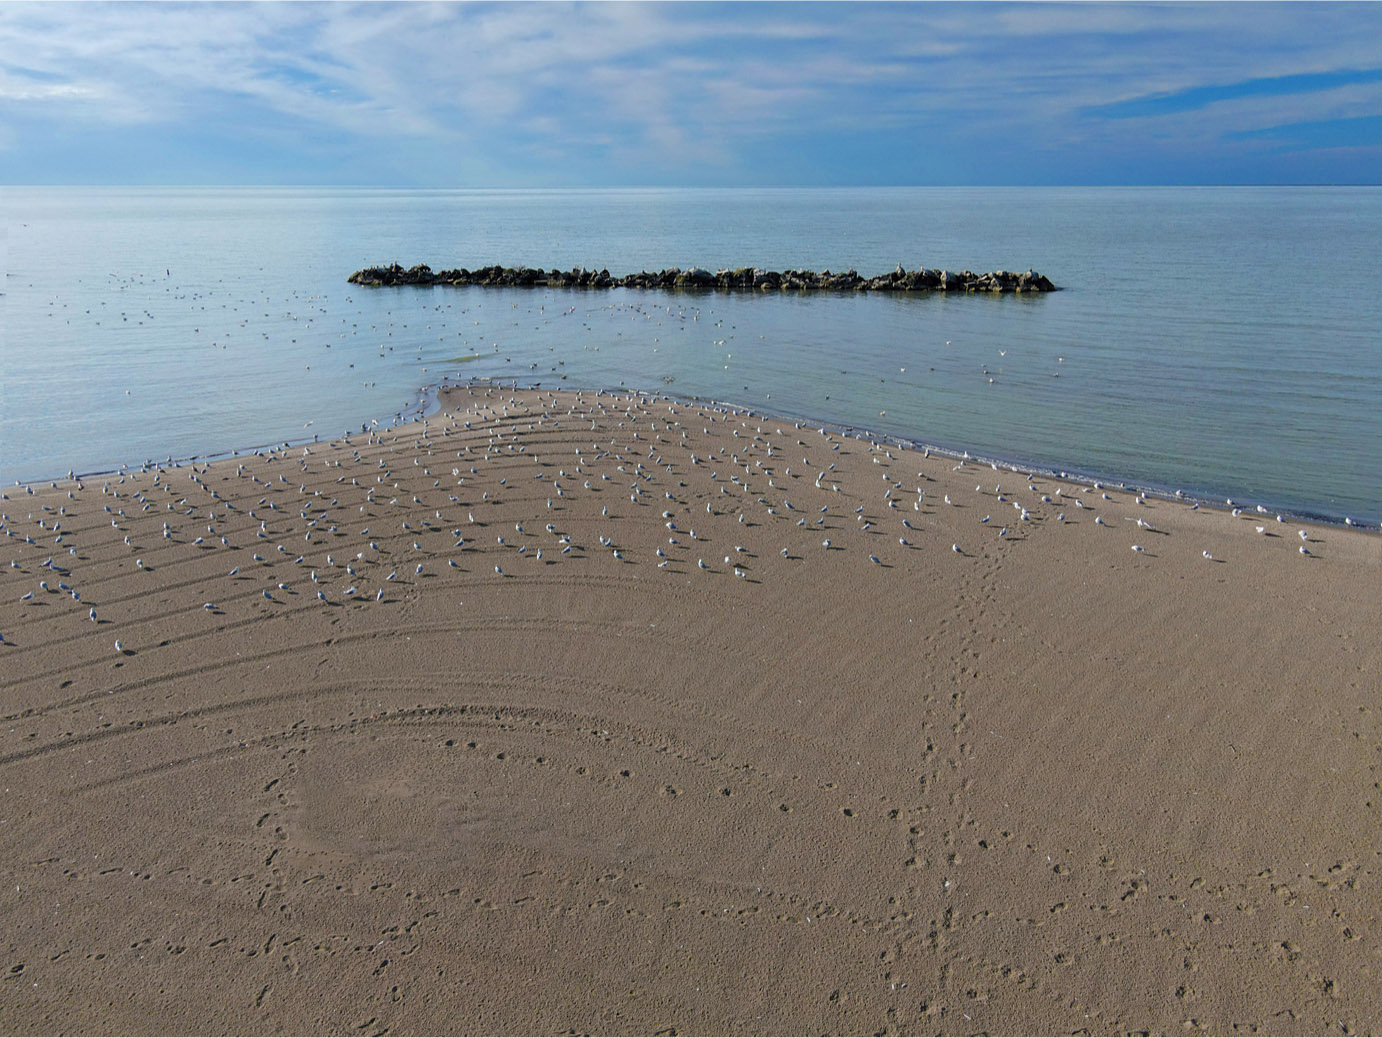
Figure 6.22 Combining shapes and lines.
Vivid colors are another way of using shapes to create an appealing image. You can always make an image come alive by using an image editor to boost the saturation or vibrance of a photo. Saturation increases the richness of all the colors in an image, often unnaturally, while vibrance affects only the muted colors while leaving already-saturated hues alone. However, I tend to prefer getting the shot in the camera rather than in post-processing, and recommend looking for colors that pop naturally. You may find them in sunsets and sunrises or richly colored skies (perhaps by using a polarizer to deepen the colors). Or, you may discover subject matter that itself jumps to life because of its vibrant colors. That was the case when I visited one of the many umbrella-based art installations that have popped up in many locales. This particular “umbrella alley,” which featured nearly 200 colorful parasols, hung over a narrow street between two buildings. I captured the image shown in Figure 6.23, some 60 feet above the installation.
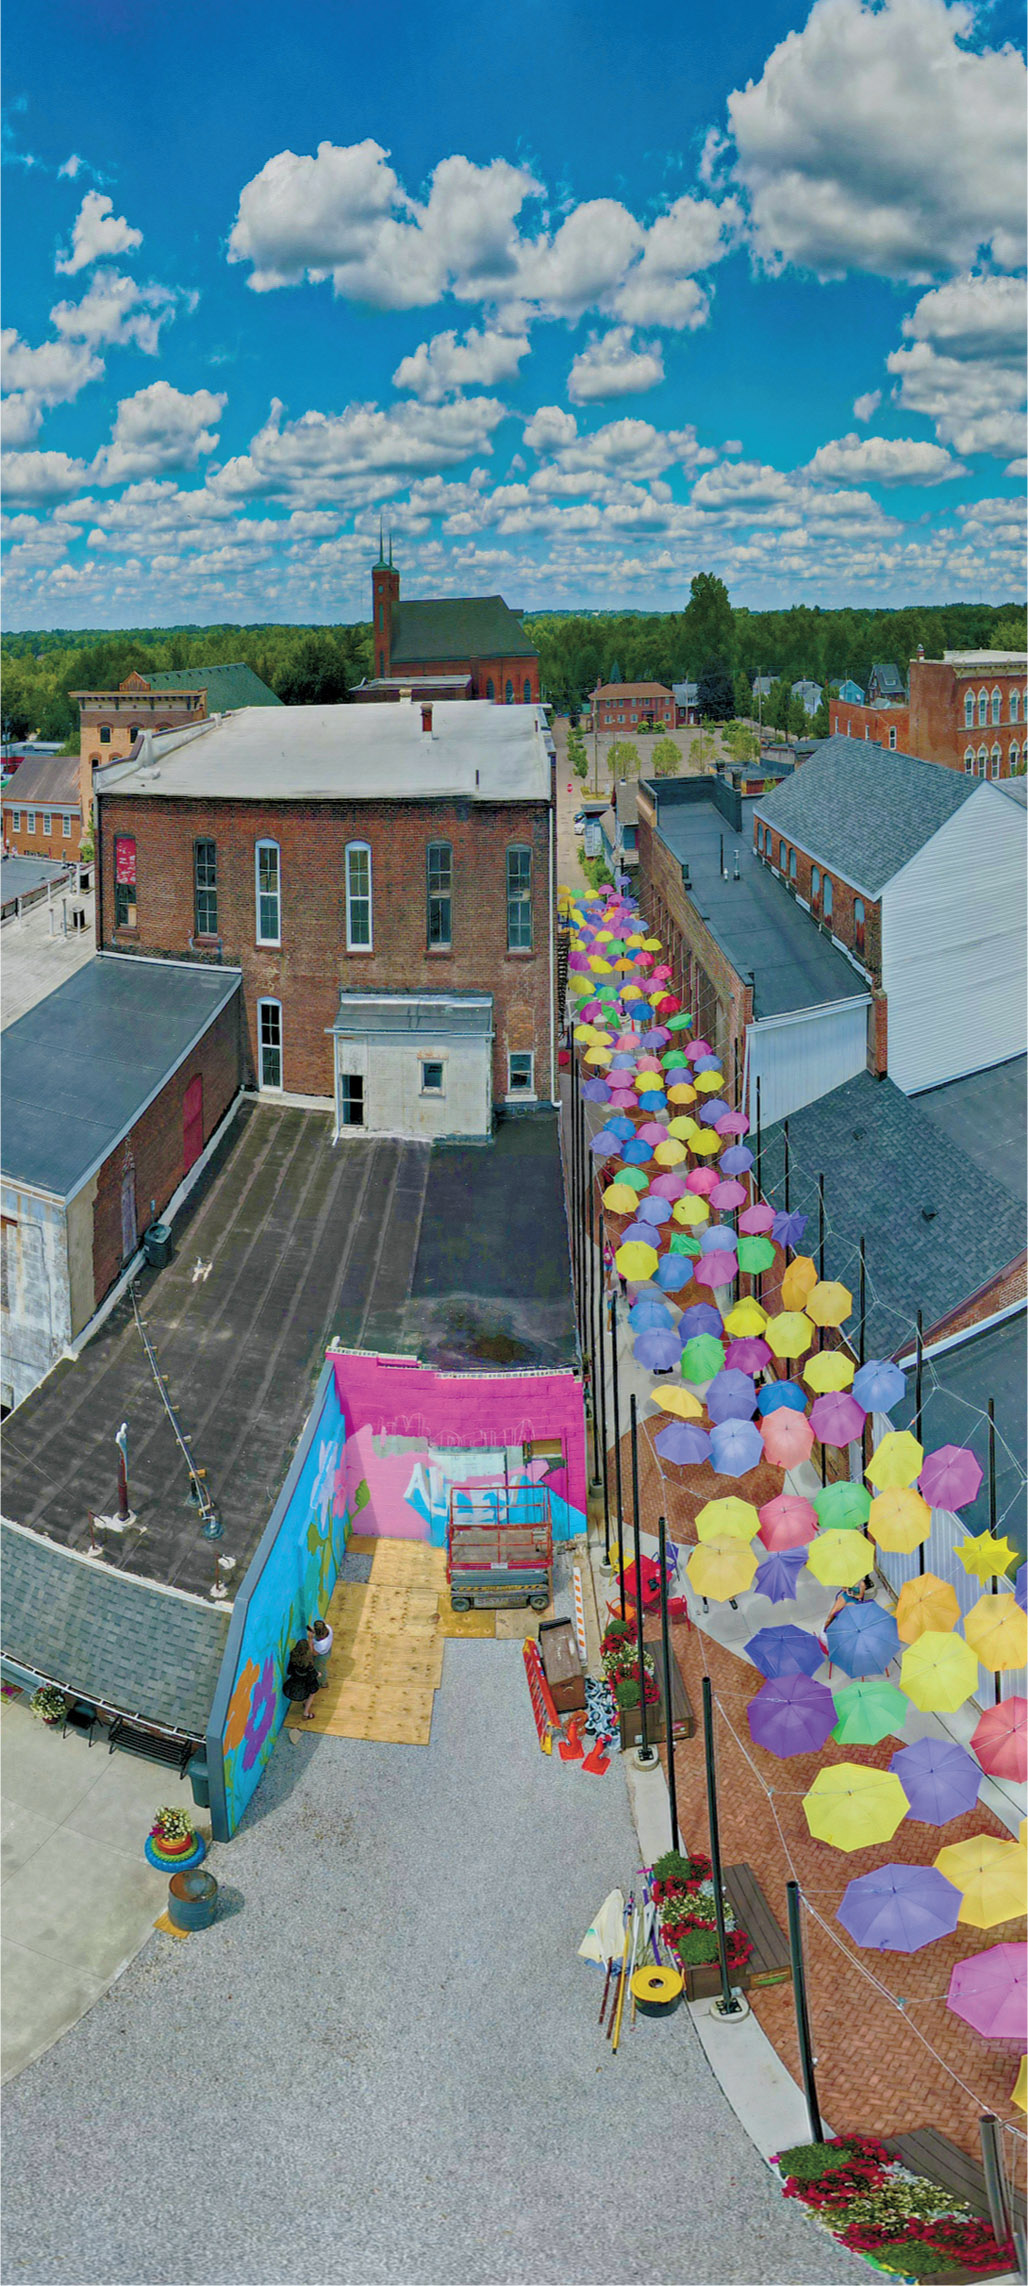
Figure 6.23 This “umbrella alley” is festooned with brightly colored shapes.
Framing an Image
Framing is a technique that is frequently used in conventional photography, most often using some foreground objects to wrap around a more distant subject to create a border. The edging around an image defines the picture’s shape and concentrates attention on the image within the frame.
Foreground frames, which are typically trees or architectural features, are problematic for drone photos, although you can sometimes use your surroundings as attractive borders around your own pictures. But even if you are unable to provide a frame in the foreground, you can still compose your images such that your subject is, indeed, “framed” by its surroundings.
Look for obvious framing shapes in which you can place your composition. With shots taken in “high tripod” mode, you can readily find frames in the form of canopies of trees, arches (when shooting below towering bridges), and space between buildings. These have the advantage of being a natural part of the scene, and not something you contrived in order to create a frame.
You can make your own frames by changing position until objects create a border around your image. Find a curving tree branch and back up your drone until the scenic view you want to capture is wrapped in its leafy embrace. One advantage of a foreground frame is that it creates a feeling of depth. A flat-looking image can jump to 3D life when it’s placed in a frame.
For Figure 6.24, I originally wanted to crop the image to create a vertical composition of the stream emptying into the pond. Then, I decided to instead crop to a panoramic shot with the natural cliffs on the left side and the structure on the right forming a foreground frame for the waterway that extended off into the distance.
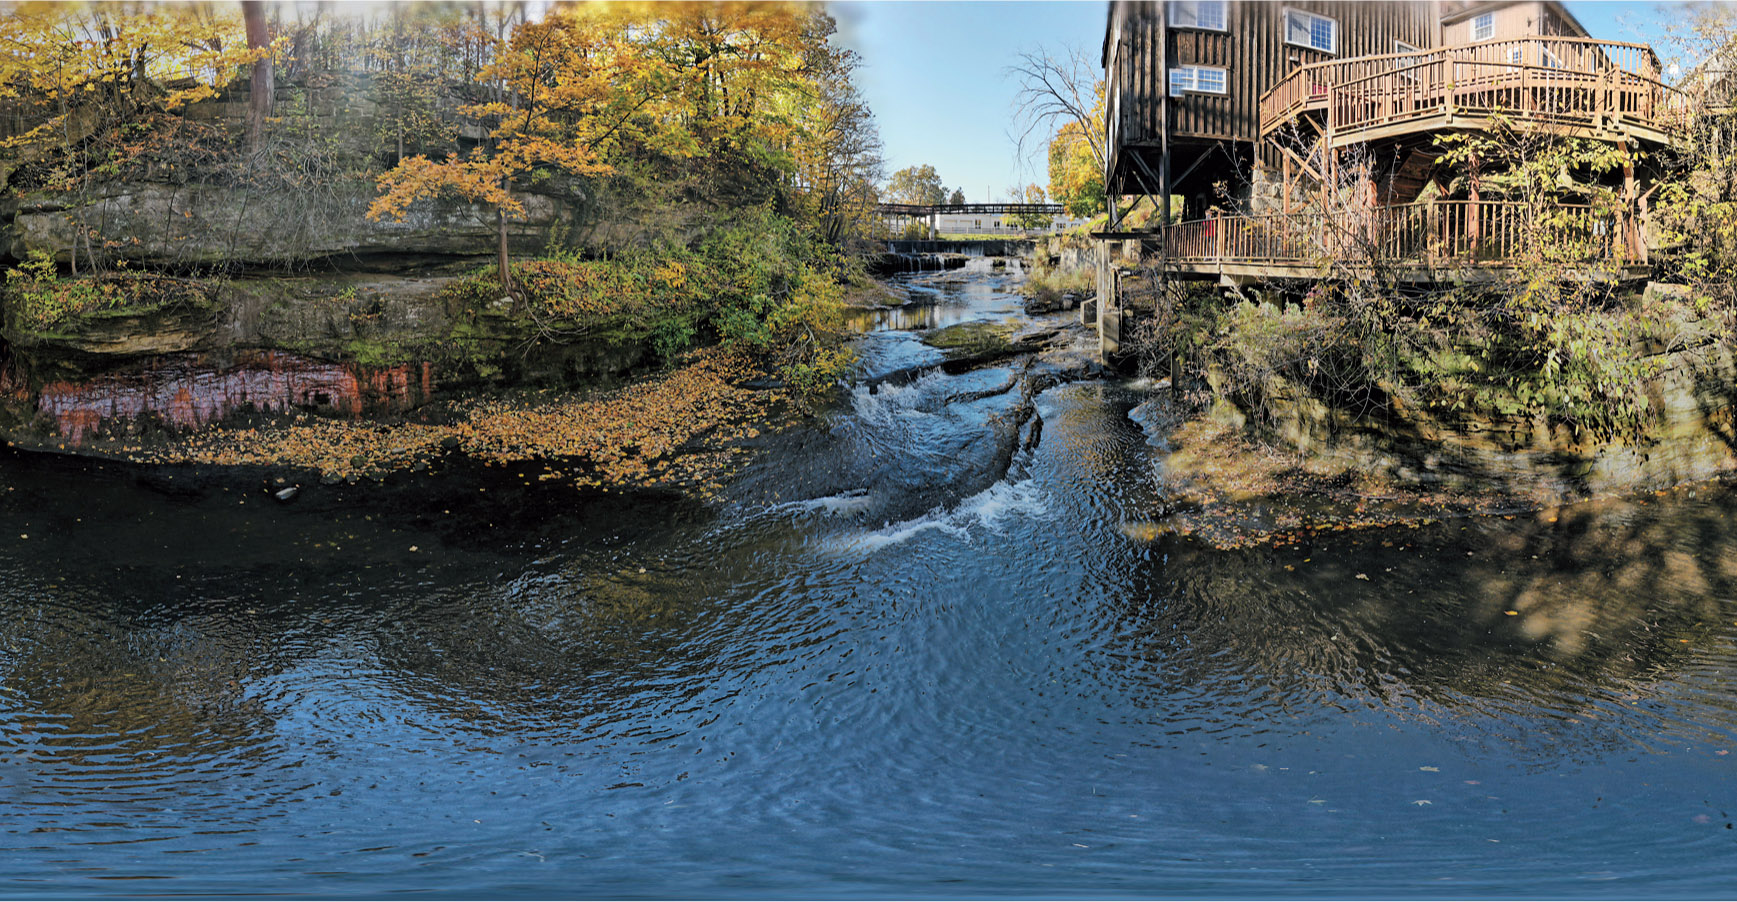
Figure 6.24 Foreground shapes can create a frame.
Because of the unusual perspective provided by aerial photography, I often like to create somewhat abstract images that are abstract simply because of their unusual viewpoint. When I posted Figure 6.25 on a website without a detailed description, one of the first comments I received was “I had to look at this photo for several minutes before I realized it was an overhead shot of a covered bridge.” That was exactly my point. The four clumps of trees dressed in their Autumn colors formed a four-point “frame” around the country river road and its bridge.
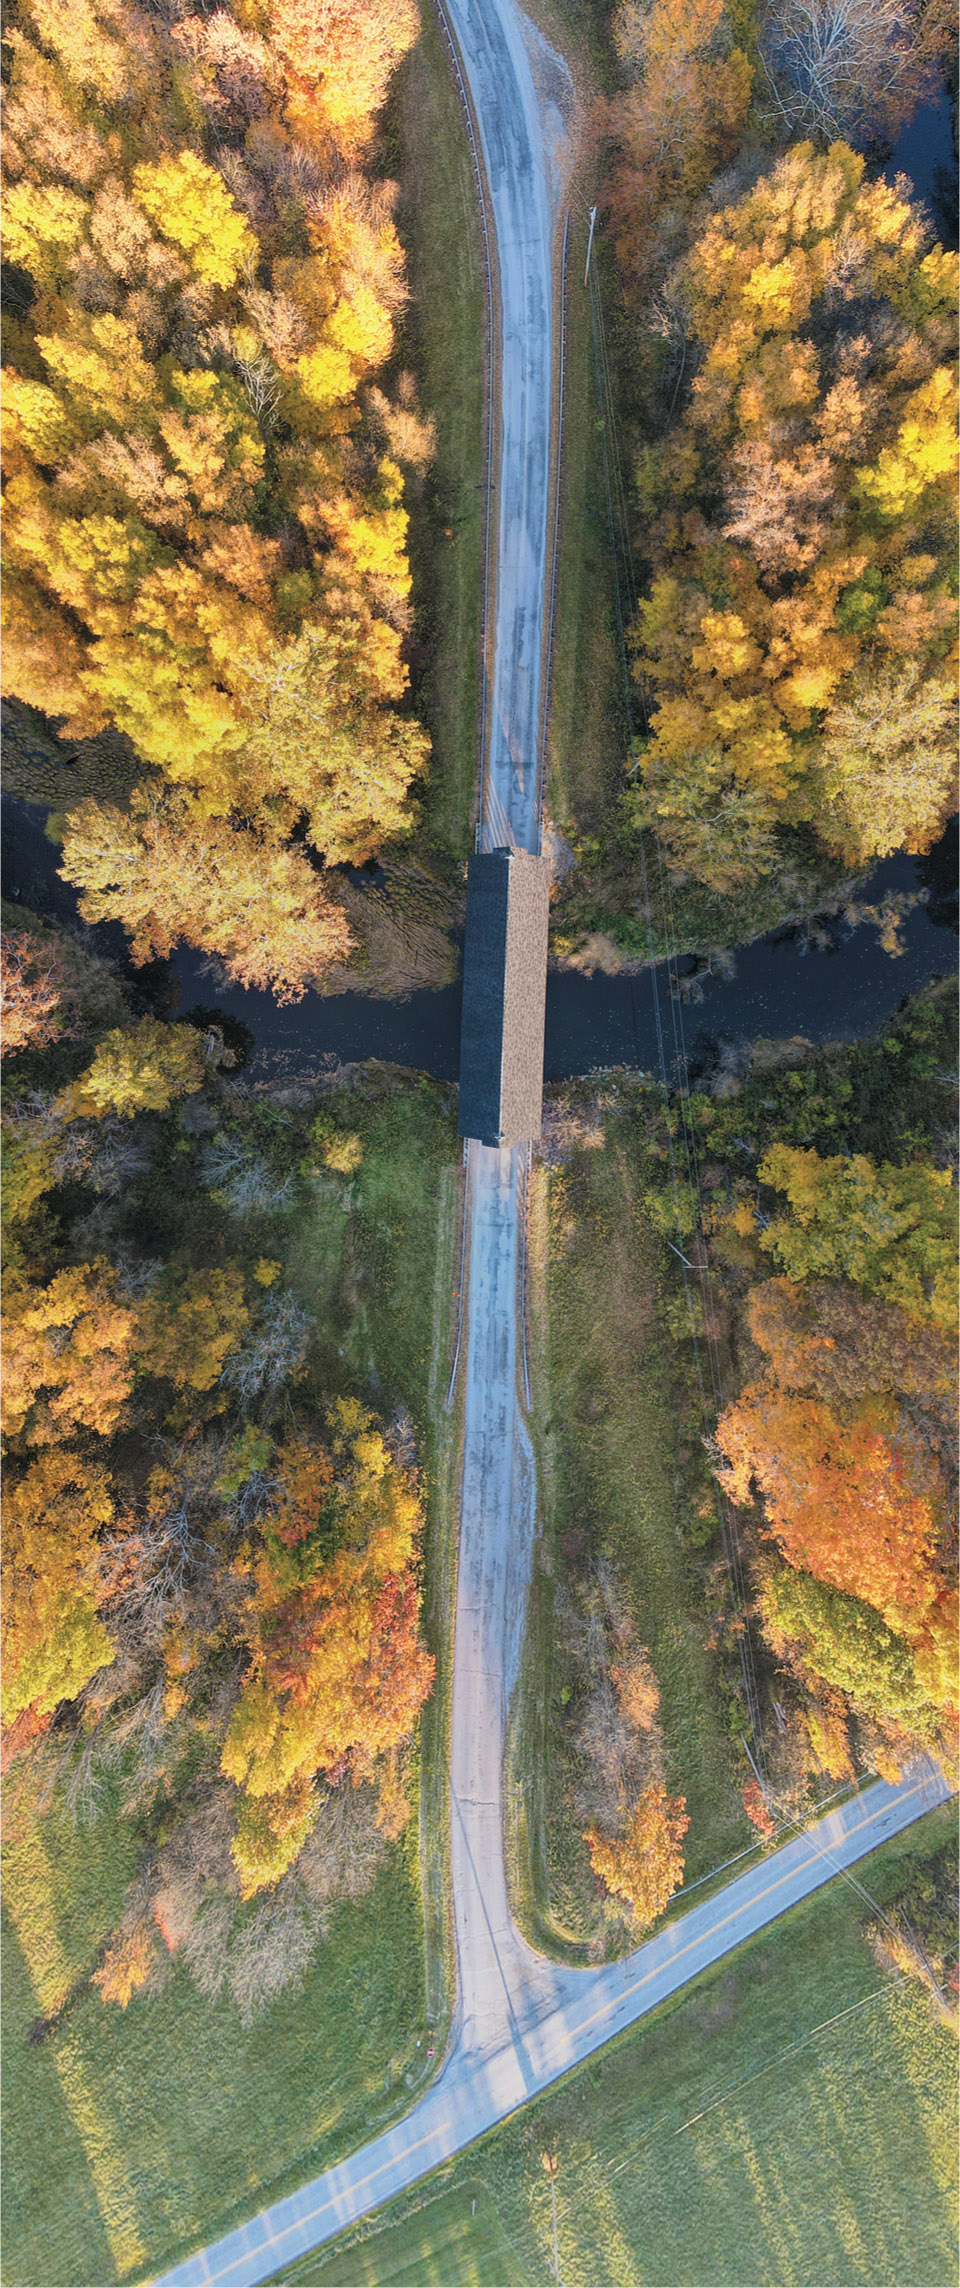
Figure 6.25 Abstract images engage the viewer as they explore their content.
Creative Cropping
Both the Mavic Air 2 and Mavic Air 2S produce images with enough resolution to withstand a reasonable amount of cropping. You can crop your images to improve the composition and to transform one type of image, say, a horizontally composed photo, into a panorama or vertically oriented shot. You can even “find” a new image hidden within a photo you’ve already taken.
Creating Balance
When working with shapes, you should consider the balance of the objects in your image. If you place every element of interest in a photograph on one side or the other, leaving little or nothing to look at on the opposite side, the picture is unbalanced, like a seesaw with a child at one end and no one on the other. The best pictures have an inherent balance that makes them look graceful.
If the photo you took doesn’t already have inherent visual equilibrium, you can create balance with cropping. To balance your image, try to arrange objects so that anything large on one side is balanced by something of importance on the other side. This is not the same as having multiple centers of interest. You can balance objects in two ways:
- ■Symmetrical balance. Have the objects on either side of the frame be of roughly similar size or weight.
- ■Asymmetrical balance. Have the objects on opposing sides be of different size or weight.
Refining the Composition
Many images can be improved by cropping out extraneous objects and reorienting the frame. For the last five years, I’ve spent a month each winter in Cedar Key, Florida, writing and taking photos using a Fifties-era motel as my base of operations. Most nights, I go out and shoot the spectacular sunsets, either from ground level or from the vantage point of my drone.
One evening, I captured the image seen in Figure 6.26, but decided I wanted one that pictured the motel and its environs. I adjusted the gimbal so that the sun itself was not within the frame, so that the exposure would allow representing the foreground. Unfortunately, the full frame, seen at left in Figure 6.27, is cluttered with parked cars and trucks, buildings, and the roadway. Cropping the image as shown at right in the figure yielded the image I wanted.
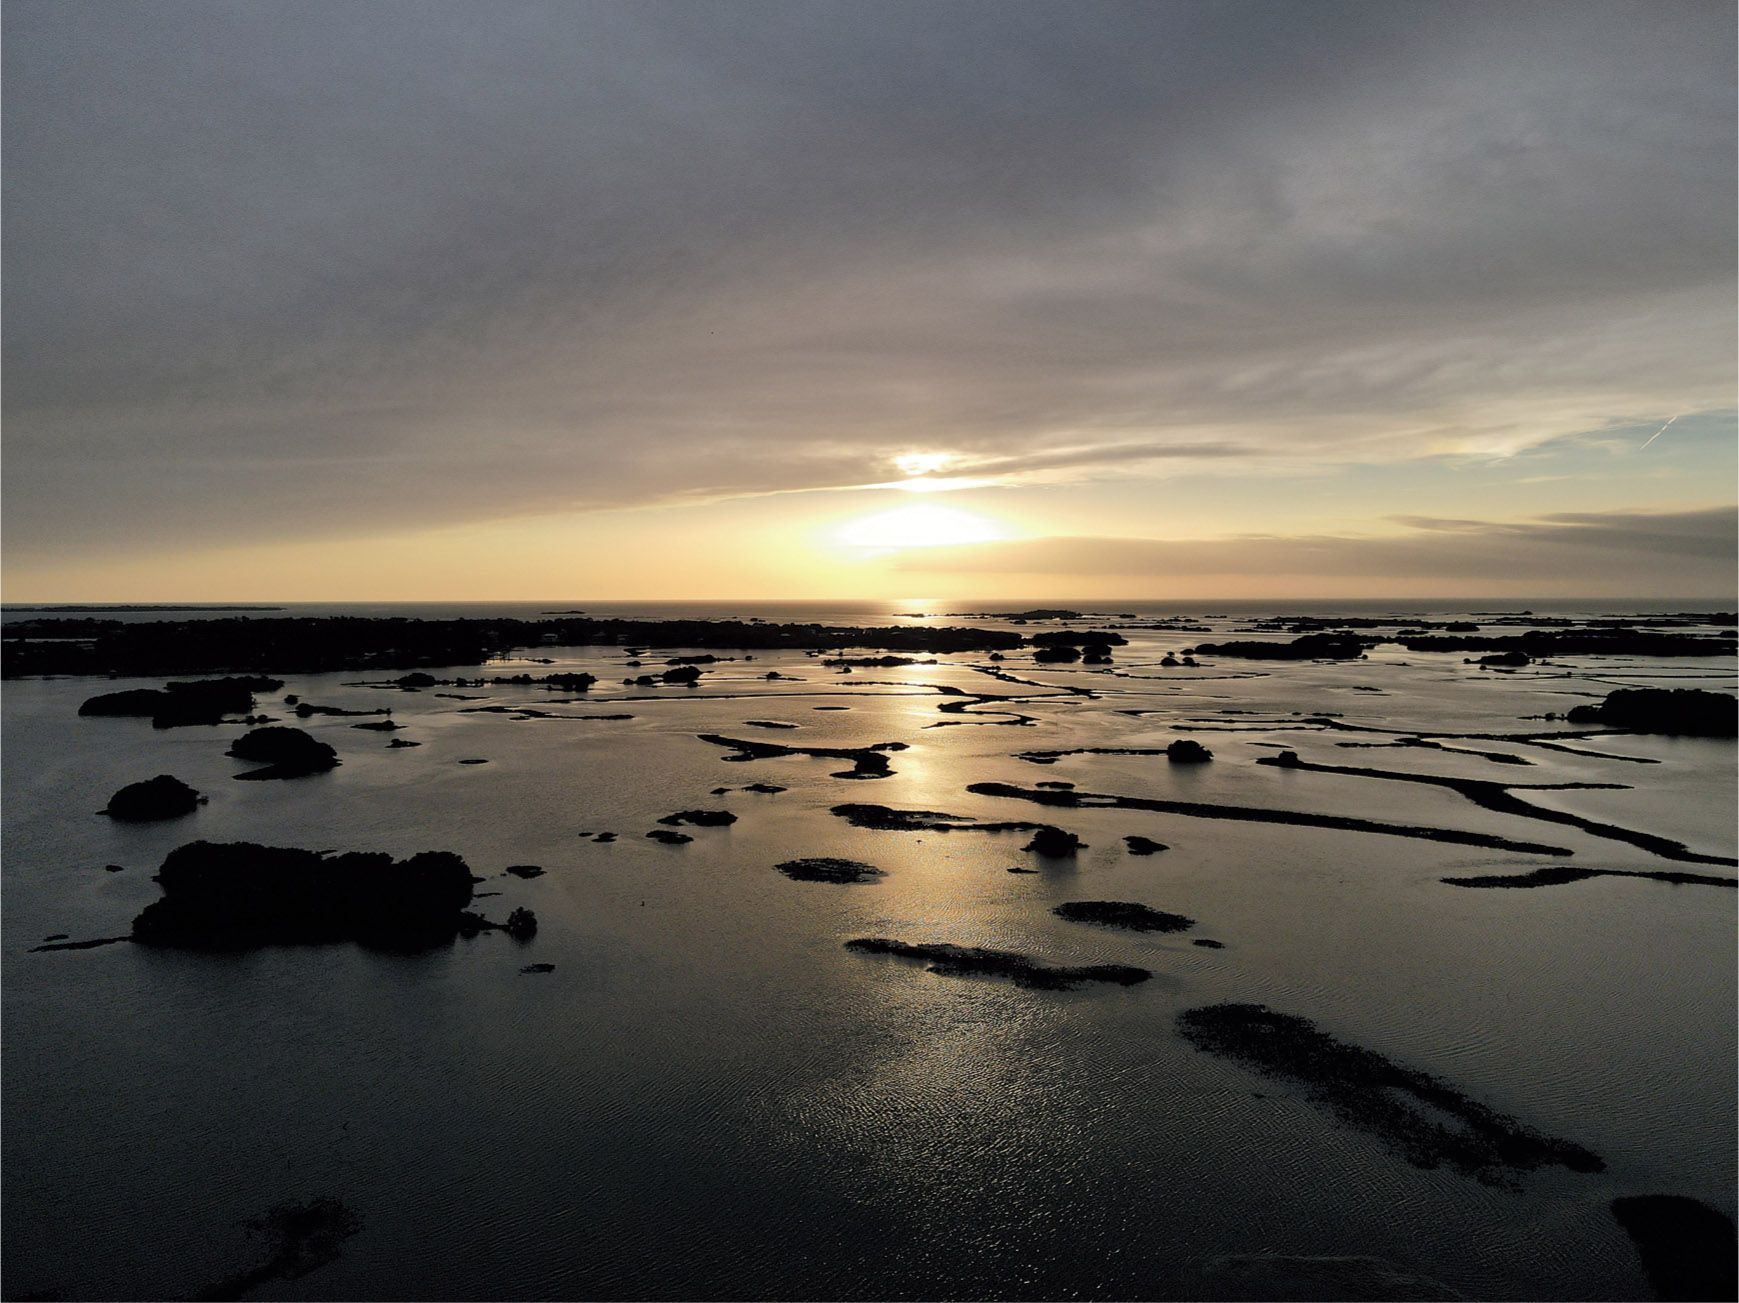
Figure 6.26 Initial shot of the sunset only.
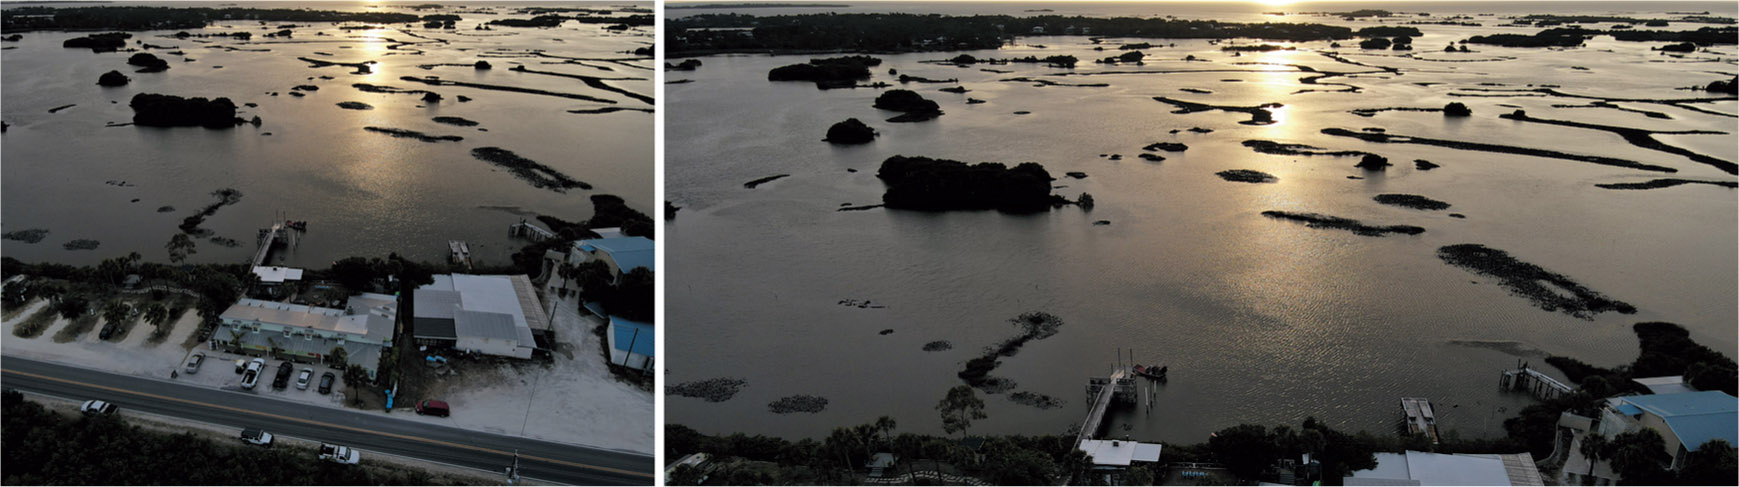
Figure 6.27 Final shot full frame (left) and cropped (right).
Twilight and Night Shooting
Flying your drone at twilight or at night can yield some exciting pictures. The most common examples involve capturing sunsets, or landscapes filled with the twinkling lights of buildings, parking areas, or other sights. I photographed the scene shown in Figure 6.28 just as the sun was setting and the lights of a nearby marina and community were already illuminated.
Both Part 107–certified and recreational drone pilots are allowed to fly their drones at night without needing to undergo the previously lengthy process of obtaining a waiver, which was required of professional drone pilots until mid-2021. However, you are required to have attached to your drone anti-collision lighting visible for at least three statute miles with a flash rate sufficient to avoid a collision. Your Mavic is not equipped with such lighting, so you will need to add a strobe in order to comply. You must also abide by all the appropriate safety rules, including not flying over people. Professional Part 107 pilots may need to take a new online course available at the FAA Safety website.
Note that the rules also apply to dawn and dusk, which the FAA defines as the period 30 minutes before official sunrise and 30 minutes after official sunset. These periods are known as civil twilight. An exception is made for Alaska. Why does Seward’s Icebox get special treatment? The 48th state is the only part of the U.S. that doesn’t have conventional twilight for part of the year, during its “midnight sun” in summers, and what are termed polar nights during winter. Civil twilight for Alaska is specified in the Air Almanac.
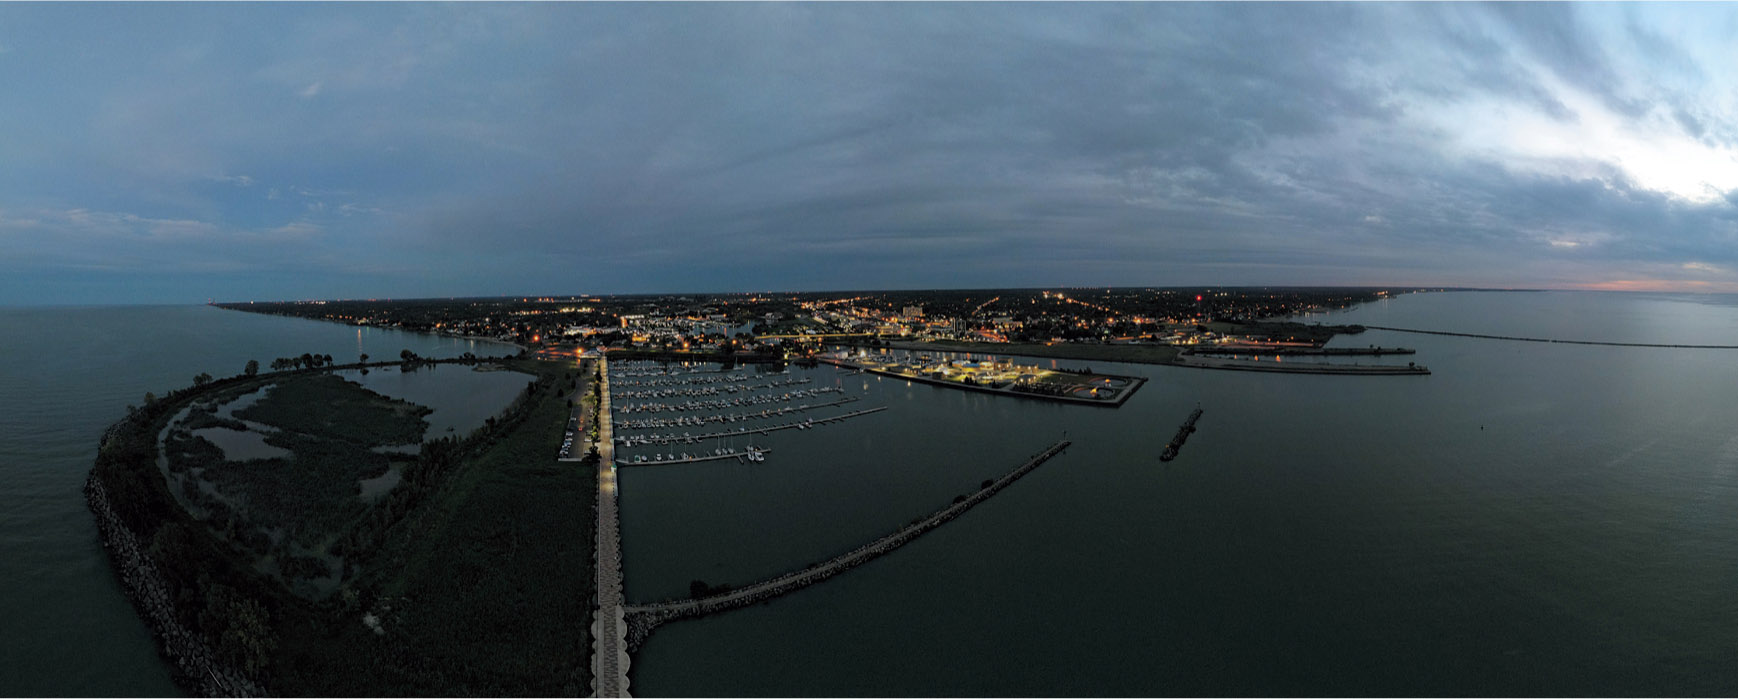
Figure 6.28 A shoreline photographed at twilight.
I don’t recommend twilight or night shooting for beginning recreational pilots, as there are multiple complications and risks involved. It’s easier to lose your required visual line of sight, even with the LED auxiliary light in the drone’s belly activated using the defined button. Moreover, you will be unable to reliably detect obstacles, and your drone’s vision systems will be ineffective.
In effect, the operational range of your drone is reduced because it is difficult to discern location, attitude, altitude, and direction of flight. In its training materials, the FAA points out the phenomena involved with night physiology and night illusions. You probably learned about the eye’s rods and cones in high school science classes. The cones near the center of the eye perceive fine detail and color, while the rods are used for peripheral vision. We all have a night blind spot in the center of the field of vision, causing us to lose perception of sharpness, color, depth, and size. The FAA recommends looking 5 to 10 degrees off-center of the direction where your drone is flying to help compensate for the blind spot.
We also suffer from illusions and distractions at night, which include:
- ■Motion parallax. At night, stationary objects may appear to move, which can cause confusion.
- ■Geometric perspective. Objects may appear to have different shapes when viewed at different distances and angles.
- ■False horizon. Because it’s dark, lights on the horizon may cause the drone to appear to be higher than it really is, so its visual appearance may differ from what you see on the controller’s telemetry.
- ■Reversible perspective illusion. Apparently when two aircraft are flying at night roughly in parallel, they may actually appear to be moving away from each other when they are actually converging.
- ■Fascination. When humans are fixated on one task, they may not notice other things going on around them. There was a famous experiment in which half of observers assigned to monitor the play in a basketball game didn’t notice a woman dressed in a gorilla suit cavorting at the sidelines.
You should also avoid looking at bright lights and, if at all possible, use a companion as a visual observer to scan for other aircraft. You’ll also need a landing area that’s illuminated, although the lights can be dimmed until needed. And, of course, all the rules about operating within controlled and uncontrolled airspaces must be followed, and you must get authorization through FAA Drone Zone or LAANC when appropriate.
Once you’re comfortable shooting at twilight, you’ll want to explore shooting the same scene in both daylight and twilight hours to provide an interesting comparison. Our Volunteer State friend Rick Murray had that in mind when he covered Sumner Fest, the annual hot air balloon festival in Hendersonville, Tennessee. Although the weather was a bit gloomy with heavy dark clouds and periodic light rain, he took advantages in breaks from the precipitation to capture the images shown in Figure 6.29, both in daylight (top) and twilight (bottom). Both photos were 180 degree panoramas, with a bit of noise reduction applied using the Topaz Denoise utility.
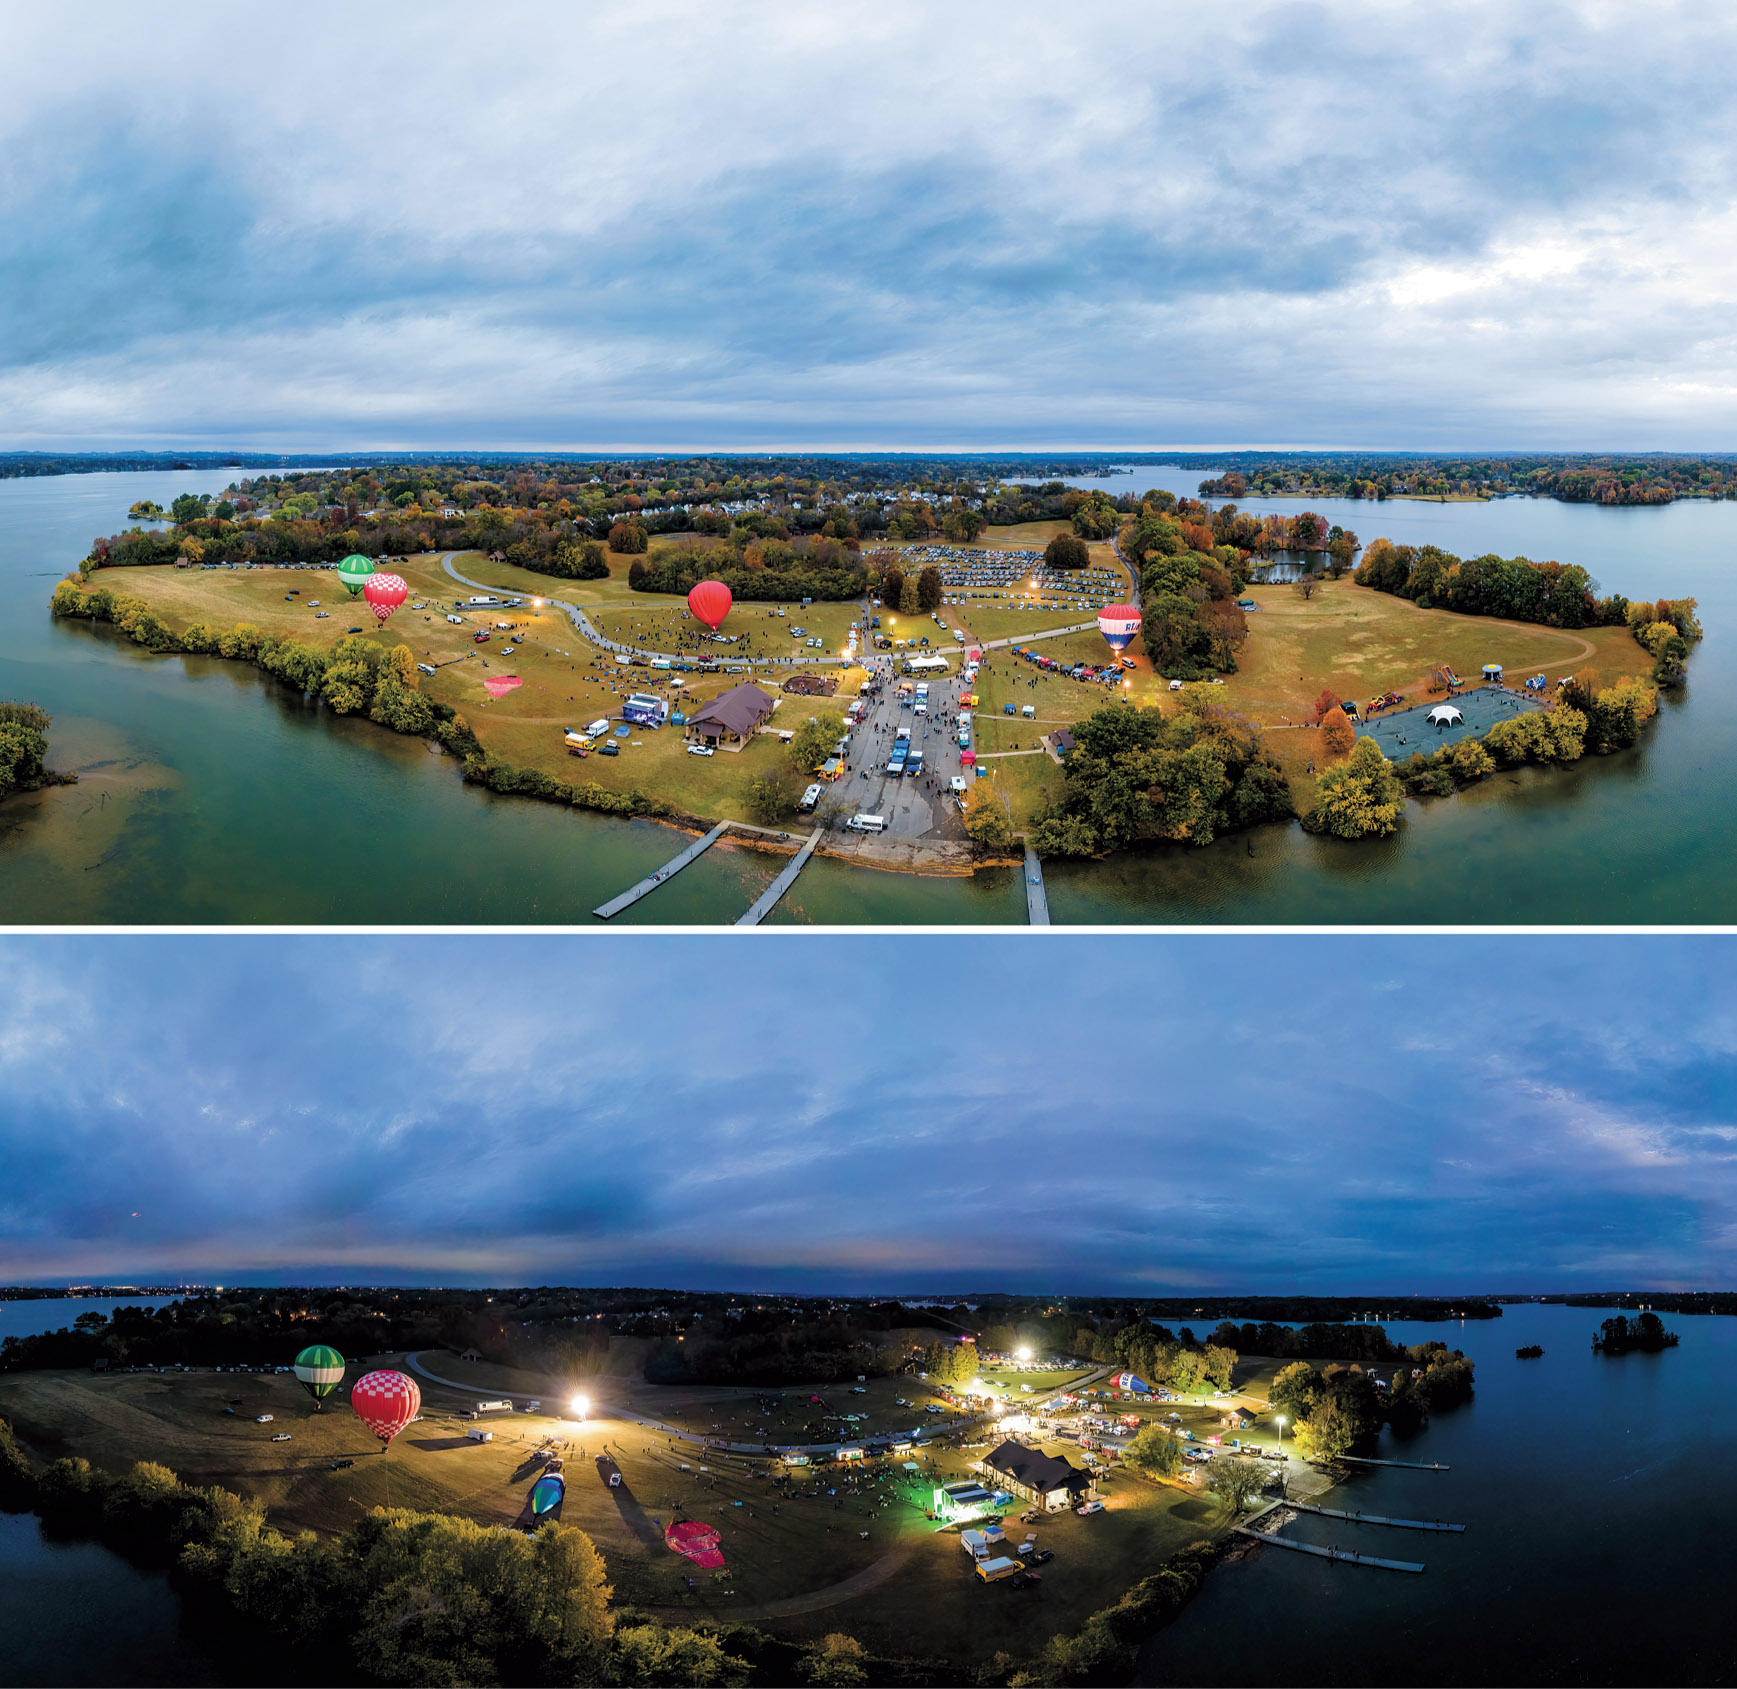
Figure 6.29 A daylight shot (top) and a twilight version of the same scene (bottom.)