
Network and Setup Menus | 9 |
The Network menu, which controls setting up and using the a7 IV’s wireless communications features, and the Setup menu, used to adjust key operational controls of the camera, are the last two configuration components you’ll need to master. Each provides a broad range of options.
Network Menu Tab
There are six groups in the Network tab shown in Figure 9.1, left. Don’t confuse the camera’s Wi-Fi, Bluetooth, and FTP (File Transfer Protocol) capabilities with the a7 IV’s wireless flash features, discussed in Chapter 13. Both can use radio transmission/reception, but of differing varieties and frequency bands.

Figure 9.1 The Network groups (left), and Smartphone Connect entries (right).
I’m going to help you get started using the a7 IV’s communications features, but I need to emphasize that all the heavy-duty information technology gobble-de-gook is beyond the scope of this book, which is, primarily a still photography guide that also explores movie making. Sony has excellent online resources, including a downloadable 124-page FTP Help Guide with information that couldn’t possibly be covered in a single chapter.
1. Smartphone Connect
There are five entries in the Smartphone Connect group. (See Figure 9.1, right.) They allow you to control the a7 IV remotely with a live preview on your phone; move images from your camera to your smartphone so you can post photos on your Instagram, Facebook, or other accounts—even if the camera happens to be powered down when you decide to make the transfer. The camera-to-smartphone features are the capabilities most likely to be of use to most Sony photo enthusiasts.
- ■Smartphone Registration
- ■Select On Camera and Send
- ■Reset Transfer Status
- ■Connect While Power Off
- ■Remote Shooting Settings
Smartphone Registration
Options: Pair your smart device and camera.
Working with the Imaging Edge Mobile app (which replaces the PlayMemories Mobile app you may have used with your previous Sony camera) on your smart device, you can transfer from your memory card still photographs, XAVC S video or their proxies (shot at 60p or lower), proxies of 4K and XAVC S videos shot at 100p or faster, and slow- or quick-motion movies. This entry lets you register your smartphone to the camera so you can connect to it as needed. You can also specify whether the files to be transferred are selected on the camera or on the smart device, and whether you transfer the original file only, or, in the case of videos, a proxy (lower-quality, faster transfer) movie only, or both the original and proxy.
The Imaging Edge Mobile app on your device allows you to choose the Image Copy Size for stills, original, 2MB, or VGA, so you can speed up transfer, if necessary, by selecting a smaller file size. RAW files are converted to JPEG before transmission. 4K video and XAVC S movies recorded at 120/100p cannot be transferred at all. Only the proxy movies can be sent. Be aware that your smart device may not be able to play back some files; even if they transfer fine, your phone or tablet may not be able to display them. That’s a limitation of the destination device, not your a7 IV. You may need to find a third-party gallery app for your Android or iOS device that can handle a wider variety of files.
To register your camera, go to the Apple App store or Google Play store (depending on whether you use iOS or Android) and install the Imaging Edge Mobile app. Then activate Bluetooth on your phone and camera (visit Network > Bluetooth > Bluetooth Function). Then, in the Imaging Edge Mobile app, follow the instructions shown on the screen of your phone (see Figure 9.2) and the a7 IV to register your camera.

Figure 9.2 Sending images to your smartphone.
Select on Camera and Send
Options: Send, Size of Sending Image, RAW+JPEG/HEIF Send Target, Proxy Sending Target
My preference: N/A
With this entry you can choose the size of the image transmitted (original size or 2MB); whether to send JPEG & HEIF, RAW only, or RAW+JPEG & HEIF; and whether to send the original only, proxy only, or both. When you select Send you can direct the camera to send This Image, All with This Date, Filtered Images, or Multiple Images, as seen in Figure 9.3. If you press the Fn button while a still image or movie is displayed, that same Send to Smartphone screen appears, bypassing this menu. If you don’t transmit to your smart device often, you can safely redefine the Fn button to another behavior for Playback, as this menu entry is always available.

Figure 9.3 Select which images to transfer.
Reset Transfer Status
Options: Select Media: Slot 1, Slot 2
My preference: N/A
This entry resets the transfer status of the image sent to the smartphone and sets all images to nontransfer status. You can use this facility when you want to retransmit images that have already been transferred and, accordingly, marked as such in the camera. Once you reset, you can reselect images from the full complement on your memory card.
Connect While Power Off
Options: On, *Off
My preference: N/A
Your smartphone can download images from your previously paired a7 IV, even if it is ostensibly powered down. If you set this to On, the a7 IV will keep its Bluetooth receiver active even when you’ve powered the camera down. Then when you launch the Imaging Edge Mobile app, you’ll see the screen shown at lower right in Figure 9.2. Your smartphone can then wake up your camera remotely to allow the app to download thumbnails of the images on the card, in date order. You can view indexes of the images and tap the images you want to import. Follow the instructions to begin transferring the selected images to your phone. Make sure Airplane Mode (discussed shortly) is not set to On, or that your camera is not already connected to another device. If you turn on your camera while transfer is taking place, the connection will be terminated. This feature does consume a small amount of battery power, so use it judiciously.
Remote Shooting Setting
Options: Still Image Save Destination, Save Image Size, RAW+JPEG Save Image, Save JPEG Size
My preference: N/A
This entry lets you set the parameters for controlling your camera remotely from your smartphone. There are four settings you can make (see Figure 9.4):

Figure 9.4 Remote Shooting Settings.
- ■Still Image Save Destination. Choose Smartphone Only, *Smartphone+Camera, or Camera Only to specify where the a7 IV should store the images it captures during remote shooting.
- ■Save Image Size. Choose Original size, or, for much faster transfer, *2M to transmit only a small 2MB version suitable for social media or email.
- ■RAW+JPEG/HEIF Save Image. This entry is not available if your still image quality is set to JPEG/ HEIF. If you’ve chosen RAW & JPEG, you can select whether you want remote shooting to save only RAW, only JPEG, or both. You may want to shoot both conventionally, but prefer to save only one or the other when shooting remotely because of the extra time required for transmission of both formats.
- ■Save JPEG Size. You can also specify whether to save *Large or Small JPEGs, again, to reduce transmission time when necessary.
When shooting remotely, you’ll see the a7 IV’s live view image on your phone, as shown at left in Figure 9.5. You have access to a full roster of features, as shown at center and right in the figure.

Figure 9.5 Controlling your camera from your phone.
2. Transfer/Remote
There are three entries in the Transfer/Remote group. (See Figure 9.6.)
- ■FTP Transfer Function
- ■PC Remote Function
- ■Bluetooth Remote Control

Figure 9.6 Transfer/Remote group.
FTP Transfer Function
Options: FTP Transfer, FTP Connect Method, USB-LAN/ Tethering Connect, Server Setting, Save/Load FTP Settings, Display FTP Result, Auto FTP Transfer, Auto FTP Target, RAW+JPEG/HEIF Transfer Target, Transfer JPEG Size, Proxy Transfer Target, FTP Power Save
My preference: N/A
Techies who understand FTP server functions can transfer images from the camera to a networked FTP (File Transfer Protocol) server, view the results, select which server to send to, and define up to three different FTP servers. Only JPEG and RAW files can be transferred using FTP. Sony offers a detailed FTP Help Guide (much too long to summarize here!) through its website: https://helpguide.sony.net/di/ftp/v1/en/index.html.
PC Remote Function
Options: PC Remote: (On, Off); PC Remote Connect Method: (USB, Wi-Fi Direct, Wi-Fi Access Point); Pairing, Wi-Fi Direct Information, Still Image Save Destination, PC Save Image Size, RAW+JPEG Save Image, PC Save JPEG Size
My preference: N/A
This entry allows you to take control of your camera from a computer connected either using Wi-Fi or a USB link and the Imaging Edge Desktop software’s Remote Module. The file-saving options are similar to those listed earlier for the Remote Shooting Settings entry. If you’re using a computer to connect to your camera, the PC Remote function is the easiest, fastest way to shoot tethered.
While the camera-to-PC option seems complex, getting connected is the most difficult part because of the variety of options. Once you’ve linked successfully, it’s not hard to use. That’s especially true if you are able to use a USB connection rather than Wi-Fi link, which I recommend. The USB connection is much easier to set up and is typically faster, although it requires using a computer instead of your smart device. This section will show you everything you need to know to begin shooting your camera by remote control using the PC Remote entry. After you’ve downloaded, installed, and launched Imaging Edge Desktop, you’re ready to go.
Just follow these steps:
- 1.Access PC Remote. In Network > Transfer/Remote select the PC Remote Function. (See Figure 9.7).

Figure 9.7 PC Remote Settings.
- 2.Specify connection. Access the PC Remote Connection Method entry and choose USB (my recommendation), Wi-Fi Direct, or Wi-Fi Access Point from the screen that appears. (See Figure 9.8.)
- •USB. Connect your computer to the a7 IV with a USB cable.
- •Wi-Fi Direct. This method will let you connect your computer directly to the a7 IV’s built-in access point. The first time you use this connection, you’ll be directed to view the connection information you’ll need to link up. The Wi-Fi Direct Information entry you can scroll down to will provide you with a screen like the one shown in Figure 9.9. You’ll then use your operating system (Mac or Windows) Wi-Fi connection dialog boxes to make the connection using that information.
- •Wi-Fi Access Point. Select this option and you can specify a Wi-Fi Access point on your computer’s network that your camera and computer can share.

Figure 9.8 Choose Remote Connection method.
- 3.Activate PC Remote. Access the PC Remote sub-entry and select On when you’re set up.

Figure 9.9 Wi-Fi Direct Information.
- 4.Choose Save parameters. You can scroll down to choose Still Image Save Destination, PC Save Image Size, RAW+JPEG PC Save Image, and PC Save JPEG Size, as described with Remote Shooting Settings earlier.
- •Opt for PC only if you will be doing a lot of shooting and don’t want to let your memory card fill up. Choose PC+Camera to automatically back up your shots to two locations. With Camera only, no images are saved on your computer.
- •The RAW+J PC option is available only if you’ve selected PC+Camera as your still image destination, and RAW & JPEG as your File Format. You can save both RAW & JPEG to the computer, JPEG only (for faster transfer; especially important if you are using Wi-Fi rather than a faster USB connection), or RAW only.
- •PC Save Image Size. Choose to store images on the computer in their original size, or in a smaller 2MP size that’s quicker to transfer.
Once you’re connected, you can operate your camera using the Image Edge Desktop’s Remote module, shown in Figure 9.10.

Figure 9.10 Operate your camera using the Imaging Edge Desktop application.
Bluetooth Remote Control
Options: On, *Off
My preference: N/A
The Sony RMT-P1BT remote control operates by Bluetooth LE (low-energy) radio signals. This remote, at a little less than $80, is not as inexpensive as infrared remote controls, drains much less juice from your camera, has a range of about 16 feet, and isn’t dazzled by bright sunlight (which can give IR remotes fits). It can start/stop movie recording, too.
3. Wi-Fi
There are five entries in the Wi-Fi group. (See Figure 9.11.)

Figure 9.11 Wi-Fi group.
- ■WPS Push
- ■Access Point Settings
- ■Wi-Fi Frequency Band
- ■Display Wi-Fi Info
- ■SSID/PW Reset
This group includes features for connecting the a7 IV to a Wi-Fi access point, either semi-automatically using WPS Push or by manually registering by entering the SSID name of the access point and entering security information. You can choose whether to use your Wi-Fi network’s standard 2.4GHz band, or the faster 5GHz band (if available from your router). You can also view the device’s detailed information, including IP address, DNS server, and MAC Address.
SSID/PW Reset deletes the current SSID and password. You might want to do this for security reasons (say, you load/give/sell your a7 IV to someone else) or if you need to start over in registering your camera with a network. Reset Network Settings removes all network settings from the camera. As I mentioned earlier, detailed IT technology for connecting through LANs and FTP is beyond the scope of this book, as I’ve discovered that those who end up needing to use all these features already understand the concepts, and nearly all my readers are happy just knowing how to link their smartphones to their cameras. So, as Sony provides a comprehensive guide to Wi-Fi and FTP connections, I’m going to provide just an overview.
WPS Push/Access Point Settings
Wi-Fi Protected Setup (WPS) works only when you’re in range of a network provided by a wireless router that is equipped with a WPS button. Not all are. Examine your router and look for a button labeled WPS, or with a  symbol. Or, find the owner’s manual for your router or use a Google search (try “routername manual PDF”) to locate the WPS button, if one is available. Some routers that support WPS provide it with software instead of a physical button; in that case, you’ll need to access the router’s control panel using a computer and then clicking the button on the WPS page. The WPS Push tactic is great, but it would not work at a Wi-Fi hotspot in a supermarket, for instance, since the network owner is unlikely to use the WPS feature for hundreds of customers.
Just follow these steps:
- 1.Access Network > Wi-Fi > WPS Push. If your router provides WPS, scroll to the WPS Push item in the camera’s Wi-Fi settings menu and press the center button.
- 2.Press router’s WPS button. A screen will appear advising you to press the router’s WPS button within 2 minutes. When you press the button (or use the software to do so), the camera should be able to establish connectivity.
- 3.Confirm registration. Once the connection is established, a screen reporting “Registered. SSID network name” appears. Press the center button to confirm.
Registering Manually
You can also select an access point manually when within range of a wireless network; you’ll need to know the network password, if one is in place, to do so. Just follow these steps:
- 1.Scroll to Access Point Set. Press the center button. A Wi-Fi Standby screen will appear confirming that the camera is searching for available access points.
- 2.Wait for the camera to find your network. The a7 IV will find the nearby access points (networks) in less than a minute. If there is more than one network or available access point, all of those found will be shown. If your smartphone has a hotspot feature and it’s turned on, that “network” may appear as well.
- When several networks are displayed, some may belong to nearby businesses or your neighbors, and you can ignore them (their signal strength is probably weaker than your own network in any case, even if your neighbor’s network is not protected by a password). In my case, my wireless router resides in my office; in other, more distant rooms is a wired access point, and, on the second floor, a wireless repeater. Scroll to the one you intend to use and press the center button to confirm.
- 3.Input the password (if necessary). The next screen that appears may have a field for entering your network password, if your router/access point is set up to require one. If not, proceed to Step 4. Otherwise, press the center button and a virtual keyboard will appear. Using this keyboard, enter the password for your network. The keyboard works a bit like the physical multi-tap keyboard found on some (older) cell phones. Use the directional buttons to highlight a letter group, such as abc, def, ghi, and press the center button once to enter the first character in the group, twice for the second character, three times for the third character, and four times for the fourth. Some of the virtual keys allow you to backspace, delete characters, and toggle between uppercase and lowercase. When finished, highlight OK and press the center button.
- 4.IP address setting. The next screen will appear, showing the IP Address Setting as Auto and Priority Connection as Off. These defaults should work perfectly. Select OK and press the center button. A screen will appear showing the camera trying to connect to the network.
- If the Auto IP Address Setting option does not work, and you have some networking expertise, change from Auto to Manual, and a screen appears that allows you to enter the IP address, Subnet Mark, and Default Gateway. You can safely leave the Priority Connection parameter set to Off. Fortunately, you probably won’t have to resort to these additional steps.
- 5.Confirm connectivity. After the Wi-Fi connectivity has been made, a screen will appear confirming that your network has been registered, with an orange dot next to the connected network. If you get a screen with a note stating cannot authenticate, or that the input value is invalid, you’ll need to start again at step 1; make sure you have the correct password for the network and be extra careful when keying it in. Remember that when a capital letter is required, you must use the shift feature (an arrow pointing upward) on the virtual keyboard.
- 6.Try it again later. After you have established Wi-Fi connectivity, you can revert to using the a7 IV as usual; a touch of the shutter release button returns it to shooting mode. The camera will retain the connection to the network until you turn it off or it goes into power-saving sleep mode; Wi-Fi is then temporarily disconnected. When you’re ready to use Wi-Fi again, activate the a7 IV while in range of the same network, scroll to Access Point Settings in the Wireless menu, and press the center button. The camera will quickly find your network to re-establish Wi-Fi connectivity.
If you’re connecting to a public Wi-Fi hotspot, the steps should be the same, but you’ll most likely find a screen that requires you to agree to the hotspot’s terms and conditions. Some hotspots may not require you to enter a password.
Selecting an Access Point Manually
If the desired access point (network) is not displayed on the screen as described in Step 2 above, you may need to enter it yourself. Just follow these steps:
- 1.Choose Manual Setting. Scroll down to Manual Setting and press the center button.
- 2.Select Manual Registration. Press the center button to begin the manual registration process.
- 3.Enter SSID. On the Manual Registration screen, there’s a field for entering the SSID name of the access point (network) you plan to use. Press the center button when this field is visible, and the virtual keyboard appears. Enter the data. When you’re finished press the center button.
- 4.Change Security (if necessary). Again, if you have some networking expertise, you’ll know if the security setting on your router is WPA (Wi-Fi Protected Access, the default), WEP (Wired Equivalent Privacy, an older, easily “hacked” protection scheme), or None (effectively, no security). If you want to change the Security setting, highlight that field and press the center button. Select your choice and press the MENU button to return.
- 5.Enter password. The next screen will ask for your password, which you can enter using the virtual keyboard.
- 6.Enter WPS PIN (if necessary). If your WPS connection requires a PIN, you can enter it.
Take care not to lose the network connection by inadvertently using the Initialize or the Reset Network Settings item of the Wireless menu. If you do so, the camera will eliminate all your network settings and you’ll need to repeat the steps in this section.
Wi-Fi Frequency Band
Options: *2.4GHz, 5GHz
My preference: N/A
Select the frequency band used by your router.
Display Wi-Fi Information
Options: Informational screen
My preference: N/A
This entry displays your Wi-Fi network’s information, including IP Address, Subnet Mask, Default Gateway, DNS servers, Mac Address, and Wi-Fi Frequency Band.
SSID/PW Reset
Options: Reset
My preference: N/A
Resets the SSID and password used when using your a7 IV as the access point.
4. Bluetooth
There are four entries in the Bluetooth group. (See Figure 9.12.)

Figure 9.12 Bluetooth group.
- ■Bluetooth Function
- ■Pairing
- ■Manage Paired Device
- ■Display Device Address
Bluetooth Settings
Options: Bluetooth Function (On, *Off); Pairing;
Display Device Address
Your a7 IV can access the GPS information available from your smartphone and embed that data in your image files using low-energy Bluetooth connectivity. Use this, and you no longer have to wonder where you took a photo; the GPS data can be displayed by many applications, including Lightroom’s Map tab. This entry allows you to turn off Bluetooth sharing, pair your phone with your camera, and display the device’s address. Keep in mind that when you initialize your camera, as described in this chapter, pairing settings are canceled as well.
Pairing
Options: Pairs Bluetooth
My preference: N/A
Use this entry to pair your a7 IV with another device, such as your smartphone; the camera’s Device Name is ILCE-7M4.
Manage Paired Device
Options: Delete Paired Devices
My preference: N/A
This entry shows you a list of paired devices. You can select one or more to delete.
Display Device Address
Options: Displays MAC address
My preference: N/A
This is an informational screen that shows the MAC address of your camera.
5. Wired LAN
There are just two entries in the Wired LAND group. (See Figure 9.13.)

Figure 9.13 Wired LAN group.
- ■LAN IP Address Settings
- ■Display Wired LAN Information
LAN IP Address Setting
Options: *Auto, Manual
My preference: N/A
You can specify an IP address manually if you’re into that sort of thing, or allow the camera to specify one automatically.
Display Wired LAN Info
Options: Informational screen
My preference: N/A
Displays an informational screen similar to the Display Wi-Fi Information entry described earlier.
6. Network Option
There are five entries in the Network Option group. (See Figure 9.14.)

Figure 9.14 Network Option group.
- ■Airplane Mode
- ■Edit Device Name
- ■Import Root Certificate
- ■Security (IPsec)
- ■Reset Network Settings
Airplane Mode
Options: On, *Off
My preference: N/A
This setting enables/disables wireless functions. Use this to save power, or when required (as when boarding an airplane). Note that NFC, if active, uses negligible power and that Wi-Fi connections consume power only while the camera is connected to a network, so that ordinarily you do not need to use Airplane mode.
Edit Device Name
Options: Change Device Name
My preference: N/A
By default, the label applied to your camera is ILCE-7M4. You can change it to something else, if, say, you own or have access to three or four a7 IV’s and want to differentiate between them—or simply want to personalize your camera’s “name.”
Import Root Certificate
Options: Import certificate from Slot 1 or Slot 2
My preference: N/A
Encrypted communications with an FTP server may require verification using a root certificate. This entry allows you to import that certificate, which you have stored on Slot 1 or Slot 2. You’ll find detailed instructions on using this FTP function in the Sony FTP Help Guide, described earlier.
Security (Ipsec)
Options: On, *Off; Destination IP Address, Shared Key
My preference: N/A
This entry allows you to encrypt the data when your a7 IV and computer are linked through a Wi-Fi connection. Most a7 IV owners will have no need for this extra layer of security. Are you really concerned about someone stealing your information when you transfer your photos to your laptop while relaxing at Starbucks? If that’s the case, you need to implement even more layers of security, because if a hacker tries to access your computer, safeguarding the photos therein are the least of your worries.
Reset Network Settings
Options: Reset Network settings
My preference: N/A
Changes all network settings to their factory defaults and reboots your a7 IV. It is not available when PC Remote is On.
Setup Menu Tab
The Sony a7 IV’s yellow-coded Setup tab menu has 13 groups, each devoted to specific adjustments that are most likely to be set once and changed only when you need a new camera configuration. (See Figure 9.15.) They are as follows:
- 1.Area/Date
- 2.Reset/Save Settings
- 3.Operation Customize
- 4.Dial Customize
- 5.Touch Operation
- 6.Accessibility
- 7.Finder/Monitor
- 8.Display Option
- 9.Power Setting Option
- 10.Sound Option
- 11.USB
- 12.External Output
- 13.Setup Option

Figure 9.15 Setup menu groups.
1. Area/Date (Stills/Movies)
The Area/Date group has three localization settings that let you specify the language, time parameters, and video system used where you live and work. (See Figure 9.16.)

Figure 9.16 Area/Date group.
- ■Language
- ■Area/Date/Time Setting
- ■NTSC/Pal Selector
Language 
Options: English, French, Italian, Spanish, Japanese, Chinese languages
My preference: English; improving in Spanish; the French have urged me to give up.
If you accidentally set a language you cannot read and find yourself with incomprehensible menus, don’t panic. Just find the Setup tab, the one with the yellow toolbox for its icon, and choose the entry with an icon that looks like an alphabet block “A” to the left of the item’s heading. No matter which language has been selected, you can recognize this menu item by the “A” icon. Scroll to it, press the center button to select this item, and scroll up/down among the options and choose a language, langue, lingua, or idioma, you can read.
Area/Date/Time Setting
Options: Area Setting, Daylight Savings, Date/Time, Date Format
My preference: N/A
Use this option to specify your preferred localization, which will be displayed by the a7 IV, and embedded in the image file’s EXIF metadata along with exposure information and other information. Having the date set accurately also is important for selecting movies for viewing by date. You set these values the first time you operated your camera, but may need to re-enter the information if your battery goes dead long enough for the a7 IV’s internal clock/CMOS battery to discharge. You can choose:
- ■Area Setting. The left/right controls will take you through a world tour map. Settle on your current location. While viewing the map, you can use the up/down controls to turn Daylight Saving time on or off (a Sun icon at bottom right indicates your current status). You can also switch using the entry described next.
- ■Daylight Savings (sic.) Apparently, those who designed your a7 IV didn’t realize the correct English term for summer hours is Daylight Saving Time. They got the French, Italian, and Spanish versions correct however: Heure d’été, Ora Legale, and Horario verano. I can neither confirm nor deny the accuracy of the Japanese and Chinese renditions.
- ■Date/Time. Here you can enter the current month, day, year, hour, minute, and second. You can’t directly change the AM/PM setting; you need to scroll the hours past midnight or noon to change that setting. Use the up/down directional buttons or rotate the control wheel to change each value as needed.
- ■Date Format. Select from Y-M-D, M-D-Y (English), M-D-Y, or D-M-Y. The difference between M-D-Y (English) and M-D-Y is that the English version starts with the English abbreviation for the month. The M-D-Y rendition substitutes the month’s numeric value instead, for the benefit of those who speak other than English but want to use the insane system favored almost exclusively by the USA (and protectorates), Canada, and Micronesia. Virtually everyone else uses D-M-Y.
NTSC/PAL Selector
Options: NTSC, PAL
My preference: N/A
Allows you to switch the camera between the two major television video systems, NTSC (used in North and South America, Korea, Japan, and some other Pacific countries), and PAL, which is used in Europe, the Middle East, and elsewhere. To switch from one video system to another, Sony says you must be using a memory card that was formatted while the camera was using that video system. You’ll be prompted to reformat the card or use a different card. However, the a7 IV does not reformat the card for you (whew!). However, if you try to shoot a video using the “new” system, you should be forced to reformat. A message appears asking you to reformat the card in the current slot the first time you try to record a movie in the new video system.
Your camera will be set up at the factory to default to the video system used in your country. If you switch to the alternate system, the start-up screen will display a message “Running on NTSC” or “Running on PAL” to make sure you’re aware of the change. Note that a few countries in South America (Brazil, Argentina, Paraguay, and Uruguay) use a modified PAL system, while others, including Bulgaria, France, Greece, Guiana, Iran, Iraq, Monaco, Russia, and Ukraine use a third system, called SECAM.
2. Reset/Save Settings
The Reset/Save Settings group has two settings. (See Figure 9.17, left.)
- ■Setting Reset
- ■Save/Load Settings

Figure 9.17 Reset/ Save Settings group (left). Setting Reset options (right).
Setting Reset
Options: Camera Settings Reset, Initialize
My preference: N/A
If you’ve made a lot of changes to your camera’s settings, you may want to return the features to their defaults, so you can start over without manually going back through the menus and restoring everything. This menu item lets you do that. Your choices, shown in Figure 9.17, right, are as follows:
- ■Camera Settings Reset. Resets the main shooting parameters for both still and movies to their default values. Your Fn settings remain.
- ■Initialize. Resets virtually all settings to their default values, including the time/date and Wi-Fi settings, but not including any Picture Profile adjustments or Different Settings for Still/Movies (discussed later in this chapter).
Save/Load Settings
Options: Load, Save, Delete
My preference: N/A
Consider this entry an extension of the Memory Recall feature of the a7 IV. It allows you to save current camera settings to a memory card. You can save up to 10 settings, named, by default, CAMSET01.DAT through CAMSET10.DAT, and which are always stored on the card in Slot 1. You have the option of choosing a name that’s different from the default, to help you remember a particular group of settings. However, the 10-setting limit applies no matter what nomenclature you choose.
The files are stored on your memory card in a folder named SONY > SETTING > 7M4 > CAMSET and are, of course, removed when you reformat the card. At some later time, you can load them back into the camera, choosing from a scrolling list of all the settings files available on that card. From there, you can store the settings in the a7 IV’s Memory Recall registers if you like.
In effect, you can have many, many more stored settings than is available with the Memory Recall feature (described in Chapter 6). You could dedicate several memory cards just to store your settings if you like. (If you use low-capacity memory cards, it would cost you very little to use them for nothing else.)
There are some limitations, of course. Settings that have no parameters, such as Focus Magnifier, cannot be saved. You cannot load or save settings when the camera’s mode dial is set to the 1, 2, or 3 Memory positions. In addition, there are some settings that cannot be saved (in other words, the a7 IV retains those settings even when the new ones are loaded). They include IPTC, Copyright Information (Shooting), External Flash Settings, White Balance Custom Settings (Exposure/ Color), Face Memory (Focus), FTP Transfer Function, WPS Push, Access Point Settings, Wi-Fi Frequency Band, LAN IP Address Setting, Edit Device Name, Import Root Certificate, Security (Ipsec) (Network), and Area/Date/Time Setting (Setup).
3. Operation Customize
The Operation Customize group has eight entries for customizing the way your a7 IV responds to button and dial controls, rotation of the focusing ring, and display of shooting information on your LCD monitor and electronic viewfinder. The first seven are shown in Figure 9.18; scroll down to see the eighth, Zoom Ring Rotate.

Figure 9.18 Operation Customize group.
- ■Custom Key/Dial Settings (Stills)
- ■Custom Key/Dial Settings (Movies)
- ■Custom Key Settings (Playback)
- ■Function Menu Settings
- ■Different Settings for Stills/Movies
- ■DISP (Screen Display) Settings
- ■Movie Record with Shutter
- ■Zoom Ring Rotate
Your a7 IV has a mind-boggling array of customization features. I covered the ways you can create your own My Menu system and store custom arrays of settings using the 1, 2, and 3 Memory Recall positions on the mode dial in Chapter 6.
In addition you can assign roughly 120 different functions listed in the Shooting, Exposure/Color, Focus, Network, and Setup tabs to buttons and dials of your choice. Some choices enable you to invoke features, such as Zoom, with a button-press that would otherwise require a visit to the menu system. Others allow you to turn features, like Eye AF, on or off as needed. While not all functions can be assigned to every control, you’ll find that you should be able to configure your camera to operate exactly the way you need it to. Keep in mind that once you’ve reassigned the controls of your a7 IV, anyone else using your camera (and sometimes yourself) may find the new function assignments confusing.
Custom Key/Dial Settings (Stills)
Options: Definitions for buttons including AEL, AF-ON, Custom C1-C4, Multi-selector center, Center, Left, Right, Down, Movie Shooting, Focus Hold (on lens), plus Control Wheel, Front Dial, Rear Dial Left, and Rear Dial Right
My preference: N/A
This entry can be accessed in both Stills and Movie modes, but its settings are applied only in Still mode. It allows customization of as many as 12 buttons of the camera, Focus Hold (found on some lenses), and front, rear left, and rear right dials. You can access each of these using five pages of options, shown in Figure 9.19. (The bottom two in the figure show two different ways of defining the dial/wheel controls.)

Figure 9.19 Default values of assignable controls.
Indeed, the following is a list of the only buttons on the camera that you cannot redefine to perform some other function:
- ■Shutter release. It is always used to take a picture and will initiate autofocus if you haven’t assigned AF-ON and other AF functions to a different key.
- ■Up directional button. It is used to change your information display in shooting and Playback modes, and as a directional button in menus.
- ■Playback button. Activates picture review.
- ■Fn (Function) button. (Almost) always summons the Function menu, and in Playback mode sends the current image to a smart device. However, you can redefine the Fn button to several functions when in Playback mode (only), as I’ll describe shortly.
Your custom key definitions override any default definitions for those buttons when in Shooting mode; they retain their original functions in Movie and Playback mode (unless you redefine them, as I’ll describe shortly). Because button definition is such a personal choice, I steer away from recommending particular definitions for each of the buttons, even though certain functions can be accessed only by assigning them to a custom key setting. Our fingers and agility vary, so, while buttons like the AF-ON button are traditionally used for something like back-button focus, you may prefer to assign that function to a different key.
When assigning definitions to keys, keep in mind that certain behaviors can be used only if you have made them available using a custom key definition. For example, if you want to use the Bright Monitoring feature, which temporarily turns the Live View Setting Effect to Off to increase the brightness level of the screen in dark locations, you must assign it to a key.
Each of the customizable controls, except the center/down buttons and control wheel, have a default behavior assigned for shooting mode, listed below. In Movie mode, these buttons have the exact same behavior, unless you choose a different option. In Playback mode, only Movie, Fn button, and C1-C3 buttons can be redefined. The Fn and Custom 3 controls have the only default behavior (Send and Protect, respectively), while the Movie and Custom 1 and Custom 2 buttons keep the same definitions assigned to Still and Movie modes until you reassign them.
- ■Custom 1: White Balance
- ■Custom 2: Focus Area
- ■Custom 3: Focus Mode (Protect in Playback mode)
- ■Custom 4: Touch Operation Select
- ■Multi-selector Center button: Focus Standard
- ■AEL button: AEL Hold
- ■AF-ON button: AF ON
- ■Control Wheel: Not Set
- ■Control Wheel Center button: Not Set
- ■Left button: Drive Mode
- ■Right button: ISO
- ■Down button: Not Set
- ■Up button: DISP (Not customizable)
- ■Center button: Not Set
- ■Focus Hold (on lens): Focus Hold
- ■Movie Button: Shoot Movies
- ■Front Dial: Av/Tv (Av in Manual mode)
- ■Rear Dial Left: Av/Tv (Tv in Manual mode)
- ■Rear Dial Right: Exposure Compensation
- ■Control Wheel: Not Set
Useful Assignable Functions
Here’s a list of useful functions you can assign to a control:
- ■Interval Shooting. If you find yourself using the new Interval Shooting feature frequently, and think it’s a pain to navigate to the Shooting menu every time, you can assign a custom key of your choice to jump immediately to the interval photography settings.
- ■Face/Eye Priority in AF. Assign this function to one of the available keys to enable/disable giving higher priority to detected faces. You’ll find this capability especially useful to turn the feature off when your subjects include faces that may be difficult for the a7 IV to detect (often people with long bangs or wearing sunglasses) or in difficult lighting conditions (shade, backlight, or low-light scenes).
- ■Subject Detection. If pet or animal photography is a big part of your shooting, you switch back and forth among Human, Animal, and Bird eye detection more frequently than your average photographer. Assign Subject Selection Detection to a custom key, and you can cycle among the three modes with multiple presses of a button. Or activate Eye AF, switch from right to left eye, or invoke Focus Magnifier to let you focus on a particular part of your subject.
- ■Shot Mark/Divider Frame. You must define a custom key to insert a Shot Mark or Divider Frame into your movie or stills sequences. Shot Marks can be used for selecting, transferring, or editing movies, while Divider Frames can be inserted to separate one sequence of shots from another. Assign a custom key (Add Shot Mark 1/Add Shot Mark 2) to insert Shot Marks. Assign a different custom key (Create Divider Frame) and then press that key each time you want to insert a Divider Frame.
- ■FINDER/MONITOR switch. If you turn off automatic switching between finder and monitor, you’ll want to have a button that will quickly toggle between the two. The down button has no default behavior, and FINDER/MONITOR is a good choice.
- ■Fast ISO change. Assign ISO to the control wheel, and as you shoot you can spin the wheel to adjust your ISO setting on the fly. While the a7 IV’s Auto ISO feature works well (especially when you’re shooting fast and quickly), at times the photographer can do a better job of adjusting sensitivity to suit the task at hand.
- ■More pairs. The control wheel and its center button can also be assigned pairs of related functions. For example, if you’ve set the control wheel to change ISO sensitivity, the center button can be used to specify ISO Auto Minimum Shutter Speed when you select ISO Auto with the wheel. Image Size/Quality is another good pair for the wheel/center button combination.
- ■Freed-up keys. Once you assign ISO to the control wheel, that leaves the right button, formerly used to set ISO, free for a new definition. You could assign it to Metering Mode or another function.
- ■MENU. I find the MENU button easy to find, even in the dark, as it’s located to the immediate left of the viewfinder. If you often make adjustments while viewing through the viewfinder, you might prefer having a second menu button that can be accessed with the camera up to your eye. Assign MENU to the C2 button, and you can summon menus by moving your trigger (shutter) finger from the shutter release position to the top-panel custom key.
- ■My Dial Assignments. You can assign up to three different behaviors to the control wheel and/or control dial, and return them to their default functions quickly. The custom functions let you activate the alternate behavior by holding the button down, switching among the three dial assignments by spinning a control, and toggling one of the three on or off. I’ll explain this feature later in the chapter.
Custom Key/Dial Settings (Movies)
Options: Definitions for buttons including AEL, AF-ON, Custom C1-C4, Multi-selector center, Center, Left, Right, Down, Movie Shooting, Focus Hold (on lens), plus Control Wheel, Front Dial, Rear Dial Left, and Rear Dial Right
This menu entry can be accessed in both Still and Movie modes, but its adjustments are applied only when you are using Movie mode. You can assign different functions to each of the customizable controls when shooting movies, assuming you have such a need and an excellent memory. The default definition for those controls is Follow Custom (Stills), which uses whichever behaviors you have assigned using the Custom Key (Stills) entry.
Custom Key Settings (Playback)
Options: Definitions for Custom Buttons 1, 2, and 3, plus Movie and Fn/Send to Smartphone buttons
My preference: N/A
Only a limited number of controls and functions are available using this entry. The Custom 1, 2, and 3 buttons can be assigned behaviors during Playback, most of them options from the Playback tab itself, plus some from the Network and Setup tabs. C1 and C2 follow the setting made for Stills/ Movie mode (unless you choose another behavior), while C3 has a default setting of Protect during image review. The Fn button, which by default sends the displayed image to your smartphone, can also be defined to switch to FTP settings, and a few Setup functions.
Function Menu Settings
Options (Stills) Defaults: Top row: Drive Mode, Focus Mode, Focus Area, ISO, Exposure Compensation, Metering mode; Bottom row: Flash Mode, Flash Creative Look, White Balance, SteadyShot, Image Quality, Recording Media Settings
Options (Movies) Defaults: Top Row: Audio Recording Level, Focus Mode, Focus Area, Picture Profile, Zebra Display, Zebra Level; Bottom Row: Peaking Display, Peaking Level, White Balance, SteadyShot, Focus Map, Recording Media Settings
My preference: N/A
When you press the Fn button when in Shooting or Movie modes, the Function screen that displays the icons shown in Figure 9.20 appears. Still functions are shown at top, and Movie functions in the bottom half of the figure. Each version has six settings each in two rows arrayed along the bottom. The default options are illustrated.

Figure 9.20 Function menu default settings.
This entry allows you to change the function of any of the 12 positions in either Function menu, so you can display only those you use most, and arrange them in the order that best suits you. There are 55 different functions available, plus Not Set. Browse through the lists and decide which 12 you want to display on the Function menu.
Note that you can select Not Set to leave a position blank if you want to unclutter your screen, or even duplicate an entry in multiple positions, accidentally or on purpose. Don’t underestimate the power of this function. You can, in effect, create your own pop-up Function menu using any of more than four dozen different functions.
Different Settings for Stills/Movies
Options: Enable: Aperture, Shutter Speed, ISO, Exposure Compensation, Metering Mode, White Balance, Picture Profile, Focus Mode
My preference: Enable all
Veteran still photographers moving into video soon discover that shooting movies requires a whole ‘nother skill set. As you’ll learn in Chapter 10, choice of shutter speed can be critical for different reasons when capturing video; focus modes and even white balance may be selected in different ways when shooting stills and movies. Sony gives your a7 IV the ability to use the same settings for stills and movies, or mandate different settings for your choice of parameters.
The setting screen shown in Figure 9.21 displays a scrollable column listing Aperture, Shutter Speed, ISO, Exposure Compensation, Metering Mode, White Balance, Picture Profile, and Focus Mode, with a check box next to each. Highlight the setting you want to specify and press the center button to add or subtract a checkmark. Then highlight OK to confirm, or Cancel to chicken out and press the center button again.

Figure 9.21 Different settings for still and movie shooting.
Display (Screen Display) Settings
Options (Monitor): Display All Info., No Disp. Info. (Exposure: On, Exposure: TimeOut), Histogram, Level, For Viewfinder, Monitor Off
Options (Viewfinder): Display All Info., No Disp. Info., Histogram, Level
My preference: Activate all
Use this item to specify which of the available display options will—and will not—be available in Shooting mode when you use the LCD or viewfinder and press the DISP button to cycle through the various modes. Choose from Monitor or Viewfinder and mark or unmark the screens you want to enable or disable. The Monitor selection includes a For Viewfinder option that displays a text/ graphic display of your current settings on the back-panel LCD. (See Figure 9.22.)
You can use this menu item to deselect one or more of the display options, so it/they will never appear on the LCD when you press the DISP button. To make that change, scroll to an option and press the center button to add or remove the check mark beside it. A preview of the display screen is shown as a thumbnail. Naturally, at least one display option must remain selected. If you de-select all of them, the camera will warn you about this and it will not return to Shooting mode until you add a check mark to one of the options. If you turn the camera off while none are selected, the camera will interpret this as a Cancel command and return to your most recent display settings.
The viewfinder versions have some slight differences; for example, at the bottom of the viewfinder version is an analog exposure indicator. You can select a different set of displays for the viewfinder and monitor. That is, you can choose to view the plain-vanilla No Display Info view in the EVF and Display All Info on the LCD monitor. Here’s a recap of the available display options for the monitor:
- ■Display All Info. The default screen when you first turn the camera on, this option displays data about current settings for a complete overview of recording information. Not all the information in the figure may be displayed at one time, and there are additional icons not shown because they occupy the same space on the screen as another indicator.
- ■No Disp. Info. Despite its name, this display option provides the basic exposure information settings, in a conventional size. Select Exposure: On and the exposure information will remain visible; with the Exposure: TimeOut choice, the exposure information will vanish after a few seconds.

Figure 9.22 Display Screen settings for Monitor (left) and Finder (right).
- ■Histogram. Activate this option if you want to be able to view a live luminance histogram to assist you in evaluating the exposure before taking a photo. The basic shooting data will appear in addition to the histogram.
- ■Level. This display shows how much the camera is rotated around the lens axis (horizontal tilt) as well as how far it is tilted forward and backward. When the camera is not perfectly level, orange indicators show the amount of forward/backward and horizontal tilt. (See Figure 9.23, left.) When the camera is level in both directions, the indicators turn green. (See Figure 9.23, right.)
- ■For Viewfinder. This display can be shown only on the LCD monitor. When visible, you can press the Fn button to produce the Quick Navi screen, as explained in Chapter 2.
- ■Monitor Off. You must scroll down to see this choice. When this option is selected, pressing the DISP button eventually takes you to a blank monitor screen, which you might need to use when a brightly lit LCD is distracting or intrusive.

Figure 9.23 The Level display shows how much the camera is rotated around the lens axis.
(Movie) Record with Shutter
Options: On, *Off
My preference: Off
Your a7 IV gives you the option of using the shutter release to start and stop shooting movies as an alternate to the Movie button located to the right of the viewfinder. Select On, and either button can be used; choose Off, and only the movie button will activate/stop movie capture. It’s usually easier to find the shutter release, which is larger and located on top of the camera, when your eye is up to the viewfinder. It’s easy to press the AF-ON or even AEL button by mistake. If your current session will be confined to video capture, you’ll probably decide that using the shutter button will be more convenient.
I like this option when I am capturing movies hand-held. If the a7 IV is mounted on a tripod and I am generally framing, composing, or focusing using the LCD monitor, I’ll usually use either the Movie button or a remote release to stop/start video capture. (The latter helps avoid camera motion from “stabbing” the Movie button with a finger.)
Zoom Ring Rotate
Options: *Left/Right (Wide-Tele), Right/Left (Wide-Tele)
My preference: N/A
This setting controls whether power zooming (with PZ-designated lenses that have a power zoom feature) proceeds from wide-angle to telephoto settings when the zoom control is pressed from left to right, or in the reverse direction, from right to left. The setting is compatible only with power zoom lenses that support this feature.
4. Dial Customize
The Dial Customize group has six settings that let you specify settings for the front dial, both rear dials, and the control wheel. (See Figure 9.24.)

Figure 9.24 The Dial Customize group.
- ■Custom Key/Dial Settings (Stills)
- ■Custom Key/Dial Settings (Movies)
- ■My Dial Settings
- ■Av/Tv Rotate
- ■Function Ring (Lens)
- ■Lock Operation Parts
Custom Key/Dial Settings (Stills) /Custom Key/Dial Settings (Movies)
Options: Define custom keys and dials
My preference: N/A
These two entries more or less duplicate the Custom Key/Dial Settings entries described above, except that summoning either takes you immediately to the Dial/Wheel setting screen with the settings for the front, rear left, and rear right dials and control wheel.
My Dial Settings
Options: Allows temporarily changing the functions of the control dials or control wheel
My preference: N/A
This is an extremely versatile feature, which allows you to temporarily assign a different behavior to the control wheel and/or control dials, and still return them to their default functions easily. Most of the time in shooting mode, you’ll want to use the wheel/dial to control shutter speed or aperture. But a quick spin of the dial/wheel can be convenient for making other settings, such as ISO or white balance adjustments. You can assign that alternate function to one of those controls, and then recall it by pressing a custom key that you’ve defined.
When you access this entry, a screen similar to the one shown in Figure 9.25 appears. The left column shows the front dial, rear dial left, rear dial right, and control wheel. The right three columns show the current values for the three definitions for each, called My Dial 1, My Dial 2, or My Dial 3. Before you have added any definitions, each of the current settings will be Not Set, represented by doubledashes like the ones at right in the figure.

Figure 9.25 My Dial Settings.
Note that each of the three My Dial settings can define actions for front dial, rear dials, and control wheel, but you do not have to define a function for all four. For example, you could use My Dial 1 to assign a particular function to the control wheel, but leave the front and rear dials at Not Set (which means they would retain their default behaviors).
To assign a definition, just follow these steps:
- 1.Access Setup > Dial Customize > My Dial Settings. The settings screen appears.
- 2.Choose Select My Dial 1, 2, or 3 registers. Use the left/right directional buttons to highlight the My Dial 1, My Dial 2, or My Dial 3 columns.
- 3.Select Control to Define. Use the up/down directional buttons to choose from Front Dial, Rear Dial Left, Rear Dial Right, or Control Wheel within the My Dial column you’ve selected.
- 4.Press the center button. A set of screens will appear with seven pages that encompass the 16 possible functions (plus Not Set) that can be assigned to the control you’ve highlighted:
- Shooting Tab
- ♦Audio Recording Level
- Exposure Tab
- ♦Av/Tv (Av in M mode)
- ♦Av/Tv (Tv in M mode)
- ♦Aperture
- ♦Shutter Speed
- ♦Shutter Speed (Step)
- ♦ISO
- ♦Exposure Compensation
- ♦White Balance
- ♦White Balance (Color Temperature)
- ♦Creative Look
- Focus Tab
- ♦Focus Area
- ♦Move AF Frame Left/Right (Standard)
- ♦Move AF Frame Left/Right (Large)
- ♦Move AF Frame Up/Down (Standard)
- ♦Move AF Frame Up/Down (Large)
- Setup Tab
- ♦Not Set
- 5.Press the center button to confirm. You can then repeat steps 2 to 4 to define additional My Dial registers.
- 6.Highlight OK. Press OK to exit.
- 7.Assign My Dial 1, 2, or 3 to a custom key. Use the Custom Key (Stills) entry described earlier to assign the temporary behavior to the button you will use to switch to the alternate function. You have three different modes for activating the feature:
- •My Dial 1 (or 2, or 3) During Hold. When you press the assigned custom key, the alternate function for the specified My Dial register is active. As soon as you release it, the wheel/dial resumes its default function.
- •My Dial 1 → 2 → 3. When you press and hold the Custom Key, rotating that control switches among each of the registers in turn, and then wraps around to the first. Think of this as a metacontrol: instead of activating a particular My Dial register and its settings, it allows you to quickly cycle among all three of them, each with their own set of settings. I suspect only those who truly need a larger number of alternate actions for the control wheel and control dial will really need this (and I don’t envy them the learning curve required to remember which My Dial settings contain which customized functions).
- •Toggle My Dial 1 (or 2, or 3). The specified My Dial register is activated when the custom key is pressed, and deactivated when the custom key is pressed again. Use this if you need to turn on particular features for a period of time, and then return to the controls’ default operation with a second key press.
Av/Tv Rotate
Options: *Normal, Reverse functions
My preference: N/A
This entry lets you specify the direction of rotation of the front and rear dials, plus the control wheel when using them to adjust the aperture or shutter speed. When the default Normal is in effect, rotating the appropriate dial clockwise produces a smaller f/stop or faster shutter speed; rotating counterclockwise sets a larger f/stop or slower shutter speed. Choose Reverse, and clockwise rotation sets a larger f/stop or slower shutter speed, while counterclockwise produces a smaller f/stop or faster shutter speed. This is a personal preference setting, often invoked by those who are migrating to the Sony world from another platform that default dial rotation to the opposite direction.
Function Ring (Lens)
Options: Power Focus, APS-C/Super 35-Full-frame Select
My preference: N/A
Sony has begun introducing lenses with an additional “Function” control ring, including the FE 400mm f/2.8 GM (SEL400F28GM) and FE 600mm f/4 GM OSS, which ring in at roughly $12,000 and $13,000, respectively. The more affordable FE 100-400 f/4-5.6 GM OSS also comes with a function ring. An accompanying select switch on these lenses has three positions: Preset, Function, and Off.
Here’s a quick explanation:

Figure 9.26 The Function ring’s mode can be selected with these controls.
- ■Preset. In this position, pressing the SET button on the lens (see Figure 9.26) memorizes a desired focus point. The present focus plane can be recalled instantly using the function ring. That’s an important feature for sports photography and other scenes with rapid movement. Importantly, the preset focus point can be specified and recalled whether the photographer is using autofocus or manual focus, and can be outside any focus limit range currently active.
- ■Function. In this position, the function ring can be assigned a specific function.
- •The Power Focus function uses focus-by-wire technology to move the focusing plane toward infinity when the function ring is rotated to the right, and closer when the function ring is rotated to the left. However, the speed at which focus is adjusted is determined by the amount of function ring rotation. This allows smooth focus shift for movies. Think of it as power “zoom” for focusing.
- •The APS-C/Super 35-Full Frame Select function switches quickly between cropped and full-frame modes, allowing you to make the adjustment using a lens control rather than using the menus or a custom-defined key on the camera body.
- ■Off. The function ring does nothing.
Lock Operation Parts
Options: *Off, Multi-Selector Only, Dial+Wheel, All
My preference: Off
If you want to avoid accidentally changing settings by inadvertently using the front/rear dials, multiselector, or control wheel, you can implement this locking option. Choose Lock and the specified dial or dials are frozen whenever the Fn button is pressed and held down. A “Locked” indicator appears on the screen. If the default Off option is selected, pressing the Fn button has no effect on the controls. You can choose to freeze the multi-selector (only), the front/rear control dials plus control wheel, or all four controls.
5. Touch Operation
The Touch Operation group has four settings that let you specify how your back-panel LCD monitor responds to touch gestures. (See Figure 9.27, left.)
- ■Touch Operation
- ■Touch Panel/Pad
- ■Touch Pad Settings
- ■Touch Functions in Shooting

Figure 9.27 Touch Operation group.
Touch Operation
Options: *On, On: Playback Only, Off
My preference: On
This entry allows you to enable/disable the touch functions of the LCD monitor. Choose on if you plan on using the spot focusing and tracking features, particularly for video. If you find touch focus distracting or not necessary, or discover you are accidentally changing the focus point through inadvertent touches, select Playback Only and you can still use gestures to review images and zoom in and out within them.
Touch Panel/Pad
Options: Both Valid, *Touch Panel Only, Touch Pad Only
My preference: Both Valid
As I described in Chapter 2, the a7 IV has a touch-sensitive LCD. With this setting, you can define whether the LCD-oriented Touch Panel or EVF-oriented Touch Pad, or both are active. The dual screen/pad modes are used because the touch feature can be used in two different ways: as a touch screen or panel when you are using the LCD monitor to compose your photos, and as a touch pad that you can tap when the camera is raised to your eye and you’re using the electronic viewfinder. (See Figure 9.27, right.)
Unfortunately, the touch features are limited to the ability to specify a focus point when shooting stills and videos. You still have to press the shutter release halfway or the AF-ON button (or other defined key) to initiate focus. You can’t select menu entries, type in text, scroll through playback views, or pinch/expand with your fingertips to zoom in and out during image review. However, the touch focus feature is quite useful, especially when shooting movies, as it allows selecting a focus area with a gentle tap. There are two modes:
- ■Touch screen. When active and you’re using the LCD monitor to compose, you can select a focus point or zone anywhere that the a7 IV is able to achieve autofocus (that is, most of the frame other than the edges). You can tap the screen or hold down your finger and slide the focus area around. Cancel your focus selection by pressing the center button. A quick tap may not register; this function requires a firm press. I’ll explain the various AF-area modes in Chapter 8.
- ■Touch pad. When touch pad mode is active and you’re using the electronic viewfinder to compose, you can touch the LCD monitor screen to specify the focus area. You don’t have to tap the exact area (actually, that’s impossible, because you’re not actually looking at the LCD). Instead, when you touch the pad, a focus point appears in the viewfinder relative to the location on the LCD. That is, if you tap the center of the sensitive area, the focus point appears in the center; tap to the right or left, and the focus area appears to the right or left side. As I’ll explain shortly, that mode is needed because you can change the size of the sensitive area of the LCD screen. Once the focus area is displayed, keep your finger on the screen and slide it around to the position you want, using your view through the EVF as your reference.
Select whether you want the touch screen and touch pad, or only one to be used, depending on your preference.
Touch Pad Settings
Options: Operation in Vertical Orientation: *On, Off; Touch Position Mode: *Absolute Position, Relative Position; Operation Area: Whole screen, *Right/Left half of screen, Upper/Lower right/ left corners
My preference: N/A
Additional settings that relate only to the touch pad configuration can be selected from this menu entry:
- ■Operation in Vertical Orientation. Here you can specify whether touch controls are available when the camera is oriented in the vertical position (On), or only when the camera is held in horizontal orientation (Off).
- ■Touch Position Mode. Choose Absolute Position to allow you to quickly move the focusing frame to a distant position on the LCD. This setting automatically changes the Operation Area (described next) to encompass the full screen. Use Relative Position to move the focus point relative to the location on the LCD.
- ■Operation Area. By default, the entire touch pad is sensitive when using the EVF. However, if your ocular dominance favors your left eye (i.e., you’re “left-eyed”), you may be more comfortable choosing an active area on the left side of the screen that avoids contact with your nose. The “relative” orientation remains the same, but is limited to that reduced area. However, if you selected Absolute Position for the Touch Position above, the entire screen is used, regardless of your setting here. (See Figure 9.28.)
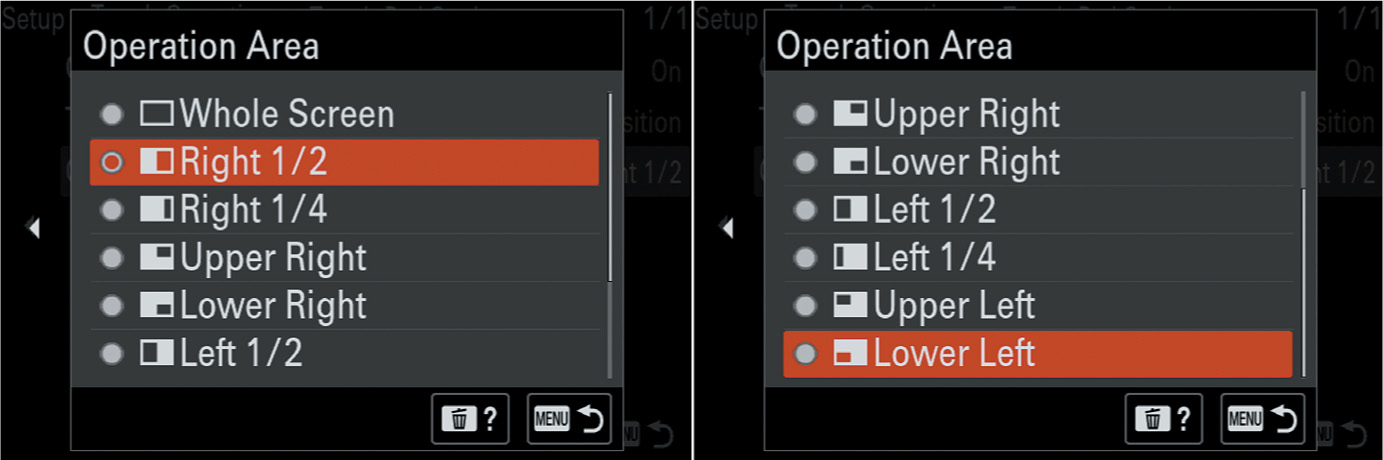
Figure 9.28 Choose the touch-sensitive area of the LCD monitor.
Touch Function in Shooting
Options: Touch Focus, *Touch Tracking, Off
My preference: Touch Tracking
As I noted in Chapter 2, the a7 IV’s touch screen can operate in two different modes: Touch Focus and Touch Tracking. You can have only one mode active at a time, but their functions overlap enough that one of the three will likely do the job for you. This entry allows you to activate the mode you prefer. To recap:
- ■Touch Focus. Tap the LCD screen and select a focus point or zone anywhere that the a7 IV is able to achieve autofocus (that is, most of the frame other than the edges).
- •Tap the LCD screen. The camera will focus at that point. Or slide your finger around the screen to move the focus area around within the frame. You can do this whether composing on the LCD monitor or looking through the viewfinder.
- •Double tap the LCD screen. In manual focus mode, a double-tap on the LCD activates the focus magnifier.
- In autofocus mode, the a7 IV will focus when you press the shutter release down halfway. You can deactivate touch focus by pressing the center button, or by tapping the “cancel focus” icon (a pointing finger with an X next to it) that appears at upper right on the screen. A quick tap may not register; this function requires a firm press.
- This mode is not available for autofocus activation when Focus Area is set to Flexible Spot or Expand Flexible Spot, but you can still move the focus frame around. In Movie mode, Spot Focus can be used with the LCD only. Touch Focus is not available when using Digital Zoom or with A-mount lenses when using the LA-EA2 or LA-EA4 adapters.
- ■Touch tracking. In this mode, you can specify a subject that will be tracked by tapping the LCD monitor. Tracking will start and continue until you press the center button or tap the Cancel Tracking icon in the upper-right corner of the LCD monitor. The camera will focus on the tracked subject when you press the shutter release down halfway. Note that this feature is not available in Manual Focus modes; with Smart, Clear Image, or Digital zoom features; and when using the LA-EA2 or LA-EA4 lens adapters. It is also disabled in Movie mode when Record Setting is set to 120p/100p.
6. Accessibility
The Accessibility group has only one entry: Screen Reader, and it’s a doozy if you happen to have an application that involves having your camera read menu settings to you.
- ■Screen Reader
Screen Reader
Options: Screen Reader: On, *Off; Speed: Fast 1-3, Standard, Slow 1-2; Volume (0-15).
My preference: N/A
You can bring your camera to life, like Frosty the Snowman, and you don’t need a magic hat. However, you must have an a7 IV sold in North America and set to English. With that combination, set your camera to read menu listings to you in a clear voice provided by Siri and Alexa’s third cousin. I suspect this entry is an exploration into additional accessibility options to come. Those who are visually impaired to the extent that reading the camera’s menus is difficult may find this feature useful. When activated, a pleasant female voice will track your navigation through the menu system by telling you where you are and the parameters of each setting that you make.
You can turn the feature on or off, adjust the reading speed, and set the volume. (See Figure 9.29.)

Figure 9.29 Settings for the Screen Reader feature.
7. Finder/Monitor
The Finder/Monitor group has six settings that let you specify the characteristics and selection of your viewfinder and LCD monitor displays. (See Figure 9.30.)

Figure 9.30 Finder/Monitor group.
- ■Select Finder/Monitor
- ■Monitor Brightness
- ■Viewfinder Brightness
- ■Finder Color Temperature
- ■Display Quality
- ■Finder Frame Rate
Select Finder/Monitor
Options: *Auto, Viewfinder (Manual), Monitor (Manual)
My preference: Auto; then define a Custom Key to perform Monitor Off
This uses the eye sensor located above the viewfinder window, but it controls only whether the camera turns off the LCD and switches the view to the viewfinder when your eye comes near the EVF. With the default setting of Auto, the screen goes blank and the viewfinder activates when your eye (or any other object) approaches the Eye-Start sensor. The eye sensor is disabled when you tilt the LCD monitor away from the camera body, presumably because in that mode you’ll be working exclusively with the LCD and do not want the a7 IV to switch to viewfinder mode if your hand (or any other object) passes in front of the sensor.
Switch to the Viewfinder (Manual) or Monitor (Manual) options and the eye sensor no longer initiates a switch from one display to the other. The display is then always sent to the viewing device you selected, and the other one is turned off. You might want to use the Monitor option if you are doing work involving critical focusing using the LCD, and as you examine the screen closely, your face will frequently be close to the back of the camera where the Eye-Start sensor might detect it. Or, perhaps, you are shooting at a concert or other venue where the bright LCD can be distracting to others. Choose Viewfinder (Manual), and the shooting preview, menus, photos displayed for review during playback, and so forth will be shown only in the EVF.
Most of the time, it’s easier to leave this setting on Auto, and use the Operations Customize functions explained earlier in this chapter to assign Finder/Monitor Selection to a Custom Key. Alternatively, you can activate the Monitor Off setting in Setup > Operation Customize > DISP (Screen Display) Settings > Monitor, and use the DISP button to cycle the LCD monitor off.
Monitor Brightness
Options: *Manual, Sunny Weather
My preference: Manual
When you access this menu item, two controls appear. The first is a Brightness bar (shown just above the grayscale/ color patches in Figure 9.31). It’s set to Manual adjustment by default but press the center button and you can change it to Sunny Weather for a brighter display. You might resort to this setting if you’re shooting in bright sun and find it hard to view the LCD even when shading it with your hand.
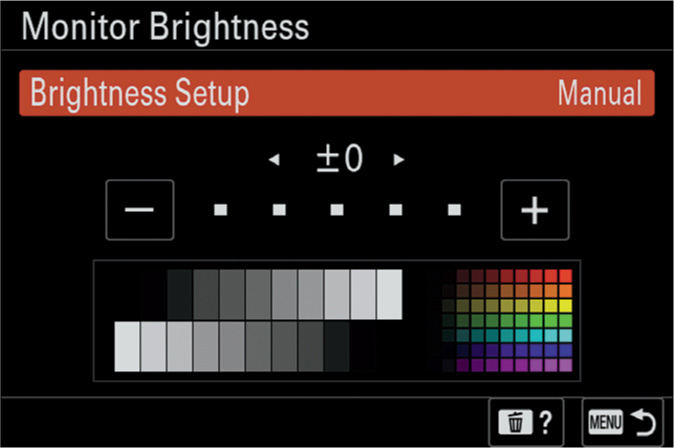
Figure 9.31 Adjust monitor brightness.
If you set it to Sunny Weather, the LCD brightness will automatically increase, making the display easier to view in very bright light. This makes the display unusually bright and less suitable for judging exposure and color, so use it only when it’s really necessary. In such bright conditions, you’re usually better off using the electronic viewfinder. Remember too that it will consume a lot more battery power, so have a spare battery available.
The grayscale steps and color patches can be used as you manually adjust the screen brightness using the left/right directional buttons. Scroll to the right to make the LCD display brighter or scroll to the left to make the LCD display darker, in a range of plus and minus 2 (arbitrary) increments. As you change the brightness, keep an eye on the grayscale and color chart to visualize the effect your setting will have on various tones and hues. The zero setting is the default and it provides the most accurate display in terms of exposure and color, but you might want to dim it when the bright display is distracting while shooting in a dark theater, perhaps. A minus setting also reduces battery consumption but makes your photos appear to be underexposed (too dark).
I prefer to choose Manual but then leave the display at the zero setting. This ensures the most accurate view of scene brightness on the LCD for the best evaluation of exposure while previewing the scene before taking a photo. When shooting 4K video or 120/100 fps video, the Monitor Brightness setting is ignored.
Viewfinder Brightness
Options: *Auto, Manual
My preference: Manual+1
This entry is similar to Monitor Brightness control but adds an Auto setting that adjusts the viewfinder’s output based on the a7 IV’s reading of the ambient light falling on the full-frame sensor. No Sunny Weather option is available, but I still like a slightly brighter viewfinder, so I prefer Manual with a +1 boost. A notice will appear on the LCD monitor advising you to look through the viewfinder and make your settings. When shooting 4K video or 120/100 fps video, the Monitor Brightness setting is ignored.
Finder Color Temperature
Options: +2 to –2; Default: 0
My preference: N/A
While looking through the viewfinder, press the left/right buttons to adjust the color balance of the finder to make it appear warmer (using the left button) or colder/bluer (using the right button), according to your preference.
Display Quality
Options: *Standard, High
My preference: Standard
Two parameters determine the quality of the image you see through the viewfinder. This one determines the resolution of the image, while the one that follows, Finder Frame Rate, determines how many frames per second are displayed. I prefer Standard, because it uses a lot less battery power and the difference between Standard Quality and High Quality is hard to spot. Note that this entry is available only when the Finder Frame Rate is set to Standard.
Finder Frame Rate
Options: *Standard, High
My preference: Standard
To reduce a slight jerkiness in the EVF when shooting action, you can switch from the default Standard (60 fps) frame rate to a blistering High (120 fps) rate that displays fast-moving subjects more smoothly. The tradeoff is a reduced resolution view at the highest frame rate. That’s because at the High setting, Display Quality is forced to Standard. Standard is also automatically invoked when reviewing images or video in playback mode, when viewing using an HDMI connection, or when the temperature inside the camera body is high. I tend to stick with the higher-resolution Standard frame rate, except when tracking sports or action subjects.
8. Display Options
The Display Options group has three settings that let you specify parameters for Time Code/User Bits, and how the display handles gamma settings specified using Picture Profiles. Two other settings control useful displays while shooting or using image review features. (See Figure 9.32.)

Figure 9.32 Display Options group.
- ■TC/UB Display Settings
- ■Gamma Display Assist
- ■Gamma Display Assist Type
- ■Remaining Shooting Display
- ■Auto Review
TC/UB Settings
Options: *Counter, TC, U-Bit
My preference: N/A
The Time Code (TC) and User Bit (U-Bit) settings are information that can be embedded and used to sync clips and sound when editing movies, especially those captured by multiple cameras. I’ll describe this advanced feature in a little more detail in Chapter 11, including what each of the options do. This entry has nothing to do with what actually is recorded onto the Time Code track; it determines how the information is displayed during review.
- ■Counter. When this default value is chosen, the display will include the time counter, which starts at zero and is shown as H:MM:SS (hours, minutes, seconds).
- ■TC. The SMPTE (Society of Motion Picture and Television Engineers) time code is displayed as HH:MM:SS:00 (hours, minutes, seconds, frames, but the frames are always shown as 00).
- ■U-Bit. A system used in the past to embed a four-character string used to identify the camera used to capture the video.
Gamma Display Assist
Options: *Off, On
My preference: N/A
As you’ll learn in Chapter 10, the a7 IV is capable of recording movies using Picture Profiles. These profiles can use gamma correction to extend the dynamic range (range of tones from black to white) recorded during video capture. Movies captured using gamma profiles appear to be very low in contrast until processed using software on your computer. As a result, reviewing these clips in the camera can be difficult. This menu entry allows selecting options that will adjust the display of extended dynamic range clips so they appear in the camera with a more normal look, which is useful if you use live view to evaluate your captures. The display is not changed if you’re viewing through a device such as an external monitor plugged into the HDMI port, and you’ll still need to process the video in your video-editing software.
Gamma Display Assist Type
Options: *Auto, S-Log2→709 (800%), S-Log3→709 (800%), HLG (BT.2020), HLG (709)
My preference: N/A
Specifies the type of gamma for which correction needs to be applied to correct for the low-contrast image what would be displayed without correction.
(Images) Remaining Shooting Display
Options: Always Display, Shoot-Only Display, *Not Displayed
My preference: Not displayed
This setting enables a remaining-shots indicator during continuous shooting, represented by a vertical bar on the left side of the display. Ostensibly, it will warn you when the buffer fills and continuous shooting will begin to slow down. Given that the a7 IV’s speedy BIONZ XR processor is coupled with fast CFexpress Type A storage, the buffer has essentially unlimited capacity. There is a limit of roughly 828 consecutive uncompressed RAW & JPEG files, but even the most resolute sports photographers are unlikely to need this warning unless they’re using relatively slow SD cards in place of CFe media.
If you feel you need this capability, you can choose Always Display or Shoot-Only Display, in which the remaining shots bar appears only when the shutter release is pressed down halfway or all the way. When the buffer begins to fill, a SLOW icon will eventually be displayed on certain screens as the frame rate slows.
(Images) Auto Review
Options: 10 seconds, 5 seconds, 2 seconds, *Off
My preference: 2 seconds
In prehistoric times (pre-live view), it was necessary to review your photos from time to time to confirm that you were getting the images you wanted. Your a7 IV, like all mirrorless cameras, is WYSIWYG (what you see is what you get) unless Setting Effect is turned off. So, there is much less need to review your images. Even so, I frequently set Auto Review to 2 seconds, so I can doublecheck my settings and framing. You can select reviews up to 10 seconds if you like. I sometimes use the longer review setting if I am taking shots of several groups in quick succession, so I can check to see if anyone had their eyes closed, and capture another shot before the next group moves in. The a7 IV automatically terminates the review of a given image when you press the shutter release to begin to focus or take the next picture, so you will never miss a shot. If given a more leisurely pace, however, it’s more efficient to manually review my images, without any auto review.
9. Power Setting Option
The Power Setting Option group has four settings that let you set parameters for certain features that can help make your battery last longer. (See Figure 9.33.)

Figure 9.33 Power Setting Option group.
- ■Auto Monitor OFF
- ■Power Save Start Time
- ■Power Save by Monitor
- ■Auto Power OFF Temperature
Auto Monitor Off
Options: * Does not turn off, 2 seconds, 5 seconds, 10 seconds
My preference: 5 seconds; Does not turn off for macro photography
Although the NP-FZ100 battery is more powerful than the one Sony used in its first interchangeable-lens mirrorless cameras, you’ll still want to avoid wasting juice. You can use this setting and the one that follows to control how your camera conserves power. This one specifies how long the back-panel LCD monitor stays illuminated while the camera is idle (it does not affect the viewfinder display). The setting does not affect the monitor when the Still/Movie/S&Q dial is set to the Movie or S&Q positions.
I generally leave this at 5 seconds for most shooting; conceivably if your battery is running low you might want to use the 2-second setting. Of course, because I always carry plenty of extra batteries with me, the only time I end up working with a nearly exhausted battery is when swapping would be badly timed (something important/crucial is about to happen), or I’m capturing a long video sequence. Keep in mind that only the monitor is turned off; the a7 IV doesn’t “go to sleep” until the Power Save Start Time, describes next, has elapsed. So, if your monitor takes a break, you can revive it instantly by tapping the shutter release button.
I find the best use of the Does Not Turn Off setting is when doing macro photography, because I typically use the LCD monitor for composing and focusing close-ups. It’s convenient to have the monitor active for the entire time I am setting up my shot.
Power Save Start Time
Options: 30 minutes, 5 minutes, 2 minutes, *1 minute, 10 seconds
My preference: 5 minutes
This item lets you specify the exact amount of time that should pass before the camera goes to “sleep” when the eye sensor under the viewfinder window, and a lack of recent button/dial activity, indicates you’re not taking photos. The default of 1 minute is a short time, useful to minimize battery consumption. You can select a much longer time before the camera will power down, or a much shorter time. I use 5 minutes most of the time to avoid having to “waken” the camera frequently. Keep in mind that a lot of the idle power demand comes from the LCD monitor, so if you’ve used the entry above to specify a 2-, 5-, or 10-second shutoff time you can safely set a longer interval here.
If I’m wandering around with long periods of time between shots or the camera is mounted on a tripod, I may set it to 2 or 5 minutes. In street photography or sports mode, I use 30 minutes to make sure my camera will always be ready for action. But, of course, I tend to carry at least two spare batteries with me at all times, and in a pinch will use my RavPower 16,750 mAh power pack linked to the camera with a USB-C cable for long-term non-stop shooting.
You’ll need to keep in mind that this setting will be ignored if the camera is linked to an external monitor or video recorder through the HDMI port, and shutoff will be postponed while you are uploading images over a Wi-Fi connection.
Power Save By Monitor
Options: *Both Linked, Open: Return, Close: Power Save, Does Not Link
My preference: Close: Power Save
This item lets you send the a7 IV into power-save mode when the LCD monitor is closed. You have four options:
- ■Both Linked. The screen turns off when the monitor is closed facing inward (say, for protection). The monitor turns back on when you reverse it and open it again.
- ■Open: Return. The camera exits power-saving mode when the monitor is opened again.
- ■Close: Power Save. Close the monitor facing inward and the a7 IV automatically enters powersaving mode.
- ■Does Not Link. Power saving is not affected by the position of the monitor.
Auto Power Off Temperature
Options: *Standard, High
My preference: High
Don’t panic! Your a7 IV will not spontaneously combust. However, it may overheat if operated continuously (as when shooting 4K movies or you are using the High finder frame rate) for periods of time or with extended continued use. The a7 IV can turn itself off when its internal temperature gets too high, which is particularly useful if the camera is mounted on a tripod so that your hands don’t feel the increasing warmth. Shooting 4K video, for example, can generate a lot of heat and deplete your battery rather quickly. This option allows you to stretch the safe operating time by switching from the default Standard mode to High (which allows operation when the camera is hotter than normal). Sony recommends not holding the camera in your hands when you’ve activated the High setting.
Sony says you should be able to shoot 4K video for up to two hours with the High setting, or 10 minutes with Standard. In practice, you generally won’t be exceeding 10 minutes for most individual shots, but an unwanted cutoff can be annoying or disruptive, so I leave this setting on High for the most part.
10. Sound Option
The Sound Option group has three settings that let you specify how your a7 IV emits sound during video playback. (See Figure 9.34, left.)
- ■Volume Settings
- ■Four Channel Audio Monitoring
- ■Audio Signals
Volume Settings
Options: 0-15
My preference: 15
This menu item affects only the audio volume of movies that are being played back in the camera (and not the beeps or other noises the a7 IV emits). When you select Volume Settings, the camera displays a scale of loudness from 0 to 15; scroll up/down to the value you want to set, and it will remain in effect until changed.
You might want to use this menu item to pre-set a volume level that you generally prefer. However, you can also adjust the volume whenever you’re displaying a movie clip, to set it to just the right level. To do so, press the down directional button and use the up/down directional buttons to raise or lower the volume.
4 Channel Audio Monitoring
Options: *CH1/CH2, CH3/CH4, CH1+3/CH2+4, CH1/CH1, CH2/CH2
My preference: CH1+3/CH2+4
The Sony XLR-K3M audio kit is a pricey ($599) adapter that slides right into your a7 IV’s multi-interface shoe so you can capture pro-quality sound. It includes a Sony ECM-XM1 stereo microphone (it should for that price), but if you really want to go pro, it also has two XLR-1/4-inch combination mic/ line inputs so you can record quadraphonic sound. Your camera, however, can only play back two-channel, stereophonic sound through the headphone jack, so you’ll need to decide which channels to play back to get the full audio picture. Channels 1 and 3 are considered the left side, while Channels 2 and 4 are considered the right side for headphones/speakers.

Figure 9.34 Sound Options Group (left); 4 Channel Auto Monitoring (right).
You can choose Channels 1/2 (left/right side), Channels 3/4 (left/right side), or listen only to either Channels 1 or 2 to provide monophonic playback. Your best bet is to combine Channels 1 and 3 (the two left sides) together, and merge Channels 2 and 4 (the two right sides) so, at least, you’ll get a stereo version of all four channels captured. Obviously, if you’re shooting stereo instead of quadraphonic, you don’t need this feature.
Audio Signals
Options: *On, Off
My preference: Off
This setting enables and disables the beeping/chirping sounds the camera makes when various operations happen, such as achieving autofocus or the self-timer countdown. Most of the time I don’t require the feedback and, on the contrary, want to blend in without calling attention to myself, so I disable the noises. The self-timer countdown is especially noticeable, even in environments with a moderate amount of noise. Couple this setting with Silent Shooting and you can often take pictures virtually unnoticed.
11. USB
The USB group has three settings that let you specify how the camera’s USB port functions. (See Figure 9.35.)

Figure 9.35 USB group.
- ■USB Connection Mode
- ■USB LUN Setting
- ■USB Power Supply
USB Connection Mode
Options: *Select when connected, USB Streaming, Mass Storage (MSC), MTP, PC Remote
My preference: Select when connected
This entry allows you to select the type of USB connection protocol between your camera and computer.
- ■Select when connected. This setting lets you choose which of the following protocols to use each time you link your camera to the computer. Unless you typically perform only one function, you’ll want to use this selection.
- ■USB Streaming. This is a new option, which enables your camera to perform video streaming using Imaging Edge Webcam and the streaming software of your choice.
- ■Mass Storage (MSC). In this mode, your camera appears to the computer as just another storage device, like a disk drive. You can drag and drop files between them. Lightroom workers will use this when transferring photos.
- ■MTP. This mode is short for Media Transfer Protocol, a slow system that is not used much today. It’s a version of the PTP (Picture Transfer Protocol) that was standard in earlier cameras. It allowed better two-way communication between the camera and the computer.
- ■PC Remote. This setting is used with Sony’s Imaging Edge software to adjust shooting functions and take pictures from a linked computer.
USB LUN Setting
Options: *Multi, Single
My preference: Multi, Single for Macs
This setting specifies how the camera selects a Logical Unit Number when connecting to a computer through the USB port. Normally, you’d use Multi with the USB Connection set to MTP; the camera will adjust the LUN automatically as necessary. If you’ve set USB Connection Mode (above) to Mass Storage, each of the two memory card slots in your camera appear on your computer as an individual device, and a third “drive” will appear named PMHOME, a vestigial folder used only by the camera itself. Use Single to lock in a LUN if you have trouble making a connection between your camera and a particular computer or device. But don’t worry, Single is generally required only for Macs, which means you won’t be able to access both memory cards.
USB Power Supply
Options: *On, Off
My preference: On
When set to On, the camera receives charging power from a connected computer or other device through the USB-C cable link. (The Multi/Micro USB terminal does not work.) Use this setting if you want to charge the a7 IV’s battery when connected to a computer or other device. Set to Off, and power is not supplied, except when using the AC Adapter furnished with your camera.
If you choose On and are connected to a computer, the USB Mode Mass Storage screen appears, with a Playback icon in the lower-right corner. If you ignore the prompt, the Playback icon will disappear after about five seconds and charging will not take place; your batteries are being depleted. If you do press the Playback button, followed by the center button, you’ll be able to operate the camera while charging takes place.
You can set it to Off to completely avoid draining power from the computer host. Although I frequently connect my camera to a desktop computer, if I am using a laptop, I set this to Off, as I have plenty of NP-FZ100 batteries and recharging the laptop is sometimes inconvenient. You’ll want to leave this On if you’re using an external power pack or power source, but only if the source can supply sufficient juice to fully recharge (rather than trickle charge). Modern USB-C chargers are specifically designed to do this and may offer 100W of power, unlike chargers designed for most smartphones and tablets.
12. External Output
The External Output group has four settings that let you specify how your HDMI connection operates. (See Figure 9.36, left.)
- ■HDMI Resolution
- ■HDMI Output Settings
- ■HDMI Information Display
- ■Control For HDMI
HDMI Resolution
Options: *Auto, 2160p, 1080p, 1080i
My preference: Auto
The camera can direct its output to an external monitor or recorder, or for display on a high-definition television. This setting determines the resolution of that output when shooting still photos, or reviewing them during Playback. There is a separate resolution entry for movies within the HDMI Output Settings entry, described next.
The Auto setting will work about 99 percent of the time, as the a7 IV does a good job of identifying the HDMI specifications your external device needs. I fall into the final 1%, and am glad this option exists. I use an older BlackMagic Intensity Shuttle (a screen capture device) to grab all the menu and screen display shots in this book. My a7 IV seems unable to detect that it requires 1080i (interlaced) output in Auto mode, so I am glad I can specify it manually. The camera does work fine with newer models of the BlackMagic device, but you may still run into an older monitor or other display that requires the manual selection.
If you, too, have trouble getting the image to display correctly, try setting the resolution manually here to 2160p or 1080p (for 4K and Full HD), or 1080i. If you do resort to setting the resolution manually, keep in mind that if you Reset or Initialize your camera, it will default back to Auto and you’ll need to return here to restore your desired setting.

Figure 9.36 External Output group entries (left). HDMI Resolution (right).
HDMI Output Settings
Options: Recording Media During HDMI Output, Output Resolution, 4K Output Settings (HDMI Only), Time Code Output, Recording Control, 4ch Audio Output
My preference: N/A
This is a separate entry that determines how video output is directed to an external device. You can choose from six parameters, but you probably won’t need to use all of them. (See Figure 9.37.) Your options include:
- ■Recording Media During HDMI Output. Choose On (the default), and the camera will record video to your internal memory cards and also direct output to the HDMI port, to which you can connect a recorder or monitor. If you don’t want/need backup, you can choose Off (HDMI Only) and output to the HDMI port and an attached recorder only. In that case, the HDMI Information Display setting, described shortly, becomes unavailable, and the in-camera counter of the actual recording time is not incremented.
- ■Output Resolution. Sets output resolution only when Recording Media During HDMI Output is set to On. This is otherwise a duplicate of the Stills/Playback version described above. You can choose from Auto (the default), 2160p, 1080p, or 1080i.
- ■4K Output Settings (HDMI Only). Determines the frame rate and depth of HDMI output when Recording Media During HDMI Output is set to Off (HDMI Only). You can select either 60p/10-bit, 30p/10-bit, or 24p/10-bit when recording in 4K mode.
- ■Time Code Output. Choose on or off to enable/disable including time code in the HDMI output signal. Use On if you are outputting to professional video equipment and want to include the time code information. Note that the time code is data and will not actually appear on the screen. If this setting is on and you are sending the signal to a television or some other device, the image may not appear properly. Change this setting to off when outputting to devices not equipped to handle TC information.
- ■REC Control. This setting is available only when TC Output is set to on. Choose on or off. The setting allows you to start and stop REC Control-compatible external video recorders connected to the camera. A REC or STBY icon will be displayed on the camera’s screen as appropriate.
- ■4ch Audio Output. You can choose either CH1/CH2 or CH3/CH4. I described quadraphonic sound earlier within the 4 Channel Audio Monitoring entry earlier.

Figure 9.37 HDMI Output Settings.
HDMI Information Display
Options: *On, Off
My preference: On
Choose On if you want the shooting information to display when the camera is connected to an HDTV television/monitor or other device using an HDMI cable. For example, I left this setting On when capturing screenshots of live view images, so all the overlaid icons appear. Select Off if you don’t want to show the shooting information on the display.
CTRL For HDMI
Options: *On, Off
My preference: Off
This option can be useful when you have connected the camera to a non-Sony HDTV and find that the TV’s remote control produces unintended results with the camera. If that happens, try turning this option Off, and see if the problem is resolved. If you later connect the camera to a Sony Bravia sync-compliant HDTV (vendors other than Sony also use it), set this menu item back to On. Be aware that not all so-called Bravia-friendly devices conform completely, so you should be prepared to turn the function off if necessary.
13. Setup Option
The Setup Option group has five settings that let you specify a few crucial setup parameters. (See Figure 9.38.)

Figure 9.38 Setup Option group.
- ■Video Light Mode
- ■Anti-Dust Function
- ■Auto Pixel Mapping
- ■Pixel Mapping
- ■Version
Video Light Mode
Options: *Power Link, REC Link, REC Link & Standby, Auto
My preference: Auto
Sony offers video lighting units for its camcorders and digital cameras, such as the HVL-LE1 (about $250), which is a battery-operated LED video light. This menu entry allows you to control when the light illuminates. Your choice is a matter of personal preference, depending on how you operate.
Your choices are as follows:
- ■Power Link. Turns on when the camera is powered up, and off when the camera is powered down. Use this if you’ll be shooting more or less continually and don’t need to save battery power between sequences. Pro videographers will usually want to use this setting.
- ■REC Link. Video light turns on when movie recording starts, and off when you stop capture. This setting will preserve your battery. I like to use it when I definitely want to use the video light at all times during movie capture, such as when I am shooting exclusively indoors, or am outdoors and want some fill light to illuminate shadows for close-ups.
- ■REC Link & STBY. Illuminates when movie capture is underway and dims at other times. Operates like the previous choice but stretches the life of your battery.
- ■Auto. The video light turns on under dim lighting conditions. You might want to use this if you intend to shoot movies under both dim and bright lighting conditions (say, indoors and out) and want the light to come on only under reduced illumination.
Anti-Dust Function
Options: Sensor Cleaning, Shutter When Power Off: On, *Off
My preference: N/A
You have two features to deal with:
- ■Sensor Cleaning. Access the Sensor Cleaning option when you want to use the camera’s auto image sensor cleaning feature. You’ll hear a buzzing sound as the camera gives the sensor a good shake. Your tip-off that the sensor needs cleaning will be blurry spots and artifacts that show up in less detailed areas of the image (such as the sky) in photos taken at small f/stops (the extra depth-of-focus makes them more obvious).
- If the a7 IV’s own sensor cleaning isn’t sufficient, you can use a “rocket”-style blower, special sensor cleaning brushers, or wet-wipe swabs available online and from photo retailers. You’ll need to make sure the Shutter When Power Off setting (discussed next) is disabled so the sensor will be exposed. Use care; while the sensor surface is reasonably well-protected, the carriage for the SteadyShot image stabilizer can be damaged with rough treatment.
- ■Shutter When Power Off. Many people have wondered why mirrorless cameras don’t close the shutter when the camera is turned off. It would offer protection when changing lenses. After all, a “naked” shutter is supposedly more susceptible to dust infiltration and exposure to very strong light sources. Old-school dSLR cameras do this.
- To date, the biggest drawback of having a feature like this is that the shutter itself is somewhat fragile and, in practice, more easily damaged than the sensor. A careless finger damaging the shutter curtains can end up as a very costly repair. In addition, pointing the camera at the sun can burn a hole in the shutter even more easily than damaging the sensor itself.
- So, consider yourself warned. Sony has relented and now supports this feature, despite the drawbacks. Go ahead and select On if you feel you need to, but remember to be careful when there is no lens mounted, use a body cap when storing the camera without lens, and don’t let moisture fall on the shutter.
Auto Pixel Mapping/Pixel Mapping
Options: Auto Pixel Mapping: *On, Off
Options: Pixel Mapping: None
My preference: Auto Pixel Mapping: On
Even with the most sophisticated manufacturing techniques and quality control measures, producing a sensor with absolutely no defects among 33 million individual photosites is quite a challenge. Sometimes a pixel “dies” and becomes permanently dark or, worse, becomes stuck or “hot” so that it will shine through brightly in areas that should be dark or even black. Pixel mapping provides a way to detect those defective pixels and automatically map them, so they no longer contribute to your images. Instead, information from surrounding pixels will be used to determine how that photosite appears in your image.
If you notice what appears to be a bad pixel, compare several different shots to see if it appears in the same place. Keep in mind that some “bad” pixels can be caused by overheating and will return to normal once your camera has been powered down for a short period. Sony gives you two separate entries:
- ■Auto Pixel Mapping. Set to On, and the camera will periodically analyze the sensor and, if a stuck pixel is discovered will map it out. That’s accomplished by ignoring the value of that particular pixel when an image is captured, and substituting the average of all the surrounding pixels instead.
- The process requires a “dark frame,” that is, one that receives no light at all, so that any stuck pixels will stand out like a sore thumb, er … pixel. So the shutter closes and the self-test/mapping takes about 10 seconds. Then, the camera reboots. The process is unobtrusive, so I leave the Auto Pixel Mapping entry set to On.
- ■Pixel Mapping. You can also perform pixel mapping manually if you’ve turned the Auto feature off. Indeed, Sony recommends performing the function once every three days. Don’t worry, you won’t be losing pixels at that pace, but it’s always better to be safe than sorry about all the retouching you need to do in Photoshop.
Version
Options: Display Version, Software Update
My preference: N/A
Select this menu option to display the version number of the firmware (internal operating software) installed in your camera. From time to time, Sony updates the original firmware with a newer version that adds or enhances features or corrects operational bugs. When a new version is released, it will be accompanied by instructions, which generally involve downloading the update to your computer and then connecting your camera to the computer with the USB cable to apply the update. It’s a good idea to check occasionally at the Sony website, www.esupport.sony.com, to see if a new version of the camera’s firmware is available for download. (You can also go to that site to download updates to the software that came with the camera, and to get general support.)
Certification Logo (Non-US/Canada Models Only)
Options: None
This information-only entry displays various certification logos indicating the camera has met specifications mandated by other countries. It’s included in cameras intended for non-US/Canada sales so that the logos can be tailored for specific areas through firmware updates, rather than printed notices on the bottom of the cameras themselves.