
Focus and Playback Menus | 8 |
This chapter focuses (ahem) on the features found in the Focus tab and Playback tab. I’m going to emphasize the entries available in still photography mode or in both still photography and movie (Movie and S&Q Movie) modes. Several of the tabs described in this chapter have a few slightly different entries when the Still/Movie/S&Q dial is set to either movie position. I’ll explain those extra features in Chapter 10.
Focus Menu Tab
The Focus menu tab has five groups that adjust settings for autofocus, manual focus, and focus assistance aids. (See Figure 8.1.)

Figure 8.1 Focus tab.
- ■AF/MF
- ■Focus Area
- ■Face/Eye AF
- ■Focus Assistant
- ■Peaking Display
1. AF/MF
These are the entries in the AF/MF group. The two marked (Movies) appear only when the Still/Movie/S&Q dial is set to either Movie position. (See Figure 8.2.)

Figure 8.2 AF/MF group (Pre-AF not shown).
- ■Focus Mode
- ■Priority Setting in AF-S
- ■Priority Setting in AF-C
- ■AF Tracking Sensitivity
- ■AF Transition Speed (Movies)
- ■AF Subject Shift Sensitivity (Movies)
- ■AF Illuminator
- ■Aperture Drive in AF
- ■AF with Shutter
- ■Pre-AF
Focus Mode 
Options: *Single-shot AF (AF-S), Automatic AF (AF-A), Continuous AF (AF-C), DMF (Direct Manual Focus), MF (Manual Focus)
My preference: Continuous AF (AF-C)
This menu item can be used to set the way in which the camera focuses. I discussed focus options in detail in Chapter 4.
- ■Single-shot AF (AF-S). With this default setting, the camera will set focus and it will keep that focus locked as long as you maintain slight pressure on the shutter release button; even if the subject moves before you take the photo, the focus will stay where it was set. If you use this setting for still photos and then switch to Movie mode, the camera switches temporarily to AF-C.
- ■Automatic AF (AF-A). Begins to focus using AF-S but will switch to continuous autofocus (AF-C) if your subject is moving. This is a good all-purpose setting when you aren’t sure whether your subject will suddenly begin moving around as you shoot.
- ■Continuous AF (AF-C). The camera will continue to adjust the focus if the camera-to-subject distance changes, as when a cyclist approaches your shooting position. The camera will constantly adjust focus to keep the subject sharply rendered. It uses predictive AF to predict the moving subject’s position at the time you’ll take the next shot and focuses at that distance. This option is useful when you’re photographing sports, active children, animals, or other moving subjects, making it possible to get a series of sharply focused shots.
- ■Direct Manual Focus (DMF). Press the shutter button halfway down to let the camera start the focusing process in AF-S mode; then, keeping the button pressed halfway, turn the focusing ring to fine-tune the focus manually. You might want to use DMF when you are focusing from a short distance on a small object and want to make sure the focus point is exactly where you want it. It’s good for close-up/macro photography, especially if you use Peaking Display (discussed later in this chapter) to outline the in-focus areas in a contrasting color. If you use this setting for still photos and then switch to Movie mode, the camera switches temporarily to AF-C.
- ■Manual Focus (MF). If you select Manual Focus, you turn the focusing ring on the lens to achieve the sharpest possible focus. With both DMF and Manual Focus, the camera will show you an enlarged image to help with the focusing process, if you have the Focus Magnifier option enabled in the Focus > Focus Assistant group.
Priority Set in AF-S/Priority Set in AF-C 
Options: *AF (AF-C), *Release (AF-S), Balanced Emphasis
My preference: AF for AF-S mode; Release for AF-C mode
These are two separate entries, one for AF-S and one for AF-C autofocus, but functionally they are identical, differing only in the autofocus mode they are applied to. It makes sense to describe them together.
This feature lets you specify whether the camera waits to actually take the picture until it has achieved sharp focus (when using an autofocus mode, not manual focus mode); whether it takes the picture immediately, even if sharp focus is not guaranteed; or a balanced approach somewhere between the two. For most kinds of candid photography, sports, or photojournalism, most of us would rather get the shot rather than lose a fleeting moment, and so Release is often your best choice. If you have a little more time, and the shot won’t be affected by a short delay (perhaps half a second, on average), Balanced Emphasis will do the job. If you’re looking for the best sharpness your camera can provide, the AF choice might be your best option. The choices are as follows:
- ■AF. The shutter is not activated until sharp focus is achieved. This is best for subjects that are not moving rapidly.
- •AF-S. When using AF-S, most prefer to set this to AF, because in this focus mode the subject is usually not moving rapidly, and it makes sense to allow a slight extra delay to get the best focus possible. However, I find that with the a7 IV, when equipped with a lens having a built-in focus motor, in combination with the hybrid AF system, focus is fast enough that I can choose Release instead. If your camera/lens combination is slower to focus, you’ll want to stick with the AF setting that I recommend for general use. The Priority setting you specify here is also applied to DMF mode.
- •AF-C. When working in AF-C focus mode, if you select AF, the a7 IV will continue to track your subjects’ movement, but the camera won’t take a picture until focus is locked in. An indicator in the viewing screen will flash green until focus can be achieved. You might miss a few shots, but you will have fewer out-of-focus images. Sports shooters probably won’t choose AF priority for AF-C. Instead, they’ll select release priority, discussed next.
- ■Release. When this option is selected, the shutter is activated when the release button is pushed down all the way, even if sharp focus has not yet been achieved. As I noted, I prefer this option for AF-C mode, as continuous focus focuses and refocuses constantly when autofocus is active, and even though an image may not quite be in sharpest focus, at least I got the shot. Use this option when taking a picture is more important than absolute best focus, such as fast action or photojournalism applications. (You don’t want to miss that record-setting home run, or the protestor’s pie smashing into the governor’s face.) Using this setting doesn’t mean that your image won’t be sharply focused; it just means that you’ll get a picture even if autofocusing isn’t quite complete. If you’ve been poised with the shutter release pressed halfway, the camera probably has been tracking the focus of your image.
- ■Balanced Emphasis. In this mode, the shutter is released when the button is pressed, with a slight pause if autofocus has not yet been achieved. It can be selected for both AF-S and AF-C modes and may be your best choice if you want a good compromise between speed of activation and sharpest focus. I don’t use this setting much because I prefer a predictable response from the camera. In addition, you would not want to use this setting if the highest possible continuous shooting rates are important to you.
AF Tracking Sensitivity
Options: 5 (Responsive) to 1 (Locked On); *3 (default)
My preference: 1 (Locked On) for sports
This feature determines how quickly the camera unlocks focus from the subject it is currently tracking and focuses instead on another subject that intervenes. For example, if you’re shooting a football game as a running back is breaking through the line and a referee bolts along the sideline in front of you. With this feature set to Responsive, the camera will very quickly switch to the ref, and then should return its attention to the running back—but often, not quickly enough. A better choice would be to use Locked On, so that the camera briefly ignores the referee, who is likely to have moved on in a second or two. Focus tracking will remain on your running back.
Note that this setting applies only to still photos; the equivalent setting for movies is AF Transition Speed, discussed in Chapter 10. Your options include:
- ■Responsive. At the 4 and 5 settings, the camera quickly responds to new subjects that cross the frame. This is the best setting to use for fast-moving subjects, such as sports or frenetic children, as long as you dont expect intervening subjects. The camera will smoothly follow your subjects. It works well when subjects within the frame are at significantly different distances.
- ■Standard. At the 3 setting, response to movement is a bit slower, so that the camera doesn’t constantly refocus as subjects move about the frame. This is the default and should be used when there is only moderate movement, and especially if the movement is across the width or height of the frame (rather than coming toward you or away from you), and when you’re using a small f/stop, because the increased depth-of-field will eliminate the need for most re-focusing.
- ■Locked On. At the 1 and 2 settings, the a7 IV will lock onto the initial subject and follow it until it leaves the frame. Use this setting when you know you’ll have intervening subjects often and are certain that you want to ignore them. Many sports events, including football, soccer, and baseball, fall into this category.
AF Transition Speed 
Options: Fast (7), Normal (4), Slow (1); *5 (default)
My preference: Normal for most scenes, Fast for sports and action
This is a movies-only setting for the a7 IV that is used to adjust how quickly the camera focuses while capturing video using an integer scale from Fast (7) to Slow (1). It’s used in conjunction with AF Subject Shift Sensitivity (Movies), described next. Unlike stills, when focus changes while shooting movies it is apparent in the clip and can be undesirable.
Your three options are as follows:
- ■Fast (5, 6, or 7). The camera focuses as quickly as possible, but with slightly less precision. This setting is good for sports, action, photojournalism, and street photography, and any situation where it’s important to keep the main subjects in focus as they move around. In such situations, the automatic focus adjustments add to the feeling of following the action; any delay in refocusing would be disconcerting.
- ■Normal (4). The AF responds smoothly to subject movement by refocusing gradually. With scenes that are not filled with constant action, this mode may be the least noticeable to the viewer.
- ■Slow (3, 2, or 1). Focusing is much less speedy and is a good choice if your subjects are moving at a constant rate of speed and direction. This setting will allow the a7 IV to smoothly follow focus. Choose Slow to be on the safe side, in such situations, particularly when using older lenses that are themselves somewhat pokey in achieving focus.
AF Subject Shift Sensitivity
Options: Scale from 1 (Locked On) to *5 (Responsive)
My preference: 3 (Standard)
This entry, available only when the Still/Movie/S&Q dial is set to one of the two movie positions, works hand-in-hand with the AF Transition Speed entry above and uses a scale from 1 (Locked On) to 5 (Responsive). It is another movies-only setting and determines how quickly the camera unlocks focus from the subject it is currently tracking and focuses instead on another subject that intervenes. For example, if you’re shooting a video of a child or grandchild enjoying a playground and another kid unexpectedly darts between you and your youngster, you don’t want the camera to switch to the intervening subject. With this feature set to the Responsive end of the scale, the camera will very quickly switch to the other youth, and then should return its attention to your child—but often, not quickly enough. A better choice would be to use the Standard, so that the camera briefly ignores the other kid, who is likely to have moved on. Focus tracking will remain on the intended “star” of your video. Your options include:
- ■Responsive (4 or 5). The camera quickly responds to new subjects that cross the frame. This is the best setting to use for fast-moving subjects, such as sports or frenetic children, as long as you dont expect intervening subjects. The camera will smoothly follow your subjects, especially if AF Drive Speed has been set to Fast, too.
- ■Standard (3). Response to movement is a bit slower, so that the camera doesn’t constantly refocus as subjects move about the frame. This should be used when there is only moderate movement, and especially if the movement is across the width or height of the frame (rather than coming toward you or away from you), and when you’re using a small f/stop, because the increased depth-of-field will eliminate the need for most re-focusing.
- ■Locked On (2 or 1). Use either of these settings if you want to keep the camera focused on the same subject, despite intervening subjects that might appear. I use the Locked On setting when I want to emphasize a particular subject (often a person) using selective focus and a large aperture.
AF Illuminator
Options: *Auto, Off
My preference: Auto
The AF illuminator is a light activated when there is insufficient light for the camera’s autofocus mechanism to zero in on the subject. This light emanates from the same lamp on the front of the camera that provides the indicator for the self-timer (and which may be blocked by lens hoods or stray fingers). The extra blast from the AF illuminator provides a bright target for the AF system to help the camera set focus for subjects roughly no farther away than 10 feet. When you’re shooting in environments so dark that conventional focusing is difficult, the a7 IV will ignore the focus area you’ve specified and instead focus on whatever the AF assist lamp is able to illuminate. This menu item is a still-photos-only option, as the illuminator does not operate while shooting conventional or S&Q motion movies.
The default setting, Auto, allows the AF illuminator to work any time the camera judges that it is necessary. Turn it off when you would prefer not to use this feature, such as when you don’t want to disturb the people around you or call attention to your photographic endeavors. Disabling the lamp is virtually mandatory when shooting stage performances, especially ballet. The illuminator is ineffective at such distances anyway, and can be particularly distracting to dancers, according to one choreographer, who told me they partially orient their pirouettes based on light fixtures they see in the auditorium as they spin.
The AF illuminator doesn’t work when the camera is set for manual focus or when using AF-C or AF-A while the subject is moving. It is also disabled when using the Focus Magnifier, or one of the EA-LA adapters (which allow using A-mount lenses on the a7 IV).
Note that some Sony flash units (such as the HVL-F45RM) include a white LED video light that the a7 IV will use as an AF illuminator lamp if the flash is mounted on the camera and powered up.
Aperture Drive in AF
Options: Focus Priority, *Standard, Silent Priority
My preference: N/A
This setting determines whether and how much the aperture opens between shots, allowing you to choose whether you want the camera to operate more quietly or focus more accurately. Why is that even necessary? Well, if you’re a photography veteran, you may wonder why Sony cameras, including the a7 IV, don’t have a depth-of-field preview button. The short answer is that they don’t need one, because, unlike most other models, these cameras always focus with the lens stopped down to the working f/stop (“taking aperture” in photo jargon) used to expose the picture.
When using cameras that keep the aperture wide open until the moment of exposure (when it stops down to take the picture), it’s useful to have a depth-of-field preview that temporarily closes the aperture to the working f/stop. With the lens stopped down, you can see (more or less) exactly how much is in focus, and how much is not.
There are some advantages and disadvantages to having the lens already set to the taking aperture while composing your images. You always get to see the current depth-of-field; the a7 IV automatically brightens the view on the LCD or electronic viewfinder to compensate. (However, exposure adjustments do change the brightness of the display when Shooting > Shooting Display > Live View Display Setting is set to On. In addition, because the camera doesn’t have to keep opening and closing the aperture between shots, faster continuous shooting speeds are possible.
The downside is that it’s more difficult to focus at smaller f/stops, even with your camera’s hybrid phase detect/contrast detect AF system. At f/stops smaller than f/11, autofocus is not used between continuous shots when using the electronic shutter (to achieve the high Hi+ speed of 10 frames per second). Instead, in that mode focus is fixed at that determined for the first shot. This entry offers three options for specifying exactly how the camera adjusts the aperture while shooting. Your choices are as follows:
- ■Focus Priority. When shooting continuously with the electronic shutter (but not Mechanical Shutter or Auto chosen for Shutter Type), the a7 IV will open slightly. Sony doesn’t specify how much, but in my tests the lens does not necessarily open to its maximum aperture. With the wider aperture, the AF system can focus more quickly and accurately.
- There is a slight increase in noise with this setting, caused by the movement of the iris; the display may flicker, and the aperture level may not be displayed on the screen. The camera uses Standard instead of Focus Priority when not using continuous shooting, even if Focus Priority is set here.
- ■Standard. The a7 IV uses the working aperture to focus, and locks the aperture to the working f/stop of the first shot for subsequent continuous shots with the electronic shutter.
- ■Silent Priority. The f/stop doesn’t change, even when an f/stop smaller than f/11 is set. Focusing may be slower, but the noise level is less than both Focus Priority and Standard settings. This option is available only when certain lenses are mounted on the camera. (Check with Sony for compatible optics. No list is available as I write this.)
AF with Shutter
Options: *On, Off
My preference: N/A
As you know, a gentle touch on the shutter release button causes the camera to begin focusing when using an autofocus mode. There may be some situations in which you prefer that the camera not re-focus every time you touch the shutter release button, such as when you want to work with back-button focus, which I explained in detail in Chapter 4.
Let’s say you are taking multiple pictures in a laboratory or studio with the subject at the same distance; you have no need to refocus constantly, and there is no need to put an extra burden on the autofocus mechanism and on the battery. But, you don’t want to switch to manual focus. Instead, you can set AF w/Shutter to Off. From then on, the camera will never begin to autofocus, or to change the focus when the shutter release is pressed. You can still initiate autofocus by pressing the AF-ON button or another key that you’ve assigned the AF-ON function (as I’ll describe later under Custom Keys). The AF-ON button will start autofocus at any point, independent of the shutter release. Pressing the shutter release still locks exposure, unless you’ve disabled that function, too, using the Exposure/Color > Metering > AEL w/Shutter entry discussed in Chapter 7.
Pre-AF
Options: *Off, On
My preference: Off, On when shooting rambunctious pets or kids
This setting tells the camera to attempt to adjust the focus even before you press the shutter button halfway, giving you a head start that’s useful for grab shots. When an image you want to capture appears, you can press the shutter release and take the picture a bit more quickly. However, this pre-focus process uses a lot of juice, depleting your battery more quickly, which is why it is turned off by default. Reserve it for short-term use during quickly unfolding situations where the slight advantage can be useful.
In my tests with the a7 IV and various lenses, Pre-AF can be a little slow to respond sometimes, but it does work with all autofocus modes and E-mount optics. If you find Pre-AF to be sluggish, say, under low-light conditions, just press the shutter release halfway to commence autofocus manually.
2. Focus Area
The Focus Area tab has 12 groups in Still Photography mode, covering almost two menu pages, with options for specifying, adjusting, and displaying the areas used by the a7 IV to achieve autofocus. (See Figure 8.3.) In either Movie mode, only five of these appear in the tab.
- ■Focus Area
- ■Focus Area Limit
- ■Switch Vertical/Horizontal AF Area
- ■Focus Area Color
- ■AF Area Registration
- ■Delete Registered AF Area
- ■AF Area Auto Clear
- ■Area Display During Tracking
- ■AF-C Area Display
- ■Phase Detection Area
- ■Circulation of Focus Point
- ■AF Frame Movement Amount
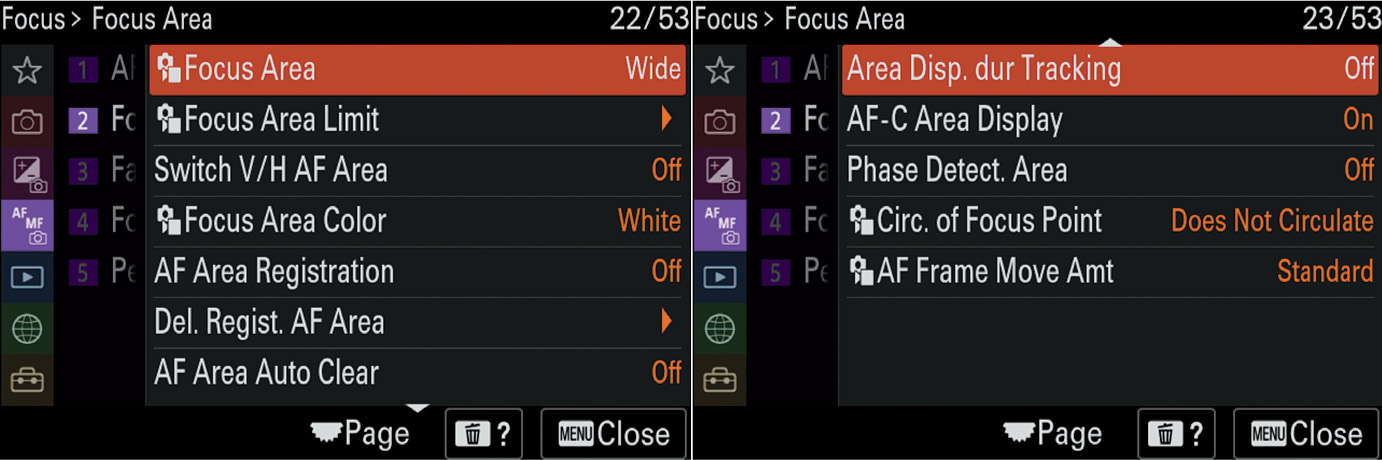
Figure 8.3 Focus Area group.
Focus Area
Options: *Wide, Zone, Center Fix, Spot, Expand Spot, Tracking
My preference: Wide for general use; Tracking Wide for sports and action
When the camera is set to Autofocus, use this menu option to specify where in the frame the camera will focus when you compose a scene in still photo mode, using the focus area selection you specify. I explained these options in Chapter 4.
- ■Wide. The camera uses its own electronic intelligence to determine what part of the scene should be in sharpest focus, providing automatic focus point selection. A green frame is displayed around the area that is in focus. Even if you set one of the other options, Wide is automatically selected in certain shooting modes, including both Auto and all SCN modes.
- ■Zone. Select one of nine focus areas (described in Chapter 9), and the camera chooses which section of that zone to use to calculate sharp focus. You can move the focus zone with the multiselector joystick.
- ■Center Fix. Choose this option if you want the camera to always focus on the subject in the center of the frame. It covers the same area as Expand Spot (discussed shortly), but is locked into the middle of the frame. Center the primary subject (like a friend’s face in a wide-angle landscape composition); allow the camera to focus on it; maintain slight pressure on the shutter release button to keep focus locked; and re-frame the scene for a more effective, off-center, composition. Take the photo at any time and your friend (who is now off-center) will be in the sharpest focus. Use this option instead of manually selecting a focus point to quickly lock focus on the center of the frame, then press the defined AF lock button to fix the focus at that point so you can recompose the image as you prefer.
- ■Spot (Small, Medium, Large). This mode allows you to move the camera’s focus detection point (focus area) around the scene to any one of multiple locations using the multi-selector joystick. When this option is highlighted, use the left/right directional buttons or control wheel to change the size range of the spot among Small (S), Medium (M), and Large (L). This mode can be useful when the camera is mounted on a tripod and you’ll be taking photos of the same scene for a long time, while the light is changing, for example. Move the focus area to cover the most important subject, and it will always focus on that point when you later take a photo.
- ■Expand Spot. If the camera is unable to lock in focus using the selected focus point, it will also use the eight adjacent points to try to achieve focus. You can move the spot using the multi-selector joystick.
- ■Tracking. In this mode, the camera locks focus onto the subject area that is under the selected focus spot when the shutter button is depressed halfway. Then, if the subject moves (or you change the framing in the camera), the camera will continue to refocus on that subject. You can select this mode only when the focus mode is set to Continuous AF (AF-C). Note that Tracking is different from Center Tracking, discussed in this chapter, and in more detail in Chapter 4.
- This option is especially powerful because you can activate it for any of the five focus area options described above. That is, once you’ve highlighted Tracking on the selection screen, you can then press the left/right directional button and choose Wide, Zone, Center Fix, Spot, or Expand Spot.
Focus Area Limit
Options: Wide, Zone, Center, Spot (Small, Medium, Large), Expand Spot, Tracking; *All Available
My preference: Deactivate little-used focus area choices
Experiencing too much of a good thing? This entry allows you to deactivate focus options that you rarely (or never) use, so that they don’t appear when you select a focus area using the Focus Area entry, or use the Function menu’s Focus Area option. Only the choices you enable will be shown; the others will be grayed out.
When you select this entry, the screen shown in Figure 8.4 appears. The check marks above each focus area indicates that that option is available. To disable/enable a particular focus area choice, highlight it using the directional buttons and press the center button to remove/add the check mark. The top row shows the non-tracking options (left to right): Wide, Zone, Center, Spot (Small), Spot (Medium), Spot (Large), and Expand Spot. The bottom row includes the Tracking counterparts of the exact same choices.

Figure 8.4 Focus Area Limit options.
That configuration gives you a great deal of flexibility. You can have one set of focus areas enabled for general use, and choose a different set when using the a7 IV’s Tracking capabilities. In my case, I use the Spot: (Small) focus area frequently, but disable the Medium and Large options. However, when shooting sports and action, I use Tracking almost exclusively, so I disable all the Tracking choices except for Spot: (Small), (Medium), and (Large). As you’ll learn in Chapter 4, you can assign the Switch Focus Area function to a Custom Key, using the Setup > Operation Customize > Custom Key/Dial Settings entry. So, I can cycle among those that remain simply by pressing the assigned function key. Fast and easy.
Alternatively, you can just press the Fn button, highlight Focus Area, and select Tracking. You can then switch among Small, Medium, or Large by pressing the left/right directional buttons, or among the roster of focus areas you choose to enable using this menu entry.
Switch Vertical/Horizontal AF Area
Options: *Off, AF Point Only, AF Point+AF Area
My preference: Depends on subject
Here you can choose whether the Focus Area mode and the location of the focusing area within the frame adjusts when you change the camera’s orientation from horizontal to vertical. It’s especially useful when you want to change orientation frequently for the same type of subject matter. For example, when I am photographing family and individual portraits, I might shoot one set of images with the camera held horizontally to capture several members of a group, then rotate to use a vertical frame to capture a head-and-shoulders image of an individual. Many sports, such as basketball, involve the same sort of adjustment—a horizontal photo showing two or three players fighting for the ball, followed by a vertically oriented picture of a pair of roundballers going after a rebound off the boards.
Here are some things to consider:
- ■You can/must set the Focus Area mode and/or focus point for each orientation individually. That is, you must choose a Focus Area mode/focus point for horizontal orientation, then shift to each of the two vertical orientations and select a different location for either/both. If you don’t specify a new location, the Focus Area and focus point remain where they were.
- You are free to change the preferred position for any orientation by rotating the camera to that orientation and moving the focus point. To cancel out any changes, just turn this feature off.
- ■Only three orientations available. They are horizontal, rotated 90 degrees clockwise with the shutter release on the lower half of the camera, and rotated 90 degrees from horizontal with the shutter release on the upper half of the camera. The horizontal/upside down orientation is the same as the conventional horizontal orientation. When the camera is pointed straight up (toward the sky) or straight down (toward your feet), the a7 IV has no idea about how it is otherwise oriented.
- ■AF Area mode/Focus Point Switching disabled. Changes in orientation are ignored if you are using Intelligent Auto, Movie, or S&Q Motion shooting modes. The feature is also disabled if you press the shutter halfway down (and then change orientations), during autofocus, continuous shooting, self-timer countdown, or Focus Settings adjustments. Using the Focus Magnifier also disables the feature.
You have three options for this feature:
- ■Off. The Focus Area mode and Focus Point (Frame) remain the same regardless of camera orientation. If you’ve selected a particular Focus Area mode and you’ve placed the focus at the lower-left area of the frame when shooting horizontally (as seen in Figure 8.5, top center), it will remain in the equivalent position when you rotate the a7 IV 90 degrees counter-clockwise (see Figure 8.5, top left), or 90 degrees clockwise. (See Figure 8.5, top right.)

Figure 8.5 When the feature is turned off, the focus points remain in the same relative position as the camera is rotated (top). When switching is enabled, you can position the focus points in different locations within the frame for each of the three orientations (bottom). You can also optionally specify a different Focus Area mode for each presentation.
- ■AF Point Only. The Focus Area mode remains the same while the Focus Point adjusts to the camera orientation. (See Figure 8.5, bottom.)
- ■AF Point+AF Area. Both the Focus Area mode and Focus Point adjust, so you can use a different Focus Area mode for each orientation.
Focus Area Color
Options: *White, Red
My preference: Red
By default, with each Focus Area other than Wide, the a7 IV shows the current focus frame in white, displaying the active points in green when focus is achieved. Many (including me) find the white frame difficult to discern with many subjects, particularly those that are bright or light in color. I prefer to see the frame highlighted in red, which seems more natural and provides a strong contrast.
AF Area Registration
Options: *Off, On
My preference: On
This is an absolute killer feature for sports photographers, as it allows you to switch from your current focus point to a pre-registered point—and then back to your original point—just by pressing a custom key. Say you’re covering a baseball game and frequently alternate between photographing the batter or some other position and first base, where a lot of action takes place. If you’ve registered first base (as I’ll describe shortly), you’re free to focus elsewhere and then, when the batter makes contact and begins running toward first (or the pitcher decides to throw to first to cut off a base runner who’s taken a lead), you can press the defined key and the focus point will instantly move back to the registered first base location within the frame.
To use this feature, just follow these steps:
- 1.Activate AF Area Registration. Navigate to this menu entry and choose On, then press the center button to confirm. A message will appear reminding you to register a specific focus area. I’ll explain how to do that shortly. Press the center button again to exit to the menu.
- 2.Register a Focus Area. Move the focus point to the location you want to register. Press the Fn button and hold it down until the message Registered the Focus Area appears (it will take about three seconds).
- 3.Access Setup > Operation Customize > Custom Key/Dial Settings (Stills). To relocate the focus point to a registered position, you’ll need to define a custom button to do that. Select a button within the Custom Key/Dial Settings entry and navigate to one of the three registration variations listed below. You’ll find them in the Focus > Focus Area group.
- •Registered AF Area Hold. Pressing the button switches to the registered location only while you hold the button down. When you release the custom key the focus point returns to your previous focus point. This option is useful if you want to be able to switch to the registered area only temporarily. If you find it awkward to manipulate two buttons at once (holding down your custom key, plus pressing the shutter release to take the picture), you may be better off switching back and forth using the toggle option described next.
- •Registered AF Area Toggle. Press and release the button to switch to the registered location and press it a second time to return to your previous focus point. Use this if you think you’ll need to take several consecutive images using the registered point. Toggle is the only available option for the left, right, and down keys.
- •Registered AF Area+AF On. When the custom key is pressed the focus point switches to the registered area and autofocus is initiated. When you release the custom key, the focus point returns to its previous location. If you’ve registered first base you can then move the focus point to home plate and continue to capture the batter’s efforts. Then, if action unfolds at first base, press the defined button and the a7 IV will switch to your registered focus point and focus. You can then continue to hold the key while pressing the shutter release down to take the picture. Release the button and the focus point returns to home plate. (You can avoid the need to hold down the button if you’re using back-button focus, which decouples the AF activation feature from the shutter release.) This sounds complicated if you don’t know how back-button focus works, but I’ll explain it in more detail in Chapter 4.
- 4.Registered focus frame appears. When the defined custom key is pressed, the focus frame and points will flash in the viewfinder and on the LCD monitor. It may also appear in some of your live view displays as a reminder.
AF Area Registration cannot be used when shooting movies or S&Q video, when using digital zoom, tracking, while focus is locked, or when you are focusing using the lens’s focus ring or the a7 IV’s Touch Focus feature.
Delete Registered AF Area
Options: Delete, *Cancel
My preference: N/A
Use this to delete a registered focus area. That prevents the camera from shifting to the previously defined area if you accidentally press the defined custom key.
AF Area Auto Clear
Options: *Off, On
My preference: Off
This setting controls whether the focus area is shown all the time as you shoot, or whether it disappears a short time after focus is achieved in AF-S mode. Choose On if you prefer having an uncluttered screen while you shoot. I prefer to have focus information available at all times, so I leave this setting at its default Off value.
Area Display During Tracking
Options: *Off, On
My preference: Off
This is a similar de-cluttering tool that can be applied when using the AF-C autofocus mode and any of the Tracking AF focus areas other than Wide. When enabled, the frame used for the current focus area is displayed to help you locate the focus point over the desired subject when you activate tracking. When disabled, the focus area frame is displayed for just a moment, and then vanishes. I prefer to leave this setting on Off to declutter the screen after tracking begins.
AF-C Area Display
Options: Off, *On
My preference: On
This item determines whether the previewing display on the monitor or EVF shows the active Wide or Zone focus areas when you’re using Continuous AF. It has no effect on their display if you’re using Center Fix, Spot, or Expand Spot or any Tracking option in Continuous AF area modes, or autofocus modes other than AF-C.
Sometimes too much information can be distracting. That’s especially true in AF-C mode, because if you’ve framed a moving subject, the camera can continue to change the active focus areas if your subject is moving. In Wide mode, you may be treated to a dancing array of green rectangles squirming around on your screen as the a7 IV focuses and refocuses in anticipation of you eventually pressing the shutter release all the way down and taking a picture. I think that the constantly shifting focus requires less continual feedback about what focus areas are being used, so you may want to switch the feature off. In my case, I don’t mind the display, and I tend to leave it on most of the time, even though it consumes a little more battery power.
Phase Detection Area
Options: On, *Off
My preference: On
The a7 IV has 759 phase detection points embedded in its full-frame sensor, covering most of the frame. This setting, which is active only when a compatible APS-C lens is attached, allows you to enable or disable display of the phase detect area, in the form of a pair of vertical lines at the left and right sides of the screen that mark the portion of the frame where the points reside. (Some compatible lenses may need a firmware update; check the Sony website for your country to view the latest list of compatible lenses and available lens firmware updates.) The area is not shown when the camera is recording movies.
Circulation of Focus Point
Options: *Does Not Circulate, Circulate
My preference: N/A
This setting simply determines whether you can only move the focus point within the image frame, or whether, when it reaches left, right, top, or bottom edges it wraps around to the opposite side. A lot of people like this feature quite a bit, but unless you played too much Pac-Man in your youth, you will probably prefer Does Not Circulate.
AF Frame Movement Amount
Options: *Standard, Large
My preference: Standard
This setting adjusts how rapidly a movable focus spot can be relocated using the directional controls. Sony shooters can sometimes be divided into two camps. On the one hand, you have those who like to keep the Zone or Spot/Expand Spot focus areas in one position, often the center of the frame. They typically point the camera at the subject they want to focus on, and lock focus (in AF-S).
Others prefer to relocate the Zone or Spot focus areas to suit the subject they’re working with, especially if that subject will likely be out of the center of the frame. If you’re one of the latter, you may find this setting handy. You can choose whether the movement is in smaller or larger increments, based on the focus area you choose. The distance doesn’t change much for Zone and SpotSmall Focus Areas, but the focus point moves twice as fast when using Spot-Medium, Spot-Large, or Expand Spot.
3. Face/Eye AF
The Face/Eye AF group has seven entries you can use to customize the a7 IV’s remarkable face and eye detection features. (See Figure 8.6.)

Figure 8.6 The Face/Eye AF group.
- ■Face/Eye Priority in Autofocus
- ■Face/Eye Subject
- ■Subject Selection Setting
- ■Right/Left Eye Select
- ■Face/Eye Frame Display
- ■Face Memory
- ■Registered Faces Priority
When you’re photographing people, the a7 IV can optionally look for faces and can base its autofocus decisions on the faces it locates. Even better, you can give certain countenances a higher priority than others by registering them with the camera, so, say, if your significant other is ensconced in the frame, the camera will favor that person as its AF focus (so to speak) over other humans in the frame. Further, the camera can locate human or animal eyes within your frame, and focus on them. Face/Eye detection can’t be used with digital zoom, Sweep Panorama, the Focus Magnifier, the Posterization Picture Effect, Landscape/Night Scene/Sunset Scene modes, and 120p/100p movie or 120 fps/100 fps S&Q motion video. The Eye AF feature is unavailable when capturing conventional and S&Q video.
Face/Eye Priority in Autofocus
Options: *On, Off
My preference: On
Choose On and the a7 IV can give a higher priority to detected faces. Select Off and AF will proceed without looking for faces. Up to eight faces, if present, may be detected. When autofocus is activated, the camera will attempt to focus on the eyes or face, if they are located within the active focus area. This can cause problems if the face(s) involved are not your main subject. Perhaps you want to focus on an object in the foreground, and not onlookers in the background. In that case, press the center button to temporarily switch to Center Fix and AF-S.
The Eye AF portion of Face/Eye Priority AF may not function as expected with subjects which are rapidly moving, have long bangs, closed eyes, or are wearing sunglasses. Shady conditions, backlight, and low-light situations can also hinder eye detection. Note that when using Intelligent Auto, Face/Eye Priority is locked at On.
Customizing Eye AF
You can customize the eye detection component (Eye AF) of the feature by assigning a custom key to one of these two behaviors, or a different key to each of them. I’ll show you how to set up custom keys in Chapter 4.
- ■Activate Eye AF with Custom Key. The Eye AF function can be assigned to a key, and the a7 IV will detect and focus on the eye as long as you are holding down the custom key. The camera will search for human eyes within the entire frame, regardless of the Focus Area you’ve selected. Press the shutter release down all the way while holding the key to take the picture. This fixes the potential problem I described in the sidebar above. It also means that if you have a preferred Focus Area setting for a particular shooting session, you don’t have to switch to another in order to make Eye AF function properly.
- ■Switch Eyes with Custom Key. If your subjects are always facing you, then setting Right/Left Eye Select to Auto may be your best bet. That’s because if you apply the Switch Right/Left Eye behavior to a custom key, should you not like the camera’s eye selection, press and hold the defined key to temporarily switch focus to the other eye. Moreover, if you’ve told the a7 IV to always choose the Left (or Right) eye, you can switch to the alternate by pressing the key.
- ■Switch from Human to Animal with Custom Key. You can switch among Human, Animal, or Bird eye detection using the Face/Eye Subject entry, described next. You might want to assign this function to a custom key so you can enable/disable detection of a certain type of subject on the fly.
Face/Eye Subject
Options: *Human, Animal, Bird
My preference: Human
You can specify the default face/eye detection subject type here, choosing from Human, Animal, or Bird. If none are found, the a7 IV will generally focus on the closest object within the focus area. Unfortunately, if your subject happens to be an animal, it may end up focusing on a beak or nose. In such cases, you can manually adjust focus, using DMF, or switch to a different subject type using a custom key definition, as described next.
Subject Selection Setting
Options: *Human, Animal, Bird
My preference: Human, Birds
As I noted above, you can tell the a7 IV to look for Human, Animal, or Bird “faces.” This setting allows you to disable one or more of the three. I shoot humans and birds (especially those in flight), so I usually disable the Animal setting. A correct subject setting can be critical, especially with animals, because you want the camera to be looking for eyes rather than snouts.
The type of face detected can be selected using check boxes in the screen that appears when you invoke this entry (see Figure 8.7). Mark or unmark the types of subjects you want to look for. If you assign Subject Select Setting to a custom key, pressing the defined button will cycle among the active choices and show the current subject type on the display.
Right/Left Eye Selection
Options: *Auto, Left, Right
My preference: Auto
Chooses whether to detect the left or right eye of the subject when both are visible. Note that this feature uses the subject’s eye, which may be on the opposite side from your perspective (that is, your subject’s right eye is on the left side of your frame). (See Figure 8.8.) Since non-owls may have their eyes on opposite sides of the head, this entry is unavailable when Subject Detection is set to Bird.

Figure 8.7 Choose any or all subjects for Face/Eye detection.

Figure 8.8 You can switch to focus on left or right eye.
Face/Eye Frame Display
Options: *Off, On
My preference: On
The camera automatically shows a small white square around a human eye it is focusing on, and that frame will turn green when the subject is in focus. But you can also enable a frame around entire faces with this option. (If you want the frames to display, but disappear after a time, use AF Area Auto Clear, described earlier in this chapter.) Although the eye-focus box is helpful, I find the additional box around the face very useful and leave it on at all times so I know exactly what face(s) have been detected. When enabled, a gray selection box appears around detected faces. The box around the face used for autofocus turns white. If there are several faces in the frame and you’ve registered and prioritized some or all of them, the boxes around the other faces turn reddish-purple. (I’ll show you how to register faces later in this chapter.) If you find the boxes distracting, you can turn them off, and face detection, if enabled as described earlier, will still be active.
Face Memory
Options: New Registration, Order Exchanging, Delete, Delete All
My preference: N/A
When you access this entry, the screen shown in Figure 8.9 (left) appears. The top option, New Registration, allows you to log up to eight different faces. For best results, line up your victim (subject) against a brightly lit background to allow easier detection of the face. A white box appears that you can use to frame the face. (See Figure 8.9, center.) Press the shutter button. A confirmation message appears (or a Shoot Again warning suggests you try another time, usually because you need to frame the face better). When Register Face? appears, choose Enter or Cancel, and press the MENU button to confirm.
The Order Exchanging option allows you to review and change the priority in which the faces appear, from 1 to 8. (See Figure 8.9, right.) The a7 IV will use your priority setting to determine which face to focus on if several registered faces are detected in a scene. For example, place close family members high on your list, and relegate that annoying brother-in-law to last place. You can also select a specific face and delete it from the registry (say, you broke up with your significant other!) or delete all faces from the registry (your SO got custody of the camera). Face data remains in the camera when you delete individual faces but is totally erased when you select Delete All.

Figure 8.9 Face Registration has four options (left). Capture an image of the face you want to register (center). You can also change the order—and therefore the priority assigned to each face (right).
Register Faces Priority
Options: *On, Off
My preference: On
I leave this setting on almost all the time. If I’ve gone to the trouble of registering important faces, I will generally want to give those faces priority. However, you might want to give all faces equal priority, say, if you’re at a wedding reception that includes your family members, but other guests and/or the bride and groom are more/just as important.
4. Focus Assistant
This group has five entries that are aids in focusing, particularly when you’re using manual focus. (See Figure 8.10.) Two additional entries, Focus Map and (Movie) Initial Focus Magnification apply only to video. The entries explained here include:

Figure 8.10 Focus Assistant group.
- ■Focus Map (Movies)
- ■Auto Magnifier in Manual Focus
- ■Focus Magnifier
- ■Focus Magnifier Time
- ■Initial Focus Magnification
- ■Movie Initial Focus Magnification (Movies)
- ■Autofocus in Focus Magnification
Focus Map
Options: *On, Off
My preference: Off
It’s become common to refer to use “on steroids” as a superlative when describing virtually any feature except an athlete’s performance. Sony’s new Focus Map feature might better be described as Focus Peaking on Valium. It provides an interesting depth map in very low resolution by using a blocky overlay that shows you roughly what is in focus, and what is not. Blocks in a blue color indicate what’s behind the plane of focus, and those in a warm color show what’s in front. Areas that are in focus are not overlaid. This feature doesn’t work when using digital zoom, USB streaming, mount adapters, certain older lenses, and when using the Focus Magnifier. See Figure 8.11 for a simulation for this hard-to-like feature.

Figure 8.11 Focus Map, a less effective tool than Peaking (at the moment).
Auto Magnifier in Manual Focus
Options: *On, Off
My preference: N/A
This entry is rightfully activated by default, so that as you rotate the focus ring in manual focus mode the center of the focus area is automatically enlarged so you can focus more precisely. You can use the multi-selector to move the magnified area around within the frame. This is the most useful focusing aid your a7 IV provides (you can even activate it during autofocus, as I’ll describe shortly).
- 1.Switch to manual focus. You can use the AF/MF switch on your lens, if present, or by pressing the Fn button and using the Function menu to choose MF from among the focus mode choices. Manual focus can also be chosen by accessing the Focus Mode entry in the menu system, described earlier in this chapter.
- 2.Access Focus Magnifier. If this entry is enabled, it should activate automatically as you rotate the focusing ring in Manual focus mode. When activated, the image will be shown within a screen like the one shown in Figure 8.12, left.
- 3.Press the center of the multi-selector to zoom in. The image first is enlarged to 5.5X and then to 11.9X. (In APS-C/Super 35 mode the magnifications are 3.6X and 7.2X.) A third press exits magnified view.
- 4.A navigation window appears at lower left showing an orange rectangle that represents the current location of the blown-up section (as seen in Figure 8.12, right). You can also use the control wheel’s center button to zoom in.
- 5.Adjust the magnified area. A quartet of triangles surrounds the image, indicating that you can move the enlarged window around with the frame. Press and release the multi-selector button or the center button, and then use the left/right/up/down directional controls to move the enlarged area.
- 6.Center the magnifier. You can press the Trash button to center the magnified section back in the center of the frame.
- 7.Manually focus. Rotate the lens’s focus ring to achieve sharp focus. A scale along the bottom of the screen shows the approximate focus distance.
- 8.Take the picture. When you press the shutter release down all the way to take the picture, Focus Magnification is canceled when you’re using manual focus.
- 9.(Optional) Return to autofocus. Remember to return to autofocus when you no longer want to focus on your subject manually.
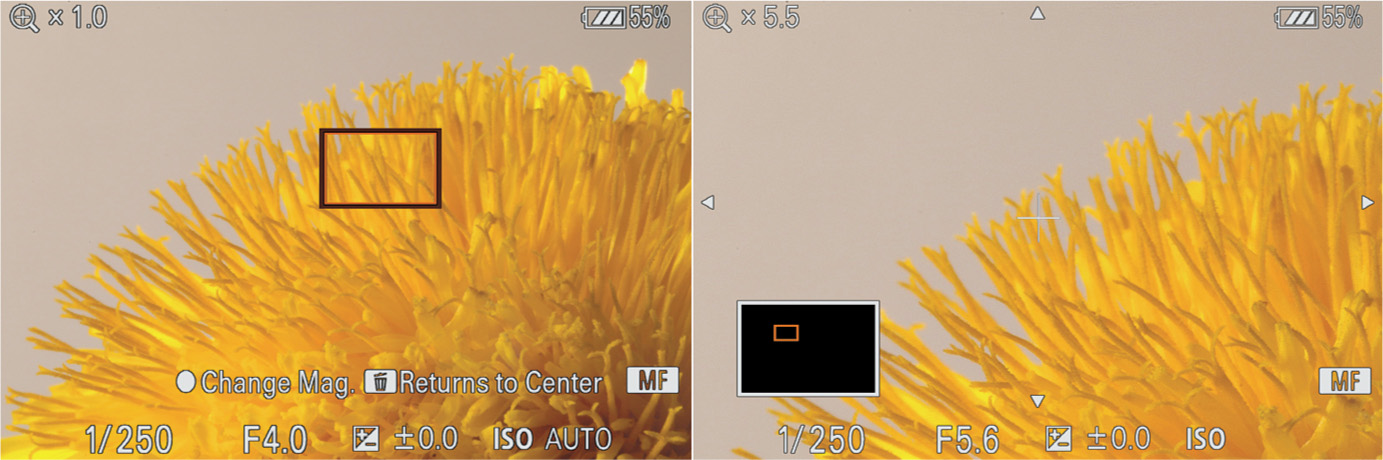
Figure 8.12 The Focus Magnifier can be zoomed from 1X (left) to 5.5X (right) and 11.9X.
Focus Magnifier
Options: Activate
My preference: N/A
Certain lenses, particularly non-Sony or adapted optics, may not automatically trigger the Auto Magnifier in Manual Focus feature. If so, you can manually initiate the magnifier with this entry. It can be assigned to a custom key to avoid a trip to the menu to invoke it.
Focus Magnifier Time
Options: 2 sec., 5 sec., *No Limit
My preference: 5 sec.
This entry can be used to specify the length of time that the Focus Magnifier will magnify the image during manual focusing. If you find that it takes you longer than two seconds to manually focus using MF Assist, you can change the time to five seconds, or to No Limit; the latter will cause the image to remain magnified until you tap the shutter release button (you don’t need to actually take a picture), press the multi-selector button again to return to full frame, or double-tap the LCD monitor if you have enabled Touch Operation. Don’t use No Limit with DMF, as one of two things will happen, both bad. If you keep the shutter release pressed halfway after you’ve focused, the magnification will remain until you press the shutter release down all the way. That’s a lousy way to compose an image. If you release the shutter button or tap the shutter button to cancel the magnification, when you press down the button again to actually take a picture, the a7 IV will refocus.
Initial Focus Magnification
Options: *1.0X, 5.5X (or 3.6X in APS-C/Super 35mm mode)
My preference: 5.5X
You can specify the initial magnification presented when the Focus Magnifier is invoked. The default is 1.0X (no magnification), which is fine if your first step is frequently to move the magnification window around in the frame before zooming in. At 1.0X, you see the entire frame and can position the window anywhere you like. I prefer to skip that step and jump right in at 5.5X, which usually positions the window close enough that I can go ahead and move it within the frame if I want. The 5.5X magnification is automatically used if you have enabled Touch Operation and double-tap the LCD monitor to zoom in. If you’re using APS-C/Super 35mm crop mode, the initial focus magnification is 3.6X instead of 5.5X.
(Movie) Initial Focus Magnification
Options: *1.0X, 4X
My preference: 4X
This menu item is visible only when the a7 IV ‘s Still/Movie/S&Q dial is in either Movie position. It’s similar to the Stills version, described above.
AF in Focus Magnification
Options: *On, Off
My preference: Off when not shooting macro/close-up images
As I mentioned earlier, the Focus Magnifier works just fine in autofocus mode. You can use it to view an enlarged image to confirm that correct focus has been achieved automatically, or to fine-tune focus when working with Direct Manual Focus (DMF) mode.
Once you’ve enabled the AF focus magnification option, activate the Focus Magnifier as described earlier and adjust the enlarged area using the directional controls and the navigation box. Avoid positioning the enlarged area at the edges of the frame, as the camera may be unable to focus at those positions. When you’re ready, press the shutter release halfway. In any AF mode or DMF, the a7 IV will focus on the center of the enlarged area. If you’re using DMF, you can fine-tune focus with the lens’s focus ring. Then press the shutter release down all the way to take the photo.
Focus magnification cannot be used with autofocus when shooting movies; when the Focus mode is set to AF-C; or when using AF-A and continuous shooting or a shooting mode other than P, A, S, or M. The feature is also disabled when using one of the EA-LA mount adapters. Certain autofocus features are disabled when using the focus magnifier, including Eye AF, Center Tracking, Eye Start AF, Pre-AF, and Face Priority in AF.
5. Peaking Display
The Peaking Display group has three entries used to activate and adjust your Peaking settings during manual focus. (See Figure 8.13.)

Figure 8.13 Peaking Display’s group.
- ■Peaking Display
- ■Peaking Level
- ■Peaking Color
Peaking Display
Options: *Off, On
My preference: On
This is a useful manual focusing aid (available only when focusing in Manual and Direct Manual modes) that’s difficult to describe and to illustrate. You’re going to have to try this feature for yourself to see exactly what it does. Focus peaking is a technique that outlines the area in sharpest focus with a color—as discussed below, that can be red, white, or yellow. The colored area shows you at a glance what will be very sharp if you take the photo at that moment. If you’re not satisfied, simply change the focused distance (with manual focus). As the focus gets closer to ideal for a specific part of the image, the color outline develops around hard edges that are in focus. You can choose how much peaking is applied (High, Medium, or Low), select a specific accent color (Red, Yellow, or White), or turn the feature off.
Peaking Level
Options: High, *Mid, Low
My preference: High
This setting allows you to choose how strong the contrasting highlights are. I find a maximum application of color works the best for most subjects that have strong colors.
Peaking Color
Options: Red, Yellow, *White
My preference: Red
Peaking Color allows you to specify which color is used to indicate peaking when you use manual focus. White is the default value, but if that color doesn’t provide enough contrast with a similarly hued subject, you can switch to a more contrasting color, such as red or yellow. (See Figure 8.14.)

Figure 8.14 You can choose any of three colors for peaking color (for manual focus), but only if you have activated the Peaking Level item. For these blossoms, red was a better choice than white or yellow.
Playback Tab
The Playback tab has seven groups with a wide selection of options for reviewing your images. (See Figure 8.15.) Most of these are functions that you select as needed rather than settings, so my preferences don’t apply, and I won’t be providing any. They include:

Figure 8.15 Playback tab.
- ■Playback Target
- ■Magnification
- ■Selection/Memo
- ■Delete
- ■Edit
- ■Viewing
- ■Playback Option
1. Playback Target
This group has two entries, shown in Figure 8.15:
- ■Select Playback Media
- ■View Mode
Select Playback Media
Options: *Slot 1, Slot 2
Your a7 IV has two memory card slots, with useful labels on the reverse side of the memory card door to help you sort them out. You can specify which slot has precedence when reviewing images. Select either Slot 1 or Slot 2 here to register your preference.
- ■See images on preferred card. Once you’ve selected a slot, when you press the Playback button, images in that card matching your current view mode will be displayed. If no images are available in that view, a sidebar appears at the left of the LCD/viewfinder. You can press the up/down buttons to change to a different view mode.
- ■Card not inserted. If you press Playback and no card is inserted in your preferred slot, you’ll see a message “No memory card inserted. Slot #.”
- ■Switching slots. To change active playback slot, you’ll need to use this menu entry. Note that if you want to change the active recording slot to use during shooting, you can define a button for the Select Recording Media behavior with the Custom Key/Dial Settings (Shooting) entry in the Setup > Operation Customize group, as described in Chapter 9.
View Mode
Options: *Date View, Folder View (Still), Movie View
Adjusts the way the camera displays image/movie files, which is useful for reviewing only certain types of files, or for deleting only particular types, as described above. You can elect to display files by Date View, Folder View (still photos only), or Movie View. Date View can come in handy, particularly on trips, when you want to see your images in reverse chronological order.
2. Magnification
The Magnification group has three entries, shown at left in Figure 8.16:
- ■Enlarge Image
- ■Enlarge Initial Magnification
- ■Enlarge Initial Position
Enlarge Image
Options: Zoom On, Zoom Out
Whenever you are playing back still images (not movies), you can use this menu entry to magnify the image. (You can also double-tap the touch screen to zoom in or press the AF-ON/Magnify button.) The a7 IV will try to zoom in on the point used to focus the image, if possible, and will zoom into the center of the frame if not. Press the Index/Reduce/AEL button to zoom out, and the AF-ON/ Magnify button to zoom in. The MENU button exits. Use the control wheel to zoom in and out, and you can scroll around inside the enlarged image using the control wheel’s directional controls. Rotate the front or rear dials to view the next or previous image (respectively) at the same magnification. Press MENU or the center button to exit. The initial magnification of the image is set using the entry that follows.
Enlarge Initial Magnification
Options: *Standard Magnification, Previous Magnification
Here you can choose the initial magnification used by the Enlarge Image entry. Use Standard Magnification to always see any image you magnify at the same zoom level. This is a good choice if you magnify from time to time to closely examine an image and may want to zoom in or out to view more or less of your subject matter. When you select Previous Magnification, the enlargement resumes at the most recent level used. For example, if you are checking focus of your images as you shoot and zooming in tightly, it’s convenient to return to the same zoom level for each successive image.
Enlarge Initial Position
Options: *Focused Position, Center
By default, whenever you magnify an image during playback, the a7 IV centers the enlargement around the area in the frame where focus was achieved. That’s often the best choice, because when evaluating an image during playback, focus is the parameter most often checked. However, I prefer the enlargement positioned in the center of the frame, so I can move the magnifying window around anywhere I like. That setting potentially minimizes the amount of “travel” if the previous area I examined is located some distance in the frame from my new area of interest.
3. Selection/Memo
The Selection/Memo group has three entries, shown at right in Figure 8.16. If you’re wondering about the Selection/Memo nomenclature, the Sony a1 has a voice memo feature with two entries that inhabit this group. My guess is that Sony may consider adding it to the a7 IV in the future through a firmware upgrade.
- ■Protect
- ■Rating
- ■Rating Settings (Custom Key)
Protect
Options: *Multiple Images, All with [Current View Mode: Folder, Date], Cancel All [This Folder, Date] You might want to protect certain images or movie clips on your memory card from accidental erasure, either by you or by others who may use your camera from time to time. This menu item enables you to tag one or more images or movies for protection, so a delete command will not delete it. (Formatting a memory card deletes everything, including protected content.) This menu item also enables you to cancel the protection from all tagged photos or movies. If all you want to do is protect/ unprotect the image currently on the screen, just press C3 during playback, a white key (“locked”) icon will appear above the image.

Figure 8.16 Magnification group (left); Selection/Memo group (right).
To use this feature, make sure to specify whether you want to do so for stills or movies; use the View Mode item in the desired view mode. There, you can select from Date View, Folder View (Still), or Movie View to see only items matching that parameter.
Then, access the Protect menu item, choose Multiple Images, and press the center button. An image (or thumbnail of a movie) will appear; scroll among the photos or videos using the control wheel to reach the photo you want to tag for protection; press the center button to tag it with an orange check mark at the left of the image. (If it’s already tagged, pressing the button will remove the tag, eliminating the protection you had previously provided.)
After you have marked all the items you want to protect, press the MENU button to confirm your choice. A screen will appear asking you to confirm that you want to protect the marked images; press the center button to do so. Later, if you want, you can go back and select the Cancel All Images option to unprotect all the tagged photos or movies.
Rating
Options: One to five stars, Off
This setting lets you apply a quality rating to still images (but not movies) you’ve shot. You can also use the rating system to represent some other criteria. Simply select this menu item (or define a custom key as a dedicated Rating button, as described next). You can use this entry to give images one, two, three, four, or five stars, or turn the rating off. The Image Jump function (described later in this chapter) can display only images that have been given a specific rating, or any rating at all. Suppose you were photographing a track meet with multiple events. You could apply a one-star rating to jumping events, two stars to relays, three stars to throwing events, four stars to hurdles, and five stars to dashes. Then, using the Image Jump feature, you could review only images of one type. I personally find this type of use more helpful than simply critiquing my own work.
With a little imagination, you can apply the rating system to all sorts of categories. At a wedding, you could classify pictures of the bride, the groom, guests, attendants, and parents of the couple. If you were shooting school portraits, one rating could apply to first grade, another to second grade, and so on. Given a little thought, this feature has many more applications than you might think. Ratings can be used to specify images for a slide show, too.
To use the Ratings menu entry, follow these steps:
- 1.Choose the Rating menu item.
- 2.The most recently viewed image appears.
- 3.Press the center button, and an icon appears, flanked by left/right triangles. (See Figure 8.17, left.)
- 4.Use the left/right controls to scroll among Off, and the individual star settings available. (You can specify which ratings can be applied, as I’ll describe shortly.)
- 5.Press MENU to confirm and exit.
- 6.The star rating (if any) that you’ve applied will henceforth be overlaid on the image each time you review it.
Rating Settings (Custom Key)
Options: Activate any (or all) star ratings
This is a clever option that allows you to specify which star ratings can be applied when rating images using a defined custom key for the Rating function. For example, if you’re rating by quality and don’t deign to mark your really bad images, you can disable the * or ** star values. Thereafter, you’ll only need to consider ***, ****, or ***** ratings.
For this to work, you must apply the Rating behavior to a custom key of your choice. After that, you can visit this menu entry, shown in Figure 8.17, right, and highlight individual star values. Press the center button to mark/unmark them, then highlight Enter and press the center button again to confirm and exit. When rating an image using the custom key, just press the key multiple times. The ratings change to the next available value each time you press the key. (This should be your default way of applying ratings!)

Figure 8.17 You can apply one to five stars or turn ratings off (left). If you rarely use a particular star value, you can deactivate it when using a custom key (right).
4. Delete (Stills/Movies)
The Delete group has three entries, seen at left in Figure 8.18:
- ■Delete
- ■(Trash) Delete Pressing Twice
- ■Delete Confirmation

Figure 8.18 Delete group (left); Edit group (right).
Delete
Options: *Multiple Img., All with [Current View Mode]
Sometimes we take pictures or video clips that we know should never see the light of day. Maybe you were looking into the lens and accidentally tripped the shutter. Perhaps you really goofed up your settings. You want to erase that photo now, before it does permanent damage to your reputation as a good photographer. Unless you have turned Auto Review off, you can delete a photo immediately after you take it by pressing the Trash key (Delete button). Also, you can use that method to delete any individual image that’s being displayed on the screen in Playback mode.
However, sometimes you need to wait for an idle moment to erase all pictures that are obviously not “keepers.” I sometimes do this during halftime when shooting sports, to eliminate a series of continuous shots I know were a waste of storage space. This menu item makes it easy to remove selected photos or video clips (Multiple Images), or to erase all the photos or video clips taken, sorted by your currently active view mode (such as folder or date). (Change the type of view using the View Mode option, described earlier in this chapter.) Note that there is no delete method that will remove images tagged as Protected.
To remove one or more images (or movie files), select the Delete menu item, and use the up/down directional buttons, front dial, either rear dial, or the control wheel to choose the Multiple Images option. Press the center button, and the most recent image using your currently active view (Date View, Folder View [Still], or Movie View) will be displayed on the LCD.
Scroll left/right through your images and press the center button when you reach the image you want to tag for deletion; a check mark then appears beside it and an orange check mark appears in the left of the screen. You can press the DISP button to see more information about a particular image. You can also press the AEL/Thumbnail button to view thumbnails of multiple images and select them in that mode.
The number of images marked for deletion is incremented in the indicator at the lower-right corner of the LCD, next to a trash can icon. When you’re satisfied (or have expressed your dissatisfaction with the really bad images), press the MENU button, and you will be asked if you’re sure you want to proceed. To confirm your decision, press the center button. The images (or video clips) you had tagged will now be deleted. If you want to delete everything on the memory card, it’s quicker to do so by using the Format item in the Setup menu, as discussed in Chapter 9.
Delete Pressing Twice
Options: On, *Off
With the default Off setting, when you press the Trash/Delete button, a screen pops up requiring you to select DELETE and the center button to confirm. It’s a safety measure to help prevent accidental deletions. You can switch to a different safety measure by setting this entry to On. Thereafter, all you have to do is press Delete twice to remove an image.
Delete Confirmation
Options: *”Delete” First, “Cancel” First
Sony, in its wisdom, gives you yet a third way to confirm you really, really want to delete an image. You can choose whether Delete or Cancel is the default value that pops up when you press the Delete key. That’s a bit faster than needing to manually switch from Cancel to Delete, but supposedly less dangerous than pressing the Delete button twice in a row. Note that if you’ve activated the Delete/ Twice option, this setting is not available.
5. Edit
The Edit group has five entries. See Figure 8.18, right.
- ■Crop
- ■Rotate
- ■Copy
- ■Photo Capture
- ■JPEG/HEIF Switch
Crop
Options: Crop, Aspect Ratio
You may find it convenient to crop your images in your camera without needing to import them into your laptop or computer first. That’s likely to happen while traveling, when you want to post an image with an improved composition on social media, or to send by email. Since it’s easy to upload photos from your a7 IV to your smartphone, this cropping capability can be very handy. Just follow these steps:
- 1.Select image to crop. When you first access this entry, you can scroll around among your images to locate the one you want to crop. Then, press the center button to begin your edit.
- 2.Adjust aspect ratio. As you begin, the screen shown in Figure 8.19 appears. Rotate either rear dial to choose from 3:2, 4:3, 1:1, 16:9, 9:16, 3:4, or 2:3 aspect ratios, which give you a selection of portrait and landscape orientations.

Figure 8.19 Cropping an image in the camera.
- 3.Choose crop size. Rotate the front dial or control wheel to adjust this size of the rectangle/square used to specify the area cropped. You can also use pinch and zoom out gestures on an active touch screen.
- 4.Position cropping frame. The multi-selector and directional buttons can be used to move the cropping frame around the screen.
- 5.Preview your image. Press the Fn button to view the cropped image; press again to return to full screen mode.
- 6.Save. When you’re satisfied, press the center button to confirm and exit. A new file will be saved with the next image number applied, leaving your original image intact.
Rotate
Options: None
When you select this menu item, you are immediately presented with a new screen showing the current or most recently reviewed image along with an indication that the center button can be used to rotate the image. (This feature does not work with movies.) Scroll left/right to reach the image you want to rotate. Successive presses of the center button will now rotate the image 90 degrees at a time. The camera will remember whatever rotation setting you apply here. You can use this function to rotate an image that was taken with the camera held vertically when you have set Display Rotation to Manual or Auto. Press the MENU button to exit.
Copy
Options: Copy all images in current view mode to other card
The ability to work with two memory cards is a great feature. One of the best uses for your two slots is to make back-up images while traveling, or at any other time that your computer isn’t easily accessible. Here are some examples of what I do:
- ■Make a copy. Use this Copy facility to make a copy of images you shot on one card to your second card.
- ■Make copies to distribute. I bought a bunch of 8GB memory cards for $4 each and find it’s quick and easy to make multiple copies of photos, not for backup, but for distribution either on the spot, say, to provide models I’ve hired with some raw (not RAW) images or to send by snail mail to colleagues, friends, or family. No computer required!
- ■Leave your laptop or external storage at home. When I use a camera with dual memory card slots, I leave my hard disk/personal storage device with its built-in reader or my laptop at home more often. If I am going to be gone for only a day or two, it’s easier to just make copies in the camera, and not bother with another external device.
The process is simple: just select Copy and the a7 IV will take all the images visible in your current view mode and copy them from the memory card slot that you specified using Select Playback Media (described earlier in this chapter) to the other memory card slot. Note that the process takes a while, especially if you have many images, so you should be prepared to wait, and have a fully charged battery installed. Use the View Mode entry to choose the type of files to copy, using Date View, Folder View (Still), Folder View (MP4), AVCHD View, XAVC S HD View, or XAVC S 4K View. You can interrupt transfer at any time (say, a UFO lands nearby) by pressing the center button to cancel.
If you have any XAVC S movies on the source card, you will not be able to copy them to a card that is not fast enough to support XAVCS S video. When that conflict happens, you’ll see a message: “Cannot copy in the current memory card combination. Insert an SDXC Class 10 or USH-I/ UHS II-compatible memory card in the slot of the device where the copies are to be saved.” Substitute another card, or switch to a view mode that excludes XAVC S clips.
Photo Capture
Options: Capture video frame
This menu entry can be accessed only when you’re playing back a video clip. You can use it to extract a still frame from a movie you’ve captured. Just follow these steps:
- 1.Select the movie. In Playback mode, navigate to the movie you want to clip from.
- 2.Press MENU. Choose Photo Capture. The first frame of the video will appear, along with a display offering playback controls.
- 3.Play video. Press the center button to start playback of the video at normal speed.
- 4.Pause. Press the center button again to pause playback when you reach the approximate location containing the desired frame.
- 5.Select frame. Use one of the following controls to navigate to the exact frame you want to extract:
- •Up button. Plays back slowly so you can monitor the action easily.
- •Forward/Reverse. Press the left/right buttons to move to next frame/previous frame.
- •Down button. Saves the currently displayed frame to your memory card.
JPEG/HEIF Switch
Options: *JPEG, HEIF (4:2:0), HEIF (4:2:2)
This menu entry specifies the file format to be used for photos captured using the Photo Capture facility. I explained the differences between JPEG and HEIF image files in Chapter 6.
6. Viewing
The Viewing group has three entries, shown in Figure 8.20, left.
- ■Continuous Play for Interval
- ■Play Speed for Interval
- ■Slide Show

Figure 8.20 Viewing group (left), Playback Option group (right).
Continuous Playback for Interval
Options: Plays back interval shots
Use this setting to play back a sequence of images you captured using the Interval feature described in Chapter 9, or when shooting with the Continuous drive mode. Select the image or image group you want to view, and then press the center button to display the images. Press the center button again to pause during playback, or to resume playback. Change the playback speed by rotating the control wheel while you are watching. You can also adjust playback speed using the menu entry described next. If you want to create a movie from the sequence, use the Imaging Edge software, as outlined in Chapter 5.
Playback Speed for Interval
Options: Playback speeds from 1 (Slow) to 9 (Fast)
While you can adjust the speed of playback for interval sequences while viewing them, you can also set a value to be used automatically. You can still speed up or slow down while watching your sequence. The camera accomplishes playback speed by skipping frames, depending on the speed requested. The faster playback goes, the jerkier the motion will appear.
Slide Show
Options: Repeat (On/Off); Interval: 1 second, 3 seconds, 5 seconds, 10 seconds, 30 seconds
Use this menu option when you want to display all the still images on your memory card in a continuous show. You can display still images in a continuous series, with each one displayed for the amount of time that you set. Choose the Repeat option to make the show repeat in a continuous loop. After making your settings, press the center button and the slide show will begin. You can scroll left or right to go back to a previous image or go forward to the next image immediately, but that will stop the slide show. The show cannot be paused, but you can exit by pressing the MENU button. If you’re displaying your images on an external monitor using an HDMI cable, you’ll want to make sure the Display Rotation entry, discussed shortly, is set to Auto so the photos will be shown in the correct orientation.
7. Playback Option
The Playback Option group has six entries, seen at right in Figure 8.20:
- ■Image Index
- ■Display as Group
- ■Display Rotation
- ■Focus Frame Display
- ■Display Specified Time Image
- ■Image Jump Setting
Image Index
Options: *9, 25
You can view an index screen of your images on the camera’s LCD by pressing the down directional button while in Playback mode. By default, that screen shows up to 9 thumbnails of photos or movies; you can change that value to 25 using this menu item. Remember to use the View Mode menu item first, to identify the folder that the index display should access; by default, it will show thumbnails of still photos, but you might want to view thumbnails of your movie clips instead. When viewing an index, highlight the bar at the left side of the screen and use the directional controls to move quickly among available thumbnails. Press the center button to switch view mode quickly.
Display as Group
Options: On, *Off
If you shoot sports, you’ll love this feature. The a7 IV is smart enough to know that when you shoot a burst of images in continuous shooting mode it would be helpful to group them all together. That makes it easy to evaluate the first shot in a particular set of images captured sequentially, without having to wade through all of them. When set to On, the camera groups images in a burst together, and overlays a “stack” icon on the group, so you’ll know you are viewing/evaluating only the first image in that burst. The view mode must be set to Date View to use this feature. Set this option to Off and you’ll be shown every picture you captured, one by one, during image review.
Display Rotation
Options: *Auto, Manual, Off
You can use this function to determine whether a vertical image is rotated automatically during picture review. If you want to rotate the image more, use the Rotate entry, described later in this section.
- ■Auto. The image will be shown in the orientation indicated by information in the image, no matter how the camera itself is rotated during picture review. For example, a vertical image will be shown in the correct orientation, as shown at top left in Figure 8.21, when the camera is held horizontally. It will be shown smaller in size to fit the long dimension of the image into the short dimension of the screen. Rotate the camera 90 degrees, and the a7 IV will automatically rotate the photo so it’s still shown in the correct orientation, but it will now fill the LCD screen, as you can see in Figure 8.21, top right. This is the best setting when displaying your images on an external monitor.
- ■Manual. With this setting, the image is always displayed on the LCD in the same orientation it was taken. That is, a vertically oriented photo will be displayed in a smaller size, just as it is when using Auto, as shown at center left in Figure 8.21. However, when you rotate the camera during picture review, the a7 IV does not automatically rotate the image at the same time, so it will be shown with an incorrect orientation (see Figure 8.21, center right).
- ■Off. With this setting, both vertical and horizontal images are displayed to fill the screen as much as possible with the image. Vertical shots are larger, as shown at bottom left in Figure 8.21, but the camera must be rotated to view them in the correct orientation. (See Figure 8.21, bottom right).

Figure 8.21 Display Rotation configurations.
Focus Frame Display
Options: *Off, On
When activated, during playback the a7 IV will display a green box that indicates the focus point used to achieve focus. It’s useful for confirming that the camera actually focused where you intended. If not, you can make adjustments for your next photo.
Display Specified Time Image
Options: Time
This is a clever feature that lets you locate images on your memory card based on the date and time when they were taken. Say, after a full day’s shooting, you want to review all those photos you took of your exotic lunch in a local bistro. Access this entry, enter the approximate time and date, and the a7 IV will jump to still photos and movies taken at approximately that time, either before or after.
Image Jump Setting
Options: Select Dial, Image Jump Method
Sony obviously expects you’ll be taking a lot of photos, because it provides you with a multitude of ways to filter them and jump among them during playback. This clever setting lets you specify which of three dials (front dial, rear dial left, or rear dial right)—or all three—can be used to scroll among your images. (See Figure 8.22, left.) Best of all, you can choose a different selection method for each dial. You can select One by One for the front dial, By 10 Images for rear dial left, and By 100 Images for rear dial right if you want.
But when I said multitude, I wasn’t kidding (almost). Figure 8.22, right, shows six of the choices; you must scroll down to view the entire multitude.
- ■Numerically. You can choose One by One, By 10 Images, or By 100 images.
- ■By Minutes. Select from 3-, 5-, 10-, or 20-minute jumps.
- ■By Hours. Choose 1-, 3-, 6-, 12-, or 24-hour intervals.

Figure 8.22 Choose a dial to use for Image Jump (left). Then, specify the jump method for that dial (right).
- ■By Status. Protected Only, Rated Only, or those with a specific Rating (1 to 5 stars), or no stars.
- ■Shot Mark. All with Shot Marks, or with Mark 1 or Mark 2 Only, or No Shot Mark. Shot marks are the marking tool you can add to videos while recording them or playing them back, as discussed in Chapter 10.
- ■Divider Frame. Only those with a divider frame, or the first image after a divider frame. Divider frames are markers you can insert as separators between sequences of images. It beats taking a picture of your hand, as I used to do and lets you find particular sequences more quickly.