
Chapter 10. Castle Windsor
- Introducing Castle Windsor
- Managing lifetime
- Working with multiple components
- Configuring difficult APIs
In the previous nine chapters, we discussed patterns and principles that apply to DI in general, but, apart from a few examples, we have yet to take a detailed look at how to apply them using any particular DI CONTAINER. In this chapter, you’ll see how these overall patterns map to Castle Windsor; you’ll need to be familiar with the material from the previous chapters to fully benefit from this.
Castle Windsor is the second-oldest DI CONTAINER for .NET. It’s part of a larger open source project known as the Castle Project[1] that provides reusable libraries for many purposes. Windsor is the DI CONTAINER part of the Castle Project, but it can be used independently of any other Castle component. In this chapter, we’ll review it as a stand-alone component.
In addition to being one of the oldest DI CONTAINERS, Castle Windsor is one of the most mature and, if we’re to believe several totally unscientific internet polls, most popular containers. Although it’s fairly easy to get started with Windsor, it offers a rich and extensible API.
In this chapter, we’ll take a tour of Castle Windsor. When we’re done, you should know enough about it to be able to start using it immediately. We aren’t going to cover advanced extensibility scenarios but will instead focus on mainstream usage patterns. Figure 10.1 shows the structure of the chapter.
Figure 10.1. The structure of this chapter resembles a tree. The first section introduces the Castle Windsor container and explains how to configure and resolve components. Based on the introduction, the rest of the sections can be read sequentially or more or less independently. The last section uses syntax and a few methods that initially appear in the section about multiple components, so if you decide to skip the penultimate section, you may still want to occasionally refer back to it.

The first section provides an overall introduction to Castle Windsor and demonstrates how to configure and resolve components. The next three sections deal with usage patterns that require a bit of extra attention; you can read them all in order, or you can skip some and read only the ones that interest you.
This chapter should enable you to get started as well as deal with the most common issues that may come up as you use Castle Windsor on a day-to-day basis. It isn’t a complete treatment of Castle Windsor—that would take a whole book in its own right.
You can read the chapter in isolation from the rest of part 4 to learn specifically about Castle Windsor, or you can read it together with the other chapters in part 4 to compare DI CONTAINERS. The focus of this chapter is to show how Castle Windsor relates to and implements the patterns and principles described in the previous nine chapters.
10.1. Introducing Castle Windsor
In this section, you’ll learn where you get Castle Windsor, what you get, and how you start using it. We’ll also look at common configuration options, as well as how we package configuration settings into reusable components. Table 10.1 provides fundamental information that you’re likely to need to get started.
Table 10.1. Castle Windsor at a glance
|
Question |
Answer |
|---|---|
| Where do I get it? | Go to www.castleproject.org/castle/projects.html and click the appropriate link under Stable release. From Visual Studio 2010 you can also get it via NuGet. The package name is Castle.Windsor. |
| What’s in the download? | You can download a .zip file with precompiled binaries. You can also get the current source code and compile it yourself. The binaries are .dll files that you can place wherever you like and reference from your own code. |
| Which platforms are supported? | .NET 3.5 SP1, .NET 4 Client Profile, .NET 4, Silverlight 3, Silverlight 4. |
| How much does it cost? | Nothing. It’s open source software with a benign (non-viral) license. |
| Where can I get help? | You can get commercial support from Castle Stronghold. Read more at www.castlestronghold.com/services/support. Other than commercial support, Castle Windsor is still open source software with a thriving ecosystem, so you’re likely (but not guaranteed) to get help in the official forum at http://groups.google.com/group/castle-project-users. Stack Overflow (http://stackoverflow.com/) is another good place to ask questions. |
| On which version is this chapter based? | 2.5.2. |
As figure 10.2 shows, there’s a simple rhythm to Castle Windsor: configure the container by adding components, and subsequently resolve the required components.
Figure 10.2. The overall usage pattern of Castle Windsor is simple: first we configure the container; then we resolve components from it. In the vast majority of cases, we create an instance of WindsorContainer and completely configure it before we start resolving components from it. We resolve components from the same instance that we configure.

When you’re done with this section, you should be familiar with the overall usage pattern of Castle Windsor, and you should be able to start using it in scenarios where all components follow proper DI patterns, such as CONSTRUCTOR INJECTION. We’ll start with the simplest scenario and see how you can resolve objects using the Windsor container.
10.1.1. Resolving objects
Every DI CONTAINER’S core purpose is to resolve objects by wiring them up with all their DEPENDENCIES. Castle Windsor offers a simple API to resolve services; but before you can resolve a service, it must be registered with the container. Here’s the simplest possible use of Windsor:
var container = new WindsorContainer();
container.Register(Component.For<SauceBéarnaise>());
SauceBéarnaise sauce = container.Resolve<SauceBéarnaise>();
Before you can ask a WindsorContainer to resolve anything, you must explicitly register the appropriate components. In this case, you can get by registering a single concrete type. However, as you’ll see next, you’ll more frequently register a map from an ABSTRACTION to a concrete type.
Once you have the container properly configured, you can resolve the Sauce-Béarnaise type to get an instance of it. You don’t have to check for null because WindsorContainer will throw an exception if it can’t AUTO-WIRE and return an instance of the requested type.
Note
Windsor requires that all required components are registered, even if they’re concrete types. This is by design,[2] but not a design shared by all other DI CONTAINERS.
2 See http://docs.castleproject.org/Default.aspx?Page=FAQ&NS=Windsor&AspxAutoDetectCookieSupport=1 for a complete explanation.
This first example is functionally equivalent to directly creating an instance of the SauceBéarnaise class with the new keyword: nothing is yet gained. Recall that DI is a means to an end, and that end is loose coupling. To achieve loose coupling, you must map ABSTRACTIONS to concrete types.
Mapping Abstractions to concrete types
Although it’s sometimes necessary to register a concrete class as itself, a much more common requirement is to map an ABSTRACTION to a concrete type. This is, after all, the core service offered by DI CONTAINERS.
Here you map the IIngredient interface to the concrete SauceBéarnaise class, which allows you to successfully resolve IIngredient:
var container = new WindsorContainer();
container.Register(Component
    .For<IIngredient>()
    .ImplementedBy<SauceBéarnaise>());
IIngredient ingredient = container.Resolve<IIngredient>();
Instead of registering a concrete type, you map an ABSTRACTION to a concrete type. When you later request an instance of IIngredient, the container will return an instance of SauceBéarnaise.
The strongly typed fluent API available through the Component class (that’s Castle.MicroKernel.Registration.Component, not System.ComponentModel.Component) helps preven configuration mistakes because the ImplementedBy method has a generic constraint that makes sure the type specified in the type argument implements the ABSTRACTION type argument specified in the For method. That is, the previous example code compiles because SauceBéarnaise implements IIngredient.
In many cases, the strongly typed API is all that you need, and, because it provides desirable compile-time checking, you should use it whenever you can. Still, there are situations where you need a more weakly typed way to resolve services. This is also possible.
Resolving weakly typed services
In some cases, we can’t write generic code to resolve a type because we might not even know the exact type of the ABSTRACTION at design time. A good example of this is the ASP.NET MVC DefaultControllerFactory that we discussed in section 7.2. The relevant part of that class is the virtual GetControllerInstance method:
protected internal virtual IController GetControllerInstance(
    RequestContext requestContext, Type controllerType);
There aren’t strongly typed generics in this API. Instead, we’re given a Type and asked to return an IController instance. The WindsorContainer class also has a weakly typed version of the Resolve method; you can use this method to implement GetControllerInstance:
return (IController)this.container.Resolve(controllerType);
Notice that, in this case, you pass the controllerType argument to the Resolve method. Because the weakly typed version of Resolve returns an instance of System.Object, you must explicitly cast to IController before returning the result.
No matter which overload of Resolve you use, Windsor guarantees that it will return an instance of the requested type or throw an exception if there are DEPENDENCIES that can’t be satisfied. When all required DEPENDENCIES have been properly registered, Windsor will AUTO-WIRE the requested type based on its configuration.
In the previous example, this.container is an instance of IWindsorContainer. To be able to resolve the requested types, all types and their DEPENDENCIES must previously have been registered. There are many ways to configure a Windsor container, and the next section reviews the most common ones.
10.1.2. Configuring the container
As we discussed in section 3.2, there are several conceptually different ways we can configure a DI CONTAINER. Figure 10.3 reviews the options.
Figure 10.3. Conceptually different configuration options. CODE AS CONFIGURATION is strongly typed and tends to be explicit. XML, on the other hand, is late bound, but still explicit. AUTO-REGISTRATION instead relies on conventions that can be both strongly typed and more loosely defined.
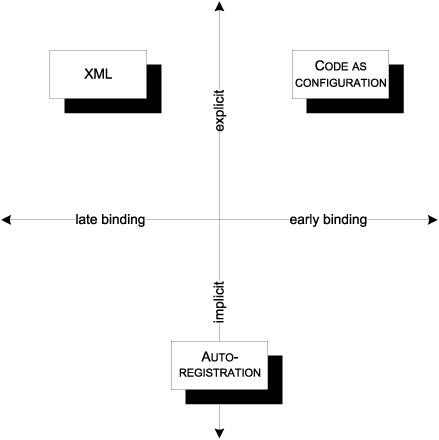
Like other DI CONTAINERS with a long history, Castle Windsor started out with XML as the main configuration source. But it didn’t take long for many teams to learn that defining type registrations in XML is extraordinarily brittle; today, we prefer strongly typed configuration. This can be done with CODE AS CONFIGURATION, but it’s often more effectively done with more convention-based AUTO-REGISTRATION.
Castle Windsor supports all three approaches and even allows us to mix them all within the same container; in this regard, it gives us all we could ask for. In this section, you’ll see how you can use each of these three types of configuration sources.
Code as Configuration
In chapter 3, you saw examples of Castle Windsor’s CODE AS CONFIGURATION API. Each registration is initiated with the Register method and usually specified using a Fluent API.
We configure a WindsorContainer with the Register method that takes an array of IRegistration as input. At first glance that looks pretty abstract, but, instead of leaving us to figure out which IRegistration implementations to use, Castle Windsor also provides a Fluent Registration API that enables us to build IRegistration instances with a more intuitive syntax.
To use the Fluent Registration API, we use the static Component class as an entry point.
Warning
Don’t confuse Castle.MicroKernel.Registration.Component with System.ComponentModel.Component from the Base Class Library.
As you saw previously, the simplest possible registration is one for a concrete type:
container.Register(Component.For<SauceBéarnaise>());
This registers the SauceBéarnaise class with the container but provides no mapping. Even though SauceBéarnaise implements IIngredient, the container will throw an exception if you ask it to resolve IIngredient:
container.Resolve<IIngredient>()
To enable this more relevant scenario, you must map the concrete type to an ABSTRACTION:
container.Register(Component
    .For<IIngredient>()
    .ImplementedBy<SauceBéarnaise>());
Note how you now register the IIngredient interface instead of the SauceBéarnaise class. This will allow you to resolve IIngredient, but, perhaps a bit surprisingly, you lose the ability to resolve the concrete SauceBéarnaise class. This is rarely an issue when all your code is loosely coupled, but in the rare cases where you need to be able to resolve both types, you can specify this with an overload of the For method:
container.Register(Component
    .For<SauceBéarnaise, IIngredient>());
This registers the SauceBéarnaise component, while at the same time forwarding the registration to the IIngredient interface. This means that both SauceBéarnaise and IIngredient are registered as resolvable types. In both cases, the implementation is provided by SauceBéarnaise. Notice that when this overload is used, you don’t need to implicitly use the ImplementedBy method.
Obviously, you can register multiple types with successive calls to the Register method:
container.Register(Component
    .For<IIngredient>()
    .ImplementedBy<SauceBéarnaise>());
container.Register(Component
    .For<ICourse>()
    .ImplementedBy<Course>());
This registers both the IIngredient and ICourse interfaces and maps them to concrete types. However, registering the same ABSTRACTION several times has some interesting results:
container.Register(Component
    .For<IIngredient>()
    .ImplementedBy<Steak>());
container.Register(Component
    .For<IIngredient>()
    .ImplementedBy<SauceBéarnaise>());
In this example, you register IIngredient twice. If you resolve IIngredient, you get an instance of Steak. The first registration wins, but subsequent registrations aren’t forgotten. Castle Windsor has a sophisticated model for dealing with multiple registrations; we’ll get back to this in section 10.3.
There are more advanced options available in the Fluent Registration API, but we can configure an entire application in this way. However, to save us from too much explicit maintenance of container configuration, we can instead consider a more convention-based approach, using AUTO-REGISTRATION.
Auto-registration
In many cases, a lot of registrations will be similar. Such registrations are tedious to maintain and explicitly registering each and every component is often counterproductive.
Consider a library that contains a lot of IIngredient implementations. You can register each class individually, but it will result in numerous similar-looking calls to the Register method. What’s worse, every time you add a new IIngredient implementation, you must also explicitly register it with the container if you want it to be available. It would be more productive to state that all implementations of IIngredient found in a given assembly should be registered.
This is possible using the static AllTypes class, which fills a role similar to the Component class. We can use one of its methods to scan an assembly for types that fit a certain criterion. This registers all IIngredient implementations in one go:
container.Register(AllTypes
    .FromAssemblyContaining<Steak>()
    .BasedOn<IIngredient>());
The AllTypes class provides many methods that enable us to point to a particular assembly, but I find the FromAssemblyContaining generic method to be particularly concise: provide a representative type as the type parameter, and it will use the assembly containing that type. There are also other methods that enable us to provide an Assembly by other means.
In the previous example, you unconditionally register all implementations of the IIngredient interface, but you can specify other selection criteria to either narrow the selection or select on other criteria than interfaces or base classes. Here’s a convention-based registration where you add all classes whose names start with Sauce and register them against all the interfaces they implement:
container.Register(AllTypes
    .FromAssemblyContaining<SauceBéarnaise>()
    .Where(t => t.Name.StartsWith("Sauce"))
    .WithService.AllInterfaces());
Notice that you supply a predicate to the Where method that filters on the type name. Any type whose name starts with Sauce will be selected from the assembly that contains the SauceBéarnaise class. The WithService property allows you to specify a rule for registering the type; in this case, you register all types against all the interfaces they implement.
With convention-based registration, you can move from strong typing into an area where type safety seems to disappear. An example like the previous one compiles, but you aren’t guaranteed that any types will get registered at all. It depends on whether there are any types that satisfy the selection criterion. You could rename all sauce classes to something else, and you’d be left with no sauces.
There’s even a method on AllTypes that takes the name of an assembly as input. It will use Fusion (the .NET Framework’s assembly loading engine) to find the corresponding assembly. By combining a late-bound assembly with an untyped predicate, you can move far into late-bound territory. This can be a useful technique to implement add-ins because Castle Windsor can also scan all assemblies in a directory.
Another way to register add-ins and other late-bound services is by employing Castle Windsor’s XML configuration feature.
XML configuration
When you need to be able to change a configuration without recompiling the application, XML configuration is a good option.
Tip
Use XML configuration only for those types you need to change without recompiling the application. Use AUTO-REGISTRATION or CODE AS CONFIGURATION for the rest.
We can embed XML configuration in normal .NET configuration files, or import XML from specialized files. Like everything else in Castle Windsor, nothing happens unless we explicitly ask for it, so we must also specify if we want to load configuration from XML.
There are several ways to do this, but the recommended way is to use the Install method (we’ll talk more about Installers in section 10.1.3):
container.Install(Configuration.FromAppConfig());
The FromAppConfig method returns an instance of ConfigurationInstaller that reads Castle Windsor’s XML configuration from the application’s configuration file and translates it to objects understood by the container.
To enable Castle Windsor configuration in a configuration file, you must first add a configuration section:
<configSections>
  <section name="castle"
           type="Castle.Windsor.Configuration.AppDomain
           .CastleSectionHandler, Castle.Windsor" />
</configSections>
.CastleSectionHandler, Castle.Windsor" />
</configSections>
This enables you to add a castle configuration section in the configuration file. Here’s a simple example that maps the IIngredient interface to the Steak class:
<castle>
  <components>
    <component id="ingredient.sauceBéarnaise"
               service="IIngredient"
               type="Steak"/>
  </components>
</castle>
Notice that you don’t have to supply the assembly qualified type name for either service or class. As long as the names are unique across all loaded assemblies, they’ll be correctly resolved—but, should you have name conflicts, you can still use assembly qualified type names.
Obviously, you can add as many components as you need. The ConfigurationInstaller translates this XML configuration to the registration objects that configure the container, and you can subsequently resolve the types configured.
XML configuration is a good option when you need to change the configuration of one or more components without recompiling the application. However, because it tends to be quite brittle, you should reserve it for those occasions and use either AUTO-REGISTRATION or CODE AS CONFIGURATION for the main part of the container’s configuration.
Tip
Remember how the first configuration of a type wins? You can use this behavior to overwrite hard-coded configuration with XML configuration. To do this, you must remember to install the ConfigurationInstaller before any other components.
In this section, we mainly looked at various configuration APIs for Castle Windsor. Although it’s certainly possible to write one big block of unstructured configuration code, it’s better to modularize configuration. We have Windsor Installers for this purpose.
10.1.3. Packaging configuration
It’s sometimes desirable to package configuration logic into reusable groups, and even when reuse itself isn’t our top priority, we may want to provide a bit of structure if we have a big and complex application to configure.
With Castle Windsor, we can package configuration into Installers. An Installer is a class that implements the IWindsorInstaller interface:
public interface IWindsorInstaller
{
    void Install(IWindsorContainer container, IConfigurationStore store);
}
Everything you’ve done so far you can do from inside an Installer as well. The following listing shows an Installer that registers all IIngredient implementations.
Listing 10.1. Implementing a Windsor Installer
public class IngredientInstaller : IWindsorInstaller
{
    public void Install(IWindsorContainer container,
        IConfigurationStore store)
    {
        container.Register(AllTypes
            .FromAssemblyContaining<Steak>()
            .BasedOn<IIngredient>());
    }
}
The IngredientInstaller implements the IWindsorInstaller interface by using the exact same API you saw earlier to register all IIngredient implementations.
To register an Installer, invoke the Install method:
container.Install(new IngredientInstaller());
Although it’s possible to invoke the Install method multiple times, the Castle Windsor documentation recommends that you perform all configuration in a single call to the Install method.[3] The Install method takes an array of IWindsorInstaller instances:
public IWindsorContainer Install(params IWindsorInstaller[] installers);
Tip
Windsor Installers let you package and structure your container configuration code. Use them instead of inline configuration: it will make your COMPOSITION ROOT more readable.
Tip
Besides the benefits that Installers offer for your own code, Castle Windsor is moving in the direction of optimizing much of its API around Installers. It’s the idiomatic and recommended way of configuring Castle Windsor to a greater degree than for other containers.
You can also specify one or more Installers in XML and load the configuration file as previously described:
<installers>
  <install type="IngredientInstaller" />
</installers>
Using Installers, you can configure a WindsorContainer in any way you like: CODE AS CONFIGURATION, AUTO-REGISTRATION, or with XML; or, you can mix all three approaches. Once a container is configured, you can ask it to resolve services.
This section introduced the Castle Windsor DI CONTAINER and demonstrated the fundamental mechanics: how to configure the container and subsequently use it to resolve services. Resolving services is easily done with a single call to the Resolve method, so the complexity involves configuring the container. This can be done in several different ways, including imperative code and XML. Until now, we’ve only looked at the most basic API; there are more advanced areas we have yet to cover. One of the most important topics is how to manage component lifetime.
10.2. Managing lifetime
In chapter 8, we discussed LIFETIME MANAGEMENT, including the most common conceptual lifetime styles, such as SINGLETON and TRANSIENT. Castle Windsor supports many different lifestyles and enables you to configure the lifetime of all services. The lifestyles shown in table 10.2 are available as part of the API.
Table 10.2. Castle Windsor lifestyles
|
Name |
Comments |
|---|---|
| Singleton | This is Castle Windsor’s default lifestyle. |
| Transient | A new instance is created each time, but the instance is still tracked by the container. |
| PerThread | One instance is created per thread. |
| PerWebRequest | Requires registration in web.config (see section 10.2.2). |
| Pooled | Configuration of pool size will often be advisable (see section 10.2.2). |
| Custom | Write your own custom lifestyle (see section 10.2.3). |
Some of the built-in lifestyles are entirely equivalent to the general lifestyle patterns described in chapter 8. This is particularly true for the SINGLETON and TRANSIENT lifestyle, so I won’t use any dedicated space on them in this chapter.
Note
The default lifestyle in Castle Windsor is SINGLETON. This is different from many other containers. As we discussed in chapter 8, SINGLETON is the most efficient, although not always the safest, of all lifestyles; Castle Windsor’s default prioritizes efficiency over safety.
In this section, you’ll see how we can configure lifestyles for components and how to use some of the more special lifestyles like PerWebRequest and POOLED. We’ll also look at implementing a custom lifestyle to showcase that we aren’t constrained to use only the built-in lifestyles. At the end of this section, you should be able to use Castle Windsor’s lifestyles in your own application.
Let’s start by reviewing how to configure lifestyles for components.
10.2.1. Configuring lifestyle
In this section, we’ll review how to manage component lifestyles with Castle Windsor. Lifestyle is configured as part of component registration, so the same options are available to us as with configuration in general: code or XML. We’ll look at each in turn.
Configuring lifestyle with code
Lifestyle is configured using the Fluent Registration API with which we register components. It’s as easy as this:
container.Register(Component
    .For<SauceBéarnaise>()
    .LifeStyle.Transient);
Notice that you specify the lifestyle using the Lifestyle property. In this example, you set the lifestyle to TRANSIENT so that each time SauceBéarnaise is resolved, a new instance is returned.
You can still explicitly specify the SINGLETON lifestyle even though it’s the default. These two examples are entirely equivalent:
container.Register(Component
    .For<SauceBéarnaise>()
    .LifeStyle.Singleton);
|
container.Register(Component
    .For<SauceBéarnaise>());
|
Because SINGLETON is the default lifestyle, you don’t have to explicitly specify it, but you can do so if you’d like.
In the same way that we can configure components from both code and XML, we can also configure lifestyles in both places.
Configuring lifestyle with XML
In section 10.1.2, you saw how to configure components using XML, but you didn’t supply any lifestyle. As is the case when configuring a component using the Fluent Registration API, the SINGLETON lifestyle is default, but you can explicitly specify a different lifestyle if you need to:
<component id="ingredient.sauceBéarnaise"
           service="IIngredient"
           type="Steak"
           lifestyle="transient" />
Compared to the example in section 10.1.2, the only difference is the added lifestyle attribute. As you can see, specifying a lifestyle is easy in both code and XML.
Releasing components
As we discussed in section 8.2.2, it’s important to release objects when we’re done with them. This is as easy as calling the Release method:
container.Release(ingredient);
This will release the instance provided to the Release method (the ingredient variable in the previous example) as well as all those DEPENDENCIES of the instance whose lifetime is up. That is, if the instance has a TRANSIENT DEPENDENCY, this DEPENDENCY will be released (and potentially disposed of), whereas a SINGLETON will remain in the container.
Tip
Castle Windsor tracks all, even TRANSIENT, components, so it’s important to remember to release all resolved instances to avoid memory leaks.
Tip
Release explicitly what you resolve explicitly.
Tip
Remember to dispose of the container itself when the application shuts down. This will dispose of SINGLETON components and ensure that the application cleans up properly after itself.
Let’s now turn our attention to some of those lifestyles that require a bit more configuration than a simple statement.
10.2.2. Using advanced lifestyles
In this section, we’ll look at two of Castle Windsor’s lifestyles that require more configuration than just a simple declaration: POOLED and PerWebRequest.
Using the Pooled lifestyle
In section 8.3.5, we looked at the general concept of a POOLED lifestyle; in this section, you’ll see how to use Windsor’s implementation. Castle Windsor’s POOLED lifestyle comes with a default pool size, but because the optimal pool size is entirely dependent on the circumstances, you should prefer to explicitly configure the size of the pool. You can specify a POOLED lifestyle with default sizes the same way that you configure any other lifestyle:
container.Register(Component
    .For<IIngredient>()
    .ImplementedBy<SauceBéarnaise>()
    .LifeStyle.Pooled);
However, this doesn’t communicate the size of the pool. Although I haven’t been able to find any documentation that states what the default pool values are, Castle Windsor 2.1.1’s source code reveals that the default initial size is 5 and the max size is 15. To me, these values seem rather arbitrary, which is another reason to explicitly decide the size.
To explicitly configure the pool sizes, you can use the PooledWithSize method:
container.Register(Component
    .For<IIngredient>()
    .ImplementedBy<SauceBéarnaise>()
    .LifeStyle.PooledWithSize(10, 50));
This example sets the initial size to 10 and the maximum size to 50. Castle Windsor pools have two configuration values: initial size and max size. The initial size obviously controls the initial size of the pool and the max size the maximum size of the pool, but the behavior at edge cases may be surprising to some. Figure 10.4 demonstrates how the pool size evolves during the lifetime of a container.
Figure 10.4. Size progression of a pool with an initial size of 3 and maximum size of 5. Even though the initial size of the pool is 3, the pool stays empty until the first instance is resolved. At that point, all 3 instances for the initial size are created and one is immediately put to use. When an instance is released, it’s returned to the pool. The pool increases in size if more instances than the minimum size are necessary. Notice that it’s possible to exceed the maximum size, but that the surplus instances aren’t recycled when released.

When an instance is resolved from a pool, it’s marked as being in use. Because it stays in that state until explicitly released from the container, it’s important to remember to release instances when you’re done with them. This enables the container to recycle the instances:
container.Release(ingredient);
Note
The behavior when the pool is fully utilized is surprising. Instead of throwing an exception or blocking the call, surplus instances are created. These are thrown away after use instead of being recycled.
Although slightly more advanced than SINGLETON or TRANSIENT, the POOLED lifestyle is still easy to use. The only extra effort you need to do is to supply two extra numbers to configure the pool sizes. The PerWebRequest lifestyle is a bit different but a little more complex to configure.
Using the PerWebRequest lifestyle
As the name implies, the PerWebRequest lifestyle works by creating an instance per web request. Declaring it is as easy as declaring the TRANSIENT lifestyle:
container.Register(Component
    .For<IIngredient>()
    .ImplementedBy<SauceBéarnaise>()
    .LifeStyle.PerWebRequest);
However, if we attempt to use it without further configuration, we receive this exception:
Looks like you forgot to register the HTTP module Castle.MicroKernel.Lifestyle.PerWebRequestLifestyleModule
Add ‘<add name=“PerRequestLifestyle” type=“Castle.MicroKernel.Lifestyle.PerWebRequestLifestyleModule, Castle.Windsor” />’ to the <httpModules> section on your web.config. If you’re running IIS7 in Integrated Mode you will need to add it to <modules> section under <system.webServer>
As far as error messages go, this one is exemplary. It tells you exactly what you need to do.
In any case, it’s relevant to notice that the PerWebRequest lifestyle uses an HTTP module to figure out which web request is currently executing. One consequence of that is that we need to register the HTTP module as I described; another is that this particular lifestyle only works within web requests. If we try to use it in another type of application, we’ll get the same exception as in the previous example.
Both the POOLED and PerWebRequest lifestyles require a tiny bit more work to use than just a simple declaration, but they’re still easy to configure and use. Castle Windsor’s built-in lifestyles provide a comprehensive and useful suite of lifestyles that fit most scenarios. Still, if none of them fit a specialized need, we can write a custom lifestyle.
10.2.3. Developing a custom lifestyle
In most cases, Castle Windsor’s built-in lifestyles should suffice, but if we need something special, we can write a custom lifestyle.
In this section, you’ll see how to do this. First, we’ll briefly look at the relevant SEAM that makes this possible, but we’ll quickly proceed to look at an example.
Understanding the lifestyle API
You can create a custom lifestyle by implementing the ILifestyleManager interface:
public interface ILifestyleManager : IDisposable
{
    void Init(IComponentActivator componentActivator,
        IKernel kernel, ComponentModel model);
    bool Release(object instance);
    object Resolve(CreationContext context);
}
One of the slightly odd requirements of an ILifestyleManager implementation is that it has a default constructor. That is, CONSTRUCTOR INJECTION is prohibited here, of all places. Instead, we’re provided with one of the relatively rare cases of METHOD INJECTION. The Init method will be invoked, providing among other parameters an IKernel instance that we can use as a SERVICE LOCATOR. This is definitely not my cup of tea, and when we look at some example code, you’ll also see how this makes the implementation more complicated than it would have been if CONSTRUCTOR INJECTION had been possible.
The other methods of the ILifestyleManager interface are Resolve and Release, but we should use them as hooks more than to provide our own implementations of Resolve and Release—that’s the responsibility of the IComponentActivator passed to us in the Init method. Figure 10.5 shows that we should only use these methods to intercept calls to Resolve and Release so that we can control the lifetime of each component.
Figure 10.5. An ILifestyleManager acts as a sort of interceptor that’s called instead of the underlying IComponetActivator. An ILifestyleManager implementation is expected to use the supplied IComponentActivator to create object instances. Because the ILifestyleManager sits in the middle, it gets a chance to intercept each call and perform its own lifestyle logic. It’s free to reuse instances instead of calling through to the IComponentActivator each time.

Castle Windsor provides a default implementation of ILifestyleManager in the form of the AbstractLifestyleManager class. It implements the interface and provides a reasonable default implementation for most methods. This is the class you’ll use to implement a sample lifestyle.
Developing a caching lifestyle
Because Castle Windsor offers a comprehensive set of standard lifestyles, it’s difficult to come up with a great example. However, imagine that you’d like to develop a caching lifestyle that would keep an instance around for a certain amount of time, and then release it. This is a good example because it’s complex enough to demonstrate different aspects of implementing a custom lifestyle, but not so complex that it doesn’t fit on a few pages.
Note
A caching lifestyle is a contrived example. There are better ways to implement caching functionality, because normally you don’t wish to cache Services,[4] but rather the data those Services manage.
4 Eric Evans, Domain-Driven Design: Tackling Complexity in the Heart of Software (New York: Addison-Wesley, 2004), 104.
Warning
The sample code shown here ignores thread-safety, but a real production implementation of ILifestyleManager must be thread-safe.
The easiest way to implement a custom lifestyle is to derive from AbstractLifestyleManager as shown in the following listing.
Listing 10.2. Defining a custom lifestyle

One of the things you get from deriving from AbstractLifestyleManager ![]() is that the Init method is implemented for you. You can override it, but it isn’t necessary in this case. All it does is save the injected
services so that you can later access them via protected properties.
is that the Init method is implemented for you. You can override it, but it isn’t necessary in this case. All it does is save the injected
services so that you can later access them via protected properties.
To implement the functionality that decides when a cached object times out, you need an instance of ILease. If you had been able to use CONSTRUCTOR INJECTION you could have requested an ILease through the constructor in three lines of code (including a Guard Clause). Now you need 12 lines of code because you need to deal with the many potential states of the CacheLifestyleManager: was the Init method invoked yet? Does the Kernel have an ILease?
You deal with this by exposing a lazy-loaded Lease property ![]() . The first time you read it, it invokes the ResolveLease method to figure out what the lease should be. It uses a default lease but attempts to look up an alternative through the
Kernel
. The first time you read it, it invokes the ResolveLease method to figure out what the lease should be. It uses a default lease but attempts to look up an alternative through the
Kernel ![]() —if there’s a Kernel at all. I think this is a pretty good illustration of the demerits of METHOD INJECTION. Notice that if anyone reads the Lease property before the Init method is called, the default lease will be used even if the Kernel contains an ILease component. However, because Castle Windsor knows nothing of the Lease property, this doesn’t happen in normal use.
—if there’s a Kernel at all. I think this is a pretty good illustration of the demerits of METHOD INJECTION. Notice that if anyone reads the Lease property before the Init method is called, the default lease will be used even if the Kernel contains an ILease component. However, because Castle Windsor knows nothing of the Lease property, this doesn’t happen in normal use.
Note
The ILease interface used in this example is a custom interface defined for this particular purpose. It isn’t System.Runtime.Remoting.Lifetime.ILease, which has a similar, but much more complex API.
Compared to all the hoops you must jump through to inject a DEPENDENCY into your custom lifestyle, implementing the Resolve method is simpler, as you can see in the following listing.
Listing 10.3. Implementing the Resolve method

Every time CacheLifestyleManager is asked to resolve the component, it starts by checking whether the current lease is expired. If this is the case, it Releases the current cached instance and nulls it out ![]() . The Release method is explicitly invoked on the base class and through it to the IComponentActivator, as shown in figure 10.5. This is important to do because it gives the underlying implementation a chance to dispose of the instance if it implements
IDisposable.
. The Release method is explicitly invoked on the base class and through it to the IComponentActivator, as shown in figure 10.5. This is important to do because it gives the underlying implementation a chance to dispose of the instance if it implements
IDisposable.
The next thing to do is to check whether the cached instance is null. This can be the case if it was released just previously
but will also be the case the first time the Resolve method is invoked. In both cases, you renew the lease ![]() and ask the base implementation to Resolve the component for you. This is where the base class invokes the appropriate method on IComponentActivator.
and ask the base implementation to Resolve the component for you. This is where the base class invokes the appropriate method on IComponentActivator.
In this custom lifestyle, you override the Release method to do nothing:
public override bool Release(object instance)
{
    return false;
}
This may seem strange but is a fairly normal thing to do. You should consider that the Release method is a Hook Method[5] that is part of Castle Windsor’s lifestyle SEAM. You’re being informed that the component can be released, but it doesn’t mean that you have to do it. As an example, the SINGLETON lifestyle per definition never releases its instance, so it has the same implementation of the Release method as the one shown previously.
5 Erich Gamma et al., Design Patterns: Elements of Reusable Object-Oriented Software (New York: Addison-Wesley, 1994), 328.
In the case of the CacheLifestyleManager, you do release the cached instance from time to time, but, as is shown in listing 10.3, you do it from within the Resolve method, when it’s appropriate.
The CacheLifestyleManager caches the resolved instance until the lease expires, and then resolves a new instance and renews the lease. There are several ways we could implement the lease logic, but we’ll only look at one.
Implementing a lease
You need at least one implementation of ILease to go with the CacheLifestyleManager. The SlidingLease class expires after a fixed time span, but you could create other implementations that expire on fixed times of the day, or after they have resolved the component a preset number of times.
Note
The ILease interface and the SlidingLease class shown here have nothing to do with Castle Windsor, but I wanted to show them for completeness’ sake. You can skip ahead and read about how to register the custom lifetime if you don’t care about SlidingLease.
The following listing shows the SlidingLease implementation.
Listing 10.4. Implementing an ILease

The SlidingLease class implements ILease by keeping track of when the lease was renewed. Every time you ask it whether it’s expired, it compares the current time
against the renewal time and the timeout ![]() . When you renew the lease, it sets the renewal time to the current time
. When you renew the lease, it sets the renewal time to the current time ![]() . I could’ve used the TimeProvider AMBIENT CONTEXT from section 4.4.4 instead of DateTime.Now, but I chose to keep things as simple as possible.
. I could’ve used the TimeProvider AMBIENT CONTEXT from section 4.4.4 instead of DateTime.Now, but I chose to keep things as simple as possible.
Now that you know how to implement a custom lifestyle and any custom DEPENDENCIES it might have, you only need to learn how to use them.
Configuring components with a custom lifestyle
Using the CacheLifestyleManager with a component is easy and works in the same way as specifying any other lifestyle:
container.Register(Component
    .For<IIngredient>()
    .ImplementedBy<SauceBéarnaise>()
    .LifeStyle.Custom<CacheLifestyleManager>());
You use a generic overload of the Custom method to specify which ILifestyleManager type to use, but there’s also an overload that takes a Type instance.
Unless you remember to also register an ILease, the CacheLifestyleManager will use the default lease of a SlidingLease with a one-minute timeout. Here’s one way you can register a custom ILease:
container.Register(Component
    .For<ILease>()
    .Instance(new SlidingLease(TimeSpan.FromHours(1))));
This will register an instance of SlidingLease with a one-hour time span. You must remember to register the ILease before using the custom lifestyle, because otherwise the default lease will be used instead.
Developing a custom lifestyle for Castle Windsor isn’t particularly difficult. In many cases, the AbstractLifestyleManager class provides a good starting point, and we only need to override the methods that we particularly care about. Often, this will be the Resolve method, although we can leave the few other methods at their default implementations. It will only be in rare cases that we need to create a custom lifestyle, because Castle Windsor’s standard set of lifestyles is quite comprehensive.
This completes our tour of LIFETIME MANAGEMENT with Castle Windsor. Components can be configured with mixed lifestyles, and this is even true when we register multiple implementations of the same ABSTRACTION. We have yet to look at how to work with multiple components, so let’s now turn our attention in that direction.
10.3. Working with multiple components
DI CONTAINERS thrive on distinctness but have a hard time with ambiguity. When using CONSTRUCTOR INJECTION, a single constructor is preferred over overloaded constructors because it’s clear which constructor to use when there’s no choice. This is also the case when mapping from ABSTRACTIONS to concrete types. If we attempt to map multiple concrete types to the same ABSTRACTION, we introduce ambiguity.
Despite the undesirable qualities of ambiguity, we often need to work with multiple implementations of a single interface. This can be the case in these situations:
- Different concrete types should be used for different consumers.
- DEPENDENCIES are sequences.
- Decorators[6] are in use.
6 Gamma, Design Patterns, 175.
In this section, we’ll look at each of these cases and see how Castle Windsor addresses each one in turn. When we’re done, you should be able to register and resolve components even when multiple implementations of the same ABSTRACTION are in play.
Let’s first take a look at how we can provide more fine-grained control than what AUTO-WIRING provides.
10.3.1. Selecting among multiple candidates
AUTO-WIRING is convenient and powerful but provides us with less control. As long as all ABSTRACTIONS are distinctly mapped to concrete types we have no problems, but as soon as we introduce more implementations of the same interface, ambiguity rears its ugly head.
Let’s first recap how Castle Windsor deals with multiple registrations of the same ABSTRACTION.
Registering multiple implementations of the same service
As you saw in section 10.1.2, you can register multiple components for the same service:
container.Register(Component
    .For<IIngredient>()
    .ImplementedBy<Steak>());
container.Register(Component
    .For<IIngredient>()
    .ImplementedBy<SauceBéarnaise>());
This example registers both the Steak and SauceBéarnaise classes with the IIngredient service. The first registration wins, so if you resolve IIngredient with container.Resolve<IIngredient>() you’ll get a Steak instance. However, a call to container.ResolveAll<IIngredient>() returns an array of IIngredient that contains both Steak and SauceBéarnaise. That is, subsequent registrations aren’t forgotten, but are harder to get at.
Tip
The first registration for a given type wins. It defines the default registration for that type.
Warning
If there are registrations of a given type that can’t be resolved because of missing DEPENDENCIES, ResolveAll silently ignores them and only returns those it can resolve. Because no exception is thrown, this can sometimes lead to some hard-to-understand bugs.[7]
7 As I’m completing the book, this has changed in the Castle Windsor code base, although no release yet includes this change. However, when you’re reading this book, the current version of Castle Windsor most likely has a different behavior than described here.
The following listing shows one way you can provide hints that can later be used to select among multiple candidates.
Listing 10.5. Naming components
container.Register(Component
    .For<IIngredient>()
    .ImplementedBy<Steak>()
    .Named("meat"));
container.Register(Component
    .For<IIngredient>()
    .ImplementedBy<SauceBéarnaise>()
    .Named("sauce"));
You can give each registration a unique name that can later be used to distinguish this particular component from other components.
Given the named components in listing 10.5, you can resolve both Steak and SauceBéarnaise like this:
var meat = container.Resolve<IIngredient>("meat");
var sauce = container.Resolve<IIngredient>("sauce");
Notice that you supply the same key that you used to name the component during registration.
Given that you should always resolve services in a single COMPOSITION ROOT, you should normally not expect to deal with such ambiguity on this level.
Tip
If you find yourself invoking the Resolve method with a specific key, consider if you can change your approach to be less ambiguous.
However, you can use named components to select among multiple alternatives when configuring DEPENDENCIES for a given service.
Registering named Dependencies
As useful as AUTO-WIRING is, sometimes you need to override the normal behavior to provide fine-grained control over which DEPENDENCIES go where; but it may also be that you need to address an ambiguous API. As an example, consider this constructor:
public ThreeCourseMeal(ICourse entrée,
    ICourse mainCourse, ICourse dessert)
In this case, you have three identically typed DEPENDENCIES that each represents a different concept. In most cases, you want to map each of the DEPENDENCIES to a separate type. The following listing shows how you could choose to register the ICourse mappings.
Listing 10.6. Registering named courses
container.Register(Component
    .For<ICourse>()
    .ImplementedBy<Rillettes>()
    .Named("entrée"));
container.Register(Component
    .For<ICourse>()
    .ImplementedBy<CordonBleu>()
    .Named("mainCourse"));
container.Register(Component
    .For<ICourse>()
    .ImplementedBy<MousseAuChocolat>()
    .Named("dessert"));
Like listing 10.6, you register three named components, mapping the Rilettes to a registration named “entrée” (American readers are reminded that this is the proper word for starter or appetizer), CordonBleu to a registration named “mainCourse,” and the MousseAuChocolat to a registration named “dessert.”
Given this configuration, you can now register the ThreeCourseMeal class, as shown in the following listing.
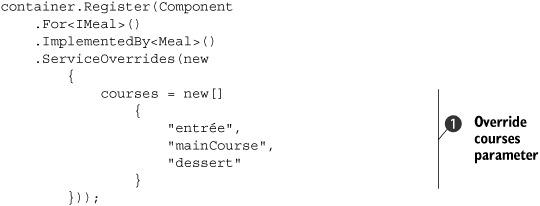
Listing 10.7. Overriding AUTO-WIRING
container.Register(Component
    .For<IMeal>()
    .ImplementedBy<ThreeCourseMeal>()
    .ServiceOverrides(new
        {
            entrée = "entrée",
            mainCourse = "mainCourse",
            dessert = "dessert"
        }));
You can explicitly provide overrides for those parameters (or properties) that you wish to explicitly address. In the case of the ThreeCourseMeal class, you need to address all three constructor parameters. However, in other cases, you may only want to override one of several parameters; that’s also possible. The ServiceOverrides method enables you to supply an anonymously typed object that specifies which parameters to override. If you don’t want to use anonymous types, other overloads of the ServiceOverrides methods allow us to supply an array of specialized ServiceOverride instances, or an IDictionary.
Using an anonymous type, you match the parameters that you want to override with a named registration. In the first case, you match the entrée parameter name with a registration named “entrée.” In this case, the parameter names are identical to the registration names, but this need not be so. The other parameters are mapped in a similar fashion.
Warning
Although an anonymous type may look like strong typing, used in this fashion it’s another group of magic strings. In the end it’s converted to a dictionary of names and values. The property names of the anonymous type must match the parameter names of the corresponding constructor. If you change the parameter name in the constructor the ServiceOverride will stop working until you correct it, so don’t rely on this feature more than absolutely necessary.
Because the ServiceOverrides method depends on a text-based match between parameter names and configured overrides, it’s best not to rely on it too much. If you feel compelled to use it only to deal with ambiguity, a better solution is to design the API to get rid of that ambiguity. It often leads to a better overall design.
In the next section, you’ll see how to refactor the current ThreeCourseMeal class to a more general implementation and, at the same time, get rid of the inherent ambiguity. You can do that by allowing an arbitrary number of courses in a meal—but that compels you to understand how Castle Windsor wires lists and sequences.
10.3.2. Wiring sequences
In section 6.4.1, we discussed how CONSTRUCTOR INJECTION acts as a warning system for SINGLE RESPONSIBILITY PRINCIPLE violations. The lesson then was that, instead of viewing constructor over-injection as a weakness of the CONSTRUCTOR INJECTION pattern, we should rather rejoice that it makes problematic design so obvious.
When it comes to DI CONTAINERS and ambiguity, we see a similar relationship. DI CONTAINERS generally don’t deal with ambiguity in a graceful manner. Although we can make a good DI CONTAINER like Castle Windsor deal with it, it often feels awkward. This is often an indication that we could improve upon the design of our own code.
Tip
If configuring a certain part of your API is difficult with Castle Windsor, consider whether you can make your API more explicit and distinct. Not only will it make it easier to configure with Castle Windsor, but it’s also likely to make the overall design better.
Instead of feeling constrained by Castle Windsor, we should embrace its conventions and let it guide us toward a better and more consistent design. In this section, we’ll look at an example that will demonstrate how we can refactor away from ambiguity, as well as show how Castle Windsor deals with sequences, arrays, and lists.
Refactoring to a better course
In section 10.3.1, you saw how the ThreeCourseMeal and its inherent ambiguity forced us to abandon AUTO-WIRING and, instead, use an explicit ServiceOverride. This should prompt you to reconsider the API design.
A simple generalization moves us toward an implementation of IMeal that takes an arbitrary number of ICourse instances instead of exactly three, as was the case with the ThreeCourseMeal class:
public Meal(IEnumerable<ICourse> courses)
Notice that, instead of requiring three distinct ICourse instances in the constructor, the single DEPENDENCY on an IEnumerable<ICourse> instance allows you to provide any number of courses to the Meal class—from zero to ... a lot! This solves the issue with ambiguity because there’s now only a single DEPENDENCY. In addition, it also improves the API and implementation by providing a single, general-purpose class that can model many different types of meal, from a simple meal with a single course to an elaborate, 12-course dinner.
Given the registration of courses shown in listing 10.6, you might expect to be able to automatically resolve IMeal if you register it like this:
container.Register(Component
    .For<IMeal>()
    .ImplementedBy<Meal>());
However, when you try to resolve IMeal, the container throws an exception. Although the exception is far from self-explanatory, the reason is that you haven’t told the container how it should resolve IEnumerable<ICourse>. Let’s review some different options that are available.
Configuring arrays
Castle Windsor understands arrays pretty well. Because arrays implement IEnumerable<T>, you can explicitly configure an array for the courses constructor parameter. This can be done in a way that’s similar to the syntax you saw in listing 10.7. In the following listing, you see the same courses specified as services.
Listing 10.8. Explicitly defining an array of services
Similar to listing 10.7, you use the ServiceOverrides method when you want to override AUTO-WIRING for specific parameters. In this case, you want to explicitly configure the courses constructor parameter ![]() of the Meal class. Because this parameter is an IEnumerable<ICourse> you must now specify a sequence of ICourse services.
of the Meal class. Because this parameter is an IEnumerable<ICourse> you must now specify a sequence of ICourse services.
Because arrays implement IEnumerable<T>, you can define an array of named services. You do this by creating an array of service names. These names are identical to the names assigned to each registration in listing 10.6, and Castle Windsor is so kind as to translate this array of service names to an array of ICourse instances at runtime. This is analogous to listing 10.7, with the only difference being that the fluent registration API natively understands and translates arrays of service names to arrays of services.
Although the refactoring from ThreeCourseMeal to Meal looked like a step in the right direction, you seem to have gained nothing in the area of configuration awkwardness. Is it possible to do better?
It’s certainly possible to make the configuration simpler, but at the expense of loss of control. As figure 10.6 illustrates, sometimes we need to be able to pick from the list of all configured services of a given type, but at other times, we want them all.
Figure 10.6. There is more than one way to deal with enumerable DEPENDENCIES. In the situation to the right, we want to resolve all services configured in the container. In the situation to the left, we only want a subset.
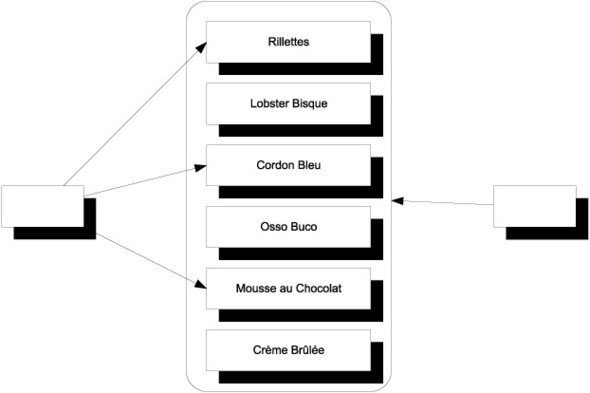
The example you saw corresponds to the situation on the left, where we hand-pick an explicit list of named services form the conceptually larger list of all configured services of the given type. In other cases, we might prefer a simpler convention where we use all available services of the required type. Let’s see how this can be accomplished.
Resolving sequences
Castle Windsor doesn’t resolve arrays or IEnumerable<T> by default. This may seem a little surprising, because invoking ResolveAll returns an array:
IIngredient[] ingredients = container.ResolveAll<IIngredient>();
However, if you try to let the container resolve a component that depends on an array of services, you’ll get an exception. The correct way to deal with this issue is to register the built-in CollectionResolver with the container, like this:
container.Kernel.Resolver.AddSubResolver(
    new CollectionResolver(container.Kernel));
The CollectionResolver will enable the container to resolve sequences of DEPENDENCIES such as IEnumerable<T>. With that, you can now resolve the Meal class without using explicit ServiceOverrides. Given this registration
container.Register(Component
    .For<IMeal>()
    .ImplementedBy<Meal>());
you can resolve IMeal with the help of the CollectionResolver:
var meal = container.Resolve<IMeal>();
This will create an instance of Meal with all ICourse services from the container.
Consumers that rely on lists of DEPENDENCIES may be the most intuitive use of multiple registrations of the same ABSTRACTION, but before we leave this subject completely, we need to look at one last, and perhaps a bit surprising, case: a case where multiple registrations come into play.
10.3.3. Wiring Decorators
In section 9.1.2, we discussed how the Decorator design pattern is useful when implementing CROSS-CUTTING CONCERNS. By definition, Decorators introduce multiple types of the same ABSTRACTION. At the very least, we have two implementations of an ABSTRACTION: the Decorator itself and the decorated type. If we stack the Decorators, we might have even more.
This is another example of having multiple registrations of the same service. Unlike the previous sections, these registrations aren’t conceptually equal, but, rather, DEPENDENCIES of each other. In this section, you’ll see how to configure Castle Windsor to deal with this pattern.
Explicitly wiring Decorators
Castle Windsor requires us to register all components that we wish to use. When it comes to Decorators, we must register both the Decorator and the decorated types. Because both types implement the same interface, we introduce ambiguity that can be addressed. As the following listing shows, we can do this explicitly.
Listing 10.9. Explicitly configuring a Decorator
container.Register(Component
    .For<IIngredient>()
    .ImplementedBy<Breading>()
    .ServiceOverrides(new
        {
            ingredient = "cutlet"
        }));
container.Register(Component
    .For<IIngredient>()
    .ImplementedBy<VealCutlet>()
    .Named("cutlet"));
As we discussed in the introduction to chapter 9, you can view breading as a decoration of a veal cutlet; register a Cotoletta. When you resolve the Cotoletta, you want a reference to the breading which should contain the veal cutlet. You first register the Breading. Recall that, in Castle Windsor, the first registration always wins. You explicitly use the ServiceOverrides method to configure which named service should be used for the ingredient constructor parameter. Notice that you reference a component named cutlet, although that component hasn’t yet been registered at that point. This is possible because the order of registration matters less. You can register components before you register their DEPENDENCIES and it will all work, as long as everything is properly registered when you attempt to resolve the services.
This means that you must still register the veal cutlet before resolving IIngredient. You subsequently register it with the cutlet name. This name matches the service name supplied to the ingredient constructor parameter in the previous configuration.
Although such explicit configuration of Decorators is possible and sometimes necessary, Castle Windsor natively understands the Decorator pattern and provides a more implicit way to do the same thing.
Implicitly wiring Decorators
Castle Windsor enables us to implicitly configure Decorators by registering them in the correct order. Recall that the first registration wins, in the sense that this is the type returned from a call to the Resolve method; we must register the outermost Decorator first.
By definition, a Decorator has a DEPENDENCY on another instance of the same type. If we don’t explicitly define which registration to use, we might expect a circular reference to occur. However, Castle Windsor is smarter than that. Instead, it picks the next registration of the appropriate type. This means that instead of listing 10.9, you can write
container.Register(Component
    .For<IIngredient>()
    .ImplementedBy<Breading>());
container.Register(Component
    .For<IIngredient>()
    .ImplementedBy<VealCutlet>());
There’s no need to explicitly name components or use the ServiceOverrides method to configure DEPENDENCIES. When you resolve IIngredient, Castle Windsor will AUTO-WIRE the Breading class with the next available IIngredient service, which is the VealCutlet class.
Note
The next logical progression from Decorator is INTERCEPTION. Castle Windsor has excellent INTERCEPTION capabilities, but because section 9.3.3 already contains a comprehensive example, I’ll refer you there instead of repeating it here.
Castle Windsor lets us work with multiple components in several different ways. We can register components as alternatives to each other, as peers resolved as sequences, or as hierarchical Decorators. In many cases, Castle Windsor will figure out what to do, but we can always use the ServiceOverrides method to explicitly define how services are composed if we need more explicit control.
This may also be the case when we need to deal with APIs that deviate from CONSTRUCTOR INJECTION. So far, you’ve seen how to configure components in a WindsorContainer, including how to specify lifetime styles and how to deal with multiple components; but, until now, we’ve allowed the container to wire DEPENDENCIES by implicitly assuming that all components use CONSTRUCTOR INJECTION. Because this isn’t always the case, in the next section we’ll review how we can deal with classes that must be instantiated in special ways.
10.4. Configuring difficult APIs
Until now, we’ve considered how we can configure components that use CONSTRUCTOR INJECTION. One of the many benefits of CONSTRUCTOR INJECTION is that DI CONTAINERS, such as Castle Windsor, can easily understand how to compose and create all classes in a dependency graph.
This becomes less clear when APIs are less well-behaved. In this section, you’ll see how to deal with primitive constructor arguments, static factories, and PROPERTY INJECTION. These all require our special attention. Let’s start by looking at classes that take primitive types, such as strings or integers, as constructor arguments.
10.4.1. Configuring primitive Dependencies
As long as we inject ABSTRACTIONS into consumers, all is well. But it becomes more difficult when a constructor depends on a primitive type, such as a string, number, or enum. This is most often the case for data access implementations that take a connection string as a constructor parameter, but is a more general issue that applies to all strings and numbers.
Conceptually, it doesn’t make much sense to register a string or number as a component in a container, and, with Castle Windsor, it doesn’t even work. If we try to resolve a component with a primitive DEPENDENCY, we’ll get an exception even though the primitive type was previously registered.
Consider, as an example, this constructor:
public ChiliConCarne(Spiciness spiciness)
In this example, Spiciness is an enum:
public enum Spiciness
{
    Mild = 0,
    Medium,
    Hot
}
Warning
As a rule of thumb, enums are code smells and should be refactored to polymorphic classes.[8] However, they serve us well for this example.
8 Martin Fowler et al., Refactoring: Improving the Design of Existing Code (New York: Addison-Wesley, 1999), 82.
You need to explicitly tell Castle Windsor how to resolve the spiciness constructor parameter. The following listing shows how it’s possible, using syntax very much like the ServiceOverrides method, but with a different method.
Listing 10.10. Supplying a primitive constructor argument value
container.Register(Component
    .For<ICourse>()
    .ImplementedBy<ChiliConCarne>()
    .DependsOn(new
        {
            spiciness = Spiciness.Hot
        }));
Instead of the ServiceOverrides method that overrides AUTO-WIRING, you can use the DependsOn method that enables you to supply instances for specific DEPENDENCIES. In this case, you supply the value Spiciness.Hot for the spiciness constructor parameter.
Note
The difference between ServiceOverrides and DependsOn is that, with DependsOn, we supply actual instances that are used for the given parameter or property, whereas with ServiceOverrides, we supply names or types of services that will be resolved for the given parameter or property.
Warning
As is the case with ServiceOverrides, the DependsOn method relies on a match between the parameter name and the name of the anonymous property supplied to DependsOn. If we rename the parameter we must also edit the DependsOn call.
Whenever we need to supply a primitive value, such as a connection string, we can define the value explicitly in code (or pull if from the application configuration) and assign it using the DependsOn method. The good thing about the DependsOn method is that we don’t need to explicitly invoke the constructor or supply any other DEPENDENCIES where AUTO-WIRING is more appropriate. But the disadvantage is that it’s more brittle in the face of refactoring.
There’s a more robust alternative that lets us explicitly invoke the constructor. This can also be used to deal with classes that don’t have traditional constructors.
10.4.2. Registering components with code blocks
Some classes can’t be instantiated through a public constructor. Instead, you must use some sort of factory to create instances of the type. This is always troublesome for DI CONTAINERS because, by default, they look after public constructors.
Consider this example constructor for the public JunkFood class:
internal JunkFood(string name)
Even though the JunkFood class is public, the constructor is internal. Obviously, instances of JunkFood should be created through the static JunkFoodFactory class:
public static class JunkFoodFactory
{
    public static IMeal Create(string name)
    {
        return new JunkFood(name);
    }
}
From Castle Windsor’s perspective, this is a problematic API because there are no unambiguous and well-established conventions around static factories. It needs help—and we can provide it with a code block, as shown in the following listing.
Listing 10.11. Configuring a factory method
container.Register(Component
    .For<IMeal>()
    .UsingFactoryMethod(() =>
        JunkFoodFactory.Create("chicken meal")));
You can use the UsingFactoryMethod method to define a code block that creates the appropriate instance—in this case, by calling the Create method on JunkFoodFactory with the desired parameter.
This code block will be invoked at the appropriate time according to the component’s configured lifestyle. In this case, because you didn’t explicitly define a lifestyle, SINGLETON is the default and the Create method will be called only once, no matter how many times you resolve IMeal. Had you instead configured the component to use the TRANSIENT lifestyle, the Create method would be invoked each time we resolve IMeal.
Apart from enabling more exotic object initialization than normal public constructors, using a code block also gives you a more type-safe alternative to supplying primitives than the DependsOn method you saw in section 10.4.1:
container.Register(Component
    .For<ICourse>()
    .UsingFactoryMethod(() =>
        new ChiliConCarne(Spiciness.Hot)));
In this case, you use the code block to explicitly create a new instance of the ChiliConCarne class with the desired Spiciness. This adds type-safety, but totally disables AUTO-WIRING for the type in question.
Tip
There are more advanced overloads of UsingFactoryMethod that enable you to resolve DEPENDENCIES from the container. This is useful when you want to use the UsingFactoryMethod to explicitly assign only a single of several parameters, but must supply all the other parameters in order to compile.
The UsingFactoryMethod is a good tool when you must deal with classes that can’t be created through a public constructor. As long as there’s some public API you can invoke to create the desired instance of the class, you can use the UsingFactoryMethod method to explicitly define the code block that will create the requested instance.
The last common deviation from CONSTRUCTOR INJECTION we’ll examine here is PROPERTY INJECTION.
10.4.3. Wiring with Property Injection
PROPERTY INJECTION is a less well-defined form of DI because you aren’t forced by the compiler to assign a value to a writable property. Even so, Castle Windsor natively understands PROPERTY INJECTION and assigns values to writable properties, if it can.
Consider this CaesarSalad class:
public class CaesarSalad : ICourse
{
    public IIngredient Extra { get; set; }
}
It’s a common misconception that a Caesar Salad includes chicken. At its core, a Caesar Salad is a salad, but, because it tastes great with chicken, many restaurants offer the option to add chicken as an extra ingredient. The CaesarSalad class models this by exposing a writable property named Extra.
If you register only the CaesarSalad class without any Chicken, the Extra property will not be assigned:
container.Register(Component
    .For<ICourse>()
    .ImplementedBy<CaesarSalad>());
Given this registration, resolving ICourse will return an instance of CaesarSalad without any Extra ingredient. However, you can change the outcome by adding Chicken to the container:
container.Register(Component
    .For<IIngredient>()
    .ImplementedBy<Chicken>());
container.Register(Component
    .For<ICourse>()
    .ImplementedBy<CaesarSalad>());
Now, when you resolve ICourse, the resulting CaesarSalad instance’s Extra property will be an instance of the Chicken class. That is, Castle Windsor scans a new instance for writable properties and assigns a value if it can provide a component that matches the type of the property.
Tip
In cases where you need to explicitly control how properties are assigned, you can use the ServiceOverrides method.
In this section, you’ve seen how to deal with APIs that deviate from plain vanilla CONSTRUCTOR INJECTION. You can address primitive constructor arguments with the DependsOn method or with UsingFactoryMethod that also supports factory methods and other alternatives to public constructors. PROPERTY INJECTION is natively supported by Castle Windsor.
10.5. Summary
The overview of Castle Windsor provided in this chapter only scratches the surface of what is possible with one of the most mature and comprehensive DI CONTAINERS available. Because SEAMS are everywhere, we can customize it to our heart’s content, and many extra features are available.
In this chapter we focused on the most common pieces of Windsor’s API. The material presented here covers mainstream usage of the container as well as hints of more advanced parts. It’s all you need to know if your code base follows proper DI patterns and conventions; armed with this knowledge, you should be able to wire up entire applications with Castle Windsor.
Even as a bare-bones DI CONTAINER, Castle Windsor is formidable. It supports almost any feature we could ask for. As one of the oldest .NET DI CONTAINERS around, it benefits greatly from years of development. Yet it doesn’t show its age; rather, it supports many new ideas and modern language constructs. Still, perhaps the greatest disadvantage of Castle Windsor is that the big feature set is realized at the expense of a somewhat heterogeneous API. Although it’s easy to get started with the WindsorContainer class, more advanced scenarios can be harder to implement unless you truly master the entire API. Luckily, because the Castle Windsor support forum is active and monitored by skilled and helpful developers, you’re likely to get a quick response if you have a question.
Although the advanced API may seem daunting, it’s as easy to get started with Castle Windsor as with any other DI CONTAINER: create an instance of WindsorContainer, configure it, and resolve components with it.
There are several ways to configure the container: CODE AS CONFIGURATION, XML, and convention-based configuration are all possible, and we can even mix and match all three to arrive at an optimal solution.
A broad range of lifetime styles are available, including SINGLETON, TRANSIENT, and WEB REQUEST CONTEXT. If the included lifestyles aren’t sufficient, we can also implement custom lifestyles—but this should be a rare occurrence.
Support for multiple components for the same ABSTRACTION seems to be one of Castle Windsor’s weaker points. It seems to understand arrays better than other types of sequences or lists, but we can address this shortcoming relatively easily. The exact way this is done depends on whether we want to resolve all or only a subset of components of the same service.
Although we should prefer to rely on AUTO-WIRING, the ServiceOverrides method enables us to explicitly configure how DEPENDENCIES are assigned to components.
Sometimes components don’t use CONSTRUCTOR INJECTION, but may instead use PROPERTY INJECTION or require use of separate factory classes. Such scenarios are also supported through various methods.
As one of the most versatile DI CONTAINERS available, there’s little reason not to use Castle Windsor, but that doesn’t preclude alternatives that are just as good. In the next chapter, we’ll look at another mature and advanced DI CONTAINER: StructureMap.