
Chapter 13. Autofac
- Introducing Autofac
- Managing lifetime
- Working with multiple components
- Configuring difficult APIs
In the previous chapters, you saw how to map the principles and patterns from parts 1–3 to specific DI CONTAINERS. In this chapter, we’ll do the same with the Autofac DI CONTAINER.
Autofac is an example of what we could call second-generation DI CONTAINERS.
Note
Examples of other second-generation DI CONTAINERS are Ninject[1] and Unity.[2]
The second-generation DI CONTAINERS are based directly on .NET 3.5, so their architectures are often directly based on the language and platform features that became available at that time. Not only do they have an intimate understanding of generics, but many also employ lambda expressions as central API elements. Although the majority of the mature DI CONTAINERS also support these more modern language constructs, their core engines are typically based on earlier .NET versions. Because the second-generation containers have no such baggage, they’re typically designed around these features from the ground up.
Autofac is a fairly comprehensive DI CONTAINER that offers a carefully designed and consistent API. It has been around since late 2007 and seems to have a fair-sized user base.[3]
3 No official statistics exist on DI CONTAINER usage, so this is my subjective assessment.
In this chapter, we’ll examine how Autofac can be used to apply the principles and patterns laid forth in parts 1–3. Figure 13.1 shows the structure of the chapter.
Figure 13.1. This chapter is divided into four sections. The first section introduces the Autofac API and should be considered a prerequisite for the next three sections. Most of these can be read independently of each other, although the fourth section uses some methods and classes that are introduced in the third section. The subject of the fourth section is sufficiently different from the third, so you may be able to read them independently—but even so, you may want to refer back for an explanation of parts of the API.

This chapter should enable you to get started, as well as deal with the most common issues that may come up as you use Autofac on a daily basis. It’s not a complete treatment of Autofac—that would take several more chapters or perhaps a whole book in itself, but if you want to know more about Autofac, the best place to start is at the Autofac home page at to http://autofac.org.
You can read the chapter in isolation from the rest of part 4 specifically to learn about Autofac, or you can read it together with the other chapters in part 4 to compare DI CONTAINERS. The focus of this chapter is to show how Autofac relates to and implements the patterns and principles described in parts 1–3.
13.1. Introducing Autofac
In this section, you’ll learn where to get Autofac, what you get, and how you start using it. We’ll also look at common configuration options, as well as how to package configuration settings into reusable components. Table 13.1 provides fundamental information that you’re likely to need to get started.
Table 13.1. Autofac at a glance
|
Answer |
|
|---|---|
| Where do I get it? | Go to http://autofac.org and click the appropriate link under Featured Download. From Visual Studio 2010 you can also get it via NuGet. The package name is Autofac. |
| What’s in the download? | You can download a .zip file with precompiled binaries. You can also download the source code and compile it yourself, although it can be difficult to figure out which change set corresponds to a particular release. The last part of the build number (for example, 724 in this chapter) corresponds to the source code revision, but to find that you’ll need the Mercurial source control tools. |
| Which platforms are supported? | .NET 3.5 SP1, .NET 4, Silverlight 3, Silverlight 4. Older versions are available that support .NET 2.0, 3.0 and Silverlight 2 (select All Releases on the Download tab). |
| How much does it cost? | Nothing. It’s open source. |
| Where can I get help? | You can get commercial support from companies associated with the Autofac developers. Read more about the options at http://code.google.com/p/autofac/wiki/CommercialSupport. Other than commercial support, Autofac is still open source software with a thriving ecosystem, so you’re also likely (but not guaranteed) to get help in the official forum at http://groups.google.com/group/autofac. |
| On which version is the chapter based? | 2.4.5.724. |
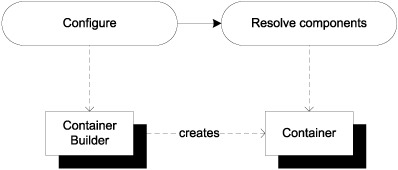
Using Autofac is a little different from using other DI CONTAINERS. As figure 13.2 illustrates, it’s a more explicit two-step process: first we configure a ContainerBuilder, and when we’re done with that, we use it to build a container that can be used to resolve components.
Figure 13.2. With Autofac, we first create and configure a ContainerBuilder instance. When we’re done configuring the ContainerBuilder, we use it to create a Container that we can subsequently use to resolve components. Notice that the rhythm is pretty much similar to Castle Windsor or StructureMap: configure, then resolve. However, here the separation of concerns is much clearer. A ContainerBuilder can’t resolve components, and we can’t configure a Container.
When you’re done with this section, you should have a good feeling for the overall usage pattern of Autofac, and you should be able to start using it in well-behaved scenarios where all components follow proper DI patterns such as CONSTRUCTOR INJECTION. Let’s start with the simplest scenario and see how we can resolve objects using an Autofac container.
13.1.1. Resolving objects
The core service of any DI CONTAINER is to resolve components. In this section, we’ll look at the API that enables us to resolve components with Autofac.
If you recall the discussion about resolving components with Castle Windsor and StructureMap, you may remember that Windsor requires us to register all relevant components before we can resolve them, whereas StructureMap makes a best effort to figure it out for us if we’re requesting concrete types with public constructors. Autofac can behave in both ways, but by default, it behaves like Windsor. We must register all relevant components before resolving them, so one of the simplest possible uses of Autofac is this:
var builder = new ContainerBuilder();
builder.RegisterType<SauceBéarnaise>();
var container = builder.Build();
SauceBéarnaise sauce = container.Resolve<SauceBéarnaise>();
As was already foreshadowed by figure 13.2, you need a ContainerBuilder instance to configure components. Here you register the concrete SauceBéarnaise class with the builder so that when you ask it to build a container, the resulting container is configured with the SauceBéarnaise class. This again enables you to resolve the Sauce-Béarnaise class from the container.
If you hadn’t registered the SauceBéarnaise component, the attempt to resolve it would have thrown a ComponentNotRegisteredException.
Comparing this, the simplest of all scenarios, with similar code snippets for Castle Windsor or StructureMap, Autofac seems somewhat verbose. However, the verbosity mostly stems from having to take the extra step of creating a container from a ContainerBuilder, so in larger and more complex configurations, Autofac will be completely comparable with other DI CONTAINERS.
By default, Autofac requires us to explicitly register all relevant components; this is the behavior we also get from Castle Windsor. If you’d prefer a behavior more like StructureMap, you can enable it like this:
var builder = new ContainerBuilder();
builder.RegisterSource(
    new AnyConcreteTypeNotAlreadyRegisteredSource());
var container = builder.Build();
SauceBéarnaise sauce = container.Resolve<SauceBéarnaise>();
The only difference from the previous code example is that you don’t explicitly register the SauceBéarnaise class. Instead, you register an IRegistrationSource called AnyConcreteTypeNotAlreadyRegisteredSource. That’s quite a mouthful, but it does more or less what it says: it acts as a source for registrations of any concrete type that hasn’t already previously been registered. When you add the AnyConcreteTypeNotAlreadyRegisteredSource you don’t need to explicitly add the SauceBéarnaise type because it’s a concrete class with a public constructor, and the registration source can automatically provide a registration for it.
An advanced feature of Autofac is the ability to provide more advanced sources for registration than by directly using the API exposed by ContainerBuilder. It’s an extensibility mechanism that Autofac uses internally to implement various features, but because it’s based on a public interface called IRegistrationSource, we can also use it as an extensibility mechanism.
The only public implementation of IRegistrationSource shipping with Autofac is the AnyConcreteTypeNotAlreadyRegisteredSource you’ve already seen, but Autofac has other, internal implementations of the interface.
The idea behind IRegistrationSource is that implementations can provide fallback mechanisms or more heuristically-based sources for component registrations than what the normal API allows. Apart from the aforementioned source of concrete types, we could also use it to turn Autofac into an automocking container. This is well beyond the scope of this book,[4] and we don’t need to talk more about IRegistrationSource to use Autofac effectively.
4 However, for an outline on how to do this, see http://stackoverflow.com/questions/2462340/automockcontainer-with-support-for-automocking-class-instances
Registering the AnyConcreteTypeNotAlreadyRegisteredSource effectively changes the container’s behavior from Castle Windsor style to StructureMap style. Not only can the container resolve concrete types with default constructors—it can also AUTO-WIRE a type with other concrete DEPENDENCIES without the need for explicit registrations. Still, as soon as we introduce loose coupling, we must configure Autofac by mapping ABSTRACTIONS to concrete types.
Mapping abstractions to concrete types
Whereas Autofac’s optional ability to AUTO-WIRE concrete types can certainly come in handy from time to time, loose coupling normally requires us to map ABSTRACTIONS to concrete types. Creating instances based upon such maps is the core service offered by any DI CONTAINER, but we must still define the map.
In this example, you map the IIngredient interface to the concrete Sauce-Béarnaise class, which allows you to successfully resolve IIngredient:
var builder = new ContainerBuilder();
builder.RegisterType<SauceBéarnaise>().As<IIngredient>();
var container = builder.Build();
IIngredient ingredient = container.Resolve<IIngredient>();
You use the ContainerBuilder instance to register types and define maps. The RegisterType method enables you to register a concrete type. As you saw in the first Autofac code example in this chapter, you can stop right there if you only wish to register the SauceBéarnaise class. You can also continue with the As method to define how the concrete type should be registered.
Note
With Autofac, we start with the concrete type and map it to an ABSTRACTION. This is the reverse of most other DI CONTAINERS that start with the ABSTRACTION and map it to a concrete type.
Warning
Contrary to Castle Windsor and StructureMap, there are no generic type constraints in effect between the types defined by the RegisterType and As methods. This means that it’s possible to map incompatible types. The code will compile, but we’ll get an exception at runtime when the ContainerBuilder builds the container.
In many cases, the generic API is all we need. Although it doesn’t offer the same degree of type safety as some other DI CONTAINERS, it’s still a readable way to configure the container. Still, there are situations where we need a more weakly typed way to resolve services. This is also possible.
Resolving weakly typed services
Sometimes we can’t use a generic API because we don’t know the appropriate type at design time. All we have is a Type instance, but we’d still like to get an instance of that type. You saw an example of that in section 7.2, where we discussed ASP.NET MVC’s DefaultControllerFactory class. The relevant method is this one:
protected internal virtual IController GetControllerInstance(
    RequestContext requestContext, Type controllerType);
Because you only have a Type instance, you can’t use generics but must resort to a weakly typed API. Fortunately, Autofac offers a weakly typed overload of the Resolve method which allows you to implement the GetControllerInstance method like this:
return (IController)this.container.Resolve(controllerType);
The weakly typed overload of Resolve enables you to pass the controllerType argument directly to Autofac, but also requires you to explicitly cast the return value to IController.
No matter which overload of Resolve we use, Autofac guarantees that it will return an instance of the requested type or throw an exception if there are DEPENDENCIES that can’t be satisfied. When all required DEPENDENCIES have been properly configured, Autofac can AUTO-WIRE the requested type.
In the previous example, this.container is an instance of Autofac.IContainer. To be able to resolve the requested type, all loosely coupled DEPENDENCIES must previously have been configured. There are many ways to configure Autofac, and the next section reviews the most common ones.
13.1.2. Configuring the ContainerBuilder
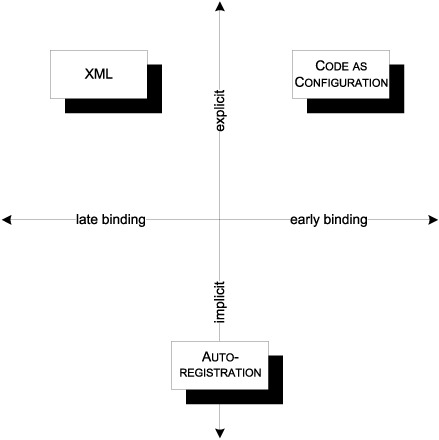
As we discussed in section 3.2, there are several conceptually different ways we can configure a DI CONTAINER. Figure 13.3 reviews the options.
Figure 13.3. Conceptually different configuration options. CODE AS CONFIGURATION is strongly typed and tends to be explicit. XML, on the other hand, is late bound, but still explicit. AUTO-REGISTRATION instead relies on conventions that can be both strongly typed and more loosely defined.
As a second-generation DI CONTAINER, Autofac wasn’t originally designed around XML configuration and later retrofitted with a programmatic configuration API like some of the more mature containers. Rather, it’s designed to be able to leverage many different sources of configuration, and XML is an optional module we can choose to use.
The core configuration API is centered on code and supports both CODE AS CONFIGURATION and convention-based AUTO-REGISTRATION while XML remains an option.
Autofac supports all three approaches and even allows us to mix them all within the same container, so in this regard it gives us all we could ask for. In this section, you’ll see how to use each of these three types of configuration sources.
Code as Configuration
In section 13.1.1, you already saw a brief glimpse of Autofac’s strongly typed configuration API. Here, we’ll examine it in greater detail.
All configuration in Autofac uses the API exposed by the ContainerBuilder class, although most of the methods we use are extension methods. One of the most commonly used methods is the RegisterType method that you’ve already seen:
builder.RegisterType<SauceBéarnaise>().As<IIngredient>();
Like Castle Windsor, registering SauceBéarnaise as IIngredient hides the concrete class so that you can no longer resolve SauceBéarnaise with this registration. However, you can easily fix this by using an overload of the As method that enables you to specify that the concrete type maps to more than one registered type:
builder.RegisterType<SauceBéarnaise>()
    .As<SauceBéarnaise, IIngredient>();
Instead of registering the class only as IIngredient, you can register it as both itself and the interface it implements. This enables the container to resolve requests for both SauceBéarnaise and IIngredient.
As an alternative, you can also chain calls to the As method:
builder.RegisterType<SauceBéarnaise>()
    .As<SauceBéarnaise>().As<IIngredient>();
This produces the same result as in the example just given.
There are three generic overloads of the As method that enable us to specify one, two, or three types. If we need to specify more, there’s also a non-generic overload we can use to specify as many types as we’d like.
Tip
If you need to specify more than three types with the As method, you should consider it a design smell of the class you’re registering. If it implements that many interfaces, it probably violates the SINGLE RESPONSIBILITY PRINCIPLE.
In real applications, we always have more than one ABSTRACTION to map, so we must configure multiple mappings. This is done with multiple calls to RegisterType:
builder.RegisterType<SauceBéarnaise>().As<IIngredient>();
builder.RegisterType<Course>().As<ICourse>();
This maps IIngredient to SauceBéarnaise and ICourse to Course. There’s no overlap of types, so it should be pretty evident what’s going on. However, you can also register the same ABSTRACTION several times:
builder.RegisterType<SauceBéarnaise>().As<IIngredient>();
builder.RegisterType<Steak>().As<IIngredient>();
Here you register IIngredient twice. If you resolve IIngredient, you get an instance of Steak. The last registration wins, but previous registrations aren’t forgotten. Autofac handles multiple configurations for the same ABSTRACTION well, but we’ll get back to this topic in section 13.3.
There are more advanced options available for configuring Autofac, but you can configure an entire application with the methods shown here. However, to save yourself from too much explicit maintenance of container configuration, you could instead consider a more convention-based approach, using AUTO-REGISTRATION.
Auto-registration
In many cases, a lot of registrations will be similar. Such registrations are tedious to maintain, and explicitly registering each and every component might not be the most productive approach.
Consider a library that contains a lot of IIngredient implementations. We can configure each class individually, but it will result in numerous similar-looking calls to the RegisterType method. What’s worse is that, every time we add a new IIngredient implementation, we must also explicitly register it with the ContainerBuilder if we want it to be available. It would be more productive to state that all implementations of IIngredient found in a given assembly should be registered.
This is possible using the RegisterAssemblyTypes extension method. This method enables us to specify an assembly and to configure all selected classes from this assembly in a single statement. To get the Assembly instance we can use a representative class—in this case, Steak:
builder.RegisterAssemblyTypes(typeof(Steak).Assembly)
    .As<IIngredient>();
The RegisterAssemblyTypes method returns the same interface as the RegisterType method, so many of the same configuration options are available. This is really a strong feature because it means that we don’t have to learn a new API to use AUTO-REGISTRATION. In the previous example, we used the As method to register all types in the assembly as IIngredient services.
Note
Although the return type is the same, it’s a complex generic interface; and because most of the API we use is implemented as extension methods, not all methods are available in all situations. It depends on the type arguments of the returned generic interface.
The previous example unconditionally configures all implementations of the IIngredient interface, but we can provide filters that enable us to select only a subset. Here is a convention-based scan where we add only classes whose name starts with Sauce:
builder.RegisterAssemblyTypes(typeof(Steak).Assembly)
    .Where(t => t.Name.StartsWith("Sauce"))
    .As<IIngredient>();
When we register all types in an assembly, we can use a predicate to define a selection criterion. The only difference from the previous code example is the inclusion of the Where method, where we select only those types whose names start with Sauce. Notice how this is the exact same syntax we used to filter types with both Castle Windsor and StructureMap.
There are many other methods that enable us to provide various selection criteria. The Where method gives us a filter that only lets those types through that match the predicate, but there’s also an Except method that works the other way around.
Apart from selecting the correct types from an assembly, another part of AUTO-REGISTRATION is defining the correct mapping. In the previous examples, we used the As method with a specific interface to register all selected types against that interface.
However, sometimes we want to use different conventions. Let’s say that instead of interfaces, we use abstract base classes, and we wish to register all types in an assembly where the name ends with Policy. For this purpose, there are several other overloads of the As method, including one that takes a Func<Type, Type> as input:
builder.RegisterAssemblyTypes(typeof(DiscountPolicy).Assembly)
    .Where(t => t.Name.EndsWith("Policy"))
    .As(t => t.BaseType);
The code block provided to the As method will be used for every single type whose name ends with Policy. This ensures that all classes with the Policy suffix will be registered against their base class so that when the base class is requested, the container will resolve it to the type mapped by this convention.
Convention-based registration with Autofac is surprisingly easy and uses an API that closely mirrors the API exposed by the singular RegisterType method.
Tip
Think of RegisterAssemblyTypes as the plural of RegisterType.
The RegisterAssemblyTypes method takes a params array of Assembly instances, so we can supply as many assemblies as we’d like to a single convention. It’s not a farfetched thought to scan a folder for assemblies and supply them all to implement add-in functionality where add-ins can be added without recompiling a core application. This is one way to implement late binding; another is to use XML configuration.
XML configuration
When we need to be able to change a configuration without recompiling the application, XML configuration is a good option.
Tip
Use XML configuration only for those types you need to change without recompiling the application. Use AUTO-REGISTRATION or CODE AS CONFIGURATION for the rest.
The most natural way to use XML configuration is to embed it into the standard .NET application configuration file. This is possible, but we can also use a stand-alone XML file if we need to be able to vary the Autofac configuration independently of the standard .config file. Whether we want to do one or the other, the API is almost the same.
Note
Autofac’s XML configuration support is implemented in a separate assembly, so to use this feature we must add a reference to the Autofac.Configuration assembly.
Once we have a reference to Autofac.Configuration, we can ask the ContainerBuilder to read component registrations from the standard .config file, like this:
builder.RegisterModule(new ConfigurationSettingsReader());
We’ll discuss Autofac modules in more details in section 13.1.3, but for now all you need to know is that the ConfigurationSettingsReader is the class that’s responsible for merging XML configuration with the rest of the registrations applied to the ContainerBuilder. When we use the default constructor, it automatically reads from a configuration section in the standard application configuration file, but we can use another overload to specify a different XML file.
Note
Unfortunately, there’s no API that enables us to read XML from other sources such as streams or nodes.
To enable Autofac configuration in a configuration file, we must first add the configuration section, using the standard .NET API for defining custom configuration sections:
<configSections>
  <section name="autofac"
           type="Autofac.Configuration.SectionHandler,
           Autofac.Configuration"/>
</configSections>
Autofac.Configuration"/>
</configSections>
This enables you to add an autofac configuration section in the configuration file. Here is a simple example that maps the IIngredient interface to the Steak class:
<autofac defaultAssembly="Ploeh.Samples.MenuModel">
  <components>
    <component type="Ploeh.Samples.MenuModel.Steak"
               service="Ploeh.Samples.MenuModel.IIngredient" />
  </components>
</autofac>
In the components element, you can add as many component elements as you’d like. In each element you must specify a concrete type with the type attribute. This is the only required attribute, but to map the Steak class to IIngredient you can use the optional service attribute. Specifying a type is done using a fully qualified type name, but you can omit the assembly name if the type is defined in the default assembly. The defaultAssembly attribute is optional, but a really nice feature that can save you from a lot of typing if you have many types defined in the same assembly.
XML configuration is a good option when we need to change the configuration of one or more components without recompiling the application, but because it tends to be quite brittle, we should reserve it for only those occasions and use either AUTO-REGISTRATION or CODE AS CONFIGURATION for the main part of the container’s configuration.
Tip
Remember that the last configuration of a type wins? You can use this behavior to overwrite hard-coded configuration with XML configuration. To do this, you must remember to read in the XML configuration after any other components have been configured.
In this section, we mainly looked at various configuration APIs for Autofac. Although it’s certainly possible to write one big block of unstructured configuration code, it’s better to modularize configuration. Autofac supports this through Modules.
13.1.3. Packaging configuration
It’s sometimes desirable to package configuration logic into reusable groups, and even when reuse itself isn’t our top priority, we may simply want to provide a bit of structure if we have a big and complex application to configure.
With Autofac, we can package configuration into Modules. A Module is a class that implements the IModule interface, but in most cases it’s easier to derive from the abstract Module class. Figure 13.4 shows the type hierarchy.
Figure 13.4. Reusable configurations can be packaged into IModule implementations. The easiest way to implement IModule is to derive from the abstract Module class—just as the IngredientModule does.

Everything you’ve done so far, you can do from inside a Module as well. The following listing shows a Module that registers all IIngredient implementations.
Listing 13.1. Implementing an Autofac Module
public class IngredientModule : Module
{
    protected override void Load(ContainerBuilder builder)
    {
        var a = typeof(Steak).Assembly;
        builder.RegisterAssemblyTypes(a).As<IIngredient>();
    }
}
The IngredientModule derives from the abstract Module class and overrides its Load method. The Load method is a convenience method defined by the Module class to make it easier to implement IModule. Through the Load method, you receive a ContainerBuilder instance that you can use to register components in exactly the same way as you would do outside a Module. This makes it easy to implement a Module when you already know how to use the ContainerBuilder API.
To use a Module, you can invoke one of the RegisterModule overloads. When the Module has a default constructor, you can use a generic shorthand version:
builder.RegisterModule<IngredientModule>();
There’s also an overload that lets you provide an instance to enable situations where you need to create the Module manually:
builder.RegisterModule(new IngredientModule());
You can also configure Modules in XML:
<modules>
  <module
    type="Ploeh.Samples.Menu.Autofac.IngredientModule,
    Ploeh.Samples.Menu.Autofac" />
</modules>
These three examples are functionally equivalent.
Tip
Autofac Modules let you package and structure your container configuration code. Use them instead of inline configuration; it will make your COMPOSITION ROOT more readable.
Using Modules, we can configure an Autofac container in any way we like: CODE AS CONFIGURATION, AUTO-REGISTRATION, or with XML; or we can mix all three approaches. Once a container is configured, we can ask it to resolve services.
This section introduced the Autofac DI CONTAINER and demonstrated the fundamental mechanics: how to configure a ContainerBuilder and subsequently use the constructed container to resolve services. Resolving services is easily done with a single call to the Resolve method, so the complexity involves configuring the container. This can be done in several different ways, including imperative code and XML. Until now, we’ve only looked at the most basic API so there are more advanced areas we’ve yet to cover. One of the most important topics is how to manage component lifetime.
13.2. Managing lifetime
In chapter 8, we discussed LIFETIME MANAGEMENT, including the most common conceptual lifetime styles such as SINGLETON and TRANSIENT. Autofac supports several different lifestyles and enables you to configure the lifetime of all services. The lifestyles shown in table 13.2 are available as part of the API.
Table 13.2. Autofac lifestyles
|
Name |
Comments |
|---|---|
| Per Dependency | Standard TRANSIENT. This is the default instance scope. Instances are tracked by the container. |
| Single Instance | Standard SINGLETON. |
| Per Lifetime Scope | Ties the lifetime of components together with a container scope (see section 13.2.1). |
| Contextual | A finer-grained version of Per Lifetime Scope. |
Note
In Autofac, lifestyles are called instance scopes.
Autofac’s implementation of TRANSIENT and SINGLETON are equivalent to the general lifestyles described in chapter 8, so I won’t spend much time on them in this chapter.
Tip
The default TRANSIENT lifestyle is the safest, but not always the most efficient, choice. SINGLETON is a more efficient choice for thread-safe services, but you must remember to explicitly register those services like that.
In this section, you’ll see how we can define lifestyles for components in both code and XML. We’ll also look at Autofac’s concept of lifetime scopes and how they can be used to implement WEB REQUEST CONTEXT and similar lifestyles. At the end of this section, you should be able to use Autofac’s lifestyles in your own application.
Let’s start by reviewing how to configure instance scopes for components.
13.2.1. Configuring instance scope
In this section, we’ll review how to manage component instance scopes with Autofac. Instance scope is configured as part of registering components, and we can define it in both code and XML. We’ll look at each in turn.
Configuring instance scope with code
Instance scope is defined as part of the registrations we make on a ContainerBuilder instance. It’s as easy as this:
builder.RegisterType<SauceBéarnaise>().SingleInstance();
This configures the concrete SauceBéarnaise class as a SINGLETON so that the same instance is returned each time SauceBéarnaise is requested. If we want to map an ABSTRACTION to a concrete class with a specific lifetime, we can use the usual As method and place the SingleInstance method call wherever we like. These two registrations are functionally equivalent:
builder
    .RegisterType<SauceBéarnaise>()
    .As<IIngredient>()
    .SingleInstance();
|
builder
    .RegisterType<SauceBéarnaise>()
    .SingleInstance()
    .As<IIngredient>();
|
Notice that the only difference is that we’ve swapped the As and SingleInstance method calls. Personally, I prefer the sequence on the left because the RegisterType and As method calls form a mapping between concrete class and ABSTRACTION; keeping them close together makes the registration more readable, and we can then state the instance scope as a modification to the mapping.
Although TRANSIENT is the default instance scope we can still explicitly state it. These two examples are equivalent:
builder
    .RegisterType<SauceBéarnaise>();
|
builder
    .RegisterType<SauceBéarnaise>()
    .InstancePerDependency();
|
Configuring instance scope for convention-based registrations is done using the same method as for singular registrations:
builder.RegisterAssemblyTypes(typeof(Steak).Assembly)
    .As<IIngredient>()
    .SingleInstance();
We can use SingleInstance and the other related methods to define the instance scope for all registrations in a convention. In the previous example, we define all IIngredients as SINGLETONS.
In the same way that we can register components from both code and XML, we can also configure instance scope in both places.
Configuring instance scope with XML
When you need to define components in XML, you’ll also want to be able to configure their instance scopes in the same place. This is easily done as part of the XML schema you already saw in section 13.1.2. You can use the optional instance-scope attribute to declare the lifestyle:
<component type="Ploeh.Samples.MenuModel.Steak"
           service="Ploeh.Samples.MenuModel.IIngredient"
           instance-scope="single-instance" />
Compared to the example in section 13.1.2, the only difference is the added instance-scope attribute that configures the instance as a SINGLETON. When you previously omitted the instance-scope attribute, Autofac’s TRANSIENT default was automatically used.
In both code and XML, it’s easy to configure instance scopes for components. In all cases it’s done in a rather declarative fashion. Although configuration is easy, you must not forget that some lifestyles involve long-lived objects that use resources as long as they’re around.
Releasing components
As discussed in section 8.2.2, it’s important to release objects when we’re done with them. Autofac has no explicit Release method but instead uses a concept called lifetime scopes. A lifetime scope can be regarded as a throw-away copy of the container. As figure 13.5 illustrates, it defines a boundary where components can be reused.
Figure 13.5. Autofac lifetime scopes act as containers that can share components for a limited duration or purpose. A lifetime scoped component is a SINGLETON within that scope. No matter how many times we ask a scope for such a component, we get the same instance. Another scope will have its own instance, and the parent container manages the truly shared SINGLETONS. TRANSIENT components are never shared, but will be decommissioned when the scope is disposed of.

A lifetime scope defines a derived container that we can use for a particular duration or purpose; the most obvious example is a web request. We spawn a scope from a container so that the scope inherits all the SINGLETONS tracked by the parent container, but the scope also acts as a container of “local SINGLETONS.” When a lifetime scoped component is requested from a lifetime scope, we always receive the same instance. The difference from true SINGLETONS is that if we query a second scope, we’ll get another instance.
TRANSIENT components still act as they should, whether we resolve them from the root container or a lifetime scope.
Tip
We can use lifetime scopes to implement context-based lifestyles such as the WEB REQUEST CONTEXT lifestyle: create a new lifetime scope at the start of each context and use it to resolve components. Then dispose of the scope when the request ends. However, for web request scope, Autofac has built-in integration to both Web Forms and ASP.NET MVC, so we don’t need to do much of this work ourselves.
One of the important features of lifetime scopes is that they allow us to properly release components when the scope completes. We create a new scope with the BeginLifetimeScope method and release all appropriate components by invoking its Dispose method:

A new scope is created from the container by invoking the BeginLifetimeScope method. The return value implements IDisposable, so you can wrap it in a using scope. Because it also implements the same interface that the container itself implements, you can use the scope to resolve components in exactly the same way as with the container itself.
When we’re done with the lifetime scope, we can dispose of it. When using a using scope this happens automatically when we exit the scope, but we can obviously also choose to explicitly dispose of it by invoking the Dispose method. When we dispose of scope, we also release all the components that were created by the lifetime scope; here it means that you release the meal object graph.
Note
Remember that releasing a disposable component isn’t the same as disposing of it. It’s a signal to the container that the component is eligible for decommissioning. If the component is TRANSIENT or lifetime scoped, it will be disposed of; it will remain active if it’s a SINGLETON.
Earlier in this section, you already saw how to configure components as SINGLETONS or TRANSIENTS. Configuring a component to have its instance scope tied to a lifetime scope is done in a similar way:
builder.RegisterType<SauceBéarnaise>()
    .As<IIngredient>()
    .InstancePerLifetimeScope();
Similar to the SingleInstance and InstancePerDependency methods, you can use the InstancePerLifetimeScope method to state that the component’s lifetime should follow the lifetime scope that created the instance.
Tip
Autofac tracks most, even disposable TRANSIENT, components, so it’s important to remember to resolve all components from a lifetime scope and dispose of the scope after use.
Due to their very nature, SINGLETONS are never released for the lifetime of the container itself. Still, we can release even those components if we don’t need the container any longer. This is done by disposing the container itself:
container.Dispose();
In practice this isn’t nearly as important because the lifetime of a container tends to correlate closely with the lifetime of the application it supports. We normally keep the container around as long as the application runs, so we’d only dispose of it when the application shuts down, in which case memory would be reclaimed by the operating system in any case.
Lifetime scopes enable us to address many of the scenarios where we’d normally want to use a WEB REQUEST CONTEXT or another contextual lifestyle. This is the idiomatic way to implement custom lifetimes with Autofac.
This completes our tour of LIFETIME MANAGEMENT with Autofac. Components can be configured with mixed instance scopes, and this is even true when we register multiple implementations of the same ABSTRACTION. We have yet to look at how to work with multiple components, so let’s now turn our attention in that direction.
13.3. Working with multiple components
DI CONTAINERS thrive on distinctness but have a hard time with ambiguity. When using CONSTRUCTOR INJECTION, a single constructor is preferred over overloaded constructors because it’s evident which constructor to use when there’s no choice. This is also the case when mapping from ABSTRACTIONS to concrete types. If we attempt to map multiple concrete types to the same ABSTRACTION, we introduce ambiguity.
Despite the undesirable qualities of ambiguity, we often need to work with multiple implementations of a single interface. This can be the case in these situations:
- Different concrete types should be used for different consumers.
- DEPENDENCIES are sequences.
- Decorators are in use.
In this section, we’ll look at each of these cases and see how Autofac addresses each one in turn. When we’re done, you should be able to register and resolve components even when multiple implementations of the same ABSTRACTION are in play.
Let’s first see how we can provide more fine-grained control than AUTO-WIRING provides.
13.3.1. Selecting among multiple candidates
AUTO-WIRING is convenient and powerful but provides us with little control. As long as all ABSTRACTIONS are distinctly mapped to concrete types we have no problems, but as soon as we introduce more implementations of the same interface, ambiguity rears its ugly head.
Let’s first recap how Autofac deals with multiple registrations of the same ABSTRACTION.
Configuring multiple implementations of the same service
As you saw in section 13.1.2, you can register multiple implementations of the same interface:
builder.RegisterType<SauceBéarnaise>().As<IIngredient>();
builder.RegisterType<Steak>().As<IIngredient>();
This example registers both the Steak and SauceBéarnaise classes as the IIngredient service. The last registration wins, so if we resolve IIngredient with container.Resolve<IIngredient>(), we’ll get a Steak instance.
Tip
The last registration of a given service wins. It defines the default instance for that type.
We can also ask the container to resolve all IIngredient components. Autofac has no dedicated method to do that, but instead relies on relationship types.[5] A relationship type is a type that indicates a relationship that the container can interpret. As an example, we can use IEnumerable<T> to indicate that we want all services of a given type:
5 Nicholas Blumhardt, The Relationship Zoo, 2010, http://nblumhardt.com/2010/01/the-relationship-zoo/
var ingredients = container.Resolve<IEnumerable<IIngredient>>();
Notice that we use the normal Resolve method, but that we request IEnumerable <IIngredient>. Autofac interprets this as a convention and gives us all the IIngredient components it has.
Tip
As an alternative to IEnumerable<T>, we can also request an array. The results are equivalent: in both cases we get all the components of the requested type.
If there are registrations that can’t be resolved when we request all services of a type, Autofac throws an exception explaining that there are DEPENDENCIES that can’t be satisfied. This is consistent with the behavior when we resolve a single component, but different from the way that Castle Windsor or MEF behaves.
When we register components, we can give each registration a name that we can later use to select among the different components:
builder.RegisterType<Steak>()
    .Named<IIngredient>("meat");
builder.RegisterType<SauceBéarnaise>()
    .Named<IIngredient>("sauce");
As always, we start out with the RegisterType method, but instead of following up with the As method, we use the Named method to specify a service type as well as a name. This enables us to resolve named services by supplying the same name to the ResolveNamed method:
var meat = container.ResolveNamed<IIngredient>("meat");
var sauce = container.ResolveNamed<IIngredient>("sauce");
Note
A named component doesn’t count as a default component. If we only register named components, we can’t resolve a default instance of the service. However, nothing prevents us from also registering a default (unnamed) component with the As method, and we can even do it in the same statement by method chaining.
Naming components with strings is a fairly common feature of DI CONTAINERS, but Autofac also enables us to identify components with arbitrary keys:
var meatKey = new object();
builder.RegisterType<Steak>().Keyed<IIngredient>(meatKey);
The key can be any object, and we can subsequently use it to resolve the component:
var meat = container.ResolveKeyed<IIngredient>(meatKey);
Given that we should always resolve services in a single COMPOSITION ROOT, we should normally not expect to deal with such ambiguity on this level.
Tip
If you find yourself invoking the Resolve method with a specific name or key, consider if you can change your approach to be less ambiguous.
However, we can use named or keyed instances to select among multiple alternatives when configuring DEPENDENCIES for a given service.
Registering named dependencies
As useful as AUTO-WIRING is, sometimes we need to override the normal behavior to provide fine-grained control over which DEPENDENCIES go where, but it may also be that we need to address an ambiguous API. As an example, consider this constructor:
public ThreeCourseMeal(ICourse entrée,
    ICourse mainCourse, ICourse dessert)
In this case, you have three identically typed DEPENDENCIES, each of which represents a different concept. In most cases, you want to map each of the DEPENDENCIES to a separate type. The following listing shows how you could choose to register the ICourse mappings.
Listing 13.2. Registering named courses
builder.RegisterType<Rillettes>()
    .Named<ICourse>("entrée");
builder.RegisterType<CordonBleu>()
    .Named<ICourse>("mainCourse");
builder.RegisterType<MousseAuChocolat>()
    .Named<ICourse>("dessert");
Here, you register three named components, mapping the Rilettes to an instance named “entrée,” CordonBleu to an instance named “mainCourse,” and the MousseAuChocolat to an instance named “dessert.”
Given this configuration, you can now register the ThreeCourseMeal class with the named registrations. This turns out to be surprisingly complex. In the following listing, I’ll first show you what it looks like, and then we’ll subsequently pick the example apart to understand what’s going on.
Listing 13.3. Overriding AUTO-WIRING

The WithParameter method ![]() enables you to provide parameter values for the ThreeCourseMeal constructor. One of its overloads takes two arguments. The first one is a predicate that determines whether a parameter is
targeted by this particular invocation of the method. For the first parameter you state that it only deals with the parameter
called entrée
enables you to provide parameter values for the ThreeCourseMeal constructor. One of its overloads takes two arguments. The first one is a predicate that determines whether a parameter is
targeted by this particular invocation of the method. For the first parameter you state that it only deals with the parameter
called entrée ![]() . If that expression is true, the second code block is executed to provide the value for the entrée parameter. The c parameter is an instance of IComponentContext that you can use to resolve the entrée named component
. If that expression is true, the second code block is executed to provide the value for the entrée parameter. The c parameter is an instance of IComponentContext that you can use to resolve the entrée named component ![]() .
.
Tip
The WithParameter method arguments represent a variation of the Tester-Doer pattern.[6]
6 Krzysztof Cwalina and Brad Abrams, Framework Design Guidelines: Conventions, Idioms, and Patterns for Reusable .NET Libraries (New York: Addison-Wesley, 2006), 203.
Let’s take a closer look at what’s going on here. The WithParameter method really wraps around the ResolvedParameter class that has this constructor:
public ResolvedParameter(
    Func<ParameterInfo, IComponentContext, bool> predicate,
    Func<ParameterInfo, IComponentContext, object> valueAccessor);
The predicate parameter is a test that determines whether the valueAccessor delegate will be invoked: when predicate returns true, valueAccessor is invoked to provide the value for the parameter. Both delegates take the same input: information about the parameter in the form of a ParameterInfo object, and an IComponentContext that can be used to resolve other components. When Autofac uses the ResolvedParameter instances, it provides both of these values when it invokes the delegates.
Sometimes there’s no other way than to painstakingly use the WithParameter method for each and every constructor parameter; but in other cases we can take advantage of conventions.
Resolving named components by convention
If you examine listing 13.3 closely, you may notice a repetitive pattern. Each call to WithParameter addresses only a single constructor parameter, but each valueAccessor does the same thing: it uses the IComponentContext to resolve an ICourse component with the same name as the parameter.
There’s no requirement that says we must name the component after the constructor parameter, but whenever this is the case, we can take advantage of this convention and rewrite listing 13.3 in a much simpler way; the following listing demonstrates how.
Listing 13.4. Overriding AUTO-WIRING with a convention
builder.RegisterType<ThreeCourseMeal>()
    .As<IMeal>()
    .WithParameter(
        (p, c) => true,
        (p, c) => c.ResolveNamed(p.Name, p.ParameterType));
It may be a little surprising, but you can address all three constructor parameters of the ThreeCourseMeal class with the same WithParameter call. You do that by stating that this instance will handle any parameter Autofac might throw at it. Because you only use this method to configure the ThreeCourseMeal class, the convention only applies within this limited scope.
As the predicate always returns true, the second code block will be invoked for all three constructor parameters. In all three cases it will ask the IComponentContext to resolve a component that has the same name and type as the parameter. This is functionally the same as you did in listing 13.3.
Warning
Identifying parameters by their names is convenient but not refactoring-safe. If you rename a parameter, you may break the configuration (depending on your refactoring tool).
Overriding AUTO-WIRING by explicitly mapping parameters to named components is a universally applicable solution. We can do this even if we configure the named components in one Module and the consumer in a completely different Module because the only identification that ties a named component together with a parameter is the name. This is always possible, but can be brittle if we have a lot of names to manage. When the original reason prompting us to use named components is to deal with ambiguity, a better solution is to design our own API to get rid of that ambiguity. It often leads to a better overall design.
In the next section, you’ll see how to use the less ambiguous and more flexible approach where you allow any number of courses in a meal. To this end, you must learn how Autofac deals with lists and sequences.
13.3.2. Wiring sequences
In section 10.3.2, we discussed how to refactor an explicit ThreeCourseMeal class to the more general-purpose Meal class with this constructor:
public Meal(IEnumerable<ICourse> courses)
In this section, we’ll look at how we can configure Autofac to wire up Meal instances with appropriate ICourse DEPENDENCIES. When we’re done, you should have a good idea of the options available when you need to configure instances with sequences of DEPENDENCIES.
Auto-wiring sequences
Autofac has a rather good understanding of sequences, so if we want to use all registered components of a given service, AUTO-WIRING just works. As an example, given the configured ICourse instances in listing 13.2, you can configure the IMeal service like this:
builder.RegisterType<Meal>().As<IMeal>();
Notice that this is a completely standard mapping from a concrete type to an ABSTRACTION. Autofac will automatically understand the Meal constructor and determine that the correct course of action is to resolve all ICourse components. When you resolve IMeal, you get a Meal instance with the ICourse components from listing 13.2: Rillettes, CordonBleu, and MousseAuChocolat.
Autofac automatically handles sequences, and unless we specify otherwise, it does what we’d expect it to do: it resolves a sequence of DEPENDENCIES to all registered components of that type. Only when we need to explicitly pick only some components from a larger set do we need to do more. Let’s see how we can do that.
Picking only some components from a larger set
Autofac’s default strategy of injecting all components is often the correct policy, but as figure 13.6 shows, there may be cases where we want to pick only some registered components from the larger set of all registered components.
Figure 13.6. In the situation on the left, we wish to explicitly select only certain DEPENDENCIES from the larger list of all registered components. This is different from the situation on the right, where we indiscriminately want them all.
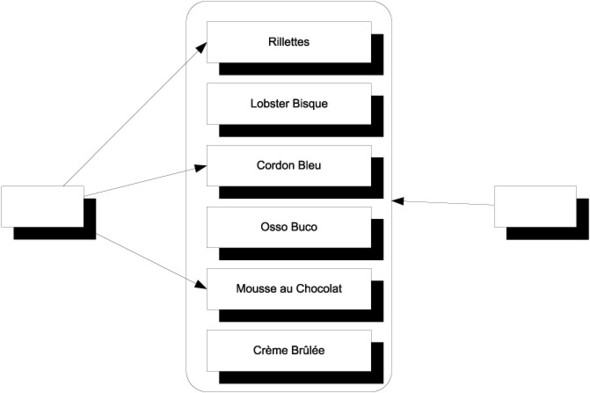
When we previously let Autofac AUTO-WIRE all configured instances, it corresponded to the situation depicted on the right side of figure 13.6. If we want to register a component as is shown on the left side, we must explicitly define which components should be used.
In order to achieve this, you can once more utilize the WithParameter method the way you did in listings 13.3 and 13.4. This time around, you’re dealing with the Meal constructor that only takes a single parameter. The following listing demonstrates how you can implement the value-providing part of WithParameter to explicitly pick named components off the IComponentContext.
Listing 13.5. Injecting named components into a sequence
builder.RegisterType<Meal>()
    .As<IMeal>()
    .WithParameter(
        (p, c) => true,
        (p, c) => new[]
        {
            c.ResolveNamed<ICourse>("entrée"),
            c.ResolveNamed<ICourse>("mainCourse"),
            c.ResolveNamed<ICourse>("dessert")
        });
As you saw in section 13.3.1, the WithParameter method takes two delegates as input parameters. The first is a predicate that’s used to determine if the second delegate should be invoked. In this case, I decided to be a bit lazy and return true. You know that the Meal class has only a single constructor parameter, so this will turn out to work. However, if you later refactor the Meal class to take a second constructor parameter, this may not work correctly anymore, so it might be safer to define an explicit check for the parameter name.
The second delegate provides the value for the parameter. You use the IComponentContext to resolve three named components into an array. The result is an array of ICourse, which is compatible with IEnumerable<ICourse>.
Autofac natively understands sequences; unless we need to explicitly pick only some components from all services of a given type, Autofac automatically does the right thing. AUTO-WIRING works not only with single instances, but also for sequences, and the container maps a sequence to all configured instances of the corresponding type.
Consumers that rely on sequences of DEPENDENCIES may be the most intuitive use of multiple instances of the same ABSTRACTION, but before we leave this subject completely, we need to look at one last, and perhaps a bit surprising, case where multiple instances come into play.
13.3.3. Wiring Decorators
In section 9.1.2, we discussed how the Decorator design pattern is useful when implementing CROSS-CUTTING CONCERNS. By definition, Decorators introduce multiple types of the same ABSTRACTION. At the very least we have two implementations of an ABSTRACTION: the Decorator itself and the decorated type. If we stack the Decorators, we may have even more.
This is another example of having multiple registrations of the same service. Unlike the previous sections, these registrations aren’t conceptually equal, but rather DEPENDENCIES of each other. In this section, you’ll see two different ways to configure Autofac to deal with this pattern.
Decorating with WithParameter
The WithParameter method offers a versatile way to define how components are created and injected. In sections 13.3.1 and 13.3.2, you saw how you could use it to select specific components for constructor parameters. It’s also a good option to provide parameters for Decorators.
Let’s see how you can use it to configure the Breading class, which is a Decorator of IIngredient. It uses CONSTRUCTOR INJECTION to receive the instance it should decorate:
public Breading(IIngredient ingredient)
To make a Cotoletta, you’d like to decorate a VealCutlet (another IIngredient) with the Breading class. Another way to look at this is that you want to inject a VealCutlet into Breading; the following listing demonstrates how you can use the WithParameter method to do that.
Listing 13.6. Decorating with WithParameter
builder.RegisterType<VealCutlet>().Named<IIngredient>("cutlet");
builder.RegisterType<Breading>()
    .As<IIngredient>()
.WithParameter(
    (p, c) => p.ParameterType == typeof(IIngredient),
    (p, c) => c.ResolveNamed<IIngredient>("cutlet"));
Breading is the Decorator, but you also need something to decorate, so you register VealCutlet as a named component. In this example, you register VealCutlet before Breading, but you could also have done it the other way around; the order doesn’t matter.
For the Breading registration, you use the WithParameter method to define the ingredient parameter of the Breading constructor. You implement the predicate by testing that the parameter type is IIngredient, and provide the value for the parameter by resolving the cutlet named component from the provided IComponentContext.
In this example, you used a named registration of IIngredient to register the VealCutlet component. This makes the Breading component the default IIngredient component. Another alternative is to register VealCutlet as both IIngredient and VealCutlet itself. The next example demonstrates that approach and combines it with a strongly typed delegate.
Decorating with delegates
Instead of referring to a constructor parameter by type or name, we can write a strongly typed code block that uses the constructor:
builder.RegisterType<VealCutlet>()
    .As<IIngredient, VealCutlet>();
builder.Register(c => new Breading(c.Resolve<VealCutlet>()))
    .As<IIngredient>();
As an alternative to registering VealCutlet as a named component, you can also register it as both IIngredient and VealCutlet itself. When you do that, it’s important that you do it before registering Breading, because otherwise VealCutlet would become the default IIngredient component.
Instead of the RegisterType method that you’ve mostly been using so far, you can also register a service with a method called Register. There are two overloads of this method, and they both take as input a delegate that creates the service in question. To register the IIngredient service, you implement a code block that creates a new Breading instance by directly invoking the constructor. To supply a value for the constructor’s ingredient parameter you resolve the VealCutlet type from the supplied IComponentContext. This is possible because you registered VealCutlet as a concrete type as well as IIngredient.
Note
You could also have resolved the VealCutlet by name if you had registered it as a named component as you did in the previous example.
When you ask the container to resolve IIngredient, it will pass an IComponentContext as input to the code block you defined in the Register method. When the code block executes, the VealCutlet instance is resolved from the context and passed to the Breading constructor, where the Breading instance is returned.
The advantage of this is that in the code block you write code that uses the Breading constructor. This is a line of code like any other line of code, so it’s checked by the compiler. This provides you with a great deal of confidence that if the Register method compiles, the VealCutlet will be correctly decorated.
Although strong typing is safer, it also requires more maintenance. If you subsequently decide to add another constructor parameter to the Breading constructor, the code block no longer compiles and you must manually address the issue. This wouldn’t be necessary if you had used the WithParameter method because Autofac would have been able to sort out the new parameter for you with AUTO-WIRING.
As you’ve seen in this section, there are different ways you can configure Decorators. The strongly typed approach is a bit safer but may require more maintenance. The more weakly typed API is more flexible and enables Autofac to deal with changes to your API, but at the expense of less type safety.
Note
In this section, we didn’t discuss runtime INTERCEPTION. Although Autofac has SEAMS that enable INTERCEPTION, it has no built-in support for dynamically emitting Proxies. It’s possible to use those SEAMS to use another library (such as Castle Dynamic Proxy) to emit such classes, but because this isn’t part of Autofac itself, it’s beyond the scope of this chapter.[7]
7 However, see http://code.google.com/p/autofac/wiki/DynamicProxy2 for more information.
Autofac lets us work with multiple instances in several different ways. We can register components as alternatives to each other, as peers resolved as sequences, or as hierarchical Decorators. In many cases, Autofac will figure out what to do, but we can always explicitly define how services are composed if we need more explicit control.
This may also be the case when we need to deal with APIs that deviate from CONSTRUCTOR INJECTION. So far, you’ve seen how to register components, including how to specify instance scopes and how to deal with multiple components; however, until now, you’ve allowed the container to wire DEPENDENCIES by implicitly assuming that all components use CONSTRUCTOR INJECTION. This isn’t always the case, so in the next section, we’ll review how to deal with classes that must be instantiated in special ways.
13.4. Registering difficult APIs
Until now, we’ve considered how we can configure components that use CONSTRUCTOR INJECTION. One of the many benefits of CONSTRUCTOR INJECTION is that DI CONTAINERS such as Autofac can easily understand how to compose and create all classes in a dependency graph.
But this becomes less clear when APIs are less well behaved. In this section, you’ll see how to deal with primitive constructor arguments, static factories, and PROPERTY INJECTION. These all require our special attention. Let’s start by looking at classes that take primitive types, such as strings or integers as constructor arguments.
13.4.1. Configuring primitive Dependencies
As long as we inject ABSTRACTIONS into consumers, all is well, but it becomes more difficult when a constructor depends on a primitive type, such as a string, a number, or an enum. This is particularly the case for data access implementations that take a connection string as constructor parameter, but is a more general issue that applies to all strings and numbers.
Conceptually, it doesn’t always make much sense to register a string or number as a component in a container. But with Autofac, this is at least possible.
Consider, as an example, this constructor:
public ChiliConCarne(Spiciness spiciness)
In this example, Spiciness is an enum:
public enum Spiciness
{
    Mild = 0,
    Medium,
    Hot
}
Warning
As a rule of thumb, enums are code smells and should be refactored to polymorphic classes.[8] But they serve us well for this example.
8 Martin Fowler et al, Refactoring: Improving the Design of Existing Code (New York: Addison-Wesley, 1999), 82.
If you want all consumers of Spiciness to use the same value, you can register Spiciness and ChiliConCarne independently of each other:
builder.Register<Spiciness>(c => Spiciness.Medium);
builder.RegisterType<ChiliConCarne>().As<ICourse>();
When you subsequently resolve ChiliConCarne, it will have a Medium Spiciness, as will all other components with a DEPENDENCY on Spiciness.
If you’d rather control the relationship between ChiliConCarne and Spiciness on a finer level, you can use the WithParameter method that same way you did in listings 13.4, 13.5, and 13.6:
builder.RegisterType<ChiliConCarne>()
    .As<ICourse>()
    .WithParameter("spiciness", Spiciness.Hot);
Because you want to supply a concrete value for the spiciness parameter, you can use another overload of the WithParameter method that takes a parameter name and a value. This overload delegates to the other WithParameter by creating a NamedParameter instance from the parameter name and value; NamedParameter also derives from Parameter like ResolvedParameter does.
Both of the options described here leverage AUTO-WIRING to provide a concrete value to a component. As we discussed in section 13.3, this has advantages and disadvantages. If you want a more strongly typed configuration that invokes the constructor or a static factory, you can do this as well.
13.4.2. Registering objects with code blocks
Another option for creating a component with a primitive value is to use the Register method that enables you to supply a delegate that creates the component:
builder.Register<ICourse>(c =>
    new ChiliConCarne(Spiciness.Hot));
You already saw the Register method when we discussed Decorators in section 13.3.3. The ChiliConCarne constructor will be invoked with Hot Spiciness every time the ICourse component is resolved.
Note
The Register method is type-safe but disables AUTO-WIRING.
When it comes to the ChiliConCarne class, you have a choice between AUTO-WIRING and using a code block. But other classes are more restrictive: they can’t be instantiated through a public constructor. Instead, you must use some sort of factory to create instances of the type. This is always troublesome for DI CONTAINERS because, by default, they look after public constructors.
Consider this example constructor for the public JunkFood class:
internal JunkFood(string name)
Even though the JunkFood class is public, the constructor is internal. Obviously, instances of JunkFood should be created through the static JunkFoodFactory class:
public static class JunkFoodFactory
{
    public static IMeal Create(string name)
    {
        return new JunkFood(name);
    }
}
From Autofac’s perspective, this is a problematic API because there are no unambiguous and well-established conventions around static factories. It needs help—and you can give it to it by providing a code block it can execute to create the instance:
builder.Register(c =>
    JunkFoodFactory.Create("chicken meal"));
This time, you use the Register method to create the component by invoking a static factory within the code block. JunkFoodFactory.Create will be invoked every time IMeal is resolved and the result will be returned.
When we end up writing the code to create the instance, how is this in any way better than invoking the code directly? By using a code block inside a Register method call, we still gain something:
- We map from IMeal to JunkFood.
- Instance scope can still be configured. Although the code block will be invoked to create the instance, it may not be invoked every time the instance is requested—by default it does, but if we change it to a SINGLETON, the code block will only be invoked once and the result cached and reused thereafter.
The last common deviation from CONSTRUCTOR INJECTION we’ll examine here is PROPERTY INJECTION.
13.4.3. Wiring with Property Injection
PROPERTY INJECTION is a less well-defined form of DI because we aren’t forced by the compiler to assign a value to a writable property. This is also the case for Autofac, which will leave writable properties alone unless we explicitly ask it to do something about them.
Consider this CaesarSalad class:
public class CaesarSalad : ICourse
{
    public IIngredient Extra { get; set; }
}
It’s a common misconception that a Caesar Salad includes chicken; this isn’t true. Fundamentally, a Caesar Salad is a salad, but it tastes great with chicken, so many restaurants allow customers to order chicken as an extra ingredient in their salad. The CaesarSalad class models this by exposing a writable property named Extra.
If you configure only the CaesarSalad without explicitly addressing the Extra property, the property won’t be assigned. You can still resolve the instance, but the property will have the default value that the constructor assigns to it (if any).
There are several ways you can configure the CaesarSalad so that the Extra property will be appropriately populated. The easiest is to use the PropertiesAutowired method:
builder.RegisterType<CaesarSalad>()
    .As<ICourse>()
    .PropertiesAutowired();
builder.RegisterType<Chicken>().As<IIngredient>();
As part of the ordinary fluent Registration API, you can invoke the PropertiesAutowired method to tell Autofac that it should AUTO-WIRE the writable properties of the CaesarSalad class. Autofac will only AUTO-WIRE those properties that it knows how to fill so you also register Chicken as an IIngredient—if you hadn’t done that, the Extra property would’ve been ignored.
When you resolve ICourse based on this registration, you’ll get back a CaesarSalad instance with a Chicken instance assigned to its Extra property.
If you want more granular control that the sweeping statement expressed by the PropertiesAutowired method, you can use the WithProperty method that’s similar to the WithParameter method you’ve used so many times already:
builder.RegisterType<Chicken>().As<IIngredient>();
builder.RegisterType<CaesarSalad>()
    .As<ICourse>(
    .WithProperty(new ResolvedParameter(
        (p, c) => p.Member.Name == "set_Extra",
        (p, c) => c.Resolve<IIngredient>()));
The WithProperty method mirrors the WithParameter method you already know and love: it takes a single Parameter argument and also has an overload that takes a property name and value.
To properly resolve the Extra method, we can use the trusted ResolvedParameter class. When it comes to properties, the predicate we supply has a little twist because Autofac invokes the code block with a ParameterInfo, not a PropertyInfo; the p parameter represents the value parameter that’s always implicitly available when implementing a property,[9] so we need to navigate to the Member that defines this parameter. This is a MethodInfo instance, so we need to know a little bit about how C# properties are implemented at the IL level: the Extra property is really a method named set_Extra.
9 I assume this must be confusing to VB.NET developers.
With the predicate in place, it’s a breeze to implement the value provider by resolving IIngredient from the supplied IComponentContext.
Using the WithProperty method gives us more fine-grained control over PROPERTY INJECTION while we retain loose coupling. If we want a strongly typed alternative, this is also possible.
Autofac enables us to supply code blocks that will be invoked when certain events occur during a component’s lifetime. We can hook into these events to fill properties while a component is being built.
One of these events is the OnActivating event that Autofac raises whenever it creates a new component instance. You can use this event to populate the Extra property before Autofac returns the CaesarSalad instance:
builder.RegisterType<Chicken>().As<IIngredient>();
builder.RegisterType<CaesarSalad>()
    .As<ICourse>()
    .OnActivating(e =>
        e.Instance.Extra = e.Context.Resolve<IIngredient>());
The OnActivating method gives you an opportunity to do something to the component before Autofac returns it to whoever requested it. As a single parameter, it takes an Action<IActivatingEventArgs<CaesarSalad>> that you can use to implement the post-processing logic of your choice. The e parameter represents the event args and it has an Instance property of the CaesarSalad type and a Context property you can use to resolve other components. You use this combination to resolve IIngredient and assign the result to the Extra property. When you resolve ICourse you’ll get a CaesarSalad instance with Extra Chicken.
Because the Instance property is tied to the generic type argument of the IActivatingEventArgs<T> interface, this approach is strongly typed with the advantages and disadvantages this entails.
In this section, you’ve seen how you can use Autofac to deal with more difficult creational APIs. You can use various derivations of the abstract Parameter class to wire constructors and properties with services to maintain a semblance of AUTO-WIRING, or you can use the Register method with a code block for a more type-safe approach. PROPERTY INJECTION is generally well-supported both for AUTO-WIRING and for strongly typed assignment.
13.5. Summary
In this chapter, you got a taste of the Autofac DI CONTAINER; although it’s a second-generation container, it’s still fairly comprehensive and addresses many of the more tricky situations we typically encounter when we use DI CONTAINERS. Its architecture is built directly on the features of .NET 3.5 and C# 3.0, but even though it internally utilizes delegates and code blocks, the general API is fairly easy to use.
An important overall theme for Autofac seems to be one of explicitness. It doesn’t attempt to guess what we mean, but rather offers an easy-to-use API that provides us with options to explicitly enable features.
One example of this explicitness is that, contrary to many other DI CONTAINERS, Autofac enforces more strict separation of concerns between configuring and consuming a container. We configure components using a ContainerBuilder instance, but a ContainerBuilder can’t resolve components. When we’re done configuring a ContainerBuilder, we use it to build an IContainer that we can use to resolve components.
We can configure a ContainerBuilder in every conceivable way: through imperative code, through XML, or by defining conventions, and we can package configurations into Modules.
The way Autofac addresses LIFETIME MANAGEMENT is a bit different than other DI CONTAINERS. Standard lifestyles such as TRANSIENT and SINGLETON are built-in, but other contextual lifestyles such as WEB REQUEST CONTEXT are addressed by lifetime scopes where we explicitly interact with the container to define a context within which components are resolved and released. This effectively addresses contextual lifestyles such as WEB REQUEST CONTEXT. On the other hand, this model doesn’t enable us to custom implement a POOLED or cached lifestyle, and there’s no other easy way to implement custom lifestyles with Autofac. According to Nicholas Blumhardt (the Autofac author), this has never come up in any discussion forum, so it’s unlikely to be a real issue.[10] In most cases, the LIFETIME MANAGEMENT offered by Autofac is more than sufficient.
10 Private correspondence, 2011.
In closing, Autofac is a modern DI CONTAINER that offers a fairly comprehensive feature set. In the next chapter, we’ll turn our attention to another second-generation DI CONTAINER: Unity.