
1
Setting Up Canva on Desktop and Mobile
Canva is a fantastic platform that is available to everyone and is, in particular, ideal for small business owners. In this chapter, you will be introduced to Canva as well as how to set up your account, and we will go through the main differences between Free and Pro, so you can decide which is best for you. You will also have the chance to look at both mobile and desktop platforms, as there are some slight differences, and we will look at the Content Planner, which is Canva’s social media scheduling tool.
In this chapter we are going to cover the following main topics:
- What is Canva?
- Free versus Pro – what’s the difference?
- Setting up your Canva account
- Using the mobile version of Canva
- Scheduling content with the Content Planner
- Setting up folders for organization
By the end of this chapter, you will have set up your Canva account, created folders to organize your designs, understood the difference between the two different accounts as well as the desktop and mobile versions, and will be ready to get creating and schedule your content.
Technical requirements
To complete this chapter, you only need to have a working desktop computer or laptop and mobile phone (if you would like to look at the mobile version, but not compulsory) as well as access to an internet connection. There are no requirements when it comes to design experience; Canva has been created to be accessible by everyone, and anyone of any age or ability can use and create with Canva. This is why it has become such a popular platform – anyone can create beautiful designs.
What is Canva?
Canva is a design platform where you can create your own designs using a drag-and-drop system. It includes hundreds of thousands of images, elements, fonts, shapes, and templates; the majority are available free for you to use, but you can upgrade to a paid subscription to gain access to everything.
The things you can create include social media designs, book covers, calendars, planners, t-shirt designs, and posters. Every type of design has its own sizing within Canva so you can just pick the size, choose a suitable template, and get designing. Templates and elements are created by freelance designers as well as in-house designers at Canva. It is a multi-purpose platform, meaning it is available both as a website, desktop app, and mobile app, all connected to help make designing easier for the everyday person.
Now you know what you need to set up an account and you have an understanding of what Canva is, let’s look at the different types of accounts that are available to you.
Free versus Pro – what’s the difference?
Canva has two main accounts, Free and Pro. Free is a free-to-open account and you have access to a lot of features to get designing straight away. With the option of purchasing Pro elements and templates if you would like to, Pro is a paid account that gives you access to everything including some amazing features that are really useful to those wanting to use Canva daily. The Pro account is, at the time of writing this book, $12.99 per month or $119.99 per year (www.canva.com).
Canva Free benefits
The following are the benefits of Canva Free:
- 250,000+ templates
- Hundreds of thousands of free photos and graphics
- 5 GB of cloud storage space
- Unlimited folders
- 100+ design styles: social media posts, posters, invites, banners, and more
Canva Pro benefits
The following are the benefits of Canva Pro:
- In Pro, you get everything that you get for Free, plus the following:
- Resize your designs with the Magic Resize tool
- 610,000+ templates, with new designs added daily
- 100+ million images, videos, audio, and graphics
- Full access to the complete brand kit
- Background Remover tools for both images and video
- Full access to the Content planner
- Unlimited folders
- 100 GB cloud storage space
Let’s look at how you can now set up your Canva account.
Setting up your Canva account
To set up a Canva account (you may already have one), follow these steps:
- Go to www.canva.com on your computer or tablet; once there, you will see the screen as shown in Figure 1.1:

Figure 1.1 – Home page screen in Canva
You then have a choice of signing up for a Free Canva account or starting a free 30-day trial of Pro. I would recommend going for the Free account with a view of trying the free trial later once you are familiar with the platform.
- Next, select the Sign up button in the top-right corner and the popup will appear as shown in Figure 1.2:

Figure 1.2 – Canva Sign-up popup
You will then be able to select how you would like to sign up. I would recommend using an existing email address by clicking the purple box that says Continue with email. This will then take you to a password screen where you can create a secure password for the account. Don’t forget to make a note of which email address you have used and the password created.
- You will then be taken to the Canva home screen ready to get your new account set up; it will look like this:

Figure 1.3 – The Canva home screen after logging in
Once you have your new account set up and you are logged in, I would always advise you to have a good look around, check out the menu on the left, scroll through the sections under the search bar in the middle, and familiarize yourself with the layout of the home screen; you will see this a lot on your design journey. Don’t worry about going too deep into the features as we will be covering these later in the book, but for now, check out your new design platform.
Next, we’ll have a look at setting up and using the mobile version of Canva as this works really well with the website.
Using the mobile version of Canva
At this point, I would like to talk a bit about the Canva mobile app, as the majority of people are now using mobiles over desktop computers for everyday life and work, so it is important to get this app set up as well. You can use the same login details that you used for the desktop/web version of Canva and when you do, all of your designs, uploads, images, and branding are carried across, so anything you create on your desktop will be available to you through the mobile app on your phone. There are a few small differences and not all features are carried over to the mobile app. The main difference is the obvious one really: the screen size. On our computers and desktop screens, we can see so much more and can design more complex projects this way. Using your mobile, you are restricted to a smaller screen, so it’s perfect for downloading designs and scheduling or uploading to social media on the go.
To get the Canva mobile app, you will need access to either the App Store on Apple or Google Play Store on Android phones. It will often appear as an advert at the top of the page. Select Canva and log in using your Canva login details.
Figure 1.4 – Canva App Store view
It will then open up on your phone and you will see a screen similar to this one:

Figure 1.5 – Canva for mobile home screen
There are a few small differences between the desktop version and mobile version of Canva, including the following:
- The main menu is across the bottom rather than the left side, and the Create a design button is the small purple circle in the bottom-right corner:

Figure 1.6 – Mobile version main menu

Figure 1.7 – Mobile version design features
- To access features when you are working on a design, you select the small purple circle in the bottom left and the elements are accessible from there, and to view all your pages together, there is a white circle with a number in a square in it, on the right of the screen:

Figure 1.8 – Mobile version create button and view all pages button
Overall, they are very similar, and any differences have been put in place to accommodate the difference in screen sizes.
The mobile version is great for being on the go and being able to find your designs quickly, which is why we will now look at setting up folders and getting organized.
Setting up folders for organization
So now we’ve set up our Canva account and know how the mobile version works, it’s time to get organized. In Canva, you can create folders to organize your designs into various parts of your business or home life, view your recent designs, and quickly see your uploaded content all on the Your projects tab. This can be found on the left-hand menu under the Home tab.
The order of sections on this page goes as follows:
- Recent
- Folders
- Designs
- Images
- Videos
This can be seen in the following screenshot:

Figure 1.9 – The project tabs on the desktop version of Canva
Scroll down the page and you will see anything you’ve uploaded or created here. This is the best place to access everything, a central hub for your account.
Creating folders
You get three folders already in the account, as follows:
- Purchased – Anything you have purchased outside of the Pro subscription
- Starred – Any elements or images that you have favorited and would like to use later are saved here
- Uploads – Everything you upload to your account, including images and video
With the Pro version and the Free version, you get unlimited folders along with the existing three mentioned previously and you can name them whatever you would like. To create a new folder, follow these instructions:

Figure 1.10 – Creating a new folder on desktop
- Click on the Folder icon.
- Add a name for your folder:

Figure 1.11 – Naming your folders
Ignore the second option, unless you are creating a team, but for this exercise, we are just looking at setting up a basic folder.
- Then, select the Create folder button at the bottom.
- It will now add your folder to the Folders section on the page. You can customize a folder by clicking on the three dots next to it or by selecting the folder itself:

Figure 1.12 – How to customize folders
You can also have your new folder as a top-level folder by selecting the star icon next to its name, which will turn the star yellow. It will now appear in the menu bar on the left. This is perfect for all users, and you can create as many folders as you would like. You can also create folders within folders up to five deep for extra organization.

Figure 1.13 – Adding a star to create a top-level folder
Finally within the Folders options, you can share a folder with a team member, but they do need to have been set up as a member within your Canva account; you can’t share a folder with someone outside of your team.
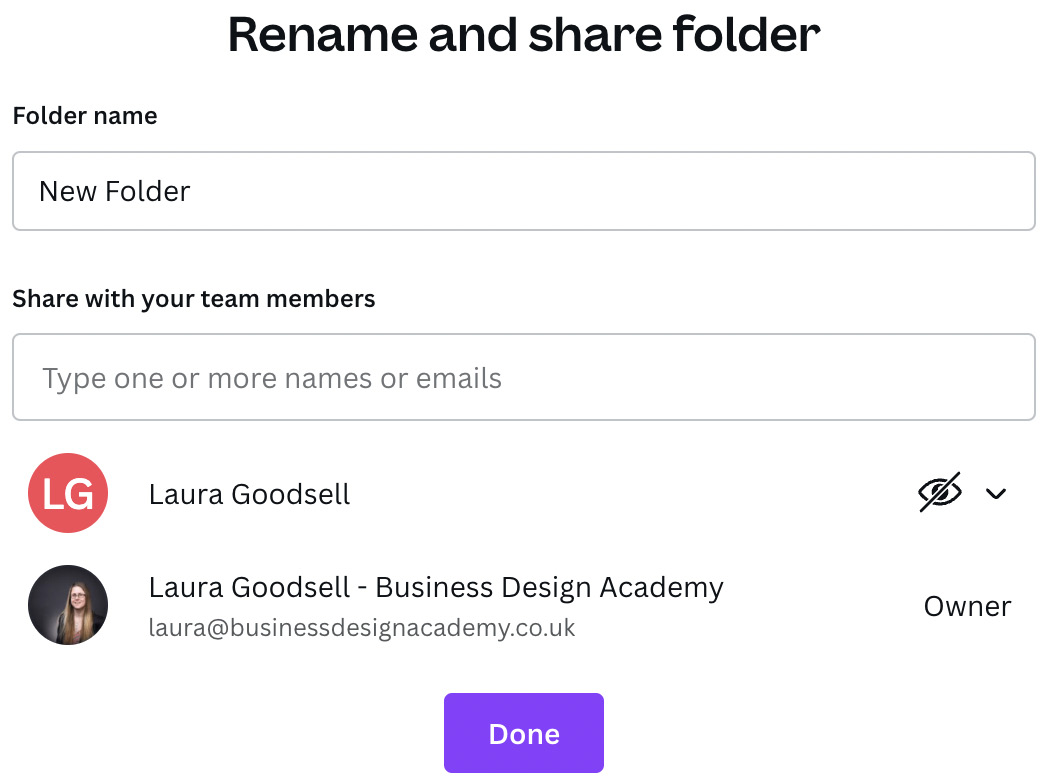
Figure 1.14 – Sharing a folder with a team member
So far, we have covered what Canva is and how it can be used, how to set up our account on desktop and mobile, and we have also looked at the differences between the two main Canva accounts. We’ve gotten ourselves organized with folders for our designs, so next, we’re going to look at the Content Planner.
Scheduling content with the Content Planner
The Canva Content Planner is a brilliant feature for anyone who uses and schedules social media. It helps you to create and schedule multiple social platforms all from within Canva. You don’t need to sign up to third-party apps and websites to get your content into your accounts.
It can be located in the main menu on the right. This is a Pro feature only, so if you are on Free, you will not have access; however, you can sign up for a 30-day free trial and have a look to see whether you would be interested in using it in the future.
The Content Planner is laid out like a calendar, with the option to toggle between months at the top, and you can see at a glance where you have scheduled your posts and when. It also has important holidays and world events on, so if you ever wanted to create for an occasion, you can click on the name and it will give you a selection of templates already created for that date:

Figure 1.15 – Canva Content Planner
Here, I have clicked on the International Yoga Day link, and I can then click on one of these options to start creating my post in relation to International Yoga Day:

Figure 1.16 – View of Templates available for different holidays in the Content Planner
Creating and scheduling a post
Here, I will go step by step through how to schedule content for your socials, as there are a couple of ways you can do this through Canva. The simplest and best way is to pick a date from the calendar that you would like to post to and then create your design.
Here, I have clicked on the date I would like to use, and it has brought up my own designs at the top to choose from, a selection of pre-made templates at the bottom, plus the option (in the middle to the right) to create a design from scratch. For this example, I will select a pre-made template:
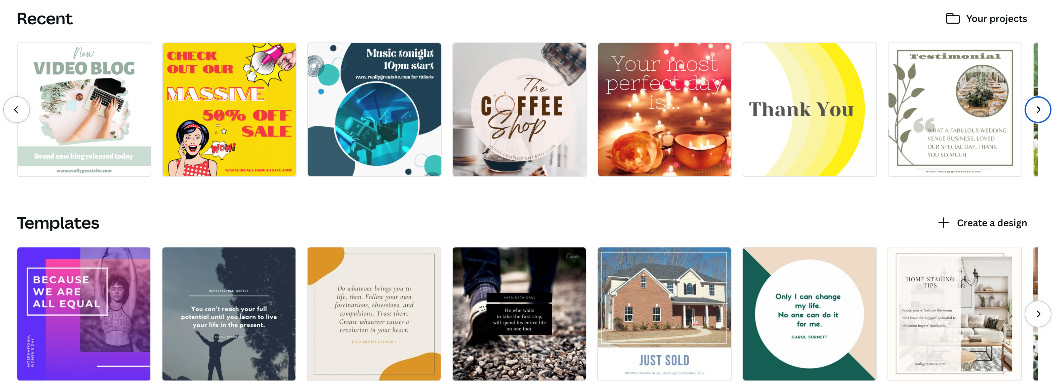
Figure 1.17 – Templates in Canva
Once I have selected my template, it will open up in the normal template editing view. I can now change the text, swap out any images, or adjust the colors to suit my brand (we will cover branding in Chapter 5, Exploring the Awesome Creative Tools for Branding).

Figure 1.18 – Canva design screen
Once you have finished editing your template (we will cover editing in Chapter 2, Discovering and Editing Templates), you are ready to schedule. Click on the Share button in the top-right corner:

Figure 1.19 – View of the Share button
You will see a drop-down menu; you will often need to select the More option at the bottom to find the Schedule button:

Figure 1.20 – Share dropdown
Once you have selected the More button, you will then see all of the available options, including every social media platform that you can directly post to, as well as the Schedule tab, as shown here:

Figure 1.21 – Schedule option in the Share dropdown
Here, you will find every option available to you within Canva. Scroll down until you find the Schedule option and select it. It will be in the Social section. Next, it will bring up boxes for you to write out your content, select your channel, and change the date and time you want the post to go out:

Figure 1.22 – Dropdown to create your social media post
Click on the date and a calendar will appear. Select your date, and at the bottom, you will find the option to select the time:

Figure 1.23 – The social media post calendar for the Content Planner
Next, select your channel. You will need to connect your social channels to Canva at this point. They are mostly easy to do apart from Facebook; you will have to log in to your Facebook account and grant Canva permission. You can also connect to Instagram, which is the most popular platform to post directly to, however, you can only connect to either a Business or Personal account, and not a Creator account.
But mostly, they just require your login details from within Canva, or if you are on a device already logged in, it can connect automatically. This can be done by selecting the Select a channel option at the bottom of the drop-down option. Once connected, it will appear at the top and you can just select the channel you need:

Figure 1.24 – Selecting the social media account to post your content to
Lastly, you are required to write your caption as you would directly on your social channel. Canva has even made it possible for you to stay within your character count. As you change the social platforms, the word count in the bottom-right corner will change; Twitter, for example, is 280 characters and Facebook is 5,000 characters:

Figure 1.25 – Writing your social media post caption
Now is the time to click Schedule or save your post as a draft to come back to at a later date. These options can be found directly on the Content Planner calendar.
If you would like to schedule the same post to another platform, you will need to click the Make a copy button of the design, as you can only use it once per platform:

Figure 1.26 – Your design is scheduled screen
Let’s go over to the Content Planner and see our post. I now have a view of my scheduled posts, and if you hover over one, it will tell you the time and platform it has been scheduled to. You can schedule multiple posts on different platforms on the same day. It will show you smaller icons of each platform, so you can easily see at a glance where everything is set to post:

Figure 1.27 – View of the Content Planner with scheduled posts
All scheduled posts can be edited if needed. Just click on the post on the Content Planner and it will bring up the scheduled post for you to edit. Click Save and schedule and you’re done.
Other ways to schedule and post
There are a couple of other ways to schedule and post posts to social platforms through Canva that achieve the same goal and are quite similar in process, but I thought it would be beneficial to briefly explain them. Both of these ways can be done on mobile or desktop versions of Canva:
- The first way is to create your design first, without selecting a date through the Content Planner. You can open up a blank template and create your design, then choose the Schedule option in the menu.
- Second, you don’t have to schedule at all; you can post directly to your chosen platform. Just click on the Share option and select your platform from the drop-down menu. A similar screen will appear as if you are scheduling but with a Publish now button instead. This saves you having to download your designs, save them to your phone or computer, and then upload them to your socials. However, you can still schedule from this drop-down if you want, by clicking the small calendar icon in the bottom-left corner:

Figure 1.28 – Posting directly to social media dropdown
Creating and scheduling your posts to social media in bulk saves a lot of time when it comes to what to post each day. The Content Planner is here to help you and is a great feature to implement into your business. As it’s included in Pro, there are no additional costs either.
We’ve now come to the end, so let’s look at what we have learned in this chapter.
Summary
It’s a wrap for the first chapter! By now, you will have a good understanding of what Canva is and the differences between the Free and Pro accounts. You have learned how to create and set up your Canva account, and how to set up and use the mobile app. Then, you learned how to create folders ready to get going with your designs and we looked at how to use the Content Planner to schedule your posts to social media. Although this is a Pro-only feature, I thought it would be beneficial to mention it in this book, as a lot of Canva users start on the Free account (which is awesome and getting better) but often find the benefits of Pro are required within their business, so you may make the switch over at some point in the future.
So that’s it for this chapter. In the next chapter, we will be discovering templates that are available in Canva, how to edit them, and the wonderful use of elements and imagery, building on our knowledge from this chapter.