Chapter 6. Integrating a map view with Ionic
When we implemented Favorites in the previous chapter, the user was asked to provide a city and optional state or country where the favorite location should be. Then, by using the GeolocationService we’ve built for TrendiCity, that input was converted to an object with latitude and longitude properties, which were stored in the favorite object.
These location details were needed to center the map view on to that particular location and retrieve nearby Instagram posts, which are shown as markers on the map. This map view is what we will be focusing on in this chapter. We will guide you through the forest of AngularJS Google Maps directives, and get you up and running with some fancy marker and positioning actions.
Picking an AngularJS directive for Google Maps
Ionic does not have a map directive built into the framework, but thankfully we can use a community directive without any issues. In the case of our example application, TrendiCity, we selected a suitable Angular-based library that met three of our needs:
- Google Maps as tile service
- Fast performance on mobile devices
- No need for offline capabilities
To be completely honest, this was probably the hardest part for us when building TrendiCity. There is a wide variety of Google Maps related directives out in the wild. Their functionality defers from very basic new google.maps.Map() calls to full on asynchronous Google Maps v3 API loading and map initialization with nested directives for markers and polygons.
We will be covering a selection of three Google Maps Angular projects, and how you can easily implement a third-party library in your existing Ionic project in this chapter. We will also be covering Ionic’s ‘magic switch’ data-tap-disabled and how, when, and why to apply it.
The candidates
Let’s take a look at the candidates.
angular-google-maps
When searching online for ‘angular google maps’ you might find the angular-google-maps directive as one of your first results. It is another project by the Angular UI team and very well documented. The project is very much alive and has a large community using it. But then again, the usage of this particular directive and its nested directives for markers and marker windows can be a tough nut to understand.
ui-maps
Confusingly, the same Angular UI team also has the ui-maps project. When we’re snooping around on the GitHub repositories page we quickly notice there is something wrong with this project. As of this moment, the project has 10 open pull requests and was last updated over a year ago. That didn’t give us much confidence in using it. Based on some community reports and a lengthy topic in the issues section the word goes that the Angular UI team discontinued this project in favor of angular-google-maps.
LeafletJS
Leaflet is something entirely different. It existed before we even started thinking about building hybrid apps with Angular. Leaflet is a widely used open source JavaScript library used to build web mapping applications. It supports most mobile and desktop platforms, supporting HTML5, and CSS3. Alongside OpenLayers, and the Google Maps API it is one of the most popular JavaScript mapping libraries, and is now used by major web sites such as FourSquare, Pinterest, and Flickr.
And the winner is
... angular-google-maps. Why not Leaflet? Keeping in mind that we wanted to demonstrate implementing a Google Maps powered map and interacting with it, angular-google-maps was the best choice. When we switched out the Open Street Maps tile provider with Google Maps when using Leaflet, there was a huge performance drop on both mobile and desktop. Considering the performance and the fact that we have no need to display tiles from an offline data source, Leaflet is great at that, we decided to go with angular-google-maps.
Note that there are plenty other Angular projects that implement Google Maps. This is just a selection of the many libraries that you can find out there.
Creating the geolocation utility service
Before we get started implementing the angular-google-maps directive we first take a look at the GeolocationService, which we already mentioned in the chapter before. In the GeolocationService we have implemented three straight forward geolocation related methods.
One of these methods is the getDefaultPosition method. As every good method name already suggests, this is a way to get the default location object. We use the method to return the fallback position, when retrieving the user’s actual position fails for any reason. No rocket science here.
Implementing ngCordova and the $cordovaGeolocation service
Next up is the getCurrentPosition method. This method returns a promise that will retrieve the user’s current position using the $cordovaGeolocation service.
// GeolocationService// /www/js/services/geolocation.jsthis.getCurrentPosition=function(){vardefer=$q.defer();$ionicPlatform.ready(function(){varposOptions={timeout:10000,enableHighAccuracy:false};$cordovaGeolocation.getCurrentPosition(posOptions).then(function(position){$log.debug('Got geolocation');defer.resolve(position);},function(locationError){$log.debug('Did not get geolocation');defer.reject({code:locationError.code,message:locationError.message,coords:fallbackPositionObject});});});returndefer.promise;};
The getCurrentPosition() method in the GeolocationService
To mimic the same behavior as $cordovaGeolocation service, we create a deferred object to return its promise later on. After that we will call `$cordovaGeolocation.getCurrentPosition() to retrieve the users current location by leveraging their GPS hardware using the installed Cordova plugin from the ngCordova project.
Following the instructions from the ngCordova website we have installed the org.apache.cordova.geolocation Cordova plugin as follows:
$ ionic plugin add org.apache.cordova.geolocationAnd of course we have installed the ngCordova project using Bower:
$ bower install --save ngCordova$ionicPlatform.ready()
After the plugin is installed, we are able to fully leverage the $cordovaGeolocation service. A keen reader would have noticed by now that the GeolocationService’s getCurrentPosition method is basically the same as the one from $cordovaGeolocation. Why bother creating a method that does exactly the same thing? There is one important difference and it’s wrapped around $cordovaGeolocation: `$ionicPlatform.
As you can see, we have wrapped $cordovaGeolocation inside of an $ionicPlatform.ready() callback. By doing so $cordovaGeolocation service will start looking up the user’s location when the device is actually ready to do so. When the application is within a webview (Cordova), it will fire the callback once the device is ready. If the app is within a web browser, it will fire the callback after the window.load event.
Converting addresses to geolocation objects using the Google Maps Geocode API
Next up is the addressToPosition method. We have already used this in the previous chapter, and by now you know it is super useful when you want to convert a certain address as a string to a geolocation object. The functionality is pretty straight forward: address as a string goes in, and geolocation comes out as a promise.
// GeolocationService// /www/js/services/geolocation.jsthis.addressToPosition=function(strAddress){vargeocodingApiUrl='http://maps.googleapis.com/maps/api/geocode/json?address='+strAddress+'&sensor=false';varconvertResultToLatLng=function(result){varlocation=result.data.results[0].geometry.location;// Transforming the 'location.lat' and 'location.lng'// object to 'location.latitude' to be compatible with// other location responses like in getCurrentPositionreturn{latitude:location.lat,longitude:location.lng}};return$http.get(geocodingApiUrl).then(convertResultToLatLng,function(reason){return$q.reject(reason);});};
Using Angular’s $http service, we literally get the geolocation object from the Google Maps Geocode API. After retrieving a successful dataset, the specific latitude and longitude values are filtered out of the results and returned as an object for later use.
Setting up the map view inside a tab
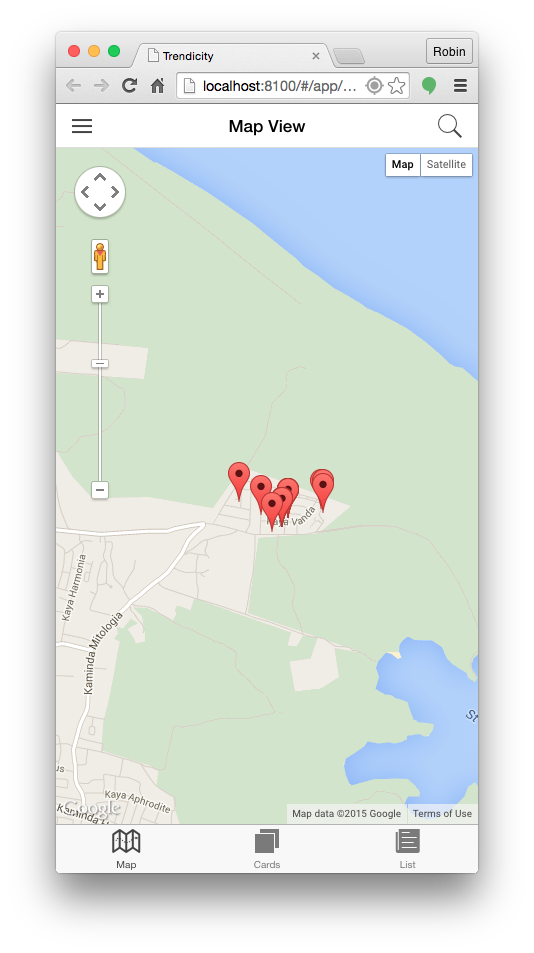
Once we have the GeolocationService up and running we are ready to move on to the big guy, implementing angular-google-maps in the tab’s view. The resulting view is shown below, and we will guide you through it step by step.
The map view as seen from a browser
The HTML used to generate the map view
// /www/templates/tap-map.html<divdata-tap-disabled="true"id="googleMap"ng-if="retrievedPosition"><ui-gmap-google-mapcenter="mapCtrl.mapOptions.center"zoom="mapCtrl.mapOptions.zoom"bounds="markerBounds"><ui-gmap-markerng-repeat="marker in mapCtrl.getMarkers()"idKey="marker.id"coords='marker.coords'icon='marker.icon'><ui-gmap-windowisIconVisibleOnClick="true"><imgng-src="{{ marker.postData.images.low_resolution.url }}"width="{{ marker.postData.images.low_resolution.width }}"height="{{ marker.postData.images.low_resolution.height }}"></ui-gmap-window></ui-gmap-marker></ui-gmap-google-map></div>
We have omitted the wrapping <ion-content> directive in this example
Touchstart, touchend, and click events on touch-enabled devices
Adam Bradley, one of the core developers of Ionic, wrote the following about the infamous 300ms click delay, also known as ‘ghost click’ or ‘fastclick', that browsers implement for touch-enabled devices:
On touch devices such as a phone or tablet, browsers implement a 300ms delay between the time the user stops touching the display and the moment the browser executes the click. It was initially introduced so the browser can tell if the user wants to double-tap to zoom in on the web page. Basically the browser waits roughly 300ms to see if the user is double-tapping, or just tapping on the display once.
Out of the box, Ionic automatically removes the 300ms delay in order to make Ionic applications feel more like native applictions. Resultingly, other solutions such as fastclick and Angular’s ngTouch should not be included, to avoid conflicts.
But Ionic is not the only one with a workaround for this behavior. As soon as you start developing a library that is mobile friendly, you will need to address this issue sooner or later when you start tweaking the performance.
Now we have two libraries handling the click events inside of our <ion-content> element. This can lead to unexpected or unwanted behavior like markers that can’t be clicked or trigger an unwanted double click. Ionic has a built in workaround for situations like these, where you can’t influence the behavior of both libraries managing the click events. In our map view, we have to add the data-tap-disabled directive to disable click event management by Ionic and allow angular-google-maps, and thus Google Maps to do its own event management.
ui-gmap-google-map
Next up is the ui-gmap-google-map directive. This is the wrapping element which actually initiates Google Maps. For TrendiCity we have used three configuration attributes of this directive: center, zoom, and bounds.
Center is an object or array containing a latitude and longitude to center the map on. By default we will try to center the map on the user’s current location using the GeolocationService.getCurrentPosition() method.
Zoom sets as one might expect the zoom level of the Google Map.
Last but not least, there is Bounds. Bounds fits the map in to the specified bounds. The expression must resolve to an object having both northeast and southwest properties. Each of those properties must have a latitude and a longitude properties. The $scope value markerBounds is linked to a MapService method, which will automatically calculate these bounds. More on that later.
// /www/templates/tap-map.html<ui-gmap-google-mapcenter="mapCtrl.mapOptions.center"zoom="mapCtrl.mapOptions.zoom"bounds="markerBounds"></ui-gmap-google-map>
ui-gmap-marker
On the map we just created, we want to show two kinds of markers. On one end there is the ‘current location’ marker, and on the other hand we want to place markers on the map for the found Instagram posts based on the user’s defined filter. All of these markers are retrieved by the getMarkers() method on the Map view controller MapViewCtrl.
The ui-gmap-marker directive repeats for each marker found in the controller
// /www/templates/tap-map.html<ui-gmap-markerng-repeat="marker in mapCtrl.getMarkers()"idKey="marker.id"coords="marker.coords"icon="marker.icon"></ui-gmap-marker>
The getMarkers() method on the Map view controller links directly to the MapService, which basically returns its internal marker collection
// MapViewCtrl// /www/js/controllers/map.jsthis.getMarkers=function(){returnMapService.getMarkers();};// MapService// /www/js/services/map.jsthis.getMarkers=function(){returnthis.markers;};
In our implementation in TrendiCity, each marker has two required properties, and one optional property. The idKey is a required unique id for each marker. For the current location marker we use currentLocation to easily identify that marker later. All Instragram markers have their own unique id based on the Instagram post’s unique id. Nothing fancy so far. The other two properties are very descriptive on their own: coords and icon. The former defines the position on the map, and the latter defines an optional custom icon image.
ui-gmap-window
Inside of each marker we have the ui-gmap-window. This defines an element which, in Google Maps terminology, is called an info window. It is basically a popup that opens up with some extra details when the marker is clicked. In TrendiCity, we show the Instagram post’s low_resolution image in this popup.
<ui-gmap-windowisIconVisibleOnClick="true"><imgng-src="{{ marker.postData.images.low_resolution.url }}"width="{{ marker.postData.images.low_resolution.width }}"height="{{ marker.postData.images.low_resolution.height }}"></ui-gmap-window>
Moving on to the controller and MapService
That wraps up the map view inside of the map tab. We have covered the setup of directives we used from angular-google-maps, and told Ionic not to handle taps and clicks inside of our map using the data-tap-disabled directive.
Map View Controller
The single most important task of the Map View Controller (we will call it MapViewCtrl) is to initialize the map and populate it with the correct set of markers received from the MapService. Whenever a user requests new posts from Instagram, the home controller adds these posts as markers to the MapService so that they will be displayed when the user opens the map view.
The MapViewCtrl controller itself will be retrieving the user’s current position, or fallback position if the user does not allow GPS access, and center the map on that location. This is done by the before mentioned GeolocationService.
Reading $state’s params property and loading the Favorite location
When the user enters the map view in an Ionic project, the $ionicView.enter event is triggered. This way we can initialize code that has to be new when opening the view. In the MapViewCtrl we check if a favorite location is available from the $route.params object. When a user opens the route #/app/home/map/1, $route.params.id will have the value ’1’ (as a string) meaning that the Favorite with ID 1 should be displayed.
// MapViewCtrl// /www/js/controllers/map.jsvarfavoriteIsDefined=false;this.checkForFavorite=function(){if($state.params.id){// Set a flag for later use.favoriteIsDefined=true;// Favorite location is set. Focus on that location instead of the geolocation center.varcurrentFavorite=FavoritesService.getFavorite(parseInt($state.params.id));if(currentFavorite){mapCtrl.setCenter([currentFavorite.lat,currentFavorite.lng]);mapCtrl.setZoom(14);}// Debug data only available in development mode.$log.debug('Loading a favorite location.');}else{// Reset the previously set flagfavoriteIsDefined=false;}};
When we have found that favorite based on the id set in the current route, we will focus the map on that favorite and retrieve nearby posts. In the home controller (/www/js/controllers/home.js) we have used the MapService.addMarkersFromPosts() method to convert an InstragramService response to map markers in TrendiCity. We read the location data from each post and create a new marker using MapService.addMarker() for each of them.
Managing map madness with the MapService
Not all of the map madness can be managed with the MapService. But we have built some nice tricks in there to manage the markers collection, convert Instagram posts to markers and calculate map bounds. Since we have mentioned using the MapService a couple of times already, let’s dive in and take a look at its most important methods.
Self documented methods We will not be discussing some methods of the MapService in detail in this book. These methods are self documented. By reading the method names, you will understand what they do.
MapService.clearMarkers()
Even though this method by itself is pretty straight forward and self documented, it has a little extra under the hood.
// MapSerivce// /www/js/services/map.jsthis.clearMarkers=function(blnRemoveCurrentPosition){if(!!blnRemoveCurrentPosition){// Clear all markers, including current positionthis.markers=[];return;}// Store the current position markervarcurrentPositionMarker=this.getCurrentPositionMarker();// Clear marker storagethis.markers=[];// Re-add current position markerthis.markers.push(currentPositionMarker);};
As you can see, by default the clearMarkers() method does not clear out the current position marker. This way, we prevent the need for TrendiCity to re-evaluate the user’s current position every time the markers are cleared. By passing true as an argument, the current location marker will also be cleared.
MapService.addMarkersFromPosts()
This utility method is very useful when we collect posts from Instagram and want to show these posts on our map.
this.addMarkersFromPosts=function(posts){// It's good practice to define variables outside the for-loopvari,postsLength=posts.length,post,marker;// Clear before adding new onesthis.clearMarkers();for(i=0;i<postsLength;i++){post=posts[i];marker={coords:post.location,id:post.id,postData:post};$log.debug('Adding marker',marker);this.addMarker(marker);}this.updateMarkerBounds();};
Using this method, we basically loop trough a collection of posts received from the InstagramService. Inside of each post object, we look for a location property and the id property. We use these two properties on our new marker object. As a bonus, we’ve created the postData property on the marker object so that we can always access the raw post data directly from the marker. This data is used in the map view to define the contents of the Info Window popup as shown before:
// Map view // /www/templates/tap-map.html<ui-gmap-windowisIconVisibleOnClick="true"><imgng-src="{{ marker.postData.images.low_resolution.url }}"width="{{ marker.postData.images.low_resolution.width }}"height="{{ marker.postData.images.low_resolution.height }}"></ui-gmap-window>
Now we have a way to add Instagram posts as markers to the map and access their raw data for later use. Before each time the posts are converted to markers, we clear the internal marker collection of the service. After the new markers are added, we have to recalculate the maps boundaries using the updateMarkerBounds() method.
MapService.updateMarkerBounds()
To calculate the marker bounds, the non-Angular Google Maps object is needed. Instead of having to reference window.google.maps and keep our fingers crossed that the Google Maps API is actually loaded before we make that call, angular-google-maps provides us with a sweet service called uiGmapMapScriptLoader.
The uiGmapMapScriptLoader service basically takes care of the asynchrounous loading of the Google Maps API and returns a promise to provide us feedback whether or not the API is loaded. The promise then returns the plain Google Maps object (google.maps) for us to safely use. Let’s take a look at how we utilize this in our updateMarkerBounds() method.
// MapService// /www/js/services/map.jsthis.updateMarkerBounds=function(){varcalculateMarkerBounds=function(googleMaps){varbounds=newgoogleMaps.LatLngBounds(),markersLength=that.markers.length,i,marker;for(i=0;i<=markersLength;i++){marker=that.markers[i];if(marker){bounds.extend(newgoogleMaps.LatLng(marker.coords.latitude,marker.coords.longitude));}}$log.debug('Figured out correct map bounds',bounds);};// Check if the global google object is available to do some vanilla Google Maps API coding.uiGmapMapScriptLoader.load().then(calculateMarkerBounds);};
Calculating the marker bounds with Google Maps API
Using the Google Maps API, we create a new LatLngBounds object to keep track of all of the markers’ latitude and longitude coordinates. A LatLngBounds instance represents a rectangle in geographical coordinates. By extending this object with marker positions, this rectangle will span over all marker positions. We do this by using the extend method on the LatLngBounds object and pass in new LatLng position objects created with the Google Maps API like this:
// MapService// /www/js/services/map.jsvarbounds=newgoogleMaps.LatLngBounds();// ...bounds.extend(newgoogleMaps.LatLng(marker.coords.latitude,marker.coords.longitude));
These calcualted bounds are updated to the map view by Angular’s two-way data binding that was set up in the MapViewCtrl controller.
Summary
In the past chapter we went through the process of selecting, implementing, and customizing angular-google-maps. Tools like ngCordova’s $cordovaGeolocation service helped us determine the user’s location from the map view controller, and when we wanted to manage the map’s marker set across multiple controllers, we used the MapService.
In the end, angular-google-maps provided us with a very nice uiGmapMapScriptLoader service, which enabled us to use some vanilla Google Maps API methods inside of our Angular oriented project.