
Chapter 4. Implementing a side menu and setting up the routes
A sliding side menu has become one of the most well known UI elements in mobile applications. In its most typical implementation, a side menu consists of a menu view in the background, and the content view on top of that menu view. A user can either swipe the content away to display the side menu, or click (or tap) a toggle button to do so. To build a side menu using Ionic, we will be using a set of predefined directives, which will handle most of the logic we just described.
The most important directives we will be using are:
<ion-side-menus><ion-side-menu-content><ion-side-menu>
These directives will be handling all of the magic that comes with side menu logic in our application, TrendiCity. Positioned on either the left or right side of the screen, or both, a side menu handles an important part of your application’s navigation.
Introduction to Ionic’s side menu directives
First, let’s go ahead and take a look at the side menu view as we built it for TrendiCity. From there on we will go through the code by breaking down every step of the process.
For starters we take a look at the end result. The side menu in TrendiCity looks like this in a browser:
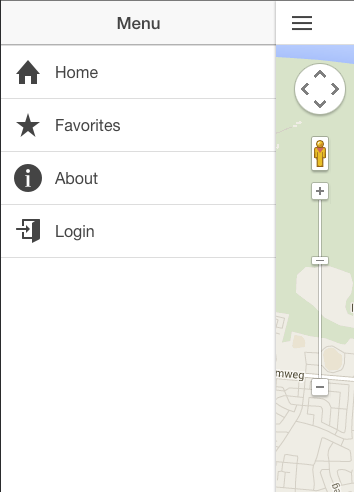
We have all of the common UI elements right in place: a header bar with the menu title, a menu toggle, which moved to the right when the menu opened, and the menu content contains a list of menu items.
To achieve this result, the following Ionic template was used:
<ion-side-menus><ion-paneion-side-menu-content><ion-nav-barclass="bar-stable"><ion-nav-back-buttonclass="button-clear"><iclass="icon ion-ios7-arrow-back"></i>Back</ion-nav-back-button></ion-nav-bar><ion-nav-viewname="menuContent"animation="slide-left-right"></ion-nav-view></ion-pane><ion-side-menuside="left"><headerclass="bar bar-header bar-stable"><h1class="title">Menu</h1></header><ion-contentclass="has-header"><ion-list><ion-itemnav-clearmenu-closeclass="item-icon-left"ui-sref="app.home.map"ui-sref-opts="{reload: true}"><iconios="ion-ios7-home"default="ion-home"></icon>Home</ion-item><ion-itemnav-clearmenu-closeclass="item-icon-left"ui-sref="app.favorites"><iconios="ion-ios7-star"default="ion-star"></icon>Favorites</ion-item><ion-itemnav-clearmenu-closeclass="item-icon-left"ui-sref="app.intro"><iconios="ion-ios7-information"default="ion-information-circled"></icon>About</ion-item><ion-itemnav-clearmenu-closeclass="item-icon-left"ng-click="login()"ng-hide="isLoggedIn()"><iclass="icon ion-log-in"></i>Login</ion-item><ion-itemnav-clearmenu-closeclass="item-icon-left"ng-click="logout()"ng-show="isLoggedIn()"><iclass="icon ion-log-out"></i>Logout</ion-item></ion-list></ion-content></ion-side-menu></ion-side-menus>
ion-side-menus
The first directive we will come across is the ion-side-menus directive. It is a container element for side menus and the main content. It also allows the left and/or right side menu to be toggled by dragging the main content area from either left to right, to open the left menu, or right to left to open the right menu if that menu is defined. The ion-side-menus directive itself does not provide much functionality aside from providing scope to child directives.
ion-side-menu-content
A part of the side menu structure we have defined is the ion-side-menu-content directive. This is a container for the main visible content, sibling to one or more ionSideMenu directives. This directive can either be used as a standalone element or as an attribute of another directive or element. In the example, ion-side-menu-content is setup as an attribute of a ion-pane element.
<ion-side-menu><!-- ion-pane contents --></ion-side-menu>
ion-pane is a simple directive that contains content, with no side effects.
Disabling content dragging to open the side menu
By default, a user can drag the content of the app from left to right to open the side menu. To disable such behavior, the ion-side-menu-content directive offers an optional attribute called drag-content, which can be set to false to disable this behavior. For TrendiCity, we have not defined a custom setting for this attribute and rely on its default true value.
For further customization of this behavior, such as whether the content drag can only start if it is below a certain threshold distance from the edge of the screen, check out the documentation.
ion-side-menu
Next up is the big guy, ion-side-menu itself. We will skip the contents of ion-side-menu-content since it is out of the scope of this chapter. The ion-side-menu directive should always be a sibling of the ion-side-menus directive. By using this directive you can define either a left or right sidemenu. To specify the position of the sidemenu, use the side attribute like so:
<ion-side-menuside="left"><!-- side menu content like a header and a list of menu items --></ion-side-menu>
The side attribute takes either ‘left’ or ‘right’ as an allowed value. The side menu’s width is set by default to 275 pixels. If you want to customize this width, simply use the width attribute to do so.
<ion-side-menuside="left"width="200 + extraPadding"><!-- side menu content like a header and a list of menu items --></ion-side-menu>
As shown above, width accepts any valid AngularJS expression. For more details about valid expressions, check out Expressions in the AngularJS documentation:
https://docs.angularjs.org/guide/expression
Programmatically disabling the side menu
There might be some cases where you want to disable the side menu. For instance when your side menu contains content only, which is only enabled for logged in users. Or perhaps your user should finish a certain case first before you want to enable the side menu. In these specific cases, Ionic provides an extra attribute called is-enabled. As with most Ionic attributes, it takes a valid AngularJS expression as its value. For instance, a scope method that validates the isLoggedIn state:
<ion-side-menuside="left"width="200 + extraPadding"is-enabled="isLoggedIn()"><!-- side menu content like a header and a list of menu items --></ion-side-menu>
In the example above, we call the isLoggedIn() method in order to check if the side menu should be enabled or not.
For TrendiCity, we have not defined a custom side menu width or a specific case where the side menu should be disabled, as you can see in our template file above.
Within the <ion-side-menu> directive, we can design our side menu just the way we want. You can think of the <ion-side-menu> content as just another view in your application. That is exactly how the main menu in TrendiCity is built: a basic view with a header, content, and list directive to show the menu items.
ion-header-bar
First up is the <ion-header-bar> directive. It resembles the header element in our application and has some neat mobile-friendly features built right in there like tap-to-scroll, and proper title alignment so that you won’t have to figure that out yourself.
The tap-to-scroll feature is very straight forward. When a user touches the headerbar, the <ion-content> element will scroll back to the top, the same way that many other apps handle that behavoir. Of course like with most default behavoir, there is a way to turn this off. That can be done by adding the no-tap-scroll attribute to the <ion-header-bar> directive and setting its value to true like so:
<ion-header-baralign-title="left"no-tap-scroll="true"class="bar-stable"><h1class="title">Menu</h1></ion-header-bar>
Since we actually want tap-to-scroll in our side menu, you will not be finding this particular attribute in the sample code because its value is set to false by default, which enables tap to scroll.
Aligning the header title
Using the align-title attribute on <ion-header-bar> you are able to, how surprising, align the header’s title properly. By default this alignment happens platform dependent. That means that on iOS, the header’s title will align to the center and on the Android platform the text will align to the left. The align-title attribute takes either ‘left', ‘right', or ‘center’ as valid values for the corresponding alignment.
Wrapping up the side menu
By now we have set up all the required directives to handle side menu logic in our application. We started off by the top-level <ion-side-menus> directive, which contains <ion-side-menu> directives and the <ion-pane> directive that holds the main application content.
Last but not least
There is one small but important part of the example code we have not paid attention to yet. That is the menu-close directive. It is an attribute only directive, which can be added to clickable elements. In TrendiCity we have given each menu item the menu-close directive, which causes, as one might expect, the side menu to close as soon as one of these links is tapped.
In some situations we might not want the menu to close when something inside the <ion-side-menu> directive is tapped. For instance, we might want to open up a sub menu or start sorting list items. That is why the menu-close directive was introduced to force this behavior manually.
As you might have noticed when we set up the menu items with the <ion-item> directives, there was an unknown attribute directive used called ui-sref. It seems familiar to an achor element’s href attribute and does indeed point to a specific part of the app. These definitions are called routes, which we will set up in the next chapter using Angular UI’s UI-Router component.
Handling routes with the AngularUI Router component
Ionic uses the Angular UI Router module so app interfaces can be organized into various states. Since handling routes and defining states in particular is not an actual part of Ionic, this chapter will shortly cover the basics of setting up routes with Angular UI’s Router component. At the moment of writing, the Angular UI Router component is one of the most popular methods to set up advanced routing logic for your AngularJS application.
About Angular UI
Angular UI is an organization that originally started off as one project to consolidate efforts people were making early on across the entire community to create defacto widgets and directives for AngularJS (like jQueryUI is to jQuery). Although it started off as one project with multiple widget wrappers, it’s evolved into an organization with multiple teams and projects with different focuses.
The future of AngularJS application routing
Please note that this book was written and the demo app TrendiCity was built when AngularJS 1.2 was the most widely used version and AngularJS 1.3 was still in beta.
For the future AngularJS 2.0, a new router has been developed that is currently also being backported to Angular 1.3. Similar to AngularUI Router, the new router is also based on (nestable) states.
When AngularJS 1.3 becomes mainstream, you might want to take a look at implementing the ‘core Angular’ router instead of installing a third-party component to handle routing.
Due to its powerful handling of named, nested, and parallel views, we are able to nest different views within the side menu structure.
Setting up the application routes
Aside from some one-time setup logic, the app.js file (which can be found in source/app/scripts/app.js) contains all of the application’s routing logic as well. This logic is defined using the aforementioned UI Router component and its $stateProvider and $urlRouterProvider providers.
First, let us take a look at the complete routing setup as it is used in TrendiCity.
// ... app.js configuration code above.config(function($stateProvider,$urlRouterProvider){// Defining the different application states on the $stateProvider provider.$stateProvider.state('app',{url:'/app',abstract:true,templateUrl:'templates/menu.html',controller:'AppCtrl'}).state('app.intro',{url:'/intro',views:{'menuContent':{templateUrl:'templates/intro.html',controller:'IntroCtrl'}}}).state('app.home',{url:'/home',abstract:true,views:{'menuContent':{templateUrl:'templates/home.html',controller:'HomeCtrl'}}}).state('app.home.map',{url:'/map',views:{'tab-map':{templateUrl:'templates/tab-map.html',controller:'MapViewCtrl'}}}).state('app.home.map.id',{url:'/:id'}).state('app.home.card',{url:'/card',views:{'tab-card':{templateUrl:'templates/tab-card.html',controller:'CardViewCtrl'}}}).state('app.home.card.id',{url:'/:id'}).state('app.home.list',{url:'/list',views:{'tab-list':{templateUrl:'templates/tab-list.html',controller:'ListViewCtrl'}}}).state('app.home.list.id',{url:'/:id'}).state('app.favorites',{url:'/favorites',views:{'menuContent':{templateUrl:'templates/favorites.html',controller:'FavoritesCtrl'}}});// The $urlRouterProvider is used to setup a default route if none of the above states are matched.$urlRouterProvider.otherwise('/app/home/map');})// ... app.js continues here
Can you say something about this long code listing before moving on? Just a transition.
Defining a simple state
In the routing setup we see two different configurations. The first one is fairly simple.
.state('app.home.list.id',{url:'/:id'})
Here we define the state name for later reference in the code using the ui-sref directive (more on that later), and as an extra, a URL is defined with a variable called id. Since all routes inherit their parents URL, the example above results in the following URL if, for example, the id is 1: /app/home/list/1.
Defining a state with named view and custom template and controller
Next we have defined a named state like this one:
.state('app.home',{url:'/home',abstract:true,views:{'menuContent':{templateUrl:'templates/home.html',controller:'HomeCtrl'}}})
One thing you might notice is that we have defined the views property in the state’s configuration object this time. Using the views property allows us to define custom template files and optional controllers for named views.
You might still remember this part from the previous chapter when we have built the side menu template file:
<ion-paneion-side-menu-content><ion-nav-barclass="bar-stable"><ion-nav-back-buttonclass="button-clear"><iclass="icon ion-ios7-arrow-back"></i>Back</ion-nav-back-button></ion-nav-bar><ion-nav-viewname="menuContent"animation="slide-left-right"></ion-nav-view></ion-pane>
In there, we have defined the <ion-nav-view> directive with the name menuContent. As mentioned before Ionic plays very nice with AngularUI’s Router component. The name of the view we have defined here is the exact same name of the view we mentioned in the previous code example where we have set up a named view.
Let’s break down the code example step-by-step. First we define the state and it’s custom route like we have done before. Then we add the views property to the configuration object:
.state('app.home',{url:'/home',abstract:true,views:{'menuContent':{templateUrl:'templates/home.html',controller:'HomeCtrl'}}})
By using the name of the view we have defined previously as a key in our configuration object, we tell the router that we want to load the template templates/home.html in the menuContent view and manage it using the controller HomeCtrl.
Abstract states
Another part of the state configuration object we mentioned before is the abstract key. Setting abstract to true means, as one might expect, that this defined state is actually an abstract state. An abstract state can have child states but can not get activated itself. An abstract state is simply a state that can’t be transitioned to. It is activated implicitly when one of its descendants are activated. This means that we cannot specifically open the /app/home route in our application.
For more details about abstract states and how to use them, read the excellent documentation from the AngularUI team and contributors.
Finished routing TrendiCity
By now you should be familiar with setting up routes for your next Ionic project using the UI-Router component from the Angular UI team. You know how you could inherit the scope to different sub views by setting up nested routes. Optionally you can provide an abstract route as a root for one of these nested routes.
Routing is something that you should think through before you get started with it. It is basically what connects all of the seperate parts in your app together by defining how they are connected and how it would be possible for an end user to navigate to one of the many (nested) routes in your application.