
4. Getting Lost (in a Maze)
What You’ll Be Doing
![]() Create your own hedge maze
Create your own hedge maze
![]() Use online-convert.com to turn your maze into an .svg file
Use online-convert.com to turn your maze into an .svg file
![]() Use Tinkercad to export your maze
Use Tinkercad to export your maze
![]() Use MCEdit to import your maze into your Minecraft world
Use MCEdit to import your maze into your Minecraft world
I hope you enjoyed watching me create the maze that surrounds my new tower in my Minecraft world. I moved quickly through Chapter 3, “Crafting a Super Maze,” but here in this chapter I’m going to slow things down a bit and walk you through each and every step. I’ll also provide more detailed explanation about using MCEdit to mold and shape your Minecraft landscape.
In this chapter, you should actually perform the steps as you read over them. If you do, you will end up with a hedge maze in your world that you and your friends can use to play a game of hide-and-seek or that you can just enjoy as a nice landmark.
To complete this project, you’ll first use a free online tool to create your maze. You’ll be able to customize the maze a bit, including controlling its complexity—so that you end up with the maze you want, whether it can be solved in a few minutes or an hour or more. You’ve already seen how easy it is to use Tinkercad to import an .svg file and export it as a .schematic file that you can then use in MCEdit. But to get that .svg file, you’ll also be using the online-convert.com tool I briefly showed you in Chapter 3. Finally, you’ll need to master the MCEdit Select tool, which is really important for other features that MCEdit offers Minecrafters. Master the Select tool, and you’ll be able to do some super-amazing things in your Minecraft worlds that will astound your friends.
Creating Your Maze
Open a web browser to mazegenerator.net, and you see a simple screen, like the one in Figure 4.1.

Tip
Outside exploration
Other maze generators are available, but mazegenerator.net is my favorite. The key is to find one that lets you control both the shape and the complexity of a maze. With mazegenerator.net, you can pick from four different styles (square, hex, triangular, and circular) and tweak the width and length. There are some other advanced settings that I don’t cover here, but you can click the Help link to read instructions for every available option.
In Chapter 3, I created a circular maze so that I could place a tower directly in the center. The steps are the same for creating and placing a maze no matter whether you choose a circular maze or the rectangular one that I recommend for your hedge maze in this chapter. To pick the shape, click on the Style box and select your shape. Orthogonal (Square Cells) is the default setting, and it’s perfect for creating a rectangular hedge maze.
The Width and Height settings control the dimensions of your maze. (Actually, the Height setting controls the length of the maze. A two-dimensional maze doesn’t have a height, but I’ll show you how to give it height!) The default settings are 20 for each Width and Height, and you can leave them as is for now. If you click on the Generate button, you’ll see a very simple maze appear below the controls, as shown in Figure 4.2.

A square or rectangular maze has an “entrance” and an “exit.” But it has no central area like the one found in a circular maze. Feel free to play around with the Width and Height settings to see how changes affect the size of the maze. For your first maze, I recommend a Width setting of 20 and a Height setting of 30 to create a rectangular shaped maze. You could create a larger maze, but later in the chapter, when you start playing with the MCEdit Select tool, you’ll appreciate having a smaller maze when it comes to landscaping a flat piece of terrain or placing the maze.
Figure 4.3 shows the simple 20 × 30 maze that will be used as the example in this chapter. Go ahead and create this maze now.

Sitting above and to the right of your new maze is a drop-down menu that lets you select a file type (.pdf, .svg, or .png) as well as a Download button. You might think that selecting the .svg option here and clicking the Download button will let you move straight to Tinkercad, but unfortunately the .svg file that mazegenerator.net saves won’t work with Tinkercad. However, there’s a quick solution: Select the PNG option (as shown near the bottom of the menu in Figure 4.4) and click the Download button. (Be sure not to choose the PNG (with Solution) option.) The .png file downloads to your computer. Pace it on the desktop or in a folder where you’ll be able to easily find it.

You’re done with the maze generator, so with your web browser still open, point it to online-convert.com, as shown in Figure 4.5.
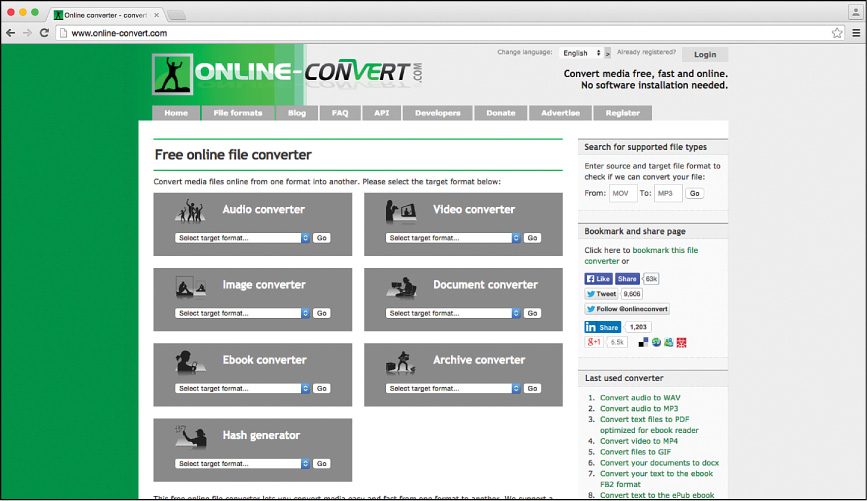
FIGURE 4.5 You’ll be using online-convert.com to change a .png to an .svg.
Converting the Maze with online-convert.com
The online-convert.com website is a very useful website for converting files from one type to another. The site can handle music, video, and other types of files, but in this case you need the Image Converter option. Click on the drop-down menu, as shown in Figure 4.6, and select the Convert to SVG option.

When you select Convert to SVG, the site jumps to a page that looks similar to Figure 4.7.

Click on the Choose Files button and find the .png file that mazegenerator.net created. Click on the file to select it, as shown in Figure 4.8, and then click the Open button.

Next, click the Monochrome option, as shown in Figure 4.9, and then click the Convert File button.

The .png file is converted to an .svg file (with the same filename), as shown in Figure 4.10.

Now that you have the .svg file, you can import it into Tinkercad for a few modifications.
Importing the Maze into Tinkercad
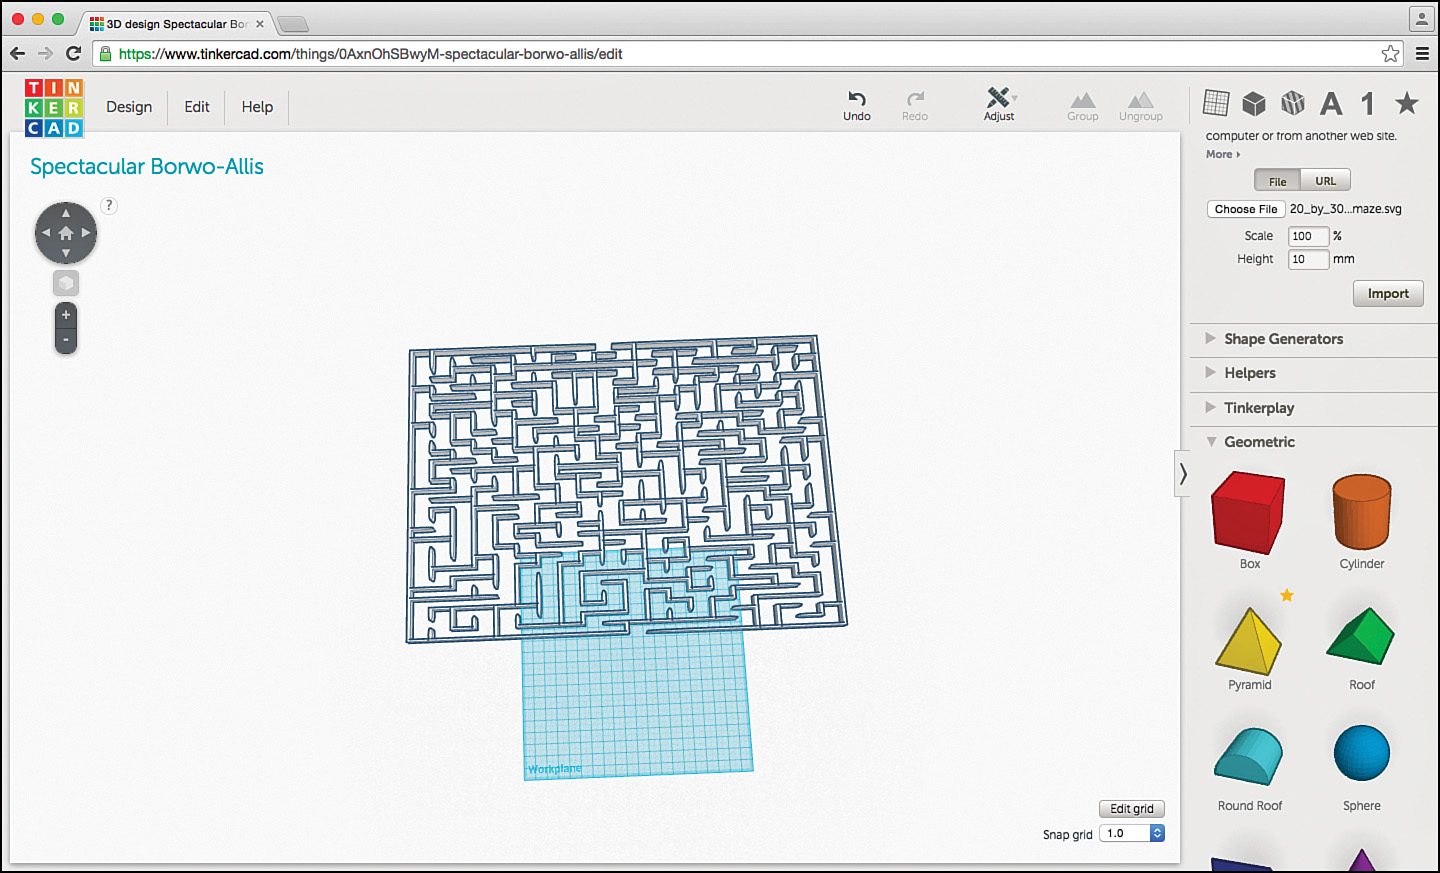
Back in Chapter 2, “Creating Your Own Castle,” you saw how to import an .svg file into Tinkercad. I’m not going to cover those steps again here, so refer back to Chapter 2 if you need assistance with that task. As you can see in Figure 4.11, I’ve imported the maze into Tinkercad, but it’s much larger than the workplane. The workplane is just barely visible underneath the maze.

You need to shrink the maze down a bit, and you also need to remember that 1mm = 1 block in Minecraft. To shrink the maze down, you need to start by zooming out. (Refer to Chapter 2 for instructions on zooming in and out.) Figure 4.12 shows what it looks like after you zoom out, with the entire maze on the screen.

Click on the maze once to select it. You know your object is selected when it appears with a blue line around every edge and one of the Resize boxes (small white boxes) in each of the four corners, as shown in Figure 4.13.

If you hover your mouse pointer over any of the corner white squares, Tinkercad shows you the length and width measurements, as shown in Figure 4.14.

This maze is 602.50mm long and 402.50mm wide. A maze with dimensions of 602.5 blocks × 402.5 blocks would be huge in Minecraft. It would take days to walk and solve! You definitely need to shrink it down.
If you click and hold on one of the corner white squares and drag, you can reshape the maze. Dragging the lower-right white box to the left will result in a skinny, deformed maze like the one in Figure 4.15.

Likewise, dragging the lower-right white box up (to the top of the screen) results in a crushed maze like the one in Figure 4.16.
Mistakes are easy to Undo
Any time you make a change in Tinkercad that you don’t like, click the Undo button to go back a single step. More clicks of the Undo button will reverse additional changes you’ve made to your object. If you accidentally crushed your maze by dragging a small white box, just click the Undo button until you get back to the original maze shape.
You want to shrink the maze at a consistent rate—so that the length and width change together and the maze remains looking the same whether it’s smaller or larger.
To do this, simply hold down the Shift key on your keyboard while clicking and holding a white corner box. When you drag the white corner box, the length and width will shrink together. Shrink your maze down until it fits on the workplane. Figure 4.17 shows the maze at new dimensions of 75.66 × 113.25; this will be much easier to navigate in a Minecraft world.

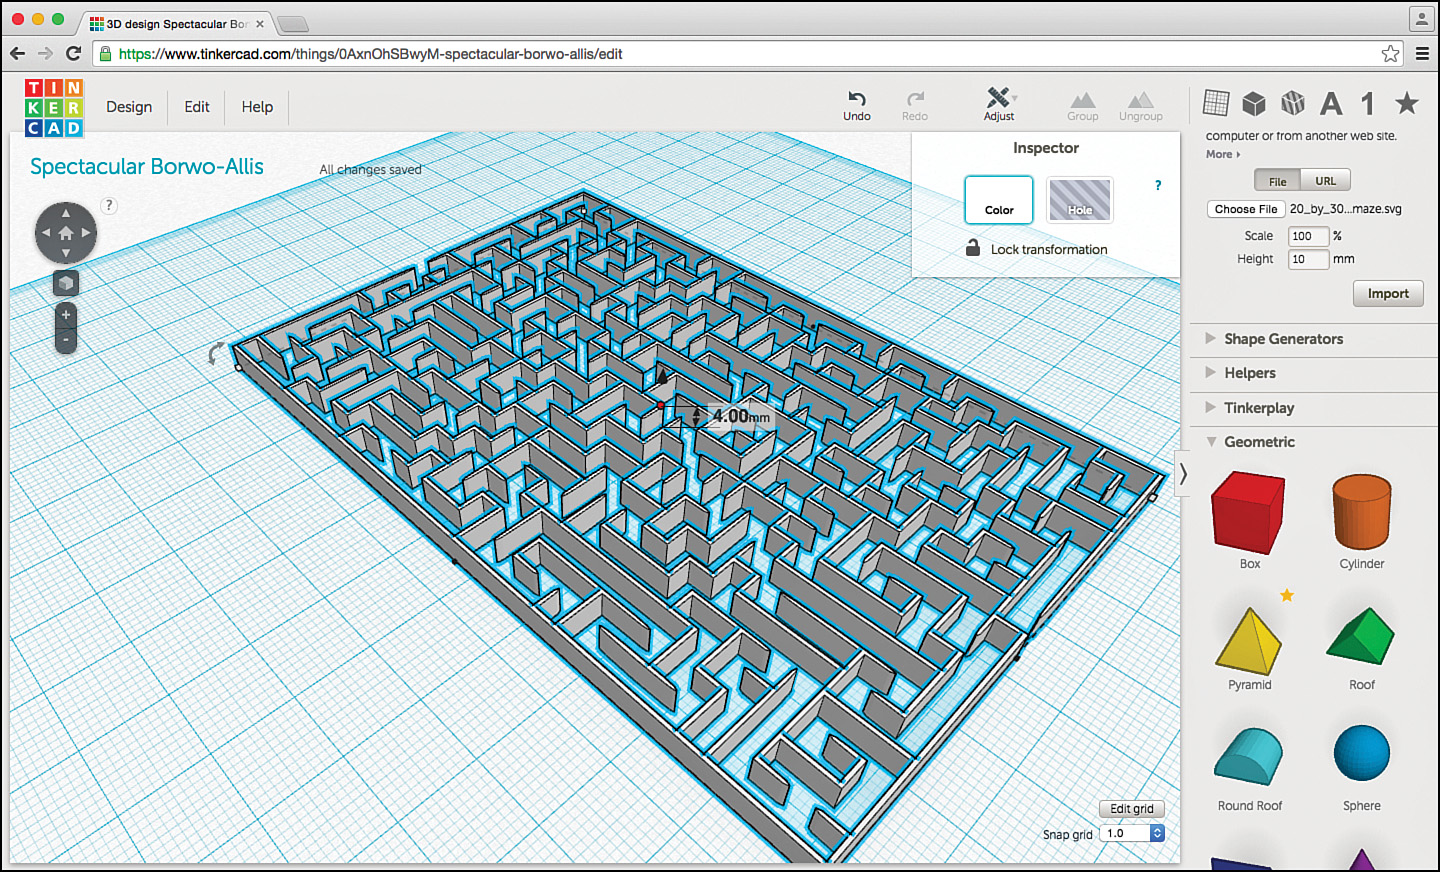
While the length and width dimensions of the maze are good now, there’s still the issue of height. A good hedge maze should be tall enough that you can’t see over the edges, which means it should be more than 3 blocks tall. But how tall is the maze right now? To find out, hover your mouse pointer over the single small white square in the center of the maze; the center white box can be a little hard to spot sometimes, so Figure 4.18 shows this box circled.

When you hover your mouse pointer over the center white box, a small measurement appears, as shown in Figure 4.19.

The height of this maze is 1.88mm tall, or roughly two blocks. It needs to be taller. You know how to change the length and width of a Tinkercad object, and changing the height is just as easy: Just click and hold on that center white square and drag up to increase the height or drag down to decrease the height. If you drag up to make the maze 4mm high, as shown in Figure 4.20, the maze will end up being 4 blocks tall in Minecraft.
Caution
Be careful with the Shift key and Resize boxes
Do not hold down the Shift key while using the center white box to change an object’s height. Doing so will cause the length and width to change as well. If you make any changes to the length and width while holding down the Shift key, the height of the Tinkercad object will automatically change. Always change the height of an object last and ensure that you don’t use the Shift key while you make that change.
All that’s left now is to export the maze for use with MCEdit. Click on the Design menu and select the Download for Minecraft option, as shown in Figure 4.21. (Leave the default setting of 1mm = 1 block.)

Move the .schematic file that was created to a place where you’ll be able to find it easily. You’re almost ready to place your hedge maze, but first you need to create a nice flat space for it in your Minecraft world.
Learning to Use MCEdit’s Select Tool
You can use MCEdit to do a lot of amazing things in a Minecraft world, but you need to have a solid understanding of one of its most powerful tools: the Select tool. The Select tool is actually easy to use with only a little practice. In this section, you’re going to get that practice by clearing out a flat space for your hedge maze.
Go ahead and open up the MCEdit tool and one of your Minecraft worlds. (Be sure Minecraft is closed before opening MCEdit.) Use the WASD and IJKL keys to navigate around the world (assuming you haven’t changed the key mappings—otherwise, use the keys you’ve assigned to Forward-Left-Right-Back as well as the Pan Up/Down/Left/Right mapped keys) and find a nice big area of land like the one shown in Figure 4.22.

In Figure 4.22, you can see a section of desert terrain with a couple small hills and some cactus plants. You may have found a different type of terrain, and that’s fine: The Select tool will work no matter what type of terrain you have chosen.
Getting down close to the surface at this point will make it easier to understand the Select tool. (If you’re high up in the air, the details of the Select tool will be difficult to discern.)
Figure 4.23 shows a good height from the surface, about 5 to 10 blocks above the ground.

You can select a tool from the bottom of the MCEdit screen by clicking it. The first tool (from the left) is the Select tool, and in Figure 4.23 it is surrounded by a yellow box to indicate that it is selected. (Go ahead and click a couple other tools to see how the yellow selection box changes, but then reselect the Select tool before continuing.)
With the Select tool selected, move your mouse pointer around on the ground but don’t click a mouse button. A small transparent box will follow your mouse pointer around on the screen as you do this, as shown in Figure 4.24.

Move the transparent box toward the left side of your screen and click the left mouse button once. This will “lock” the transparent box onto that location.
Note
The Select tool follows the terrain
If you moved the mouse pointer onto a hill, the transparent box will “climb” the hill as the terrain increases in height. While you’re practicing, try to click on ground level if possible. If you don’t have a large flat area of terrain to practice, use the WASD keys to move around your world to find a large flat area.
This first click will select a piece of terrain or even a block of air. Drag your mouse pointer to the right and down, and you’ll see a collection of these transparent blocks begin to appear. This collection of transparent blocks is “selecting” whatever type of block (air, terrain, water, lava, and so on) is found inside the blocks. Figure 4.25 shows an 8 × 8 collection of transparent blocks created.

You can enlarge or shrink the area by moving the mouse pointer. When you’re happy with the selected area, left-click again to lock in the selection size. Figure 4.26 shows a 9 × 11 collection of transparent boxes with a blue box in one corner and a yellow box in the opposite corner. The blue box and the yellow box are used with the Nudge buttons to increase or decrease the size of the selected area.

You can increase or decrease the area you’ve selected by clicking and holding on either the blue Nudge button or the yellow Nudge button and using the WASD keys to expand the selection area. For example, to create the selection area shown in Figure 4.27, I clicked and held on the yellow Nudge button and then press twice on the D key to increase the width from 11 blocks to 13 (from the yellow block’s location).

You can also press the A key to reduce the width or the W and S key to add length to the selection area. These keys work the same with the blue Nudge button, but in this case the increase or decrease in size begins at the location of the blue box.
Reading how to do this is one thing. You need to actually try it, so experiment and play around with the WASD keys and the blue and yellow Nudge buttons to see how they actually work. Play around with making that first click and last click to select an area and then use the blue and yellow Nudge buttons with the WASD keys to see what kinds of results you get.
As you’re experimenting, take note of one very useful feature with the Select tool. When you have an area selected, the dimensions of this area are displayed above the blue and yellow Nudge buttons. In Figure 4.27, for example, the selected area is 9W × 11L × 1H. That’s 9 blocks wide, 11 blocks long, and 1 block in height.
This technique is very useful when you want to select a large section of terrain to fit something in…such as a maze with dimensions of 76 blocks × 114 blocks. By using the Nudge buttons, you can keep pressing the WASD keys (while holding down the blue and yellow Nudge buttons) to select an area equal to the size of a castle, or a maze, or anything else!
But what do you do if some bit of terrain, such as a hill, is taking up part of the area you want to use? In that case, you’ll want to select an area as described above but also increase the height of the selection area. To do this, you simply click and hold on top of the selection area and drag up. Figure 4.28 shows that the 9W × 11L × 1H area increased to 9W × 11L × 3H.

Using this method, you can select an area of terrain that has lakes, mountains, and even existing buildings on it. By selecting an area in both length, width, and height, you can use another feature of MCEdit to replace any terrain (or other blocks, such as lava or water) with the material of your choosing—or even air. Why would you replace terrain with air? Replacing selected terrain with air is the same as deleting it! By deleting existing terrain blocks and replacing them with air blocks, you can clear out a large piece of land and prepare it for placing a castle or maze.
How do you replace a selection of terrain with air? First, make sure you’ve selected the terrain you want to clear for your maze. In Figure 4.29, I’ve zoomed out a bit (by flying higher into the sky) so you can see the entire area that’s been selected. Note the dimensions above the blue and yellow Nudge buttons: 77W × 115L × 29H. Selecting this is going to let me carve out a very large area of land, including removing part of that mountain you see on the left side of the screen.

Once the area is selected, all you need to do is replace whatever terrain is inside the selection area with air blocks. To do this, you need to use the Fill and Replace tool. Press the number 4 key on your keyboard to select the Fill and Replace tool. The screen now looks as shown in Figure 4.30.

The Search screen has a small field where you can type in the type of terrain you wish to find. If you leave the area blank, the first option in the list below the Search box is Air. Nice.
When you find the terrain you wish to insert into the selected area (which may be the Air option), just double-click it, and it is placed in the Fill With screen on the left, as shown in Figure 4.31.

All that’s left to do now is click the Fill button. A progress bar appears to let you know the Fill process is proceeding. Depending on the size of the area you have selected, this could take a few seconds up to a minute or more. When the process is done, click the Deselect button indicated in Figure 4.32.

You should now have a large blank area of terrain, as shown in Figure 4.33. It’s a bit strange to see mountains cut in half, but it’s a sacrifice you need to make for progress and growth in Minecraft.

With the area empty, you can now import the maze (.schematic) file and place it. (The import process is covered in Chapter 2, so refer back to that chapter for the steps necessary to import a .schematic file if needed.)
Figure 4.34 shows the hedge maze placed in the new empty terrain spot.

Right now, the maze consists of simple white stone. You can follow the steps outlined in Chapter 2 if you want to modify the material to something like grass or even lava blocks. (Just don’t get too close to lava walls or you can get burned.)
As you can see, using the Select tool allows you to perform modifications to your world quickly and much easier than with block-by-block mining or placement. In later chapters, you’ll learn a few more interesting uses for MCEdit, but for now, you can go enjoy your new hedge maze. Be sure to save your work in MCEdit by clicking the MCEdit menu and choosing Save. Then click the MCEdit menu again and choose Quit.
Up Next…
You’ve seen how easy it is to import .stl files into Tinkercad (from sites such as Thingiverse) or create .svg files using online-convert.com, but not all 3D models you wish to use in your Minecraft world are Tinkercad-compatible. There are many different tools available for creating 3D models, and not all of them save files using the .stl format. Up next in Chapter 5, you’ll be introduced to another important 3D model file type and how you can convert it so MCEdit can import it into your Minecraft worlds.