
8. Viewing Your Worlds—Full 360!
What You’ll Be Doing
![]() Take screenshots of your favorite Minecraft sites
Take screenshots of your favorite Minecraft sites
![]() Learn to use 123D Catch
Learn to use 123D Catch
![]() Create a 360-degree viewable model of a Minecraft site
Create a 360-degree viewable model of a Minecraft site
Until we can all get our hands on a tool such as the Oculus Rift that can give us a real-time 3D view of our Minecraft worlds, we’ll have to do with substitutes. You learned about one option in Chapter 7, “Seeing Your World in 3D,” using an inexpensive 3D viewer and pairs of screenshots taken from inside a world.
If you’ve created a few 3D image cards, you’ve likely discovered just how fun it is to view your worlds in 3D…and how easy it is to create the cards. But there’s one drawback to the cards that really stands out when you compare it to this chapter’s project, and that is that the 3D image cards you create using screenshots give you only a single 3D view of a favorite Minecraft creation or site. Depending on whether you took the screenshots from the front or from the left or from above, that’s the 3D view you’ll get with your 3D viewer. If you wish to see a site or creation in 3D from a different angle, you’ve got to take more screenshots (and create more 3D image cards if you wish to have a portable version to share with friends).
If you have a castle that you’d like to see in 3D from the front, left, and right sides, and also from the back and from above, you’ll have to create five (or more) sets of 3D image cards. It’s not a big problem, but there’s another method you can use to view your Minecraft creations in 3D that does away with creating multiple cards. You can view a snippet of your Minecraft world from all angles with just a slight movement of your mouse. It’s like walking around a real object in front of you and seeing it from all sides,…but instead of a real object, you’ll be viewing a Minecraft object or location on your computer screen from any angle you like. And even better, you can save your 3D-viewable objects on your computer so they can be shared, or you can create a small movie of your 360-degree exploration.
This process has two steps, and it’s not difficult. In the following sections you should follow along in your own Minecraft world so you can duplicate what you see me doing in one of my own Minecraft worlds.
Special 360-view software runs on Windows
The software used to create these 360-degree viewable objects is free, but it’s only available for iOS and Android tablets/phones and for Windows PCs. To write this chapter, I used my Mac laptop to take the Minecraft screenshots and my Windows desktop PC to run the special software. If you don’t have access to a Windows computer, you might be able to convince a friend or family member to install the software so you can see the final results for yourself.
Creating a 3D Model with Photos
Imagine that you have a favorite (small) toy sitting on top of a flat desk. You can walk around the table and view the toy from different angles, including from directly above and from down low, where it sits on the table. Now imagine that you have a camera in your hands and are told to take as many photos as possible so that someone in a different room can look at the photos and be able to see every side of that toy (except for the bottom).
Note
Pretend you won’t look at the bottom (but you know you will)
The only side not visible would be the underside, where the toy rests on the table. You could set the toy on a clear glass table and take photos from underneath, but for now let’s just assume that seeing the underside isn’t as important as seeing all the other sides.
With all those photos, someone who has never seen your toy would at least be able to get a much better idea of what it looks like from any angle because they could look at all your photos—from the left, from the right, from above and behind, and even from above. If you took enough photos, other people would be able to determine from them the shape and colors and textures of your toy. As a matter of fact, if you took enough, you’d probably have quite a few photos that overlap a little in what they show.
Now, imagine that there is a piece of special software that can “stitch” together a 3D model of your toy, based on all those photos you took. If the photos were good quality and you didn’t miss any sides or angles, the software should be able to re-create your toy as a 3D model on the screen. They you would be able to use your mouse to move “around” and “above” the toy as if it were an actual object.
Well, that software exists. As a matter of fact, there are a lot of different applications available that can do this sort of thing. The one I’ll be using in this book is a free application called 123D Catch (http://www.123dapp.com/catch). It’s from Autodesk, the same company that owns Tinkercad and 123D Sculpt+ you saw back in Chapter 5, “Modifying a 3D World.” With 123D Catch, you can take up to 70 photos that the software then stitches together to create a 3D model. It’s available for iOS devices (iPhone and iPad) as well as Android devices. It’s also available as an application for a Windows computer. (Unfortunately, there isn’t an OS X version for Mac users yet but you can try the browser version of the app at http://apps.123dapp.com/catch/.)
To use the app on a phone or tablet, you open the app and use the device’s built-in camera to take a series of photos. As you can see in Figure 8.1, the software provides a small wheel that changes as you move around an object (such as my milk shake).
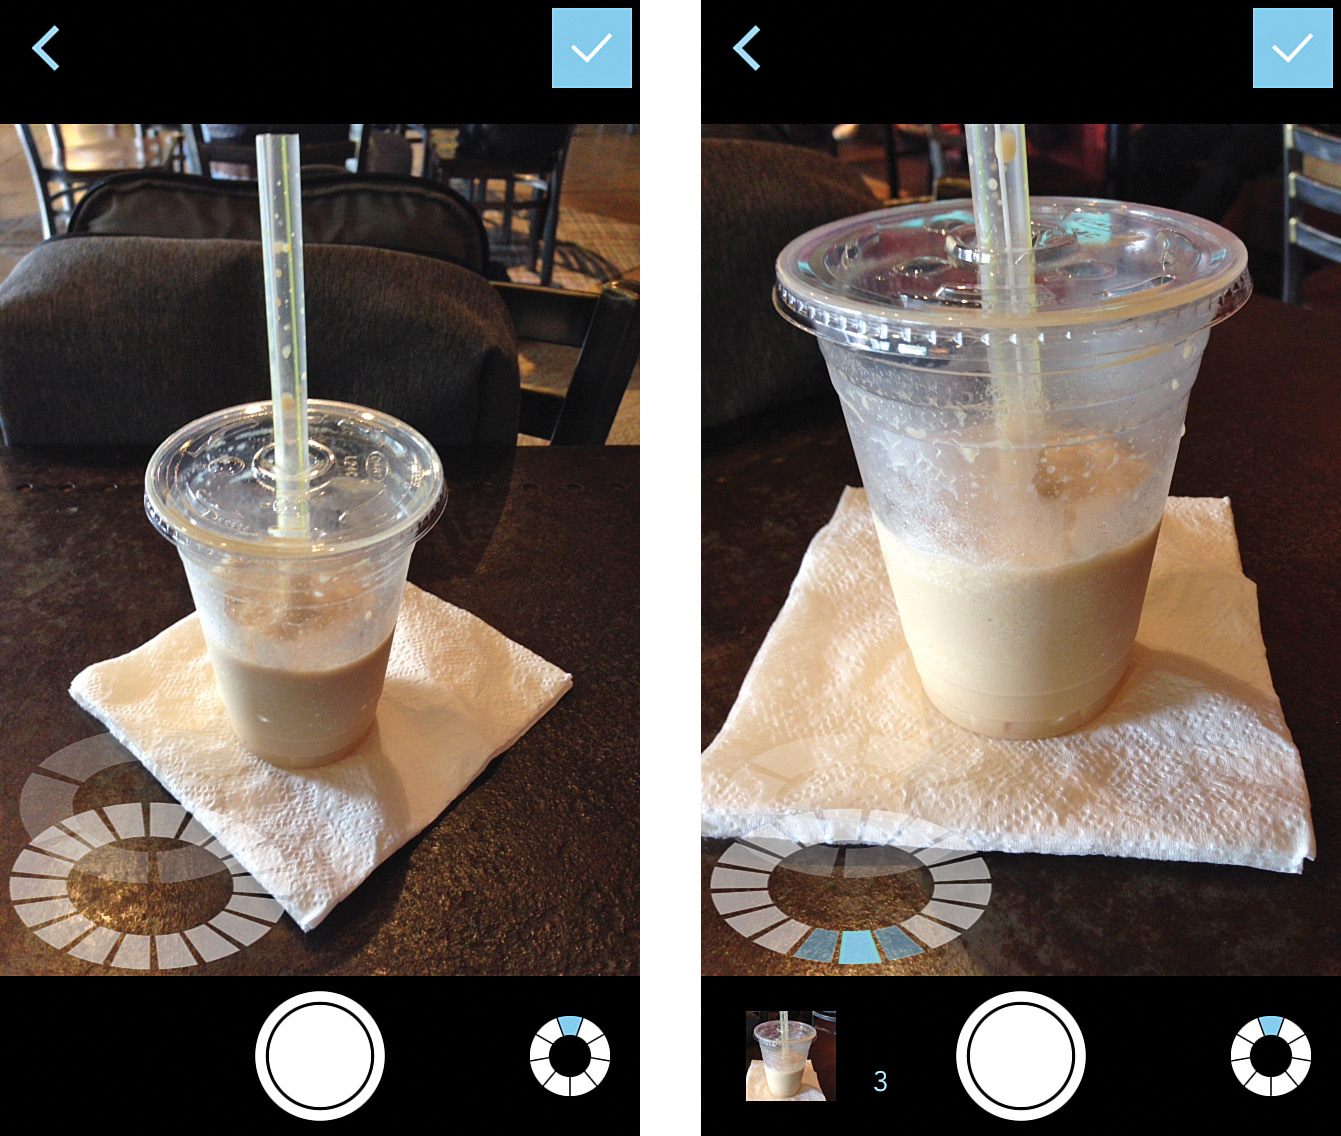
When you take a photo, one of the small circular slices turns blue, giving you a visual indicator of where you’ve already been so you don’t miss a side of the object. You need to take a minimum of 18 going around an object and 6 going around the object at a slightly higher view. While 24 photos sounds like enough, the software actually performs best when you take many many more—up to 70 photos.
As you work your way around an object, snapping photos, the app saves the photos until you’re done. Then you upload the photos to Autodesk, which goes to work on your photos, stitching them together to create what will (hopefully) be a good 3D representation of your object.
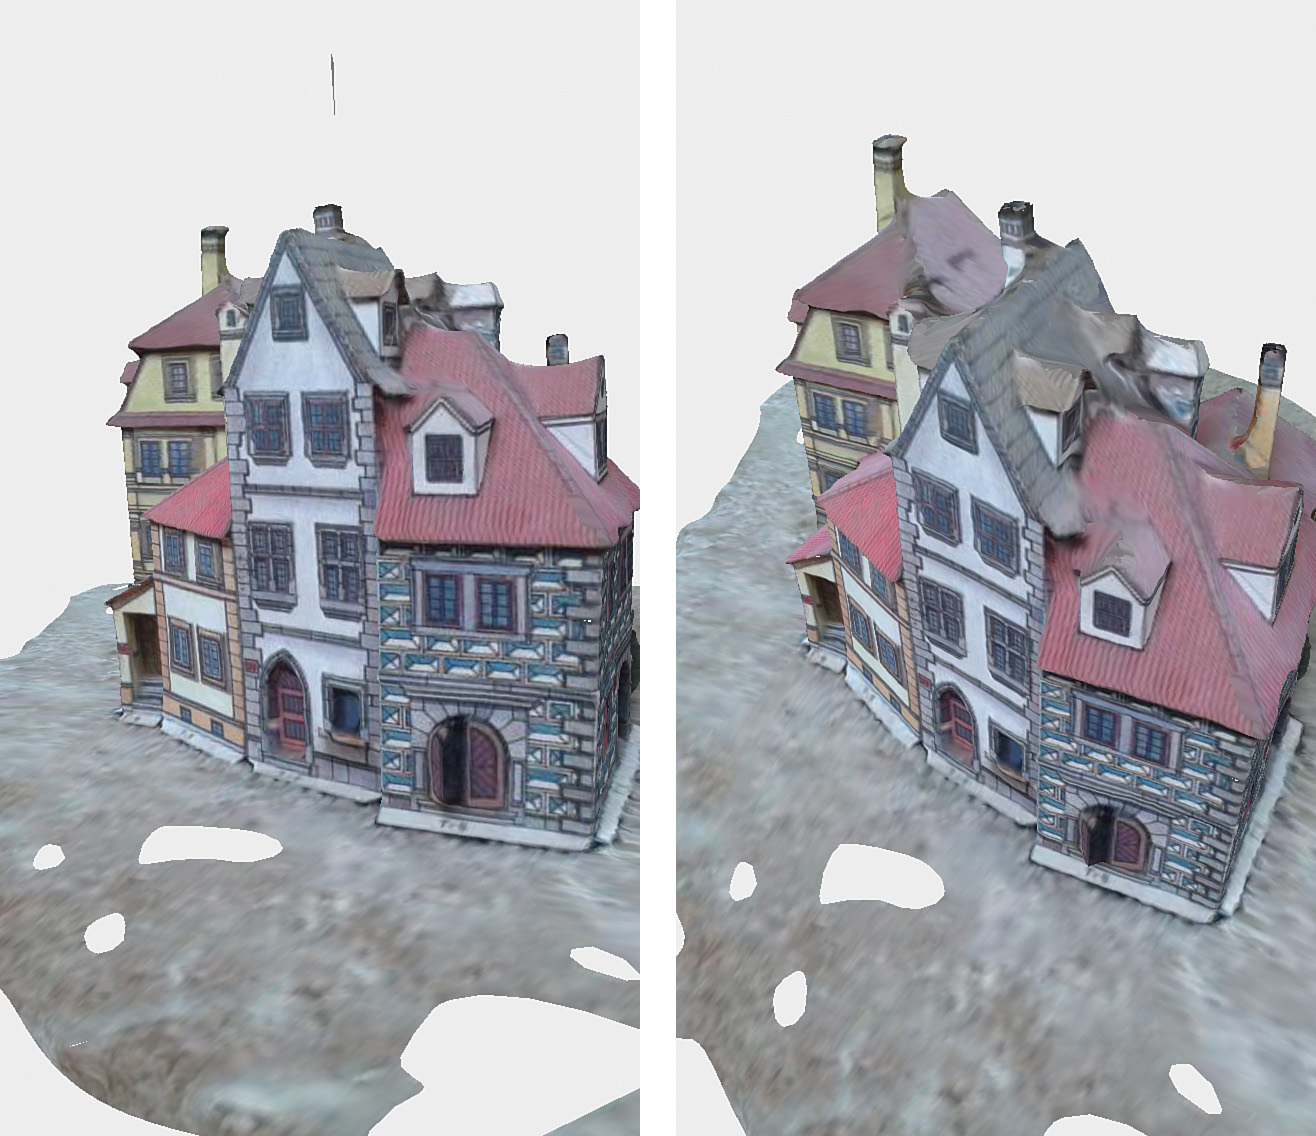
If you’d like to see just how powerful this software is, point a web browser to the gallery of user-submitted 3D models found at http://autode.sk/1J5Ha1p and look around. If you have a phone or tablet with the 123D Catch app installed (covered in the next section), you can view objects from the gallery onscreen and rotate around as shown in Figure 8.2.
Using 123D Catch, you can create 3D models of just about anything that can be photographed, including people. (Taking a bunch of photos of a person, however, can be tricky: They must remain very still until you are finished. If they move, the final 3D model will be blurry.)
Most people use 123D Catch to create 3D models of real objects like cars or artwork or famous buildings, and this is exactly what the app was designed to do. But after I discovered 123D Catch and played around with it, I began to wonder whether it would work with Minecraft. The only way to find out was to try, so I did. And guess what? It works! Let me show you how.
Starting with Screenshots—Lots of Them
The 123D Catch app running on a phone or tablet has a drawback: It can only be used to take photos with the device’s camera. The app (running on a phone or tablet) doesn’t allow you to upload preexisting photos to the Autodesk stitching service. But the Windows PC version of the software doesn’t have this limitation. As a matter of fact, it works best if you take photos ahead of time (with any digital camera) and then upload those photo files to your computer so that the 123D Catch application can import them.
Why am I telling you this? Because it’s not like you can jump inside a Minecraft world with a real camera and start taking photos. The only tool available to you to take “photos” of your Minecraft worlds is a screen capture tool. Fortunately, Minecraft has a built-in screen capture tool that works great.
If you can find a way to move around a Minecraft creation (like a castle or giant statue) and take a bunch of screenshots, you can use the 123D Catch app to stitch those screenshots together to create a 3D model of the subject of your screenshots.
Tip
Take screenshots in Creative mode worlds
Using Creative mode in Minecraft is about the only way you can take the necessary screenshots because you’ll need to be flying around your object, high up in the air—flying is disabled in Survival mode. If you set the Allow Cheats option to ON (done when creating a world and clicking the More World Options button), you can enable flying as well as the ability to toggle back and forth between Survival and Creative.
How many screenshots should you take? Obviously, the more the better. I’ve found that using between 60 and 70 screenshots produces the best results, but you can experiment to see if fewer screenshots can get you the results you want.
Capturing Screenshots
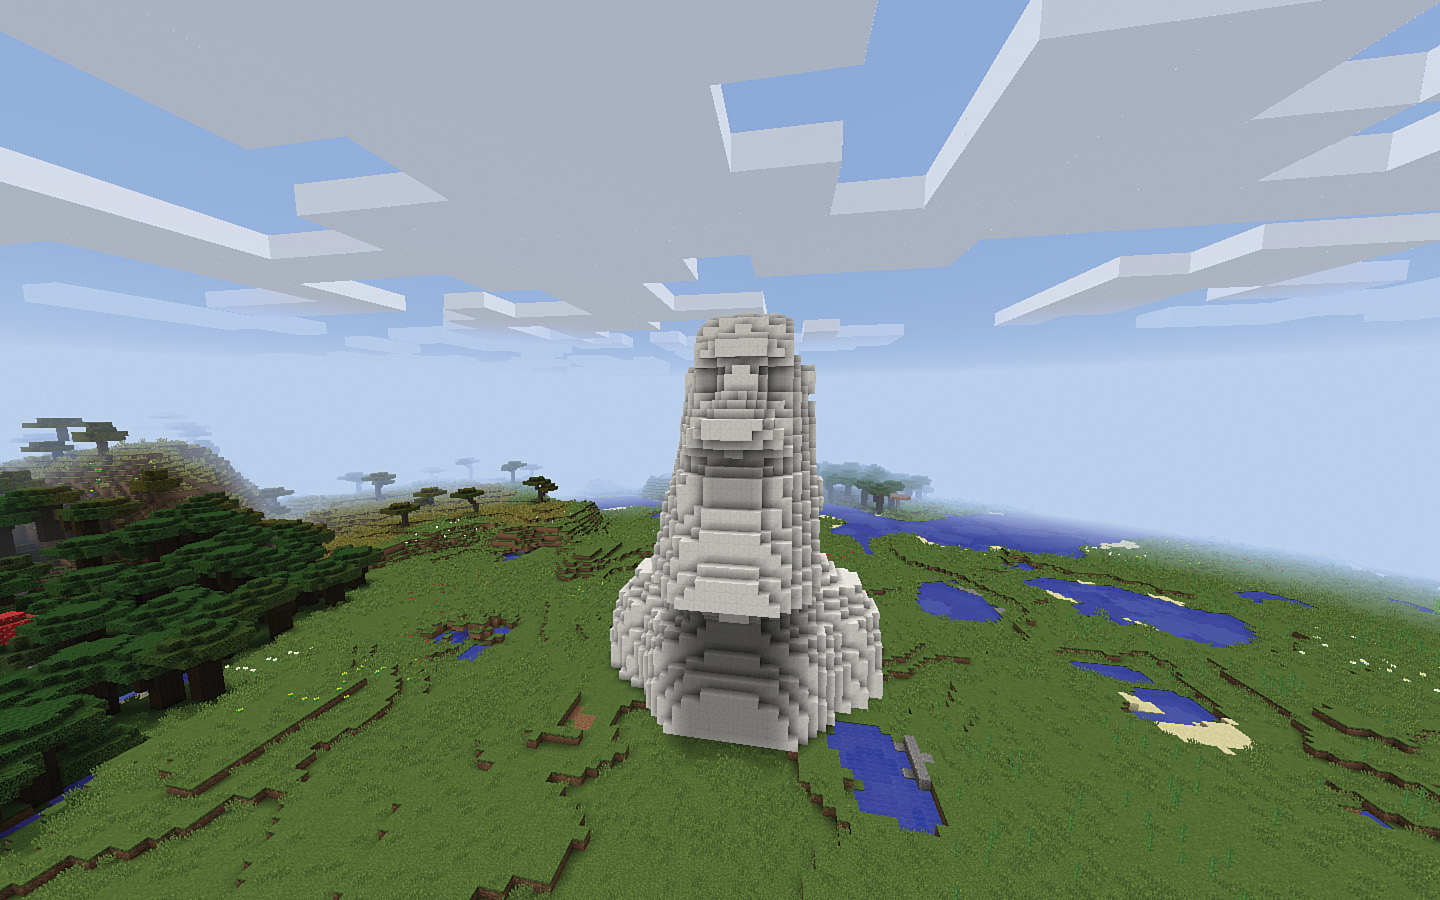
It all starts by finding a snippet of your Minecraft world that you wish to view in a full 360-degree manner. Take a look at Figure 8.3, and you’ll see what I’ve selected as the subject for my screenshots. Download the monolith (see TIP below) used in the example below and place it in one of your own worlds and follow along with my instructions.

Tip
Grab an Easter Island monolith for your own world
You can download this object, called Maoi (and created by user alien000), by visiting http://www.thingiverse.com/thing:144668.
Place the stone guardian where you like, fly up in the air a bit (double-tap the space bar and hold it down on the second tap to fly up, and hold the Left Shift key to fly down) and then begin by taking a bunch of screenshots as you move around the stone figure.
Recall from Chapter 7 that you can hide the toolbar, health bar and other items by pressing F1 in Windows or pressing Fn+F1 on a Mac. This will also make your arm or any tool you’re holding disappear, giving you a nice clean screenshot (press F2 on Windows to take a screenshot or Fn+F2 on Mac), as shown in Figure 8.4.

To take the screenshots, use the A key (to move left, or clockwise) to move around your object. Avoid touching your touchpad (or a mouse) so that your view of the object and the screenshots that will be taken are all from the same elevation from the ground.
Take your first set of screenshots as you move completely around the object. This means picking a good starting point you can remember. (In this case, try looking at the statue’s nose, as shown in Figure 8.5.)

Since there are 360 degrees in a complete circle, try to take 30 screenshots at this elevation. This means taking a photo every 12 degrees (360/30 = 12). Another way to think about this is to visualize a clock face where your object sits in the center of the clock (the point where the hands spin). You’ll want to try to take a picture at the even minutes—2 minutes, 4 minutes, all the way up to 58 minutes—and eventually you should find yourself back at your starting position.
To do this, use a combination of pressing the A key and moving your mouse (or touchpad) to rotate the view so you’re always looking at the object and keeping it in the center of the screen. It’s important not to move too far away from or get too close to the object; the goal is to stay at roughly the same distance from the object as you move and take screenshots from all the various angles. After you’ve completed a small move, press the F2 key on Windows or Fn+F2 key on a Mac. Then move to the next spot and take another. And another.
Notice in Figure 8.6 that I’ve moved about one-quarter of the way around the object. At this point, I’ve taken about 8 screenshots.
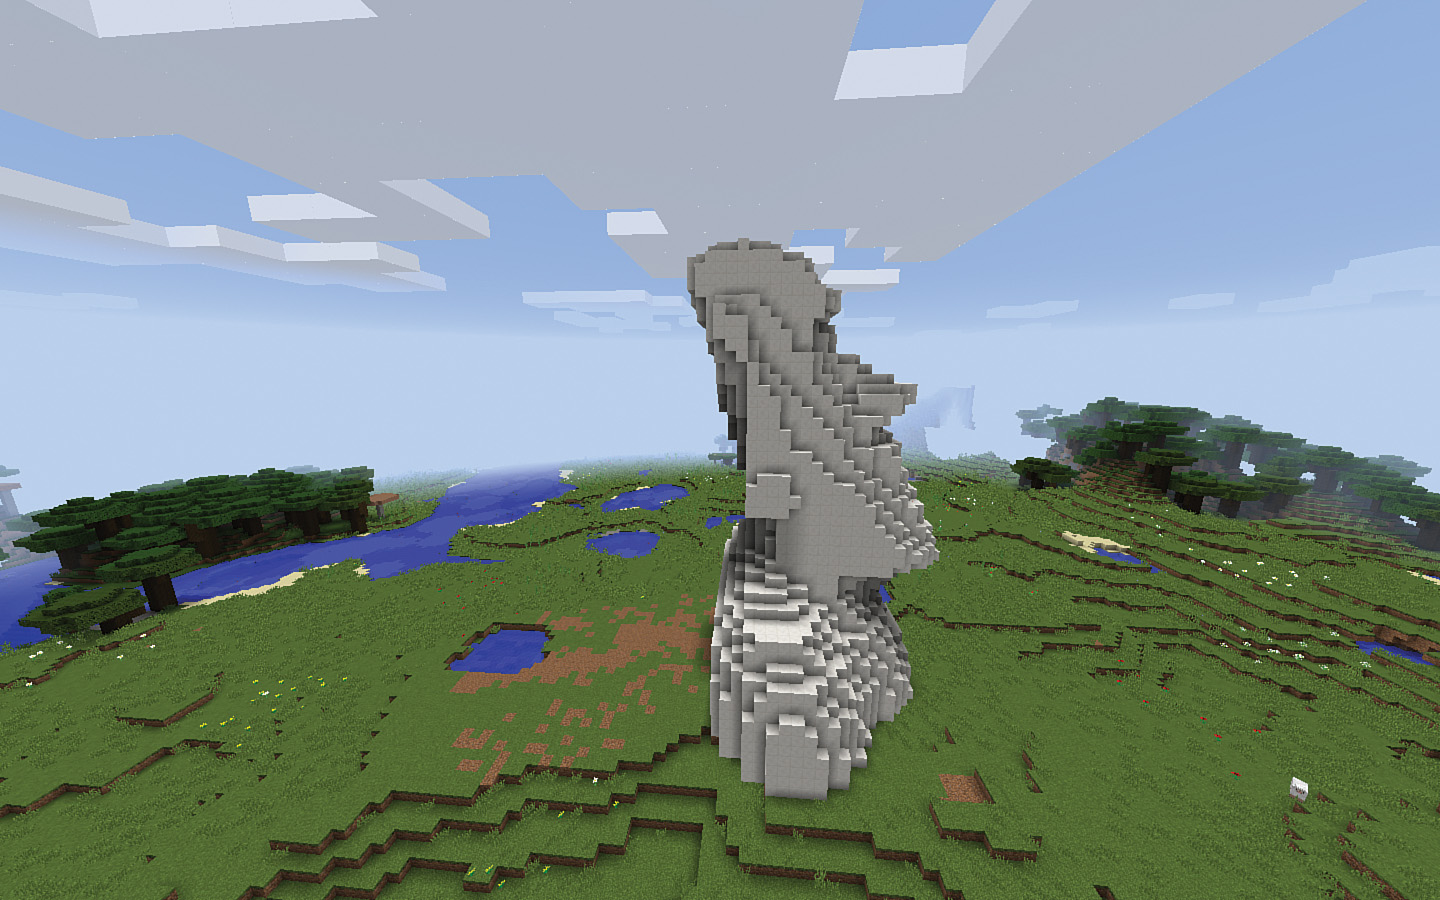
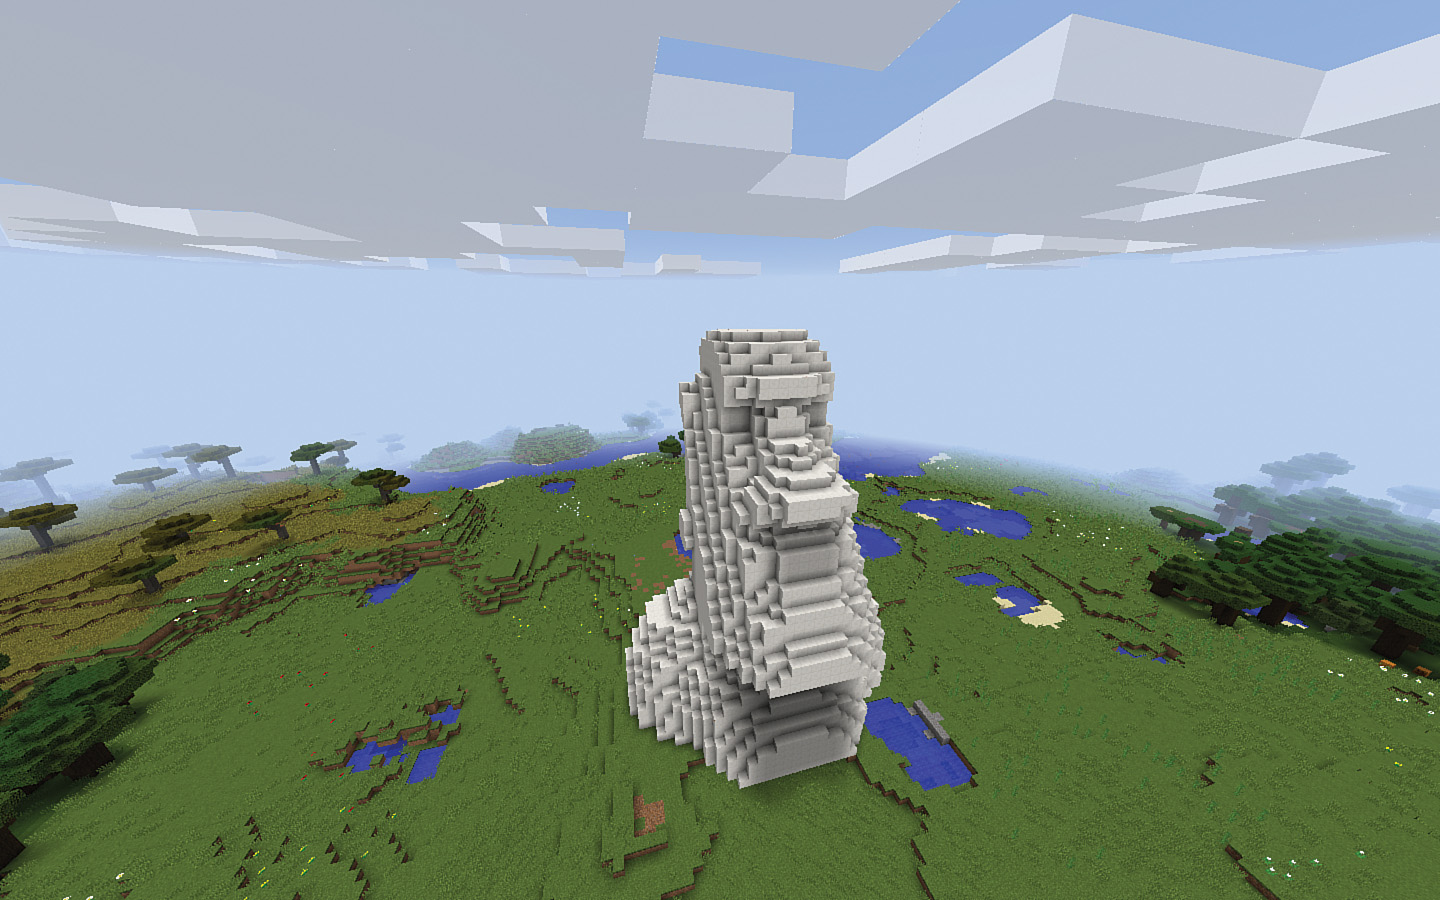
Figure 8.7 shows what it looks like after I’ve taken 17 screenshots: I’m now facing the back of the statue. (It doesn’t have to be exact, but try to get about 30 photos by the time you finish your first time circling your object.)
Finally, come back around, and you should be looking at the object from almost the front. At this point you should have somewhere around 26 to 30 photos.
You’re not done yet, however, when you finish that first circle. To really give a 3D model the best chance to look great, you need to increase your elevation a bit (past the halfway point on the height of the subject) and take another round of screenshots. The good news is that you can take fewer photos here, but you don’t want to take fewer than 12. As you can see in Figure 8.9, I’ve raised myself a bit higher (by holding down the Spacebar to fly up a bit) and am looking down at my statue from a bit above it.
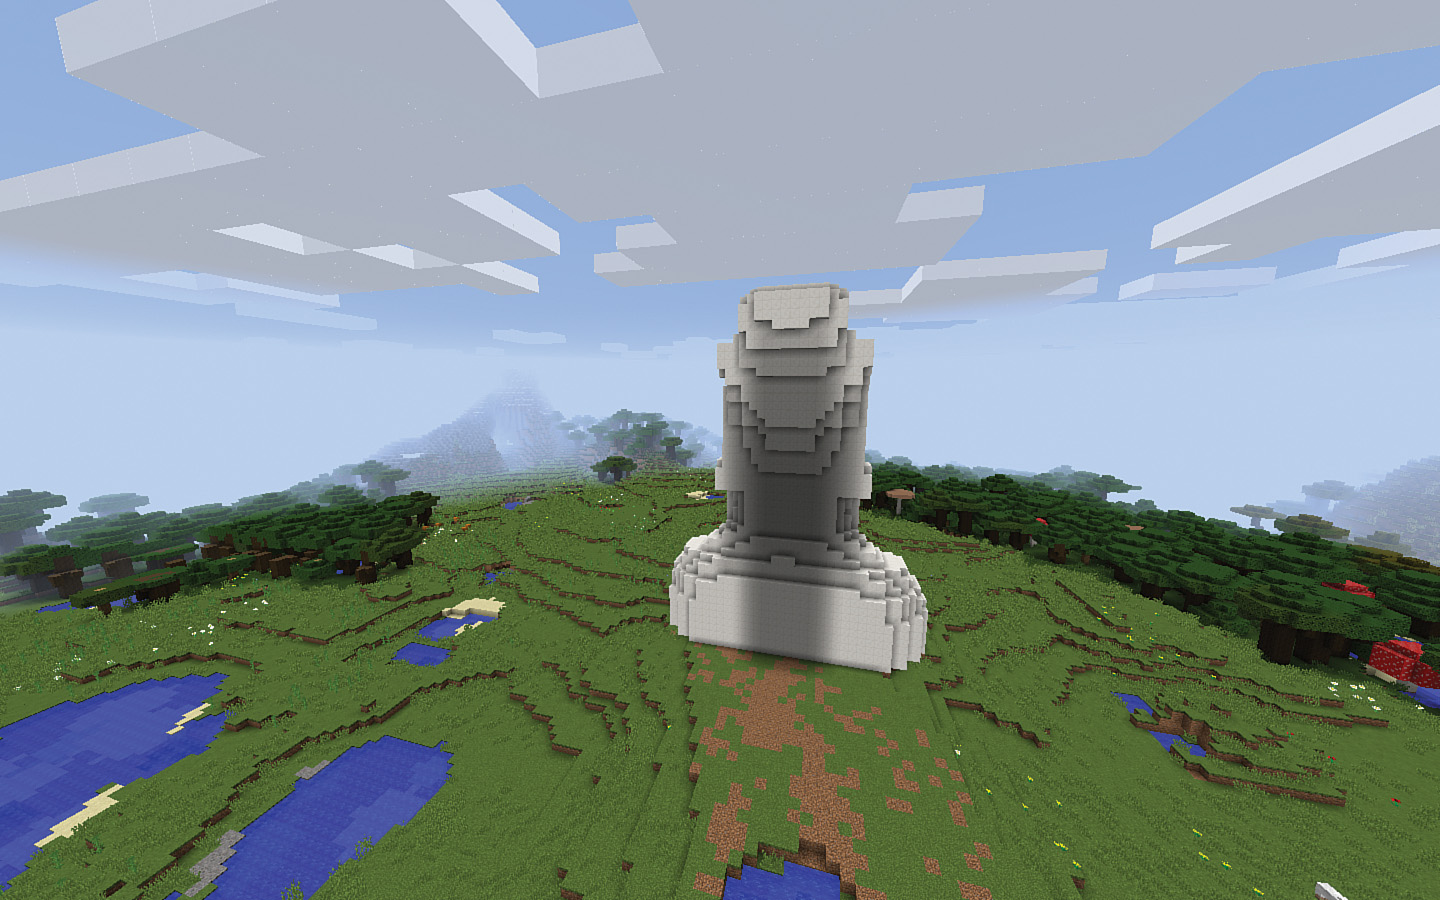
Finally, move closer to your object so that you’re almost looking down on it from above. Figure 8.10 shows you how close I get—basically close enough so that I can see the top of the object and the edges of where it meets the ground, all in one screen. Take about eight screenshots as you circle the object from this elevation.

You want to end up with close to 60 images or more. Remember that the 123D Catch software has a limit of 70 uploaded images, so you should delete a few that look too similar.
If you’re not sure how to locate your screenshots, refer to Chapter 7. As described there, the location will be different depending on whether you took the screenshots on a Windows computer or a Mac.
Tip
Taking screenshots with Minecraft Pocket Edition
Can you take screenshots on a tablet with Minecraft Pocket Edition? Absolutely! However, you’ll need to transfer the screenshot images to a Windows computer, so use a service like Dropbox or sync your tablet to download those images. Also, you may need to do some digging to find out the proper way to take screenshots on your device. With an iPad, you press and hold the Power button (on top) and the Home button (just beneath the screen) at the same time. For other tablets, the method varies.
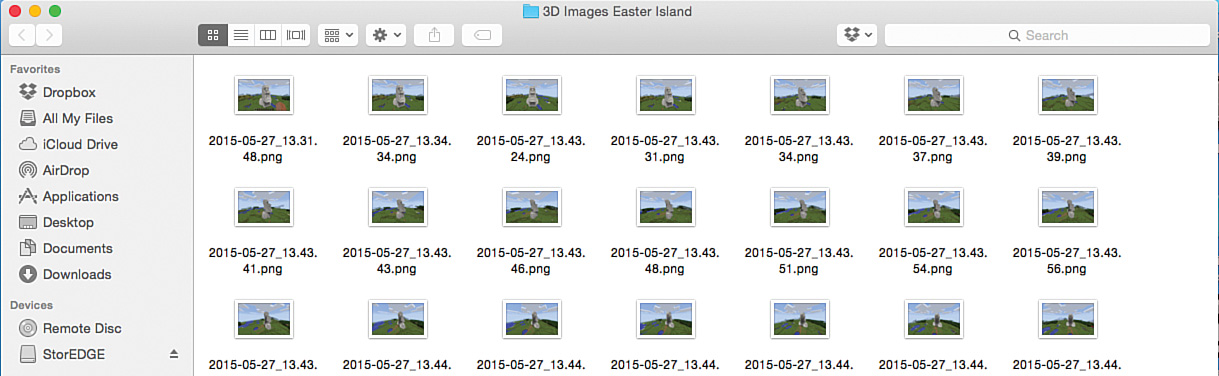
Find and collect these screenshots into a single folder, as shown in Figure 8.11.
Converting Image Files
Once you have your 60 or so screenshots, you’re almost ready to move on to using the 123D Catch app, but there’s still one last step that may be necessary. The 123D Catch app only accepts certain file types, the main ones being JPEG/JPG and TIFF. But Minecraft takes screenshots using the PNG file type. This means you’ll need to convert your PNG files to JPG images.
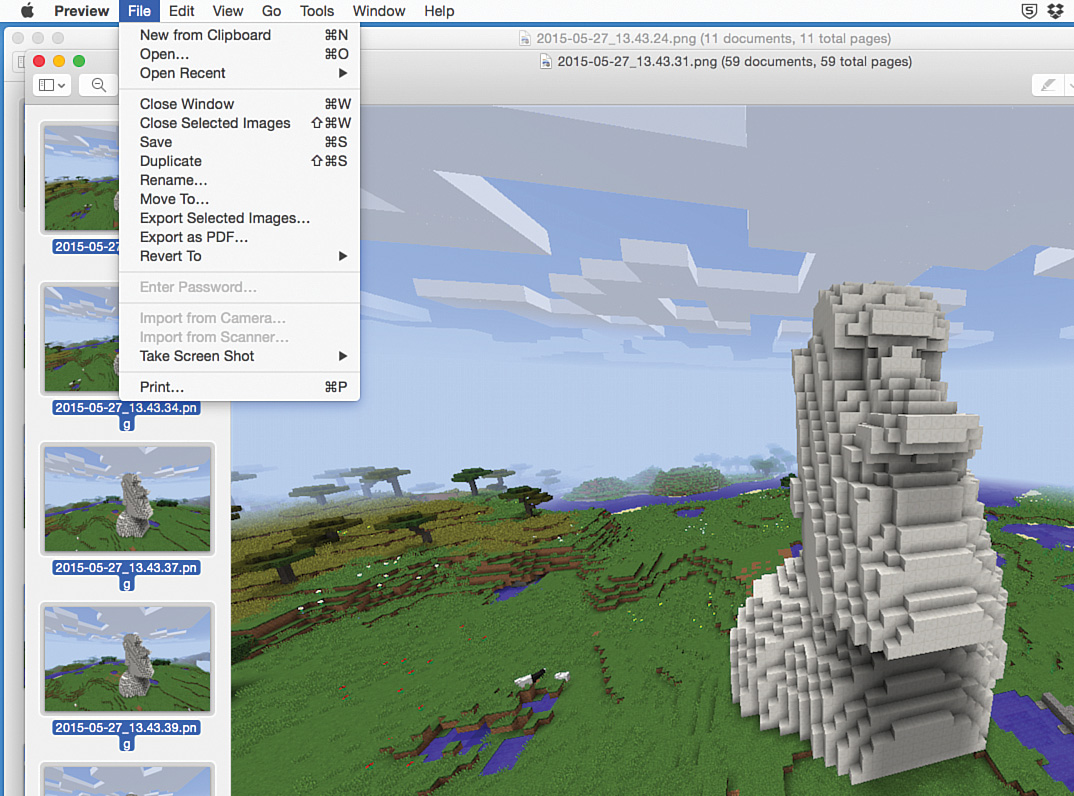
For Mac users, this is an easy task: Select all the screenshots (go to Finder, select Edit, and click on Select All), right-click on any of the selected images, and choose Open With, Preview. Once in Preview, you’ll see all your screenshots scrolling down the left side in thumbnail view, as shown in Figure 8.12.

Once again, select all the thumbnails by clicking the Edit menu and choosing Select All. All the screenshots will be selected. Click on the File menu and choose Export Selected Images, as shown in Figure 8.13.
A window like the one in Figure 8.14 appears. Select the folder where you wish to save your files and choose the JPEG option in the Format drop-down menu. (You can also click the New Folder button to create a new folder to keep things organized.) Click Choose to complete the conversion, and then wait about 30 seconds for it to complete.

You’ll need to get this collection of JPEG images to a Windows computer, so use a USB flash drive or cloud storage (such as Dropbox) to copy them over.
If you’re a Windows user, you might remember that you’ve already used online-convert.com in previous chapters. You can use it to convert a PNG to JPG, but it’s slow going because it requires you to convert one image at a time. More useful would be a conversion tool that can do all the conversions at once—a batch conversion tool. There are a number of free ones available online. Do an online search for “batch image convert tool,” and you’ll find them.
One free and simple one is ImageBatch, found at imagebatch.org and shown in Figure 8.15. Download and run it: Select the folder containing the PNG files and specify a folder where you wish to save the JPEG conversions. Check the JPEG box only, click on the Start button, and you’re done.

Once you’ve got your collection of JPEG files, you’re ready to create your 3D model with the 123D Catch app. In the next section, I’ll show you where to find it and how to use it.
Using 123D Catch to Create 3D Models
123D Catch is a free app from Autodesk that you can get for your Windows computer. Just visit http://www.123dapp.com/catch, scroll down the page about halfway, click on the PC Download button, and follow the instructions to install it.
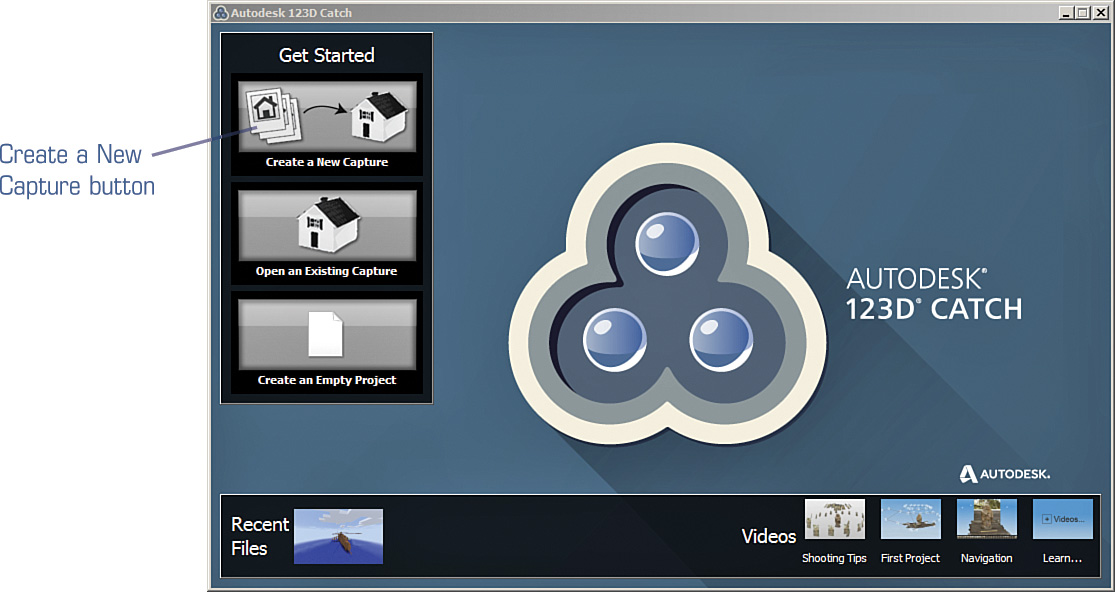
After you’ve installed the application on your Windows computer, double-click it, and you’ll see a screen like the one in Figure 8.16.
I’m not going to go into super-detail on all the special tools available with the 123D Catch application, but just know that after you’ve created your 3D model with the app, you can also use its editing tools to erase or delete areas of the 3D visual that you don’t like or want floating around. You’ll want to spend some time experimenting to discover the best ways to present your 3D models, but before you can do that, you’ve got to have a 3D model to view! Let’s take care of that now.
Uploading Your Image Files
Click the Create a New Capture button to open a browsing window where you’ll need to browse to your new JPEG images and select them all. To do this, hold down the Shift key and click on the first image in the list and then scroll down (while still holding Shift) and click on the last image. You’ve now selected all the images, as shown in Figure 8.17. (If you count carefully, you’ll see that I took a total of 59 images.)

With the screenshots selected, click on the Open button. The 123D Catch screen displays a large green check mark button, as shown in Figure 8.18.

Click on that check mark, and a new window appears, as shown in Figure 8.19. You’ll need to provide some information, including the email address you want the application to use to send you a message when the 3D model is completed.
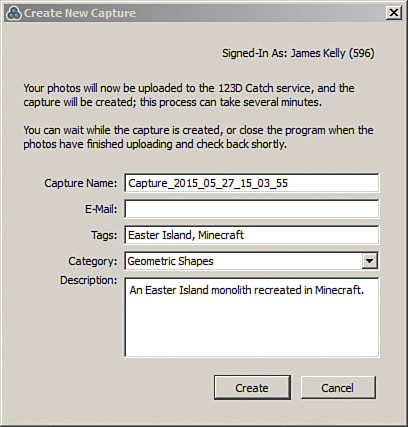
Tags are required, but a description isn’t. Click the Create button when you’re done providing the information, and accept the Terms of Service (that appears in a pop-up window) by clicking the OK button. A new window appears, as shown in Figure 8.20, to let you know the process has, and the app is uploading the images to Autodesk.

Running the Create Capture Process
The uploading of the images doesn’t take long (maybe a minute or so). The next step is the Create Capture process, and it can take a while. I’ve had one model created in about 10 minutes, but another one took a few hours. The time it takes depends partly on how many users are submitting images, so be patient! Figure 8.21 shows what it looks like when the Create Capture process has started.

When the Create Capture process is completed, your 3D model will be downloaded to the 123D Catch software installed on Windows and opened so you can view the results. Figure 8.22 shows my monument open in the 123D Catch application on Windows.
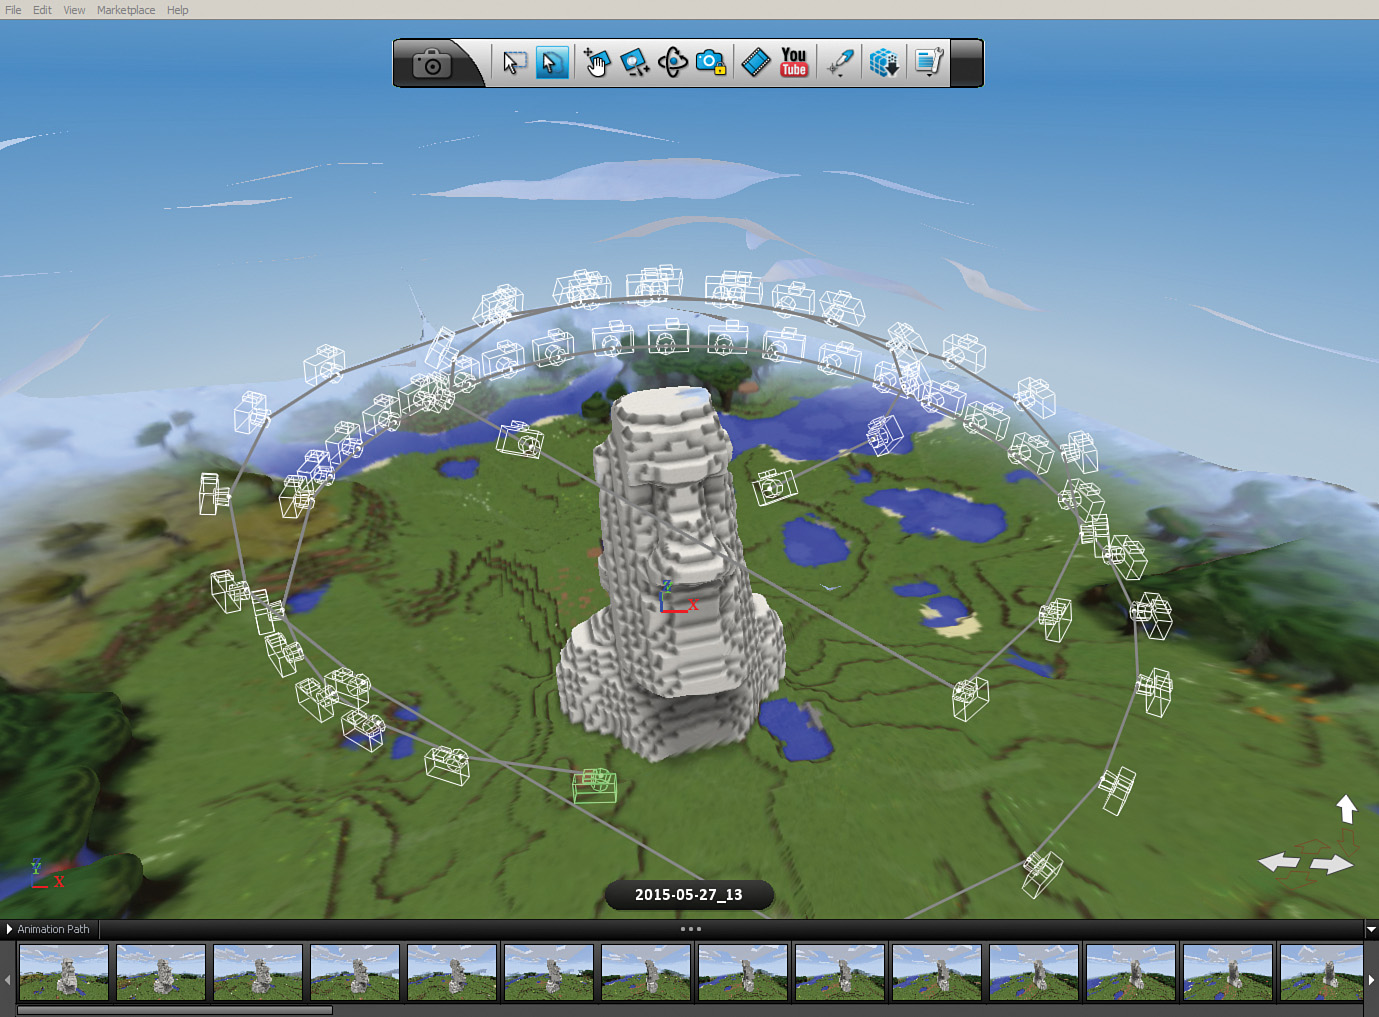
Notice that small white camera outlines appear all around the monument. These are the locations I took the screenshots, as calculated by the 123D Catch application. Don’t worry—these will go away.
Along the top of the screen are various tools you can use to move around the screen and edit your model. If you have a scroll wheel mouse, you can use the wheel to zoom in and out on your model. Figure 8.23 shows what it looks like after I’ve zoomed out a little.
Why does the surrounding Minecraft scenery look blurred? Blur is caused by having too few images of an area for the 123D Catch app to display in better detail. In this case, I was focused on the monument, not the surrounding forest and plains. Therefore, I didn’t get enough photos showing the trees and grass to make them clear; the application does its best to display those areas based on what screenshots it did have with those areas in the image. This is why the image is sharper closer to the monument and more blurry further away from the monument.
There’s just not enough room in this chapter for me to go over every tool in detail, but if you click the Help menu, you’ll find an option labeled Online Content. Click that to gain access to online tutorials and help with all the various toolbars available. There is one tool, however, that I want to show you because it’s really fun to use.
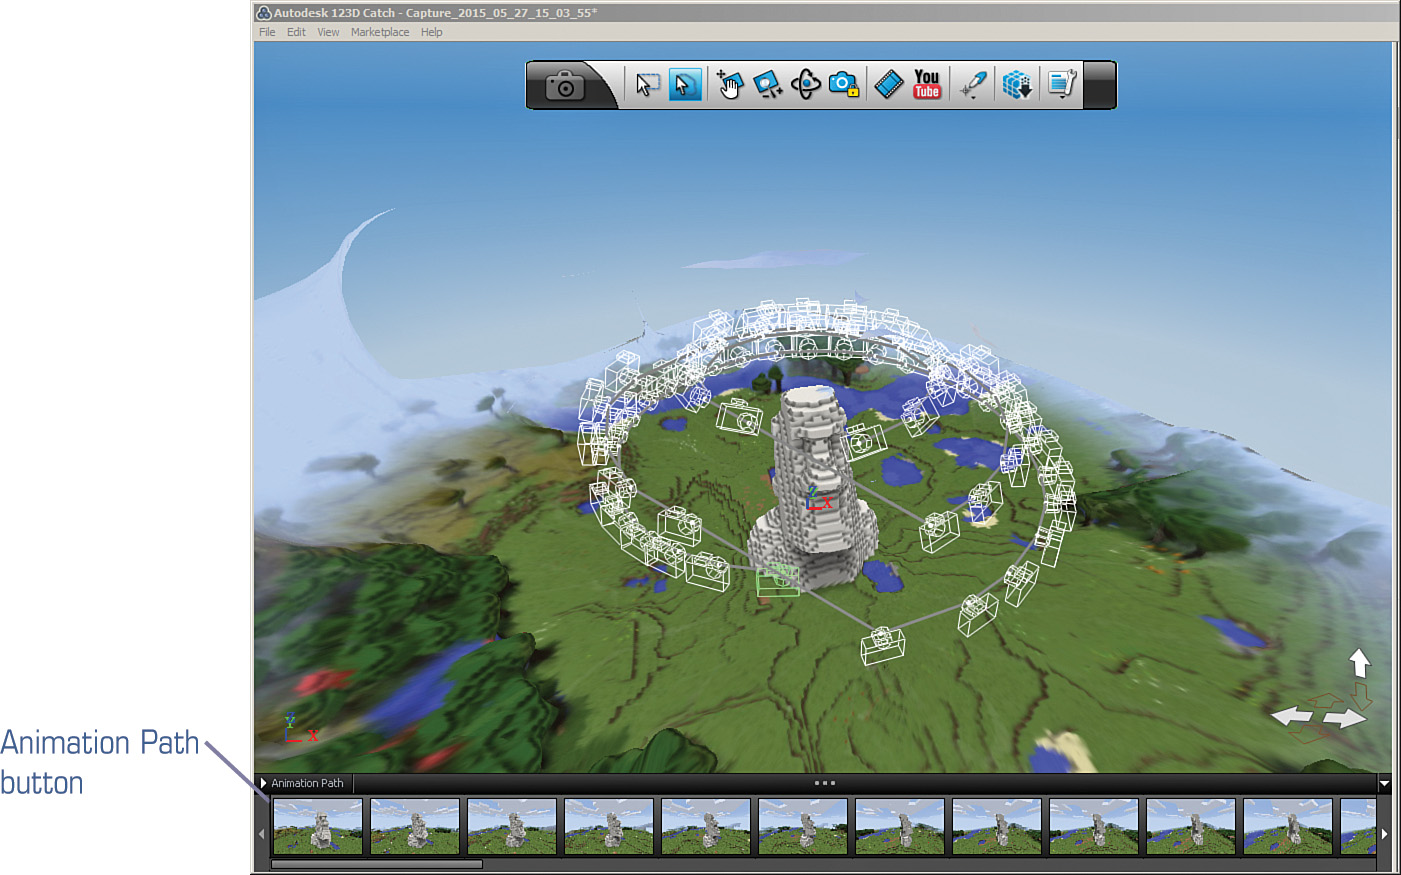
In the lower-left corner of the screen, click the Animation Path button to open up the toolbar shown in Figure 8.24.
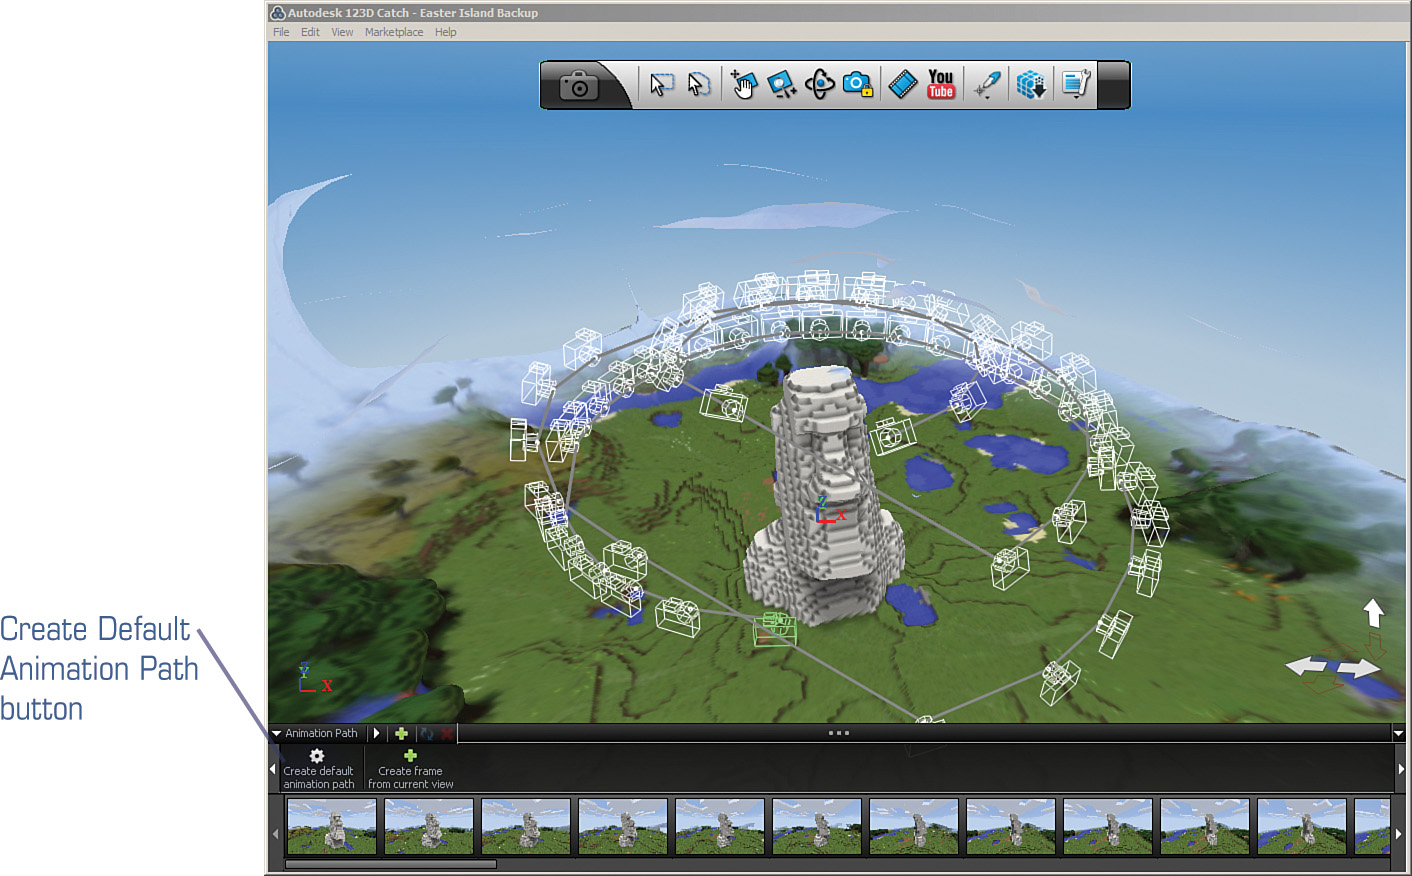
Next, click the Create Default Animation Path button. A blue spiral surrounds your central object, as shown in Figure 8.25. (You can create a custom path, but it’s tricky. The default animation path works fine.)
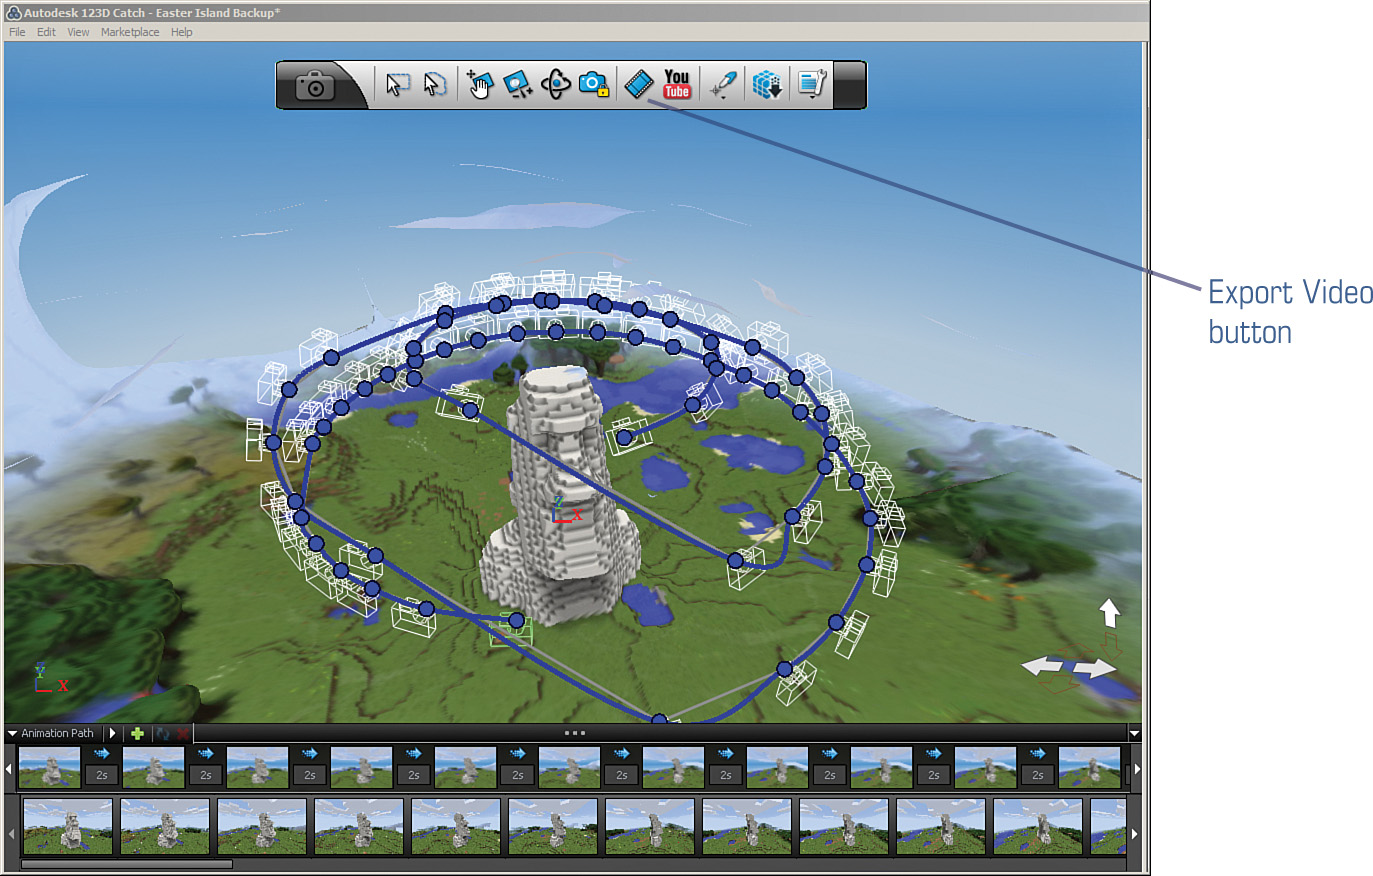
Click on the Export Video button (it’s to the left of the YouTube button on the toolbar), and the window shown in Figure 8.26 appears.

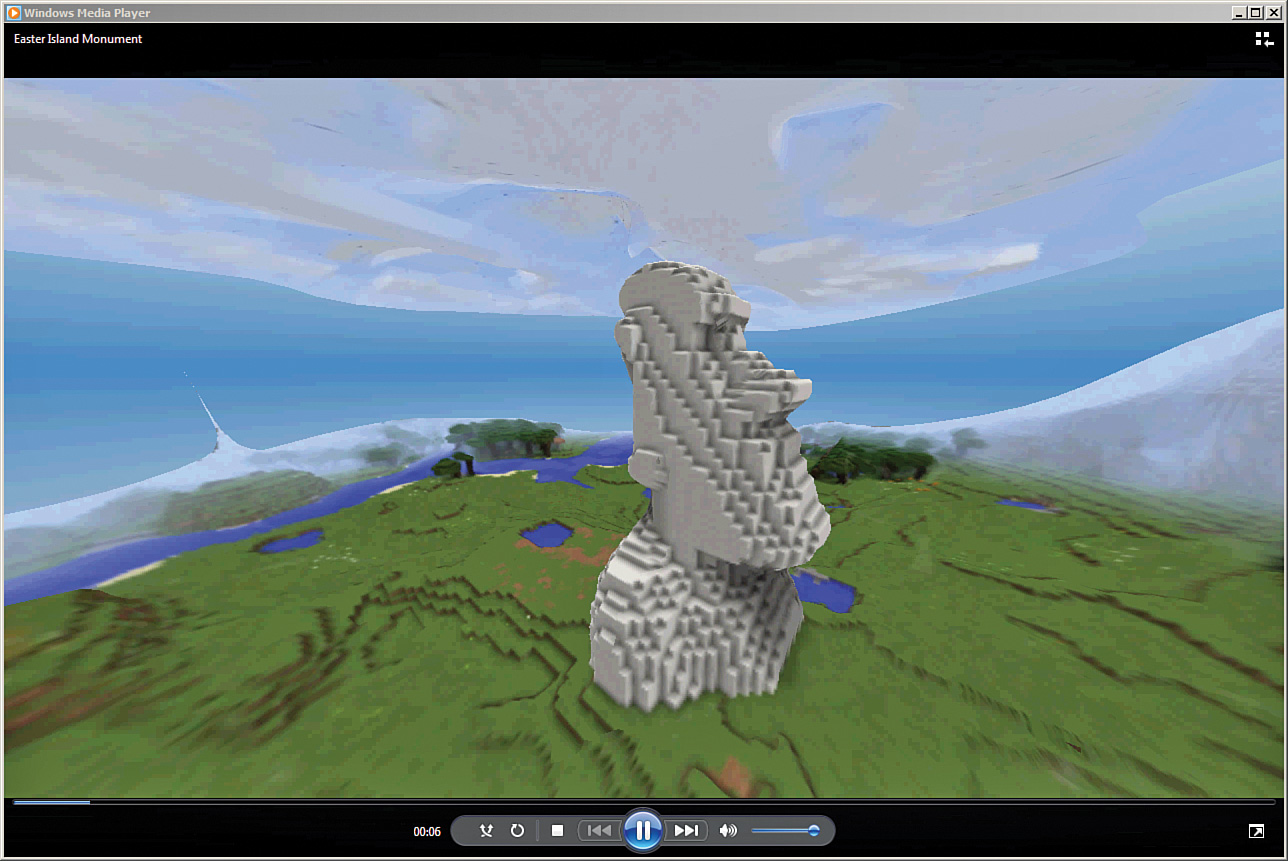
If you know a lot about video configuration, feel free to tweak the settings. Otherwise, give the video a title and click the Choose Folder button to specify a location for the video that will be created. Accept the rest of the default settings (which will work 99% of the time) and click on the Render button. The video creation process takes a few minutes to complete. When it’s done, you end up with a small animation video you can share with friends and family members that show your Minecraft feature in 3D as the camera zooms around and up and down. Figure 8.27 shows my video playing on my computer.
Note
View the Easter Island monolith video
If you like, you can view my upload in the 123D Catch gallery by visiting http://www.123dapp.com/catch/Easter-Island-Minecraft-Tour/4006221.
Be sure to click on the File menu and save your project. This way you can visit it later if you want to do some editing (such as deleting some of the surrounding countryside).
All in all, you’ve just learned a pretty slick way to share some of your best Minecraft designs as 3D models that can be viewed in real-time 3D vision on a computer screen. It’s a great way to get a little glimpse into how playing Minecraft with a device such as the Oculus Rift (see Chapter 7) will feel and look.
Up Next…
You’ve been using Tinkercad to create .schematic files to use with MCEdit, but did you know that Tinkercad is also a perfect tool for creating your own 3D models? If you can’t find what you need on Thingiverse.com or similar 3D model websites, you might just want to make it yourself! Tinkercad’s got plenty of features that allow you to add and merge shapes to create your own unique 3D models. In the next chapter, you’ll learn about some of the basic Tinkercad features and see how they are used to create an original object (a futuristic city) that can be imported into a Minecraft world.