
5. Modifying a 3D World
What You’ll Be Doing
![]() Watch Didgee invite Coolcrafter10 to her friends’ castle
Watch Didgee invite Coolcrafter10 to her friends’ castle
![]() Discover the 123D Sculpt+ app
Discover the 123D Sculpt+ app
![]() Select a 3D model with 123D Sculpt+
Select a 3D model with 123D Sculpt+
![]() Download and install Binvox
Download and install Binvox
![]() Use Binvox to convert an .obj file to .schematic
Use Binvox to convert an .obj file to .schematic
Coolcrafter10 could hear laughing coming from around the corner. He ran forward, peeked around the maze wall, and saw Didgee disappear around another corner. “Almost caught you!” he yelled.
The maze was incredible. Didgee had shown Coolcrafter10 how to create the shape of the maze on his computer and then had used Tinkercad to give the maze walls height. Coolcrafter10 had resized the maze in Tinkercad so it would be a certain number of blocks wide in diameter and then plunked it down on some empty land nearby. For the last 10 minutes, the two Minecrafters had been playing a game of hide-and-seek inside the maze.
Coolcrafter10 continued to run after Didgee, who had the map of the maze. He turned corner after corner, following the laughter, until the exit to the inner portion of the maze appeared. Standing in front of the small tower that Coolcrafter10 had chosen to put inside the maze was Didgee, with a big grin on her face.
“Without the map, it would take someone a lot longer to navigate that maze,” said Didgee as Coolcrafter10 opened the door to the tower and waved for her to come inside.
“Yeah, I’m glad you couldn’t stop laughing, or I might have gotten lost,” replied Coolcrafter10 with a smile. “Thanks for showing me how to do that. Tinkercad and MCEdit are some seriously powerful tools.”
“They are,” said Didgee. “But they’re not the only tools available.” She looked out the window at the blue sky. “Looks like the storm is long gone. I’m going to have to get on the road.”
Coolcrafter10 frowned. “Aw, I hate that you have to leave. Are you sure you can’t stay a bit longer?”
Didgee shook her head. “I’ve got some friends waiting on me at our castle. We’ve got a big project
planned for tomorrow, and I need to get back to my own computer and get my part of the job done.”
“I understand,” said Coolcrafter10. “But now you’ve got me very curious about these other tools you mentioned. What do they do?”
Didgee double-checked her backpack for supplies and refilled her water bottle at Coolcrafter10’s sink. “Remember how you use Tinkercad to export a .schematic file that can be imported into your world with MCEdit?”
Coolcrafter10 nodded.
“Well, that works great if you’ve got a 3D object in Tinkercad that you’ve created yourself or imported from a site like Thingiverse. But sometimes you don’t have an .stl file. And other times Tinkercad might not give you exactly the tools you need to create something that’s in your mind. Tinkercad is great for creating things with spheres and cubes and pyramids and other shapes that can be joined and morphed, but there are much more complicated 3D objects that you can create only with different software apps.”
“Like what?” asked Coolcrafter10.
“Well, take the castle I share with my friends. We’ve been having some trouble with a local group of bandits. They’re not very smart and are very scared of a particular type of monster. We tried to create the monster in Tinkercad, but the final result didn’t match what we had in mind. One of my friends found a different software tool that is perfect for creating the monster, but it doesn’t save the 3D monster model as an .stl file. It’s an .obj file, and Tinkercad can’t import .obj files. But that didn’t stop us. We found a way to convert an .obj file to a .schematic file, just like Tinkercad does with .stl files. And now we’re going to use MCEdit to see if we can get the monster placed to scare off those bandits.”
“Sounds like fun—I mean the monster statue, not the bandits,” said Coolcrafter10. “I wish I could be there to see it.”
Didgee cocked her head and looked at Coolcrafter10. “Why don’t you come with me? You’ll get to meet my friends, and I can show you some other tools that we’ve been using to create and modify the land around us.”
“I hate to leave my new castle and maze. What if some monsters or griefers start tearing them down?”
Didgee smiled. “I used to worry about that, too. But now I know I can quickly repair or replace anything by using MCEdit and these other tools. I think your castle will be safe, but remember that you can always use MCEdit to erase it completely and put a new one back in its spot—maybe an even bigger castle!”
“You’re right,” said Coolcrafter10. “I didn’t think about that. And I’ll bet with my laptop and MCEdit, I can always import a tower or another structure anytime I need it, especially when I’m out exploring and can’t get back to my home computer.”
“So, are you going to come with me?” asked Didgee.
“Absolutely! I can’t wait to see your monster scare away those bandits!”
More Tools Means More Options
Tinkercad is a great tool for importing 3D models you find on sites such as Thingiverse or for importing .svg files. Once you have the file you want in Tinkercad, it’s a simple matter of clicking the Design menu and selecting the Download for Minecraft option to download a .schematic file that MCEdit can open and place inside one of your Minecraft worlds.
Later in the book, you’ll get some hands-on time actually using the Tinkercad tools to create original 3D models. Tinkercad can import items, but its real strength lies in its toolbars, which allow you to create your own 3D models. Once you create a 3D model and save it as an .stl file, you can modify it—shrink it, enlarge it, rotate it, and even add more features to it over time. Then, when you’re done making mods, you use Tinkercad’s special ability to create .schematic files for use with Minecraft.
But before you dive into creating your own 3D models with Tinkercad, you should be aware that Tinkercad isn’t the only tool around for creating fun models that can be used in Minecraft. There are many other software tools that can create .stl files. If one of them doesn’t allow you to download a .schematic file, you can import an .stl file that you create elsewhere into Tinkercad (remember that Tinkercad can import both .stl and .svg files) and then use the Download for Minecraft menu option to create an MCEdit-compatible .schematic file.
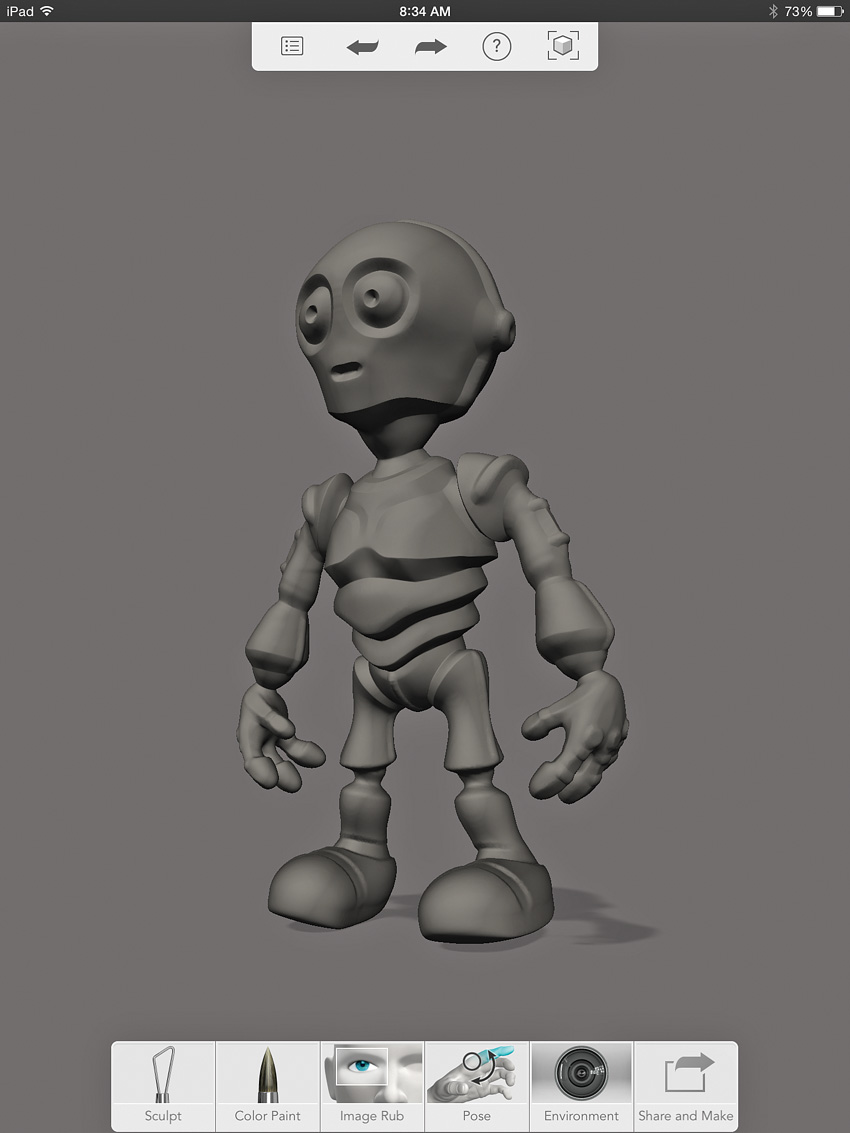
Take a look at Figure 5.1, which shows a 3D model of a robot. This robot is one of the standard 3D models you can open and modify using a tablet app called 123D Sculpt+ from Autodesk.
Note
The 123D Sculpt+ app
123D Sculpt+ is just one 3D modeling tool that’s available for free from Autodesk. It is available from the App Store for iPads running iOS 7.0 and higher and from Google Play for Android tablets running version 4.2 and higher. I’ll cover installing and using 123D Sculpt+ in Chapter 6, “Creating Your Own Monster Island.” (The 123D Sculpt app shouldn’t be confused with 123D+ Sculpt—it’s just an older version that is still available for download. Grab the 123D+ Sculpt app for purposes of this chapter.)
123D Sculpt+ is fun and easy to use, and you’ll see it in action in Chapter 6. For now, there’s one important thing you need to know about this 3D modeling app: It doesn’t save or export models as .stl or .schematic files. It allows you to download your creations, but when you examine the files, you’ll see that they’re in the .obj (object) file format. So how can you possibly use a 3D model .obj file from 123D Sculpt+ with Minecraft?
I’ve mentioned this already in the book, and I’ll say it again: Often you’ll need to find workarounds when you work with digital tools and software, such as when you need to convert one file type to another. You converted a .jpg to a .svg using the online-convert.com website, and you may be wondering if there’s a way to convert an .obj file to an .stl file or even directly to a .schematic file. Yes, there is!
Finding a 3D Model with 123D Sculpt+
In this chapter, I’ll show you an example of using a non-Tinkercad application to create a 3D model for use in Minecraft. I’m going to run through the process quickly so you can
see what’s possible. Then, in Chapter 6, I’ll go a bit slower through all the steps and give more details.
It all starts with downloading and loading the 123D Sculpt+ app you see in Figure 5.2.

The 123D Sculpt+ app lets you create your own 3D models or view what other app users have designed. If you find something you like, it’s easy to save a copy to use as is or modify.
The app also comes with some predesigned models that you can open and play with. Figure 5.3 shows such a model—in this case the robot from before, now rotated around with some color applied. (However, the color really won’t make much of a difference, as you’ll see when I import this into a Minecraft world with MCEdit.)

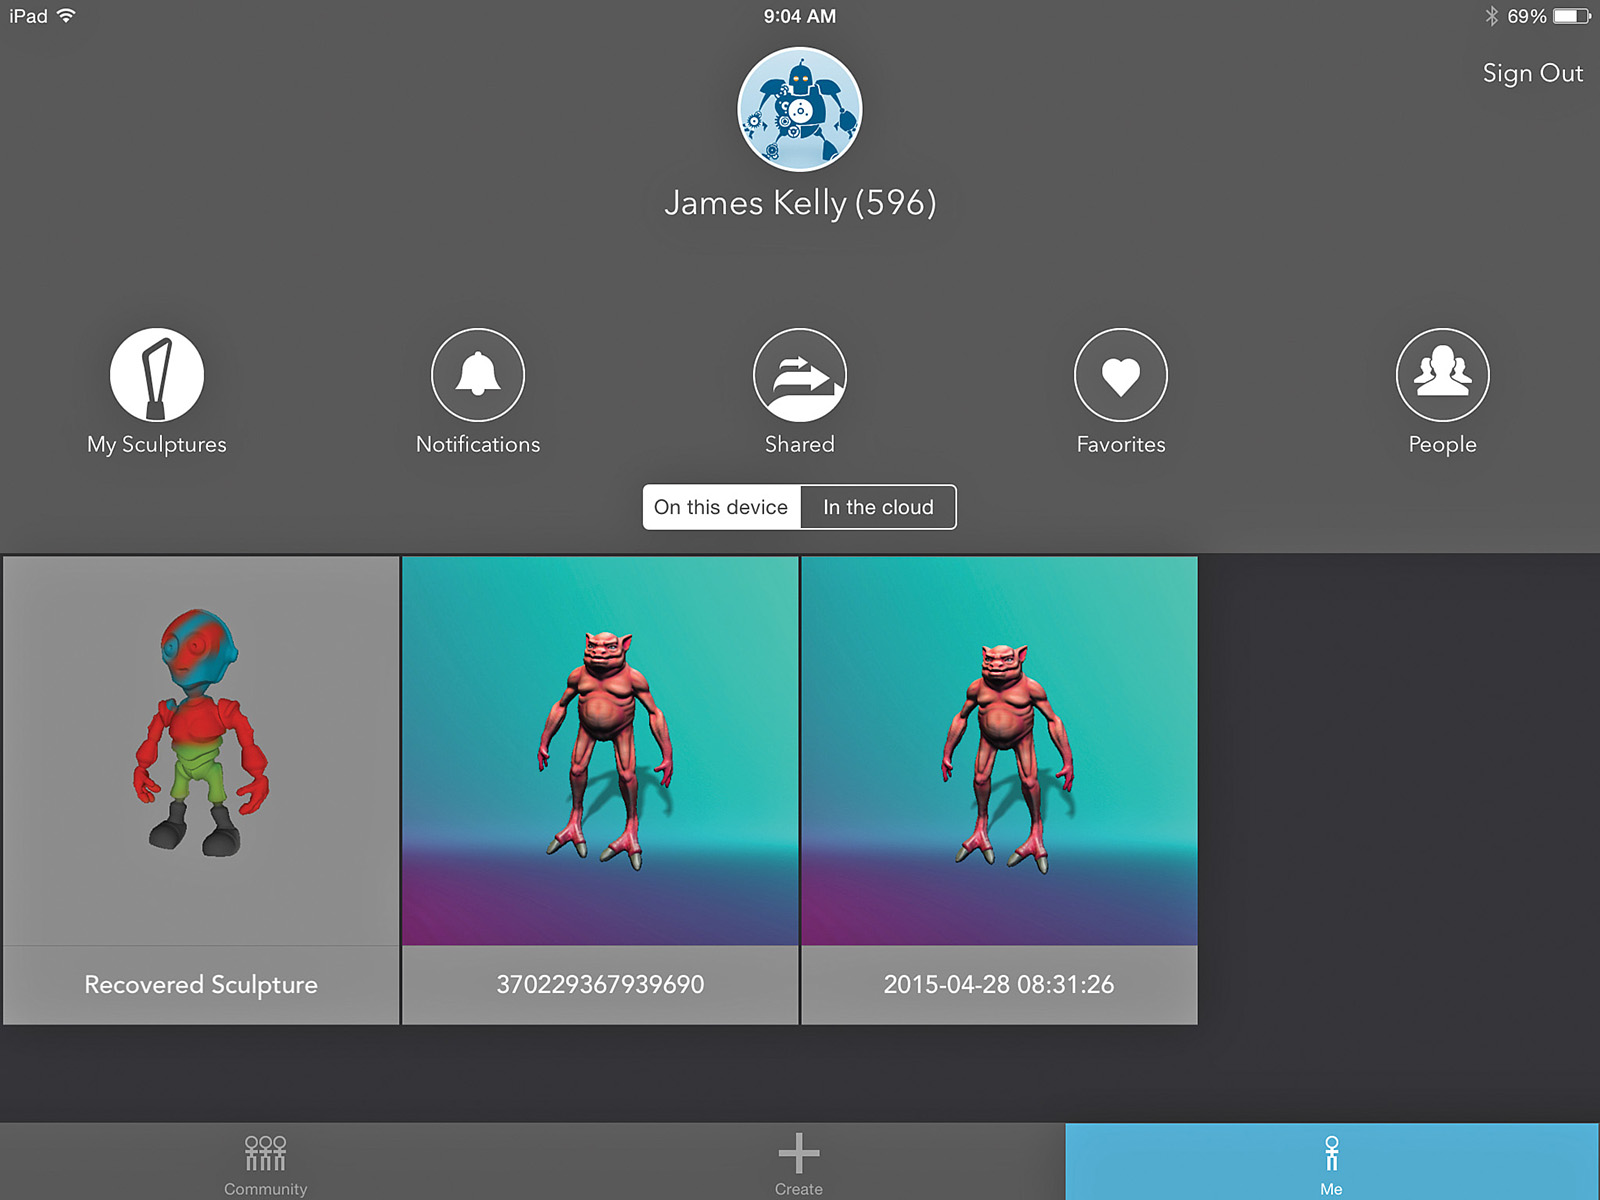
Once I have a 3D model created, I can save it so I can access it later and make changes if necessary. Figure 5.4 shows the My Sculptures page, with all my models listed—both models I’ve created and those I’ve downloaded from other users.
Note
Share your creations with the world
The app lets you share your models with friends and family. It also lets you follow your favorite 3D model designers and get alerts when they upload new designs. Your own designs could even become popular with other 123D Sculpt+ users, so don’t forget to upload them and share them with the world. And should you download someone else’s creation, modify it, and then upload the new version, be sure to give proper attribution to the original designer by providing the designer’s user name and a link to the original file you copied.
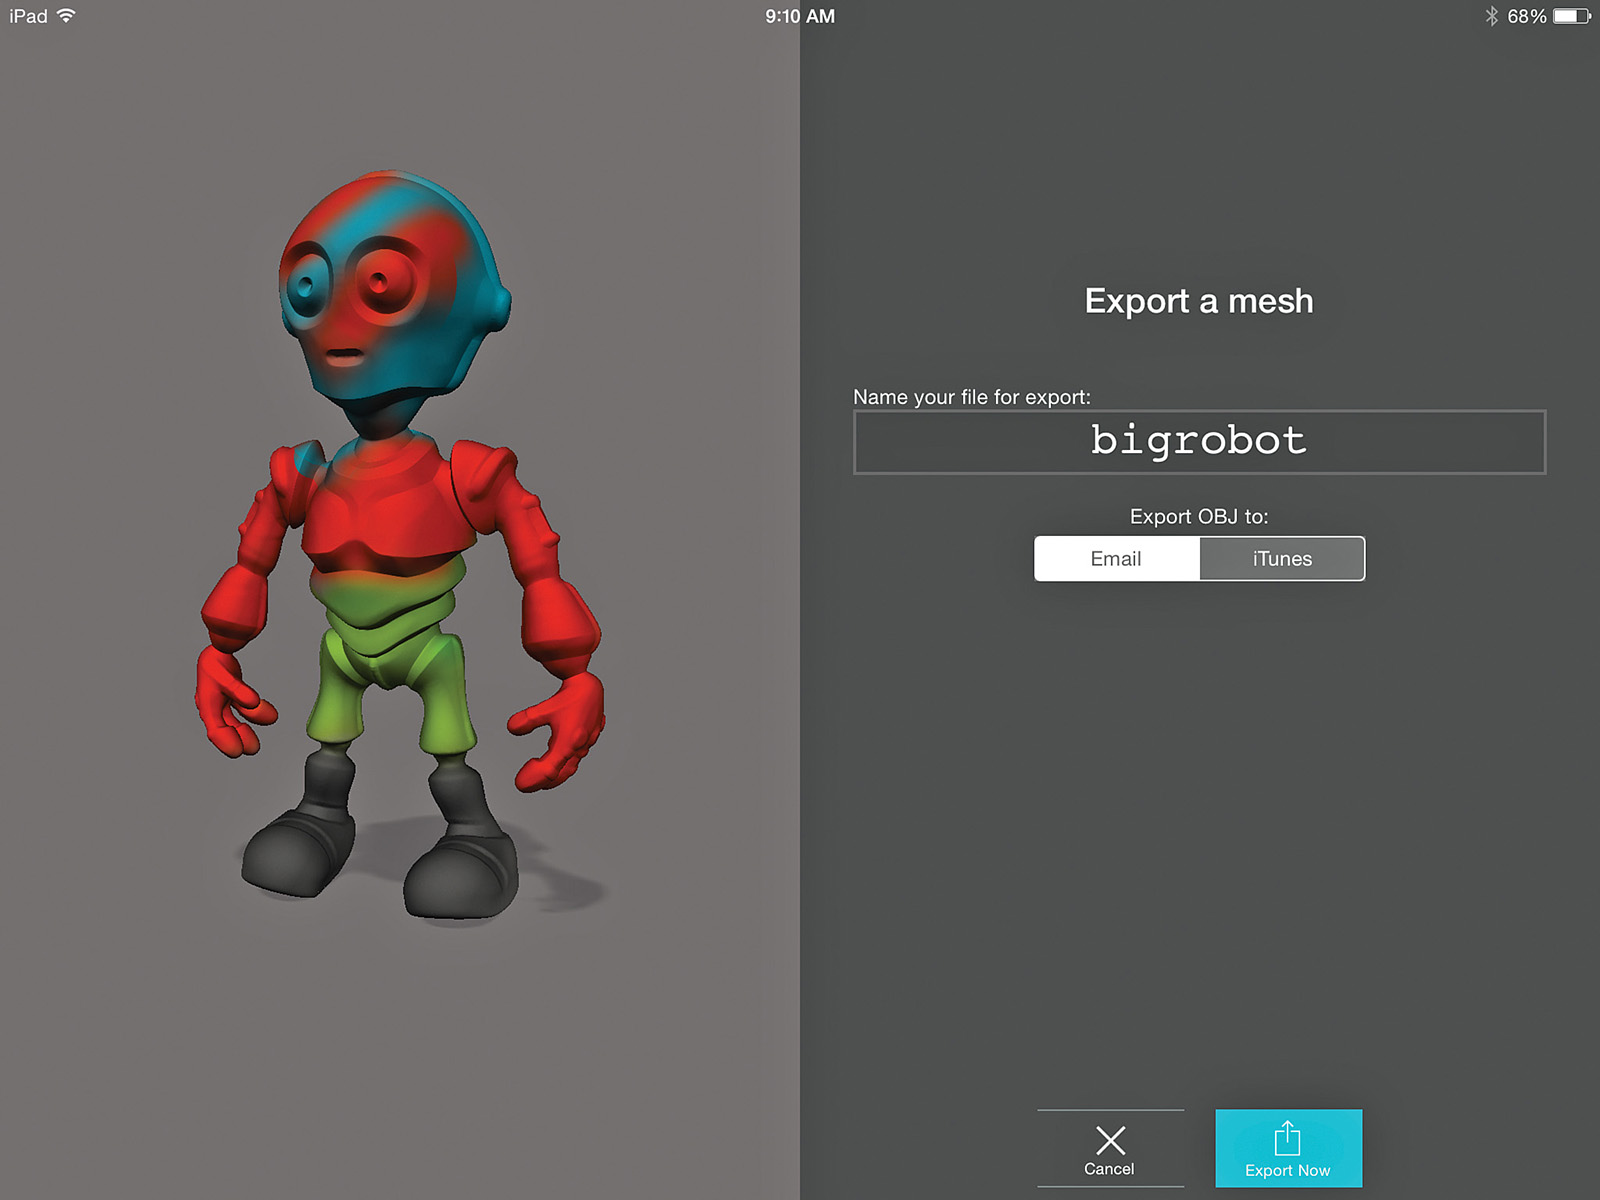
To get this robot into my Minecraft world, I need to download a few files. One file is the .obj file that contains the model’s basic shape and design (called the mesh), and a few other files provide additional details, such as the colors and textures (called skins). The 123D Sculpt+ app makes it very easy to get these files to my computer via email, as shown in Figure 5.5.
When I choose to export the model this way, the app emails me a zipped file that I can save to my computer (see Figure 5.6).

When I open up the zip file, I see the three files shown in Figure 5.7. The only file I’m interested in is the one that ends with .obj; in this case, it’s called bigrobot.obj.

After I save the bigrobot.obj file to a folder where I’ll be able to easily find it later, I need to convert that .obj file to a .schematic file. I’ve got a great tool for making this conversion, but as you’re about to see, it’s not as “pretty” as other tools I’ve been introducing to you. But just as you should never judge a book by its cover, you should also never judge a piece of software until you’ve used it and decided whether it’s useful to you.
Note
Mac and Windows options for .obj files
You may have noticed from the screenshots in Figures 5.6 and 5.7 that I’m using a Windows computer. Don’t worry, Mac users. I’ll be providing some additional details in Chapter 6 on how Mac users can convert .obj files to .schematic files.
Converting Files with Binvox
During my search for tools to convert .obj files to .schematic files, I found quite a few solutions, but most of them required owning a piece of expensive software. Not everyone can afford to spend hundreds or even thousands of dollars on powerful design software, so I kept looking. And I finally found a solution that both works and is free. It’s called Binvox, and once you figure out its basic controls, it’s quite easy to use.
I’ll go into the details of using Binvox (including downloading and installing it) in Chapter 6, so for now you can just sit back and let me give you a brief overview of the process for converting .obj files to .schematic files in Binvox.
These days, software is almost always graphical in nature, with drop-down menus and pop-up alerts and all sorts of visual aids. But years ago, a lot of software was text based: You just typed a command or two on the keyboard and pressed the Enter key. Binvox is such a command-line tool. This means you won’t be double-clicking an icon on the desktop or tapping the name of an app on a tablet. Instead, Binvox’s work is all done from what’s called a command prompt. You can see the Windows command prompt in Figure 5.8.

Note
A command prompt can be useful
I won’t be going into a lot of detail about using a command prompt here, but for now just know that command prompts are really useful: You can access every folder you have on your computer from a command prompt if you know the right commands. You’ll learn more in Chapter 6.
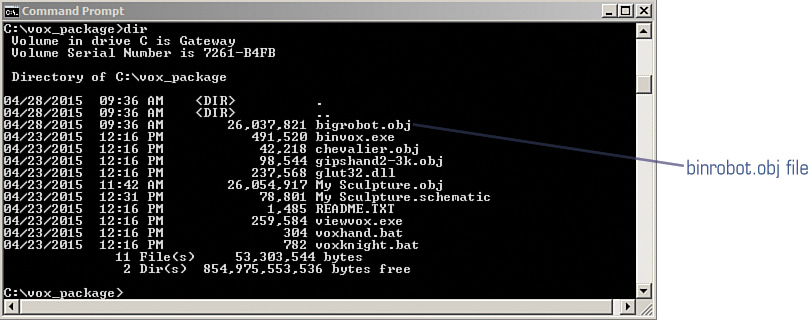
I’ve copied the bigrobot.obj file into a folder called vox_package that was created when I installed Binvox. Figure 5.9 shows the contents of the vox_package folder. Look closely, and you should see the bigrobot.obj file, toward the top of the list.
There’s also another file called binvox.exe, which is the executable file for the actual Binvox app (or program) that you will run. You run a command prompt program by simply typing in the name of the .exe file and pressing Enter. In this case, if I type binvox and press the Enter key, I get a long list of explanations about how to use the binvox.exe program, as shown in Figure 5.10.
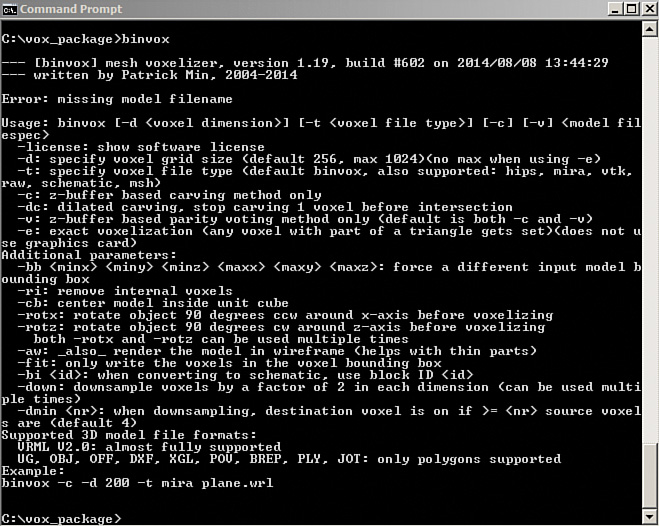
All I need to do to get binvox.exe working properly and converting my .obj file to a .schematic file is to type the following at the command prompt (and be aware of the lowercase usage and enter the command exactly as shown):
binvox -t schematic bigrobot.obj
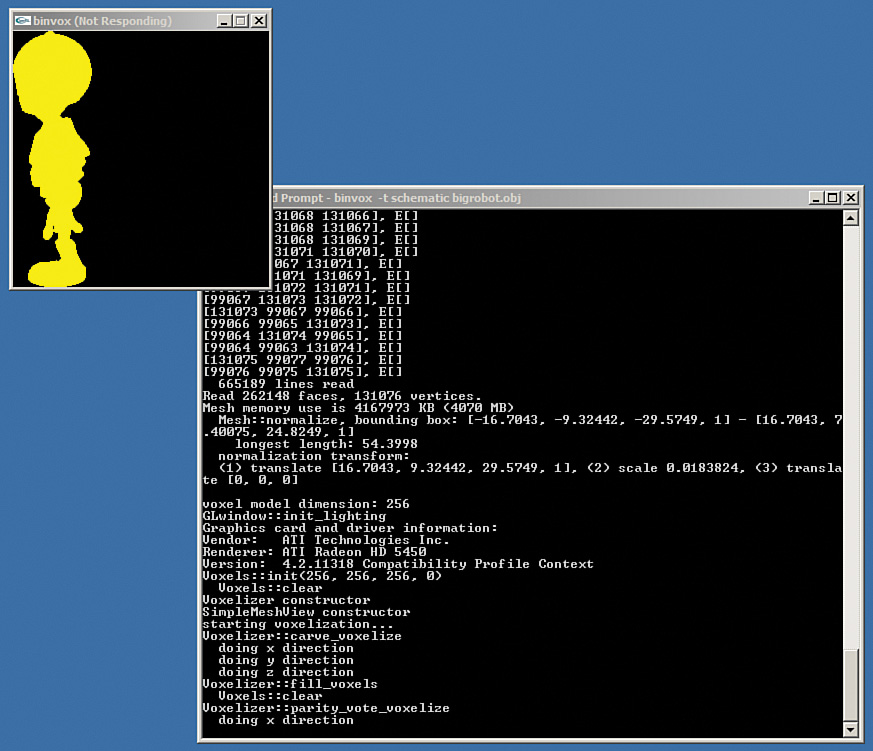
When I type that bit of text and press Enter, a strange thing happens. Another window appears on the screen, with lots of crazy-looking rows of numbers (see Figure 5.11).

The numbers and other characters scroll up from the bottom of the screen and off the top, and they move much faster than I can read. You shouldn’t even try to read that stuff. Just wait about 8 to 10 minutes for Binvox to finish its work; it’s taking the data stored in the .obj file that defines the shape and structure of the 3D model its changing that into the .schematic file format that MCEdit can read.
At some point, yet another window appears, containing a colorful shape of the 3D model, as shown in Figure 5.12. As part of the conversion process, this shape changes from a top view to a side view and on to other angles. The conversion process takes a little time, so be patient.
When the conversion process is done, I take another look in the vox_package folder and see that there’s a new file called bigrobot.schematic, as shown in Figure 5.13. Woo hoo!

Now that I have a .schematic file, I can use MCEdit to import the robot into one of my Minecraft worlds.
I’ve got Minecraft and MCEdit installed on both my Mac laptop and my Windows desktop computer. Since I used my Windows computer to do the Binvox conversion, I’ll stick around and import the robot model with MCEdit.
Note
I’ve got Minecraft and MCEdit installed on both my Mac laptop and my Windows desktop computer (and the worlds I create and edit on each computer are compatible). Since I used my Windows computer to do the Binvox conversion and the .schematic file is on my computer, I’ll use MCEdit to import the robot into one of my other Minecraft worlds. I could just as easily copy the bigrobot.schematic file over to my Mac laptop and import it there, but I want to show you that most of the processes in this book can be done with both Windows and Mac machines.
Importing and Sizing the Robot
Remember that when you use Tinkercad for creating .schematic files, at one point in the process you are asked to specify the block size to be used. The default is 1mm (millimeter) is equal to 1 block, so a 50mm-tall object in Tinkercad will be 50 blocks tall in Minecraft. Knowing this is helpful for sizing 3D models and helping you find suitable locations for them in your Minecraft worlds.
There’s a slight problem with the .obj file created in 123D Sculpt+. You can’t specify the dimensions (height, length, and width) of a 3D model in the app. You may have noticed that during the Binvox conversion process, I was never asked to specify a size for the robot 3D model. But I’m not worried because I know that MCEdit will allow me to modify the size of an imported object before I place it permanently.
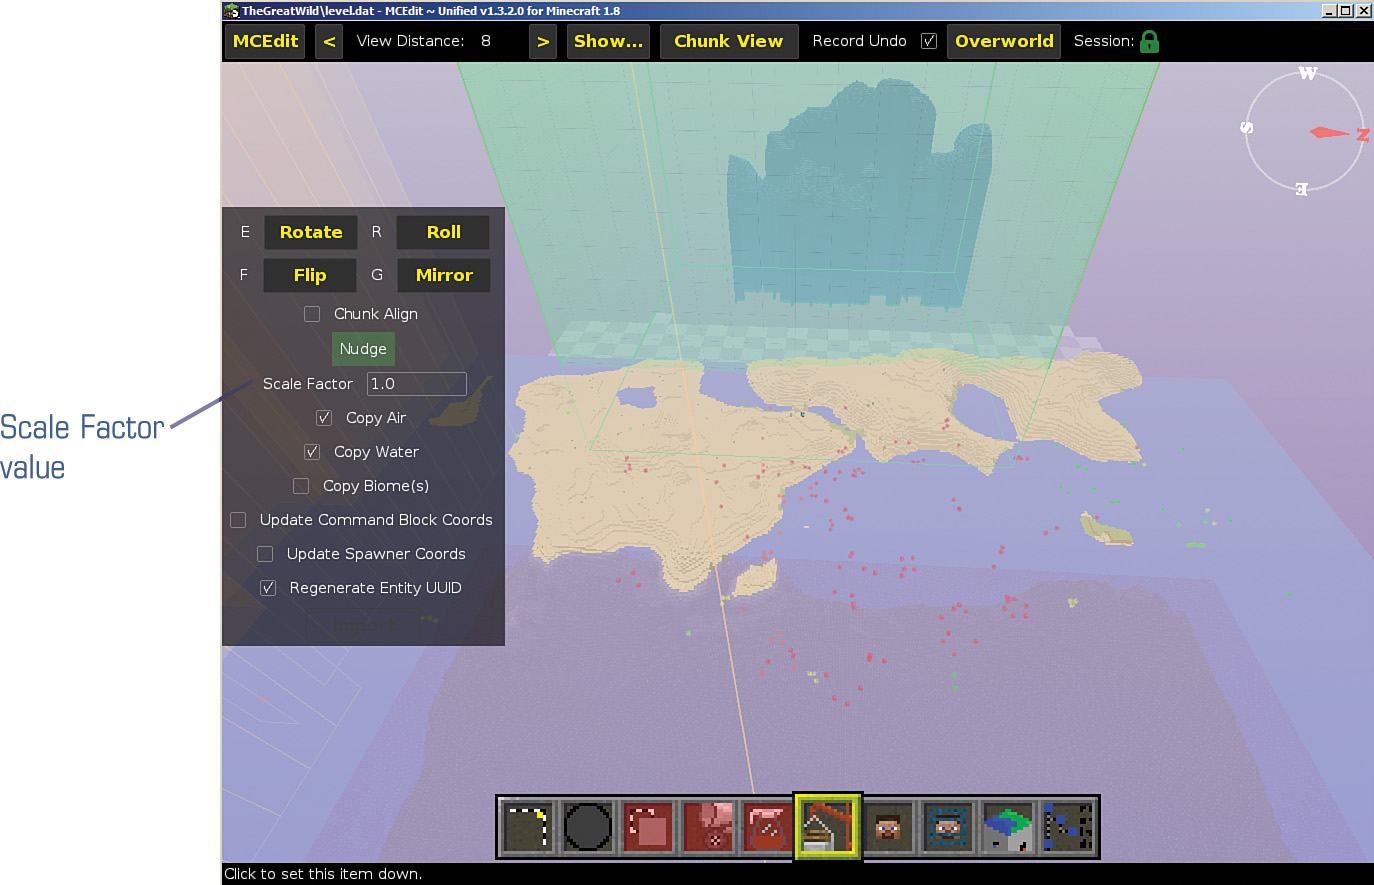
Let’s take a look at how to modify the size of my imported robot using an MCEdit control. Figure 5.14 shows that I’m inside MCEdit, and I’ve opened up one of my worlds (found on my Windows computer), called TheGreatWild.

Just as Easter Island has those huge monoliths staring out at the ocean, I’d like to place my big robot facing out at the ocean, warning away any unfriendly visitors.
Note
Easter Island monoliths
There are a lot of theories about the large stone faces that line the shore of Easter Island. One of them is that the stones were meant to look like giants that lived on the island. The idea is that the “giants” would scare away anyone approaching the island. You can read more information on Easter Island, including theories on how the island’s inhabitants made and transported these giant stones, by visiting http://en.wikipedia.org/wiki/Easter_Island.
I’ve found a suitable place for the robot and clicked the Import button to start the process. As you can see in Figure 5.15, however, the green box that indicates the size of my robot is very large—too large. It almost completely covers both islands!
Thankfully, MCEdit allows me to resize the robot before placing it. To do this, I need to click on the Scale Factor value box (the default is 1.0) and change it to 0.5 (half size) or even 0.25 (one-quarter size). But even after I try out 0.25, I can see that the robot is still too large (see Figure 5.16). (You might also notice the shape of the robot: He’s lying down rather than standing on his feet! Don’t worry. I’ll fix that shortly.)

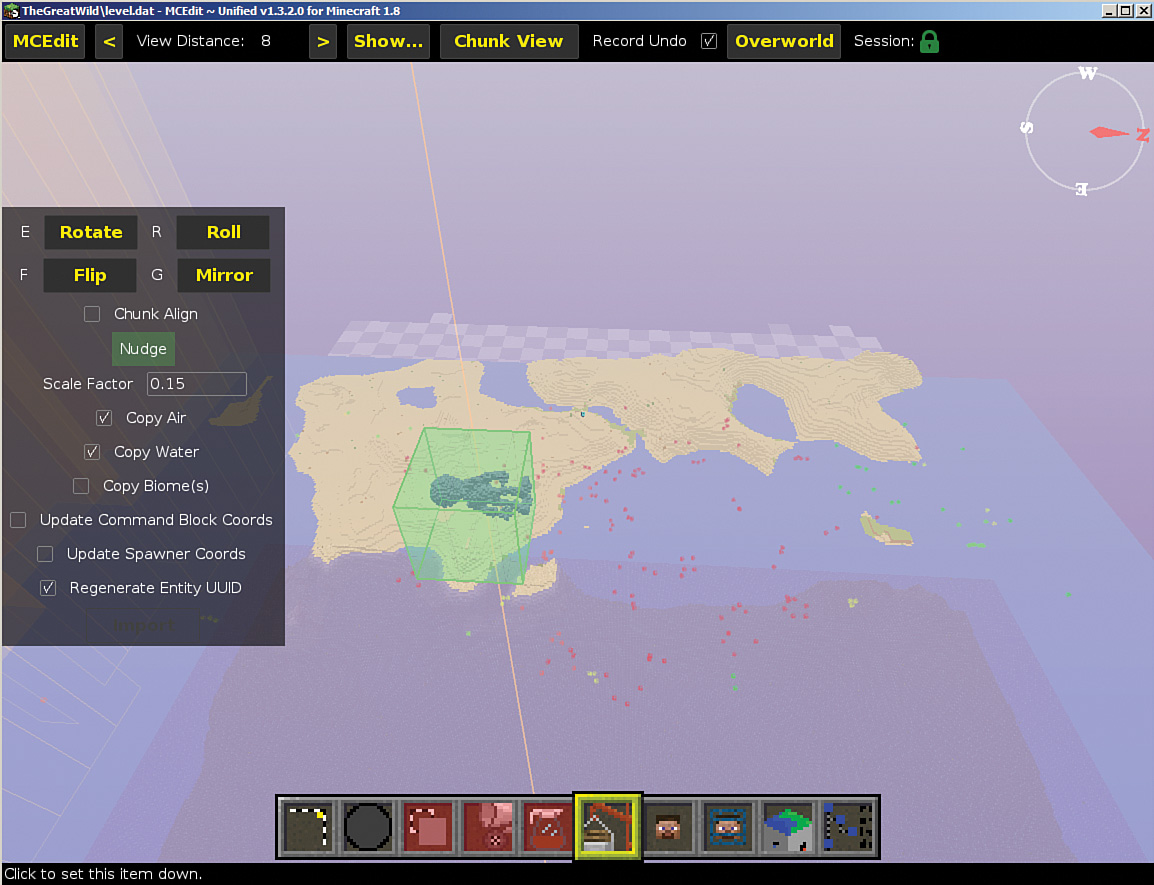
I try changing the Scale Factor value to 0.15 and think that I have found the perfect size for my robot, as shown in Figure 5.17.
I click the spot where I want to place my robot, but notice in Figure 5.18 that he’s still lying down, so I need to correct his orientation.
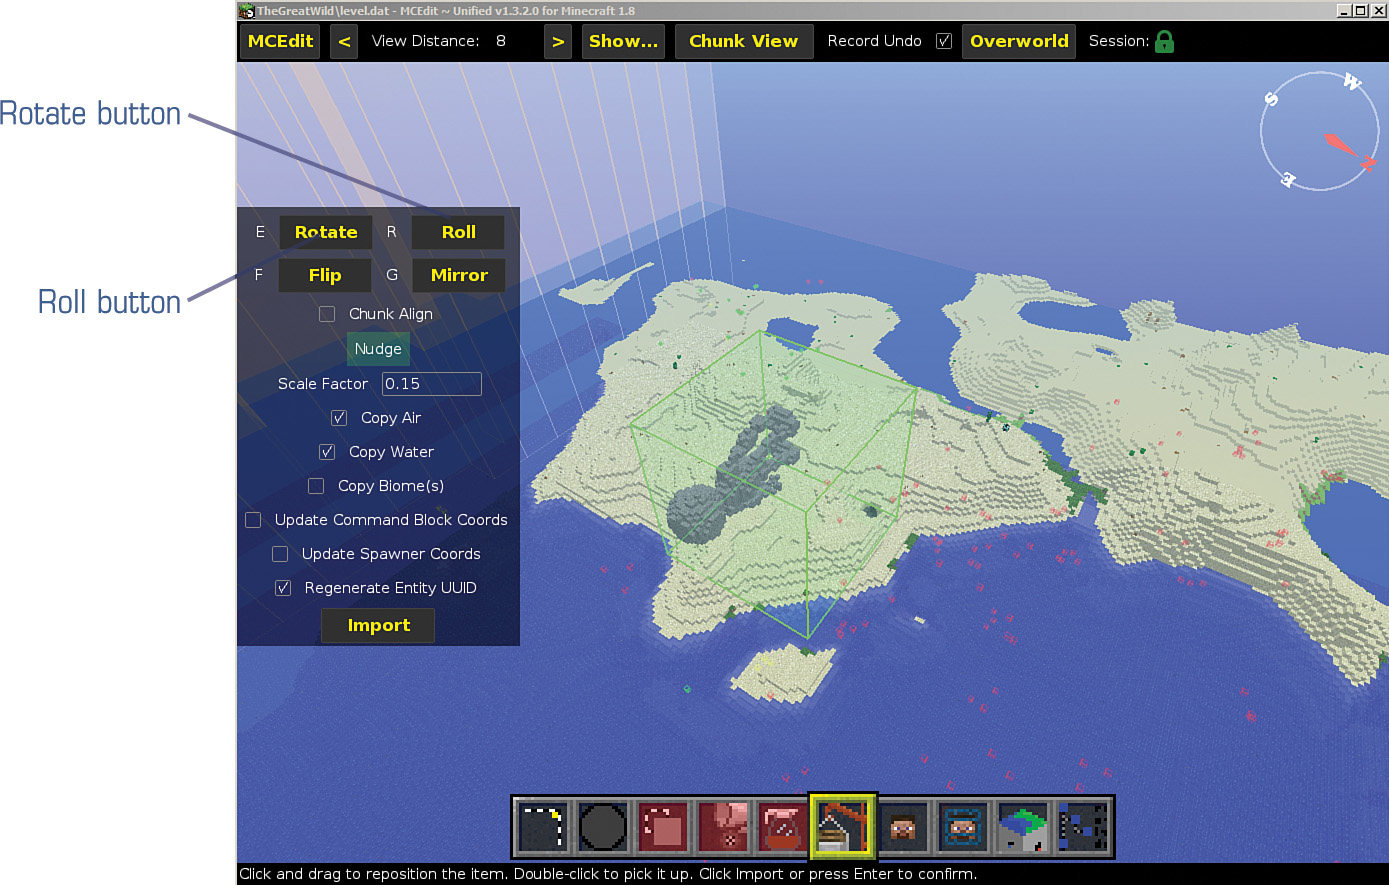
I’ll use a combination of clicks on the Rotate and Roll buttons to get the robot standing up. After a few test clicks, I’ve got the robot standing up, but now I see that I’d like him to be more centered on the shore of the left island.

By clicking and holding down the Nudge button, I can use the WASD keys to move him forward, backward, left, and right. Figure 5.20 shows that I’ve got the robot right where I want him.

All that’s left to do is to click the Import button to finalize the import action. When the import is finished, I click on the MCEdit menu (in the upper-left corner of the screen) and select the Save option.
Note
Binvox doesn’t care about colors
The robot’s colors don’t carry through during the conversion process. I can go in and use blocks of different colors if I want to give him some color, but I like the pure gray stone color because it reminds me of the Easter Island faces.
After closing down MCEdit, I open up my TheGreatWild world in Minecraft and take a walk to visit my new island guardian (see Figure 5.21).

I could have some fun and import 10 or 20 more copies of the bigrobot.schematic file and place them all around my island to create my own version of Easter Island…but with giant robots.
Binvox Opens Up Many Possibilities
None of what I’ve done in this chapter would be possible without the ability to convert .obj files to .schematic files that Binvox provides. Being able to make this file type conversion opens up many more opportunities for my Minecraft worlds. Just as Thingiverse.com allows me to browse and find interesting .stl files to import into Tinkercad (and then into Minecraft via MCEdit), there are also online libraries of free .obj files (such as the one offered byTurboSquid at http://www.turbosquid.com/Search/3D-Models/free/obj) that you can browse to find fun and interesting 3D models.
One final thing: The 123D Sculpt+ app isn’t the only app out there that can create 3D models using the .obj file format, but it is one of the most fun apps to use. I’ll go into a few of the basics of using it in Chapter 6, but it’s not hard to figure out on your own, so feel free to download it and try it out now.
Up Next...
Before this chapter, you already knew that Tinkercad allows you to convert .stl files (and .svg files) into .schematic files that MCEdit can import into your Minecraft worlds. Now you also know about Binvox, a command-line program that can convert .obj files into .schematic files. All that you need to do now is get some more instructions on installing and using the 123D Sculpt+ app and the Binvox program. Up next in Chapter 6, I’ll provide a more detailed explanation about using 123D Sculpt+ and Binvox so you’ll have another couple tools for your Minecraft digital tool belt.