
7. Seeing Your World in 3D
What You’ll Be Doing
![]() Coolcrafter10 meets PackRat and Prism
Coolcrafter10 meets PackRat and Prism
![]() Having fun outside the Minecraft game
Having fun outside the Minecraft game
![]() Examining the Oculus Rift
Examining the Oculus Rift
![]() Obtaining your own 3D Viewer
Obtaining your own 3D Viewer
![]() Taking screenshots of your Minecraft worlds
Taking screenshots of your Minecraft worlds
![]() Creating 3D Image Cards for viewing
Creating 3D Image Cards for viewing
As the forest cleared, Didgee waved back at Coolcrafter10. “Come on. We’re almost there! My friends and our castle are just over this small hill.”
Coolcrafter10 walked a bit faster, catching up with his new friend as they reached the top of the hill. Standing next to Didgee, Coolcrafter10 looked down at the valley below and gasped. A castle unlike any Coolcrafter10 had ever seen reached high into the clouds. “That’s where you live?” asked Coolcrafter10.
“With my friends,” replied Didgee. “We’ve shared it for a year now, and we just keep making changes to it.”
Coolcrafter10 shook his head. “It’s incredible. I wish I’d brought my camera to take a photo. I’d love to show it to my family.”
“I’m sure we have a camera somewhere you can borrow. Come on. I’ll introduce you to my friends.”
Coolcrafter10 stepped carefully as he followed Didgee down the steep path cut into the hill’s side. In the distance he could see some sheep grazing outside the castle’s main entrance, and a few horses were being chased by two figures in armor.
At the bottom of the hill, Didgee waved at the two figures: “Prism! PackRat!”
The two figures waved back and began walking toward Didgee and Coolcrafter10. Coolcrafter10 could see one was a boy and one was a girl. They looked like twins. As the two groups met, Didgee hugged them both and turned to smile at Coolcrafter10.
“Prism and PackRat, this is my new friend, Coolcrafter10. Cool, meet Prism and PackRat,” said Didgee.
The girl smiled and waved. “Hey, I’m Prism. Where did you get that backpack? Did you make it or buy it? It looks like it’s made of dragon scale. Is it heavy?”
The young boy shook his head and stuck out his hand. “I’m PackRat. Forgive my sister. She’ll ask a million questions if you let her.”
Coolcrafter10 shook PackRat’s hand and nodded at the castle. “It’s okay. I have that many questions about your castle there.”
Prism beamed. “Well, we can take turns then. Why don’t both of you come inside and rest, and we can visit. I really want to hear all about Didgee’s latest adventures away.”
Coolcrafter10 followed Didgee and her two friends as they began walking toward the castle. He whistled as he got closer. “I don’t think any of my friends have ever built anything this impressive.”
“That reminds me,” said Didgee. “Don’t we have a camera somewhere, PackRat? Cool wanted to take a photo of the castle.” She followed Prism through the doorway and into the entry hall of the castle where she dropped her bag and sat down on a nearby chair. “Have a seat, Cool. I’ll bet you’re as tired as I am.”
Coolcrafter10 nodded and sat down next to Didgee. “I’d love to email my friends a photo of that castle. It’s not as good as standing here in person looking at it, but it’ll do…if you can find a camera.”
Prism jumped a bit. “Oooh, oooh! PackRat, maybe we can test out our new project and give Coolcrafter10 something better to share with his friends!”
Didgee’s left eyebrow went up, and she smiled. “New project? Have you guys been working on something without me?”
PackRat grinned and began digging through a nearby cabinet. “Well, you were gone for a few weeks, Didgee. Plenty of time for Prism and me to find something new and fun to do. And yes, Prism, I think the castle would make a great test of our new idea. We can show them before we tackle building the guardian monster on the hilltop.”
“Tell me,” said Didgee. “Don’t hold back if you’ve got some new tool to make Minecrafting easier and more fun.”
“Oh, you’re going to love it,” said Prism. “It’s so much fun to do.”
Coolcrafter10 looked at Prism, then PackRat, then Didgee. “Didgee has been showing me some of the amazing tools that your group uses for Minecrafting, and now you’re telling me you have yet another special tool?”
PackRat nodded and pulled out a camera. “It’s not a tool for crafting, but I think you’ll both like it. How would you like your friends to be able to see a picture of our castle in 3D, just as if they were standing outside looking at it?”
Didgee and Coolcrafter10 both smiled. “Show us.”
Having Fun Outside Minecraft
Most of this book’s lessons involve creating something and then taking it into a Minecraft world. So far, you’ve used Tinkercad and Thingiverse and 123D Sculpt+ to find or create objects that are converted to .schematic files. You’ve also used MCEdit to import the .schematic files into a Minecraft world of your choosing. Basically, for all the projects you’ve seen so far in this book, you’ve done something outside Minecraft and then used MCEdit to move it inside Minecraft.
But in this chapter and Chapter 8, “Viewing Your Worlds—Full 360!” I’m going to show you a couple interesting projects that start inside a Minecraft world first and then have you leave the game for some fun.
To better understand what we’ll be doing, I want you to take a look at your surroundings right now. You live and breathe in a three-dimensional world. Objects have length, width, and height, and objects can be described as being near or far away. Most humans have two functional eyes that allow them to see the world around them and determine when something is close or distant; we call this depth perception, and it’s an ability that helps us navigate the world around us. With both eyes open, you can easily figure out whether something is within reach of your hands. A driver in a vehicle can determine a safe distance to put between the front bumper of her own car and the car in front of her to avoid a collision. Baseball players can decide how much energy to put into throwing a ball to get it from third base to first.
Once again, look around you and mentally decide what is close and what is far away. Once you’ve done this, close one eye. Now examine the same surroundings and determine how near or far away objects are. Did you notice that something changed when you closed one eye? That happened because seeing out of only one eye causes you to lose your depth perception. You can still see things around you, but it’s much more difficult to determine what is near or far because your 3D world is now more of a 2D world.
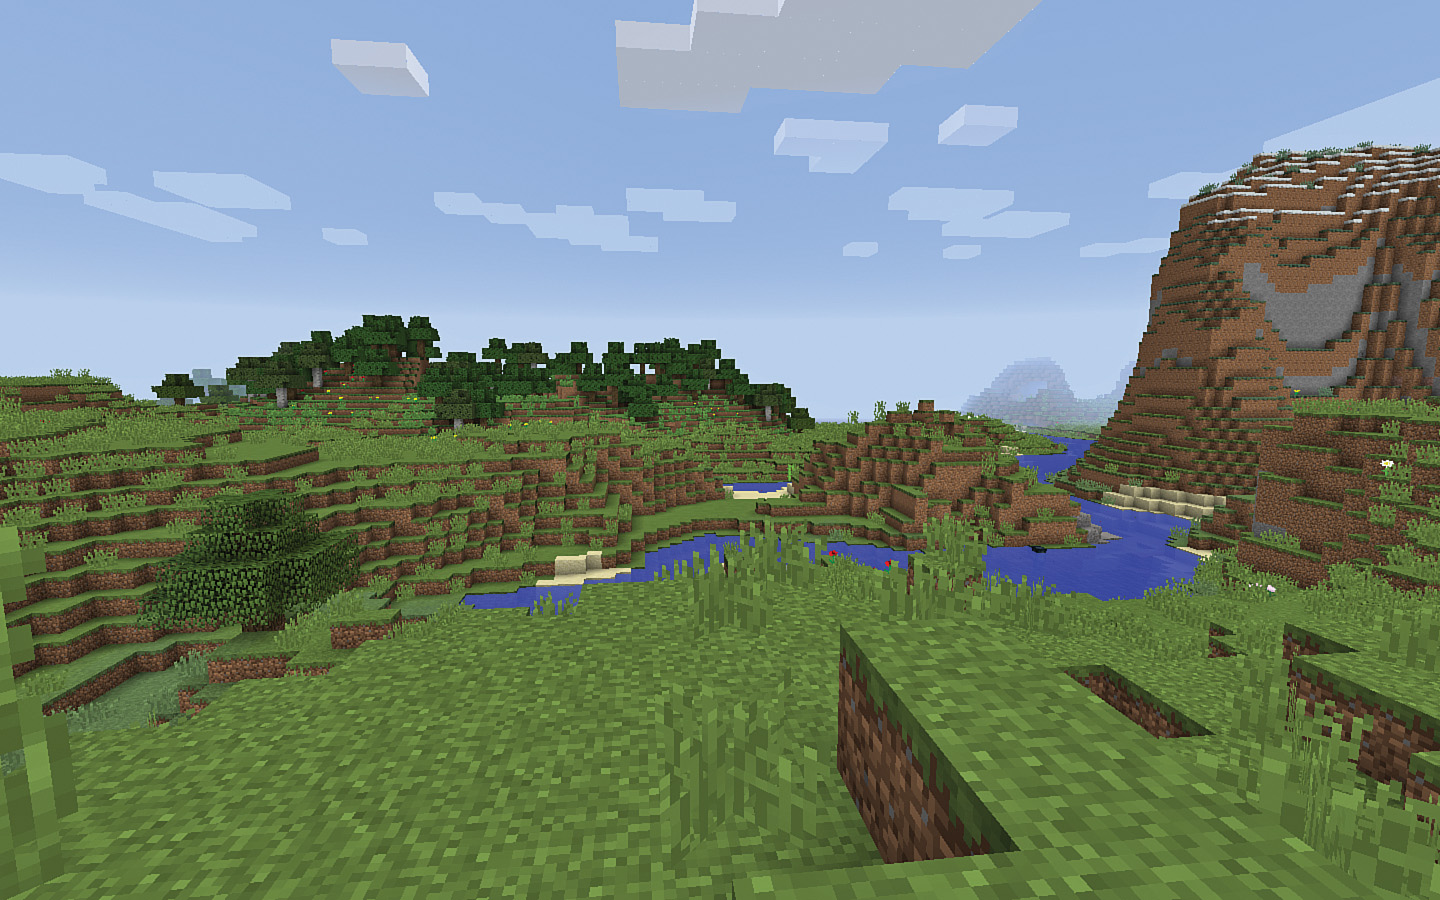
Two-dimensional objects are flat—they have length and width, but they lack height (or depth). When you play Minecraft and view your world on a computer screen, you’re actually looking at a flat screen. The world is three-dimensional because you can move around in it, but it’s still a 2D representation because the game’s imagery is displayed on a two-dimensional screen. You know the trees in Figure 7.1 are in the distance but only because they are smaller, and your brain knows that smaller objects displayed in Minecraft are small because they’re far away.
As you move around in Minecraft, the software performs calculations that determine what is displayed on your screen. Turn left, and whatever is to the left of your avatar is displayed. Look straight ahead, and objects that are close and far are both displayed together on the 2D screen. Both of your eyeballs are seeing exactly the same image. Because of this, your brain sees the Minecraft world exactly as you’d see it if you had one eye closed. Try it! Look at the screen with both eyes open and then close one. Nothing changes. You’re getting closer to the secret of how our eyes work.
It’s your brain’s ability to combine a left image and a right image (from your left and right eyeballs) into a single image that provides you with three-dimensional vision and depth perception.
And now you’re probably beginning to realize that the image of your Minecraft world on a computer screen presents exactly the same image to both your left eye and your right eye. You may be playing in a 3D world, but you’re not seeing it in three dimensions. Your surroundings don’t jump out at you like they do in a 3D movie How might you be able to see your Minecraft worlds in such a way that mountains truly appear in the distance and Creepers are actually getting closer and closer to you? Believe it or not, there are ways to experience Minecraft in this manner.
For now, just know that it is possible. There are several ways you can view your Minecraft world in 3D. In this chapter, we’ll look at two of them: One is very expensive, and the other is not. Let’s look at both and then see how you can use the inexpensive option to see your Minecraft worlds as they really should be seen—in amazing 3D!
Viewing with the Oculus Rift
There are more than a few solutions to viewing computer screen images in 3D, but I’m going to focus on just two in this chapter. One way is to use a specialized device that can easily cost more than the computer that runs Minecraft but provides constant 3D imagery as you play your game. The other is a small $3 device that is easy to obtain but lets you view only a single 3D image that you select from your game (similar to viewing photographs of an event rather than a video).
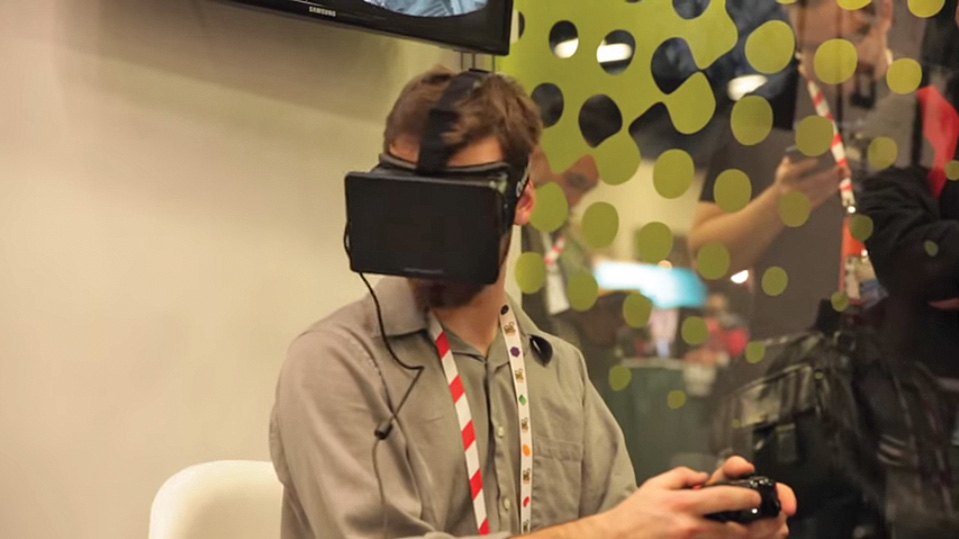
The expensive device is called an Oculus Rift, and you can see it in Figure 7.2.

The Oculus Rift attaches to your computer, and for many applications (including games like Minecraft), it provides your left eye and your right eye with two different images. You wear it over your eyes as shown in Figure 7.3 and use a joystick or mouse and keyboard while viewing what is displayed on the two screens in front of your eyes. While you’re wearing a Rift, your brain combines these two images, and you end up being able to view the game (or other application) in 3D. Mountains in the distance actually appear far away in Minecraft. A nearby sheep appears close enough to touch.
It’s an amazing technology that is sure to change the way we play games, but right now it has two limitations. First, it’s not out yet. As I’m writing this book, the group that is building and testing the Oculus Rift is stating that it will be released in early 2016. It remains to be seen if the company will make that deadline as the Oculus Rift has had a number of setbacks. It will eventually be released, but there’s always a risk that another company could come out with something much sooner—and possibly with even better capabilities.
The second limitation is one I’ve already mentioned—price. The Oculus Rift is likely to be priced around $350. This price doesn’t include the computer that will also be needed, and it’s quite possible that the computing power needed for Oculus Rift to operate properly could require you to purchase a computer that is significantly higher in price that the Oculus Rift.
Note
Two 3D viewing technology options
You can read all about the Oculus Rift at the official website, as well as receive updates about its release. Point a web browser to https://www.oculus.com to learn more. And while you’ve got a web browser open, you’ll definitely want to read and see details about Microsoft’s take on 3D technology called HoloLens. Visit https://www.microsoft.com/microsoft-hololens/en-us and be sure to watch a video (https://youtu.be/xgakdcEzVwg) on one possible future for Minecraft that uses holographic technology to view your worlds.
Ultimately, however, price and release date don’t matter. Game players around the world will be flocking to buy the Oculus Rift so they can see their favorite games in full 3D. And maybe you’ll be one of those Oculus Rift users who will get to experience Minecraft in full 3D! For now, however, you’ll just have to wait like most everyone else until the Oculus Rift is released. But that doesn’t mean you can’t get a little preview of what Minecraft will look like in true 3D.…
Imagine for a moment being able to share your favorite castle or mountain or other locale in Minecraft with your friends and family in 3D. Imagine letting people see these sites as if they were actually standing in your world. Would you like to know how to do that? I thought so.
Using a 3D Viewer
This chapter’s project has two parts to it—the first involves obtaining a special 3D viewer and the second involves taking screenshots of various Minecraft scenes in your world and editing them for use with the 3D viewer. You might be familiar with a very popular 3D viewer called the View Master. This has been a popular toy for kids for decades, using small paper discs with small images (printed on plastic film) to provide 3D images for viewing. You don’t have to make your own paper discs, however—with the 3D viewer described below and the steps later in this chapter for taking screenshots, you’ll have all you need to make your own homemade 3D images.
First, the easier task—obtaining a 3D viewer. There are a number of places on the Internet that sell them, and you can search online for “3D viewer” and sift through the various shapes and sizes. The one I recommend is made by a company called Loreo. You can visit http://www.loreo.com and scroll down the page to look at the various 3D viewer models they sell. Most of them are made from heavy cardstock with special small lenses mounted inside. My favorite is the Loreo Lite 3D Viewer, which folds flat and can be stored easily or even sent through the postal service in a regular envelope. Best of all, the Loreo Lite 3D Viewer is less than $5 (including shipping). Figure 7.4 shows the Loreo Lite 3D Viewer.

3D viewers come in many shapes and sizes and materials. If you buy one, just make certain that it is the two-lens variety that can be used for stereoscopic photography. (Stereoscopic means that two images are viewed with the viewer—an image on the left and an image on the right.) You’ll see examples of these types of photos later in the chapter.
Ordering a 3D viewer is easy, but you’ll have to wait a few days or weeks for it to arrive. Thankfully, you can start creating the 3D images that you’ll use with the 3D viewer right away, and you’ll have plenty of them ready to go when the viewer arrives.
There are two ways you can create your 3D images:
![]() You can use JPEG files that you view on your computer screen.
You can use JPEG files that you view on your computer screen.
![]() You can have 4×6 photographs printed.
You can have 4×6 photographs printed.
I’ll show you how to do both methods, although my preferred method is the second one. There’s just something really fun about a stack of 3D photos that you can take to share with family and friends (along with your 3D viewer).
Both methods start in a Minecraft world. I’m going to open up one of my favorite Minecraft world and get ready to create some 3D images.
Taking Minecraft Screenshots
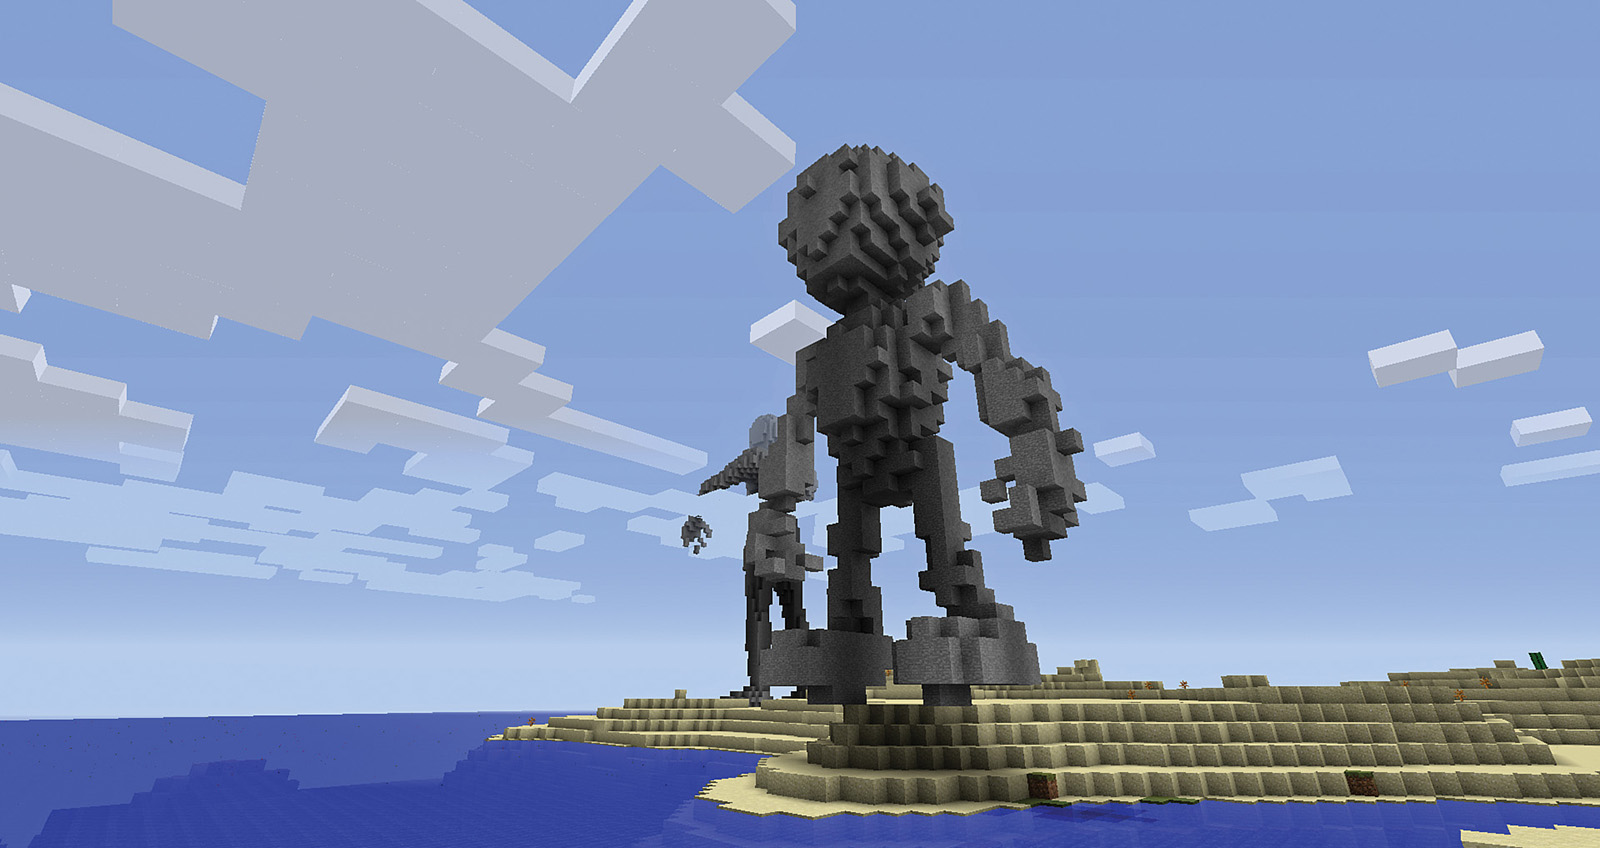
Take a look at Figure 7.5, and you’ll see that my game avatar is standing on flat ground, looking at one of the recent additions to my world, the monster guardian from Chapter 6, “Creating Your Own Monster Island.” In the distance, you can see another large statue.

As I stare at this screen, I close my right eye and look at what’s shown in Figure 7.5. Next, I open my right eye and close my left eye. And I see exactly the same image shown in Figure 7.5. That’s because this is a 2D image.
What I need to do is take two screen captures (also called screenshots or screen grabs). One screenshot should show what my in-game avatar would see if he closed just his right eye. The other screenshot should show what my in-game avatar would see if he closed only his left eye. These two images will simulate how a real person’s eyes see two slightly different versions of the same view. But how do I do this?
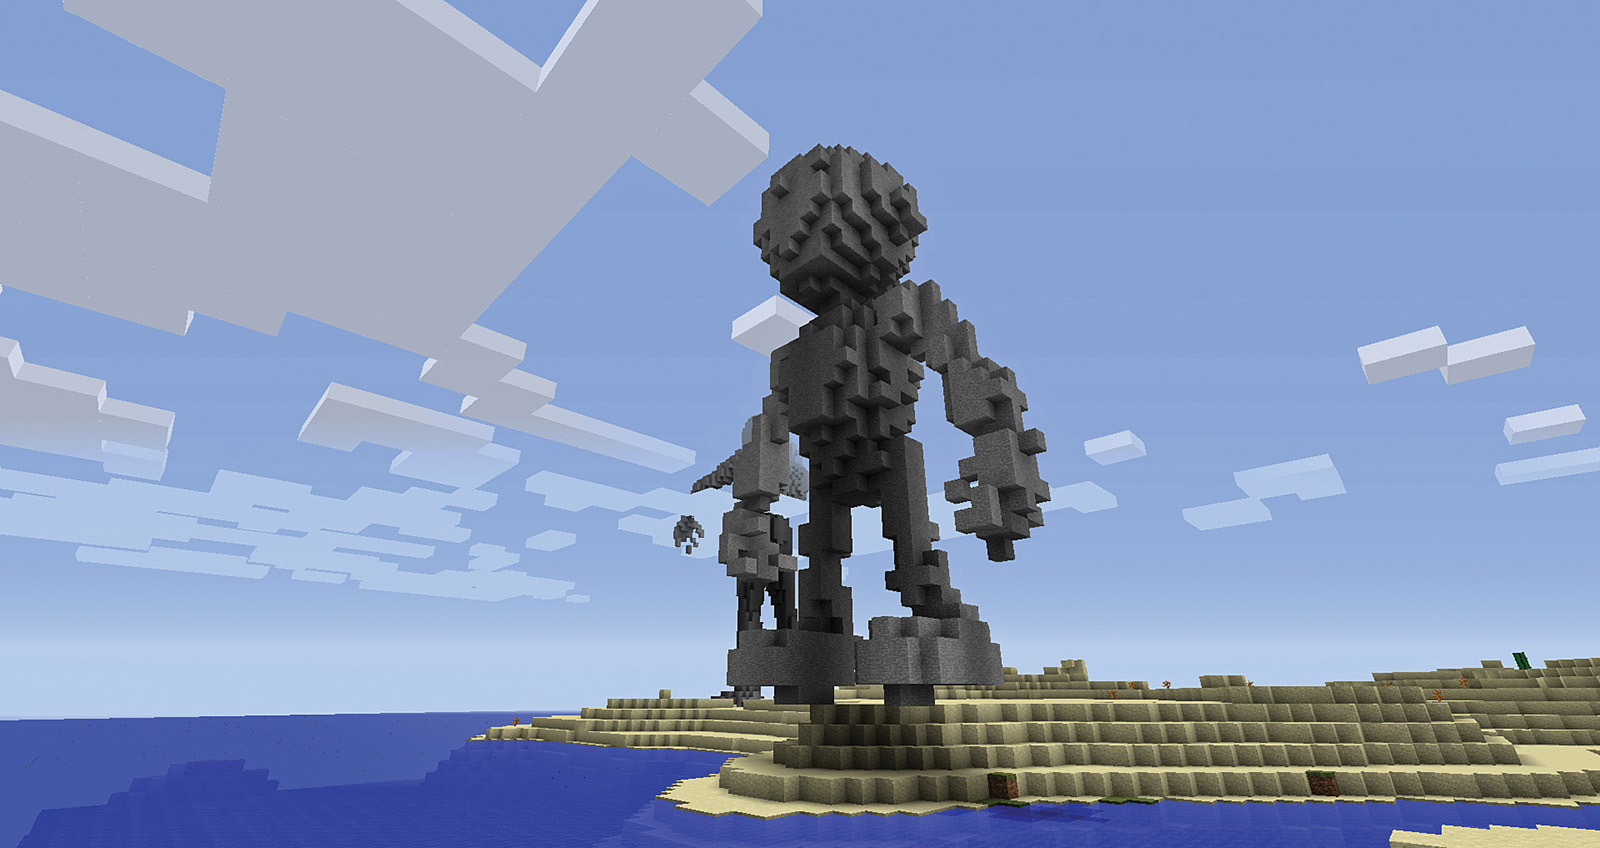
First, notice in Figure 7.5 that you can see my tools, my health and food bars, and my hand. I’d like for those to go away so I can see more of the surrounding landscape. Fortunately, Minecraft makes this really easy. Press the F1 key in Windows or press Fn key on a Mac keyboard and then press the F1 key. (This is the default setting—if you’ve made changes to your key assignments, you may need to check to see the key combination you used as a replacement.) Doing this causes your avatar’s hand and the other visuals to disappear, leaving behind an unobstructed view, as shown in Figure 7.6.
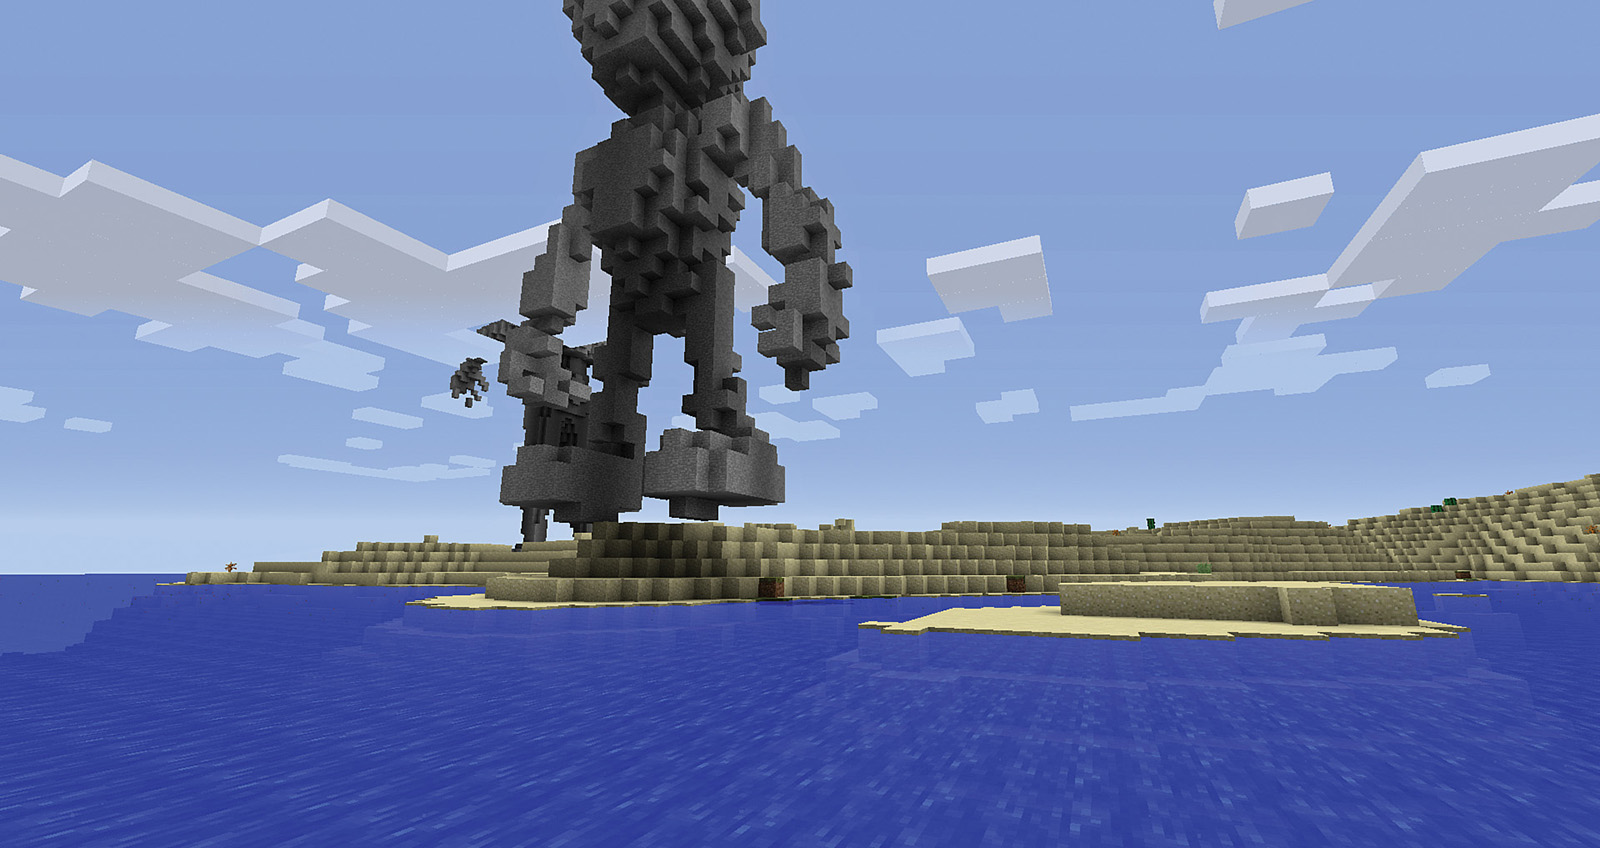
Next, move your mouse around until you’re happy with the full screen view. It’s best to have whatever you wish to be the main focus of the image centered on the screen. In Figure 7.6, you can see that I’ve got the large stone figure centered.
Once you have a mountain or castle or other object centered, it’s time to take your first screenshot. Carefully move your hand away from the mouse or touchpad. You do not want to change the current view on the screen by looking around or accidentally moving the mouse/touchpad.
To take a screenshot, in Windows, press F2. On a Mac, hold down the Fn key and press F2. (Again, these are the default settings—change them back or check the Options settings for key assignments if you’ve made changes.) This first screenshot will represent what is seen by your avatar’s right eye. (I’ll tell you in a moment where to find the screenshots that are stored on your computer.) Figure 7.7 shows the screenshot I got when I did this.
After taking the first screenshot, use the A key to move to your left. Press the A key long enough to say “One Mississippi” and release it. Be careful not to move the view onscreen with the mouse or touchpad; the only movement that should occur is that your avatar moves slightly to the left. Take another screenshot with the F2 key (or Fn+F2 on a Mac), and you’re done taking screenshots for now. You can repeat this procedure as many times as you like in as many locations and worlds in Minecraft as you desire. It’s these matched pair of images that you’ll be using with your 3D viewer to see your various Minecraft scenes as if you were standing right there in the digital world.
Figure 7.8 shows the screenshot I took after moving my avatar slightly to the left. Compare it to Figure 7.7. Although Figures 7.7 and 7.8 look pretty much identical, you’ll notice some subtle differences between the two if you look carefully. (For example, look at the small cloud to the right of the monument’s hand. In Figure 7.7 there’s a larger gap of blue sky between the cloud and the wrist than there is in Figure 7.8.)
Next, I’m going to use this pair of screenshot to create a 3D image card that can be used with a 3D viewer.
Note
Collecting your worlds’ sites as 3D image cards
Using the method described here, you can easily create a nice collection of 3D image cards, showing various interesting sites in your world. You can go so far as to create a small scrapbook for each of your worlds that holds the famous sites and creations you’ve added. You’ll learn how to create 3D image cards later in the chapter.
Locating Your Screenshots
Before you can use your 3D viewer, you need to locate the screenshots you took, rename them, and then resize them on your computer screen so they can be properly viewed.
The folder holding your Minecraft screenshots will vary depending on whether you are using a Windows or Mac computer.
Finding Minecraft Screenshots on a Windows Computer
If you’re a Windows user, click on the Start button and in the Search box at the bottom, type in %appdata%, as shown in Figure 7.9, and press the Enter key.

Windows will display a list of folders, including one called .minecraft. If you double-click the .minecraft folder, you’ll see a list of folders like the one in Figure 7.10.
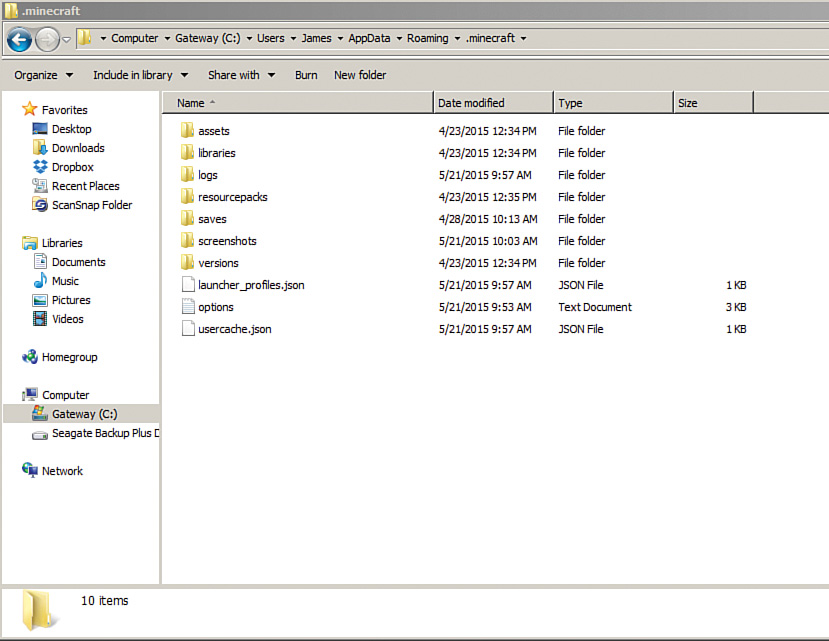
In case you didn’t spot it already, double-click on the screenshots folder (which in Figure 7.10 is the sixth folder down the list). Any screenshots you’ve taken will appear here. Figure 7.11 shows the two screenshots I took.

Copy these images to a folder that you’ll be able to more easily find; I copied them to a “Minecraft Screenshots” folder I created on my desktop. I also like to copy them to a thumb drive so I can take them to have them printed.
Unless you’re curious about how to do this on a Mac, you can jump to the “Preparing Your Screenshots” section, where I’ll show the next steps.
Finding Minecraft Screenshots on a Mac
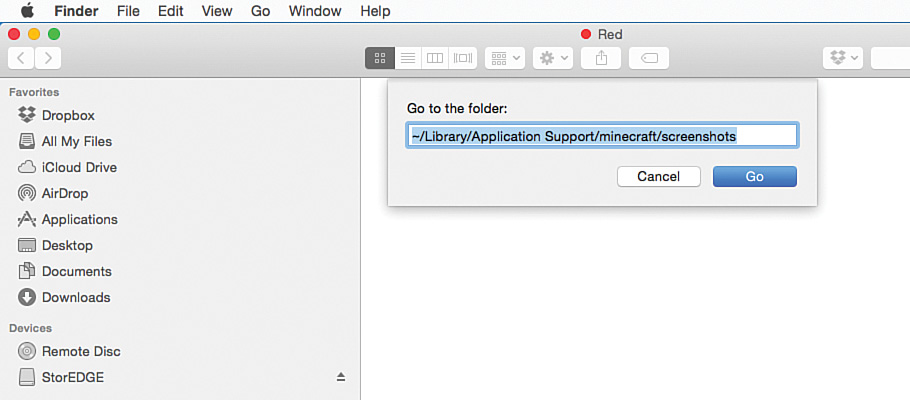
To find your screenshots on a Mac, open the Finder window (shown in Figure 7.12), click on the Go menu, and select Go To Folder.

A small box like the one in Figure 7.13 opens. In the box, type in ~/Library/Application Support/minecraft/screenshots and press the Enter key.
The screen changes to show the contents of the screenshot folder, as shown in Figure 7.14.

Copy these images to a folder that you’ll be able to more easily find; I’ve copied them to a “Minecraft Screenshots” folder I created on my desktop. I also like to copy them to a thumb drive so I can take them to have them printed.
Once you’ve got the screenshots where you can easily access them, it’s time to prepare them for viewing.
Preparing Your Screenshots
To properly use your 3D viewer, you have to place the image pairs side-by-side. It’s important that the screenshot taken for the right-eye view is placed on the right and the other screenshot (the one for which you moved your avatar slightly to the left) is placed to the left. Figure 7.15 shows that I’ve placed these two images side-by-side on my Windows desktop.
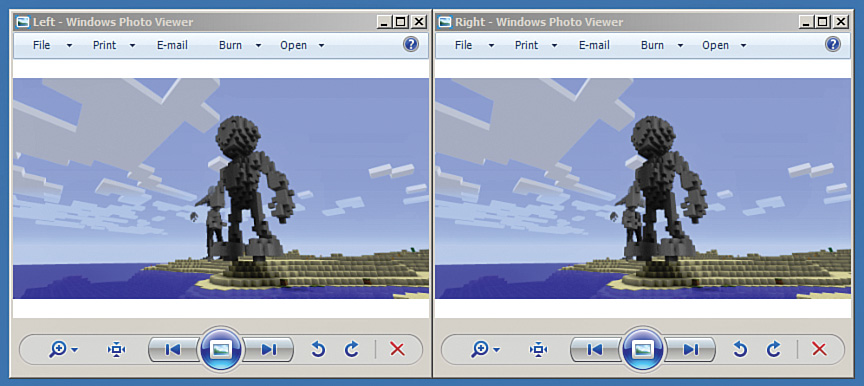
When I double-click them, they open using the Windows Photo Viewer, which lets me resize them by clicking and dragging on the lower-right corner of the window.
Tip
Distinguishing between left and right images
If you can’t remember which screenshot goes on the right, look at the filenames. A computer names screenshots based on the date and time the image was taken. For example, I have two screenshots with filenames 2015-05-21_10.01.11 and 2015-05-21_10.01.14. The numbers before the underscore show the date (May 5, 2015), and the numbers after the underscore (separated by periods) show the time. You can see that I took the one with the timestamp 10.01.11 (10:01 and 11 seconds) before the one stamped 10.01.14 (10:01 and 14 seconds), so that makes the first file my right-eye view and the other my left-eye view. You can rename these files “left view” and “right view” if it helps.
It’s important to shrink the photos down a bit. The Loreo Lite 3D Viewer works best when both the left and right images are no more than 3 inches wide, making for a 6-inch-wide pair of images. It’s hard to tell in Figure 7.15, but these images on the screen are about 3 inches wide and 1.5 inches tall.
To view the 3D image, you simply hold up the 3D viewer so that your left eye is looking through the left lens while your right eye is looking through the right lens. Try to center it by getting your nose lined up with the dividing line that runs vertically between the two images. Look through the viewer, and your Minecraft world should suddenly jump to life as you view it in 3D!
If you’re a Mac user, you perform the same steps with your screenshots, but the images will open in the Preview app. Once again, place them side-by-side and shrink them a bit so both images are no more than 3 inches or so wide. Figure 7.16 shows that I’ve placed two screenshots on my Mac screen together. You can look at the filenames in the right and left images to see that the 2015-5-21_12.16.06 file is on the right and the 2015-5-21_12.16.08 file is on the left. It only took two seconds for me to shift my avatar to the left and take the left-eye image.

Using this method, you can store a bunch of screenshot pairs that you can share with friends and family members on your computer screen. (Rename them things such as Monument_Left and Monument_Right so you can more easily find them and open them together.)
Even though this is an easy way to view Minecraft worlds in 3D, I much prefer to have printed copies because I can make something I called 3D image cards.
Creating 3D Image Cards
3D image cards are easy to make and fun to share with your friends. To make them, you need to have your screenshots printed. There are many options out there, from online ordering with companies such as www.snapfish.com to using a self-serve kiosk like you find at stores like Walgreens or Target.
You’ll want to have them printed as 4×6 photos, and if the option exists for matte (versus glossy), choose it. Online ordering is usually slower since the photos must be mailed to you, but they typically have a lower cost per photo to print. Self-serve kiosks often print them out immediately (or within an hour), but they’re usually a few pennies or more extra per photo. (There’s an in-between option, too: You can send your photos to a store like Walgreens and pick them up in the store a short time later.)
Figure 7.17 shows six photos I had printed at a self-serve kiosk. You can’t tell from the figure, but the photos are very bright and vivid, and the detail is amazing.
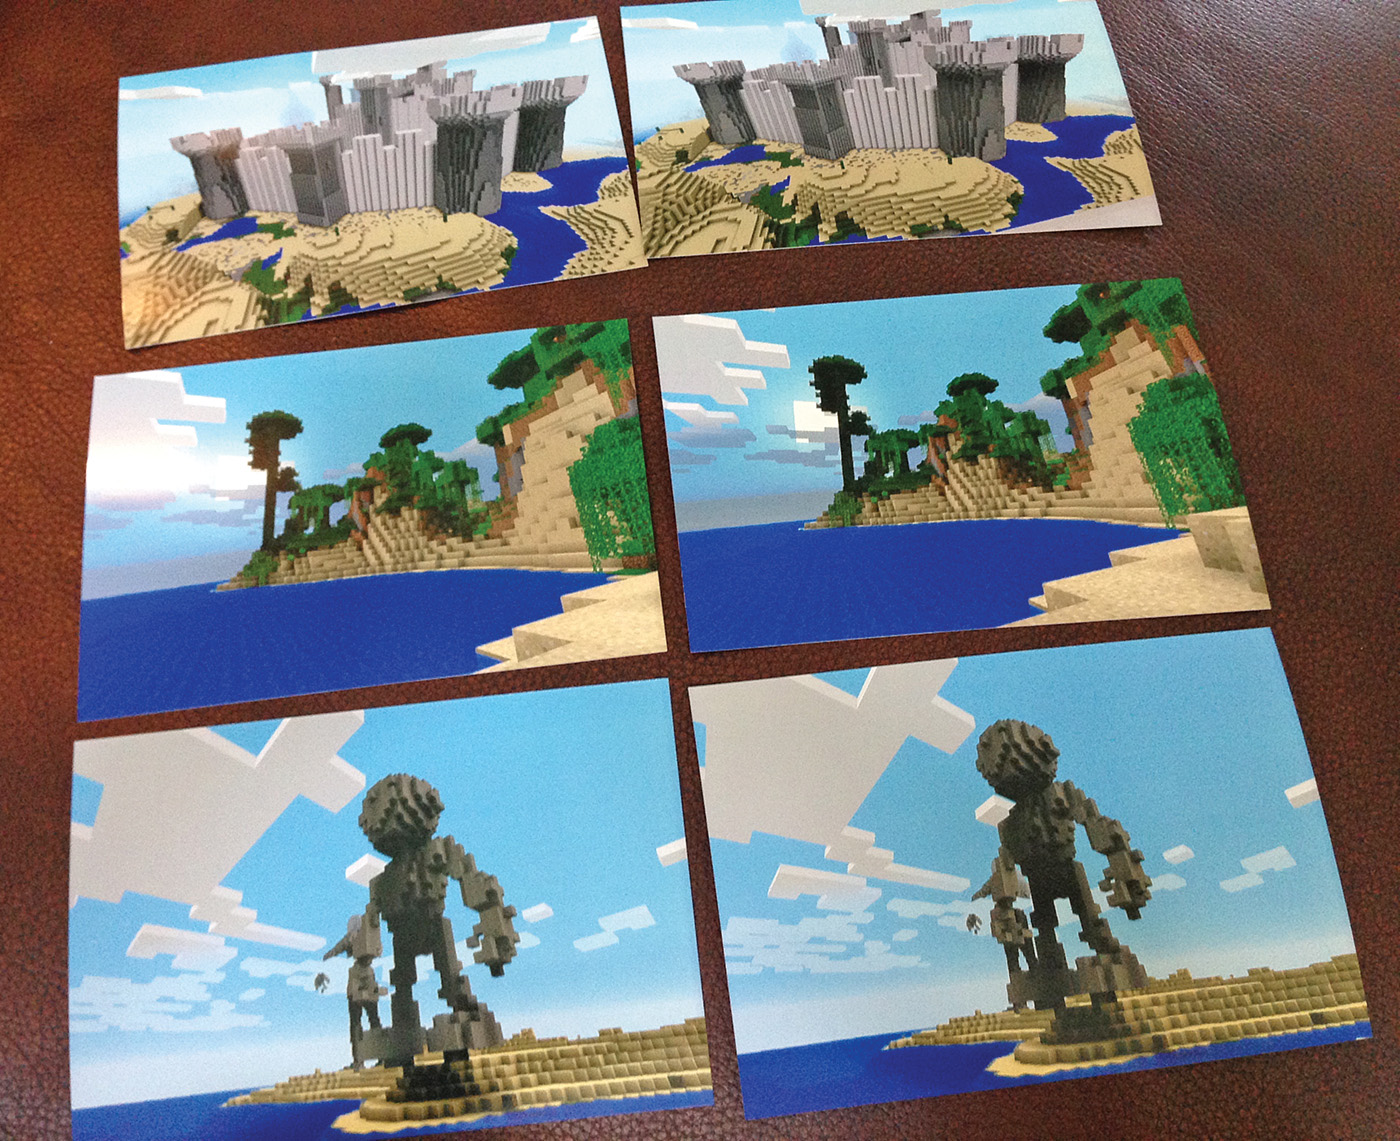
Feel free to put them side-by-side as 4×6 photos and take a look. You’ll probably find that, without a 3D viewer, you don’t get a 3D effect at all.
Remember that most small portable 3D viewers work best with images that are about 3 inches wide. So the next step is to trim down the photos. In my case, I simply trimmed 1 inch from the left and 1 inch from the right of each photo, leaving the main point of interest, as shown in Figure 7.18.
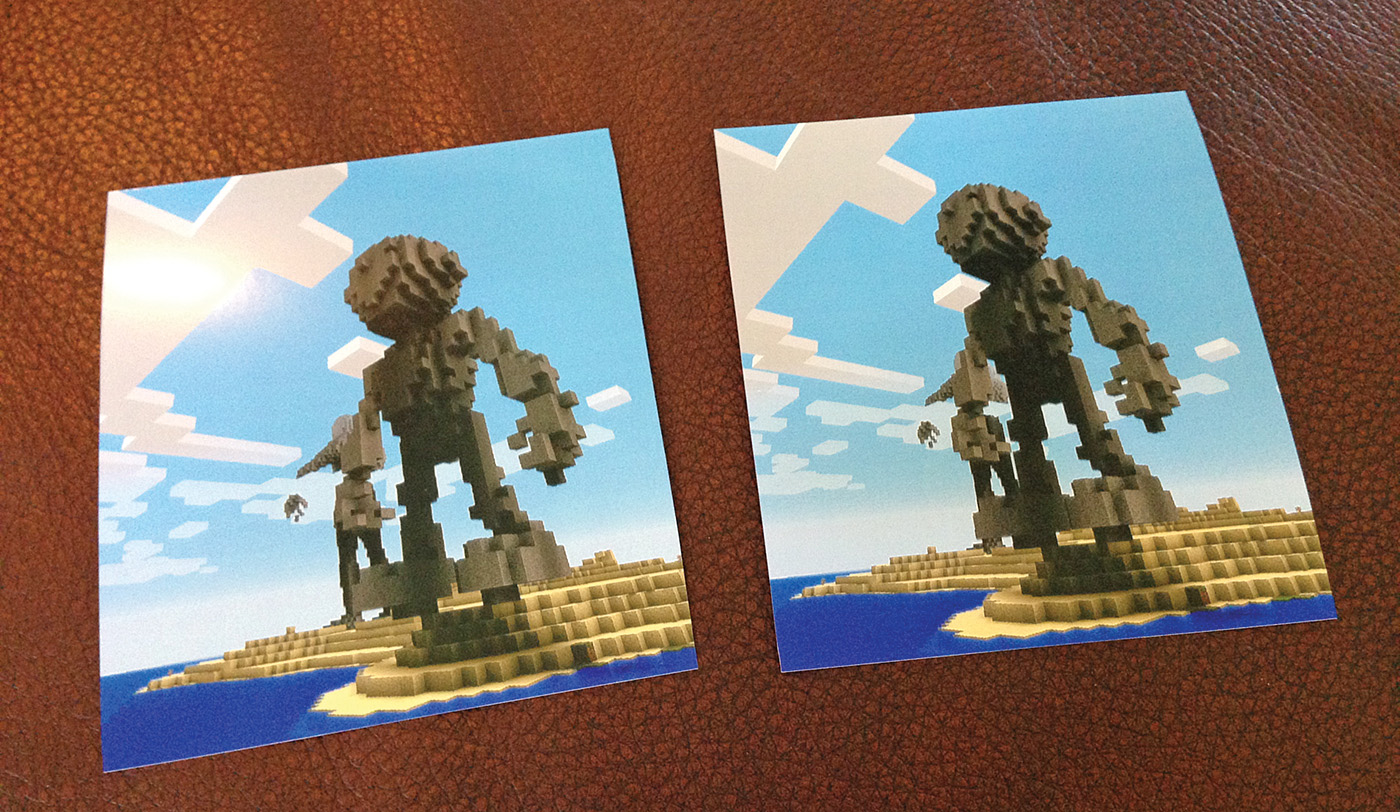
Once the photos are trimmed down, use a bit of clear tape to secure the photos together, as shown in Figure 7.19. Before taping, remember to check that the right-eye view and left-eye view are in their proper places and flip over both pictures together to keep their left/right orientation.

Another option is to place the two photos over a piece of cardboard or cardstock and trace around the edges. Then you can cut out the tracing and glue down the photos to create a more sturdy 3D image card.
And that’s it. Repeat as often as you like and build up a nice collection of 3D image cards that you can take with you (along with a 3D viewer) to share the amazing designs and creations from your various Minecraft worlds. I’ve yet to meet anyone who isn’t amazed the first time they get a glimpse of 3D scenes from Minecraft, and I’m sure you’ll get the same response.
Up Next…
We’re not done with 3D projects yet. Up next in Chapter 8, I’m going to show you another way to make scenes from your Minecraft worlds come to life as a 3D video. Best of all, the software required is 100% free, so you can get started right away while you wait on your 3D viewer to be delivered.