
12. Discover More MCEdit Tools
What You’ll Be Doing
![]() Learn the Copy and Paste commands
Learn the Copy and Paste commands
![]() Make a mirror image of an object
Make a mirror image of an object
![]() Use the Clone tool for precise copy placements
Use the Clone tool for precise copy placements
MCEdit Mastery
As you’ve discovered in the previous chapters, MCEdit is a tool that Minecraft engineers can rely on when it comes to creating some truly out-of-this-world…uh…worlds. From importing and placing models that you’ve found online (from sites such as Thingiverse.com) to landscaping the perfect little corner of a world and preparing it for a maze or castle or a giant statue of yourself, MCEdit can take you from idea to final creation much faster than the traditional block-by-block building method.
Throughout the book, you’ve seen a number of projects that have used MCEdit, and hopefully you’ve gotten plenty of practice using this amazing tool. You may be so fast at using MCEdit, however, that you might have overlooked a few of the useful tools it offers. This chapter finishes up the book by looking at a few more uses for MCEdit that you’ll hopefully find helpful with your future Minecraft projects.
Keep in mind that MCEdit is constantly being updated. I’ve used MCEdit 1.0 for all the projects in this book, but MCEdit 2.0 is in development. Once that version is released as an official version, you’ll want to install it and test all the features you already know from 1.0 as well as take a look at what new features it brings to the table.
For now, however, let’s take a look together at a few more ways that MCEdit can assist you when it comes to engineering your perfect world.
MCEdit 2.0 information
You can read more details about MCEdit 2.0 and even test the early version by visiting the official website, at http://www.mcedit.net.
Copy and Paste
Did you just drop a nice big tyrannosaurus rex in your world? I did, and you can see it trying to find a way into the domed cities in Figure 12.1.

Note
Grab your own T-rex
You can find this T-rex (created by user Hurtzmyhead) at Thingiverse.com. Go to http://www.thingiverse.com/thing:12088.
You know what’s better than one tyrannosaurus rex? You might have answered “two,” but the best answer is “as many as you can squeeze in”!
Fortunately, MCEdit doesn’t require you to import a new tyrannosaurus rex because there’s a copy feature built in that makes it super-easy to just select what you want to copy and then paste another one…and another one…and another one.
Before you can make a copy in MCEdit, you need to have the object selected. It could be an animal, a building, or even just a bit of interesting terrain that you like and want to replicate.
As shown in Figure 12.2, you click on the Select tool and drag a box around the tyrannosaurus rex. You can use the blue Nudge and yellow Nudge buttons to fine-tune the selection area and reduce it to the smallest area possible that still contains the entire dinosaur.
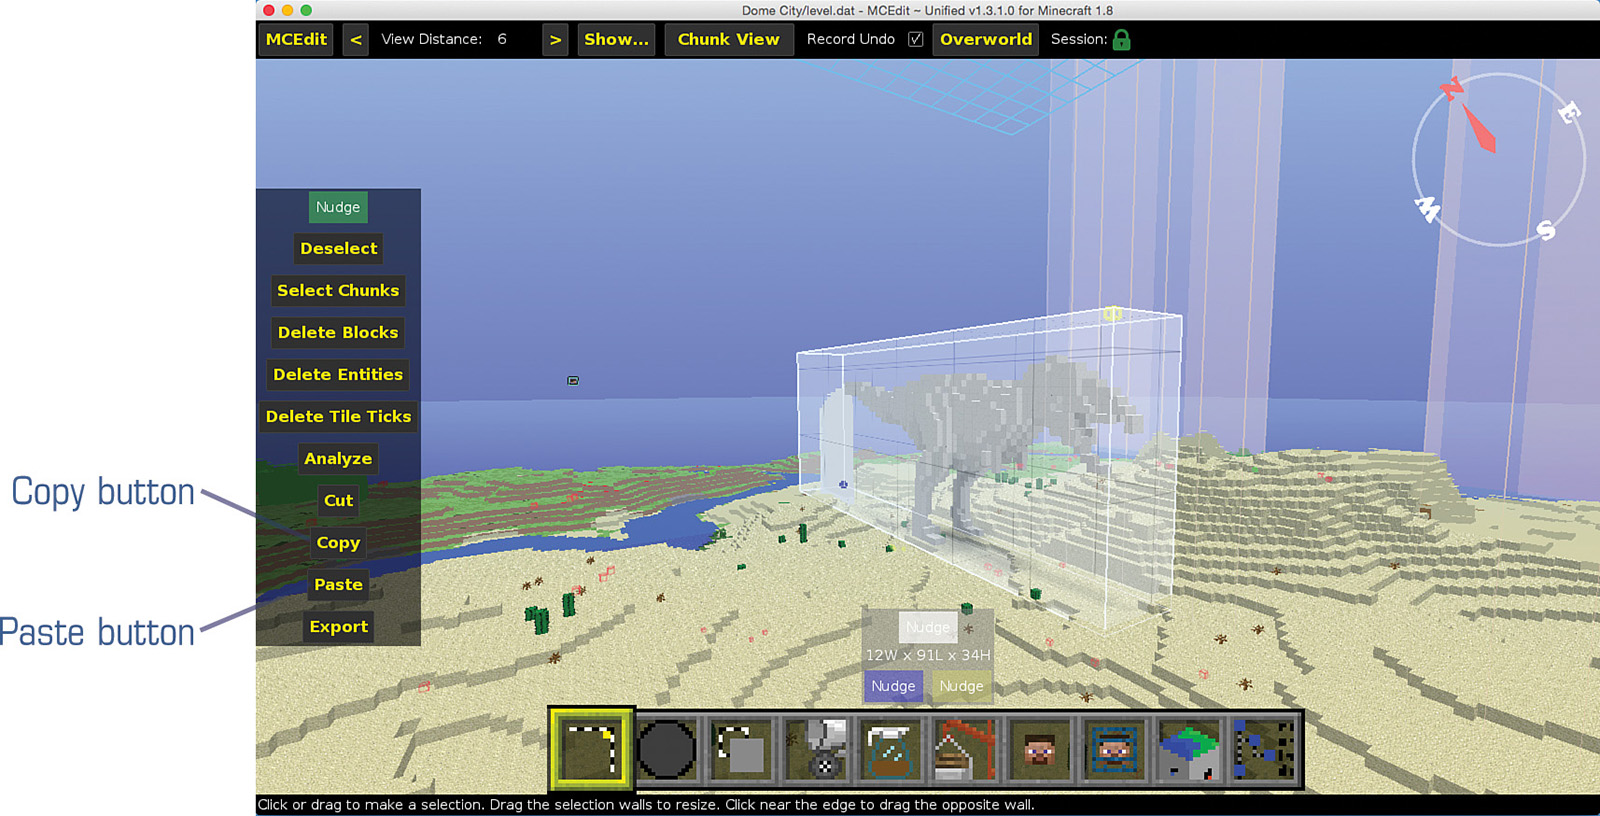
After selecting the dinosaur, you next click on the Copy button. A copy of the dinosaur is made available for pasting wherever you like and for however many copies you’d like to place. To place a copy, click on the Paste button and then move your mouse pointer to the desired location. As shown in Figure 12.3, a green selection area indicates where the copy will be placed.
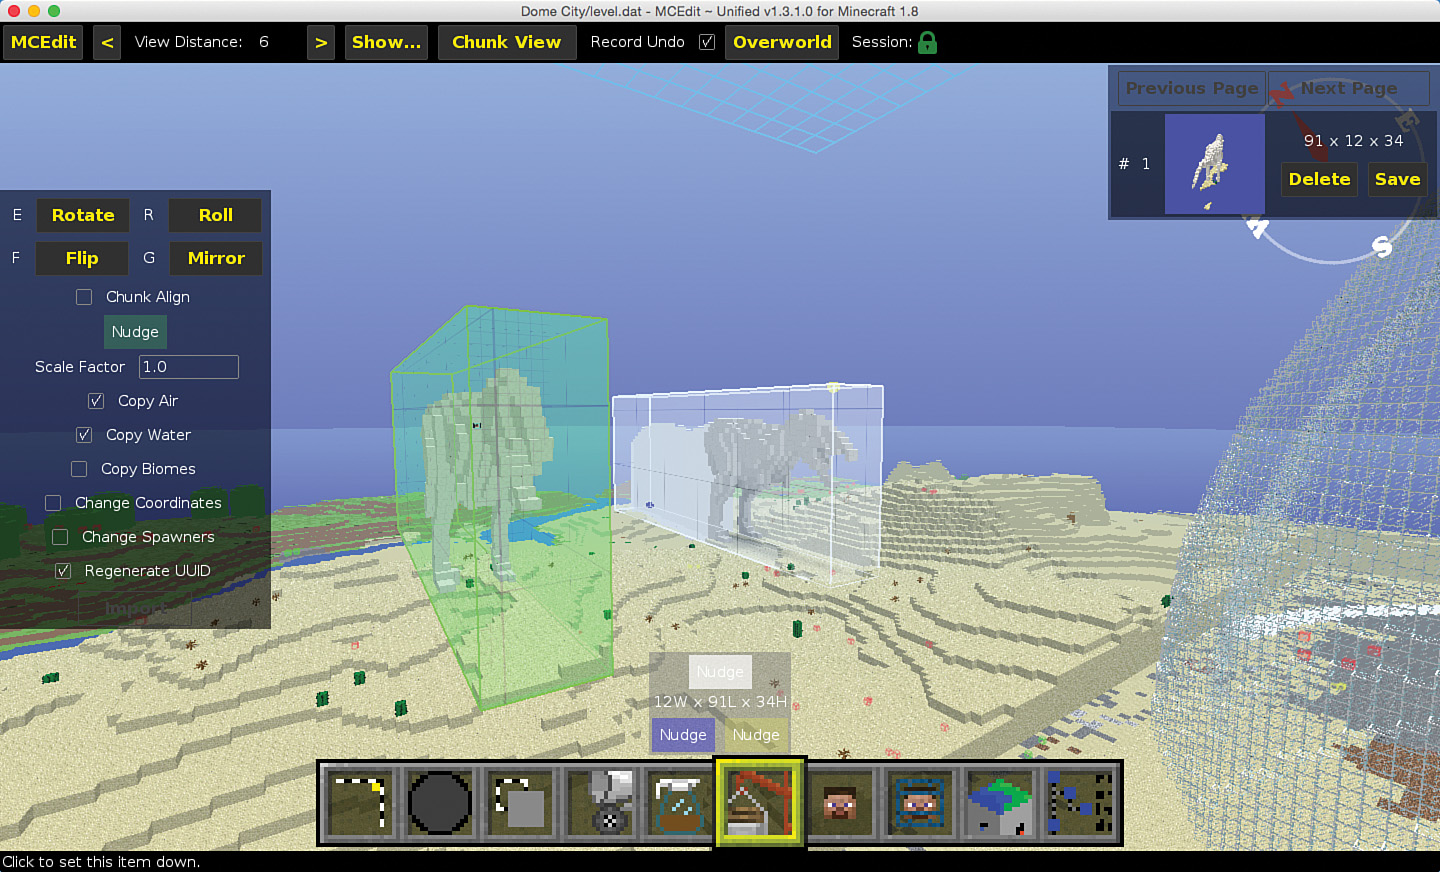
Click to lock in the location of the copy. You can use the Rotate and Roll buttons to make changes to the orientation. For example, in Figure 12.4 I’ve clicked on the Rotate button once to turn the dinosaur 90 degrees, so it’s facing its partner. You can also click and hold on the green Nudge button and tap the WASD keys to move the location one block at a time in the direction of the tapped key.

Change a copy’s size easily
Keep in mind that not only can you place copies but you can also use the Scale Factor box to change the size of a copy. The value 1.0 corresponds to the original size of the object, so selecting 0.5 will change it to half of its original size. A value of 2.0 will change it to two times its original size.
To place the copy permanently, don’t forget to click on the Import button. After that copy is placed, select Paste again if you want to add another. You can use the Paste button over and over again (or press Ctrl+V in Windows or Command+V on a Mac), and you can make changes to the orientation (with the Rotate button) and size (with Scale Factor) as needed.
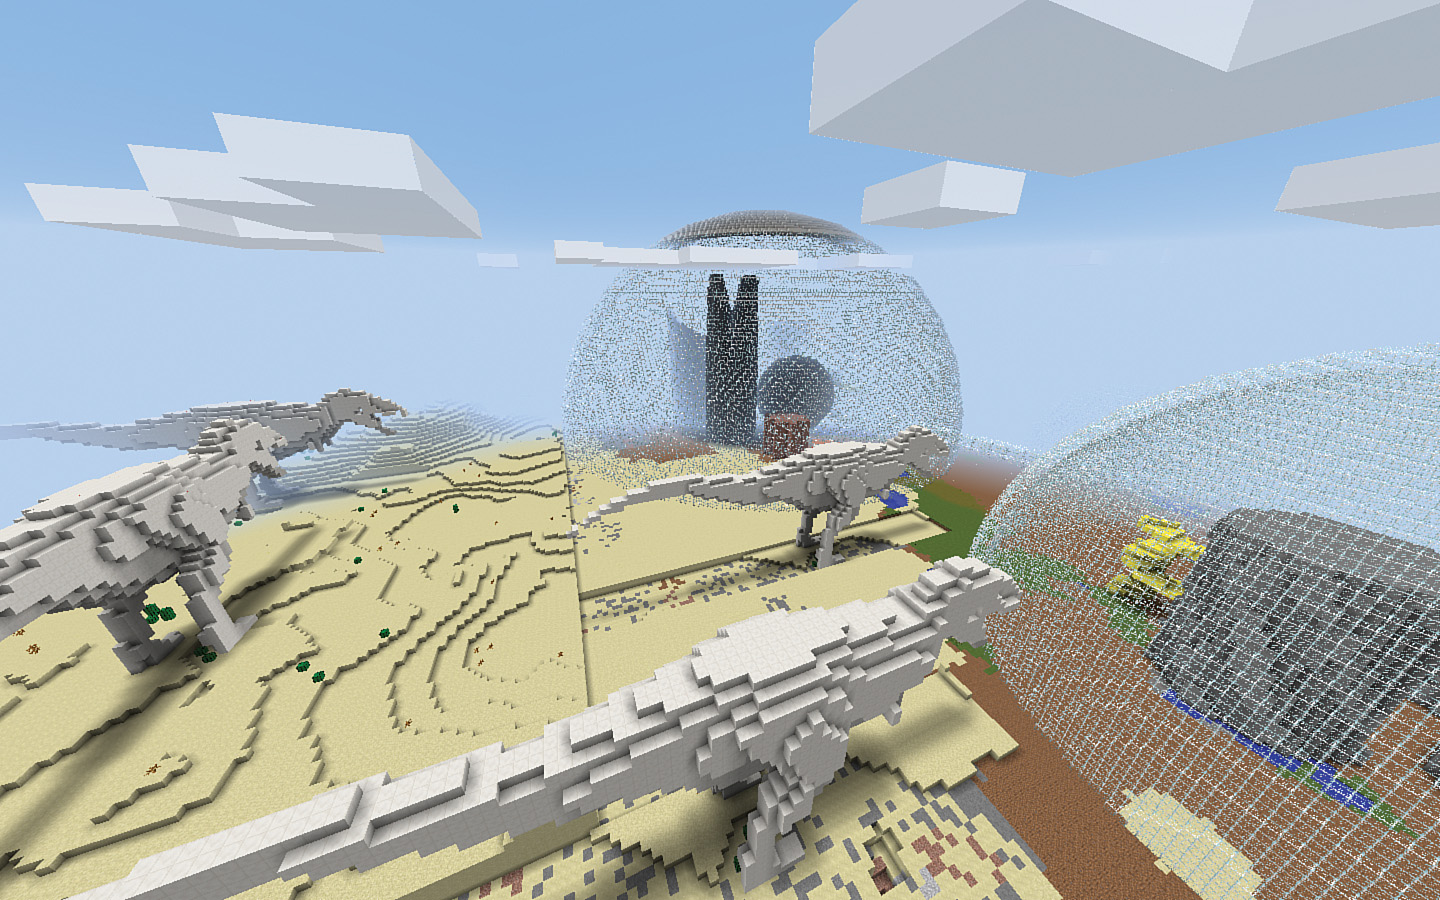
After just a few clicks of the Paste button, the citizens of the domed cities are probably wondering just how durable those glass domes are against the gang of T-rexes shown in Figure 12.5.
Mirror, Mirror
Just as two (or a dozen) T-rexes are better than one, it’s always a good idea to have an extra castle or two around for visiting friends to explore and modify. You just saw how easy it is to make a copy of any selected object. Next you’ll see how you can add an extra step to what you’ve just learned to make something truly unique.
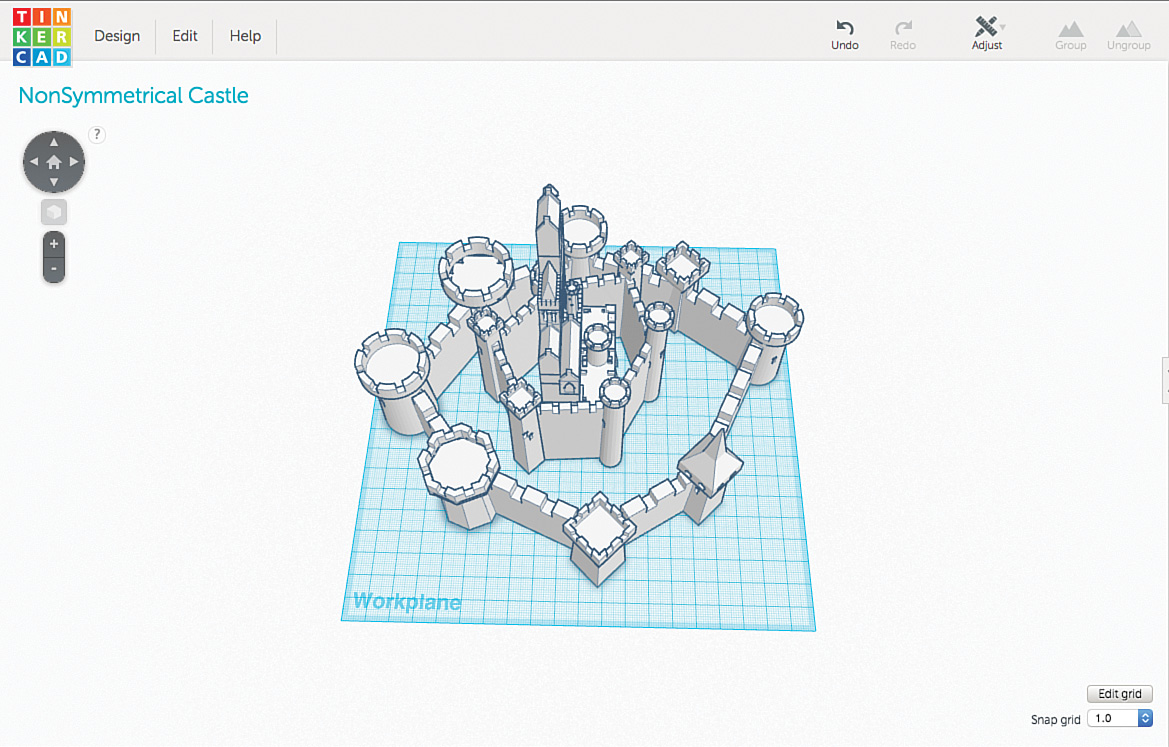
I’m going to start this demonstration by dropping into Tinkercad a castle that isn’t symmetrical. In Figure 12.6, you’re looking down on a castle from above, and you can see that the left side isn’t an exact mirror of the right.
Note
Grab a copy of a great castle
You can download your own version of this castle (created by user smcameron) from http://www.thingiverse.com/thing:59581.
If you make a copy of the castle and paste the copy and rotate it 180 degrees, you end up with something like what Figure 12.7 shows.
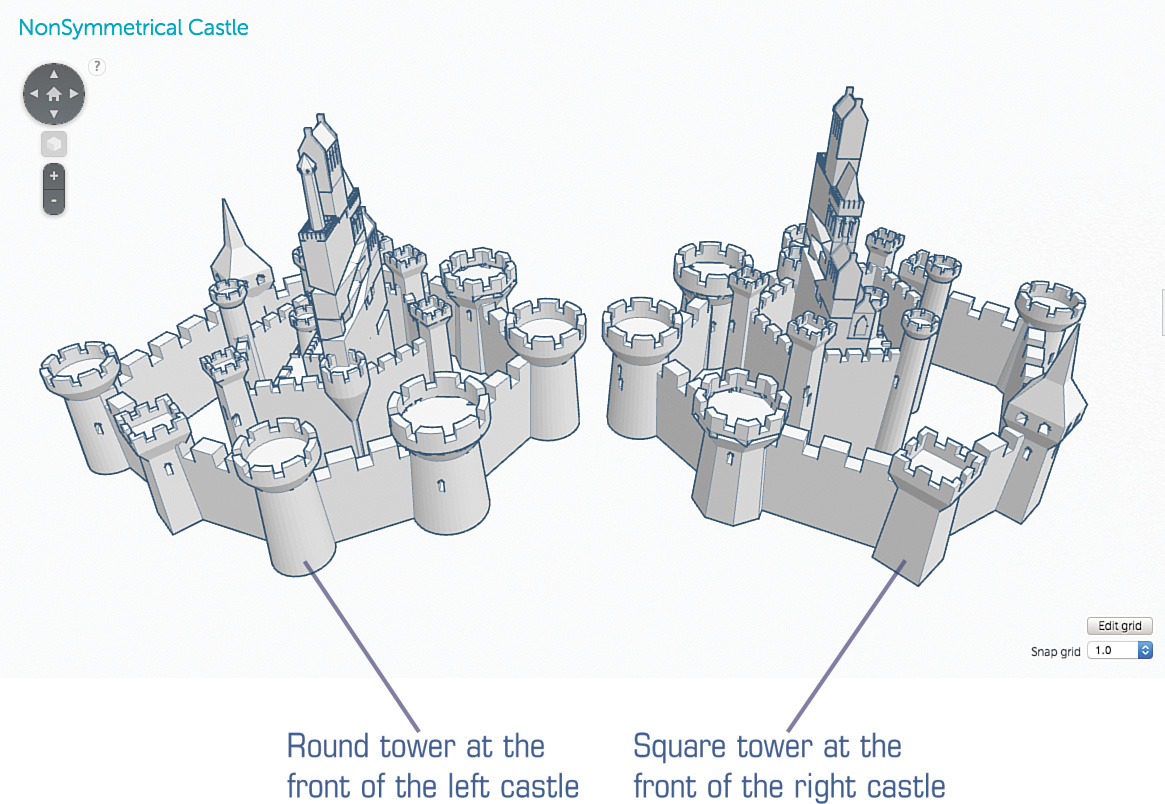
If you examine Figure 12.7 carefully, you’ll notice that while the two side-by-side castles look similar, there are some differences. Look at the towers that are closest to the front of the image, and you’ll see a round tower closest to the front on the left castle and a square tower closest to the front on the right castle.
I’d like a truly symmetrical castle, and while I can easily make a copy of this castle in Tinkercad and use the Mirror tool to create an exact mirror, I can also get the effect I want in MCEdit. Someday you might want to create a mirror image of something in Minecraft (as opposed to Tinkercad), so I’m going to show you how easy that is to do.
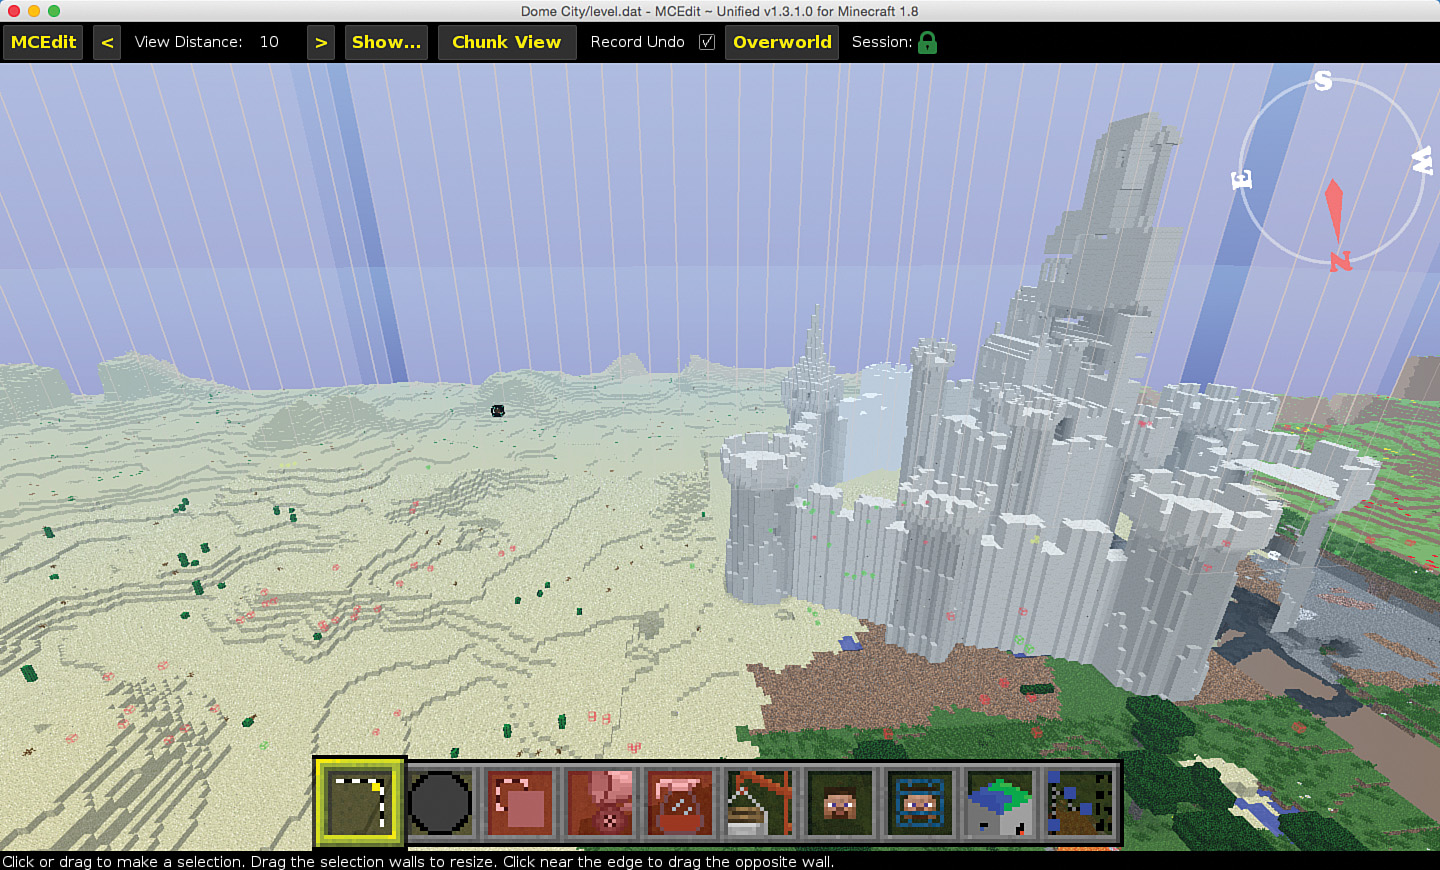
In Figure 12.8 you can see the nonsymmetrical castle placed in one of my worlds, and I’m viewing it in MCEdit.
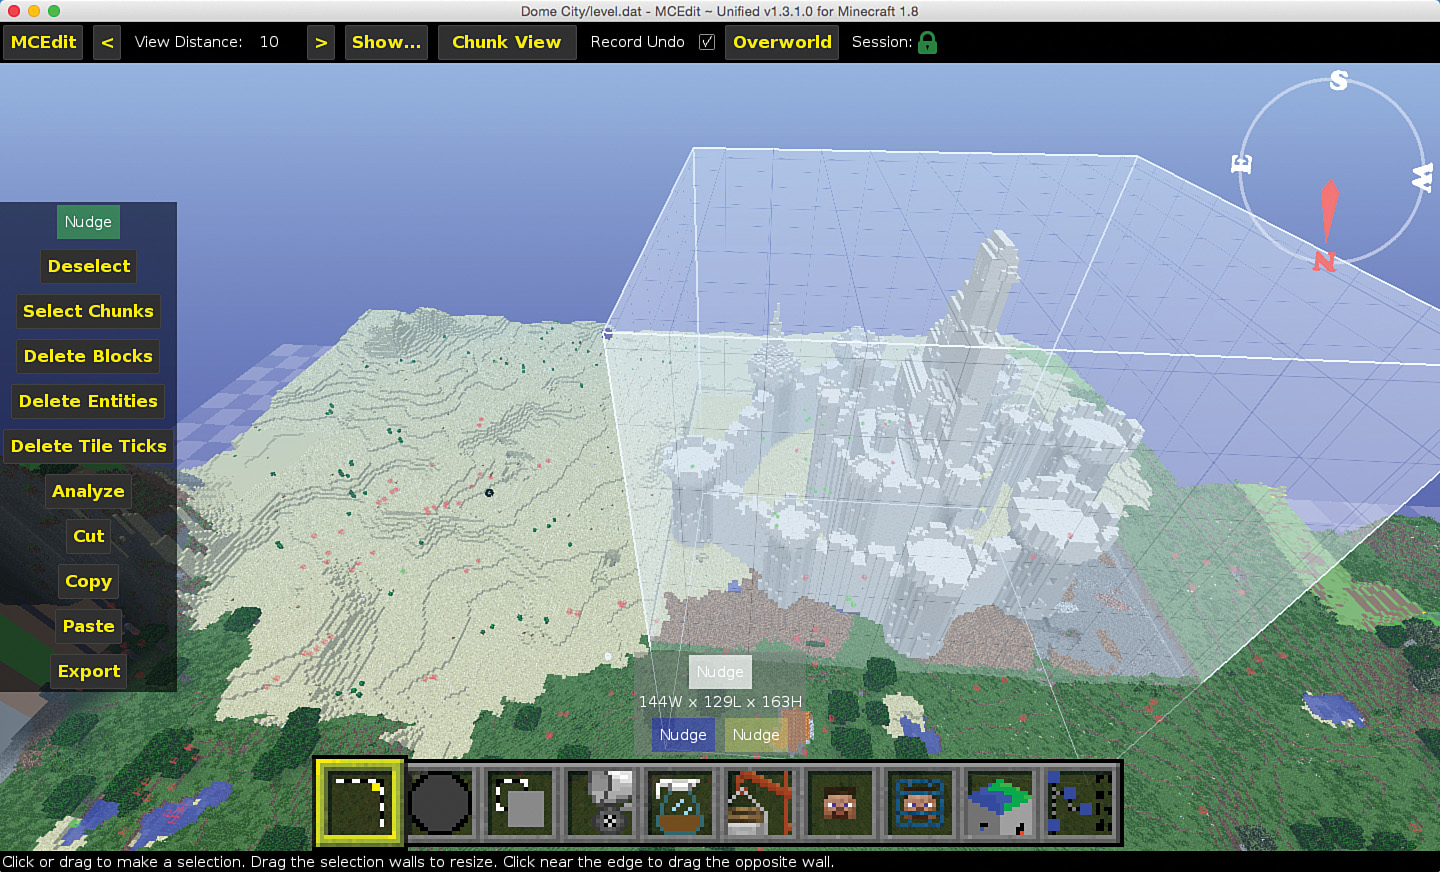
Select the castle, as shown in Figure 12.9, and click Copy—just as you did in the previous section.
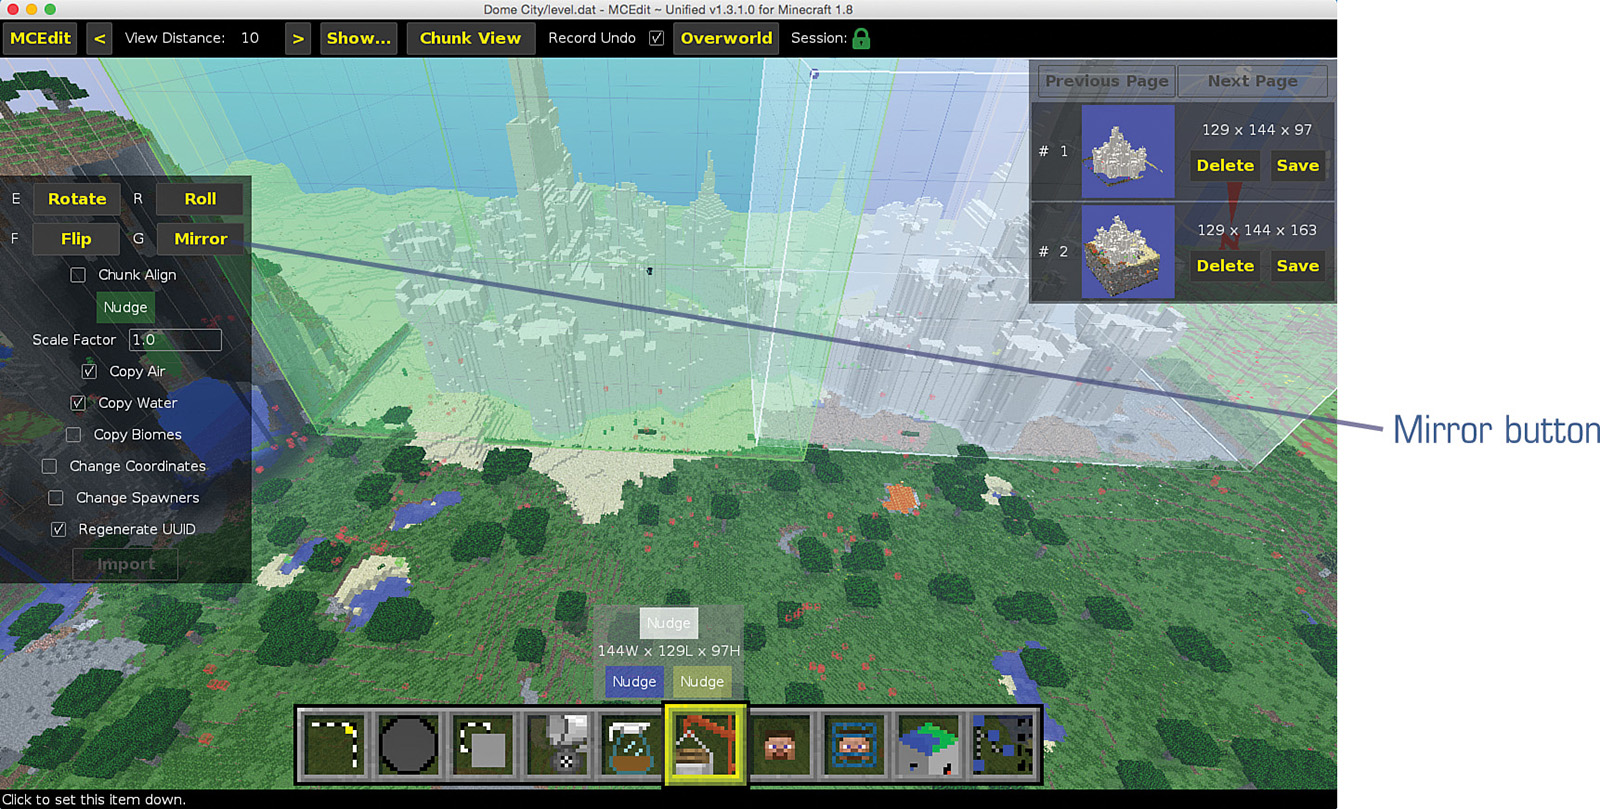
Now here’s the tricky part: Before you place the castle in its final resting place, you need to press the G key or click Mirror. If you look at the control panel on the far left side of the screen (where the Rotate button is located), you’ll notice an option called Mirror. You can click the Mirror button or just press the G key, and the copy instantly becomes a mirror image of the original.
Drag one of the round towers on the copy so it overlaps its mirror image on the castle on the right, as shown in Figure 12.10. (Use the Nudge button to get it as close as possible to overlapping, but it might not be perfect.)
When you’re done with the overlapping, click the Import button, save your work, and then open up the world in Minecraft to see how it looks. As you can see in Figure 12.11, the two castles are perfect mirror images, and they share a single round tower.

The Mirror option is perfect when you have two objects that you want to share orientation. The Mirror tool is especially useful when copying and rotating one object 180 degrees would result in one of the objects facing backward.
Clone Clone Clone Clone
MCEdit gives you the ability to copy an object and paste as many copies as you like, but it can be a bit finicky when it comes to placing your copies exactly where you want them. That’s why you’re sure to find the Clone tool useful, especially if you’re looking at creating something that repeats a specific number of times and you need the repeated copies to be placed carefully.
For this example, you’re going to be building a bridge. Take a look at Figure 12.12, and you’ll find a small section of a bridge span. You’re going to use this single span to create a longer bridge with the Clone tool.

Note
Grab a copy of the bridge
You can download your own version of this bridge span (created by user wolverineboat) from http://www.thingiverse.com/thing:272773.
You need to import the bridge section into a Minecraft world. (For this example, I’m using a flat world so you’ll be able to easily see how this works, but the concept works just as well with mountains, lakes, and all other terrain.) Figure 12.13 shows the single section of bridge been imported with MCEdit.

After importing the bridge and placing it where you like (and pointed in the direction you want), use the Select tool and carefully use the Nudge buttons to reduce the selection box so it surrounds the bridge and maybe just a little bit of space around the structure. Figure 12.14 shows the bridge surrounded with the Select tool.
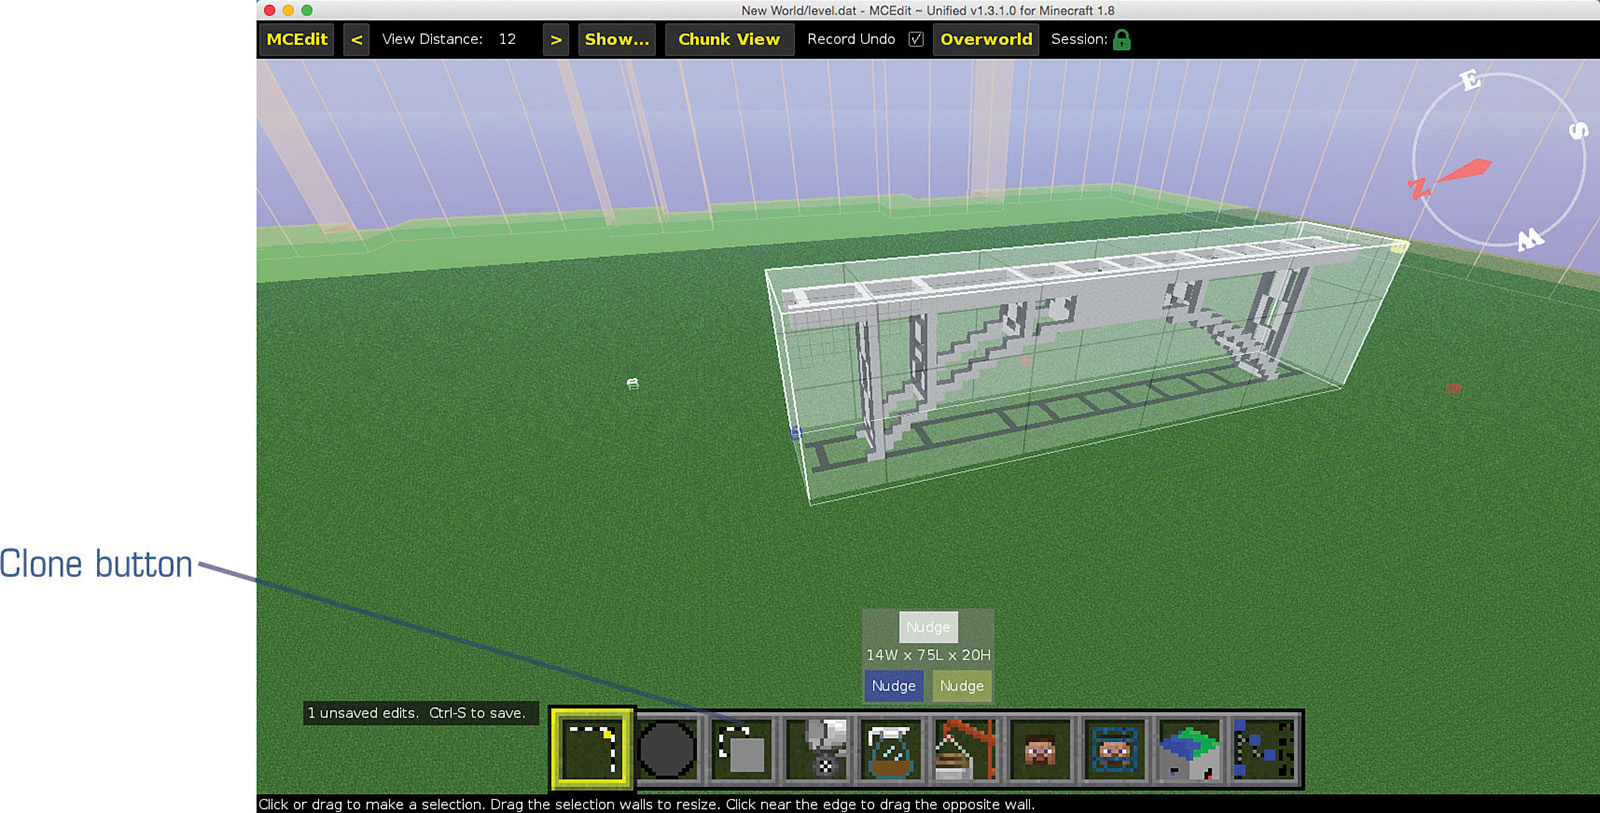
Next, you click on the Clone button. After clicking on the Clone button, a new window like the one in Figure 12.15 appears.
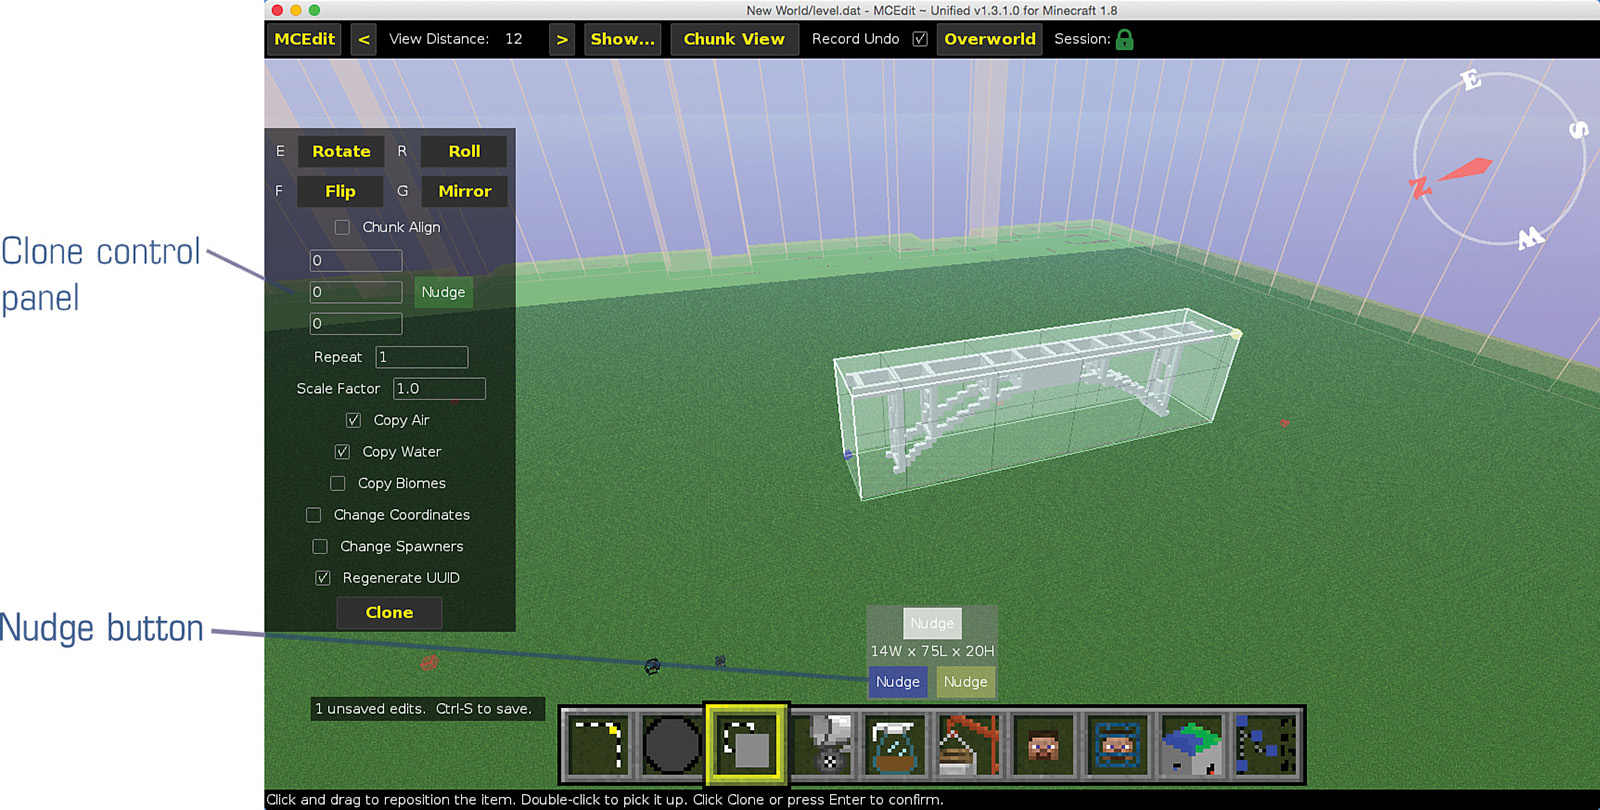
It’s hard to tell from the figure, but there’s an exact copy (a clone) of the selected bridge, sharing space with the original. To see the cloned copy, click on the single Nudge button and use the WASD keys to move it. The clone will appear in a green selection box. In Figure 12.16, I’ve used the A key to move the clone bridge to the left so you can see it.
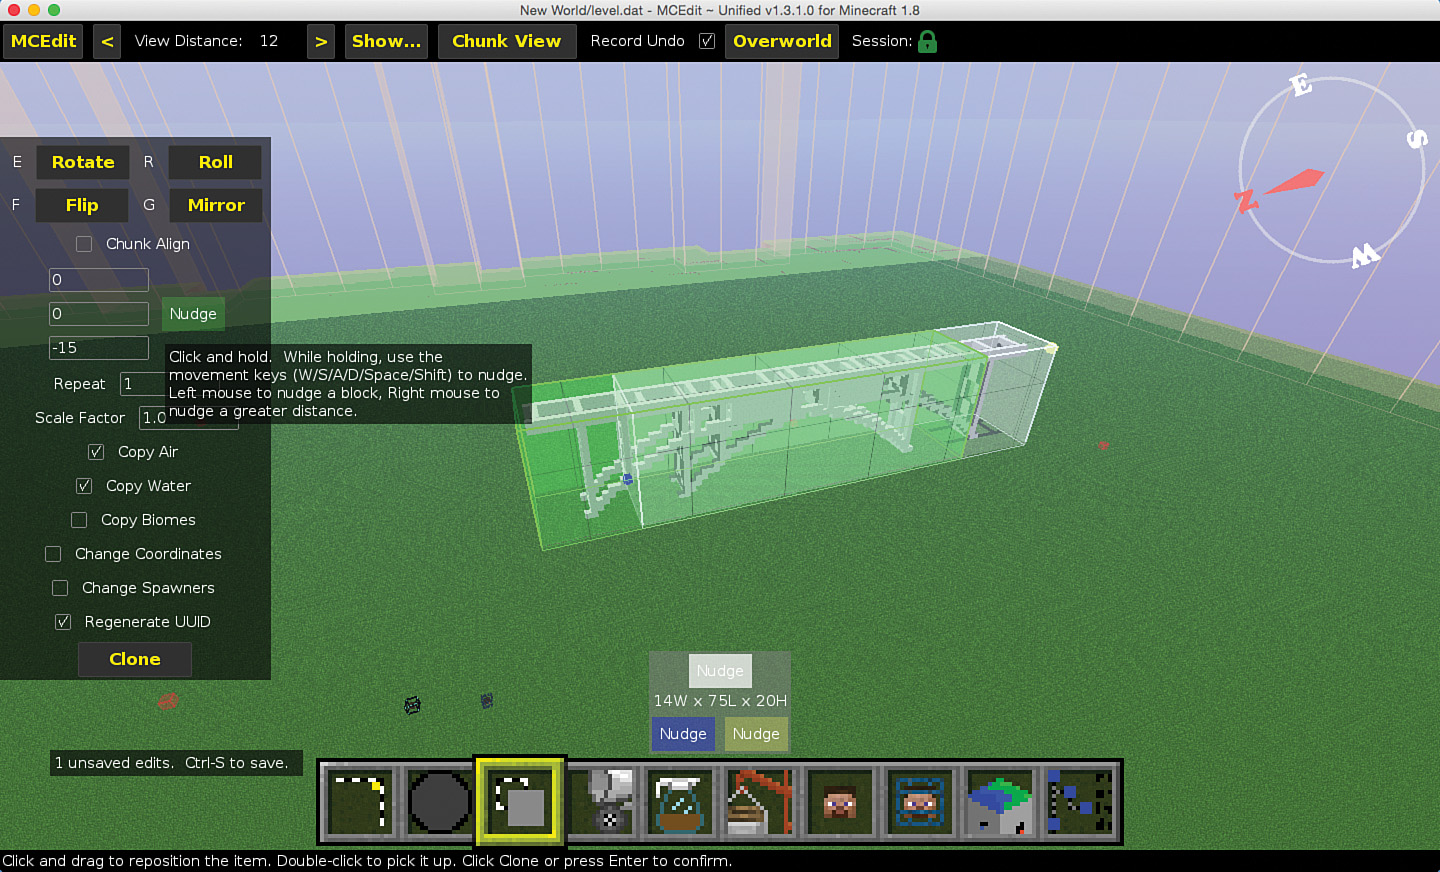
If you want the little bridge sections to be connected, keep pressing the A key while holding down the Nudge button. As you can see in Figure 12.17, you can stop when the end of the clone copy is still overlapping the original bridge section.

Take a look at the Clone control panel, and you’ll notice a text box with the value -63 in it. This means I moved the cloned bridge section 63 block lengths to the left. (If I’d moved the clone section to the right, it would have been 63, indicating that the copy moved 63 block lengths in the other direction.)
You can enter values in this box to get very specific placement, but keep in mind that the values are measured from the original object. Feel free to experiment with the WASD keys and see how a clone can be nudged forward, backward, left and right, and even up and down. The middle text box (just above the on that shows -63 in Figure 12.17) controls the up/down movement (Z-axis); a positive (+) value raises the cloned object that number of block lengths above the surface, while a negative (-) value lowers it.
Say that you’re satisfied with the -63 block length movement to the left. While you could easily click the Clone button, you’re not done yet. You want to connect a bunch of bridge lengths—say, 20 of them.
Because you’ve already defined how far the cloned object should be from the original, all you need to do now is specify how many clones should be added. For that, you type 19 in the Repeat box (not 20; the original bridge counts as 1, so you only need 19 “repeats”), and MCEdit shows the direction and length that many clones will occupy, as you can see in Figure 12.18.

In Figure 12.18 you can see the green frame heading off into the distance. All that’s left to do is to click the Clone button and let MCEdit do the hard work. As you can see in Figure 12.19, the bridge now looks like a real bridge! (Note that it can take a while to make and place a large number of copies, so be patient.)

Conclusion
It is my sincere hope that during your adventures in this book, you learned something new and useful to do in Minecraft. If you learned a lot of new things, that’s even better.
I’ve discovered over the years that when someone tells me that you “can’t do that in the game/program,” it lights a fire for me to go and find a way. Often, someone else has already found a solution, and all I have to do is a quick search online to find a video or set of instructions. But sometimes I have to experiment and try new things to figure out how to make things work. (The perfect example is when I was told that there was no way to view my Minecraft worlds in 3D without an Oculus Rift device. I think Chapter 7, “Seeing Your World In 3D,” proved that wrong, huh?)
With Minecraft, your imagination is really your only limit. If you want something in your world, go find a 3D model on Thingiverse or some other model library. If it doesn’t exist, create it with Tinkercad or another CAD application. Instead of creating something one block at a time, you can take an idea that’s in your head and make it real in far less time.
I hope you’ve found a lot of inspiration for your Minecraft worlds, and hopefully the skills you picked up in this book will help you refine your worlds and impress your friends and family. Better yet, you may have discovered a skill you enjoy that could help you in school and maybe even a future career. You’re now an official Minecraft engineer, and there is no limit to what you can learn and create for a Minecraft world and the real world.