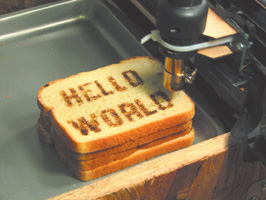
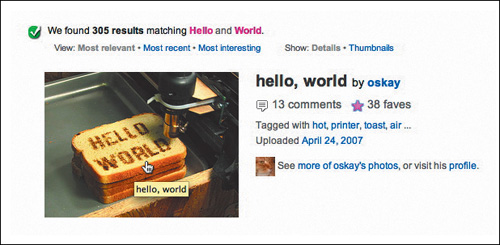
Hello World is the first exercise you learn in any code or mark-up language. Photo credit: Windell H. Oskay, www.evilmadscientist.com.
Every web page is code made visual by the web browser. Open any page in a web browser and use the View menu to see the page source. There you will see the code used to create that page. This code tells the browser how to render the layout, images, links, and interactivity of the page. Whereas in the previous applications, we have clicked and dragged our way to good design, with web pages we design interface elements and then write the code that describes what we want our interface to look like in the browser.
While web sites are usually programmed to hide the presence of code in a seamless graphic façade, experimental artists often revel in exposing it. The artist group JODI (Joan Heemskerk and Dirk Paesmans) works extensively with the materiality of code. In the early moments of the dot-com boom, when corporations began to stake out an aesthetic and functional claim online (1995–96), JODI hosted a series of confrontational pages. Theirs responded to the corporate attempt to professionalize the aesthetics of online media and conceal the presence of code. The site wwwwwwwww.jodi.org looks like disorganized text in the browser and viewing the source reveals a rough diagram of a nuclear bomb made with the letters of the source code. (Fig 15.1)
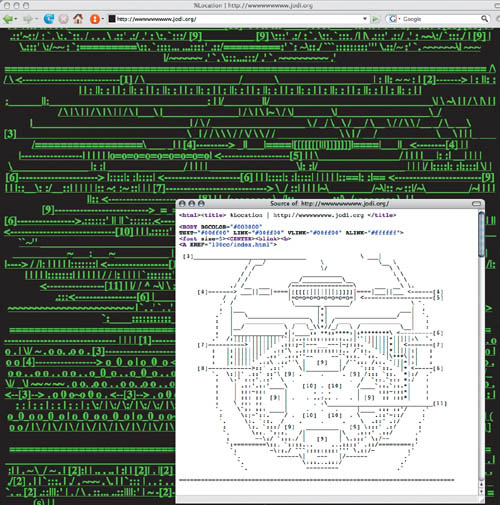
Jodi.org reversed the order of the medium. Where design elements are organized to create visual messages in the browser, Jodi.org appears random and frantic. In the source code Jodi.org reveals the message of the work in a simple illustration. JODI throws a bomb at clean design. Web pages are written in Hypertext Markup Language (HTML), which ignores extra spacebar characters. Ignoring this basic principle allowed Jodi to make a brilliant visual and conceptual argument for breaking the rules of web design.
In the early years of the World Wide Web, bandwidth was small. A large amount of communication took place on text-only listservs, chat rooms, multi-user dungeons (MUDs), and bulletin board servers (BBS). Pages were designed with few images because they took too long to download. In the absence of high-resolution images, people found creative ways of drawing with text.
Loosely defined, ASCII art is art made by arranging the 128 glyphs that are part of the American Standard Code for Information Interchange, usually in the form of figurative drawings. The shapes and densities of the characters are treated purely as formal elements to construct line, form, and shading.
As an example, Heath Bunting’s 1998 portrait of Natalie Bookchin, an early net artist, can be seen here: http://www.irational.org/heath/imaging_natalie/. (Fig 15.2)

Figure 15.2. Portrait of Natalie Bookchin, Heath Bunting, 1998, http://www.irational.org/heath/imaging_natalie/, used by permission of the artist.
With the materiality of code in mind, we will construct our first web page.
Note
Choose the Designer workspace from the pull-down menu in the Application bar before working on the following exercises.
For this chapter, create a folder on your desktop or hard drive and commit to saving everything that you make from or related to this chapter into that one folder. Do not make sub-folders. Do not make more than one folder. Our folder is named chapter 15.

Open a text editing application such as TextEdit, Text Wrangler, TextMate, Smultron, or BBEdit. On a PC, use Notepad or WordPad. Since we often teach this in labs with TextEdit installed, the screenshots will be from that interface. The first, very important step when writing HTML in any text editing application is to make sure that it is working in plain text format.
From the TextEdit menu, choose Preferences. In the Preferences New Document dialog box, click the Plain Text radio button. In the Open and Save dialog box, check “Ignore rich text commands in HTML files”, check “Delete the automatic backup file”, and uncheck “Add ‘.txt’ extension to plain text files.” These preferences will be in effect on new documents. (Fig 15.2)
Close any open documents in TextEdit and click File > New to start on a new document.
Type the opening and closing HTML tags. (Fig 15.4)
The <html> opening tag tells the browser that we are writing in Hypertext Markup Language, and the same tag with a slash, as shown, tells the browser to stop rendering HTML. All tags within HTML follow the same scheme. Other markup languages that a browser understands will have similar rules with some variation.
Position your cursor after the opening HTML tag. Press Enter and press the Tab key. Tabbing is used to add visible structure to the code so that it is easier to read. Tabs and other extra white space are ignored by the browser and do not affect the display or functionality of the code.
Add the opening and closing body tags. (Fig 15.5) All media placed inside the body tags is displayed on the web page.
Inside the body tags type “Hello World!” (Fig 15.6)
Save the file as helloworld.html. (Fig 15.7) Make sure that you add the .html extension to the end of the file name. The file extension is important. It communicates to the browser that this is an HTML file.
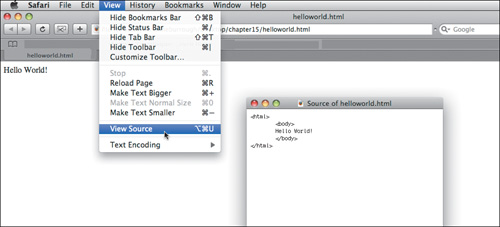
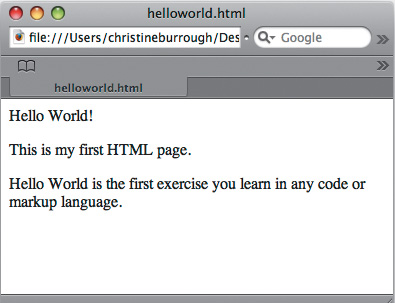
Open a web browser, click File > Open and find the helloworld.html file. We opened Safari, clicked File > Open File... and browsed to Desktop > chapter 15 > helloworld.html. Notice that the message “Hello World!” is the only part of the code that is displayed. In the Browser, choose View > View Source to see all of the code. (Fig 15.8)
In Exercise 2 we will be returning to this file in the web browser, so leave it open if you are going to work on that exercise next.


In the previous exercise, we wrote the Hello World! code using a text editing program. A text editor is the most basic application required for writing code, but it can be a lot of work when hand-typing lots of code. Most artists and designers prefer to use a WYSIWYG (what you see is what you get) application such as Dreamweaver to develop code. Dreamweaver actually writes the code for you, which makes creating the HTML file much easier.
In this exercise, we will modify the file we just made. We will make changes to the existing file and save on top of it, meaning we will not use Save As. At the end of this exercise you should have only one file in your folder.
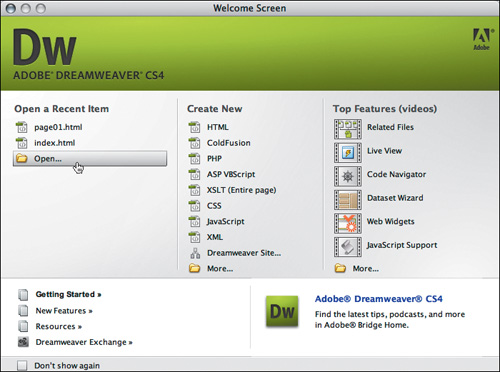
Open Dreamweaver from the Dock or Applications folder. In Dreamweaver choose File > Open and open the helloworld.html file. (Fig 15.9) We will click File > Open then Desktop > chapter 15 > helloworld.html.
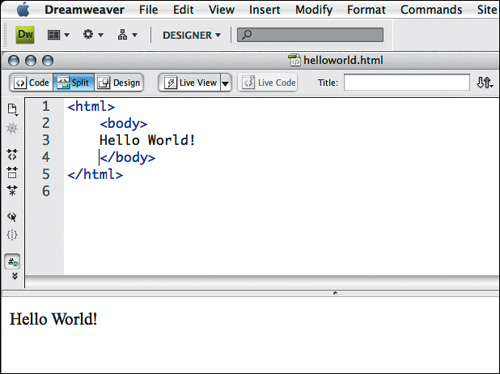
In the upper left corner of the document, click the Split button. (Fig 15.10) Split view displays both the code and the result of the code in a browser. Another way to think about this is that the code view is the set of instructions to the browser and the design view is what the browser should do with those instructions.
Note
Dreamweaver is a WYSIWYG editor because you can change the code by using Dreamweaver pull down menus and buttons in Design view. It should be called a WYSIWYGMOTT, or What You See Is What You Get Most Of The Time. The Design view is going to be about 95 percent accurate. When designing for the web, always preview your work in the browser.
In the upper left corner click Code. (Fig 15.11) Only the code is displayed. Note that your markup language is color-coded. Tags are blue, and text is black.
Click Design. (Fig 15.12) Now we can only see the result of the code, or what will be displayed in the browser.
Switch back to Split view. In the Design view half, place your cursor at the end of “Hello World!” Press the Return key and type “This is my first HTML page.” (Fig 15.13) Save the document using File > Save. Note how Dreamweaver changes the code for you. A paragraph tag has been added to the code to format the new paragraph we requested when we pressed the Return key in Design view.
The paragraph tag is opened and closed around the new line of text. This is an example of nesting. Nesting is when a set of open and closed tags are placed inside of another open and closed tag. The relationship between where each set opens and closes is important. One is structured around the other so that they never overlap. (Fig 15.14)
Return to the browser where you viewed helloworld.html in Exercise 1. (Fig 15.15) Refresh the browser page and observe the changes we made to the file in Dreamweaver. If the file was closed, use File > Open and open the helloworld.html file. In this exercise we modified the helloworld.html file. We did not save a new file, we saved on top of the existing file. The browser displays changes to the file when changes have been made to the original file (File > Save) in Dreamweaver and the page is reloaded in the browser (Command+R in most browsers).
Go back to Dreamweaver and type a new paragraph in Design view: “Hello World is the first exercise you learn in any code or markup language.” (Fig 15.16) Save the file and refresh the browser to see the new text display on the web page.


Hyperlinks, or links as they are commonly called, are a one-click route from one HTML file to another. Links are the simplest form of interactivity on the web.
Open a new web browser tab or window and search for the phrase “Hello World! Collection.” Click on the Hello World Collection, which was at the following URL at the time of this writing: http://www.roesler-ac.de/wolfram/hello.htm. This collection of Hello World! examples started in 1994, although “Hello World!” first appeared in a programming book in 1978. Copy the site’s URL from the browser’s address bar and return to the file we modified in Exercise 2 in Dreamweaver.
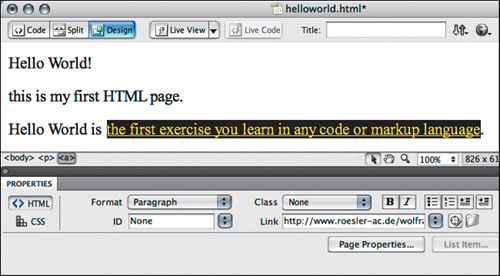
In Design view, select the text “the first exercise you learn in any code or markup language” by highlighting it with your mouse. If it isn’t already active, click the HTML button on the left edge of the Properties inspector. Paste the URL you just copied into the field labeled Link.
Press the Return key and it will change the selected text from body copy to a hyperlink. (Fig 15.17) This is important: save the file. If the file is not saved, the updated work will not load in the browser.
Go to the browser and refresh the helloworld.html page. The link should function in the browser. Return to Dreamweaver and inspect the code that was created.
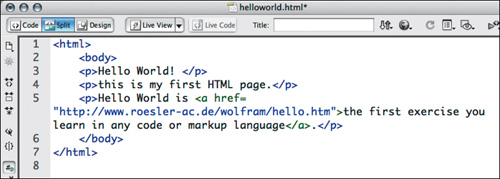
In the code, the “a” stands for anchor and “href” tells the browser that this is a hypertext reference, while the URL in the quote marks is the value that tells the browser where the hypertext reference points. The anchor tag is closed with </a>. Notice that the tag starts just before the word “the” and closes just before the period at the end of the sentence. This part of the sentence becomes the link. (Fig 15.18)
Move the closing anchor tag to just after the word “learn.” The link will be shortened to include only the text that is between the opening and closing tags. (Fig 15.9)

To add an image to the HTML page, you need to have an image prepared for online viewing (see Chapter 12). For this exercise, we will search for an image on Flickr. In Chapter 2 we explained that Flickr is an online photo sharing website where viewers can search for images by tags. In this exercise we will use an image that has been placed in the public domain with a Creative Commons license.
Go to flickr.com. If you are not signed in, the Search field is vertically centered on the right half of the page. If you are signed in, use the Search field in the top left corner. Search for “Hello World.” (Fig 15.20)
Click the Advanced Search button on the results page.
Scroll down and check the boxes next to “Only search within Creative Commons-licensed content.” (Fig 15.21) Creative Commons is a licensing schema that presents an alternative to the standard U.S. copyright laws. All photographs uploaded to Flickr are automatically copyrighted, preventing other people from using or building upon them. Creative Commons allows you to post your work online and license it openly, allowing others to use it in their work. Online culture is a culture of sharing, remixing, and collaboration. Creative Commons licensing enables and empowers this culture. Reference Chapter 2 for a more detailed synopsis of copyright laws, fair use, and alternative licensing with Creative Commons.
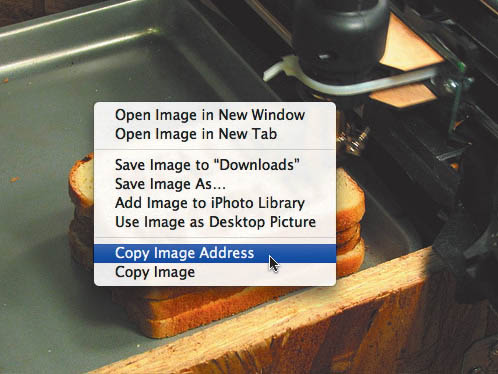
Click on an image that you found in the Creative Commons “Hello World” Flickr search. (Fig 15.22) Now the image appears on the Flickr page maintained by its author.
Contol-click or right-click on the image and choose Copy Image Address or Copy Image Location. (Fig 15.23) This copies the URL. The URL is the path to the location where the image file is saved on the server. The next time you use Edit > Paste in any text field, this address will be pasted. We will use this in Dreamweaver in the next step.
Go back to Dreamweaver and view the helloworld.html file in Code view. Type a new paragraph tag. Note that Dreamweaver automatically closes the tag. Now add an image tag like this, <img src=“url” />. Replace the letters “url” with the URL that you copied from flickr.com by pasting it into that area. Leave the quote marks in the tag, and the space before the closing bracket.
The image tag closes itself. The combination of space, slash, and bracket at the end of the tag signifies a closing tag.
Save the file and refresh the page in your browser. The image appears on the page, with a paragraph break between it and the link we made in Exercise 3. (Fig 15.24)


If you have printed documents from Microsoft Word to a laser printer, you have used a markup language. The difference between working in Dreamweaver and printing from Word is that you are aware that you are creating the markup language in the HTML code. In essence, the B button in Word is a user interface component that marks up the selected type so it displays and prints as bold. The printer reads the file sent by the program and formats the typography. In Dreamweaver, you use the interface to add formatting, and you see the code that is being written for the browser. Thinking of the browser like a printer (and the web as the page) can be helpful for understanding markup language. You will discover that it is not always the perfect simile, as user interaction varies from the printed page to the web browser. The media environment always affects the audience.
The header tag will transform the words “Hello World!” into a headline. Insert the tag as demonstrated. (Fig 15.25)
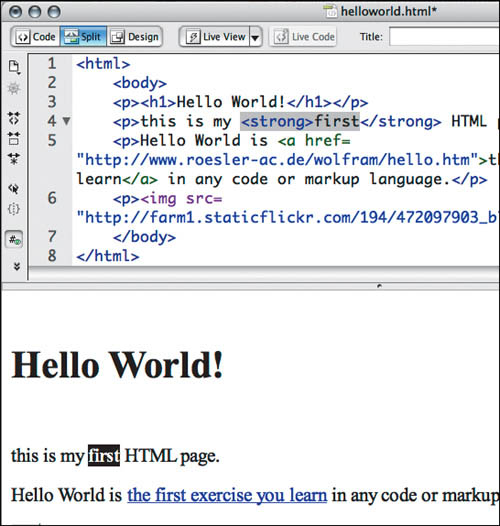
Formatting type in Dreamweaver is like formatting type in other Adobe programs. Bold and italic styles are one click away, but do notice the tags that are added to the HTML so that the styles are displayed properly in the browser. Click on Split view. Make the word “first” bold by selecting it and clicking the B button in the Properties inspector. (Fig 15.26) Dreamweaver will surround the word with the strong tag.
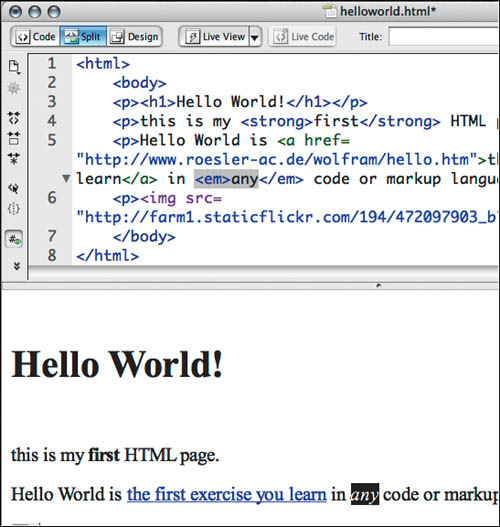
Select the word “any” and click the Italicize button in the Properties inspector. Dreamweaver uses the em tag to italicize the word. (Fig 15.27)