
Louis Sullivan’s Prudential Building, Buffalo, New York. Photo credit: Seth Tisue, http://flickr.com/people/tisue/, CC-BY.
In the last two chapters, we left many aesthetic design choices out of the exercises and focused on the tools for building code. However, aesthetics must not be left out of the conversation. As American architect Louis Sullivan (1856–1924) once said, “Form ever follows function.” Sullivan’s use of steel instead of masonry to create the structure of a building allowed it to be separate from the building’s external elements of appearance. Sullivan is known for solving the problem architects faced when designing for these new buildings, which were no longer constrained by the technical limits of weight-bearing masonry. He embraced the changes that came with the steel frame and created a way to stylize the exterior appearance of the building. His call to allow form to derive from function has profoundly influenced design and art.
In constructing web pages, we too have a way to keep the structure separate from the appearance through the use of one or more style sheets. When you can make a web page look so many wildly different ways, you need to remember your site’s function. Even the most experimental or conceptual art site has a function. In this chapter, we focus on relating to form and function: keeping the structural markup of the HTML document separate from the code that controls the aesthetics.
There are several reasons for keeping the content and form of a web page separated, including the following:
Web users display code on different browsers. Each browser follows different styling rules.
There are web standards that rely on the separation of content and form to make web content accessible for the greatest amount of users.
A web page can easily take on a whole new design, look, and feel with the switch of a style sheet.
It creates an efficient, productive workflow.
In the following exercises, we will write a new type of file called a Cascading Style Sheet (CSS) to contain our style information. This file will be attached to our HTML page. Our HTML page will contain all of our content, in structural <div> tags, and the CSS page will contain all of the style information for each of those labeled <div> tags.
The maxim form follows function dictates that the visual appearance of an object is derived from its use. Sometimes this visual appearance will necessarily be highly designed, and other times it will look like the bare-bones HTML in the previous chapter. Each function dictates a different form.
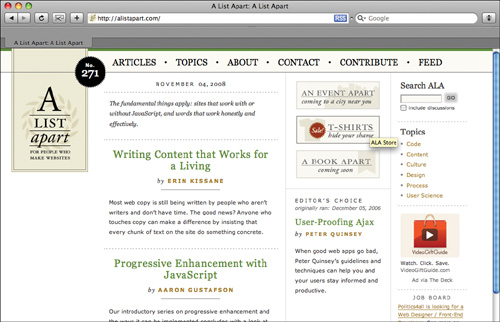
A List Apart Magazine (http://alistapart.com/about) “explores the design, development, and meaning of web content, with a special focus on web standards and best practices.” A List Apart was one of the first web sites to advocate an exclusively CSS-centric design strategy. This web site is an excellent resource for developing web designers and information architects.
In addition to the wealth of articles, the site teaches by demonstration. It is written in well-crafted structural HTML code, fronted with easy-to-navigate typography written in CSS.
Notice the contrast in typographic hierarchies from the search area to the body content of the page, in the headers and links.
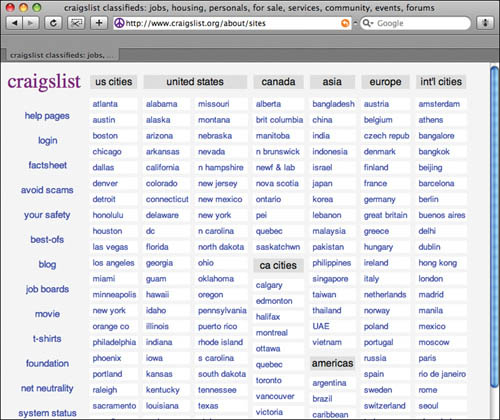
Compare AListApart.com with Craigslist.com, a popular web site that facilitates an exchange of information between people looking for buyers/sellers/traders and every other possible relationship to commodity, personals, or idea exchange. (Fig 17.1–2) When you are thinking about web design, Craigslist may not be the first web site on your mind. However, as a work of information design, it is successful: the type is easy to read and even easier to navigate. The hierarchy among the various types of exchanges and locations worldwide is intuitive.
Exercise 01: Applying a style[*]
So far we have modified the HTML page properties and placed links and images on the web page using Dreamweaver. Until now, these page elements have all followed the default settings for font, font size, text color, and so on. By using CSS, we can control these and other design settings. We will separate the content of the page from its style properties, which will be stored in the CSS file.
Note
Choose the Designer workspace from the pull-down menu in the Application bar before working on the following exercises.
Open Dreamweaver and choose HTML from the Create New area of the Welcome Screen. (Fig 17.3)
Note
Remember, certain aesthetic options are limited on the web. For instance, in order for a web page to load a specific font, the font must be installed on the user’s computer. If the font is missing, the browser will load a different font. Therefore, most web pages are designed using “system” fonts (those installed on the computer at the time of purchase), including Helvetica, Arial, Times, Georgia, Verdana, Courier, and Geneva.
Before adding content to the HTML file, choose File > Save As and save the file as index.html into a folder you will use for this chapter. We saved our file in a folder on the Desktop called chapter 17.
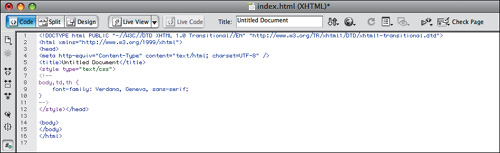
Evaluate the code of the HTML file. (Fig 17.4) You can do this in Code view, or you can open the saved HTML file in a web browser and use the View menu to see the source code. So far, the code only contains HTML.
Open the Page Properties dialog box by choosing Modify > Page Properties and change the default font. We used the Page font pull-down menu to choose the default font: Verdana, Geneva, sans-serif. Click OK after choosing a font. (Fig 17.5)
Dreamweaver saves the default HTML page settings as a style. Choose File > Save. Look in Code view or reload the page in the browser so you can see the changes. We will evaluate this code in the next exercise. (Fig 17.6)
![Choose File > New > HTML > [None] if you were not prompted by the Welcome Screen.](http://imgdetail.ebookreading.net/career_development/career_development_detail1_2/9780321602602/9780321602602__digital-foundations-intro__9780321602602__graphics__fig17_03.jpg)


Dreamweaver adds the code for styles in style tags in the <head> section of the document. Styles are written in declaration blocks. Declaration blocks contain properties and values. Here we have a declaration block for the body of the HTML page. Inside the style tag, you will see:
body, td, th {
font-family: Verdana, Geneva, sans-serif;
}
In this code, “font-family” is the property. “Verdana, Geneva, sans-serif” is the value.
Note
There are some very good, free resources available for helping evaluate code. When working with HTML, CSS, or any other code meant for the web for the first time, it’s always a good idea to make use of the helpful web sites that exist. A Google search for whatever tag or concept you are struggling with will lead to a seemingly infinite supply of helpful lessons and tutorials. Some good places to start are:
World Wide Web Consortium
w3 Markup Validation Service
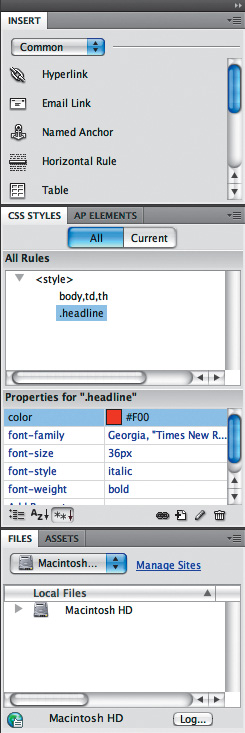
Styles can be created, modified, and deleted using the CSS Styles panel. To open it, choose Window > CSS Styles. You can redefine a default HTML tag (which we did in Exercise 1) or create a custom style called a class. We will work with classes throughout the remaining exercises. A class is a modifier that can be applied to an HTML tag in order to add a style.
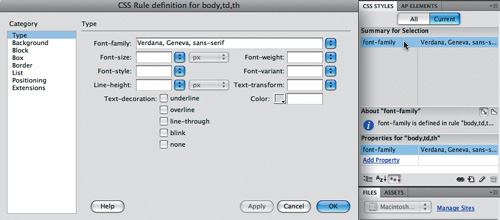
Double-click the CSS Styles tab to expand the panel. The style for the font-family property that we just made is saved in this panel. Double-clicking the font-family property for the CSS Rule Definition dialog box would open the settings applied to that rule. (Fig 17.7) We use this panel to create or modify styles. Press cancel if you’ve opened the Rule Definition dialog box.
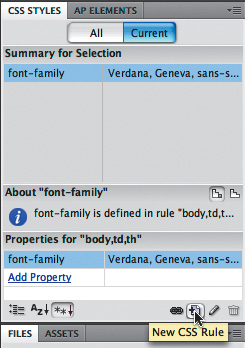
Create a new style using the New CSS Rule button in the lower right corner of the panel (it looks like a plus sign). Define a rule for the tag. A CSS rule is made of two parts, a selector and a declaration. The selector names the part of the HTML document that will be affected by the style. The declaration tells the HTML code how the selector is affected in the rule. (Fig 17.8)
Leave the Selector Type pull-down panel menu set to Class. Our rule will format text that could be used as a headline. Name the selector .headline. Leave the Rules Definition pull-down menu on the selection “(This document only).” Click OK to exit the dialog box. (Fig 17.9)
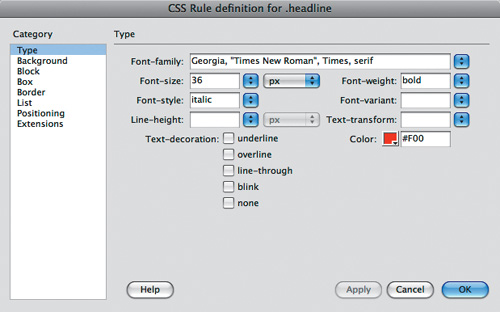
Give the new rule values for the declaration using the CSS Rule definition that appears for the .headline dialog box. We formatted our headline type with the following: Font-family: Georgia, Times New Roman, Times, serif; Font Size: 36 pixels; Font-weight: bold; Font-style: italic; and Color: #F00. Click OK to exit the dialog box. (Fig 17.10)
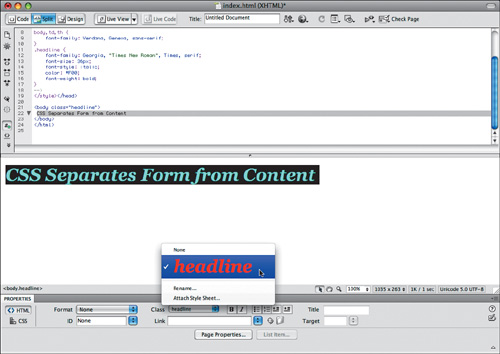
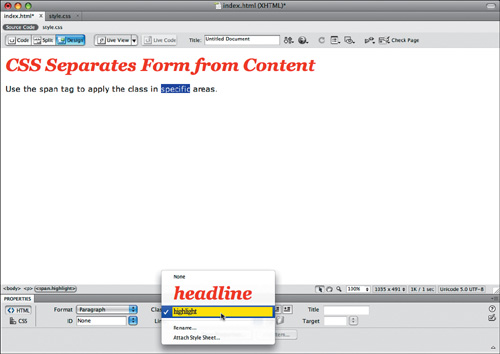
Now we will apply the new rule. View the HTML document in Split View mode and type the phrase “CSS Separates Form from Content” in the design area of the HTML page.
Select the phrase in Design view and apply the new rule using the Class pull-down menu in the Properties inspector. (Fig 17.11) The phrase takes on the attributes that we defined in the .headline rule. Save the HTML file (Command+S).
Evaluate the style in two places. First look in the CSS panel and notice that you can click on the All tab or the Current tab. Click on the All tab in order to see all of the styles that are defined for this HTML document. (Fig 17.12) You should see the rule .headline there. You can double-click it to modify the rule. Also look at the document code area. Notice that the phrase “CSS Separates Form from Content” is written in the body area of the HTML code. (Fig 17.13) This is the content on the page. The “form” of the content is applied by using CSS. In the head section of the page, the CSS code for the new rule, .headline, has been added. This rule has declarations for five different selectors: font-family, font-size, font-style, color, and font-weight. The style is actually being applied to the phrase within the body tag. Notice the additional code in the body tag, class=“headline”. Class modifies the body HTML tag so that the CSS rule .headline is applied to any content inside that tag.
Since the .headline class is modifying the entire body tag, see what happens when you try to write some copy beneath the headline. In Design view, press the Return key at the end of the phrase and type in “Use the span tag to apply the class in specific areas.” Notice that this text is also formatted in large, serif, red text. In the next step we will remove the formatting from this part of the text by adding the span tag.
View the page in Split view. We will modify the HTML code so that the .headline class will only be applied to the phrase “CSS Separates Form from Content.” Cut (Command+X) the class=“headline” portion of the code from the <body> tag and delete the space that was between the two words “body” and “class.”
In other words, the tag
<body class = "headline">
becomes the tag
<body>
Replace the tag
<p>CSS Separates Form from Content</p>
with this tag
<span class="headline">CSS Separates Form from Content</span>
Notice that the rest of the text, “Use the span tag to apply the class in specific areas,” is now formatted in the default text. (Fig 17.14)


So far, the CSS that we have created has been saved in the head area of the HTML page index.html and applied in the body area of the page. CSS code can also be saved in an external style sheet. Saving the CSS externally has three implications:
The HTML document will rely upon a second document with a .css extension for any formatting that has been applied with CSS code.
The external style sheet can be applied to multiple HTML documents.
The CSS code saved in an external sheet is easily modified in one location (as opposed to opening multiple HTML files). In this exercise we will create an external style sheet, a CSS file that is applied by being linked to an HTML document.
Choose File > New and select CSS from the page type list and click Create.
In the CSS panel, add a new class called .highlight (leave the rest of the settings as we did in Exercise 3, Step 3). In the CSS Rule definition for the .highlight dialog box, click on Background from the Category list and set the Background-color field to bright yellow. We used #FF0. (Fig 17.15)
Click OK to exit the dialog box and choose File > Save As to save the CSS file. Name the CSS file style.css and save it in the same folder as the index.html file that you created in the previous exercises.
Click on the index.html tab or use File > Open to edit the page we created in the previous exercises.
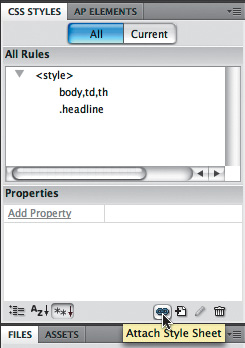
Now we will link the new CSS document to index.html. Click the Attach Style Sheet icon on the bottom of the CSS Styles panel. (Fig 17.16)
You are prompted to browse for the CSS file that will be attached to index.html. You can press the Browse button, or if you know that you saved your CSS file as style.css, you can type the name of the file into the File field. We recommend browsing for the file to avoid typos. Make sure the Link radio button is selected and click OK. (Fig 17.17)
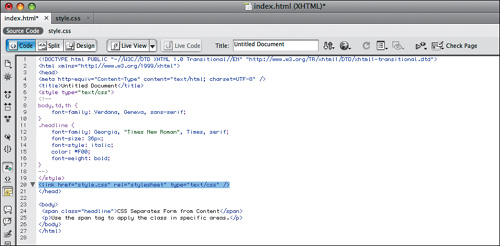
Once you have linked the file using the CSS Styles panel, check the code in the index.html file to see how the CSS file is linked. You should see that Dreamweaver added the code <link href=”style.css” rel=”stylesheet” type=”text/css” /> in the head area of the document. (Fig 17.18)
Now modify index.html in Design view. Select the word “specific” and use the Properties inspector to choose the class .highlight. (Fig 17.19)
View index.html in Split view and notice that the code includes the <span> tag around the word “specific.” (Fig 17.20) This is because we selected the word individually before applying the style. The .highlight class applied to the <span> tag comes from the external style sheet.
Choose File > Save All. The Save All command saves all open documents.
Open the index.html file in a web browser to see the document with the styles applied. The red headline style is stored in the head area of the HTML document. The yellow highlight style is stored in the style.css document. Both documents should be saved in the same location. (Fig 17.21)
To see that the style.css document is affecting your index.html file, move the style.css to a new location on your hard drive. For instance, we had both files saved in a folder named chapter 17 on our Desktop. Move style.css out of the folder, to the Desktop. Refresh the index.html file in the web browser. (Fig 17.22) The style will not affect the HTML page if the page cannot find it. The linked file is pointing to the folder where the HTML file was stored. By moving the file, you are breaking the link between the CSS and HTML files. Move the CSS file back to the same location where the HTML file is stored and refresh the browser again. The link should be fixed.


Note
Visit http://www.csszengarden.com to see a gallery of CSS designs applied to one HTML page.