
Chapter 5. Containers
Applications typically don’t come bundled with everything they need in a single file. This is true not only for Node.js applications, which consist at least a single .js file and a node executable, but for applications compiled using other platforms as well. There are always other requirements involved, such as shared libraries. Even a single-executable binary written in C that statically links any dependencies will still technically rely on the system call API offered by the Kernel.
There are many different ways that applications are distributed and executed. Each of these approaches has trade-offs concerning portability, efficiency, security, and brittleness.
Sometimes it’s nice to “just ship a binary”. But this means, at the very least, shipping a different binary for different operating systems, and sometimes (as is often the case when a binary depends on OpenSSL), it requires shipping multiple binaries depending on operating system and library versions. This is an issue of portability.
One of the biggest issues is with shared libraries. Consider a server running the Linux operating system. This single machine is then expected to run two pieces of software, Resizer Service A and Resizer Service B. However, one version depends on ImageMagick v7, and the other relies on ImageMagick v5. It’s now no longer a straightforward task of installing the ImageMagick shared library, and instead is a juggling act of isolating the different library versions. This situation is brittle.
Other problems can arise with running multiple applications as well. Perhaps the applications need to maintain a lock in the filesystem and the path is hard-coded and would collide. Or, perhaps the applications want to listen on the same port. Or, maybe one of the applications gets compromised and may then be used by an attacker to interfere with another application, which is an issue of security.
Virtual Machines (VMs) were created to solve many of these problems. A VM is able emulate computer hardware within a host operating system, having access to an isolated subset of memory and disk space. An operating system installed within this VM is able to run applications completely isolated from the host OS. This is a very powerful concept, one that is still extremely important today. However, it comes with the disadvantage that every running VM needs an entire copy of an OS. It also means that freshly deployed VMs will need to take time to boot up the guest OS. This overhead can make it prohibitive to dedicate one VM per application, and is a problem of efficiency.
A container is a way to describe and bundle the requirements of an application into a single distributable package. This includes the contents of a private filesystem and the shared libraries therein, an isolated list of PIDs, isolated ports that are being listened to (which cannot conflict with ports from other containers), all without allowing access to memory dedicated to other containers. The only thing that isn’t bundled within a container is the operating system itself—instead, the containers rely on the host operating system (or, perhaps more specifically, the kernel of the host OS). System calls made within a container go through some light translation before being provided to the host OS.
Figure 5-1 compares three approaches to application isolation. The first approach, which I call the classic approach, relies on running applications directly on the OS running on hardware. In this case, a complicated juggling act with shared libraries is likely to happen. A system administrator may be needed when new applications are deployed, or an organization might need to agree to use the same exact dependencies everywhere. However, the overhead is the smallest. The second approach, virtual machines, conveys the redundant copies of an OS kernel, possibly for each application (though multiple applications often run within the same VM). VM nomenclature refers to a parent OS as the Host OS, and a child OS as a Guest OS. The third approach, containers, shows how the light-weight container abstraction can reuse a kernel, but shared libraries will likely be redundant. It also illustrates the need to have smaller containers.
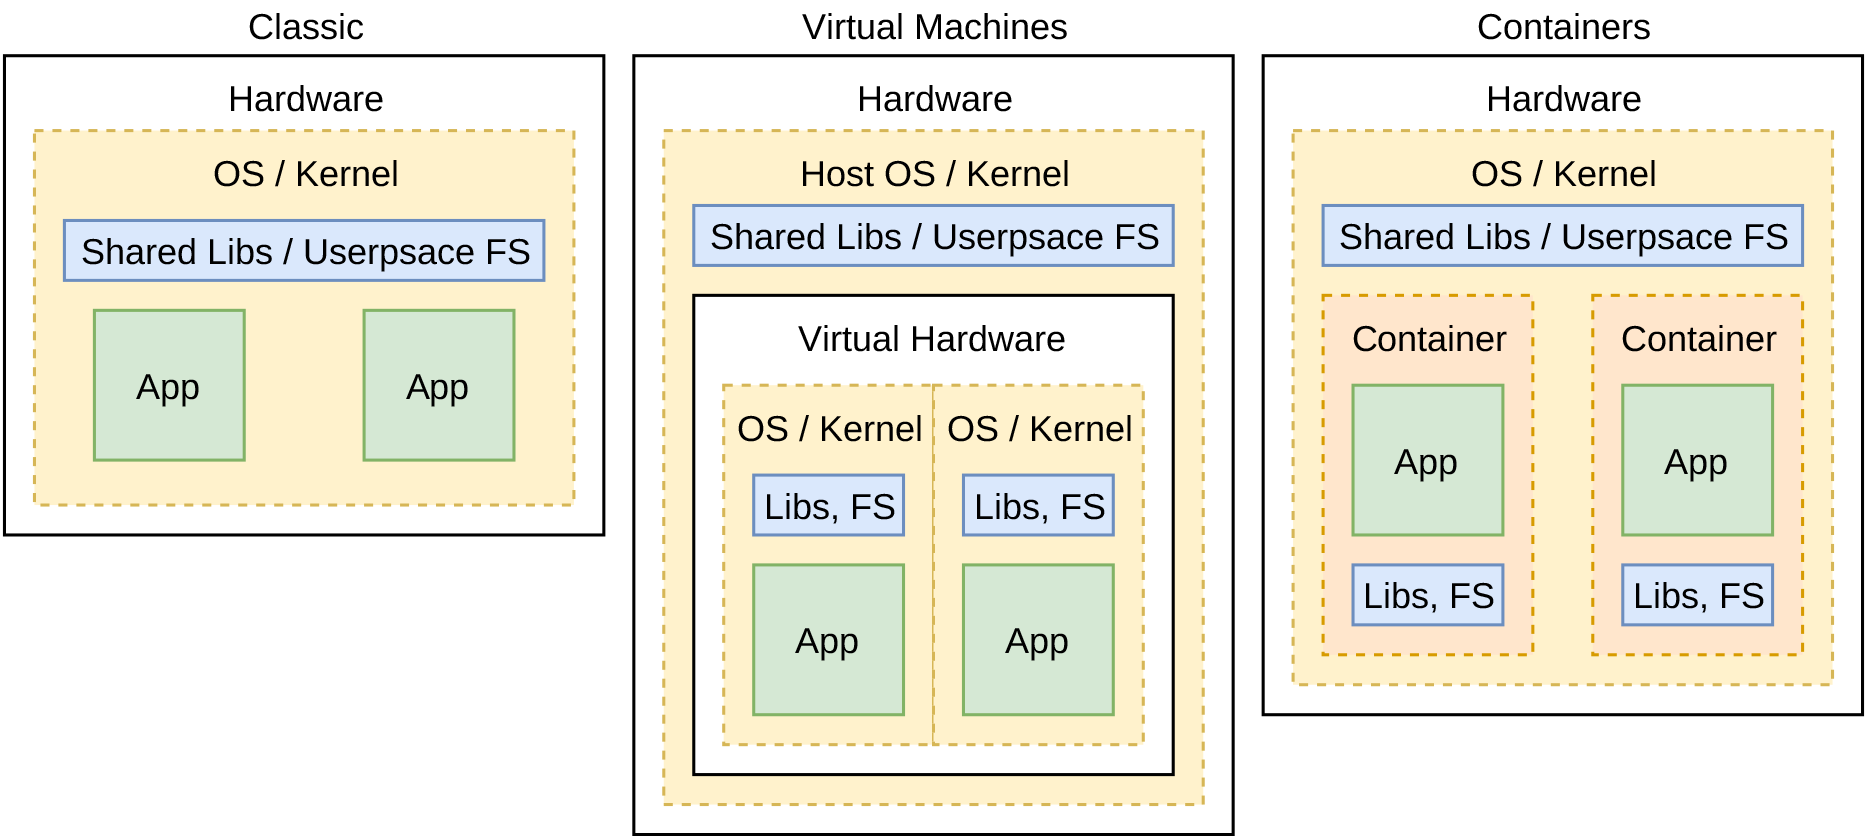
Figure 5-1. Classic vs Virtual Machines vs Containers
The ideal situation is that an application can very quickly be deployed, regardless of whatever dependencies it has, to some location where it can then consume CPU and RAM and reply to network requests. Once this application is no longer needed, it can then be torn down very quickly without leaving behind a mess.
Note
Modern technology stacks should leverage at least two of these approaches. While containers are great for deploying stateless, first party applications which are updated and deployed frequently and scale up and down, stateful databases will benefit more by running directly on an OS, virtual or otherwise.
Containers have won the battle for application encapsulation. They have become the basic unit of application deployment within modern service oriented architecture. This layer of abstraction, having redundancy of shared libraries but not of an OS, hits the sweet spot where memory efficiency is traded for portability, all while being robust and secure. There have been several different container formats, but only one format has become ubiquitous.
Introduction to Docker
Docker is a conglomeration of related tools. The first tool worth mentioning is the dockerd daemon, which exposes an HTTP API for receiving commands. The next tool is the docker CLI, which makes calls to the daemon and is how you’ve interacted with Docker so far in this book. A killer feature of Docker is Docker Hub, which is a central repository of docker images. While there may be competing container formats, none of them has a marketplace as impressive.
A Docker image is an immutable representation of a filesystem that you can run applications within. One Docker image can also extend from another. For example, one might have a base Ubuntu image, then a Node.js image, then finally an application image. In this situation the Ubuntu image provides things like a basic filesystem (/usr/bin, users and permissions, and common libraries). The Node.js image provides the node and npm binaries and shared libraries required by Node.js. Finally, the application image provides the .js application code, the node_modules directory (which might include modules compiled for Linux), and even other application-specific dependencies (such as a compiled ImageMagick binary).
Docker runs Linux applications. However, the Linux kernel is not actually provided in any of these image layers, not even a base Ubuntu image. Instead, that ultimately comes from a Linux OS running outside of Docker. When the machine running Docker is a Linux machine (which is how production applications running on a server typically work), then there’s likely only a single OS involved. When Docker is running on a non-Linux OS, such as macOS or Windows development machine, then a Linux virtual machine is required. Docker Desktop is a tool created by Docker for just this situation. Docker Desktop not only provides a VM, but it also provides other niceties such as an admin UI and Kubernetes (which is covered in more detail in [Link to Come]).
A Docker container is an instance of a Docker image, associated with configuration such as a name, port mappings, and volume mappings—which is how the filesystem within the container can be mapped to the host filesystem. This means that you can run as many containers pointing to the same image on a single machine as you want—assuming you have the computing resources to do so. Containers can be started and stopped and interacted with in many ways.
An important aspect of Docker is the Dockerfile, which is a declarative file describing a Docker image. A Dockerfile can contain many different lines, which describes how the container ends up being built. Directives are listed on different lines, with directives being run from top to bottom. The first directive usually ends up being the FROM directive, which is how an image declares which image to use as a parent. The official Node.js Alpine container, for example, uses FROM alpine:3.11 as the first line of the Dockerfile. In this case it’s declaring that the Docker image named alpine tagged with a version of 3.11 is its base container. An application might then extend from that image by using the FROM node:lts-alpine3.11 directive. These directives will be covered in more detail shortly. Note that a Docker image cannot have more than one parent Docker images—no multi inheritance here! However it can have multiple FROM directives, which is called a multi-stage Dockerfile. Again, more on this later.
Each new directive in a Dockerfile creates a new layer. A layer is a partial representation of an image after that particular directive has finished running. Each one of these layers increases the storage size and potentially startup time of an image. Figure 5-2 shows the relationship between images and layers, and how they can contribute to the resulting filesystem. For these reasons it’s common for applications to combine as many operations into as few lines as possible by chaining commands. Each layer can be represented as a hash of its contents, much like git does when you checkout a specific commit hash. For this reason, if a line in a Dockerfile is expected to change frequently, it should be placed later in a Dockerfile. This will allow the previous layers to be reused between multiple versions of an application’s Docker image.

Figure 5-2. Images container layers, and layers contribute to the filesystem
Docker images are often tuned for performance by shrinking the filesystem to the smallest version required by the application. The Ubuntu Linux distribution is intended for generic use on desktops and servers, and can be rather large. Debian is a lighter distribution, but also contains many tools that are needed by whole server machines but aren’t required within a container. Alpine is an extremely stripped down Linux distribution and is often the base image of choice for storage-concious developers. Sometimes an application does rely on features that aren’t provided by such a simple base image and may need to instead use a more complex one. The official Node.js Docker images contain variants for both Debian and Alpine.
When you work with Docker images, such as when you previously run all of those docker run commands, a version of the image is downloaded and cached on your machine. This is very similar to how npm install works. Both npm and Docker cache remote files, and can keep track of multiple versions of these files. Docker even tracks each layer of the images.
To see a list of the Docker images that are currently cached on your machine, run this command:
$ docker imagesYou should then see a list of images. The list that I see looks like this:
REPOSITORY                   TAG      IMAGE ID      CREATED       SIZE
grafana/grafana              6.5.2    7a40c3c56100  8 weeks ago   228MB
grafana/grafana              latest   7a40c3c56100  8 weeks ago   228MB
openzipkin/zipkin            latest   12ee1ce53834  2 months ago  157MB
openzipkin/zipkin-slim       2.19     c9db4427dbdd  2 months ago  124MB
graphiteapp/graphite-statsd  1.1.6-1  5881ff30f9a5  3 months ago  423MB
sebp/elk                     latest   99e6d3f782ad  4 months ago  2.06GB
This list hints at a lot of things—other than how much time it takes to write a book. First, notice how large some of the images can get. In the case of sebp/elk, the image is just over 2GB in size! Also notice the TAG column. This column references the version. A version is usually one of three values: either a version string, the string latest (which refers to the most recent version of an image when it was last downloaded from the registry), or the value <none>, which usually happens when you build an image for your own software but don’t provide a version string.
Every image has two ways to refer to it. The permanent way is by using the image ID. This value should always refer to the same exact content. The other way to refer to an image is by its repository and tag name. In my results the grafana/grafana repository with a tag of 6.5.2 happens to point to the same image as the one with a tag of latest since they have the same image ID. When I download the latest version of Grafana again in a few weeks, it might point to a different image ID.
Next, it’s time to gain some insight into the layers used by each of these images by using another command. This time run the following command (or, substitute a different version number if your listing is different):
$dockerhistorygrafana/grafana:6.5.2
You will then see a list of the different layers of the image. The results that I get look like this:
IMAGE         CREATED BY                                      SIZE
7a40c3c56100  /bin/sh -c #(nop)  ENTRYPOINT ["/run.sh"]       0B
<missing>     /bin/sh -c #(nop)  USER grafana                 0B
<missing>     /bin/sh -c #(nop) COPY file:3e1dfb34fa628163…   3.35kB
<missing>     /bin/sh -c #(nop)  EXPOSE 3000                  0B
<missing>     |2 GF_GID=472 GF_UID=472 /bin/sh -c mkdir -p…   28.5kB
<missing>     /bin/sh -c #(nop) COPY dir:200fe8c0cffc35297…   177MB
<missing>     |2 GF_GID=472 GF_UID=472 /bin/sh -c if [ `ar…   18.7MB
<missing>     |2 GF_GID=472 GF_UID=472 /bin/sh -c if [ `ar…   15.6MB
<missing>     |2 GF_GID=472 GF_UID=472 /bin/sh -c apk add …   10.6MB
... <TRUNCATED RESULTS> ...
<missing>     /bin/sh -c #(nop) ADD file:fe1f09249227e2da2…   5.55MB
In this case, prior to truncating the list, the Grafana version 6.5.2 image is composed of 15 different layers. The list correlates to the steps in a Dockerfile backwards; the earlier entries in the list are later lines in the Dockerfile. The list displayed as the result of the docker history command only include steps for the specific image being queried; not any parent images.
The docker pull command is used to download an image from a remote repository. Run the following command to download such an image:
$ docker pull node:lts-alpineThis will begin downloading the layers of the Alpine variant of the most recent LTS release. In my case, I’m greeted with the following output:
lts-alpine: Pulling from library/node
c9b1b535fdd9: Pull complete
750cdd924064: Downloading [=====>           ]  2.485MB/24.28MB
2078ab7cf9df: Download complete
02f523899354: Download complete
In my case there are four layers with a file size greater than 0 being downloaded (some of the layers don’t modify the filesystem and won’t be listed as being downloaded).
The Debian variant is a lot larger than the Alpine variant. For example, this LTS Alpine image is 85.2MB. If you were to download the Debian variant using the docker pull node:lts command, you would see that it’s a much larger 913MB. One thing to keep in mind is that these layers end up getting cached on the different machines they’re used on. If you were to deploy an application using the Debian variant, the first time it’s deployed the server would need to download the nearly 800MB Debian base image. However, for subsequent deploys, the Debian layer would already be present and the deploy would be faster.
Storage isn’t the only concern with large images. Another thing to consider is security. If a Node.js application running inside of Debian gets hacked, there will be many utilities available in the filesystem that can get executed. However, if an application based on Alpine is compromised, there will be less binaries around. In theory this will lead to a smaller attack surface area.
Tip
As a rule of thumb, if your application works with Alpine, use Alpine! If your application needs a few shared libraries, install those libraries in your Alpine image. Only for complex applications should you consider using a heavier base container like Debian or Ubuntu.
Now that you’re more familiar with some of the theory behind Docker, it’s time to start running more containers. For this first example you’ll run a plain Ubuntu container without packaging an application with it. The previous sections in this book have done just this. However, this time, you’ll run the container in an interactive mode. Run the following command to enter an interactive bash session within an Ubuntu container:
$ docker run -it --rm --name ephemeral ubuntu /bin/bashThe -i flag means that the session is interactive, and the -t flag means that Docker should use a TTY session (as a convention they’ve been combined into simply -it). Both these flags are set to make the session interactive. The --rm flag tells Docker to remove all traces of the container once it exits. The --name flag sets a name for the container, which will help to identify it in a list. The argument ubuntu is the name of the image being run (which really translates into ubuntu:latest). The final argument of /bin/bash is the binary that Docker will execute inside the container.
Once Docker downloads the necessary layers you should see your terminal prompt change. At this point you are able to execute commands within the running container itself. Run the command ps -e. This will list all currently running processes inside the container. The output I get when I run the command looks like this:
PID TTY          TIME CMD
  1 pts/0    00:00:00 bash
 10 pts/0    00:00:00 ps
The root process within the container, the one with a PID value of 1, is bash. Only a second process is also being run, namely ps. If this same command were run on a more traditional Linux server, the root process would probably be a more complex service manager such as systemd or init. There would also be dozens if not hundreds of other processes listed. Service managers handle things like reading configuration files, running services and managing their interdependencies, and managing process restarts in a configurable manner when a child fails. In short, they’re complex tools required for managing a complete operating system.
Within a Docker container, such service management features are usually overkill, and a simpler program should be used. For an interactive shell, bash will suffice as the root process. However, in more complex situations, you might need to reach for another program. For example, sometimes it’s beneficial to run a sidecar process within a Docker container. A sidecar is an external process that performs certain duties, such as providing a proxy to make service discovery easier for an application, or providing a health-checking daemon that polls the application for health stats and relays the stats to another service. In those situations, restart policies become very important. For example, maybe if the sidecar crashes, it can simply be restarted, but if the main application crashes, the whole container should then exit. In those cases you may need to research an alternative service manager, one that allows for granular configuration.
Now, switch to a new terminal window, and run this command:
$ docker psThis Docker subcommand is different than the ps command that was run within the container, but in spirit, both commands intend to list a snapshot of currently running things. The output I get when I run this command looks like this:
CONTAINER ID  IMAGE   COMMAND      CREATED         PORTS  NAMES
527847ba22f8  ubuntu  "/bin/bash"  11 minutes ago         ephemeral
Note that you might see more entries if you still have some other containers running.
It’s even possible to manually execute a command within a currently running docker container. This is useful if you need to debug a runaway Node.js application. The subcommand to do this is exec. Switch to a new terminal window and run docker exec ephemeral /bin/ls /var to execute a new command within your running Ubuntu container. You’ve just executed a second command within your container without disrupting the other commands.
You’re now free to exit the container. Switch back to the terminal running the Docker container and type exit. The container will be torn down and, since it was run with the --rm flag, it will be completely removed from your system. Running docker ps again will prove that it is no longer running. But, to prove that it is no longer on your system, run the docker ps --all command. You will see several entries listed in the results, though the ephemeral container you created earlier will not be listed amongst them.
Tip
At this point you might want to prune some of the old containers that you’re no longer using as they do consume disk space. To remove a container from your machine, you can run the docker rm <name/id> command, using either the hexadecimal container identifier or the human-friendly container name. Similarly, you can run the docker images command to see a list of all the images still available on your computer. You can then run docker rmi <image id> to remove any unused images. Note that you cannot remove an image currently being used by a container; the container will need to be removed first.
Containers aren’t that useful if external applications can’t interface with them. Luckily, Docker provides two important methods to do just that. The first method is by sharing part of the filesystem within a running container with part of the filesystem in the host operating system. This is done by using the -v / --volume or the --mount flags (the first two are an alias for each other, and the third flag accepts a more verbose syntax, but they essentially do the same thing). The other method for interfacing with a container is by mapping a port inside the container to the host operating system by using the -p / --publish flag.
Execute the following commands to download an example index.html file and to run a container with nginx configured to read from the directory:
$rm index.html;curl -o index.html http://example.org$docker run --rm -p 8080:80-v$PWD:/usr/share/nginx/html nginx
Both the volume and publish flags have a verbose syntax for configuring the way the mapping between the host and the container work. For example, it’s possible to specify if a volume mapping is read only or if a port mapping should be UDP. Both flags support a simple syntax as well, where a resource on the host is mapped with reasonable defaults to a resource on the guest. The command you just ran uses this simple syntax for both volume mapping and port mapping. In this case, port 8080 on the host is mapped to port 80 in the container by using -p 8080:80. The current directory is mapped to the directory used by nginx to read static files with the -v $PWD:/usr/share/nginx/html flag (the -v flag expects absolute directories, which is why the command uses $PWD instead of “.”).
Now that the nginx container is running, visit http://localhost:8080/ in your browser to see the rendered index.html page. The volume mount flag is very useful when running database services which need to persist state. However, it’s not that common to mount the host’s filesystem for a Node.js application, since such services should be run in a stateless manner. For that reason you’ll probably not need to use the volume flag with your apps.
Containerizing a Node.js Service
In this section you’ll create a Docker container for the recipe-api service. This container will be used for two different purposes. The first will be to install modules, and the second will be to setup the environment to run the Node.js application. These two operations sound similar, but as you’ll see, it’s important to keep the two concepts separated.
The fact that Docker will be used to install the project’s modules might sound a bit odd at first. Right now, on disk, within your recipe-api directory, you already have a node_modules directory which contains all the modules required to run the application! Why aren’t those modules good enough?
For the most part, this comes down to the fact that modules installed via npm, and even yarn, don’t simply download JavaScript files and place them on the filesystem. Instead, the installation of modules from the npm registry is actually a fairly non-deterministic operation. For one thing, if an npm module has native code involved, such as C++ files, that code will need to be compiled. There’s no guarantee that the compiled output on your local development machine will be compatible with that of the Linux Docker environment (for example, a local development machine might be a macOS or Windows machine, or a Linux machine with different shared library versions). If you’ve ever deployed an application and saw many error logs mentioning the chokidar or fsevents modules, it might be due to deploying a macOS node_modules directory to a Linux server. Another reason for this non-determinism is the postinstall and preinstall scripts of a module, which can run any arbitrary code the module author likes. Sometimes this is used to do things like download a binary from the internet. For these reasons the module installation must happen in an environment similar to where the code will ultimately run.
As part of both the installation step, as well as preparing the execution environment, some files will need to be copied from the directory where your project files live. Much like git has the concept of a .gitignore file, and npm has an .npmignore file, Docker has its own .dockerignore file. This file, similar to the others, specifies patterns of files which should be ignored. In the case of Docker, files matching these patterns won’t be copied into the containers. Ignoring such files is convenient because wild cards can later be used when specifying which files to copy. Create a new file at recipe-api/.dockerignore and add the content from Example 5-1 to it.
Example 5-1. recipe-api/.dockerignore
node_modules
npm-debug.log
Dockerfile
The entries in this file are pretty similar to the files that you might already have in a .gitignore for other Node.js projects. Much like you wouldn’t want the node_modules directory checked into git, you also don’t want those modules copied into the Docker image.
Dependency Stage
Now it’s time to consider the Dockerfile itself. This example will use a multi-stage Dockerfile. The first stage will build the dependencies and the second will prepare the application container. The build stage will be based on the official Node.js Docker image. This image is built with the intention to satisfy the needs of as many Node.js developers as possible, providing tools that they will likely need. As an example, it includes both the npm and yarn package manager. For this reason it’s a pretty useful base image for the build stage of an application.
Create a new file at recipe-api/Dockerfile and add the content from Example 5-2 to it. Keep the file open as you’ll add more content to it in a moment.
Example 5-2. recipe-api/Dockerfile “deps” stage
FROM node:13.6-alpine3.11 AS deps

WORKDIR /srv
COPY package*.json ./
RUN npm ci --only=production
# COPY yarn.lock ./
# RUN yarn install --production
The first line in this file, beginning with FROM, specifies that the node:13.6-alpine3.11 image will be used as a base. If this were the only FROM directive in the entire file, it would be the base of the resulting image. But, since you’ll add another one later, it’s only the base image of the first stage. This line also states that the first stage of the build is being named deps. This name will be useful in the next stage.
The WORKDIR /srv line states that the actions that follow will take place within the /srv directory. This is similar to running the cd command in your shell, which changes the current working directory.
Next is the COPY statement. The first argument of the statement represents the filesystem in the host, and the second represents the filesystem within the container. In this case the command is stating that files matching package*.json (specifically package.json and package-lock.json), will be copied to ./ within the container (being the /srv directory). Alternatively, if you prefer to use yarn, you would instead copy the yarn.lock file.
After that is the RUN command. This command will execute the specified command within the container. In this case, it’s executing the command npm ci --only=production. This performs a clean installation of all non-development dependencies. In general, the npm ci command is faster than npm install when dealing with a clean environment such as a Docker image. Alternatively, if you were using yarn, you might instead run yarn install --production. Again, both the npm and yarn binaries are provided in the image due to inheriting from the official node base image.
Tip
Some people like to create an earlier stage in their build where they install dev dependencies and run their test suite. This can help increase confidence that the resulting image is free of bugs. But, since this likely involves two separate npm install steps (with with dev dependencies and one without), it won’t necessarily find all bugs, like if application code mistakenly requires a dev dependency.
Release Stage
Now you’re ready to work on the second half of the Dockerfile. Add the content from Example 5-3 to the same recipe-api/Dockerfile file that you’ve been working with.
Example 5-3. recipe-api/Dockerfile “release” stage part one
FROM alpine:3.11 AS release

ENV V 13.6.0
ENV FILE node-v$V-linux-x64-musl.tar.xz

RUN apk add --no-cache libstdc++
  && apk add --no-cache --virtual .deps curl
  && curl -fsSLO --compressed
  "https://unofficial-builds.nodejs.org/download/release/v$V/$FILE"
  && tar -xJf $FILE -C /usr/local --strip-components=1
  && rm -f $FILE /usr/local/bin/npm /usr/local/bin/npx
  && rm -rf /usr/local/lib/node_modules
  && apk del .deps
Unlike the first deps stage of the Dockerfile, this second release stage of the build doesn’t make use of the official Node.js image. Instead, it’s using a rather plain alpine image. The reason for this is that some of the niceties provided by the official Node.js image aren’t needed in a production application. For example, once the dependencies are squared away, it’s uncommon for an application to later invoke the npm or yarn binaries. By using the alpine image directly the image will be just a little smaller and simpler. It also helps for demonstrating more complex Dockerfile directives.
The next two lines define environment variables that are used by the other directives. This is a convenient way to prevent common strings from being repeated in the file. The first variable is called V and represents the version. In this case the Dockerfile is working with Node.js v13.6.0. The second variable is called FILE and is the name of the tarball to be downloaded.
After the environment variables is a complex series of commands that will be run inside the container using the RUN directive. The Dockerfile is stating that several commands will be executed, but they’re wrapped up in a single RUN directive to keep the number of intermediate layers small. The backslash at the end of the line states that the next line is still part of the same line, and the ampersands state that a new command is being run (and that if a previous command fails then to not run the following commands).
The Alpine operating system comes with a package manager called apk, and the first two commands in the RUN directive install packages using it. The packages are installed by running apk add. The --no-cache flag tells apk not to leave behind any package management files tracking the installs, which helps keep the image that much smaller. The first package being installed is libstdc++. This package provides a shared library required by Node.js. The second package is curl. This package is only needed during setup and will be later removed. The --virtual .deps flag tells apk to keep track of the installed package and its dependencies. Then, later, that group of packages can be removed all at once.
The next command executes curl inside of the container and downloads the Node.js release tarball. After that, the tar command extracts the contents of the tarball into /usr/local. The tarball doesn’t include yarn but it does include npm, so the following rm commands remove npm and its dependent files. Finally, the apk del .deps command removes curl and its dependencies.
This was the most complex part of the Dockerfile. Now, add the final contents from Example 5-4, which contains the second half of the directives for the release stage.
Example 5-4. recipe-api/Dockerfile “release” stage part two
WORKDIR /srv
COPY --from=deps /srv/node_modules ./node_modules
COPY . .

EXPOSE 1337
ENV HOST 0.0.0.0
ENV PORT 1337
CMD [ "node", "producer-http-basic.js" ]
Again, the working directory is set to /srv. This is a common convention on Linux servers but otherwise the application code could reside almost anywhere.
The more interesting line though is the following COPY directive. The --from flag instructs the COPY directive to copy files from another stage of the image build process, not the host operating filesystem like it usually does. This is where the magic of the multi-stage presents itself. In this case, the /srv/node_modules directory from the deps stage is being copied to the /srv/node_modules directory within the release container. This ensures that the modules are built for the proper architecture.
The next COPY directive copies files from the current directory (.) into the /srv directory (. with a WORKDIR of /srv). This is where the .dockerignore file comes into play. Normally, the node_modules would get copied as well, overwriting the node_modules that were just copied from the deps stage. Note that in the case of this example application, every single one of the producer-*.js files will get copied into the image. Technically only one of them is needed for a service to run. But, the COPY . approach is more applicable to a real world application.
Warning
In general, using COPY . is a decent approach to copying application files into a Docker image. One caveat to be aware of is that this copies every file that isn’t ignored, including the Dockerfile itself, a potentially massive .git directory (if run in the project root directory). It will even copy temporary files used by your text editors!
For this reason, you’ll need to both be diligent about adding entries to your .dockerignore file, and you’ll occasionally want to look at the filesystem of the Docker image (such as with docker exec <name> ls -la /srv). You should also consider only building Docker images on a special build server, and not on a local development machine.
Having specific COPY directives for every file that should be copied can be risky too. For example, your application might require a JSON file that is read at runtime which isn’t explicitly copied, leading to a buggy image.
The EXPOSE directive is a way of documenting that the image plans on listening using a specific port, in this case 1337. This doesn’t actually open the port to the outside world; instead, that is later done when a container is run from the image.
The two ENV directives set environment variables, and this time the variables are going to be used by the application itself. Specifically, the HOST and PORT environment variables are what the services have been using to decide which interface and port to listen on. The application defaults to listening for connections on the 127.0.0.1 interface. Leaving this as-is would mean that the application only listens for requests originating within the docker container, not from requests generated from the host, which wouldn’t be very useful.
And finally, the Dockerfile ends with a CMD directive. This is a way of declaring what command should be executed when a container is run. In this case, the node binary will be executed and it will run the producer-http-basic.js file. This command can be overridden at run time.
This image is far from perfect. The official Node.js containers, while a little heaver, do provide some other niceties. For example, when they download the compiled Node.js tarballs, they also compare them against checksum values to ensure the files haven’t been tampered with. They also creates a specialized user and setup filesystem permissions for running the Node.js application. It’s up to you to decide which of these features you want for your application.
From Image to Container
With the Dockerfile complete, it’s now time to build an image from the Dockerfile. The Dockerfile, and its supporting files, exist on disk and are usually checked into version control. The images which are generated from them are managed by the Docker daemon.
Run the commands in Example 5-5 to enter the recipe-api directory and then build a docker image.
Example 5-5. Building an image from a Dockerfile
$cdrecipe-api$docker build -t tlhunter/recipe-api:v0.0.1 .
This docker build command has one flag and one argument. The flag is the -t flag which represents the tag for the image. The tag used in this example has three parts to it, following the pattern repository/name:version. In this case the repository, which is a way to namespace image names, is tlhunter. The name represents the actual content of the image, and in this case is recipe-api. The version, which is used for differentiating different releases of the image, is v0.0.1.
Regarding versions, an image doesn’t necessarily need to follow along with a particular pattern. In this case I chose to use a value that looks like a SemVer version string, a value familiar to many Node.js developers. However, applications don’t usually have a SemVer version assigned to them like modules do. One common approach is to simply use an integer, one that gets incremented with each new container build. If a version isn’t supplied, Docker will supply a default version tag of latest. Generally, you should always supply a version.
While this command runs you’ll see the output as each of the directives in the Dockerfile builds a new layer. Each one of these layers has its hash printed, as well as the directive for that layer. The output that I get when the command has finished looks like this:
Sending build context to Docker daemon  155.6kB
Step 1/15 : FROM node:13-alpine AS deps
 ---> 532fd65ecacd
... TRUNCATED ...
Step 15/15 : CMD [ "node", "producer-http-basic.js" ]
 ---> Running in d7bde6cfc4dc
Removing intermediate container d7bde6cfc4dc
 ---> a99750d85d81
Successfully built a99750d85d81
Successfully tagged tlhunter/recipe-api:v0.0.1
Once the image has been built, you’re ready to run a container instance based off of this image. Each container instance has metadata attached to it to differentiate it from other running containers. Run the following command to create a new running container instance from your container:
$docker run --rm --name recipe-api-1-p 8000:1337 tlhunter/recipe-api:v0.0.1
This command uses the --rm flag, which previous examples have used, to clean up the container once it’s done. The --name flag sets the name of this container to recipe-api-1. The -p flag maps the 8000 port of the host to the 1337 port within the container which the Node.js application is listening on. The final argument is the tag for the image being run.
Once you’ve run the command, you’ll see some output from the service printed to the screen. The first piece of information logged is the PID of the process within the container. In this case it prints worker pid=1, meaning it’s the master process within the container. The next piece of information printed is that the service is listening at http://0.0.0.0:1337. This is the interface and port that the Node.js service is available at within the container.
Note
Keep in mind that the address the service thinks it is available at isn’t going to be the same as the address that clients will use to contact it. This can affect a service which need to report its URL to the client (like an API providing URLs to other resources). In these cases you can provide an environment variable containing the external host and port combination for the service to relay to consumers.
At this point you’re ready to confirm that the service runs. Since the container is mapping the internal 1337 port to 8000 on the host, you’ll need to use the host’s port when making a request. Run the following command to make a request to your containerized service:
$ curl http://localhost:8000/recipes/42Once you run the command you should see the familiar JSON data in response. If you were to change the command to use the port 1337, you would get an error that the connection was refused.
Unfortunately, with the way this container is setup, you won’t be able to type Ctrl+C and have the container stop running. Instead, you’ll need to run the following command in a new terminal window to terminate the service:
$dockerkillrecipe-api-1
Rebuilding and Versioning an Image
Now that you’ve built an application image and run a container, you’re ready to modify the application and produce a second version. Applications change all the time, and it’s important to be able to repackage these different versions of an application and run them. It’s also important to retain old versions of an application so that if a new version is troublesome, an old version can quickly be restored.
Within the recipe-api directory, run the docker build command shown in Example 5-5 again. This time, note down the layers being created when the command is run. This will serve as a baseline for examining the effects of building an application, and how modifications will change the resulting Docker images. In my case I see the following layers:
532fd65ecacd, bec6e0fc4a96, 58341ced6003, dd6cd3c5a283, e7d92cdc71fe,
4f2ea97869f7, b5b203367e62, 0dc0f7fddd33, 4c9a03ee9903, a86f6f94fc75,
cab24763e869, 0efe3d9cd543, 9104495370ba, 04d6b8f0afce, b3babfadde8e
Next, make a change to the .recipe-api/producer-http-basic.js file (the entrypoint to the application) by replacing the route handler with the code in Example 5-6.
Example 5-6. recipe-api/producer-http-basic.js, truncated
server.get('/recipes/:id',async(req,reply)=>{return"Hello, world!";});
This time, run the build command from Example 5-5 and keep an eye on the output, but modify the command to use a version tag of v0.0.2. In my case, I now see the following layers:
532fd65ecacd, bec6e0fc4a96, 58341ced6003, dd6cd3c5a283, e7d92cdc71fe,
4f2ea97869f7, b5b203367e62, 0dc0f7fddd33, 4c9a03ee9903, a86f6f94fc75,
7f6f49f5bc16, 4fc6b68804c9, df073bd1c682, f67d0897cb11, 9b6514336e72
In this case, the final five layers of the image have changed. Specifically, everything from the COPY . . line and below.
Next, revert the changes to the producer-http-basic.js file, restoring the request handler to its previous state. Then, modify the application build process at an earlier stage by running the following command:
$ npm install --save-exact [email protected]By installing a new package, the contents of the package.json and package-lock.json files will be different. Because of this, Docker will know not to reuse the existing layer correlating with the early COPY directive which copies those files to the deps stage. It knows not to reuse the cached layer because the hash of the filesystem represented in the layer will be different. Run the Example 5-5 command again, this time with a version tag of v0.0.3, to again see the effects that the changes have had on the image build process. In my case, the layers now look like this:
532fd65ecacd, bec6e0fc4a96, 959c7f2c693b, 6e9065bacad0, e7d92cdc71fe,
4f2ea97869f7, b5b203367e62, 0dc0f7fddd33, 4c9a03ee9903, b97b002f4734,
f2c9ac237a1c, f4b64a1c5e64, fee5ff92855c, 638a7ff0c240, 12d0c7e37935
In this case, the last six layers of the release image have changed. This means that everything from the COPY --from=deps directive and below has changed. Also, the last two layers of the deps stage have also changed. This part isn’t as important since the layers in the deps stage don’t directly contribute to the overall image based on the release stage.
So, what exactly does this difference of five layers verse six layers mean? Well, each layer contributes different filesystem entries to the overall stack of layers representing the Docker image. Run the following command to view the size of each of the layers of the v0.0.1 version of your application:
$dockerhistorytlhunter/recipe-api:v0.0.1
Some of the directives don’t contribute to the filesystem size and have a size of 0B. For example, the ENV, CMD, EXPOSE, and WORKDIR directives correlate to layers that don’t have file sizes. Others do contribute. For example, the FROM … release directive contributes about 5.6MB to the resulting image. The RUN apk add directive adds 80MB. The actual application code, resulting from the COPY . . directive, only contributes about 140kB to the image. However, the part that is likely to vary the most between application updates is the COPY --from=deps directive. For this example application, the node_modules directory contains tons of entries not needed by the application, since it contains packages for other project files, such as the GraphQL and gRPC modules. In this case it weighs in about 68MB. Most projects written in Node.js consist of around 3% first-party application code and about 97% third-party code, so this file size ratio isn’t that far fetched.
Table 5-1 contains a summary of the three different application versions that you have created. The Layer column contains the number of the layer and a shorthand reference to the directive being run. The Size column contains the size of that layer. Technically, the layer sizes across the three different versions of the application do vary slightly, like when the left-pad module was installed, but the size difference is mostly negligible so only the size of the layer in the v0.0.1 image is shown. Finally, the columns under the version numbers contain the hash of that layer. The hash is emboldened if it has diverged from a previous version.
| Layer | Size | v0.0.1 | v0.0.2 | v0.0.3 |
|---|---|---|---|---|
1: |
N/A |
|
|
|
2: |
N/A |
|
|
|
3: |
N/A |
|
|
|
4: |
N/A |
|
|
|
5: |
5.6MB |
|
|
|
6: |
0 |
|
|
|
7: |
0 |
|
|
|
8: |
79.4MB |
|
|
|
9: |
0 |
|
|
|
10: |
67.8MB |
|
|
|
11: |
138kB |
|
|
|
12: |
0 |
|
|
|
13: |
0 |
|
|
|
14: |
0 |
|
|
|
15: |
0 |
|
|
|
Cost per Deploy |
N/A |
138kB |
68MB |
The effects of changing application code, which is layer 11 in the v0.0.2 column, is that an additional 138kB of space is required when deploying image v0.0.2 to a server that already has image v0.0.1. By changing the content of a layer, every following layer that depends on it will also change. Since layers 12 through 15 don’t contribute to the overall file size, it results in only a 138kB increase.
The effects of changing the installed packages, which is layer 10 of the v0.0.3 column, is that an additional 67.8MB of data will need to be sent to a server that already has v0.0.2, or even v0.0.1, of the image installed.
Typically, Node.js application code will change much more frequently than changes to the package.json file (and therefor the entries in node_modules). And, even less likely to change are the operating system packages installed by the apk command. For this reason you usually want the directive to copy the application files to be later than the directive to copy npm modules, which itself should be later than the directive to install operating system packages.
One final note is that you’ll often see Docker containers tagged with a version of latest. If you wanted to make such a tag available when building images, you can build each image twice. The first time you build the image, supply a version string for it. Then the second time, don’t supply a version string. When the version is omitted, Docker will fill in latest, but this can get confusing. For example, if you were to tag an image as v0.1.0, and also tag it as latest, then go back and tag an images as v0.0.4, and tag that as latest, then the latest tag wouldn’t refer to the highest version of the image (v0.1.0), it would instead refer to the most recently generated image (v0.0.4). For that reason it’s sometimes best to not tag an image as latest and only publish images with exact version numbers.
Basic Orchestration with Docker Compose
Docker is a convenient tool for packaging the dependencies of a service, whether it be a stable backing store like Postgres or if it’s a highly dynamic Node.js application that changes daily. Often times, one of these services will depend on another service to run. In fact, the web-api and recipe-api services that you’ve been building so far are examples of this very situation.
So far, with these services, you’ve been required to manually copy and paste shell commands to spin up dependent services. But, managing such a collection of scripts for a project can become unruly. Each of the docker run commands can require several configuration flags, especially if they rely on volume mounts and complex port assignments.
Sometimes, multiple services are packed into the same container. The sebp/elk image used in “Logging with ELK” does just this, providing Elasticsearch, Logstash, and Kibana all in one place. This approach sometimes makes sense when using closely related services, and it certainly makes instantiating such services easier on a local development machine. But, when working with application code, it doesn’t make as much sense to bundle backing services with the main app.
Consider a Node.js service that depends on Redis. Bundling Redis with the app would make it easier to run the app locally. But, in production, multiple services might need to use the same Redis instance, and this convenience falls apart. You’d then need to either have two Dockerfiles created—one combining Redis for local development and one without it for production—or have a single Dockerfile that optionally starts Redis if a flag is set. The approach with multiple Dockerfiles means two files need to be maintained—files that might accidentally diverge. The approach with a single Dockerfile means you’d be shipping dead weight to production.
Luckily, there’s another tool available for managing these container relationships. In fact, this tool was already used previously in “Running Cabot via Docker”. This tool is Docker Compose. Docker Compose is built-in to Docker Desktop. If you’re using Docker on Linux, you will need to install it separately. Take a look at [Link to Come] for more information.
Docker Compose allows for the configuration of multiple dependant Docker containers by using a single declarative docker-compose.yml file. This file contains the same configuration data that can be represented as docker run flags, as well as other information, like the dependency graph between those containers.
Composing Node.js Services
Now it’s time to convert that pair of applications you’ve been working on to run with Docker Compose. For this section you’ll work with the Zipkin variant of the services that you created in “Distributed Request Tracing with Zipkin”. The dependency graph for these services are visualized in Figure 5-3. In this case, the web-api service depends on the recipe-api service, and both of those services depend on Zipkin.

Figure 5-3. Consumer, producer, and Zipkin dependency graph
Once you’re done with this section you’ll be able to run all three services by executing a single command. Within a larger organization, this approach can be used to ease local development for part of the backend stack.
First, copy the recipe-api/.dockerignore file that you created in Example 5-1 to web-api/.dockerignore. This file is rather generic and is useful for both applications.
Next, you’ll create a simpler variant of a Dockerfile. This version doesn’t do all the powerful multi-stage work to create a slim image like what was covered in “Containerizing a Node.js Service”. But, it is simple enough to quickly get two new applications up and running. Create a file at recipe-api/Dockerfile-zipkin containing the content in Example 5-7.
Example 5-7. recipe-api/Dockerfile-zipkin
FROM node:13-alpine
WORKDIR /srv
COPY package*.json ./
RUN npm ci --only=production
COPY . .
CMD [ "node", "producer-http-zipkin.js" ] # change for web-api
Once you’ve created that file, copy it to web-api/Dockerfile-zipkin, then modify the CMD directive on the last line to execute the correct consumer-http-zipkin.js file.
When certain commands like docker build are run they assume that configuration happens using a file named Dockerfile. But, you already have a Dockerfile in recipe-api that runs the producer-http-basic.js service. In cases like this where a project has multiple configurations, the convention is to name the files Dockerfile-*. The various docker sub commands accept a flag to specify a different Dockerfile.
With the preliminary work out of the way, you’re now ready to start creating the docker-compose.yml file. If you work on a service that depends on other services, you might find yourself checking this file into the source code repository. In this case, create the file in the root of your distributed-node/ directory. Then, begin the file by adding the content from Example 5-8 to it.
Example 5-8. docker-compose.yml, part one
version:"3.7"services:zipkin:image:openzipkin/zipkin-slim:2.19ports:-"127.0.0.1:9411:9411"

This line defines a service named “zipkin”.

This is the name of the image.

Port mapping for this service.
This is just the start of the Docker Compose file. The first version key is how the file declares which compose file version it is using. The official Docker website maintains a compose version to Docker version compatibility matrix. Docker occasionally add backwards-incompatible features. In this case the file is using version 3.7, which is compatible with at least Docker version 18.06.0.
After that is the services key, which contains a list of services managed by the file. A service basically refers to a container, though a service can technically refer to multiple replicated container instances. In this first part of the compose file the zipkin service has been declared. Within each service definition are further key value/pairs, like the two used for the zipkin service.
The image key is one way to refer to the image that will be used as a template for the service. In the case of the zipkin service, the openzipkin/zipkin-slim image will be used. This value is equivalent to the argument passed into docker run.
The ports key is used to define port mappings. In this case port 9411 in the container will map to port 9411 in the host, and it will only be accessible from within the host. This entry correlates with the -p flag for the docker run command.
Now that the first service has been defined, add the content from Example 5-9 to your docker-compose.yml file for the second service.
Example 5-9. docker-compose.yml, part two
recipe-api:build:context:./recipe-apidockerfile:Dockerfile-zipkinports:-"127.0.0.1:4000:4000"environment:HOST:0.0.0.0ZIPKIN:zipkin:9411links:-zipkin
Instead of using a named image, a path to a Dockerfile is provided.
Environment variable pairs used by the service.
The zipkin service will be accessible from within the container.
This service entry represents the recipe-api service and is a bit more complicated than the zipkin service.
First, the image entry has been replaced with a more complex build object. image is useful for referring to an image already built somewhere else. However, the build object allows Docker Compose to build a Dockerfile into an image at the time when Docker Compose is invoked. This build object has two keys within it. The first is context, which refers to the directory to build the image in, in this case the recipe-api subdirectory. The dockerfile key is only required when the configuration file has a name other than Dockerfile, and in this case it points to the Dockerfile-zipkin file.
The environment object contains key/value pairs where the key is the name of the environment variable and the value is the environment variable’s value. In this case, the HOST value is overridden to 0.0.0.0 so that the application will accept requests coming from outside the docker container. The ZIPKIN environment variable refers to the host/port combination that the application will communicate with, in this case a hostname of zipkin and a port of 9411.
That hostname might look a little suspicious at first. Where is it coming from? Shouldn’t Docker be using something like localhost instead? This value actually comes from the links key of the service definition. This is a list of services that should be made available to this container’s network, and also decides which order the services are started in. In this case, the zipkin service will be made available using the zipkin hostname within the recipe-api service.
You’re now ready to add the final service definition to your docker-compose.yml file. Add the content from Example 5-10 to describe the web-api service.
Example 5-10. docker-compose.yml, part three
web-api:build:context:./web-apidockerfile:Dockerfile-zipkinports:-"127.0.0.1:3000:3000"environment:TARGET:recipe-api:4000ZIPKIN:zipkin:9411HOST:0.0.0.0links:-zipkin-recipe-api
With the final piece of the puzzle in place, tell Docker Compose to start your services by running the following command:
$ docker-compose upOnce you do that you’ll need to wait a minute until the output stabilizes. During this time each of the three services will be started. Once things have calmed down, run the three curl commands one after another in another terminal window to generate some requests:
$curl http://localhost:3000/$curl http://localhost:4000/recipes/42$curl http://localhost:9411/zipkin/
The first curl command confirms that the web-api service is listening for requests. The following command confirms that the recipe-api is also listening for requests. The final command confirms that Zipkin is running and also listening for requests.
Tip
Assuming this Docker Compose file was created to bootstrap the web-api service for local development, you technically do not need to expose the zipkin and recipe-api ports to the host. In other words, omitting the ports field for recipe-api would still allow web-api to make requests to recipe-api. But, in my experience, exposing the ports of the upstream services makes it much easier to debug a faulty service.
Docker Compose provides a convenient way to describe the configuration and relationships between multiple containers. However, it describes such relationships in a fairly static manner. It doesn’t help with things like dynamically increasing or decreasing the number of running services, or with deploying updated versions of a service. In short, it’s great for local development, but is a bit lacking when it comes to deploying dynamic applications to production. [Link to Come] describes a more robust approach for deploying applications to production.
Internal Docker Registry
A Docker Registry is a place where docker images and their accompanying layers can be stored. By default, the Docker CLI is configured to make use of Docker Hub, the official public registry of Docker. Throughout this book you’ve been downloading images hosted on Docker Hub, everything from the ELK stack to the official Node.js images. The convention in Docker-land is that open source projects are expected to have their images available on Docker Hub.
This works great for uploading and downloading public, open-source projects. You can even create an account with Docker Hub, and as of this writing, you can use it to host one private repository for free. You can also choose to upgrade to a paid account to host even more private repositories, currently for the cost of about one dollar per repository.
Tip
The repository/name:version convention that you’ve been working with so far is actually shorthand for a longer version of the command, server/repository/name:version. When the server part is missing, the Docker CLI defaults to using the Docker Hub repository of docker.io. The repository part also has a default value as well. As an example of this, the command docker pull node:13-alpine can also be represented using the more terse version of docker pull docker.io/library/node:13-alpine.
Many organizations instead choose to host their own internal Docker Registry. Depending on the number of repositories this might prove to be more or less expensive than using Docker Hub. Non-cost requirements also come into play. For example, the ability to lock up the service behind a corporate firewall may be important. Many organizations require the ability to deploy applications even when external public services like Docker Hub may be down or unreachable.
Running the Docker Registry
Docker provides an official Docker Registry docker image which can be used to run a self-hosted service for storing docker images. In turn, the Docker CLI utilities can be configured to communicate with this registry, allowing you and others in your organization to store and interact with private images.
Docker hasn’t been the best approach for running many of the backing services you’ve worked with so far—assuming they require production traffic. For example, Graphite and StatsD might receive such high load in production—receiving requests from dozens of service instances—that the overhead of running them inside Docker might not let them keep up. The Docker Registry, however, doesn’t receive load based on the amount of traffic your public-facing application receives. Instead, it might only receive hundreds of requests per day as images are built and deployed. For that reason it’s perfectly fine to run the Docker Registry within a docker container.
Run the following command to start a copy of the Docker Registry:
$docker run -d--name distnode-registry-p 5000:5000--restart=always-v /tmp/registry:/var/lib/registryregistry:2.7.1
This command is almost suitable for production use, though you would need to mount the volume somewhere more permanent than /mnt/. You would also want to keep it from being publicly accessible, enable TLS termination, and even authentication before putting anything sensitive on it.
The -d flag forks the service to the background. This is useful in a production setting, though if you have problems getting the registry to start, you might want to omit that flag.
Now that your registry is up and running, it’s time to publish some of the images you’ve been working on. Previously, in “Containerizing a Node.js Service”, you created three versions of the same recipe-api application. You’ll use those tagged images to supply the registry with some fresh data.
There are two sets of commands that you’ll need to run for each of the tagged images. The first is docker image tag, which is a way to assign a new tag to an already tagged image. This is useful for specifying which server a tagged image should be published to, such as your new Docker Registry service. Run the following command three times, once for each of the versions of your application that you created earlier:
# run for each of v0.0.1, v0.0.2, v0.0.3$docker image tag tlhunter/recipe-api:v0.0.1localhost:5000/tlhunter/recipe-api:v0.0.1
Pushing and Pulling to the Registry
Once that’s done, you’re just about ready to publish the images that you’ve built on your local development machine to the Docker Registry. Technically, you’re running the registry on the same machine that you’ve built the images, but these commands do work if you’re running the registry on a remote machine. In fact, even when you’re running the registry service locally, it’s still isolated from the Docker daemon on your local machine.
Before you run the commands, recall the conclusion regarding image layer sizes that was covered in Table 5-1. According to that data, the added cost of deploying v0.0.2 after v0.0.1 is in the hundreds of kilobytes. However, deploying v0.0.3 after deploying v0.0.2 is in the tens of megabytes. Keep this in mind when you run the next set of commands.
The commands you’ll use to send the images to the Docker Registry begin with docker push. This is a lot like running git push or npm publish, and it will send a local copy of the image to the remote server. Run the following command three times, once for each version of your application:
# run for each of v0.0.1, v0.0.2, v0.0.3$timedocker push localhost:5000/tlhunter/recipe-api:v0.0.1
This command has been prefixed with the time command, which will print how much time it took to copy the images. Table 5-2 lists the amount of time each image took to deploy on my machine.
| Version | Time |
|---|---|
v0.0.1 |
4.494s |
v0.0.2 |
0.332s |
v0.0.3 |
3.035s |
The first deployment takes the longest because all of the base images need to get copied, such as the Alpine image and the first iteration of node_modules. The second is the quickest because it only involves the small application change. The third is slow because it needs a new iteration of node_modules. Overall, the deployment time of a few seconds might not seem that bad, but in production you’ll see larger images being copied, likely weighing in at hundreds of megabytes, and they will probably be copied between separate machines over a network. The real takeaway is that changing the node_modules directory resulted in a tenfold increase in deployment time.
With your application images safely stored inside your Docker Registry, it’s time to simulate a situation where you would need to download the images to a new server. This can be done by removing the copies of the images on your local machine. Run the following commands to first remove the images from your machine, then to try and start a container from the missing image:
$docker rmi localhost:5000/tlhunter/recipe-api:v0.0.2$docker rmi tlhunter/recipe-api:v0.0.2$docker run tlhunter/recipe-api:v0.0.2
The tags ultimately point to an image, referenced by the hash of the image. The first docker rmi command deletes a tag that points to the image. But, the files for the image still exist on disk somewhere. Once the second command is run, the final reference to the image is removed, and the actual files on disk are removed. The call to docker run will fail as the referenced tag is no longer present. The error message for this should look like Unable to find image tlhunter/recipe-api:v0.0.2 locally. The Docker CLI will attempt to grab the image from the public repository and, assuming I haven’t accidentally published such an image under my tlhunter account, will also fail.
Your machine now resembles a fresh server, one which doesn’t have the recipe-api:v0.0.2 image stored on it (technically, it does have some of the layers, but it doesn’t have the full image). It’s now time to download the image to your machine from the Docker Registry, just like a server you’re deploying an application to might. Run the following commands to simulate this process:
$docker pull localhost:5000/tlhunter/recipe-api:v0.0.2$docker image tag localhost:5000/tlhunter/recipe-api:v0.0.2tlhunter/recipe-api:v0.0.2$docker run tlhunter/recipe-api:v0.0.2
The first docker pull command downloads the image to your machine. The name of the image is the fully qualified name containing the localhost:5000 server prefix. The next docker image tag command makes the image available using the shorter name. The final docker run command executes a copy of the container using the shorter name alias. Technically, you could have skipped step three and used docker run with the full name, but this way you’re using the same run command from before.
Running a Docker Registry UI
So far, you’ve been able to interact with the Docker Registry entirely using the Docker CLI tool. This is certainly convenient for doing things programmatically, but sometimes having a UI to browse images is more convenient. The Docker Registry image doesn’t come with a UI. This is probably because Docker would rather you purchase their paid products which do come with a UI.
There are several different projects out there that provide a Docker Registry UI. Unexpectedly, most of them run within a Docker container. Run the following commands to start a container that provides a UI for your Docker Registry:
$docker run--name registry-browser--link distnode-registry-it --rm-p 8080:8080-eDOCKER_REGISTRY_URL=http://distnode-registry:5000klausmeyer/docker-registry-browser:1.3.2
This container doesn’t need any persistence and is configured to be removed once it’s done running. The --link and -e DOCKER_REGISTRY_URL flags allow it to connect directly to the Docker Registry that you already have running. This container should start up pretty quickly. Once it’s ready, visit http://localhost:8080 in your browser.
Once the webpage has loaded, you should see a screen containing the namespaces of the images you’ve pushed. In this case you should see a single workspace named tlhunter. This workspace should list a single image entry, recipe-api, which is the only image pushed so far. Click that entry.
On the next screen, you should see a list of tags associated with this image. Since you already pushed three tags for this image you should see v0.0.3, v0.0.2, and v0.0.1 listed, similar to what is shown in Figure 5-4.
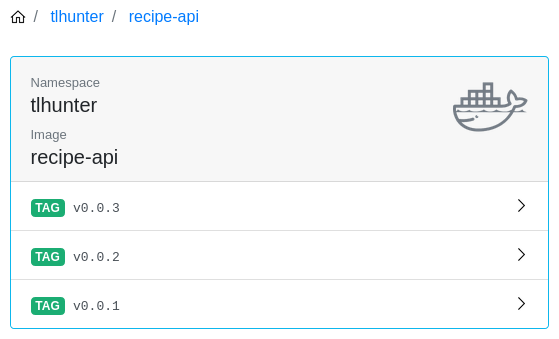
Figure 5-4. Docker Registry browser screenshot
Click whichever tag your heart desires. On the next screen, you’ll see more information about that particular tag, such as when it was created, the hash for the image, the environment variables associated with the image, and even the layers (and their associated file sizes) used by the image. There’s even a section titled History, which contains the same information as if you had run docker history.
Now that you’re done with this section it’s time to do some cleanup. The Registry Browser container can be killed by running Ctrl+C in its terminal window. The Docker Registry itself will take another step since it’s running in the background. Run the following command to stop the container:
$ docker stop distnode-registry