Chapter 6
Planning the Shoot
Making a documentary, on any scale or in any format, is a multipronged effort. On the one hand there is the creative dimension, which involves conceptualizing a project (sometimes called ideation), writing the proposal and treatment, developing your style, finding subjects to follow and people to interview, visualizing the shots and sequences, and so on. Then there is the practical dimension of documentary film production, which involves the organizing of time and personnel, coordinating travel and locations, dealing with equipment and workflow, and working with budgets.
These production management aspects of a film have a big impact on what audiences see on screen. All filmmakers have had the unpleasant experience of losing a day of shooting because someone forgot to pack a critical piece of equipment, or to confirm with an interviewee. Often these mistakes can cost dearly—when you are dealing with real-life events, there is sometimes no “rain date.” Many events happen only once, and if you arrive late, or without batteries, or if you weren’t even aware that a critical event was taking place, you risk losing the moment forever.
The creative side of filmmaking and the practical side need to remain in close dialogue with one another for the duration of every film project, big or small. Balanced and proper attention, as well as a healthy collaboration between crew members, assure a successful process and a satisfying project. Every film shoot, from the smallest to the largest, involves unforeseen challenges, extenuating circumstances, and unanticipated difficulties. To deal with these adequately, you must make sure that all of those production elements that you can control, plan, and prepare for are taken care of.
■ Crew Size
The smallest documentary crew is the “one-man band,” where one person directs, films, and handles sound (Figure 6.1). There are advantages to a small crew; it keeps the budget down and heightens the intimacy of a shooting situation. Some experienced filmmakers create wonderful work flying solo, but having one person do everything is not an advisable choice for the beginning filmmaker. Even seasoned professionals usually prefer to hand off some responsibilities to others.
For example, remaining conscious of sound while handling the technical and creative aspects of camerawork is challenging for even experienced filmmakers. A separate sound person is a great investment. They can get a microphone closer to your subject, and more specifically positioned, resulting in noticeably better sound. A sound recordist can also adjust sound levels as you film, avoiding overmodulation and guaranteeing a healthy sound level throughout (Chapters 13 and 14).

■ Figure 6.1 “One-man band” filmmaking. Here cinematographer David Alvarado works with a Canon C100 camera and two camera-mounted microphones: a short shotgun and a wireless microphone receiver (with the transmitter on the subject).
David Alvarado, who directed (with Jason Sussberg) and did the camerawork for The Immortalists (2014), explains that crew size depends on the situation you are shooting in.
For some really intimate stuff I’d rather just shoot it and do the audio myself. In my thesis film I shot a love scene between a person with a traumatic brain injury and his girlfriend. I didn’t want somebody with a microphone up in their business. If you think about the standard car interview, you put a lavalier on the person, put a microphone on top of the camera, and you can’t get better audio than that. But if it’s a vérité event, where one person is going to be going around talking to different people—people who aren’t miked—there’s no way around having a separate sound recordist. Because if you can’t hear somebody saying something, the scene is really kind of lost.1
Many directors prefer to bring in a separate cameraperson. This leaves the director free to focus on directing, conducting interviews, and connecting with their subjects. This is another wise choice. Most interviewing conventions require that your interviewee avoid looking directly into the camera lens, and often this is achieved by having the interviewer sit next to the lens while they are asking questions and listening to the person being interviewed. This setup makes it almost impossible to shoot and interview at the same time.
Throughout documentary history, there have been many two-person directing teams where one person shoots and the other interviews and does sound. A veteran example is the team of David and Albert Maysles (Figure 6.2). But very often a director will prefer not to handle any of the technical aspects so they can focus on other things, which would result in a three-person team (Figure 6.3). You can also find production coordinators, associate producers, and/or production assistants on many documentary shoots.

■ Figure 6.2 Albert (right) and David Maysles make up a two-person crew for this scene with “Big Edie” and “Little Edie” Bouvier for their film Grey Gardens (1973).
Nowadays, with most documentaries shooting onto card media, the crew will likely include either a digital loader or a digital imaging technician. These jobs are similar in that they involve downloading media from the cards into a computer or onto hard drives, but the digital imaging technician will also be involved in media management, preparing media for editing, transcoding, syncing picture, and sound, and other advanced tasks.
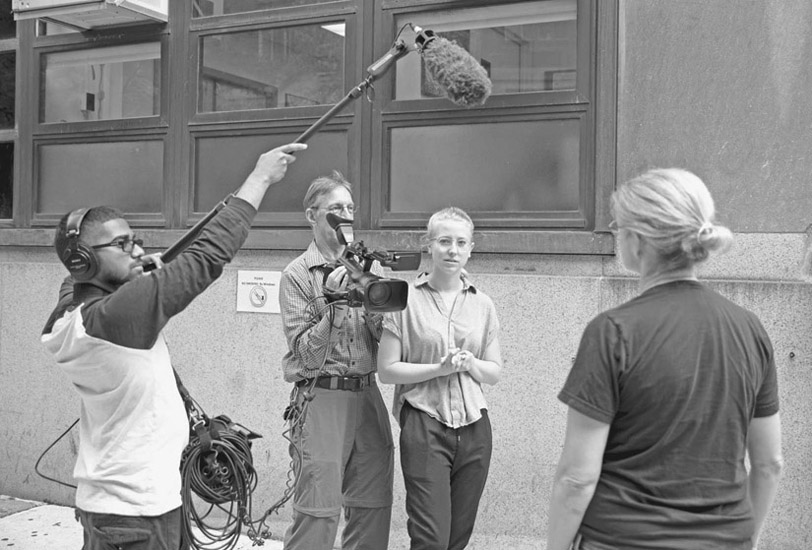
■ Figure 6.3 This typical three-person documentary crew has a director working with a sound recordist and cinematographer.
A large documentary crew may include a gaffer and grips. A gaffer helps with lighting, while grips handle any complicated camera support (dollies and cranes, for example) and deal with any electrical needs that go beyond the basics. Larger crews may also include a separate sound mixer to accompany the boom operator, an assistant camera person, a driver, several production assistants, and even hair and makeup. In the end, you will find the style that works best for you. Just remember that filmmaking is hard work, and much is gained by bringing together the talents and energies of more than one person.
■ Crew Responsibilities
The documentary director’s role is to be responsible for the vision of the film, making sure that all the things you will film and all the other elements you gather have the potential to add up to a coherent story (no small task!), and communicating this vision to the crew. Before production, the director should meet with the cinematographer to discuss the look and shooting style of the film. They also decide which events, people, and environments to shoot, and are responsible for developing fruitful working relationships with the subjects of the film. The director’s preparation for a shoot can include coming up with interview questions, developing shot lists, and, in the case of a highly constructed film, even storyboarding. While shooting more observational scenes, preparation involves having a strong sense of the dramatic core of your story so that you can recognize and capture important moments that unfold spontaneously.
The documentary producer’s job varies from project to project, but it always includes raising the funds for the film, budgeting, and making sure the film is delivered on budget. Producing may also involve hiring crew, finding film subjects and locations, and helping develop the vision for the project. Quite often, the director and the producer on a documentary are the same person. A line producer is a producer who focuses specifically on the daily logistics of the shoot.
The cinematographer is responsible for shooting the film, including lighting interviews and scenes, capturing the image, framing the compositions, choosing the length of the shots and deciding which elements within the frame to emphasize—often in a series of split-second decisions. Since it’s impossible to storyboard observational documentary scenes because you don’t know how the action will unfold, the cinematographer needs to communicate with the director before shooting to develop a clear understanding of the story, including who the central characters are, and what action is important. Together they devise a shooting strategy for every event they shoot. See Chapter 7 for more on coverage for documentary scenes.
A sound recordist’s primary function is to make sound recordings of outstanding quality, free from interference and all unwanted noise. They also work to ensure that the location is as quiet as possible. The sound recordist decides on a sound recording strategy for a given scene, and places microphones. On a documentary, the sound recordist often operates a boom mic and carries a recorder and/or mixer in a shoulder-mounted bag. In addition to synchronized production sound, they may also record sound effects, ambience, and other nonsynchronous sound elements to be used in editing (Chapters 13 and 14).
An associate producer or production coordinator handles a variety of tasks including confirming locations and meeting times, coordinating transportation, helping things stay on schedule, making sure release forms are signed, and generally providing backup for the director and other crew.
Production assistants lend extra help to a production, whether that means running to the next location with extra equipment, grabbing lunch or parking the car. In foreign locations, the production assistant will be replaced by a fixer, someone who knows the lay of the land, speaks the local language, or has other specialized knowledge that will help ease your way.
■ Locations
Documentaries are rarely shot on a stage or set. You will most likely be filming where the action is unfolding, whether in someone’s home, in an office, driving in a car, or outdoors. The unpredictable nature of capturing reality makes planning difficult, but there are things you can do to maximize the possibility of success. While a location scout is a defined job in fiction filmmaking, in documentary it is typically someone on the production crew— the director, producer, cinematographer, or a combination—who will be involved in location choices. For instance, if you want to interview someone, they may offer you a choice of their office or their home. You may actually decide you would prefer them walking around their neighborhood to add a bit of dynamism to the interview. Each of these three options offers advantages and disadvantages.
When possible, it is a good idea to do a location survey ahead of time. This may occur a few days, or a few hours, before the shoot. Note that location surveys are not the same thing as “location scouting.” Scouting means trying to find a location to film in, while the survey helps you plan a shoot in a location you’ve already picked. The location survey allows you to develop a sense of how your action might unfold, and where you can place the camera to capture things from the most advantageous points of view. If you are going to use lights, a survey will allow you to develop a plan for what lights to bring. It’s a good idea to scout for AC outlets. Figure out where you can park your vehicle, and whether there is a separate entrance for freight (bulky equipment will often be considered freight and banned from passenger elevators). Once you are at your location, try and find a secure place where you can store equipment, and where you can stage from if you need to be portable and run somewhere with your subjects. Bring a notebook and sketch the dimensions and layout of your locations. This will help you remember, and to communicate later with crew members who haven’t seen the location.
Surveying locations is also important for sound. Often people will describe their environment as “quiet,” but when you arrive to film you find there is a loud air vent, or a barking dog next door, or that the location is right below a flight path. Any of these could necessitate finding a new location, but if you don’t realize the problem exists until an hour before the interview, there is likely not going to be much you can do. The specifics of the sound scout are covered in Chapter 14.
Permits and Location Agreements
One other key aspect of any location survey is getting location permits (for public spaces) and location agreements (for private property). Different municipalities handle permits differently. The organization Film London notes, “Whatever location you are using, no matter how public it seems, it is likely you’ll need to notify or get permission from somebody.”2 Permits issued by New York City’s government are designed for feature film crews and will generally not be needed for a documentary crew. However, it is worth noting that it was only in 2006 that New York stopped demanding a permit for any filming with a tripod on city streets. Some public locations, such as parks, universities, or monuments, will require permission for any “professional” use of their space, which usually means filming with an obvious crew, a lot of equipment, and/or a tripod. While not every camera set up on a street will bring down the arm of the law, in this security-conscious age, certain locations—bridges and tunnels, for example—are subject to special restrictions. Transportation systems are another complex area. If you want to film on a bus or train, you are well advised to seek official permission. In some countries, “panorama rights,” or the right to take a picture of a building or monument, may be subject to restrictions as well.
Keep in mind that some locations may seem to be public even though they are actually private. When you are filming in a private location you don’t need a permit, but you should have a signed location agreement that indicates the owner’s permission for your filming (Figure 6.4). This will be something your insurance agents will need to have in the case of any claim.
Rules vary from place to place. It’s also important to remember that these rules are often contested, and interpreted differently by law enforcement. Talking with other journalists or filmmakers in a particular place, and even consulting with legal entities such as an

■ Figure 6.4 Here is a sample location agreement (also called a “location contract”).
Courtesy of Renato Tonelli, Dept. of Film and Media Studies, Hunter College.
attorney or the American Civil Liberties Union, can be helpful if you think you are being stopped from doing something you have a right to do.
Location Aesthetics and Meaning
The right location can add value and meaning to your film. Remember, viewers notice everything in the frame, and where people are interviewed can communicate information as strongly as what they say. In S. Leo Chiang’s film Mr. Cao Goes to Washington (2012), the first Vietnamese-American US congressman is supported by Louisiana Republicans who see an opportunity to elect a Republican for the first time in decades. Cao’s campaign chairpersons are filmed in their home, and Chiang chose his frame very carefully. The resulting image suggests that the people running Cao’s campaign are wealthy and likely conservative, but it is all visual information that the viewer can interpret on their own (Figure 6.5).
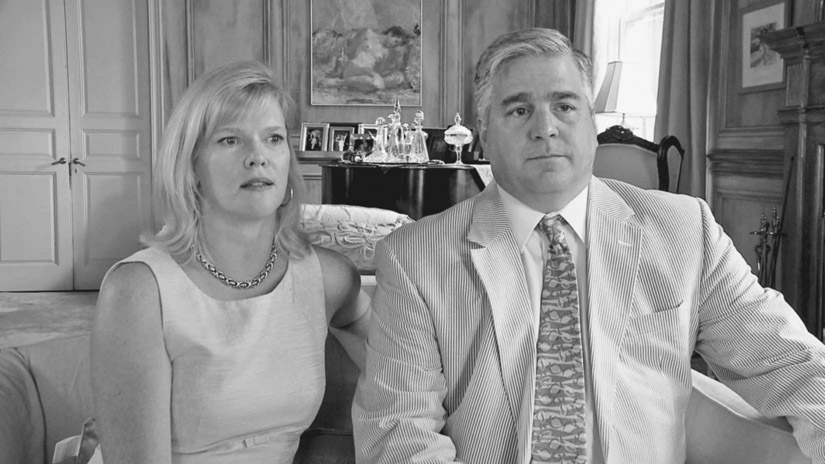
■ Figure 6.5 The choice of this location in Mr. Cao Goes to Washington helps define the characters and adds to the overall meaning of the shot.
When you are setting up an interview or scene, some directors opt to “dress the set” by rearranging objects, decorations, or furniture. Most try not to create a false sense of what the place usually looks like. Always be careful with people’s belongings to avoid breakage or damage. When possible, take photographs of a location before you alter it so that you know exactly how to return it to its original state when the shoot is over.
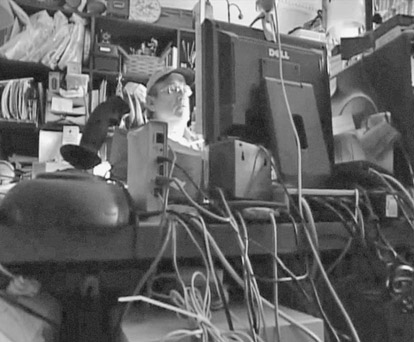
■ Figure 6.6 Ron Alford’s cluttered office in Never Enough reveals character and provides an ironic twist given Alford’s work as a de-cluttering consultant.
It is quite common for people to clean up their home or office before a camera crew arrives. Sometimes this can create problems, for nothing speaks more eloquently about the busy life of a person than the natural chaos of their workspace. In order to avoid having the natural character and color drained from your location, you can ask people to avoid tidying up for you (while understanding that people have to right to some control over how they are represented). An example of a location that would have been ruined by over-cleaning is the office of Ron “Disaster Master” Alford, a clutter intervention specialist profiled in coauthor Kelly Anderson’s documentary Never Enough (2010), about people’s relationship with their material possessions. Alford’s office is so cluttered that it contributes a sense of irony to the scene (Figure 6.6).

■ Figure 6.7 In The Immortalists, Aubrey de Grey is interviewed while on a punting boat. The location reinforces his solitary nature and unique personality.
While in documentary, you can’t always control the location of an event, there are times when you can persuade an interviewee to allow you to film them in the better of several options. Most corporate offices, for example, are visually boring, generic, or characterless, not to mention too cramped to allow for varied camera positions. They also tend to have sound problems. Often an interview at home or in some other location will work just as well and lend something important to your film. In The Immortalists, for example, one of the main characters, scientist Aubrey de Grey, has a punting boat hobby. Alvarado and Sussberg interviewed him boating on a canal, and the results reveal the beauty of the medieval Cambridge locale and communicate something about the unique personality of de Grey, a loner who marches to the beat of his own drummer (Figure 6.7).
■ Equipment
There are important decisions to be made about equipment before you shoot for even a day. What kind of look do you want your film to have? Which camera and supporting equipment will allow you to achieve your goals? Is there anything in the shooting environment that makes for special equipment demands? What does your budget allow? Do you need to be highly portable, or will you use heavier equipment to get more constructed shots? Will you shoot handheld, or will you need a tripod? What are the sound recording requirements and challenges? Is there any specialized equipment (shoulder mounts, sliders, lights, microphones, field monitor) you will need? Location surveys and conversations with your key crew members will help you decide the answers to these questions.
It is also a good idea to develop a backup plan, so if you have equipment failure, you have some way of obtaining equipment on short notice. Equipment breaks down often, especially in humid or dusty conditions, so plan accordingly. The chapters on cameras and lenses (Chapters 8 and 9), camera support (Chapter 10), and sound recording (Chapters 13 and 14) will help you understand what equipment is suited to various circumstances.
■ Things to Consider When Scouting a Location:
- 1. Shot opportunities. Does the location offer the space and visual qualities needed for your film?
- 2. Light considerations. Does the location have natural light? What kind of lighting will you need to bring in?
- 3. Power. What kind of electrical supply is available? How is it fused? Where are the outlets? (Chapter 16)
- 4. Sound considerations. What kind of acoustics does the location have? Where can you detect potential problems? (Chapters 13 and 14)
- 5. Storage and staging area. Identify where equipment can be left, where you can lay out your lighting equipment, etc.
- 6. Safety and security. Is this a secure area? Will you need to leave someone to watch equipment? Where are the exits? Sprinkler systems and alarms?
- 7. Logistics. Where can you park? Where are the bathrooms? Where and what will you eat?
Lighting Considerations
Will you be using artificial lighting or working exclusively with natural light? Many of today’s cameras can perform well in low light, but in some situations adding light will produce a better image and give you more flexibility in achieving your aesthetic goals. If you are bringing lights, make sure you have enough extension cords and adapters for getting grounded power cables into ungrounded sockets (Chapter 16). Many lights used for video draw a lot of electricity, so be sure you know where the fuse or breaker box is, and that you can access it during production. Colored gels (blue and orange) can be useful in situations where you are mixing artificial and natural light. Even if you aren’t bringing lights, are there reflectors or other lighting tools you can bring with you to shape, diffuse, and/or block the available light? And finally, lights are bulky and weighty. You’ll need someone to carry them, and help setting them up. You may need to consider getting a gaffer.
If you are shooting outdoors, it’s a good idea to consider what time of day it will be. Direct overhead sunlight can be harsh, and a reflector or diffusion, or a plan to shoot where there is shadow, can be helpful.
Sound Recording Preparation
One of the first determinations you need to make when approaching sound is whether you will be shooting single- or double-system sound. This will depend largely on what camera you are using. Digital single-lens reflex (DSLR) cameras, because of the low quality of their sound, typically require that sound be recorded separately on a digital audio recorder. Professional camcorders will allow sound and image to be recorded together on the same medium. More attention will be given to sound recording setups in Chapters 13 and 14. For now, the important point is that you need to think carefully about sound and develop a strategy for your particular shoot before you arrive on set. Understanding how you plan to work with sound will determine what equipment you’ll need to secure before the shoot.
Documentaries usually use some combination of wireless microphones, a boom pole and a directional microphone, a portable mixer, and headphones. Make sure that you have a hardwired backup for wireless mics, as interference can occur with even the best wireless microphones. The dynamics of your shoot will determine what specific equipment you will need. Will you be following one person, or covering a group? If you are following a main character and are planning to put a wireless microphone on them, is there a chance they will be interacting with other people whose sound you will want to pick up? Do mics need to be hidden? Are you going to be outside or indoors? If the location you are going to record sound in is very “live,” you should plan to bring sound blankets and cover some of the hard surfaces to reduce echo. Again, all of these contingencies are covered in Chapters 13 and 14.
If you are shooting to digital media, you will also need to think about the computer and/or hard drives that you will need in the field to back up your media. And, make sure you have enough audio cables and batteries to power your mics and mixers. Finally, make sure you can carry your entire setup comfortably, without compromising your portability.
■ Insurance
Production insurance is required by many funders and broadcasters, as well as by many municipalities or private entities that grant location permits. While it is tempting to go without insurance on low-budget productions, it is not a good idea. Packages are available for specific periods of time, or yearly. A film production insurance package will cover liability (necessary if anybody injures themselves on your shoot or claims you harmed their property). It will also cover loss or damage to production equipment, whether rented or owned.
Workers’ compensation is also a necessity for hired crew; you need to get it to comply with the law. Your insurance broker can arrange this for you, or if you are using a payroll service they can take care of it.
Errors and omissions insurance protects you from claims involving violation of certain personal rights such as invasion of privacy, libel, or slander. This is especially important for documentary makers, but you don’t need to secure this policy until you have completed editing. The important thing at this stage is to make sure you have personal release forms from all participants in your documentary, and sources for any controversial claims you will be making.
If you are a student, your school should have information about where and how to acquire production insurance. If you are an independent filmmaker, there are several insurance companies that cater to low-budget films. In the United States, the Independent Film Project (www.ifp.org) and Fractured Atlas (www.fracturedatlas.org) are good places to start. For the United Kingdom, try the BBC’s site.3
■ Crew and Communication
Regular and precise communication with your crew is paramount and is at the heart of successful directing. Good communication begins when someone agrees to work with you, whether for a day or for a longer term. You should work out specifics before you are actually on location, including:
- How many days will they work, and what are those days?
- How much will you pay them?
- Will they be treated as independent contractors, or employees? (Chapter 16)
- Are they expected to bring their own equipment? If so, are you compensating them for that?
- How will they get to the location and home again? Are you covering transportation costs?
- How long is a day’s work? Will you pay them overtime for a longer day than anticipated?
- If you are going out of town, will you pay them for travel days? At what rate?
- What can they expect in terms of hotels and/or meals?
- What kind of support will they have, in terms of other crew?
Often these terms are solidified in a deal memo signed by the producer and the crew member. Having everybody on the same page from the beginning of production will ensure that things go smoothly.
You should have meetings with at least your key crew members prior to shooting to discuss your goals for the project, what you will be shooting, aesthetics, your opinions on your subject, and anything else that seems relevant. Listen to their ideas and contributions. As the director, you will ultimately call the shots, but the success of your film depends on everybody sharing your vision and feeling invested. Also, people will bring ideas to the table that you can use.
It is critical that you take the time to show appreciation for your crew’s work. Whether people are paid or working for free, letting them know you value their contribution to your documentary will go a long way. Make sure you credit everybody who works on, or contributes to, your film. Keeping a list throughout production is a good idea since it’s always hard at the end to remember every shoot in detail.
If you are using free production assistants or interns, it’s nice if you can figure out a way that they can gain valuable experience on your film set. Interns expect to have to do a certain amount of running around for coffee, or feeding the parking meter, but facilitating a relationship with professional crew members who can help them learn skills is priceless and likely the reason they are working for free. Be generous with your time and contacts.
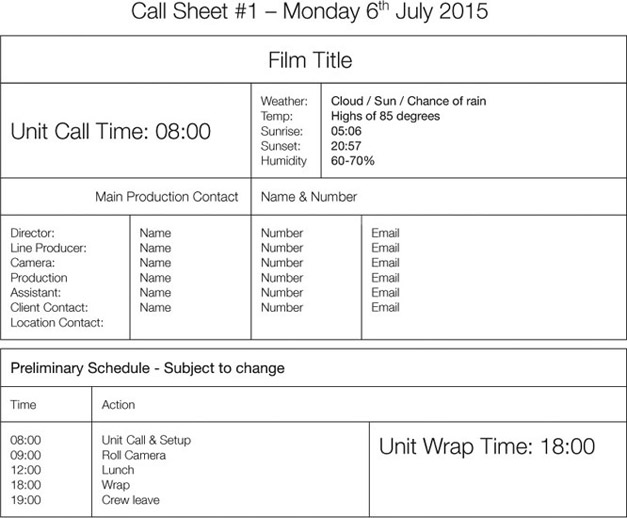
The Call Sheet
A call sheet is a one-to two-page document that is circulated before a shoot to everyone involved in a production (Figure 6.8). It is a vital tool that will help ensure everybody knows the following:
- Where they need to be, and at what time
- How they get to and from the location
- What they need to bring (clothing, equipment)
- Contact information for everybody on the production
- The schedule for the day
- Health and safety information
There is a sample documentary call sheet in Figure 6.8, and on our companion website (www.routledge.com/cw/Anderson).

■ Scheduling
Be realistic about how long it will take to pick up the equipment and travel to the location, set up, shoot, and pack up in each location. Remember, all this takes time! People should be at the location at least an hour before you plan to start filming. It is rarely advisable to film in more than two or maybe three locations in a single day (depending on how long you will be in each place).
While documentaries are by nature unpredictable, it is important to develop and maintain a schedule for the full production. This schedule should include how many production days remain, travel required for each one, what equipment is needed, how many crew members will be needed, and so on. This schedule is essential for budgeting.
■ Budgeting
A good budget requires research, planning, and a vision for what you would like your documentary to be. As such, it is more than a requirement you need to produce for funding proposals. It is an essential part of your preproduction process and, in combination with cost reports, your budget is a flexible tool you will use throughout the filmmaking process to align your vision with your resources and make the most of the support you have available to you.
“Don’t Fudge on Your Budget: Toeing the Line Items” is an excellent article on budgeting for documentaries that was written for the International Documentary Association’s website (http://documentary.org/docbudget) by Robert Bahar.4 We are grateful to Mr. Bahar for allowing us to adapt that article and his extensive insights for much of this section and the section below it on cost reports.
Bahar lays out a series of questions you must answer before you begin budgeting. They include:
- What is the story you’re trying to tell and what will it require? Possibilities include:
- Interviews (how many?)
- Observational shooting (how many days?)
- Archival materials or stock footage (how much?)
- Graphics and/or animation e. Narration
- Music
- Reenactments
- How long will you need for each stage of production? Stages of production include preproduction, production, and postproduction. Are there any special constraints on the schedule (like a tight shooting window or a hard delivery deadline)?
- How long will the film be? What equipment will you need for shooting and editing? How many people will be on your crew? What will your shooting ratio be? How much travel will be required? What acquisition format will you use? What will you need to “deliver” (if you have been commissioned) or have in hand for your own distribution?
One question that will inevitably come up as you start this process is, “How can I make a budget if I don’t know how much money I’ll be able to raise?” Bahar addresses this:
While some filmmakers are lucky and persistent enough to raise the necessary funds before they begin, a vast number begin shooting and even editing while still fundraising. In these cases, you’ll probably need two budgets. The first budget should include “professional” rates and will be the budget that you’ll submit to potential funders. The second should be the “bare bones” budget that you’ll keep hidden in your desk drawer. This will be the absolute minimum amount of money needed to complete the project in a way that is acceptable to you.5
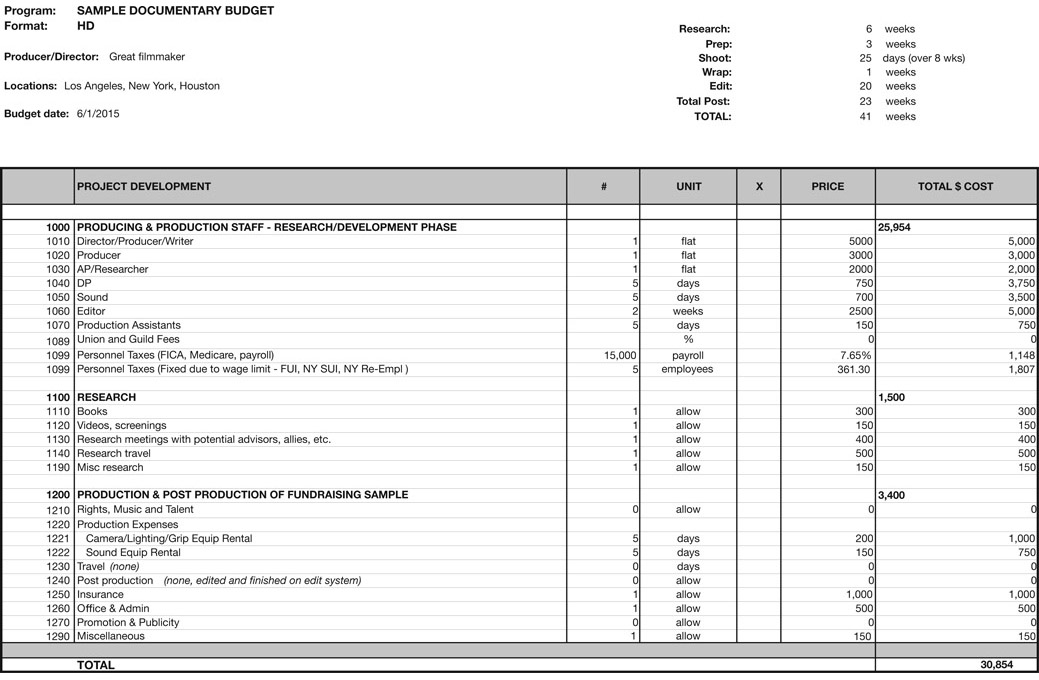
In order to delve into budgeting more deeply, Mr. Bahar presents a sample documentary budget, which we have adapted for use here (Figure 6.9). Please note that this budget is for a professional feature-length documentary. The total of $452,544 is much higher than most filmmakers, especially students or emerging filmmakers, spend! The vast majority of independent documentaries are made for much less than $450,000, and students’ documentaries can be made for a few hundred dollars. In this example, though, we are including all of the relevant expenses, at realistic rates, so that you will know what things cost in the real world, and can make your own decisions about what to cut. Do you want to bring down your number of shoot days? Pay yourself or your crew members less? Edit for fewer weeks? Use your own apartment or house as your production office? These are all choices that you are free to make, and should do based on your own circumstances. The sample budgets in this chapter are available in Excel format on our companion website (www.routledge.com/cw/Anderson).
The Budget Topsheet
The topsheet is a one-page summary of the budget. It generally includes some basic facts about the project, based on your production schedule. Our sample budget includes the following constants:
Format: HD
Research Phase: 6 weeks
Prep for Shooting: 3 weeks
Days of Shooting: 25 days (20 with sound recordist) over 8 weeks
Wrap Shooting and Prep for Editing: 1 week
Editing: 20 weeks
Sound and Picture Finishing: 3 weeks
Locations: Based in Los Angeles, includes 2 trips to New York City and 1 trip to Houston, TX
The topsheet then summarizes the budget by its major categories:
Topsheet: Sample Documentary Budget
| Account | Description | Amount |
| 1000 | Project Development | $30,854 |
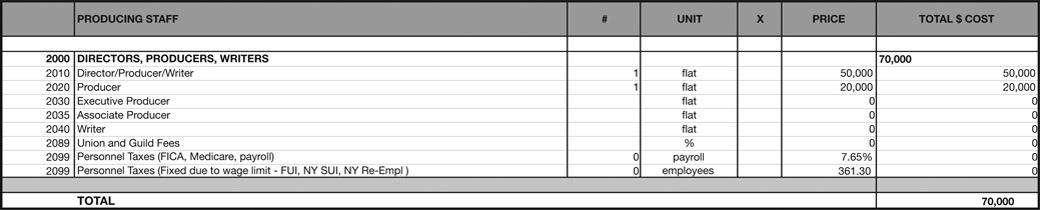
| 2000 | Producing Staff | $70,000 |
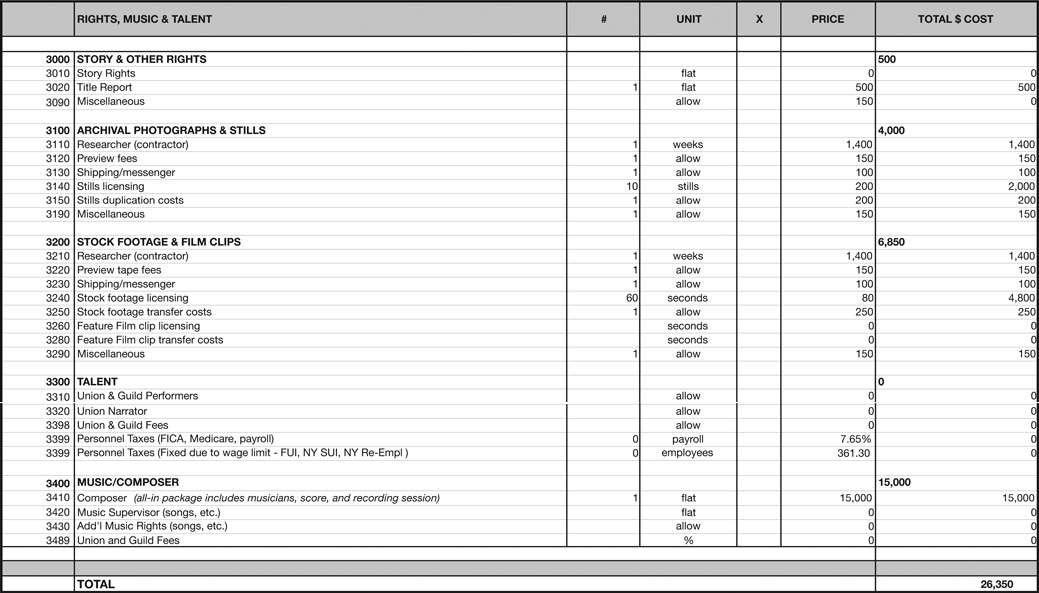
| 3000 | Rights, Music, Talent | $26,350 |
| 4000 | Crew and Personnel | $150,680 |
| 5000 | Production Expenses | $23,674 |
| 6000 | Travel | $6,636 |
| 7000 | Postproduction | $54,320 |
| 8000 | Insurance | $10,300 |
| 9000 | Office and Administration | $24,955 |
| 10000 | Publicity | $1,300 |
| Subtotal | $399,069 | |
| Contingency (8%) | $31,925 | |
| Fiscal Sponsor Fee (5%) | $21,550 | |
| Grand Total | $452,544 |
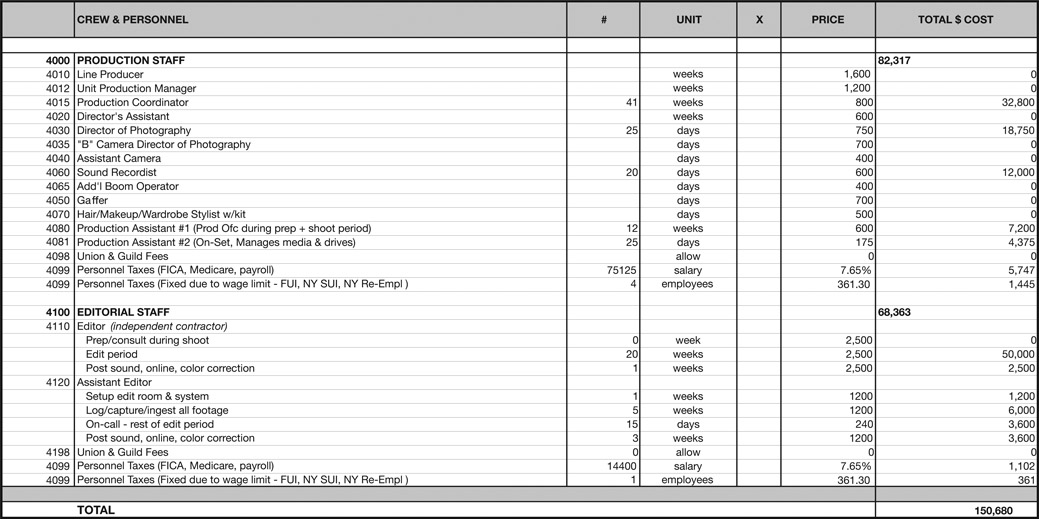
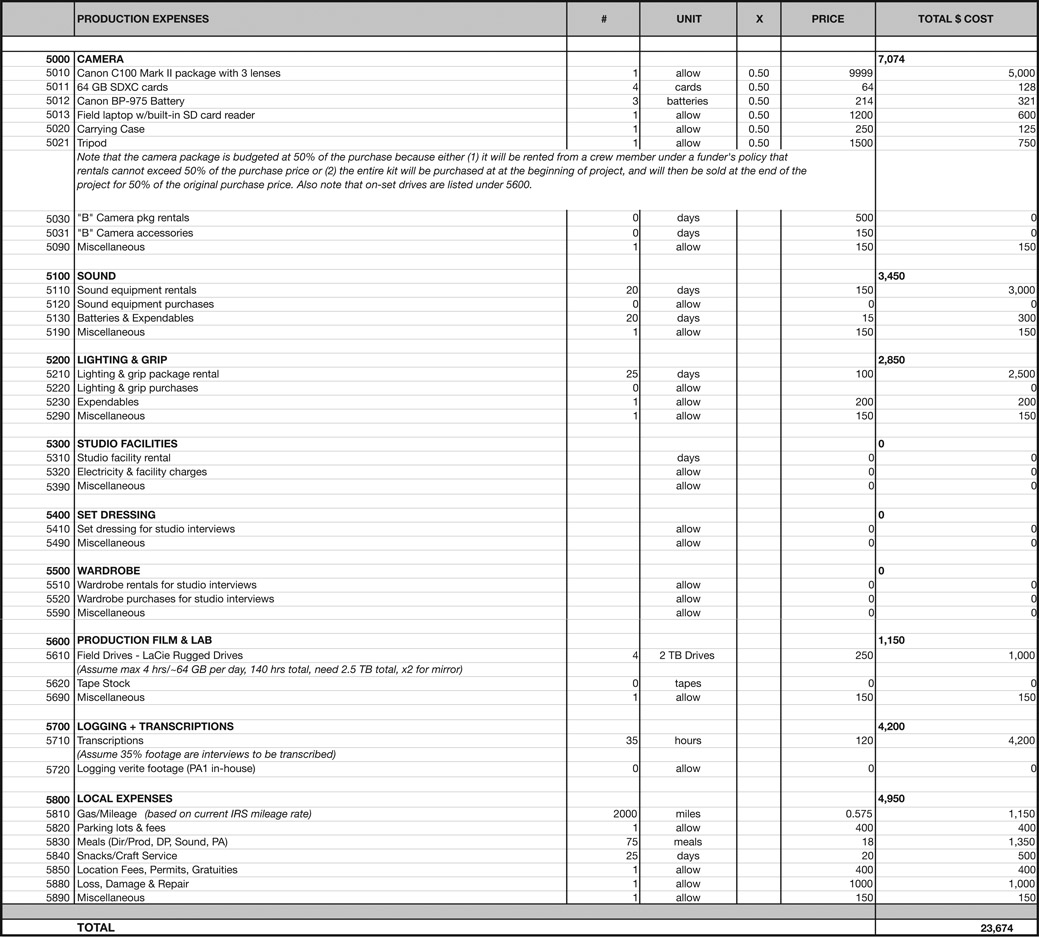


The Detail Budget
Creating a detail budget (Figure 6.9) requires a lot of research. You will need to call potential crew members, vendors, postproduction facilities, hotels, and airlines for estimates (and to start negotiating rates).
You will note that our sample budget includes a number of line items where no money is being spent. Normally, these “empty” or “zero amount accounts” would not be shown, but they are included here to make the sample budget more useful as a template, so that you don’t forget anything when you begin making your own budget.
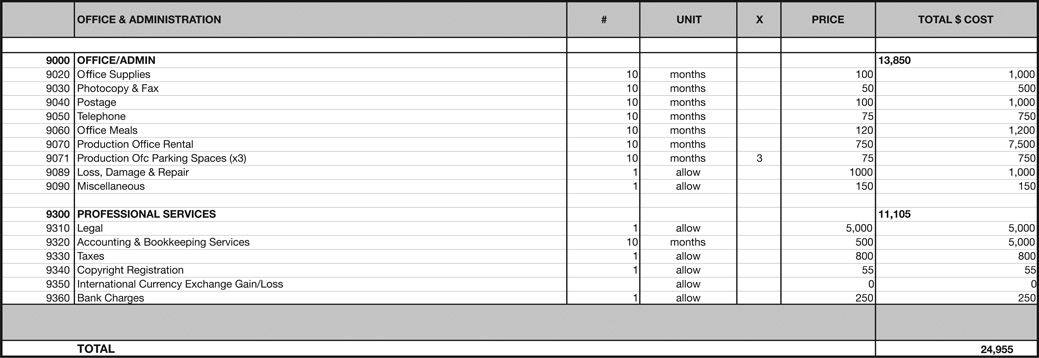
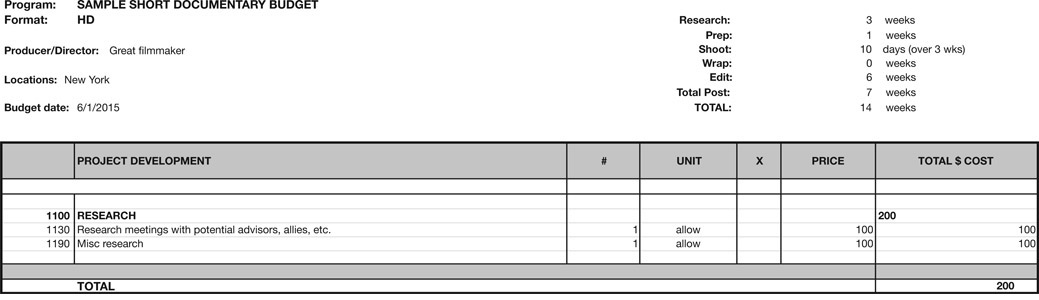
Budgeting for a Low-Budget Documentary
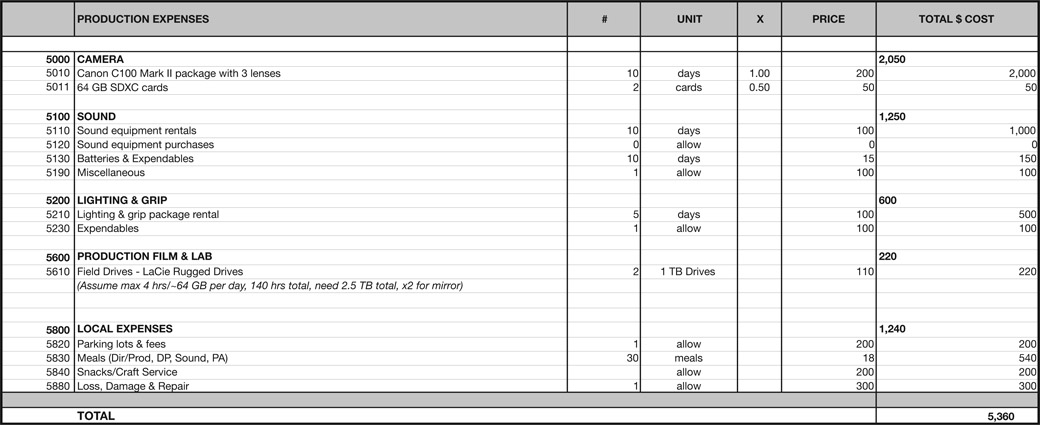
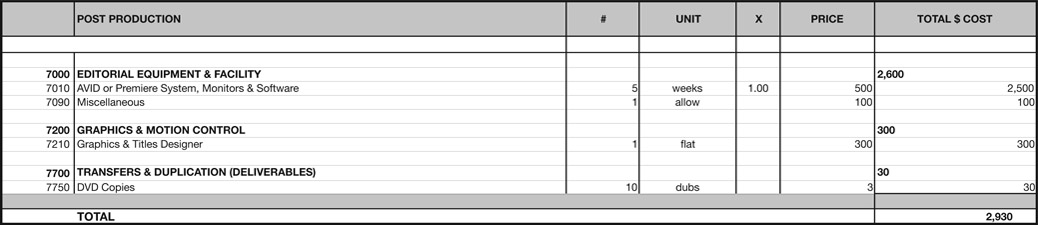
As we discussed, $450,000 is a lot more than most documentary filmmakers will ever have to spend on a production, but the same principles can be applied to a lower-budget documentary. A budget of just under $20,000 might look more like the one in Figure 6.10.
Constants:
| Format: | HD |
| Research Phase: | 3 weeks |
| Prep for Shooting: | 1 weeks |
| Days of Shooting: | 10 days (10 with sound recordist) over 3 weeks |
| Editing: | 6 weeks |
| Sound and Picture Finishing: | 1 week |
| Locations: | All local, no travel |
In this budget, there are some important things to note. First, there is no money allocated for the creation of a fundraising sample. You (the producer/director) are working without pay, and doing the editing yourself, without an assistant. The cinematographer and sound recordist are budgeted at a very low daily rate. There is $1,000 budgeted for some assistance with sound and picture finishing in your Nonlinear Editing System (Chapters 21 and 22). There is a small budget for licensing still photos, but not for archival or stock footage. You will do your own transcriptions. There is a small (5 percent) contingency, but no fee for a fiscal sponsor.
Every part of a budget reflects your priorities, your ability and desire to work for free, and your ability to negotiate rates with service and equipment providers. It’s always a balancing act between what you need and what you can afford.
Cost Reports: Knowing Where You Are
A budget is not something to be written and left in a file cabinet. It is a living document, and if you keep careful track of your expenses and compare them to your budget periodically, you’ll have a powerful tool for managing your production. For example, suppose you’re early in the edit process and your editor asks whether the production can afford to keep the assistant editor on for two additional weeks. You have money in the bank today but if you spend it now, you worry that you will not be able to cover costs later. How do you make a good decision?
The answer is to look at your cost report. A cost report shows where you are in comparison to your budget at a given time, and is usually created on a periodic basis. The faster you’re spending money, the more often you should create cost reports. Many funders will require cost reports at certain regular intervals.


■ Figure 6.11 Excerpt from a sample cost report. Courtesy of Robert Bahar.
By examining the report, you’ll quickly be able to see if you’re under budget in some areas and can allocate extra money to keep the assistant editor on, or if you’re over budget in most areas and simply can’t afford the additional expense.
A short excerpt from a cost report is shown here (Figure 6.11). In the left section you see the project budget. The center section shows “actual costs” that have already occurred. The right section shows “committed costs” (things you have agreed to pay in the future) and the “estimate to complete” for each line item. This “estimate to complete” column is the most subjective and perhaps the most important. It is where a producer must decide how much more money to spend in a given area. By making good decisions, you can keep the overall project from going over budget. For example, in the excerpt shown here, the camera department is running over budget by $530. This cannot be avoided, so the producer has reduced the amount that will be spent in the sound department by $530 to compensate. The two variances balance each other out and the project remains on budget. Without a cost report, the producer wouldn’t have known that the camera department was over budget. And without creating cost reports frequently enough, there wouldn’t have been time to make an adjustment in another department to balance things out.
A good cost report also lets you predict future problems. For example, if early in production you see that you’re spending more on production than you had planned (because you are shooting more each day), you can predict that the amount of time and money needed to log, transcribe, and digitize the footage is likely to increase as well. As in the previous example, it may not be desirable to reduce the amount that’s being shot, but perhaps everyone can agree to conserve money in another area to keep the project on budget.
■ Conclusion
While these production management tools might seem to be adding extra labor to your project, they will in fact save you time, energy, and money by allowing you to think through your project on paper before you get out into the field. Call sheets, budgets, and cost reports are also a great way of keeping all the members of your crew on the same page. In addition, when you have wrapped and your funders want to know how their money was spent, it’s much easier to just print out an updated budget than to have to assemble one after the fact. These are a few reasons why production planning is important. They are also excellent skills if you want to be employable on other people’s films.