Chapter 21
Sound Design and Finishing
Before the 1930s, documentaries—like all films—were a fundamentally visual art form, with images providing the entire narrative experience. Films like Robert Flaherty’s Nanook of the North (1922) and Dziga Vertov’s Man with a Movie Camera (1929) were silent, and sound was incorporated almost exclusively in the form of live musical accompaniment played during the screenings. The films made under John Grierson at the Empire Marketing Board were among the first documentaries to include sound in the form of narration, music, and ambience, often to creative effect. Song of Ceylon (1935, Dir. Basil Wright), about the Ceylonese tea trade, begins with images of people and places in Ceylon (now Sri Lanka) (Figure 21.1). Over them, the viewer hears Sri Lankan folk music, commentary from a 1680 travel book written by Robert Knox, and ambient sounds (children’s voices, women pounding rice, and so on). Even in this early film, the directors used sounds to add additional meaning. Towards the end of the film, we begin to hear market quotations of tea prices, telephone orders, invoices, and mail inquiries. As Erik Barnouw wrote, “The overriding impression is of commerce intruding on a lovely, age-old environment.”1 That same year, Housing Problems (1935, Dirs. Edgar Anstey and Arthur Elton) gave audiences a first taste of sync sound as slum-dwellers spoke for themselves about their decrepit living conditions. The four sound elements found in these early films—music, narration, sound effects, and dialogue—still form the basis of much sound design today.

■ Figure 21.1 The soundtrack of Song of Ceylon makes extensive use of multiple sound sources recorded on location, combined with a studio score and an evocative voice-over to help create a lyrical and impressionistic sense of Sri Lankan culture and society.
Sound design refers to the final form of a film’s total aural impression. Whether you are cutting to only a single music track, or layering 16 or 32 tracks of audio, there is virtually no end to the contributions a well-crafted sound design can bring to a documentary. Sound can establish a tone or mood with unmatchable nuance, and it can vividly signal the legitimacy and emotional impression of a location. Sound is able to bring dramatic emphasis to actions or details inside or outside of the frame. Sound can, in fact, create entire worlds off-screen. Sound can contribute to establishing a character’s point of view, even to the point of reflecting their particular psychology. In short, sound is an essential storytelling component that deserves considerable attention throughout all phases of the documentary filmmaking process.
The creative manipulation, placement, layering, enhancing, composing, juxtaposing, and mixing of the various sound elements that comprise the sound design is done in the postproduction stage. As you gather and lay down your sound elements, you should place them on different audio tracks, keeping each type separate and distinct from the others. For example, you might have three or four audio tracks for your sync sound, a fifth and sixth track for the music (which is typically stereo), another track or two for sound effects, and another for ambient sound (also called backgrounds). Taken as a whole, all of these audio tracks and the way they are mixed together comprise the sound design.
■ Figure 21.2 The timeline from a scene in Care, showing the layering of audio tracks to build the sound design. Tracks 1–4 contain voices (dialogue, interviews, narration); Tracks 5 and 6 contain backgrounds; Tracks 7–10 contain sound effects; Tracks 11 and 12 contain music.
Figure 21.2 shows the NLE timeline from a scene in Deirdre Fishel’s documentary Care (2016), about the elder care crisis in the United States. It is edited by Annukka Lilja, and you can see the way she has organized her audio tracks by the types of sounds.
Some of these tracks (like dialogue and certain effects) are synced with picture, while others (like music, backgrounds, and narration) are nonsync. The volume of each track can be adjusted independently to create an optimum blend of the various sounds.
■ Types of Sounds: Speech, Sound Effects, and Music
The sound components of a film can be organized into three broad categories: speech, sound effects, and music. These sounds constitute the way a film can aurally communicate to an audience, but not every scene within a film will have all three types of sound. For example, many scenes are edited to music without any dialogue or sound effects at all, while other scenes may have dialogue and no music.
Speech
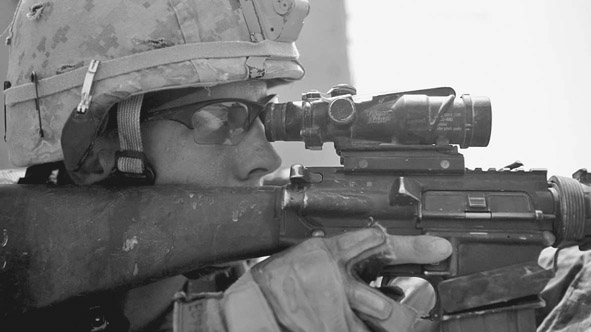
With very few exceptions, documentaries rely on human speech as a major element. A film like Tia Lessin and Carl Deal’s Trouble the Water (2008), analyzed in detail in Chapter 18, has a fairly typical amount of speech for an expository documentary. In the first 10 minutes, there is more than 9 minutes of talking delivered by the film’s characters, news broadcasters, and public officials (Figure 21.3). There are, of course, exceptions to this trend. One striking example is Ilisa Barbash and Lucien Castaing-Taylor’s observational documentary Sweetgrass (2009), which follows sheep herders driving their flocks up into Montana’s mountains for summer pasture. The film’s first human speech is heard 19 minutes into the film, and the first dialogue between two characters occurs at 51 minutes!
Speech in documentaries comes in two basic forms: dialogue and narration. Dialogue is speech that emanates from characters within the film, whether they are on- or off-screen. Synchronous (sync) dialogue is recorded with the picture during the production phase, the picture and sound from the shot are both used on-screen, and frame-accurate sync is maintained during editing. Dialogue can also be nonsynchronous, meaning that it has no corresponding image and therefore no visible source. This occurs, for example, when we hear off-screen dialogue, where the voice of a person who is part of a scene is speaking but they are not in the view of the camera. An example from Trouble the Water would be Kimberly Roberts’ voice, which we hear coming from behind the camera as she records scenes of her neighborhood before Hurricane Katrina.

■ Figure 21.3 Some documentaries, like Trouble the Water (left), rely heavily on speech. In this scene Scott Roberts is pleading with US army officials to let residents take shelter in an empty army base. Others, like Sweetgrass (right), focus instead on the sounds of the natural world and feature very little human dialogue.
It is common, in expository documentaries, to have a person being interviewed in sync, then cut to other visuals while the viewer continues to hear the person speaking. This is considered voice-over dialogue and is not to be confused with narration.
Narration is also nonsync sound and has no corresponding visual in the frame. It differs from voice-over and dialogue, however, in that it is understood by viewers that the voice cannot be heard by the people in the scene. This means that the voice is not in the time and space of the film world, and is instead an element that comes from outside the world of the characters in the film.
A key concept here, derived from film theory, is that of diegetic vs non-diegetic sound. The world of the film—the characters, actions, objects, locations, time, and story—is called the film’s diegesis. A soundtrack can have sounds that seem to come from within the conceptual reality of the movie, called diegetic sound, as well as non-diegetic sounds, which don’t come from any source in the world of the film. Examples of diegetic sound are the dialogue spoken by a character, music playing on a radio that is visible in the scene, and the sound of a siren that our characters respond to, whether it is on-screen or not. Examples of non-diegetic sounds are narration or music put into the film by the filmmaker to add emotion, context, or exposition. Observational films that adhere to the strict parameters of the direct cinema and cinéma vérité movements decline, as a matter of principle, to add non-diegetic sounds because it goes against the idea of capturing the truth in an immediate “fly on the wall” way (Chapter 2). The absence of non-diegetic elements strengthens the feeling of immediacy and realism in these films.
When considering the presence of speech in a film, keep in mind that sometimes the visual information we are getting from a scene is enough. Recently a student of ours had cut a documentary scene involving a young Pacific Islander who enlisted in the US Army. The new recruit found himself wandering through a typical American convenience store assessing all the products he could buy in the United States that weren’t available in his home country. In the rough cut, the scene included voice-over dialogue of the character saying, “Here in Georgia, there are many things we cannot buy back home.” During a rough cut screening, it became clear that the dialogue wasn’t needed, as all the information was expressed powerfully through the scene’s visuals. Audiences come to your film with a desire to decode the images before them. If the picture can tell the story, don’t burden it with redundant voice-over or narration.
■ Cutting Dialogue
Almost everybody speaks in a less direct and economical way than is ideal for documentary film purposes, so it is common to cut dialogue, and sometimes even rearrange it, to make it smoother and more efficient. Most students are amazed at the amount of cutting that goes into a simple statement by a character in a documentary. It is common to edit out utterances like “um,” “ah,” and “you know,” and to streamline dialogue by cutting out tangents and backtracking. Consider this example from coauthor Kelly Anderson’s film Never Enough (2010), about hoarding, collecting, cluttering, and people’s relationships with their things. The text below comes from the transcript of an interview with Ron Alford, a central character in the film. The crossed out words were removed during the process of dialogue editing. Note that in addition to condensing dialogue, Anderson also used sections of three very different parts of the interview. One is labeled Ron 1 and comes from the beginning of the interview, whereas the others are Ron 9.2 and Ron 10 and come from much later.
Ron 1: It’s not from here out, it’s from here out. Clutter begins in the brain, and ends up on the floor. Look around. Everything that’s in here, I brought in, and I have here for one of two reasons. Either I like—three reasons. I like it, I want it, or I may need it one day. Those are the three classic reasons for this to occur. And then the other thing is that, stuff that I’m not sure about, like this stuff over here, if you look through here, there’s a whole pile of stuff here, and this is no different than them. Who are they? They are my clients. How do I know what they are? Because I, too, am one of them. The only difference is I know the difference and I’m able to act on it. But if you look at this stuff, this pile, this pile is always, almost always about that tall. And what it is, these are decisions that I have yet to make. So the decision was, they’re all decisions. We make decisions—good, bad or in different. So the good decision is to throw this in the trash, or to put it someplace or to deal with it. The uh, the bad decision is not to do anything with it but to let it sit there and pile up. These are a lot of decision over here.

■ Figure 21.4 Dialogue editing in Never Enough (2010). The transcript shows how many words are edited out in the progress of condensing the dialogue. This corresponding timeline shows how the dialogue (on audio channels 1 and 2) was cut up.
Ron 9.2: Here is Disaster Masters Website, which is there. “The right people to know before things go wrong.” Or the other tagline is, “The right people to call after things have gone wrong.” Done? And here is the piece de resistance: disposophobia.com. This is the fear of getting rid of stuff. This is what we provide for the internet. If you type in the word “clutter” you are more than likely going to show up here. If you type in the words “Collyer Brothers,” let’s try it. C-O-L-L-Y-E-R
Ron 10: Disposophobics are generally very smart people who basically can’t, don’t or won’t make fast value judgments about their stuff. Their solution for their dilemma is they keep everything. Here’s about disposo phobia: the fear of getting rid of stuff. The problem is that Disposophobics are generally very smart people who basically can’t, don’t or won’t make fast value judgments about their stuff. Their solution for their dilemma is they keep everything. Example: Put $5, a magazine, a diamond ring and 2 dozen plastic chinese food containers and ask the disposophobic to trash two of them. Their response? I want them all. Their solution for this problem and it’s available, so this is what we do at disposophobia.com. We help these people make those decisions in an easy and non-threatening and non-judgmental way.
Figure 21.4 shows the Final Cut Pro timeline for the section of the film that corresponds with the marked up transcript. Note the number of dialogue edits in the timeline (they correspond with the cuts in the transcript). You can see the original clips and the edited sequence on our companion website (www.routledge.com/cw/Anderson).
What are the ethical implications of editing someone’s dialogue? Most documentary filmmakers feel that, as long as you aren’t changing the essence of what is being said, it’s not a problem. Most film subjects are pleased that they sound more coherent and concise than they did when they made the statement the first time around! On the other hand, it would indeed be problematic to rework a person’s interview in a way that changes their intentions or alters their statements in a significant way.
Of course, there is no rule that says you must edit out people’s um’s or ah’s, stumbles, or redundancies. Sometimes leaving those in can reveal character, or help show how uncomfortable a particular interviewee was. If that’s the goal, it can work well for the film to leave them in.
Sound Effects
Sound effects are perhaps best defined by what they are not: any sound that is not speech or music. Hard effects are sound effects that are gathered as nonsync sound and then inserted into the sound design either as postsynchronous sound (synced up to a corresponding image in editing) or as a nonsync sound effect. Hard effects are sounds like shattering glass, dog barks, gunshots, explosions, creaking stairs, doorbells, telephones, bird calls, or a helicopter fly-by. A hard sound effect can come from the production wild sound (e.g., a clean, nonsync recording of an actual car starting or birds chirping), or can be found as a prerecorded sound effect from a commercial sound effects library. There are many sound libraries online. Some are free while others will require that you purchase the rights to use the sound.
It’s extremely important to record, create, or find the sound effect that will have the exact impact you need, and this is a task that requires great attention to detail. You don’t just say, “I need a dog barking.” You need to have a specific sense for the size and kind of dog (the “yap” of a Yorkie or the lazy “woof-woof” of a hound dog?), the kind of bark (playful, serious, or rabid?), and the dramatic context for the bark (is the barking realistic or expressionistic?).
Foley effects, named after Universal Pictures sound department head Jack Foley, differ from hard effects in that they are created and recorded in sync with the edited film. A foley session involves watching a scene in a soundproof room, with whatever objects or surfaces you need to create the right noise, and having a professional foley artist create and record the sounds as they watch each scene. The sounds are recorded digitally and put into the NLE system, where they are built into an effects track aligned with the picture.
A foley session can be an extremely elaborate and expensive event, requiring professional foley artists and a special foley room equipped with, among other things, different floor surfaces (gravel, concrete, wood, carpet, etc.) that are used to create just the right sounds (Figure 21.5). But for shorts and independent films, a foley session can simply mean watching your footage on a laptop computer in a soundproof room and re-creating a sound effect or two, recording it, and putting it back into the NLE where you can hopefully slide it into sync. Foley effects are relatively rare in documentary, but for those seeking an especially rich sound design, they can be useful. For example, in The Immortalists (2014), David Alvarado and Jason Sussberg foleyed every single effect. The intention, according to Alvarado, was “to make the visuals as real as possible, and the sound design as surreal as possible.”2

■ Figure 21.5 Professional foley rooms are sound studios designed to record post-synchronous sound effects while the foley artist watches the scene on a screen. As you can see here, foley rooms are outfitted with a wide array of objects that can make a variety of noises.
In documentary, you will often find yourself working with footage, such as historical material, that comes to you with no soundtrack. This means you need to define your own approach to the sound design of the scenes that use the silent material. One approach is fairly literal: a shot of a fairground gets matched with the sound of a happy crowd and rides. The image of a World War II airplane gets matched with the sound of an engine from the period. But you might also choose to run the footage without effects to emphasize its historical nature, or use effects that are more impressionistic to create a more subjective feel.
Ambient Sounds
Ambient sounds, also called backgrounds, provide the background noises specific to a location. Ambient sound can come from the field recordings made at the actual locations, or it can be pulled from commercial sound effects libraries. These libraries offer thousands of different ambient environments (“rainforest with birds,” “city streets/rush hour,” “small restaurant,” “children’s playground,” and so on) (Figure 21.6). Ambient sound in a final sound design can be a combination of the ambience that is already part of the sync field recordings and added sounds. It is not uncommon to use multiple ambient tracks in a single scene to get the atmosphere just right.
It’s important to note that “silence” in film, as well as in real life, does not mean there is no sound at all. During “silent” passages, we should be able to hear the naturally occurring background noises. What this means is that there is never a time when a soundtrack has no audio. At the very least, it will contain very quiet room tone (Chapter 14) or ambiences like the ones in Figure 21.6.
As with everything else in film, ambient sound has both a practical use and a creative application. Practically speaking, ambience tracks are used to smooth out any shifts that would be apparent when cutting from one shot to another in the same scene. For example, in a scene where you cut between two people sitting at a sidewalk cafe, and one person is facing the traffic and the other is facing away, there will likely be a noticeable discrepancy between the traffic noise in their respective sound recordings. Often, this ambience shift can be too abrupt for continuity’s sake when cutting from one shot to the other. Although you can’t get rid of the traffic noise from one subject’s audio, you could add a little traffic ambience on another track, under the character who has less, in order to even them out. You might find some traffic noise to layer under the entire scene. This can help unify the scene by subliminally affirming that the characters are in the same place.
■ Figure 21.6 A search for “house backgrounds” on the website sounddogs.com shows the wide variety of available backgrounds. Note the level of detail in the descriptions, such as “Kitchen Roomtone, Int. 6:15am, Heater on Steady Throughout, Occasional Faint Clock Ticks.”
The creative dimension of ambient sound is not to be underestimated. Finding just the right ambient sound for a scene can establish an environment that adds additional narrative information or an emotional tone. Ambience is also often used to create a subjective sound space, meaning that the sound environment the audience hears is a reflection of what a specific character is feeling. In Danfung Dennis’ Hell and Back Again (2012), sound is used as a bridge between times and locations, and as a reflection of the main character’s psychological state of mind. The film follows Sergeant Nathan Harris, who is struggling with physical injuries and post-traumatic stress disorder after being shot by the Taliban in Afghanistan. The film cuts back and forth between Harris at home in North Carolina and on duty a year earlier in Afghanistan. In one scene, Harris is in a North Carolina department store looking at the combat video game Call of Duty (Figure 21.7). The ambient sound of the department store fades, and we begin to hear the natural sounds of birds chirping and wind blowing. The change in backgrounds puts us in the subjective space of Harris’ mind, as he becomes lost in thought and the outside world fades from his consciousness. It also creates a feeling of disconnection and tension, and signals that we are about to begin a flashback, picking up Harris’ story before his injury, while he was still in the military.
■ Figure 21.7 In Danfung Dennis’ documentary Hell and Back Again, sound from combat in Afghanistan is used over footage of Sergeant Nathan Harris as he watches video game screens in a store in the United States (top). The shift in sound signals a change in Harris’ consciousness, and the beginning of a flashback to his time in combat (bottom), which follows.
Music: Source and Score
Source music is the name for any music that has a visible source in the scene. This could include a song playing on the car radio while your subject is driving, the guitar that a character is playing, or the song your characters are singing (think “Happy Birthday” at a party). Source music presents particular problems for documentary filmmakers. Although it would seem that a sound playing on the radio would be fair game to include in a scene, the copyright holders can, and have, claimed rights to be compensated for this use. A best practice is to have subjects turn off the radio, television, or any other device likely to transmit copyrighted material, before you begin filming, and then add material that you do have rights to in postproduction as if it were playing on the radio in the scene. Another good reason to do this is that having music recorded under dialogue will make it virtually impossible to edit.
There are times, however, when the content of the song or broadcast is essential to the meaning of your scene (“Happy Birthday” being sung at a birthday party, for example). As documentarians, we capture the world of our subjects, and that world includes the media they consume and perform. In these cases, there may be exceptions to copyright law. When in doubt, consult an entertainment attorney. Another good source of information is the Center for Media and Social Impact (CMSI), which, as we have mentioned in Chapter 5 and Chapter 20, has conducted extensive research around best practices for fair use and copyright clearance.
According to CMSI,
Fair use should protect documentary filmmakers from being forced to falsify reality. Where a sound or image has been captured incidentally and without prevision, as part of an unstaged scene, it should be permissible to use it, to a reasonable extent, as part of the final version of the film.3
Documentarians should take care, however that:
- the music playing in the scene was not requested by the filmmaker
- the music is integral to the scene or action
- the scene has not been included primarily to exploit the incidentally captured music, or if the music functions as a substitute for non-source music in its own right (i.e., you show your character driving and then use the music on the radio under a montage of other images), and the captured content does not constitute the scene’s primary focus of interest
There are times when you have no choice but to clear your music. If you are making a film about the Rolling Stones, as David and Albert Maysles did with Gimme Shelter (1970), you will have to clear the rights pertaining to both the composers (Jagger and Richards, and a few others), the record company whose recording you are using, and the performers.
The musical score (or background music) is nonsync and non-diegetic music that underscores the events of a scene with a tone, a mood, or musical commentary. Most people understand how a drawn-out note from a string instrument can add tension to a moment, how a song can unify a montage, or how a plaintive piano solo can infuse a scene with pathos. These uses are so common that audiences may barely notice them, but they will feel them deeply.
Score music can be existing music for which you’ve cleared the rights, or it can be original music composed specifically for the film. Given the hassles and costs associated with clearing music rights, many documentary filmmakers commission original score for most if not all of their film. The music can be performed by live musicians or created in a computer program. At times, computer-generated music is enhanced through the inclusion of one or more live instruments. Sometimes, the edited film is given to a composer who, in close consultation with the director, composes music timed to the actions, rhythms, and durations of specific scenes. This often occurs after picture lock, so the editor will cut to temp music that is later replaced by the composer’s score.
Sometimes the composer will record a number of musical sketches or motifs (small musical phrases) that the editor can work with. Once picture is locked, the composer will finalize the cues based on what was used.
Sometimes a combination of acquired and commissioned music works best. Coauthor Kelly Anderson and Allison Lirish Dean commissioned composers Benjamin Fries and Simon Beins to create the score for their film My Brooklyn (2012), about the redevelopment of Downtown Brooklyn’s Fulton Mall area. Since part of the film was about the importance of that commercial district to the emergence of hip-hop music, the filmmakers decided to clear the song “Brooklyn-Queens” by 3rd Bass because its music video was shot at Fulton Mall and they wanted to use the music video in the film. Even though 3rd Bass agreed to allow the filmmakers to use the song and the music video, the record company still insisted that they be paid for the master use license (p. 348).
Another option for filmmakers is to use prerecorded music from music libraries (also called needle-drop music). In these cases, you pay a flat fee per cue. This is generally much less expensive than clearing existing music. There are a wide variety of music libraries, and even some sites that offer free music for non-commercial projects.
For students and other low-budget filmmakers, we recommend finding low-cost music libraries, or working with a music student or aspiring composer who is looking for experience scoring film or material to include in their sample reel. Often you can find great music at low or no cost this way, and avoid the hassles of trying to clear music.
Common Music Pitfalls
Music, when used correctly, can be a profoundly expressive option in the filmmaker’s toolbox of storytelling elements. The use of music to enhance a documentary’s impact can seem so easy, and yet there are a number of pitfalls to be wary of. Most problems with poorly used music come from “too much.” Music is like a strong cooking spice—just because a little bit is good does not mean that more is better. A few guidelines:
- Use music only where it is necessary. Wall-to-wall music is the phenomenon of excessive and indiscriminate use of music from the beginning to the end of a film. Music that relentlessly cues emotions from the audience can be exhausting and counterproductive because it ultimately impedes authentic audience involvement.
- Don’t try to evoke an emotion that is not in the film. It doesn’t help to throw music under a scene simply because the scene isn’t working. If a scene is not suspenseful or poignant, adding music will not help. It will simply become an unsuccessful scene with mismatched music.
- Too loud! Often in student films, the music is mixed in so loudly that it dominates anything else in the scene. In especially bad cases, loud music makes dialogue unintelligible.
- Watch out for mismatched tempo. Rhythm and tempo come from many places: the cutting pace, the actions in the frame, the camerawork, and the dialogue. Be careful that your music fits well with the tempo you’ve established in the picture editing. This doesn’t necessarily mean to duplicate the rhythms beat-for-beat—because music can often serve as a rhythmic counterpoint—but the energy of the image and the music should be complimentary.
- Lyrics can be difficult to manage, especially in dialogue scenes. Lyrics tend to fight with dialogue for attention, even if you’re using low-level source music, like a radio softly playing in the background.
- Emotional associations are not fixed. While music is especially useful for conjuring emotions, the relationship between the particular music and the individual listener can be highly subjective. This is especially a problem when using popular music. You may decide to use a song in a love scene because it was on the radio two summers ago when you fell madly in love, so that piece of music resonates, for you, with all of those feelings. But this may not be a universal feeling about that song.
in practice
■ Clearing Music Rights
If you want to use a piece of preexisting music in your documentary, here are some guidelines for clearing the rights. It is best to start this process as soon as you know what music you might want to use. It takes time, patience, and money to clear music. And you must clear it before you can exhibit your film! (The section below is adapted from “All Clear: A Music Clearance Primer” published by The Music Bridge.4)
1. First you must ascertain and contact the person (or entity) who holds the rights to the song. The best places to start your investigation are ASCAP, BMI, and SESAC. These are performance rights societies, to which most professional songwriters and publishers belong. Each society has a website for easy online research of publisher/copyright owner contact information for songs, plus phone support. The rights you will obtain from the publisher are called synchronization (or “sync”) rights, and are basically permission to use the composition in your film for a fee.
2. The second type of license you must get is a master use license, controlled by the record label, that grants the right to include a specific recording of the composition in your film. A song will have one publisher you need to clear the sync rights with, but there may be multiple recordings of that song that you could clear through the corresponding record label.
You can also research rights information for commercially released recordings on sites such as amazon. com, as well as CD jackets and booklet credits. Usually, independently released artists, whom you can approach directly, will be self-published and will control both sync and master use rights.
3. Once you have contacted the rights holder, you need to state specifically (a) what you want, (b) how much of it you want, (c) in what context it will be used, and (d) how the music will be credited. As you can understand, people who create or control artistic works can be very particular about how the works are used.
4. If the rights holders are in agreement with your use of the music, then you negotiate a price. What’s important to the rights holder is how much money you stand to make from your film. You need to be honest about what sort of distribution you expect. If it is a short movie made for a class and you hope to show it at only a few film festivals, then what you’re asking for is called “festival rights.” The cost of festival rights is often manageable. Occasionally, students are given permission to use commercial music in their films for nothing. A word of advice: the more rights you can clear up front, the better. Some low-budget, independent films can become surprise festival hits and attract the interest of a distributor or a broadcaster. One of the first questions they will ask you is, “Do you have the rights to all of the music?” If you don’t, then they may well back away. Why? A music rights holder is more likely to give a filmmaker a cheap price for rights before it has a distribution company attached. If you attempt to buy music rights after your festival success, the earning potential of the movie has increased and the cost of clearing the music might be prohibitive.
■ Sound Perspective
What is the source of a sound? Film theorist Michel Chion makes the astute observation, in his book Audio-Vision, that in film, images are always contained within the confines of the frame. But sound has no such “container,” no such strictly delineated limits.5 Not only are you free to layer as many sounds as you want on top of other sounds, but you can also have various rationales for where those sounds are ostensibly coming from.
Sound perspective refers to the apparent distance of a sound. Clues to the distance of the source include the volume of the sound, the balance between the sound from the source and other sounds, and the amount of reverberation. Imagine you have filmed an observational scene of a character walking and talking in an exterior location. You have used a wireless lavalier microphone to record the dialogue, and also have a sound recordist using a shotgun microphone on a boom pole. During editing, you cut from a shot of the character in close-up to one of the same character in a long shot. For the close-up, the sound from the wireless microphone will likely work well, but when you cut to the long shot the close perspective of the lavalier will seem unnatural. At the cut point, you would likely want to mix in more of the sound from the boom microphone to create a more realistic perspective.
in practice
■ Experimenting with Sound Perspective
In Sweetgrass (2009), Ilisa Barbash and Lucien Castaing-Taylor follow sheep herders driving their flocks up into Montana’s mountains for summer pasture. The film has a rich sound design, the foundations of which were established during preproduction. In addition to recording audio from a microphone mounted on the camera, the filmmakers put wireless lavalier microphones on the herders, and even occasionally on sheep and dogs. Because there was little radio interference up in the mountains, the mics could record sounds occurring far from the camera. “It meant that people could be three miles apart from each other, in different directions from me, and I would be getting this incredible signal of this super intimate, subjective . . . really embodied sound,” Castaing-Taylor says (Figure 21.8).6
The filmmakers worked with experimental musician and sound artist Ernst Karel at Harvard’s Sensory Ethnography Lab (where Castaing-Taylor is currently the director). Together they created a rich surround-sound mix that featured very little coherent human dialogue. Castaing-Taylor explains:
When you think of documentary, spoken word is often just reduced to the content, the meaning, the propositional logic of what people are saying. But I was really interested in embodied sound, and what people are doing when they’re hacking, or coughing, or they’re crying or they’re just mumbling under their breath to themselves, these fragments of noise that are half-language and half not. In many ways, that’s a much more profound kind of noise than the words we issue when we’re trying to make sense.7
Karel’s soundscape also plays with the existing conventions around perspective in documentary sound. Castaing-Taylor explains:
With documentary in general there’s this set of conventions that’s congealed that has you suppose that acoustic perspective has to coincide precisely with optical perspective. We really wanted to create some sort of aesthetic tension, so at times you’d have this very subjective, guttural, intimate proximate sound that would be playing over an image shot with a long lens that would really be a distant landscape or mountain shot.8

■ Figure 21.8 Sound perspective in Sweetgrass. In this scene, we hear the close-up sounds of a sheep rancher saying “Good Morning” to the sheep, but the shot is such an extreme long shot that we can barely make him out amidst the herd.
■ Sound Design Strategies
The sound design for a particular documentary can generally be placed on a continuum with realism on one end and expressionistic or stylized sound design on the other. Realism obviously can be achieved through direct sound, which is the use of sounds recorded at the actual location. But depending on microphone placement, these sounds will be more or less convincing, and may require the careful and judicious addition of other sounds. For example, a scene of a child on a playground may require the addition of ambient sounds of other children playing if the audio was recorded with a shotgun microphone that captured only the primary child and the sounds emanating from sources close to her.
One example of a documentary with a highly layered but realistic sound design is Florian Borchmeyer’s Habana: arte nuevo de hacer ruinas (Havana: The New Art of Making Ruins, 2006). The film is a portrait of the inhabited ruins of Havana and their strange blend of magic and demolition, and captures the final moments of these buildings before they are either renovated or collapse. In addition to recording interviews, Borchmeyer recorded wild surround sound of the environment, and then layered multiple tracks of sound under and around the interviews. Blogger David Tamés wrote about the experience of viewing the film, “I felt as if I was enveloped by the landscape in a manner I have rarely experienced in a documentary.”9
A more stylized use of sound is seen in the essay films of Alan Berliner. In several of Berliner’s films, the aural motif of a typewriter reoccurs as part of a richly layered, highly expressive sound design (Figure 21.9). Berliner says,
Back in 1981, my film Myth in the Electric Age made use of the sounds of a manual typewriter—the rat-tat-tat of the keys, the carriage return, and the small bell that always goes off when you reach the end of a line—to structure several rapid sequences of abstract imagery. Ten years later I brought back those same typewriter sounds as motifs in Intimate Stranger, this time to orchestrate and organize the voluminous documentary paper trail of my grandfather’s life—all the letters, documents, stamps, envelopes, and photographs that he was so obsessed with. It felt like an appropriate metaphor. After all, the typewriter was the tool of my grandfather’s autobiography and the primary tool of business during his lifetime. I wanted to transform it into a kind of musical instrument that would also function as a unifying editorial strategy, a way of allowing my unseen hand to “type” images on and off the screen with a kind of visceral immediacy. The sounds of the typewriter allowed me to “sculpt in time”—if I can borrow that phrase from Tarkovsky—and invigorate the film with rhythm.
The typewriter sounds also allowed me to create a set of visual “codes” that appear throughout the film. For instance, before you see any passage of home-movie imagery in the film, a typewriter bell rings over a short fragment of film stock identification circles. Before historical documents come on-screen, a typewriter bell rings over a short image fragment of arrows that shake and tremble. Before any archival footage comes on screen, a typewriter bell rings over a short swish-pan. Still photographs are always preceded by a quick, abstract scissor-like animation, accompanied by the sound of a camera click. These sound-image identification markers are used consistently throughout the film. Eventually the viewer learns to associate each of them with a particular kind of visual and stylistic representation.10
While not all filmmakers will need to create the complex soundscapes of an Alan Berliner, you can see that thoughtful sound design is critical to the tone and meaning of every documentary. A creative strategy for your soundscape is just as important for the ultimate success of your film as the overall look or structure of your story. Achieving good sound design should start in the field, but ultimately, most of the work will happen when you do your sound editing.

■ Figure 21.9 In Alan Berliner’s Intimate Stranger (1991), sound effects like typewriter keys being hit and carriage returns bells are combined with iconic imagery to signal various types of footage are about to appear.
■ Sound Editing
On a low-budget or student documentary, you will probably do your own sound edit and sound mix in your NLE program. On more professional productions, you will likely “prep” your sound elements in your NLE system and then deliver your project to a specialized Sound Editor and Rerecording Mixer (or Dubbing Mixer in Europe). For either scenario, you will begin in your NLE by building your audio tracks.
Building Your Audio Tracks
Even though NLE systems allow you to create as many as 100 or more audio tracks, most films use only a fraction of this capacity. The construction of your sound design occurs in various stages, from the most important sounds (those that are essential to understanding the story) to the supplementary sounds (those that add tone, mood, or other sonic dimensions to the film).
You begin to build your tracks from the moment you start to put shots together in the first rough cut. If your film is mostly dialogue based, then picture and dialogue editing will happen simultaneously. As you edit your early rough cuts, you will find it necessary to start adding other sound layers, like music or narration, that also play a vital role in the progress of the story and are therefore necessary for picture editing. As in editing your rough cut, build the basic structure first and fine-tune it later on. Don’t spend a lot of time at the beginning of your process creating something that sounds beautiful but may have to be undone later because the whole concept doesn’t work.
A typical progression for the gradual buildup of audio tracks for a documentary goes something like this:
- Dialogue and/or narration. The first rough cuts include rough picture, scratch narration, and production dialogue. These only take up a few tracks of audio.
- Music. Additional tracks are added for sequences where music is the primary sound element. Often this music will be scratch track—uncleared music that will be replaced later on with original score or cleared music.
- Sound effects. Subsequent rough cuts add sound effects tracks for important hard sound effects, especially those that are central to the story. Many documentaries wait until the picture is locked to add effects, but if you have them in your production audio you can add them in during your fine cut stage. You can also add ambiences at this stage.
Refining Your Sound Design
Once you have arrived at picture lock, with the image and essential audio tracks in their fixed places, you then turn your attention to the supplementary sounds that provide extra layers of mood, tone, and information. This is where much of the creative sound design work begins. The first step in this process is called spotting. Spotting is the process of sitting down and closely watching the picture-locked film to identify, scene by scene, the placement and character of any additional sound effects, ambience tracks, or music. Notes are taken on a spotting sheet detailing the time code reference of each sound effect, along with a description and your thoughts on the contribution the sound is supposed to make to the scene. If someone else is creating the sound design, then this process is done by the director, the editor, and the sound designer (or sound editor).
Additional tracks are then added for room tone and backgrounds, especially where they are needed to smooth over dialogue edits and fill in sound gaps. If you are working with a composer, you will go through a similar process of watching the film together and creating a music cue sheet.
Splitting Tracks and Checkerboarding Your Audio
Often, it is easier to begin editing with most of the dialogue on two to four tracks. This way, you don’t have to keep expanding the timeline vertically to see all your audio elements at the same time. As you progress towards picture lock, though, you will want to spread your audio out onto more tracks. The goal is to keep all the clips from one character on a single track (or set of two tracks if you have two sync tracks that go with the picture). This consolidation makes it easier to control volume and apply equalization (EQ) and effects to “sweeten” your audio (pp. 353–356) across a range of clips. It may not be feasible to give each character their own dedicated set of tracks, but the principle is to make it simpler to isolate each person for a given section of the film.
Even within each character, though, you will ultimately want to checkerboard the audio. This means alternating the clips of their audio over two (or four) tracks. So, for example, if you have chosen tracks 1–2 for Character A’s dialogue, you would place the first audio clip on track 1, the second on track 2, and the third on track 1. If you are using stereo or linked tracks, you would use 1&2, then 3&4, then 1&2 again. This is called “checker-boarding” because it results in the alternating pattern found on a checkerboard (see Figure 21.4 for an example of what this looks like). The reason for checkerboarding is that it allows you to make more complex edits between clips, which may need to be faded up or down at different rates under the clips that immediately precede or follow them. The same principle applies for backgrounds and music.
Finessing Your Audio

■ Figure 21.10 Audio level adjustments are done right on the timeline and can be monitored on the sound tool’s level meter window. Pictured here is Avid’s Audio tool.
If you are doing your own audio work, you should go through your cut carefully, making sure you have chosen the best audio tracks for each sound source. Make sure, for example, that if an interview was recorded with two microphones, you have chosen the best one. Make sure all intended sound effects are in the sequence and that they are high-quality files. Replace scratch dialogue and music with their final versions. If you are working with a sound editor, you will want to deliver them your audio with as many choices as possible. If you have two channels of sync audio recorded, give them both so they can choose which to use or how to combine them. A sound editor will also add effects and backgrounds, but you should add any sync sources before you deliver the cut to them. An editor will be searching through libraries to find backgrounds and effects, and if you can provide them with production sound their process will be faster and your film may sound more authentic.
During the editing stage, you will need to adjust the audio levels of all your tracks to some extent, just to be able to hear everything and to get a sense of how the various sound elements are working to tell your story. All NLE systems offer some sort of easily accessible level control right in the timeline (Figure 21.10). You can adjust tracks globally, by selecting the entire track, or adjust individual clips. Adjusting clip levels in the timeline does not alter the master clip or the original media in any way. You can also add simple transitions like sound fades and cross-fades into your sequence to smooth out audio edits. This is especially useful for test screenings where viewers may be distracted by audio that’s still too rough.
The editing stage is not the place to get the sound absolutely perfect. Finessing the track levels, creating transition effects, and enhancing the sound through equalization and audio filters are done in the next and final stage of the sound design process: sound mixing.
■ The Sound Mix
The sound mix is the process of polishing and finalizing the various audio tracks in your sound design and creating a single mixtrack. This is the mono, stereo, or even surround sound track that is then married to your images and accompanies your film into distribution and exhibition. On professional productions, your sound editor will set everything in place and leave it to the rerecording mixer to adjust levels and sweeten the sound. At the mix, the sound editor will be present, along with the director and perhaps the producer.
As a rule, everything is in its place before you arrive at the mix. In some cases, especially with low or medium budgets, one person may do the sound editing and mixing. For most student and independent films that are edited and finished on an NLE system, it’s hard to strictly delineate the sound editing stage from the sound mixing stage. As you work with your rough cuts and build your sound design, you will be doing some rough sound mixing along the way. But at some point, after picture lock and after you’ve placed all your sounds where they need to be, you need to turn all your attention to perfecting the way your film sounds. The ultimate goal of a sound mix is to create a harmonious sonic environment for your film, meaning that the completed sound design is both believable and appropriate for the conceptual and aesthetic aims of your documentary. In this respect, the sound mix should not be viewed as merely a polishing process—there are substantial creative decisions to be made here.
The sound mix process involves the following four steps, generally in this order: (1) audio sweetening, (2) creating audio transitions, (3) audio level balancing, and (4) the mix down.
Step 1: Audio Sweetening
Audio sweetening means making your audio sound better. This is accomplished by evaluating, and adjusting when necessary, every individual audio clip in the film. Sweetening includes a variety of audio signal processing tools that can be employed to accomplish three goals: to generally enhance the quality of the audio, to repair poor audio, and to create audio effects. The reason your prep involves putting all the sound from one interview together on a track is that it allows the mixer to apply the setting to the whole track instead of having to evaluate and sweeten every clip from the same subject and location individually.
Audio Filters
At the heart of audio sweetening is the application of audio filters. Audio filters are audio signal processors that digitally alter the audio data, and therefore the characteristics of your sound. Each audio filter manipulates the spectrum in a unique way. It is certainly not possible here to explore the capabilities of every processing tool found in most NLE systems, but a few basics should get you started. The effect and function of a specific audio filter generally falls into one of three categories: (1) equalization, (2) reverb/echo, and (3) compression/expansion.
Filters for Frequency Equalization and Noise Reduction
Equalization, or EQ, means the manipulation of the various frequencies in your signal. Generally, we divide the frequency spectrum of an audio signal into three frequency bands: low frequencies, which are the deep, bass quality (around 25_Hz to 250 Hz); midrange frequencies, which are the most perceptible range for the human ear and include the human voice (250_Hz to 4 _kHz); and high frequencies, which include the bright, treble quality of the sound (4 _kHz to 20 _kHz). Most NLE systems offer a filter called a three-band equalizer, which allows you to manipulate these three broad areas of the sound spectrum independently (Figure 21.11).

■ Figure 21.11 The Audio EQ Tool in Avid’s Media Composer.
When might you use an EQ filter? Let’s say you shot a scene with a microphone that accentuated the high, treble end of the audio and, to your ear, it sounds too “crispy.” You can use the EQ filter to bring down the high frequencies. Often a microphone will pick up the hum of a nearby refrigerator, for example, or the buzz of fluorescent lights overhead. Some of these unwanted noises can be reduced by isolating their frequencies and removing them from your track, or lessening them. Be aware, though, that if you need to EQ out a frequency that is found in other areas of the recorded sound, the filter will remove that frequency throughout the recording and will alter sounds you don’t want changed in addition to the ones you are targeting. Completely removing high frequencies and low frequencies from a voice, for example, will make it sound like it’s coming through the telephone or over a PA system. Also keep in mind, as a general rule, that you may be able to successfully remove (or accentuate) frequencies that are in the recording, but you cannot add frequencies that are not there in the first place. The removal of high- and low-frequency noise is so common in sound sweetening that you’ll find numerous filter presets for high-end and low-end roll-off filters designed exactly for these problems.
Filters for Reverb and Echo
Echo and reverb are similar in that they both involve the reflection and return of sound after a slight delay. The return delay for reverb is fast, creating an effect like putting your source in a small tiled bathroom or concrete stairwell. The return delay for an echo is much longer, like you might hear in a Gothic cathedral or the Grand Canyon. Reverb and echo effects change the audio signal to make it sound as if it were recorded in an acoustically live space, where sound reverberates off hard surfaces. They are commonly used to add richness and depth to material recorded in an entirely dead space (Chapter 14).
In all popular NLEs, there are several preset filters (Figure 21.12). Reverb and echo can sound great, but be careful not to use too much or to use them without justification. Too much can make otherwise clear sound, especially dialogue, murky and unintelligible. Also remember that reverb filters do not remove reverberation— they can only add it!

■ Figure 21.12 Do you want your audio to sound like it’s reverberating in a church? A large hall? In Premiere Pro, you can choose from a range of acoustic effects when you apply the reverb filter.
Filters for Amplitude Compression or Expansion
Compression and expansion filters work on the amplitude of a sound signal or, more accurately, on the dynamic range (Chapter 13) of a given recording. As we know already, the result of audio that peaks above 0 dB on a peak meter is distortion. In digital audio, this means the loss of data and noticeable crackling in the sound. A compression filter detects when a sound will peak above or near 0 dB and it will suppress the sound to keep it within range without affecting the average audio levels of the track.
This is very different than lowering the overall audio level of a clip to keep loud sounds from peaking above 0 dB, which would also lower everything on that track. Let’s say you have a scene in which a married couple is talking while the husband washes the dishes. The sound recordist did his job well and kept the sound from peaking above 0 dB in the field recordings, but now that you’re mixing your sound, you want to be able to hear the dialogue clearly, and so you’ve set the audio levels for the dialogue track fairly high. But now you discover that every time the husband bumps a plate in the sink, the audio spikes above 0 dB and crackles. If you were to lower the track level overall, you’ll be lowering the dialogue as well. The solution here is a compression filter, which will suppress only the audio that threatens to peak above 0 dB, leaving the rest at the level established in the timeline.
While compression filters lower loud, peaking sounds, expansion filters lower the amplitude of extremely quiet sounds in order to drop them below the level of audibility. Let’s say you go into your sound mix, where you’ll be listening on super high-quality speakers, and suddenly notice that during the shooting of a tight, close-up interview, the microphone picked up the ticking of the boom operator’s watch. It’s faint, but definitely distracting. An expansion filter will drop this very quiet noise even lower, hopefully out of the range of hearing, without affecting the rest of the audio on the track. Expansion filters can also be used to minimize the room tone in a dialogue recording, allowing you to more successfully replace it with another background if you so desire.
Filters for Sibilance Suppression or “P” Popping
Another useful set of filters relate to dialogue specifically. A sibilance suppressor decreases the hiss of an “S” sound, a common problem in voice recording. A pop filter is used to diminish the strength of a plosive “P,” which is what happens when a person speaks into a microphone too vehemently.
Step 2: Creating Audio Transitions
Most of the creative audio editing choices, like split edits for dialogue, sound bridges, and ambient track layering, are accomplished during the picture and sound editing stages. During the sound mixing phase, the concern is the smoothness of the transitions from sound clip to sound clip across an entire track. This includes the use of room tone to fill in gaps of silence on the soundtrack, and to even out the qualities of two neighboring pieces of audio so they sound continuous. In the mix, almost every audio clip will get a little extra attention. A straight cut between two audio clips not only magnifies small ambient shifts, but the inconsistent waveforms of the two directly abutted audio clips will also result in an audible “pop” or “click” right at the edit point. To correct this, sound editors and/or mixers routinely add a very quick, four-to six-frame cross-fade (or audio dissolve) right at the edit point between two connected sound clips, and two-to four-frame fades (in and out) at the beginning and end of sound clips that are not directly joined to another audio clip (Figure 21.13). Obviously, like an image dissolve, you can create long cross-fades of many seconds to, for example, slowly introduce some background music. This is particularly important when you are transitioning between scenes with very different sound qualities, as from an interior to an exterior, where it is common to introduce the sound of the new scene as much as several seconds before the picture transition.
When you cross-fade between two clips, the dissolve can either be centered on the cut, or you can control how much of each clip is included. For example, if you decide that you need a 30-frame centered cross-fade to smooth out an ambience discrepancy, then the first shot will end 15 frames after the cut point before it completely fades out, and the second clip will begin 15 frames before the edit point to accommodate the fade-in. These extra frames are called handles, and you must be sure that there are no unwanted sounds, like the tail end of some dialogue that you wanted to cut out, within those extra frames (Figure 21.13).
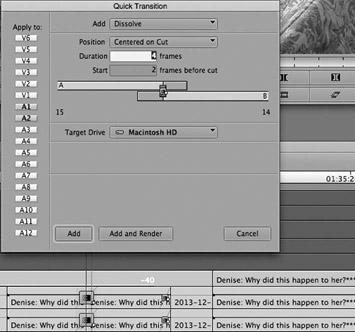
■ Figure 21.13 An audio dissolve in Avid’s Media Composer. Pictured here is four-frame cross-fade used to create an invisible dialogue edit. The dissolve is centered on the cut, with two-frame handles on each side.
Keep in mind that if you checkerboard your audio, you will not be using cross-fades. Because the audio clips are on alternating tracks, you will fade each up and out independently of its neighboring clips. The effect can be the same, but with checker-boarding you will have more control over the length of your sound transitions.
Step 3: Audio Level Balancing
Once all of the tracks sound good on their own, and all of the edit points are clean and smooth, it’s time to think about adjusting the volume of the clips in each track and of the various tracks in relation to one another. This stage is critical not only for the intelligibility of your sound (important dialogue shouldn’t be drowned out by music, for example). It also is critical for the general believability of the world of your film. An ambience track that is too loud can make a scene ring false; dialogue levels that are all over the map can make the editing painfully obvious; music that is too low will cause the audience to turn around and scream “louder!” at the poor projectionist. Track levels helps you to create emphasis and direct the ear and the eye to what is most important at a particular moment.
The Reference Track and Establishing Average Level Range
When establishing audio levels, you should start with the most important tracks first and then adjust all other tracks relative to this central reference. For example, if a film is primarily music driven with an occasional special effect tossed in here and there, then you’ll set levels for the music track first. For dialogue-driven projects, start with dialogue tracks and then later adjust the effects, music, and ambience tracks relative to the dialogue. In either case, the first and most important track you mix is called your reference track.
Just as with field recording, you use a peak meter as your primary reference tool as you adjust levels. You monitor with headphones as well, but the peak meter helps maintain consistency across time, meaning from clip to clip, from start to finish, across your timeline. The first track that you adjust, your reference track, establishes your average audio level range. Your headroom is a safety area just above the place your audio peaks (Figure 21.14).

■ Figure 21.14 Your NLE’s audio mixing tool allows you to monitor your audio levels as you work. The thin line towards the top shows that a sound has just peaked at –14dB, well within range, while the thicker bars show an average low of –36dB. Audio should never exceed –6 dB.
Let’s say you are adjusting dialogue first. The area between –20 and –12 dB becomes your average audio range, with peaks going up to -6 dB. Now you can adjust the levels of each and every clip, across the dialogue tracks, relative to this reference. A whisper should obviously dip below –20 dB, loud voices will register around –16 dB, and a scream will clearly be even louder, but should not peak above –6 dB. As you adjust your clip levels for the reference track across time, you should use the peak meter to maintain consistency from clip to clip to clip. For example, if your narrator’s average voice in the first scene held around –20 dB, then in the last scene it should also be at the same level. By comparing the levels of the two clips, you can easily see if your mix levels have drifted over time.
Adjusting the Other Tracks
Once you have established the levels of your reference track, you can then adjust the other tracks (sound effects, ambience, music) relative to this one. Keep in mind that “reference track” does not mean that this is always the loudest track in the movie. There are many times, for example, when music levels will be set well under dialogue levels and then later fade up to become the most prominent track in the sound design. Also, some sound effects, like explosions, should clearly be mixed louder than average dialogue.
NLE Systems and Audio Levels
As with most other functions in NLE systems, there are a number of ways to adjust the audio levels of clips and tracks. Most NLE systems make it extremely easy to adjust audio levels right in the timeline. To do this, you must select the track setting that shows the audio waveforms. The line that you see drawn through each clip is the system’s default level. Using your mouse or keypad, you can simply grab the audio overlay and manually raise or lower it to raise or lower the entire clip level (Figure 21.15). If you have a clip that has multiple dynamic level adjustments (for example, music in which the volume dips and then rises again), you can use keyframes to control the audio levels with precision. You can create as many keyframes as you need, allowing for enormous flexibility for level adjustment (Figure 21.15).

■ Figure 21.15 Audio waveforms (A) in Premiere Pro. You can adjust audio levels in the timeline by clicking and dragging clip overlays (B). Here, key frames (C) are used to increase and then decrease the level of the audio.
Step 4: The Mix Down

■ Figure 21.16 Avid’s audio mixer mixes all your audio tracks down to two master output stereo channels (A). With the panning slider (B), you can send each track to either one or both stereo channels. Each track also has its own fader (C) for independent level adjustment.
Finally, with all of the tracks sounding their best and their levels set to create a perfect balance of sounds, you are ready to mix down and output your multiple tracks to create a master mix track. Your NLE program’s mix tool is used for this purpose (Figure 21.16). When you open the mix tool, you will see one audio gain slider for every audio track in the program, and as you play through your sound design, the gain sliders will move, corresponding to the level adjustments you made in each clip. At the top of each level slider is a pan slider. Generally, you will be outputting your audio as a two-channel stereo master. The pan sliders allow you to select which channel on the mix track each audio track should be directed to. If you want both channels of audio to be the same (called a mono mix), then all of the pan sliders remain in their central position.
Surround sound is an increasingly common alternative to mono or stereo mixing, especially considering the popularity of sophisticated home viewing setups. Surround sound is also required for Digital Cinema Packages (Chapter 22) and may be required for other delivery situations. Essentially, surround sound uses five or more speakers behind and to the sides of the audience to create a more three-dimensional soundscape.
If you are going to be creating a surround sound mix track, you will likely work with a sound editor and/or rerecording mixer who specialize in creating surround sound mixes.
■ Sound Mixing Tips
The Mix Environment
Sound mixing should be done in an environment with audio playback equipment that accurately represents a high-quality exhibition space. In a professional mixing facility, the rerecording mixer handles the hardware and the mixing tasks while the director and the picture and sound editors watch the film projected on a fairly large screen, listening to the sound mix on high-quality speakers. The whole mixing suite is sound baffled to minimize reverberation. Most students in introductory or intermediate production courses, however, mix right on their NLE system. This is fine, but it is recommended to mix in a space that is quiet. It is essential that you use good speakers. Be aware that any traffic noise, reverberant surfaces, HVAC, and other noises in the environment will blend with what’s coming out of your speakers. Mixing with headphones is also a viable alternative, but again, make sure the headphones are of very high quality and are isolation-type headphones, meaning that they have foam that surrounds your ears to keep external noises from leaking in. Poor-quality headphones, especially those that do not press firmly against your ear, can give you a less than accurate impression of your sound track. If you do mix with headphones, be sure to check your sound on a good set of speakers from time to time to get a more accurate impression of how the audience will hear it. One of the biggest weaknesses of most computer speakers and headphones is an inability to give you a clear sense of the bass sounds in your track.
Audio Monitor Reference
When setting audio levels during the sound mix, it is essential that you keep the output level of your speakers and headphones absolutely consistent. Audio levels are relative, so if your headphone level is low one day, you might raise the levels of your clips higher than you need, and if the headphone levels are higher another day, then you may be tempted to set clip levels lower than on the previous day. So set the output volume to a comfortable level and leave it alone for the duration of the sound mix.
■ Advanced Sound Editing and Mixing Programs
The audio sweetening and sound mixing capabilities found in most NLE systems are truly remarkable, but to a professional sound mixer they offer only basic functions. As your films get more complex and your soundtrack needs become more demanding, you may find yourself wanting to use more advanced, stand-alone, sound mixing programs. Remember, Avid and Premiere Pro are picture editing programs, and professional sound mixers would never use them to mix sound. Instead, they use a digital audio workstation (DAW). The most common DAW for documentary sound editing and mixing is Avid Pro Tools (Figure 21.17). Pro Tools offers much more powerful audio filters for special effects and audio sweetening than any NLE. It has more precise equalizers and many more transition effects. Its ability to make subframe edits and stretch audio without changing pitch allows for highly precise sound edits. Pro Tools is also designed to import both your edited video (for visual reference) as well as all of the sound tracks and adjustments you’ve made along the way. Pro Tools requires that all sound files be converted into the open media framework (OMF) file format. It is relatively easy to export audio from either AVID or Premiere Pro in OMF format. You can even set the conversion to export each clip with handles (p. 356).
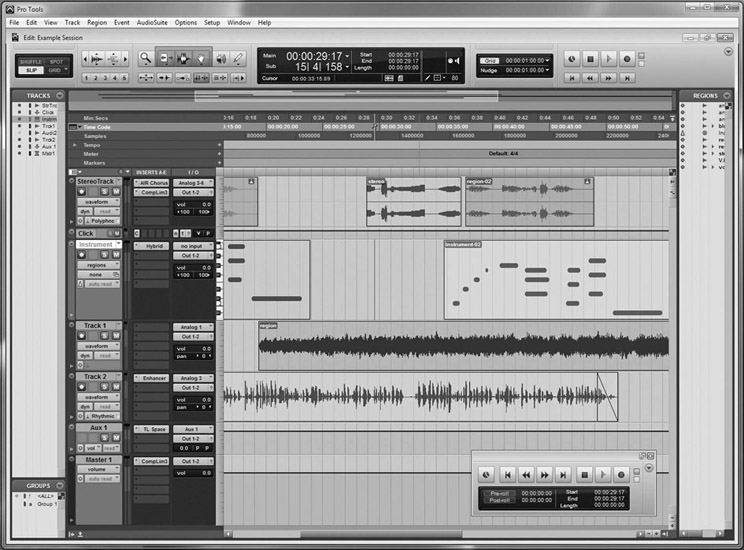
■ Figure 21.17 DAWs are substantially more precise and powerful for audio work than NLEs. Pictured is the Pro Tools 9.0 desktop.
Why Go Pro?
Certainly, as you are starting out, the benefits of mixing the soundtracks on your films on your own are enormous. Mixing your own sound gives you an intimate and nuanced understanding of the power of layered audio tracks. Placing a sound effect with perfect timing, adjusting the audio balance between clips to create dramatic emphasis, changing the mood by inserting a different ambience track, and literally seeing the way a music track can weave its way throughout a film are all invaluable experiences that will have an impact on the way you will use sound in future projects. Doing your own sound edit and mix may even convince you that you’d like to be a sound designer. If you find, though, that your ideas and requirements have become more complex than your abilities, it’s time to turn to those people who absolutely adore postproduction sound, those who have dedicated their careers to it and have a talent for it, those people who know exactly what every one of those audio filters and third-party plug-ins in a Pro Tools system does.
Pros will have high-end mixing programs with audio processors, scopes, and equalizers, but more importantly, they have experience and a sensibility for the world of sound. A good sound editor or rerecording mixer can not only make everything sound much better, they can hear problems in the tracks you might not have noticed. They can make creative suggestions, especially for sound bridges between scenes that will improve your film. And that’s why you go to a professional in any area of filmmaking: experience, talent, and technical expertise will enhance the expressive impact of your film.
When you decide to start using professional sound mixers, it is a good idea to consult with them before you start shooting your film. They will tell you the details of the mixing system they use and how it interfaces with your particular editing system. They will tell you what resources they have, what they need, and in what format they prefer the audio data and video delivered. It is especially important to consult with them ahead of time if you have sound that will need significant fixing in the mix. Some things can be fixed; others, like too much reverb in a recording, are nearly impossible to correct.
Keep in mind that the options are not limited to DIY or going with a professional sound mixer charging $200 an hour or more. Just as with cinematography, writing, or any other filmmaking task, there are people who have a talent for sound design and mixing who are good, but not yet professionals. This person might be your classmate or it might be you! These people need to establish themselves in the field and gain experience, and the only way to do that is to practice and show what they’ve got. You might just find the perfect match.