
Chapter 9
The Lens
It is often said that “the lens is the eye of the camera.” This is true, in that light enters through and is controlled by the lens, and ultimately this light registers as an image. However, there are many things that human eyes and human psychology of perception do automatically which, on a lens, must be accomplished manually. Focusing, exposure, and framing are activities we rarely consciously think about, but on a lens we have to deliberately set each of these functions. These choices are, in fact, part of the creative potential of any lens and part of the aesthetic palette of a documentary filmmaker. Often there is no absolute “right” setting. Rather, you must find the appropriate setting for what you want to express. You must determine which parts of the frame you want to make soft or sharp, bright or dark. For every shot, you must also decide the size of the subject in the frame, as well as the visual perspective. Knowing how lenses work will help you capture your subject in a way that expresses exactly what you want to communicate to your audience. It is helpful to remember that the lens is much more than just the eye of the camera—it becomes the eyes of your audience.
■ The Optics of the Lens
Regardless of whether you are using a smartphone, a digital single-lens reflex camera (DSLR), or a camcorder, the basic construction and function of camera lenses are the same. Broadly speaking, lenses are a series of polished glass sections called lens elements. These elements are held parallel to each other in a light-tight housing called the barrel, or lens housing. The function of these glass elements is to gather the light reflecting off a scene and bend the light through a process called optical refraction, forming a flat image on the camera’s focal plane. The focal plane (also called the recording surface) of a video camera is the faceplate of the CCD or CMOS chip (Figure 9.1). Many cameras have an external marking that indicates precisely where the focal plane is located. The marking looks like this: ⎞. The image registered on the focal plane is both reversed and flipped. This flipping of the image occurs at the exact optical center of the lens and is later reversed on viewing. The distance between the optical center of the lens and the recording surface is called the focal length of the lens (pp. 141–148).
There are many lenses to choose from, and many variables on each, so understanding lenses in general will help you pick the right one to create the image you want. There are three critical aspects of every lens that you must learn to give you control of the image: focus, focal length, and aperture.
Video cameras offer different ways of controlling and monitoring these lens functions. Some use lenses with focus, aperture, and focal length settings etched into their barrels, and you can directly manipulate the lens yourself (Figure 9.2). Many cameras, however, place some or all of that information in menus (Figure 9.3). It is important for you to familiarize yourself with these functions and figure out how to control your camera’s lens manually before you shoot.

■ Figure 9.1 The function of a lens is to gather the light reflected off a scene and bend it so that it registers on the image plane (sensor). The distance between the optical center of the lens and the image plane is called the focal length of the lens.

■ Figure 9.2 Lens functions marked on a lens barrel: focal point in feet and meters (A), focal length indicator, or witness mark, with depth of field indications (B), aperture ring marked in f-stops (C).

■ Figure 9.3 Lens functions indicated on a viewscreen.
■ Focus
We all have some intuitive sense of what focus is. Images that appear fuzzy and indistinct are “out of focus” and images that are sharply defined and clear are “in focus.” But to be more precise about it, focus can be defined as when a point on the subject is registered as a similarly sharp point on the focal plane (or sensor). The focus ring on a lens brings a subject into focus by very precisely moving the front element of the lens forward and backward in relation to the focal plane.
In documentary cinematography, the main task in a new situation is to identify the most important thing happening and make sure it is in focus and stays sharp. This can be challenging as people move around and events unfold.
When you focus the lens, you are adjusting what is called the focus point, or plane of critical focus. The plane of critical focus is the precise region in front of the camera that will be in sharp focus. If you set the focus ring for 10 feet, objects 10 feet from the camera’s focal plane will be rendered sharply. If you set the focus ring to 30 feet, objects 30 feet from the focal plane will be in focus. Turning the focus ring moves the plane of critical focus along the z-axis, toward or away from the camera. The range of distances that you find on the focus ring scale will be from the closest to the farthest an object can be from the focal plane and still be in sharp focus. This range is usually infinity (represented on the focus ring scale with the symbol ∞) on the far end, and a few feet on the close end. While some lenses (called macro lenses) allow a much closer subject to be in focus, with most lenses a subject can’t be closer than about 3 feet from the camera and be in focus. Focus is often indicated in both meters and feet, so be careful not to mix up these scales.
Setting the focus is done by turning the focus ring until the distance you want is lined up against a witness mark, which is a line etched into a non-movable part of the lens barrel (Figure 9.2). In documentary, you are rarely able to actually measure the distance between the subject and the camera, as you are probably capturing the action on the fly. In these cases, you can use other techniques to focus.
When shooting video, we can see the actual image that is being registered on the sensor, either through the viewfinder, an LCD viewscreen, or a larger field monitor, so focusing is usually done by eye. Some video camcorders offer a focus assist function, which enlarges a portion of the image to help you find critical focus (Figure 9.4).


■ Figure 9.4 The focus assist function. On the left is a shot as framed. On the right, the focus assist has been used to blow up the image to five times its original size to allow the operator to put the banner into sharp focus.


■ Figure 9.5 The problem with autofocus. In the shot on the left, the camera’s autofocus function has set the focus using the center of the frame, putting the main subject out of focus. In the shot on the right, the focus has been set manually to stay on the main subject in the left foreground.
If you are using a zoom lens (pp. 145–146), another common procedure for setting video focus is to zoom all the way in on a detail of what you want to have in focus (for example, the eyes of an interviewee), adjust your focus until the image is sharp, and then zoom out and find your frame. The subject will remain in focus even if you zoom in or out to get a closer or wider frame. This is called presetting focus.
Given the challenges involved in finding and maintaining sharp focus, you might be tempted to use autofocus. This strategy can create serious problems, however. One significant problem with autofocus is that it favors objects in the center of the frame, which might not be appropriate for the composition you want. Let’s say you have a composition in which your subject is tucked over to the left of the frame, with a building behind her. It’s likely that the camera will choose to set focus automatically for what is in the middle (a bystander in the background), leaving the main subject out of focus (Figure 9.5).

■ Figure 9.6 The manual/automatic focus switch on a camera (A), and the push auto focus function (B).
Autofocus also tends to shift focus in the middle of a take, especially when anything moves across the foreground of the frame. For example, if you are filming a wide shot of a house, and a person walks in between the camera and the house, the autofocus mechanism can start shifting arbitrarily from the house to the person and back to the house, “hunting” for focus but never quite settling. There is a popular technique that uses autofocus but avoids these pitfalls. You can start with autofocus enabled, make sure your subject is in the middle of the frame, and allow the autofocus to choose its setting. Then flip into manual mode and return to your original framing. When you readjust your frame with the subject to one side, the camera will hold your focus point. Some cameras have a “push auto” feature that temporarily engages the autofocus so that you don’t have go to the trouble of switching back and forth between the auto and manual modes (Figure 9.6).
in practice
■ Maintaining Focus in the Field
As we have learned, focus is dependent on the distance between the subject and the camera. What that means in practice is that as long as the subject you want to have in sharp focus is kept at the same distance from the camera—even if in motion—you can avoid having them go “soft,” or out of focus. A common shot in documentary is to have a subject walking towards the camera, with the camera operator walking backward, maintaining a consistent distance (Figure 9.7). This requires practice (and hopefully a production assistant to make sure you don’t injure yourself as you are walking backwards or sideways).
When covering multiple subjects (for instance, around a table), this aspect of focus also means that you can pan from one subject to another and maintain focus as long as they are the same distance from the camera (Figure 9.8).

■ Figure 9.7 When filming a subject walking towards the camera, the cinematographer can back up and stay in focus by maintaining a consistent distance between the camera and the subject.
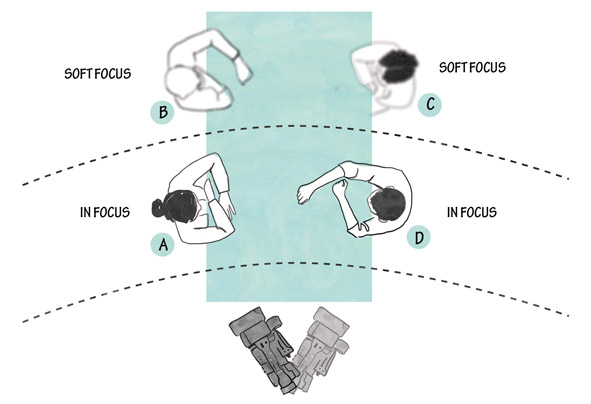
■ Figure 9.8 In this situation with four people seated at a table, if subject (A) is in focus, the camera operator can pan with confidence to subject (D) knowing that, because they are the same distance from the camera, they will also be in focus. Subjects (B) and (C), however, will be out of focus because they are further away from the camera.
Adjusting Focus During a Take
There are times when you may need to change the plane of critical focus during a take, while the camera is running. Say an interview subject starts to lean in toward the camera. You can’t afford to zoom in to preset focus again, so you make a slight adjustment by turning your focus ring a small amount in the right direction (something you learn by doing). When a larger adjustment is required or a change in focal point is used as part of a conscious strategy to shift the audience’s attention, it is called pulling focus.
One type of pulling focus is follow focus. Follow focus is used when your subject is moving along the z-axis either closer to or farther away from the camera. Let’s say you have a shot in which a subject begins 30 feet away from the camera, then moves to 20 feet away, and finally comes to rest 10 feet from the camera. You must adjust the plane of critical focus to follow your subject’s progress, preferably in smooth, controlled movements.

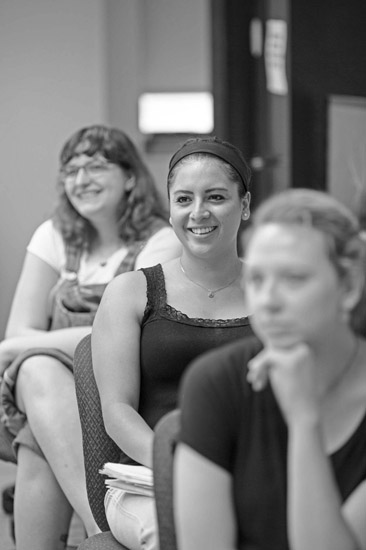

■ Figure 9.9 Selective focus is used here to draw the viewer’s attention to three different parts of the image.
In dramatic filmmaking, a camera assistant would adjust the focus ring as the subject hits predetermined marks, but in documentary this is usually done “on the fly,” monitoring the results with your eye. Experienced documentary camera operators develop a keen ability to follow a moving subject and keep them in focus through large or small focus adjustments, as well as by maintaining an awareness of the camera-to-subject distance. Like any other specialized skill, the ability to focus quickly and accurately must be practiced so that it becomes as instinctive as a pianist who does not need to look at her fingers to see what keys she’s supposed to play.
Selective Focus
As we have discussed, a primary task of the documentary cinematographer is keeping the main action in focus, even as people and objects move around. However, there are also creative decisions to be made about what constitutes the “main action” in a scene. Let’s say you are filming a conversation happening at a dinner table, where the parents are discussing money issues in the family. Their son is in the background, and out of focus. You notice out of the corner of your eye that he looks upset. Adjusting your lens so that the child comes into sharp focus, even as the parents continue to speak, could make a strong impact and even change the whole point of the scene. You would be using the power of selective focus to direct your viewer’s eye to an important aspect of a scene (Figure 9.9). Making these decisions is an important creative skill, and being able to execute them in rapidly evolving real-life situations involves much practice.
■ Focal Length
We all have an intuitive knowledge of what focal length is, even if we don’t know the term. The idea of “zooming in and out” is something even children are familiar with. What is actually happening when we “zoom” a lens is that we are changing the focal length. The focal length of a lens determines the degree of magnification or demagnification of the subject being filmed (whether it looks “big” or “small” in the frame).

■ Figure 9.10 Focal length and the optical center of a lens with multiple elements (a compound lens).
As shown in Figure 9.1, focal length is determined by the distance between the optical center of the lens (the point at which the image flips) and the focal plane (the image sensor). This distance is usually measured in millimeters (25 mm, 75 mm, 150 mm, etc.). Most lenses are compound lenses (made up of multiple glass elements) and in these cases the optical center is calculated by the manufacturer and is difficult to locate physically by eye (Figure 9.10).
The focal length of a lens defines the angle of view, which in turn determines the image size within the frame. The exact focal length of a lens can be found etched into the front of the lens (Figure 9.11).
There are three broad focal length classifications for lenses: wide-angle (short lenses), normal (medium lenses), and telephoto (long lenses). The longer the focal length, the more the subject is magnified. The shorter the focal length, the smaller the subject appears, and the farther away objects appear (Figure 9.12).
A normal lens approximates the same perspective and image size that the human eye would see if one were to stand in the same spot as the camera. Although this sounds like a nonscientific description, human visual perspective is indeed the intended reference point.

■ Figure 9.11 Focal length marking on a lens.
Wide-angle lenses are those with focal lengths shorter than normal lenses, which is why they are commonly referred to as short lenses. Wide-angle lenses broaden the angle of view, reducing the size of any given subject in the frame and allowing us to see more of a situation. For example, if you are filming a three-person conversation, the wide lens allows the viewer to see all the participants and gauge their reactions. Wide-angle lenses are often used to shoot observational footage for documentary, because they make small camera movements less obvious.
An extreme wide-angle lens, with an angle of view greater than 180°, is also called a fisheye lens. These lenses can provide an interesting perspective on events, but be careful as they can distort people’s faces (Figure 9.13). In some cases, the distortion is desirable. Dan Geva’s Description of a Memory (2006) is a reexamination of a 1960 documentary by filmmaker Chris Marker. Geva’s film questions all images, particularly of his homeland Israel. He uses the fisheye lens extensively throughout the film. Its distorted images push the viewer to question which is the correct angle to view a memory from, and what is at stake in our encounter with images of a country and a people.
Telephoto lenses have a longer focal length than normal, which is why they are commonly referred to as long lenses. These enlarge the size of the subject in the frame and narrow the angle of view. This narrow angle of view also has the effect of flattening out the image, actually altering the perspective to make objects and faces look less round (the opposite of the fisheye). While we normally think of the telephoto as offering us a close-up look at something far away, it is also common to use a telephoto for an interview as the flatter image can be flattering to the human face. In fact, a medium telephoto lens on a still camera is often referred to as a “portrait lens.”

■ Figure 9.12 Focal length affects angle of view.

■ Figure 9.13 A fisheye lens creates a distorted close-up image of a man’s face while emphasizing the vast loneliness of the desert in Dan Geva’s Description of a Memory.
Focal Length and Sensor Size: Crop Factor
Focal length measurements are not absolute indicators of image size. There is a relationship between focal length and format size, so that a wide-angle lens always has a shorter focal length than a long lens, for a particular camera. However, the actual focal length in millimeters varies in relation to the size of the camera’s sensor.
Consider this frame, a medium shot, filmed with two cameras with very different sensor sizes (Figure 9.14):

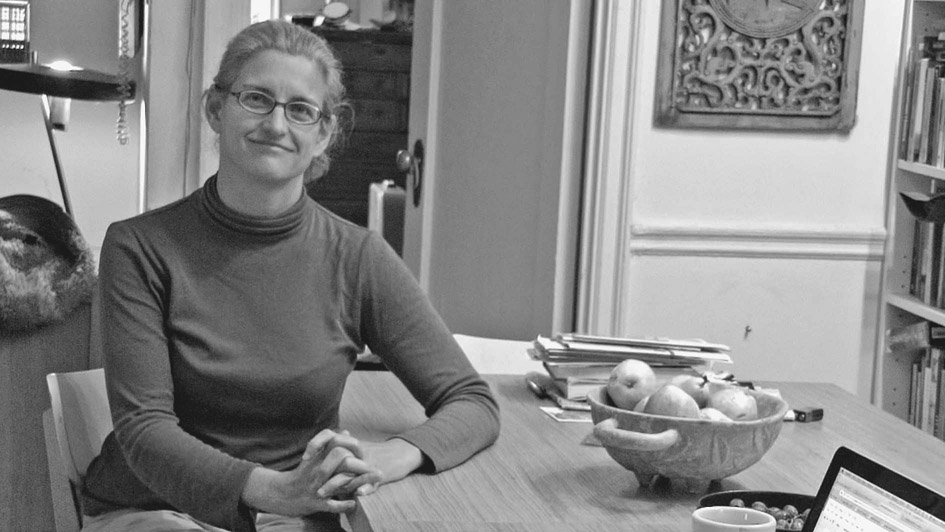
■ Figure 9.14 Focal length varies according to sensor size. The image on the left was shot with a larger sensor (and longer focal length), while the image on the right was shot with a smaller sensor and shorter focal length. Interestingly, they look relatively the same, as the field of view is equivalent.
On the left, the image was filmed using a Canon T3i DSLR camera, which has an APS-C sensor measuring 22.2 x 14.8mm. The image on the right was filmed using a Sony HXR-NX5U, with a considerably smaller sensor size of 1/3 inch (4.6 x 3.7mm). Even though the shots look more or less “normal” in terms of magnification and angle of view, the shot filmed with the Canon T3i was made with a lens with a focal length of 60mm, while the same shot on the HXR-NX5U had a focal length of 12mm (about 5x smaller).
Because of their ubiquity in both still and moving image photography, the focal lengths of 35mm cameras have come to be used to define lens capability for other sensors. This is known as the crop factor. On a 35mm camera, for example, a normal lens has a 50 mm focal length. If you use a camera such as a DSLR with an APC chip, which is closer to 22mm wide, you will have a crop factor of about 1.6. This means that the same 50 mm lens will behave like an 80 mm lens would on the full frame 35mm camera. In other words, your 50 mm lens is now a telephoto. On the 1/3 inch chip camera, the crop factor is about 7. So a 50 mm lens would be the equivalent of a 350 mm lens. When you look at the specifications for a video camera, you will notice that the focal length is often expressed in terms of its 35mm equivalent.

■ Figure 9.15 This chart shows the size of the sensor for a variety of digital cameras and the corresponding crop factors in relation to the full 35mm frame.
All this means that it is very important to know what sensor size your camera has, and what the crop factor will be, before making assumptions about what field of view a particular focal length will deliver (Figure 9.15). One useful tool is a crop factor calculator, such as Abel Cine’s (www.abelcine.com).
Prime and Zoom Lenses
Lenses that have one fixed focal length are called prime lenses. These lenses are very common in narrative film production, and more recently in DSLR documentary shooting. However, most documentary filmmakers prefer to use zoom (or variable focal length) lenses, which offer a continuous range of focal lengths, because of their flexibility in situations where stopping and changing a lens might mean missing the action.
Zoom lenses are constructed with a mix of stable and movable lens elements. The moveable elements can shift forward or backward to physically shift the optical center of the lens, and therefore change the focal length (Figure 9.16).
Zooming in increases the magnifying power of the lens by adjusting the optical center away from the focal plane. This makes the focal length longer, creating a telephoto effect. Zooming out moves the optical center back toward the focal plane, shortening the focal length and causing the image to become more wide-angle. Zooming is accomplished with an adjustable zoom ring that allows the filmmaker to manually set the desired focal length, or with a servo zoom motor, which allows you to move from one focal length to another smoothly during a shot (Figure 9.16).
Different zoom lenses offer different ranges of focal lengths, and this range is often stated as a ratio. A 21:1 zoom lens (also stated 21x) is one that increases the focal length 21 times over its full range, going, for example, from 5.7 mm to 120 mm (Figure 9.17).
Using the actual zoom movement as part of a shot is common in documentary filmmaking. As documentary cinematographer S. Leo Chiang explains:
Having worked with camcorders for so many years, I learned to incorporate the servo zoom into my shooting style. I often do a zoom-pan combination (start with an extreme close-up of a subject’s fidgeting hands, for example, and zoom out while panning up to her worried face). In editing, these short and smooth moves add a nice energy that static shots do not have.1
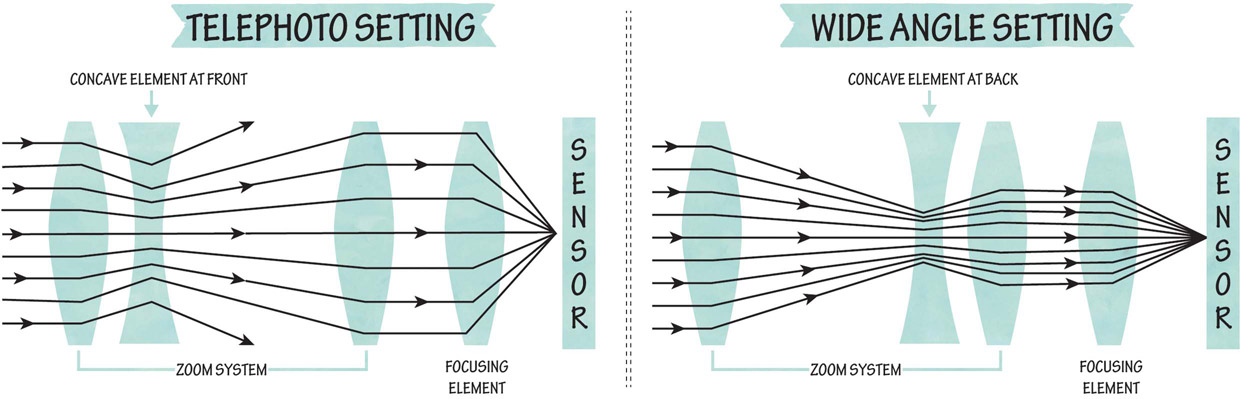
■ Figure 9.16 Changing focal length on a zoom lens involves moving a group of lenses in relation to a focusing lens element.

■ Figure 9.17 This Canon 21x zoom lens has a wide setting of 5.7mm and a long setting of 120mm, giving it very broad range of focal lengths. Photo by Kitmondo Marketplace.
Zoom lenses are very convenient, as they offer a wide range of focal lengths in one lens. For documentary, which calls for flexibility and spontaneity, they are indispensable. There can be trade-offs, including light loss and optical aberrations, but most documentary cinematographers are willing to pay that price.
Focal Length and Lens Perspective
Imagine you want to show a subject in a close-up shot. One approach would be to keep your distance and zoom in. Another would be to use a wide focal length and get close to the subject. These two approaches will give you very different shots with a different sense of space. This difference is called perspective. Consider the difference between these two images (Figure 9.18):


In the image on the right, which was taken from far away using a long (telephoto) lens, the trees behind the statue much closer than in the second image, where the camera has been moved closer to the statue feel and a wide-angle lens was used. Notice that the size of the subject (the statue) has not changed, but everything around it has.
Perspective has to do with how far apart or close together objects appear to the viewer, as well as how much information appears in the frame. This can be separated into horizontal and vertical effects, along the x and y axes, and depth effects along the z-axis (the depth dimension). Compare the two examples in Figure 9.19. Both are long shots where the subjects are nearly identical in size, and the horizontal center of both frames is the same (no left-to-right angle adjustment); however, the shot taken with the wide-angle lens and camera moved closer (A) includes the Gothic windows behind the farthest subject, as well as some bulletin boards on the wall to the left (to the left of the frame). Shot B, of the same subjects taken using a longer focal length and moving the camera back, has narrowed the field of view to exclude these details.
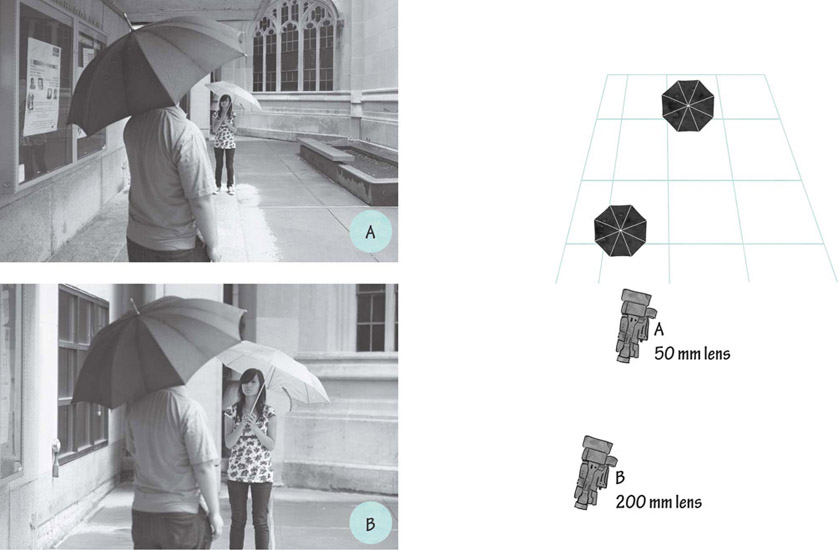
■ Figure 9.19 Focal length and perspective.
■ Using a Telephoto Lens to Condense Space
In Lessons of Darkness (1993), about the oil fires that raged in Kuwait after the 1991 Gulf War, Director Werner Herzog used extremely long lenses to compress space along the z-axis, creating an other-worldly landscape that brought the fires extremely close to the firefighters battling them (Figure 9.20). This spatial compression also suffused the image with the shimmering thermal waves associated with extreme heat. The emotional impact is one of being in hell. Herzog explained that he wanted to depict “a crime against Creation itself.”2

■ Figure 9.20 Long lenses compress space in Lessons of Darkness. Cinematography by Simon Werry, Paul Berriff, and Rainer Klausmann.
Changing the focal length also significantly alters the perception of depth in the frame. A normal lens replicates the same perception of depth that our eyes see. For example, if we use a normal lens to frame a subject in a medium shot with another object 5 feet behind, that object will indeed seem like it is 5 feet behind the subject. Wide-angle lenses tend to exaggerate depth along the z-axis, making objects look farther apart. Long lenses tend to compress space, making objects look closer together. For example, in Figure 9.19, the subjects have not physically moved between shots A and B, but they look much closer together in shot B, taken with a 200 mm lens, than in shot A, taken with a 50 mm lens. In documentary, this lens functionality is sometimes used to make spaces look more crowded (by using a long lens) or sparsely populated (by using a wide-angle lens).
You may be tempted to use the telephoto capability of a lens to “get closer” to your subject because it is easy, but keep in mind that the flat perspective can have a subtle surveillance effect. Moving physically closer to your subject with the camera may create more interaction with your subject, offering your audience a feeling of being there in the space of the subject rather than being outside peering in.
■ Aperture
Another adjustable ring found on all professional lenses is the aperture ring (or f-stop ring). The aperture ring controls the iris, a diaphragm inside the camera made up of flat, metal blades. These blades overlap in such a way that they create an opening that is nearly circular. This opening is called the aperture and all light gathered by the lens must pass through the aperture before it is registered on the sensor. By adjusting the aperture ring, the iris either opens to allow more light in, or closes to allow less light to reach the sensor. The most important purpose of the iris is to control the amount of light striking the sensor. Allow too much light through the lens and you will have a washed out, overexposed image. Block too much light and you will have a dark, underexposed image.
The size of the aperture opening is calibrated to a scale called the f-stop scale, which is either etched into the aperture ring or displayed in the viewfinder. The f-stop scale typically includes the settings f/1.4, f/2, f/2.8, f/4, f/5.6, f/8, f/11, f/16, and f/22. Partial f-stops, in between these primary ones, are marked on some lenses. At first, f-stops can be confusing because the smaller the f-stop number, the larger the aperture opening. Conversely, the larger the f-stop number, the smaller the aperture opening. So a setting of f/2 lets in a lot of light, while at f/16 the aperture is only the size of a pinhole (Figure 9.21).
Each number on the scale is called a stop. There is one stop between f/4 and f/5.6, and two stops between f/4 and f/2. Going down or up one stop on the scale exactly doubles or halves the amount of light allowed to pass. Expanding the aperture (smaller f-stop number) is called “opening up” the lens. Reducing the size of the aperture (larger f-stop number) is called “closing down” or “stopping down.” Opening up to f/4 from f/5.6 allows in twice as much light, while closing the aperture to f/2.8 from f/2 cuts the light in half.
As you can imagine, this range of f-stops gives you a huge amount of control over the actual amount of light hitting the camera’s sensor. In the case of Figure 9.22, which shows a lens with a range from f/2.8 to f/22, there is a range in light levels of some 256 times higher or lower. How do you access the iris control? This varies hugely. If you have a DSLR with an older manual lens, you turn a ring that is marked on the lens, as in Figure 9.2. However, most modern cameras offer some other route to controlling aperture. A typical mid-level camera will have an iris control on a ring, but no numbers. You will only see the exact f-stop setting in the viewfinder. Other cameras, usually smaller and less expensive ones, will have only a menu option.

■ Figure 9.21 The f-stop scale.
As with focus, there is not one single “correct” exposure for any video frame. There is a range of possible exposures you choose from in order to achieve the mood, style, and visual meaning you are seeking. A built-in light meter on all video cameras can trigger an auto iris function (also called auto exposure), which will take the average meter reading for your scene and automatically set the camera’s aperture. However, exposure control is such a crucial area of aesthetic impact that you will want to be very discerning about when you allow the camera to automatically set your f-stop and when you want to set it yourself. With digital cameras, a small difference of even a quarter or half of an f-stop can have a big impact on the image in terms of shadow detail, color saturation, and overall feel. In addition, only you know which part of the frame should be set for optimum exposure. See Chapter 12 for more on controlling your aperture and exposure.
All professional and industrial-grade cameras and many (but not all) consumer cameras have manual override capabilities. Digital cameras often offer a manual aperture override (also called “push auto iris”) function on your camera (Figure 9.23). This function allows you to turn the auto iris on briefly to get an average exposure, and then turn it back to manual to fine tune.


■ Figure 9.22 These three images suggest how light values can fall along the range of possible exposures. The top image was shot at f/4, the middle image (which has the fullest range of light values) at f/5.6, and the bottom image at f/8.
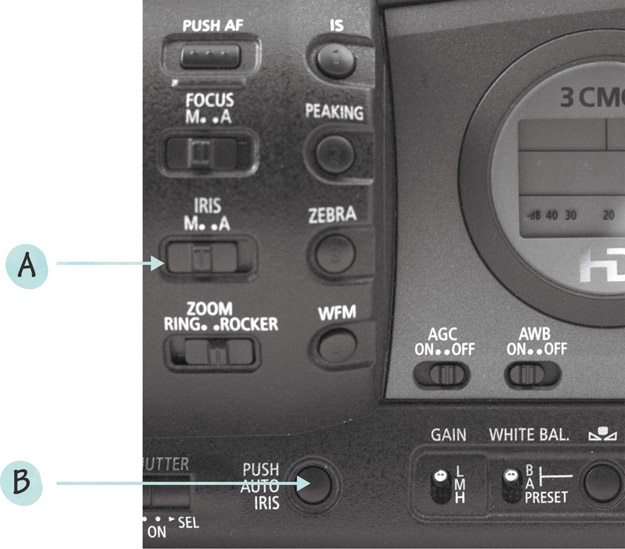
■ Figure 9.23 A close-up of the aperture controls on a Canon XF300. In this case there is a manual/auto switch (A), and then a button that temporarily engages the auto-iris function to give you a baseline exposure (B).
Lens Speed
The ability of a lens to gather light is determined by the largest possible aperture opening of that particular lens. We refer to this ability as lens speed. A fast lens can open up to allow more light than a slow lens. A lens with a maximum aperture of f/1.4 is a very fast lens and can register a readable image with very little light. Why are some lenses faster than others? What limits the ability of a lens to gather light are the optics: the number, size, and quality of the glass elements. Generally, wide-angle lenses are faster than telephoto lenses. Zoom lenses tend to be slower than prime lenses, as their construction requires many more elements. In fact, a maximum aperture of only f/3.5 or f/4 is not uncommon for a zoom lens.
■ Depth of Field
Beyond the question of exposure, the selection of your f-stop plays an important role in determining the look, tone, mood, and visual content of each and every shot in your film. This is because f-stop impacts the depth of field (DOF). As we discussed earlier, the plane of critical focus is the point at which the lens focus is actually set, and there can be only one setting for any given situation. However, when we look at an actual photographed image, we notice that there is always an area, both in front of and behind this plane of focus, that also appears to be in focus. This range of apparent focus along the z-axis is called the DOF. The relative depth or shallowness of this area is not fixed. It can be as shallow as a few inches or as deep as infinity (Figure 9.24).
For any given scene, depending on lighting, filters, and other factors, there may be a range of f-stops that will give an acceptable image. Therefore, the decision of which f-stop to use is often made based on the desired DOF, and boils down to the questions: What do you want to communicate with this shot? Which f-stop will create the image that best expresses your idea? What are the possibilities of your shooting situation in terms of lighting?
Creating a frame with a shallow depth of field makes your subject stand out from the environment and gain prominence in the frame, because objects both in front of and behind the subject are out of focus and indistinct. Adopting a deep depth of field (also called “deep focus”) increases the amount of information we see along the z-axis and gives environmental detail that can provide more context. In addition, a deeper DOF makes it easier to keep your subject in focus.
In terms of f-stop, the larger the aperture opening (smaller f-stop numbers), the shallower the DOF will be. The smaller the aperture opening (larger f-stop numbers), the deeper the DOF will be. That is why scenes shot in very low light situations have such a shallow DOF that we sometimes can see an eye in focus, but the ear, just a few inches back, is soft. Conversely, scenes shot in brightly lit environments can have a DOF so deep that everything in the background is in focus. Sometimes, when shooting in bright light, cinematographers will add neutral density (ND) filters to cut down the amount of light, allowing them to open up and decrease the DOF.

■ Figure 9.24 Shallow vs deep depth of field (DOF).
■ Deep Focus vs Shallow Depth of Field
In this scene from Alan Berliner’s Nobody’s Business (1996), Berliner used an extremely long lens with its very shallow DOF to isolate his father from the people around him, emphasizing the feeling of a “lonely man in a crowd” (Figure 9.25). Note how the lens also compresses the space along the z-axis, making the people in front of and behind Berliner’s father seem closer together.
In Helvetica (2007), a documentary by Gary Hustwit about the Helvetica font, deep DOF allows us to see detail on the widest possible range of signs in Times Square (Figure 9.26). This is important because at this point in the film, Hustwit is making the point that Helvetica is everywhere, so ubiquitous that we don’t even notice it.
Whether to use deep or shallow DOF in documentary depends as much on the situation as on your aesthetic goals. As cinematographer David Alvarado says,
If it’s not heavy action and I’m outside, and I want it to be pretty with shallow DOF, I can shoot at f1.4, but if there’s heavy action I wouldn’t want to shoot so shallow. It would be hard to follow the action and keep the right things in focus. So I would decide to shoot at f3.5 or f5.6.3

■ Figure 9.25 Shallow depth of field in Nobody’s Business.

■ Figure 9.26 Deep depth of field in Helvetica.
Other Factors Impacting Depth of Field
Another primary factor in determining DOF is the size of the image sensor. The smaller the sensor, the deeper the DOF tends to be. It is harder to get shallow DOF on a camcorder that has a 1/3ʺ (8.4 mm) sensor than it is with a DSLR, which may have a full 35mm sensor. In fact, many filmmakers chose to shoot with large sensor cameras because they like the look of a shallow DOF.
There are two other variables that determine the actual range of DOF over which we have some control:
- The focal length of the lens. The longer the focal length of the lens, the shallower the DOF will be. The shorter the focal length of the lens, the deeper the DOF will be. So, in documentary work, it is good to remember that it is much easier to keep subjects in focus when shooting with a wide-angle lens than a telephoto (or using the wide end of the zoom lens range).
- The focus point setting. The closer the subject is to the camera, the shallower the DOF will be. This is why, in documentary interviews, if you place the subject too close to the camera, you risk having them go out of focus if they lean forward or backwards even a little bit. Conversely, the farther away you place the subject from the camera, the deeper the DOF will be.
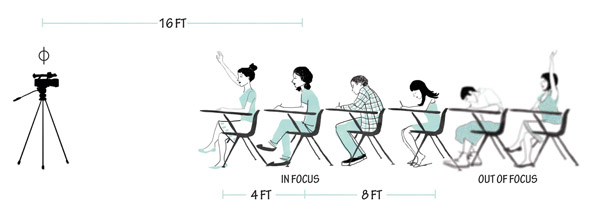
■ Figure 9.27 The 1/3–2/3 rule showing the range of focus in front and behind the subject. In this case, the depth of field is 12 feet. If the focal point is on the student in the second row, this will put the students in the first, third, and fourth rows in focus as well.
The 1/3–2/3 Rule
Regardless of your actual DOF, the 1/3–2/3 rule for DOF tells us that two-thirds of the depth range along the z-axis is behind the focus point and one-third is in front. Let’s say you are filming several rows of students in a classroom, from the front of the room. If you want the first four rows to be more or less in focus, you should focus on the second row, which means that the one row in front and the two rows behind will also be in focus (Figure 9.27).
■ Conclusion
While you might think that, with documentary shooting, you have the job done when you have clear focus and adequate exposure, nothing could be further from the truth. Harnessing the power of focus, aperture, and focal length will allow your shots to resonate deeply with meaning. Do you want the environment you are depicting to feel expansive, or claustrophobic? Do you want to isolate your subject, or present them in a context that gives the viewer additional information about who and where they are? These are just a few of the questions you can ask yourself when working with the variable components of your lens.