Chapter 9 Outline
The term “graphic facilitation” refers to recording ideas on visual aids, in full view of all participants, as the meeting progresses. Chapter 4 covered the benefits, equipment, and advance planning for graphic facilitation; this chapter covers how to implement those plans during the meeting itself.
MEETING IMPLEMENTATION CHECKLIST | ||
|---|---|---|
6. Opening the Meeting | ||
During the Meeting | ||
7. Verbal Facilitation | 8. Listening Facilitation | 9. Graphic Facilitation |
10. Closing the Meeting | ||
To record a group discussion, consider using a scribe (as described on page 23) because it is difficult to write clearly at the same time as you are concentrating on understanding each person and trying to move the discussion along. With or without a scribe, however, use the following tips:
As we explained on pages 30–37, plan your graphics to have:
Clear ties to agenda: Participants should immediately see the relationship between the agenda items and the visual aids. For example, if the agenda lists three items for discussion, the same three items should serve as headings on your board or flipchart.
Effective headings: Participants should always be able to see a heading that reminds them of the topic under discussion. (1) Questions: You might phrase your headings as questions (e.g., “Why has customer satisfaction dropped?” or “Can we develop a new system by June?”). (2) Actions: Another option is to phrase your headings as actions (e.g., “Brainstorm List of Solutions to Steel Shortage”).
Color and graphic design if possible: A little use of color goes a long way in meeting management. For example, you might use different colored markers to help participants distinguish between the heading versus the brainstormed list of ideas. Or, you might use a visual framework (as described on page 36) to show the relationship among the ideas to be generated.
Try to accurately summarize each idea.
Record essential phrases only. If the group is having a particularly dynamic moment, it may be useful to simply record a string of essential statements or phrases. Ideas expressed during a dynamic exchange can have great sticking power and may be used repeatedly by group members as the project moves forward.
Paraphrase ideas. Work on capturing the essence of the idea in a short phrase. If you do paraphrase, it is usually a good idea to confirm your record before moving on to entirely new topics or ideas.
Confirm what you have written. Briefly ask participants if they are happy with what you have recorded. Doing so will assure accuracy and reassure participants that you heard them.
Refer people back to what was recorded. If a participant raises an issue that has already been discussed, you will find it easier to move that person away from a redundant conversation by referring to the list of discussed ideas and then redirecting the conversation.
Aim toward an action plan. As we will explain on page 84, effective meetings end with an action plan. Recording ideas throughout the meeting provides a useful basis for forming that plan.
Group members are far more likely to support the group’s decision, even if their ideas are rejected, if they feel heard and believe that their input was valued during the process.
Record everyone’s input. Record everyone’s ideas, no matter how irrelevant or tangential some may seem. Protecting feelings of inclusiveness and of being valued will serve your group’s long-term interests when it is time to implement an idea or when you need everyone’s buy-in.
Keep charts in full view. Graphic facilitation is a visual support mechanism. Therefore, it is most effective when everyone can see the ideas being recorded.
Obviously, none of the benefits of recording ideas will occur unless all of the participants can read what is being recorded.
Use large and dark lettering. Not only must your writing be large enough for everyone to see, the color of your ink must provide a stark contrast to the color of your paper. Try to use white or light-colored paper along with dark black, blue, green, and red markers.
Write neatly. If you do not have neat handwriting, take the time to practice using markers and paper so that you can improve the readability of your record. If you don’t, use a scribe.
Make sure you or your scribe is familiar with how to use the equipment. For example, practice flipping the pages of a flipchart or putting up your transparencies straight. Decide in advance what you will do with filled-in flipchart pages (Attach them to the wall? How?) or when the board needs to be erased (How will the comments be permanently saved?).
As explained on page 25, brainstorming is a highly effective method for generating creative ideas. Brainstorming involves having people think of diverse ideas, having participants follow up on others’ ideas and think of new ideas, and making sure participants do not criticize or evaluate any ideas while they are being generated.
Traditional methods of graphic facilitation during a brainstorming session include (1) simply recording lists of ideas, usually on a flipchart or board, or (2) recording ideas on T charts or TT charts as described on page 36. These two visual diagrams will allow you to make lists, place important ideas side-by-side, and facilitate comparisons and discussions during the rest of the meeting.
These traditional methods are efficient and most appropriate for generating ideas. If your goal is to generate ideas and then regroup and organize them, you might want to try an approach developed by David Straker. His method also gets everyone involved, promotes feelings of inclusiveness, can break up a monotonous routine, and injects a dose of energy into a meeting. The method gets participants out of their chairs and engages them actively, using adhesive-backed or sticky notes, in the following four steps.
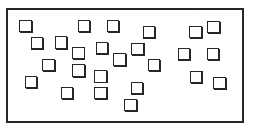
Either before or at the beginning of the meeting, ask the participants to write down their ideas on sticky notes, with only one idea per note. Participants then post their notes on a wall or board in any random or scattered order.

Step 1: Post Individual Ideas
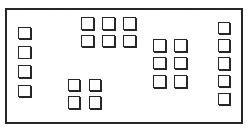
Once all the ideas are posted, ask the participants to “step back” and look for larger patterns. Which ideas can be “grouped” together? Everyone should feel free to move the notes and place similar items into groups. Discussion of where to place each idea is essential. If there are fewer than three notes in any group, the individual items should be moved to another group.

Step 2: Group Ideas
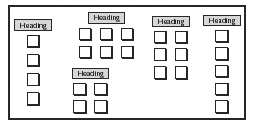
After grouping similar ideas, participants should look for a common theme or topic that connects all the items in each particular group. Write the unifying idea or heading on a different color sticky note. From the board illustrated below, you can create a rough outline of options or solutions. You also have a complete set of notes for entering the groupings and ideas into the meeting minutes.

Step 3: Look for Common Themes
