
Chapter Syllabus
In Chapter 15, we discussed the use of static routes as one way to enable nodes to communicate with each other when they are connected to physically and logically separate networks. We discussed that, even though a router may fail, a static route behaves as its name suggests—statically. Even if there were an alternative router on the network, we would have to manually manage static routes with the route command. In a large, complex, highly available network configuration, we can't rely on an administrator sitting at his desk watching the state of every network link just in case one fails. This is the job of the dynamic routing daemon gated. The gated can provide dynamic routing and automatic rerouting in the event that a particular route fails. This is crucial in a High Availability environment where we may have multiple physical network links to our servers, our client machines, and our customers. It is the job of the gated to maintain the kernel routing table. We should stress at this point that we should use either static routes (the route command) or dynamic route (the gated daemon), but don't use both because the results are ill-defined. The other aspect of gated that makes it a good choice for maintaining our kernel routing table is the fact that it supports numerous routing protocols. This allows an HP-UX hosts running gated to communicate with many other hosts and commercial routers using specific protocols. To illustrate some capabilities of the gated, we use the simple network configuration we saw in Chapter 15:
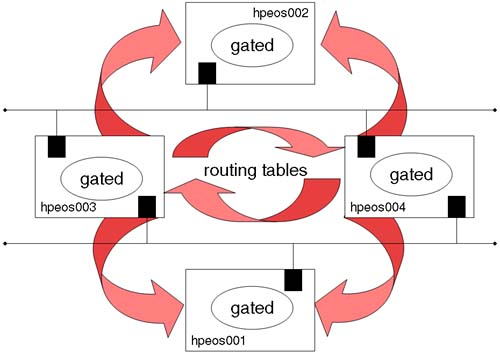
The only physical difference is that I will maintain my APA configuration established at the end of Chapter 15, on node hpeos003. There are essentially three solutions that our nodes can employ to discover all the available routers in our network:
Listen for ICMP router advertisements from the Router Discover Protocol.
Use a vector-distance routing protocol such as RIP, RIP-II.
Use a link-state routing protocol such as OSPF.
All these solutions are handled by the gated dynamic routing daemon. The first solution used to be handled by a separate daemon called rdpd, which is now obsolete because the functionality has been subsumed into gated.
The default configuration file for gated is /etc/gated.conf. This file exists by default. The default configuration uses one of the oldest routing protocols: RIP (version 1). There is a man page (man gated.conf) that describes the format and its numerous options. We start by setting up some basic behavioral characteristics relating to how gated will log routing information as well as how to treat interfaces that don't do very much:
root@hpeos003[] vi /etc/gated.conf
#
#       This is an initial /etc/gated.conf file.
#       Note that this file should be modified according
#       to the routing topology. Refer to the sample
#       configuration files in the "/usr/examples/gated" directory.
#       See gated-config(4) for details.
# @(#)B.11.11_LR
#

traceoption "/var/adm/gated.trc" size 10M files 2 route;

interface { all passive ; };


root@hpeos003[]
root@hpeos003[] gdc checkconf
configuration file /etc/gated.conf checks out okay
root@hpeos003[]
The most common problem with the format of statements is forgetting the semicolon at the end of the line! The gdc checkconf command is very useful. If the file syntax is wrong in any way, errors are appended to the /var/tmp/gated_parse file.
The first line in our configuration file is used to specify a name and size for our log file. We have specified that we want to maintain two files as well as stipulating we want to particularly trace routing information. The second line is useful where we have interfaces that may be acting as standby networks. Although there is no IP configuration on the interface currently, there may be one in the not-so-distant future. If gated does not receive routing information for an active interface, it can change its preference or even remove it from the routing table entirely. The passive option prevents this.
I won't activate this configuration yet because we haven't specified a particular routing protocol to use.
Although rare, some commercial routers use this simple protocol in order to advertise routes on connected interfaces. This protocol isn't really a routing protocol; it's simply a means whereby a default route can be inserted into a client's routing table. One useful feature is being managed by gated; if the route fails, gated can update the routing table with a new advertised route automatically. Both hpeos003 and hpeos004 will operate in server mode while the other two machines will operate in client mode.
As we mentioned at the beginning of this chapter, there is still a daemon called rdpd, which used to look after router advertisements. The daemon is still available (it is activated via /etc/rc.config.d/netconf), but its use is discouraged. If you read the man page for rdpd, it does mention that its capabilities have been subsumed by gated, and the rdpd daemon may disappear in future releases of HP-UX. Here is the gated configuration we will employ on nodes hpeos003 and hpeos004 to support Router Discovery:
root@hpeos003[] vi /etc/gated.conf
#
#       This is an initial /etc/gated.conf file.
#       Note that this file should be modified according
#       to the routing topology. Refer to the sample
#       configuration files in the "/usr/examples/gated" directory.
#       See gated-config(4) for details.
# @(#)B.11.11_LR
#

traceoptions "/var/adm/gated.trc" size 10M files 2 route;

interfaces { interface all passive ; } ;

routerdiscovery server yes {
        interface all maxadvinterval 30;
        address all broadcast;
} ;

icmp {
        traceoptions routerdiscovery ;
        } ;
root@hpeos003[] gdc checkconf
configuration file /etc/gated.conf checks out okay
root@hpeos003[]
I hope that the routerdiscovery definition needs little explaining except the maxadvinterval. This is simply the maximum time between sending advertisements. Advertisements are broadcast using a class-D multicast IP address of 224.0.0.1. In our example, we are broadcasting on all interfaces.
The icmp definition is simplicity itself. The only option we have with the ICMP protocol is to specify what type of packets we will trace. In this case, we are tracing Router Discovery packets. Once the configuration has been put in place on both hpeos003 and hpeos004, we are almost ready to start the gated daemon. First, we need to ensure that the daemon is started after every reboot (GATED=1) and that we disable static routes from inside the netconf file:
root@hpeos003[] vi /etc/rc.config.d/netconf
...
#ROUTE_DESTINATION[0]="default"
#ROUTE_MASK[0]="255.255.255.0"
#ROUTE_GATEWAY[0]="192.168.0.1"
#ROUTE_COUNT[0]="1"
#ROUTE_ARGS[0]=""

Dynamic routing daemon configuration. See gated(1m)
#
# GATED:        Set to 1 to start gated daemon.
# GATED_ARGS:   Arguments to the gated daemon.

GATED=1
GATED_ARGS=""

#
# Router Discover Protocol daemon configuration.  See rdpd(1m)
#
# RDPD:         Set to 1 to start rdpd daemon
#

RDPD=0
root@hpeos003[]
To ensure that there is no conflict between our old static routes and gated, we should flush the current routing table. Be aware that this may cause problems for client machines using this node as a router. I am sure you will be testing this outside prime user hours.
root@hpeos003[] route -f
root@hpeos003[] netstat -rn
Routing tables
Destination           Gateway            Flags   Refs Interface  Pmtu
127.0.0.1             127.0.0.1          UH        0  lo0        4136
192.168.0.33          192.168.0.33       UH        0  lan0       4136
192.168.0.13          192.168.0.13       UH        0  lan0:1     4136
192.168.0.65          192.168.0.65       UH        0  lan902     4136
192.168.0.32          192.168.0.33       U         3  lan0       1500
192.168.0.64          192.168.0.65       U         2  lan902     1500
192.168.0.0           192.168.0.13       U         3  lan0:1     1500
root@hpeos003[]
root@hpeos003[] gdc start
gated started, pid 4933
root@hpeos003[]
gated is running (pid 4933)
root@hpeos003[] ll /var/adm/gated.trc
-rw-r--r--   1 root       sys          17693 Nov 24 16:19 /var/adm/gated.trc
root@hpeos003[]
We can configure our clients now.
The client configuration is syntactically similar to the server configuration. The differences include the fact that we explicitly do not start the RIP protocol because it is unnecessary; RDP is going to supply us with a default route, which is going to be our exit point from this network. The other change is that we explicitly allow redirects. ICMP redirects are used to direct a client to a router if it becomes available. Essentially, that is all we are trying to achieve here, the best exit point for our clients:
root@hpeos002[] # vi /etc/gated.conf
#
#       This is an initial /etc/gated.conf file.
#       Note that this file should be modified according
#       to the routing topology. Refer to the sample
#       configuration files in the "/usr/examples/gated" directory.
#       See gated-config(4) for details.
# @(#)B.11.11_LR
#

traceoptions "/var/adm/gated.trc" size 10M files 2 route;

interfaces { interface all passive ; } ;

rip no;

routerdiscovery client yes {
        interface all broadcast;
} ;

icmp {
        traceoptions routerdiscovery ;
        } ;

redirect yes;

root@hpeos002[] #
When we start up the clients, we expect them to receive an advertisement from all the routers on the network. If there are two advertisements for the same network, the kernel will choose one route (based on the preference of a route) and install it as the default route for the client. Should the default route fail, gated will remove the route from the routing table and update it from the next advertisement.
root@hpeos002[] # netstat -rn
Routing tables
Destination           Gateway            Flags   Refs Interface  Pmtu
127.0.0.1             127.0.0.1          UH        0  lo0        4136
192.168.0.34          192.168.0.34       UH        0  lan0       4136
192.168.0.32          192.168.0.34       U         2  lan0       1500
127.0.0.0             127.0.0.1          U         0  lo0           0
root@hpeos002[] #
root@hpeos002[] # gdc start
gated started, pid 3086
root@hpeos002[] # netstat -rn
Routing tables
Destination           Gateway            Flags   Refs Interface  Pmtu
127.0.0.1             127.0.0.1          UH        0  lo0        4136
192.168.0.34          192.168.0.34       UH        0  lan0       4136
192.168.0.32          192.168.0.34       U         2  lan0       1500
127.0.0.0             127.0.0.1          U         0  lo0           0
default               192.168.0.33       UG        0  lan0          0
root@hpeos002[] #
Assuming that all clients have been updated with a similar configuration, we should be able to contact our distant cousin hpeos001:
root@hpeos002[] # traceroute hpeos001
traceroute: Warning: hpeos001 has multiple addresses; using 192.168.0.67
traceroute to hpeos001 (192.168.0.67), 30 hops max, 40 byte packets
 1  hpeos004 (192.168.0.35)  2.556 ms  2.390 ms  1.636 ms
 2  hpeos001 (192.168.0.67)  2.019 ms  2.825 ms  2.095 ms
root@hpeos002[] #
This all appears to be working fine. Now, we simply need to ensure that the dynamic component of this configuration works. We will simulate a LAN card failure. I will simply remove the cable from both network cards on node hpeos003 (you could use ifconfig lan0 unplumb). We should see a new route appear in the routing table of node hpeos002:
************************100 Mb/s LAN/9000 Networking**********************@#%
  Timestamp            : Mon Nov 24 GMT 2003 23:34:19.511709
  Process ID           : [ICS]              Subsystem        : BTLAN
  User ID ( UID )      : -1                 Log Class        : ERROR
  Device ID            : 0                  Path ID          : 0
  Connection ID        : 0                  Log Instance     : 0
~~~~~~~~~~~~~~~~~~~~~~~~~~~~~~~~~~~~~~~~~~~~~~~~~~~~~~~~~~~~~~~~~~~~~~~~~~~~
<7002>  10/100BASE-T driver detected bad cable connection between
        the adapter in slot(Crd In#) 0 and the hub or switch.

        btlan[ 0] [HP PCI 10/100Base-TX Core]
        going Offline @ [0/0/0/0] [Cable Disconnected]
Now if we look on node hpeos002, we can see our new default route:
root@hpeos002[] # netstat -rn
Routing tables
Destination           Gateway            Flags   Refs Interface  Pmtu
127.0.0.1             127.0.0.1          UH        0  lo0        4136
192.168.0.34          192.168.0.34       UH        0  lan0       4136
192.168.0.32          192.168.0.34       U         2  lan0       1500
127.0.0.0             127.0.0.1          U         0  lo0           0
default               192.168.0.35       UG        0  lan0          0
root@hpeos002[] #
We can see this in the gated logfile:
root@hpeos002[] # more /var/adm/gated.trc
...
Nov 24 18:38:10 ICMP RECV 192.168.0.35 -> 192.168.0.63 type RouterAdvertisement(9) code (0)
Nov 24 18:38:10 ICMP RECV       addresses 1 size 8 lifetime 1:30
Nov 24 18:38:10 ICMP RECV       router 192.168.0.35    preference 0
Nov 24 18:38:10
root@hpeos002[] #
When the failure on node hpeos003 is recovered, we might think that our client(s) would go back to using node hpeos003. They won't. When node hpeos003 comes back online, advertisements will be broadcast for the route via this node. However, the current route has the same preference because we didn't actually specify one; you can see a preference = 0 from the advertisement logged above. Where we have a configuration with a preferred route, we should make it explicit in the configuration of that server. Here, I am giving node hpeos003 a higher preference:
root@hpeos003[] vi /etc/gated.conf
#
#       This is an initial /etc/gated.conf file.
#       Note that this file should be modified according
#       to the routing topology. Refer to the sample
#       configuration files in the "/usr/examples/gated" directory.
#       See gated-config(4) for details.
# @(#)B.11.11_LR
#

traceoptions "/var/adm/gated.trc" size 10M files 2 route;

routerdiscovery server yes {
        interface all maxadvinterval 30;
        address all broadcast perference 10;
} ;

icmp {
        traceoptions routerdiscovery;
};

root@hpeos003[]
It's probably a good idea to do the same on node hpeos004 to ensure that we explicitly set the preference for all routers. This configuration makes sense because node hpeos003 has the APA configuration in place, and I would prefer that my clients use the big fat pipe available via that node than the piece of wet string attached to node hpeos004.
RDP is a simple yet effective way of supplying a default route to a number of clients connected to a local network. It works well for small- to medium-size networks and can react quickly to failures in a specific route. It showcases the benefits of the dynamic routing daemon gated. With preferences, we can give clients a preferred exit point from the network, which is normally a high availability, high performance, secure network connection. The configuration is relatively simple to put in place and maintain. The only other thing to consider is to turn off the ICMP tracing of routerdiscovery packets because leaving it on will fill up the /var filesystems in the space of a day or so.
The default configuration file for gated lists RIP as the only routing protocol configured by default. This highlights its widespread support and popularity in the UNIX community. This goes against the trend in the networking industry that is moving away from RIP, especially version 1 (the default). RIP is losing favor because version 1 doesn't support variable length subnet masks, multicasting, or authentication, and it is slow to repair failed routes (180 seconds to delete an unreachable route). In a world where every network is using some form of subnetting and three minutes is a long time; these are serious limitations. When we use it on HP-UX, it's usually version 2 of the protocol that we choose. This needs to be configured explicitly in the gated.conf file. The advantage of RIP is that it is relatively simple to configure. RIP is best suited to small- to medium-sized networks where the network topology is relatively stable. Below is a simple example of a RIPv2 configuration file that I will use in this example:
root@hpeos003[] vi /etc/gated.conf
#
#       This is an initial /etc/gated.conf file.
#       Note that this file should be modified according
#       to the routing topology. Refer to the sample
#       configuration files in the "/usr/examples/gated" directory.
#       See gated-config(4) for details.
# @(#)B.11.11_LR
#

traceoptions "/var/adm/gated.trc" size 10M files 2 route;

interfaces { interface all passive ; };

rip yes {
        interface all version 2;
        };

root@hpeos003[]
root@hpeos003[] gdc checkconf
configuration file /etc/gated.conf checks out okay
root@hpeos003[]
root@hpeos003[] gdc start
gated started, pid 3893
root@hpeos003[]
It is this simplicity that makes RIP so popular. This is a simple configuration for a router. For a client machine, we could use the same configuration with only minor modifications to ensure that a non-router doesn't broadcast on its (only) interface:
root@hpeos002[] vi /etc/gated.conf
#
#       This is an initial /etc/gated.conf file.
#       Note that this file should be modified according
#       to the routing topology. Refer to the sample
#       configuration files in the "/usr/examples/gated" directory.
#       See gated-config(4) for details.
# @(#)B.11.11_LR
#

traceoptions "/var/adm/gated.trc" size 10M files 2 route;

interfaces { interface all passive ; };

rip yes {
       nobroadcast ;
interface all version 2;
        };

root@hpeos002[]
root@hpeos002[] # gdc checkconf
configuration file /etc/gated.conf checks out okay
root@hpeos002[] #
root@hpeos002[] # netstat -rn
Routing tables
Destination           Gateway            Flags   Refs Interface  Pmtu
127.0.0.1             127.0.0.1          UH        0  lo0        4136
192.168.0.34          192.168.0.34       UH        0  lan0       4136
192.168.0.32          192.168.0.34       U         2  lan0       1500
192.168.0.64          192.168.0.35       UG        0  lan0          0
127.0.0.0             127.0.0.1          U         0  lo0           0
root@hpeos002[] #
root@hpeos002[] # gdc start
gated started, pid 3927
root@hpeos002[] #
The first thing to notice is that clients are no longer supplied with a default route. The gated process on each of our routers is simply broadcasting the routes they have available. The clients will update their routing tables with all newly discovered routes supplied by gated. gated will broadcast its available routes every 30 seconds. Clients (a router is also a client) will receive these broadcasts and add them to their routing table if they are better routes to a particular destination. A better route is one with fewer hops from the current network. The hop count is the primary measure of whether a particular route is selected. A directly connected path has a hop count of 1. As successive routers are crossed the hop count is increased by one each time. The maximum hop count (RIP's infinity metric) is when the hop count reaches 16. At that point, the network or node is deemed unreachable. The drawback of this model is that there is no weight given to a particular route depending on the speed of its connection. RIP is a typical vector-distance protocol.
Now that we have our clients and routers up and running, we can test our configuration. First, we can perform a sanity check to ensure that the basic routing is working:
root@hpeos002[] # traceroute hpeos001
traceroute: Warning: hpeos001 has multiple addresses; using 192.168.0.67
traceroute to hpeos001 (192.168.0.67), 30 hops max, 40 byte packets
 1  hpeos004 (192.168.0.35)  2.349 ms  2.403 ms  1.375 ms
 2  hpeos001 (192.168.0.67)  2.091 ms  2.879 ms  1.940 ms
root@hpeos002[] #
We need to test the resilience of dynamic routing. In this instance, I will remove the cable from the hpeos004 node because it is acting as the router for node hpeos002. The time to update the routing table is controlled by the kernel parameter ip_ire_gw_probe_interval:
root@hpeos002[] # ndd -get /dev/ip ip_ire_gw_probe_interval
180000
root@hpeos002[] #
This time is specified in milliseconds. The default value of 180000 = 3 minutes. We can use ndd to change this if we like, but we get into a discussion regarding how often the kernel should wake up to perform the probe of potentially dead gateways against the performance impact of having the kernel wake up and execute kernel code; it's a matter of high availability versus performance. If you are going to use RIP, you must tackle that question yourself. After a few heart-stopping minutes, the routing table is updated and communications are restored:
root@hpeos002[] # netstat -rn
Routing tables
Destination           Gateway            Flags   Refs Interface  Pmtu
127.0.0.1             127.0.0.1          UH        0  lo0        4136
192.168.0.34          192.168.0.34       UH        0  lan0       4136
192.168.0.32          192.168.0.34       U         2  lan0       1500
192.168.0.64          192.168.0.33       UG        0  lan0          0
127.0.0.0             127.0.0.1          U         0  lo0           0
root@hpeos002[] #
root@hpeos002[] # traceroute hpeos001
traceroute: Warning: hpeos001 has multiple addresses; using 192.168.0.67
traceroute to hpeos001 (192.168.0.67), 30 hops max, 40 byte packets
 1  hpeos003 (192.168.0.33)  2.323 ms  2.370 ms  1.340 ms
 2  hpeos001 (192.168.0.67)  2.101 ms  2.861 ms  1.915 ms
root@hpeos002[] #
We can also test an individual router by using the ripquery command.
root@hpeos002[] # ripquery -r hpeos003
24 bytes from hpeos003(192.168.0.33) version 2:
192.168.0.64/255.255.255.224  router 192.168.0.33     metric  1  tag 0000
root@hpeos002[] #
These are simply the routes that are being broadcast on my network. In this way, I can begin to troubleshoot why a router is not broadcasting a specific route. As more routers join our network, my routing table will begin to grow and grow. If you become concerned about the possibility of lots of routers flooding your machine, you can consider using options such as noripin and trustedgateways to control which interfaces you will listen on for RIP packets and which nodes you will accept RIP updates from.
The Routing Information Protocol is relatively simple to set up initially. It provides a robust infrastructure for managing multiple routers in a small- to medium-sized organization. One of its main limitations is the speed with which it can react to a failed route, although we can tune this via kernel parameters and the ndd command. The algorithm that RIP uses to establish the best route to a network or host is also one of its drawbacks because we can't build in to the algorithm any characteristics of the connection that would allow us to weight the selection of one route over another. Once our network begins to grow, we will probably want to utilize a more sophisticated routing protocol. Such a protocol is OSPF (Open Shortest Path First).
OSPF was designed in the late 1980s to get around the limitations of distance-vector protocols such as RIP. At that time, the Internet was a fraction of its current size, but even then the idea of using a hop count to get around the Internet didn't seem to make sense. The result is OSPF (Open Shortest Path First). The Open comes from the fact that the protocol was developed in an Open fashion by the Internet Engineering Task Force (IETF). The SPF is the clever part. OSPF is a link-state protocol where an entire map of the entire network is maintained by every node (known as the Link State Database). Updates to the map can occur on a regular basis when links fail and new links are established. Updates are coordinated through Designated and Backup Designated Routers. When routers join the network, they go through an election process to select the most suitable Designated Router based on how well connected a router is. The Shortest Path part of the equation comes from the ability of the protocol to support multiple metrics to calculate the cost of a particular link. These metrics can include delay time, throughput, monetary cost, and reliability. When a node needs to select a path through the network, it will consult the Link State Database. As you can start to appreciate, OSPF is taking us into rather deep and meaningful discussions. If you are interested in taking this discussion further, check out the excellent book Routing on the Internet by Christian Huitema, which goes into great detail about the protocols surrounding OSPF.
We mentioned that OSPF was designed to get around many of the limitations of RIP by allowing multiple metrics to designate the cost of a link as well as maintaining a Link State Database that is distributed to all nodes in the network. If we think of a network like the Internet, it becomes inconceivable to imagine a single Link State Database that covers the entire Internet. You are absolutely right that it would be like trying to maintain a paper-based record of all IP Address and hostnames on the Internet. The way around this is to divide a large network into Areas. The size of an Area is arbitrary, but a common analogy is to think of an area in the same context of a DNS domain. The Link State Database has a boundary that extends to the edge of the Area. The Link State Database contains records of every node in the Area. In this way, OSPF (like RIP) is known as an Interior Gateway Protocol. Areas are connected by the idea of a Backbone Area. Area-Border nodes are nodes that belong to more than one area (one lower-level Area and a Backbone Area) and maintain a Link State Database for both Areas. Once this concept of an Area grows beyond the bounds of a reasonably large network, we start getting into issues of physical connectivity of a router on the border of Areas. There is also the problem of the size of the Link State Database, and if a node is connected to multiple Areas, the memory requirements of such a node become significant. Then we throw into the mix several updates to the Link State Database including a software and hardware update for the router itself. As you can imagine, the concept of an Area has limits. The original designers of Arpanet realized the limitations of using a single-network concept. This led to the concept of Autonomous Systems. As the name suggests (to me anyway), an Autonomous Systems (AS) can operate quite happily on its own. An Autonomous System is made up of a collection of subnets of interconnected routers running IGP protocols to communicate with each other. In order to communicate with the AS, you need to have a router that understands how an AS is defined (it's got an address) and where it is located in relation to other nodes on the network (we need to know its IP address on our network). In essence, the AS router is our exit point from our AS to another AS. The difference here is that all we are maintaining is information on how to reach another AS, not the internal detail as we do with objects such as the Link State Database (hence, the Autonomous part of the name). Once we get inside the AS, we start communicating with internal routers using Interior Gateway Protocols. To glue all these large, interconnected networks together required a few interconnected routers running additional software allowing them to learn about their neighboring AS. The result was the Exterior Gateway Protocol (EGP). Put in its simplest form, EGP allows Autonomous Systems to discover neighboring Autonomous Systems. There have been subsequent protocols since EGP including BGP (Border Gateway Protocol) and IDRP (Inter-Domain Routing Protocol). The address of an AS is a 16-bit AS number. The allocation of these numbers is controlled by the same organizations that assigns IP addresses (http://www.iana.org).
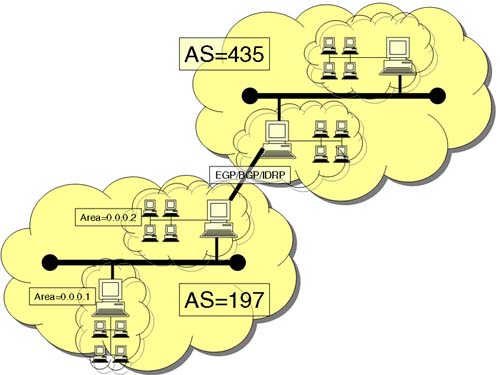
We look at a simple configuration involving two nodes (one a router, one a client) within a single Area. Unfortunately, we don't have the time or space to discuss Exterior Gateway Protocols. Essentially, we need to decide on an area number, the behavior of some parameters that control how quickly OSPF responds to link failures, and the behavior of the HELLO protocol. Obviously, it can get much more involved than that. This is a simple example to prove what is possible in a short space of time. I hope it gives you the confidence to try this on your own network.
Nodes/routers with multiple interfaces require a bigger, but no more complex, configuration. Choosing path costs and priorities are based on the capacity/reliability/cost of the link. Here's an example for our node hpeos003:
root@hpeos003[] vi /etc/gated.conf
#
#       This is an initial /etc/gated.conf file.
#       Note that this file should be modified according
#       to the routing topology. Refer to the sample
#       configuration files in the "/usr/examples/gated" directory.
#       See gated-config(4) for details.
# @(#)B.11.11_LR
#

traceoptions "/var/adm/gated.trc" size 10M files 2 route;

interfaces { interface all passive ; };

routerid 192.168.0.33;
ospf yes { area 0.0.0.2
        {       authtype none ;
                interface lan0 cost 10
                {       enable;
                        priority 10;
                        hellointerval 10;
                        transitdelay 10;
                        retransmitinterval 10;
                        routerdeadinterval 30;
                };
                interface lan920 cost 5
                {       enable;
                        priority 5;
                        hellointerval 10;
                        transitdelay 10;
                        retransmitinterval 10;
                        routerdeadinterval 30;
                };
        };
};

root@hpeos003[]
root@hpeos003[] gdc checkconf
configuration file /etc/gated.conf checks out okay
root@hpeos003[]
root@hpeos003[] gdc stop
gated signaled but still running, waiting 8 seconds more
gated terminated
root@hpeos003[]
root@hpeos003[] gdc start
gated started, pid 2273
root@hpeos003[]
Nodes with a single interface will have a slightly simpler configuration:
root@hpeos002[] # cat /etc/gated.conf
#
#       This is an initial /etc/gated.conf file.
#       Note that this file should be modified according
#       to the routing topology. Refer to the sample
#       configuration files in the "/usr/examples/gated" directory.
#       See gated-config(4) for details.
# @(#)B.11.11_LR
#

traceoptions "/var/adm/gated.trc" size 10M files 2 route;

interfaces { interface all passive ; };

routerid 192.168.0.34;
ospf yes { area 0.0.0.2
        {       authtype none ;
                interface lan0 cost 10
                {       enable;
                        priority 10;
                        hellointerval 10;
                        transitdelay 10;
                        retransmitinterval 10;
                        routerdeadinterval 30;
                };
        };
};

root@hpeos002[] #
root@hpeos002[] # gdc checkconf
configuration file /etc/gated.conf checks out okay
root@hpeos002[] # gdc stop
gated terminated
root@hpeos002[] #
root@hpeos002[] gdc start
gated started, pid 3850
root@hpeos002[]
We should spend some time testing this configuration to ensure that it can sustain the loss of a link without too much interruption (routerdeadinterval = 30 seconds).
There is the interactive command ospf_monitor, which allows you to query OSPF statistics from remote machines. First, you create a database file of the machines you want to communicate with and then you run ospf_monitor:
root@hpeos002[] # cat /tmp/ospf
192.168.0.33    hpeos003
root@hpeos002[] #
root@hpeos002[] # ospf_monitor /tmp/ospf
task_get_proto: getprotobyname("ospf") failed, using proto 89
listening on 0.0.0.0.49670
[ 1 ] dest command params > @1 o
   remote-command <o> sent to 192.168.0.33

          Source <<192.168.0.33     hpeos003>>
AS Border Routes:
Router          Cost AdvRouter       NextHop(s)
----------------------------------------------------
Area 0.0.0.2:


Area Border Routes:
Router          Cost AdvRouter       NextHop(s)
----------------------------------------------------
Area 0.0.0.2:


Summary AS Border Routes:
Router          Cost AdvRouter       NextHop(s)
---------------------------------------------------

Networks:
Destination        Area            Cost Type NextHop         AdvRouter
----------------------------------------------------------------------------
192.168.0.32/27    0.0.0.2           10 Net  192.168.0.33    192.168.0.34
192.168.0.64/27    0.0.0.2           20 Net  192.168.0.35    192.168.0.67
ASEs:
Destination        Cost E      Tag NextHop         AdvRotuer
-----------------------------------------------------------------------------
Total nets: 2
        Intra Area: 2   Inter Area: 0   ASE: 0
done

[ 2 ] dest command params >
[ 3 ] dest command params > @1 N
   remote-command <N> sent to 192.168.0.33

          Source <<192.168.0.33     hpeos003>>

Interface: 192.168.0.33    Area: 0.0.0.2
Router Id       Nbr IP Addr     State      Mode   Prio
------------------------------------------------------
192.168.0.34    192.168.0.34    Full       Slave  10
192.168.0.35    192.168.0.35    Full       Slave  10
done

[ 4 ] dest command params >
[ 4 ] dest command params > ?
Local commands:
   ?: help
   ?R: remote command information
   d: show configured destinations
   h: show history
   x: exit
   @ <remote command>: use last destination
   @<dest index> <remote command>: use configured destination
   F <filename>: write monitor information to filename
   S: write monitor information to stdout (defalut)
[ 5 ] dest command params > quit
root@hpeos002[] #
There are many other options to the command than the ones listed above. This is but a simple introduction. There is quite a good description of the commands you can use in the man page for ospf_monitor.
OSPF is certainly the interior routing protocol of choice at the moment. It is so popular that it has even made it into the world of Fibre Channel. The protocol used in a switched fabric is known as FSPF (Fibre Shortest Path First) and is a subset of OSPF. Get to know it because it's here to stay for some time.
Dynamic routing is an important part of any network configuration. With careful planning and implementation, we can maximize the availability of network links by carefully selecting the routing protocols we use. At one end of the scale, we have the relatively simple Router Discovery Protocol supplying a default route to individual clients all the way through RIP and to the other end of the scale where we have OSPF, the protocol that is being adopted in more and more situations due to its flexibility and widespread appeal in the networking arena and elsewhere. I hope that this introduction and series of examples gives you the confidence to try some of these solutions for yourself.