
The DNS is said to be the glue of the Internet. In layman's terms, that normally means converting a hostname into an IP address or an IP address into a hostname. With this IP address, we can then kick the entire IP software into action. Are we talking to a local network and looking up our ARP cache, or do we need to communicate with a remote network and need to know the address of a local router and then consult our routing table? Without DNS, we wouldn't be able to resolve a URL to an IP address. Its primary use is providing resolver capabilities to clients, converting a given name into a different representation of that name. This is the basic functionality that we configure first, although I suspect we know how to set up a rudimentary DNS server. We look at the following tasks:
Configure master, slave, and caching-only servers including testing with the
rndcutility.Configure additional backup slave and caching-only name servers.
Configure DNS to accept automatic updates from a DHCP server.
Perform an update of a Dynamic DNS Server using
nsupdateand TSIG authentication.
The current version of the DNS software (known as BIND = Berkeley Internet Name Daemon) for HP-UX is version 9.2.0. This is available as a free download from http://software.hp.com → Security and Manageability. If you are looking at utilizing the automatic updates feature, you need at least version 8.1.2, which is supplied by default with HP-UX 11i version 1. BIND 9.2.0 is supplied as standard with HP-UX 11i versions 1.6 and 2.0.
Here's a quick recap of what the DNS is: It provides a distributed name resolution service by distributing special machines across its entire structure running special software. The special machines and the special software are affectionately known as name servers. The special machines are not really that special, and neither is the software. What makes them special is that they hold the hostnames and IP addresses for all the machines in their locale: They are said to be authoritative for a zone. The structure used by the DNS is similar to the UNIX filesystem inverted tree structure with a few differences:
The directories are called domains.
The separator is a dot (.) instead of a forward-slash (/).
Names are ready backward, i.e., the leaf of the tree is read first, e.g., machinex.sub-domain.domain. This makes referring to local names easy; we just leave of the domain components. We use the Fully Qualified Domain Name (FQDN) only when we want to fully qualify which node we are talking about (much like the absolute pathname to a file).
A zone is a collection of machines and/or a collection of networks. A zone may part of a domain or may encompass the entire domain. A name server is authoritative for the resource records for a zone. Delegating responsibility for a subdomain alleviates the pressure on a higher-level server by making another name server authoritative for the resource records for that zone. A delegated subdomain inserts a new name server into the DNS hierarchy. In this way, an upper-level server knows the name and IP address of the name server responsible for the delegated subdomain. Should a query arrive for that subdomain, the higher-level name server does not have any of the resource records for that subdomain and hence cannot answer the query directly, but can reply with the IP address of the name server for the delegated subdomain that can answer the query. The reverse of this is not necessarily true; in other words, the lower-level server need not know the name and IP address of the upper-level server. This makes some kind of sense when we look at a simple example (see Figure 17-1).
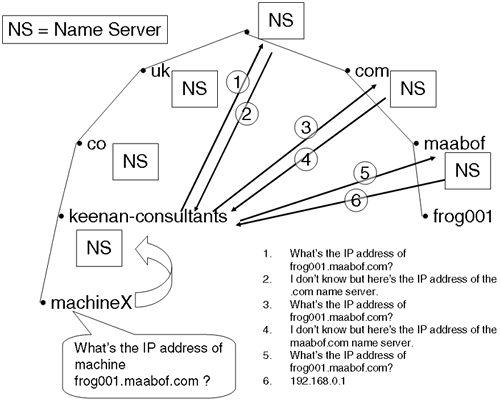
The machine machineX needs to know the IP address of a node called frog001.maabof.com. Node machineX constructs the query and forwards it to the name server for domain keenan-consultants.co.uk. This name server looks up its cache of all known IP addresses and hostnames. It doesn't find the name. At this stage, there is absolutely no point in asking the name server for the domain .co.uk, because that won't get me any closer to finding out the IP address. The only sensible place to start looking for the IP address is at the top of the tree; we have to ask a root name server. If it doesn't know the IP address, it can point me in the general direction because it does know the name servers for delegated subdomains. In this case, it's the name server for the .com domain. (I know that the root name servers are also the name servers for some of the top-level domains (TLD), but this is simply for demonstration purposes.) This continues until I am directed to the name server for the maabof.com domain, which can respond to my initial query. My name server will cache this information as well as all other information gathered during this query for a period of time (using a time-to-live—TTL—value) whereby, if I wanted to know the IP address of a node, for example, frog002.maabof.com, my name server could contact the maabof.com name server directly. This is how the DNS operates by default. Forwarding requests to a higher-level domain may make sense in some instances, but that is a specific configuration choice, one we look at later.
The other helpful thing about the structure of the DNS is that it allows us to neatly plug an IP address into the existing structure. If we think about it, an IP address sort of looks like a domain name except that it is backward, e.g., 192.168.0.1, with the leaf (in this case 1 = host part) of the domain name on the right side instead of the left side. If we simply turn an IP address around, we get a structure whereby the names used in the DNS hierarchy are simply the components of an IP address backward. This is advantageous because network services, e.g., remsh, rcp, rlogin, frequently deal with IP addresses and need to convert them back to hostnames. A name server can perform a reverse lookup because the DNS supports PTR records that glue an IP address back to its original hostname. (PTRs are sometimes referred to as glue records.) To accommodate IP addresses in the DNS namespace, a fictitious domain is created called in-addr.arpa. This part of the namespace is big enough to accommodate every IP address, with an example being (backward remember) 100.0.168.192.in-addr.arpa referring to the IP address 192.168.0.100. There's a similar part of the namespace for IPv6 IP addresses in which the domain where they reside is called IP6.INT.
At the heart of the DNS are the resource records (RR) contained in the DNS database file (db files). Initially, we need to set up the database files either by hand or convert our /etc/hosts file using the utility hosts_to_named. Most administrators on HP-UX will use hosts_to_named because the format of the db files is less than straightforward. The db files will be referenced in a configuration file that will identify our status in the DNS. The first server we set up will be our master server. Before we start looking at this configuration, let's clear up a little misunderstanding that I have come across with some administrators. From BIND 8.1.2 onward, we now refer to a master server. Prior to BIND 8.1.2, a master server was referred to as a primary server. When reading other documentation, a primary server is now a master server and a secondary server is now a slave server. A caching-only server has not changed its name. The steps to set up a master server can be summarized as follows:
Decide on and register (if necessary) a DNS domain name.
Update your
/etc/hostsfile with all known hostnames and IP addresses. Update the hostnames to be Fully Qualified Domain Names (FQDN). Use the old hostname as an alias.Create a working directory for the DNS database files.
Create the DNS database files using the
hosts_to_namedutility.Set up the
rndcconfiguration file.Start the
nameddaemon.Set up the resolver configuration files.
Test DNS functionality.
Let's see if we can get a master server up and running.
The Internet Corporation for Assigned Names and Numbers (ICANN) is the non-profit organization responsible for coordinating certain Internet technical functions, including managing the registering of domain names in the DNS. To register a domain name, you go through a process with an organization known as an official registrar who will ask for contact and technical information that forms part of the registration. The registration of domainnames usually carries an annual fee. A list of official registrars can be found at http://www.internic.net/regist.html. I have registered a number of domain names in my time using a UK-based registrar known as Easyspace (http://www.easyspace.net). The process takes a few days, after which you are the official owner of a domain name. The domain name I will use in this demonstration is a real domain name: maabof.com. There's a prize for anyone who can guess what it stands for.
I need to ensure that all hostnames are now Fully Qualified Domain Names (FDQN). I will use the original hostname as an alias. At this stage, all machines belong to the same domain and the same zone:
root@hpeos004[] more /etc/hosts
# @(#)B.11.11_LRhosts $Revision: 1.9.214.1 $ $Date: 96/10/08 13:20:01 $
#
# The form for each entry is:
# <internet address>    <official hostname> <aliases>
#
# For example:
# 192.1.2.34    hpfcrm  loghost
#
# See the hosts(4) manual page for more information.
# Note: The entries cannot be preceded by a space.
#       The format described in this file is the correct format.
#       The original Berkeley manual page contains an error in
#       the format description.
#

192.168.0.67    hpeos001.maabof.com     hpeos001
192.168.0.34    hpeos002.maabof.com     hpeos002
192.168.0.65    hpeos003.maabof.com     hpeos003 hp003_lan1
192.168.0.33    hpeos003.maabof.com     hpeos003 hp003_lan0
192.168.0.35    hpeos004.maabof.com     hpeos004 hp004_lan0
192.168.0.66    hpeos004.maabof.com     hpeos004 hp004_lan1

fec0:0:0:1::3   hpeos001.maabof.com     hpeos001 hp1v6
root@hpeos004[]
This task in itself can take considerable time when you have hundreds of machines in your network. I have purposefully left out all DHCP entries because we demonstrate dynamic DNS updates later. One thing to note is the hosts_to_named will create a mail exchanger (MX) record for each hostname referencing itself as its own mail hub; in other words, it will receive emails directly to the machine itself. This is unlikely to be the case; most sites use a central server as a mail hub. If you append the comment “[no smtp]” to each line in /etc/hosts, hosts_to_named, it will not make the self-referencing MX record:
root@hpeos004[dns] more /etc/hosts
# @(#)B.11.11_LRhosts $Revision: 1.9.214.1 $ $Date: 96/10/08 13:20:01 $
#
# The form for each entry is:
# <internet address>    <official hostname> <aliases>
#
# For example:
# 192.1.2.34    hpfcrm  loghost
#
# See the hosts(4) manual page for more information.
# Note: The entries cannot be preceded by a space.
#       The format described in this file is the correct format.
#       The original Berkeley manual page contains an error in
#       the format description.
#

192.168.0.67    hpeos001.maabof.com     hpeos001   #[no smtp]
192.168.0.34    hpeos002.maabof.com     hpeos002   #[no smtp]
192.168.0.65    hpeos003.maabof.com     hpeos003 hp003_lan1  #[no smtp]
192.168.0.33    hpeos003.maabof.com     hpeos003 hp003_lan0  #[no smtp]
192.168.0.35    hpeos004.maabof.com     hpeos004 hp004_lan0  #[no smtp]
192.168.0.66    hpeos004.maabof.com     hpeos004 hp004_lan1  #[no smtp]

fec0:0:0:1::3   hpeos001.maabof.com     hpeos001 hp1v6  #[no smtp]
root@hpeos004[dns]
This is not really a technical requirement, but it makes life much easier if we have a separate directory containing all of our DNS database files:
root@hpeos004[] mkdir /etc/dns
root@hpeos004[] cd /etc/dns
root@hpeos004[dns] pwd
/etc/dns
root@hpeos004[dns]
The challenge is to ensure that you are in this directory whenever you run the next command, hosts_to_named, because it will create DNS database files in your current working directory.
Before running the command, we can create a file containing all the parameters we want to include on the command line. Whenever we come to rerun this command, it will be much easier if we have a preconfigured parameter file. Here is the file I created:
root@hpeos004[dns] cat param.conf
-d maabof.com
-n 192.168.0.32:255.255.255.224
-n 192.168.0.64:255.255.255.224
-n 192.168.0.96:255.255.255.224
-n 192.168.0.128:255.255.255.224
-n 192.168.0.160:255.255.255.224
-Z 192.168.0.35
-Z 192.168.0.66
-z 192.168.0.35
-z 192.168.0.66
-m 10:hpeos003
-b /etc/named.conf
root@hpeos004[dns]
The following options are specified:
-d maabof.com: Resource records for this domain (maabof.com) will be created. If I had multiple domain names listed in /etc/hosts, this is used to segregate and filter out the relevant address (A) records.
-n 192.168.0.32:255.255.255.224: I have included this entry even though I am fairly confident it won't work. I am specifying the network numbers used in my network along with the relevant subnet mask. Individual database files will be created for the relevant pointer (PTR) records for each network number. I could simply have used 192.168.0.0, which would have created a single database file with all IP addresses listed in it. This is less efficient for lookup performance.
-z|Z 192.168.0.35|66: I am creating the necessary boot files for a slave server with local disk storage (-z) as well as a slave server that will not store the resource records on disk (-Z). Because I am a multi-homed machine, I have listed both IP addresses.
-m 10:hpeos003: I am going to create an MX record referencing my mail hub (node hpeos003). This is necessary because I used the [no smtp] comment in my /etc/hosts file. The weight (preference) for the mail hub is set to 10.
-b /etc/named.conf: This specifies the name of the boot file. If I don't specify the actual file name and location, it will be created in the current directory. Any reference to the filename named.boot refers to the old name of this configuration file.
Now let's run the hosts_to_named command itself:
root@hpeos004[dns] hosts_to_named -f param.conf

        hosts_to_named: Network number should have less than four bytes

root@hpeos004[dns]
As expected hosts_to_named doesn't like the network addresses I used in the parameter file. It's unfortunate, but that's life. Here's my modified parameter file:
root@hpeos004[dns] cat param.conf
-d maabof.com
-n 192.168
-Z 192.168.0.35
-Z 192.168.0.66
-z 192.168.0.35
-z 192.168.0.66
-m 10:hpeos003
-b /etc/named.conf
root@hpeos004[dns]
Now to try again …
root@hpeos004[dns] hosts_to_named -f param.conf
Translating /etc/hosts to lower case ...
Collecting network data ...
        192.168
Creating list of multi-homed hosts ...
Creating "A" data (name to address mapping) for net 192.168 ...
Creating "PTR" data (address to name mapping) for net 192.168 ...
Creating "MX" (mail exchanger) data ...
Building default named.boot file ...
Building default db.cache file ...

WARNING: db.cache must be filled in with
         the name(s) and address(es) of the
         rootserver(s)

Building default boot.sec.save for secondary servers ...
Building default boot.sec for secondary servers ...
Building default boot.cacheonly for caching only servers ...
done
root@hpeos004[dns]
Here are the files created:
root@hpeos004[dns] ll
total 44
-rw-rw-r--   1 root       sys            146 Oct 21 13:25 boot.cacheonly
-rw-rw-r--   1 root       sys            296 Oct 21 13:25 boot.sec
-rw-rw-r--   1 root       sys            328 Oct 21 13:25 boot.sec.save
-rw-rw-r--   1 root       sys            180 Oct 21 13:25 conf.cacheonly
-rw-rw-r--   1 root       sys            457 Oct 21 13:25 conf.sec
-rw-rw-r--   1 root       sys            498 Oct 21 13:25 conf.sec.save
-rw-rw-r--   1 root       sys            277 Oct 21 13:25 db.127.0.0
-rw-rw-r--   1 root       sys           2138 Oct 21 13:25 db.192.168
-rw-rw-r--   1 root       sys           1361 Oct 21 13:25 db.IP6.INT
-rw-rw-r--   1 root       sys            134 Oct 21 13:25 db.cache
-rw-rw-r--   1 root       sys           6884 Oct 21 13:25 db.maabof
-rw-rw-r--   1 root       sys            247 Oct 21 13:25 named.boot
-rw-rw-r--   1 root       sys            108 Oct 21 13:22 param.conf
root@hpeos004[dns]
By default, hosts_to_named does not update my boot file with the directive listen-on-v6, which is required to support any IPv6 interfaces. The default behavior for named is to listen on all IPV4 interfaces (I explicitly included the option listen-on { any; }; just for completeness). If you have only IPv4 interfaces but have IPv6 installed, you may come across some problems. We see this later when I try to start up the named daemon. Here's my modified boot file:
root@hpeos004[dns] cat /etc/named.conf
#
# type domain source file
#

options {
        directory "/etc/dns";
        listen-on { any; };
        listen-on-v6 { any; };
        random-device "/dev/random";
};

zone "0.0.127.IN-ADDR.ARPA" {
        type master;
        file "db.127.0.0";
};

zone "IP6.INT" {
        type master;
        file "db.IP6.INT";
};

zone "maabof.com" {
        type master;
        file "db.maabof";
};

zone "168.192.IN-ADDR.ARPA" {
        type master;
        file "db.192.168";
};

zone "." {
        type hint;
        file "db.cache";
};
root@hpeos004[dns]
As you can see, I am categorized as a master server for all the zones listed. We see later the difference for a slave server.
NOTE: I have included a random-device specification. This requires the HP-UX Strong Random Number Generator software, which is available as a free download from http://software.hp.com → Security and Manageability. We use this later as a source of entropy (a measure of disorder in a system) when we utilize Transaction Signatures.
The structure of the individual database files is the same as previous versions of BIND:
root@hpeos004[dns] more db.maabof
$TTL    86400
@       IN      SOA     hpeos004.maabof.com. root.hpeos004.maabof.com. (
                                        1       ; Serial
                                        10800   ; Refresh every 3 hours
                                        3600    ; Retry every hour
                                        604800  ; Expire after a week
                                        86400 ) ; Minimum ttl of 1 day
        IN      NS      hpeos004.maabof.com.

localhost       IN      A       127.0.0.1
hpeos001        IN      A       192.168.0.67
hpeos002        IN      A       192.168.0.34
hpeos003        IN      A       192.168.0.65
hp003_lan1      IN      A       192.168.0.65
hpeos003        IN      A       192.168.0.33
hp003_lan0      IN      A       192.168.0.33
hpeos004        IN      A       192.168.0.35
hp004_lan0      IN      A       192.168.0.35
hpeos004        IN      A       192.168.0.66
hp004_lan1      IN      A       192.168.0.66
ckpc2           IN      A       192.168.0.70
ckhome1         IN      A       192.168.0.1
ntpdc1          IN      A       192.168.0.10
...
hpeos004        IN      A6      0       fe80::230:6eff:fe5c:4f4f
hp4v6           IN      AAAA    fe80::230:6eff:fe5c:4f4f
hp4v6_lan0      IN      AAAA    fe80::230:6eff:fe5c:4f4f
acctg081        IN      MX      10      hpeos003.maabof.com.
acctg082        IN      MX      10      hpeos003.maabof.com.
acctg083        IN      MX      10      hpeos003.maabof.com.
acctg084        IN      MX      10      hpeos003.maabof.com.
...
root@hpeos004[dns]
We can see the Start-Of-Authority record at the top of the file indicating that this name server is the best source of information for the data within this domain.
Serial: This is the serial number of this database file. If this is a lower value on a slave server, the slave server will request a zone transfer, i.e., transfer this database file. Every time we modify a database file, this value needs to be incremented.
Refresh: This is the frequency with which a slave server will refresh the data in its cache. This is to ensure that the data is up to date.
Retry: This is the frequency with which a slave server will retry to refresh its data if the master server was not available.
Expire: This is when the slave server will flush all its resource records because it has not been able to refresh them from the master server.
TTL: There has been much confusion with the TTL field. Originally, it was used to specify a minimum time-to-live value for all resource records in the zone. This has now been dropped (see RFC 2308: Negative Caching of DNS Queries, at http://www.ietf.org/rfc/rfc2308.txt). One of its uses is to specify a time-to-live for resource records that don't explicitly include a TTL, and have the TTL set to that given in the SOA record. Utilities such as hosts_to_named, as well as lots of system documentation, still refer to the old “minimum value” behavior even though this behavior has been dropped. I won't bore you with all the details of what it is used for now, but here's a relevant extract from RFC 2308 that deals with this:
“The SOA minimum field has been overloaded in the past to have three different meanings, the minimum TTL value of all RRs in a zone, the default TTL of RRs which did not contain a TTL value, and the TTL of negative responses.
Despite being the original defined meaning, the first of these, the minimum TTL value of all RRs in a zone, has never in practice been used and is hereby deprecated.
The second, the default TTL of RRs which contain no explicit TTL in the master zone file, is relevant only at the primary server. After a zone transfer, all RRs have explicit TTLs and it is impossible to determine whether the TTL for a record was explicitly set or derived from the default after a zone transfer. Where a server does not require RRs to include the TTL value explicitly, it should provide a mechanism, not being the value of the MINIMUM field of the SOA record, from which the missing TTL values are obtained. How this is done is implementation dependent.
The Master File format [RFC 1035 Section 5] is extended to include the following directive:
$TTL <TTL> [comment]
All resource records appearing after the directive, and which do not explicitly include a TTL value, have their TTL set to the TTL given in the $TTL directive. SIG records without an explicit TTL get their TTL from the “original TTL” of the SIG record [RFC 2065 Section 4.5].
The remaining of the current meanings, of being the TTL to be used for negative responses, is the new defined meaning of the SOA minimum field.”
We can see that the NS (name server) record explicitly lists this machine as the name server for this zone.
Notice that we have IPv6 resource records as well as our MX record referencing our mail hub.
Also notice that, at the bottom of the file, the hints file is listed where the named daemon will obtain hints of which servers to query when it cannot resolve hostnames/IP addresses itself. This file details the names and addresses of root name servers. This file contains very little by default:
root@hpeos004[dns] cat db.cache
;
; FILL IN THE NAMES AND ADDRESSES OF THE ROOT SERVERS
;
; .             99999999        IN      NS      root.server.
; root.server.  99999999        IN      A       ??.??.??.??
;
root@hpeos004[dns]
On HP-UX, there is a file listing some of the root name servers, which we can use to get us started:
root@hpeos004[] # cat /usr/examples/bind/db.cache
;
;       This file holds the information on root name servers needed to
;       initialize cache of Internet domain name servers
;       (e.g., reference this file in the "cache  .  <file>"
;       configuration file of BIND domain name servers).
;
;       This file is made available by InterNIC registration services
;       under anonymous FTP as
;           file                /domain/named.root
;           on server           FTP.RS.INTERNIC.NET
;       -OR- under Gopher at    RS.INTERNIC.NET
;           under menu          InterNIC Registration Services (NSI)
;              submenu          InterNIC Registration Archives
;           file                named.root
;
; @(#)B.11.11_LR
;       last update:    Oct 5, 1994
;       related version of root zone:   94100500
;
.                        99999999 IN  NS    NS.INTERNIC.NET.
NS.INTERNIC.NET.         99999999     A     198.41.0.4
.                        99999999     NS    NS1.ISI.EDU.
NS1.ISI.EDU.             99999999     A     128.9.0.107
.                        99999999     NS    C.PSI.NET.
C.PSI.NET.               99999999     A     192.33.4.12
.                        99999999     NS    TERP.UMD.EDU.
TERP.UMD.EDU.            99999999     A     128.8.10.90
.                        99999999     NS    NS.NASA.GOV.
NS.NASA.GOV.             99999999     A     128.102.16.10
                         99999999     A     192.52.195.10
.                        99999999     NS    NS.ISC.ORG.
NS.ISC.ORG.              99999999     A     192.5.5.241
.                        99999999     NS    NS.NIC.DDN.MIL.
NS.NIC.DDN.MIL.          99999999     A     192.112.36.4
.                        99999999     NS    AOS.ARL.ARMY.MIL.
AOS.ARL.ARMY.MIL.        99999999     A     128.63.4.82
                         99999999     A     192.5.25.82
.                        99999999     NS    NIC.NORDU.NET.
NIC.NORDU.NET.           99999999     A     192.36.148.17
; End of File
root@hpeos004[] #
Unfortunately, when you install BIND version 9.2.0, the contents of the /usr/examples/bind directory are destroyed and linked to files under /usr/contrib/bind/usr/examples/bind. You could keep a copy of the file listed above before installing the new version of the BIND software. As you can see from the above file, you can get a copy using anonymous FTP. I downloaded the most recent version of the file from InterNIC:
root@hpeos004[dns] cat db.cache
;       This file holds the information on root name servers needed to
;       initialize cache of Internet domain name servers
;       (e.g., reference this file in the "cache  .  <file>"
;       configuration file of BIND domain name servers).
;
;       This file is made available by InterNIC
;       under anonymous FTP as
;           file                /domain/named.root
;           on server           FTP.INTERNIC.NET
;
;       last update:    Nov 5, 2002
;       related version of root zone:   2002110501
;
;
; formerly NS.INTERNIC.NET
;
.                        3600000  IN  NS    A.ROOT-SERVERS.NET.
A.ROOT-SERVERS.NET.      3600000      A     198.41.0.4
;
; formerly NS1.ISI.EDU
;
.                        3600000      NS    B.ROOT-SERVERS.NET.
B.ROOT-SERVERS.NET.      3600000      A     128.9.0.107
;
; formerly C.PSI.NET
;
.                        3600000      NS    C.ROOT-SERVERS.NET.
C.ROOT-SERVERS.NET.      3600000      A     192.33.4.12
;
; formerly TERP.UMD.EDU
;
.                        3600000      NS    D.ROOT-SERVERS.NET.
D.ROOT-SERVERS.NET.      3600000      A     128.8.10.90
;
; formerly NS.NASA.GOV
;
.                        3600000      NS    E.ROOT-SERVERS.NET.
E.ROOT-SERVERS.NET.      3600000      A     192.203.230.10
;
; formerly NS.ISC.ORG
;
.                        3600000      NS    F.ROOT-SERVERS.NET.
F.ROOT-SERVERS.NET.      3600000      A     192.5.5.241
;
; formerly NS.NIC.DDN.MIL
;
.                        3600000      NS    G.ROOT-SERVERS.NET.
G.ROOT-SERVERS.NET.      3600000      A     192.112.36.4
;
; formerly AOS.ARL.ARMY.MIL
;
.                        3600000      NS    H.ROOT-SERVERS.NET.
H.ROOT-SERVERS.NET.      3600000      A     128.63.2.53
;
; formerly NIC.NORDU.NET
;
.                        3600000      NS    I.ROOT-SERVERS.NET.
I.ROOT-SERVERS.NET.      3600000      A     192.36.148.17
;
; operated by VeriSign, Inc.
;
.                        3600000      NS    J.ROOT-SERVERS.NET.
J.ROOT-SERVERS.NET.      3600000      A     192.58.128.30
;
; housed in LINX, operated by RIPE NCC
;
.                        3600000      NS    K.ROOT-SERVERS.NET.
K.ROOT-SERVERS.NET.      3600000      A     193.0.14.129
;
; operated by IANA
;
.                        3600000      NS    L.ROOT-SERVERS.NET.
L.ROOT-SERVERS.NET.      3600000      A     198.32.64.12
;
; housed in Japan, operated by WIDE
;
.                        3600000      NS    M.ROOT-SERVERS.NET.
M.ROOT-SERVERS.NET.      3600000      A     202.12.27.33
; End of File


root@hpeos004[dns]
Alternately, if you are not connected directly to the Internet, you could have used the –r option in your parameter file for hosts_to_named to make your machine the root name server. In such a situation, we get a db.root file (instead of a db.cache hints file) that references ourselves as the master server for the . (root) domain.
In BIND version 9, rndc is the utility we use to communicate with the named process. In previous versions of BIND, we would use commands like sig_named dump to dump the in-memory cache from the named process. While sig_named is still available, the majority of its functionality has been replaced and superseded by rndc. Unfortunately, rndc needs a configuration file because it uses secure, encrypted communications to query and interrogate name servers (known as TSIG or Transaction Signatures). The configuration file requires a secret key. We can use either the utility rndc-confgen to create a key file (/etc/rndc.key) or the utility dnssec-keygen to generate the key. I prefer dnssec-keygen because it guarantees to create TSIG keys that conform to RFC2845: Secret Key Transaction Authentication for DNS (TSIG). Here, I am using the largest key possible for the hmac-md5 encryption algorithm (this is secure but will affect performance or the rndc utility):
root@hpeos004[] dnssec-keygen -a hmac-md5 -b 512 -n user -r /dev/random rndc
Krndc.+157+65409
root@hpeos004[] ll Krndc*
-rw-------   1 root       sys       111 Oct 21 15:26 Krndc.+157+65409.key
-rw-------   1 root       sys       145 Oct 21 15:26 Krndc.+157+65409.private
root@hpeos004[]
root@hpeos004[] cat Krndc.+157+65409.private
Private-key-format: v1.2
Algorithm: 157 (HMAC_MD5)
Key: L4Et2wOlxj6CYKIf8g2AbOjBaa+DSDhmGoDOARdsx4WfBbkbiwyKT+BFZ5dFBNrPY7XBDa/uSluKmfyB3kUPeQ==
root@hpeos004[]
I extract the key from either the .key or the .private file and enter it in the rndc configuration file:
root@hpeos004[dns] cat /etc/rndc.conf
options {
        default-server  localhost;
        default-key     TSIGkey;
        };

server localhost {
        key TSIGkey;
        };

key TSIGkey {
        algorithm hmac-md5;
        secret "L4Et2wOlxj6CYKIf8g2AbOjBaa+DSDhmGoDOARdsx4WfBbkbiwyKT+BFZ5dFBNrP
Y7XBDa/uSluKmfyB3kUPeQ==";
        };

root@hpeos004[dns]
I would keep the .key or the .private file for use later with the nsupdate command. I need to set up the key definition in the /etc/named.conf file before starting up the daemon. The rndc utility also requires a controls directive in /etc/named.conf to establish the secure communications channel with the rndc utility. Here's my resulting configuration file:
root@hpeos004[] cat /etc/named.conf
#
# type domain source file
#

options {
        directory "/etc/dns";
        listen-on { any; };
        listen-on-v6 { any; };
        random-device "/dev/random";
};

key TSIGkey {
        algorithm hmac-md5;
        secret "L4Et2wOlxj6CYKIf8g2AbOjBaa+DSDhmGoDOARdsx4WfBbkbiwyKT+BFZ5dFBNrP
Y7XBDa/uSluKmfyB3kUPeQ==";
        };

controls {
        inet 127.0.0.1 allow { 127.0.0.1; } keys { TSIGkey; };
        };

zone "0.0.127.IN-ADDR.ARPA" {
        type master;
        file "db.127.0.0";
};

zone "IP6.INT" {
        type master;
        file "db.IP6.INT";
};

zone "maabof.com" {
        type master;
        file "db.maabof";
};

zone "168.192.IN-ADDR.ARPA" {
        type master;
        file "db.192.168";
};

zone "." {
        type hint;
        file "db.cache";
};

root@hpeos004[]
root@hpeos004[] named-checkconf
root@hpeos004[]
If you are going to use rndc, you may want to keep a copy of /etc/named.conf in case running hosts_to_named accidentally destroys the changes you have just made.
We are now ready to start the named daemon. Before we do so, we may want to configure the namesvrs file to indicate that we want to start the daemon after every reboot:
root@hpeos004[dns] vi /etc/rc.config.d/namesvrs
unset UNIX95
PRE_U95=true;export PRE_U95;

##############################################
# named (BIND) configuration. See named(1m). #
##############################################
#
#  Name server using the Domain Name System (DNS) protocol (RFC 1034/1035)
#
# @(#)B.11.11_LR
#
# NAMED:      Set to 1 to start nameserver daemon.
# NAMED_ARGS: Arguments to the nameserver daemon
#
#  Configuration of a named boot file (e.g., /etc/named.boot) is needed for
#  successful operation of the name server.
#
NAMED=1
NAMED_ARGS=""


##########################################################
# NIS (YP) configuration.  See domainname(1), ypserv(1m) #
root@hpeos004[dns]
To start the daemon, we can simply run the named program itself or use the startup script:
root@hpeos004[dns] /sbin/init.d/named start
named  root@hpeos004[dns]
root@hpeos004[dns]
Just to make sure that basic functionality is up and running, we can use the rndc utility:
root@hpeos004[dns] rndc status
number of zones: 6
debug level: 0
xfers running: 0
xfers deferred: 0
soa queries in progress: 0
query logging is OFF
server is up and running
root@hpeos004[dns]
It's always worth checking the daemon messages from syslog to ensure that all is working as you expect. In my configuration, syslog is sending daemon messages to a file called netdaemon.log:
root@hpeos004[dns] more /etc/syslog.conf
# @(#)B.11.11_LR
#
# syslogd configuration file.
#
# See syslogd(1M) for information about the format of this file.
#
daemon.debug            /var/adm/syslog/netdaemon.log
mail.debug              /var/adm/syslog/mail.log
*.info;mail.none;daemon.none    /var/adm/syslog/syslog.log
auth.debug              /var/adm/syslog/auth_debug.log
*.alert                 /dev/console
*.alert                 root
*.emerg                 *
root@hpeos004[dns]
I want to check the netdaemon.log file to ensure that the named daemon is up and running and that there are no untoward messages. Here is an extract:
root@hpeos004[dns] more /var/adm/syslog/netdaemon.log
...
Oct 21 15:58:33 hpeos004 named[5264]: starting BIND 9.2.0
Oct 21 15:58:33 hpeos004 named[5264]: using 1 CPU
Oct 21 15:58:33 hpeos004 named[5264]: loading configuration from '/etc/named.conf'
Oct 21 15:58:33 hpeos004 named[5264]: listening on IPv6 interfaces, port 53
Oct 21 15:58:33 hpeos004 named[5264]: could not listen on UDP socket: address in use
Oct 21 15:58:33 hpeos004 named[5264]: listening on IPv6 interfaces failed
Oct 21 15:58:33 hpeos004 named[5264]: not listening on any interfaces
Oct 21 15:58:33 hpeos004 named[5264]: command channel listening on 127.0.0.1#953
Oct 21 15:58:33 hpeos004 named[5264]: zone 0.0.127.IN-ADDR.ARPA/IN: loaded serial 1
Oct 21 15:58:33 hpeos004 named[5264]: zone 168.192.IN-ADDR.ARPA/IN: loaded serial 1
Oct 21 15:58:33 hpeos004 named[5264]: zone maabof.com/IN: loaded serial 2
Oct 21 15:58:33 hpeos004 named[5264]: zone IP6.INT/IN: loaded serial 1
Oct 21 15:58:33 hpeos004 named[5264]: running
There appears to be a problem with named listening on any interface. I tried adding the line listen-on { any; }; into my /etc/named.conf file to no avail. Normally, this error means that another program has port 53 open (possibly an old named process). I have used various tools (lsof, a contributed utility) to check whether this port is open. It isn't. After much digging around, at the time of this writing, there appears to be a problem with named and a device /dev/ip6. I tried loading all the current ARPA/Streams patches, but still the problem persists. I checked the various HP Web sites, but there doesn't seem to be a fix for it at present. Throughout this book, I have always worked through my examples to ensure that what I am telling you works. At this point, I am going to have to introduce a workaround for this problem. I am sure that, by the time you read this, there will be a fix for this problem. Here's the workaround. I rename the device /dev/ip6.
root@hpeos004[dns] mv /dev/ip6 /dev/ip6.old
root@hpeos004[dns]
This will have an impact on the functioning of my IPv6 stack. I am willing to take that hit at the moment. Can I now start up named?
root@hpeos004[dns] /sbin/init.d/named start
named  root@hpeos004[dns]
root@hpeos004[dns] more /var/adm/syslog/netdaemon.log
...
Oct 21 19:32:01 hpeos004 named[17641]: starting BIND 9.2.0
Oct 21 19:32:01 hpeos004 named[17641]: using 1 CPU
Oct 21 19:32:01 hpeos004 named[17641]: loading configuration from '/etc/named.conf'
Oct 21 19:32:01 hpeos004 named[17641]: no IPv6 interfaces found
Oct 21 19:32:01 hpeos004 named[17641]: listening on IPv4 interface lan1, 192.168.0.66#53
Oct 21 19:32:01 hpeos004 named[17641]: listening on IPv4 interface lan0, 192.168.0.35#53
Oct 21 19:32:01 hpeos004 named[17641]: listening on IPv4 interface lo0, 127.0.0.1#53
Oct 21 19:32:01 hpeos004 named[17641]: command channel listening on 127.0.0.1#953
Oct 21 19:32:01 hpeos004 named[17641]: zone 0.0.127.IN-ADDR.ARPA/IN: loaded serial 1
Oct 21 19:32:01 hpeos004 named[17641]: zone 168.192.IN-ADDR.ARPA/IN: loaded serial 2
Oct 21 19:32:01 hpeos004 named[17641]: zone maabof.com/IN: loaded serial 2
Oct 21 19:32:01 hpeos004 named[17641]: zone IP6.INT/IN: loaded serial 2
Oct 21 19:32:01 hpeos004 named[17641]: running
Oct 21 19:32:01 hpeos004 named[17641]: zone 0.0.127.IN-ADDR.ARPA/IN: sending notifies (serial 1)
Oct 21 19:32:01 hpeos004 named[17641]: zone IP6.INT/IN: sending notifies (serial 2)
Oct 21 19:32:01 hpeos004 named[17641]: zone maabof.com/IN: sending notifies (serial 2)
Oct 21 19:32:01 hpeos004 named[17641]: zone 168.192.IN-ADDR.ARPA/IN: sending notifies (serial 2)
root@hpeos004[dns]
This appears to be okay now and underscores the importance of checking the output from syslog. If I had not made sure that all was working properly, my slave servers would not have received any updates because named wasn't listening on any of my network interfaces for requests for updates to the DNS resource records. I can now proceed with setting up the resolver configuration files.
The resolver configuration files are /etc/nsswitch.conf and /etc/resolv.conf. Only the /etc/resolv.conf file is required because the /etc/nsswitch.conf file has a default behavior whereby a DNS server will be queried if available. Here is my /etc/resolv.conf file:
root@hpeos004[dns] cat /etc/resolv.conf
domain maabof.com
search maabof.com
nameserver 192.168.0.35
root@hpeos004[dns]
Notice that I have used the domain and the search keyword. I like to mention both because it reminds me that I can modify the commonly searched domains for a particular hostname (the searchlist). This can be useful for users who communicate with machines in different domains while only specifying the hostname component of the FQDN. I always specify the domain keyword at least, because there are some utilities (HP's Service Control Manager, for example) that complain if they cannot determine the DNS domain name.
Notice also that I have only listed one name server IP address. I could have listed both of my IP addresses, but because the maximum number of listed name servers is only three, I will not use up an entry for a machine that is multi-homed.
I decided to set up my /etc/nsswitch.conf file because I do not have NIS and hence do not want to reference it in any way:
root@hpeos004[dns] cat /etc/nsswitch.conf
ipnodes: dns [ NOTFOUND=continue ] files
hosts: dns [ NOTFOUND=continue ] files
root@hpeos004[dns]
The ipnodes entry is required to resolve IPv6 addresses.
We can still use commands like nslookup and nsquery to test that DNS is functioning as required:
root@hpeos004[dns] nslookup -type=AAAA hpeos004
Name Server:  hpeos004.maabof.com
Address:  192.168.0.35

Trying DNS
Name:    hpeos004.maabof.com
Addresses:  fe80::230:6eff:fe5c:4f4f, fe80::a00:9ff:febb:bbbb, fec0:0:0:1::2, fec0:0:0:2::2

root@hpeos004[dns]
However, there is a new command, dig (Domain Information Groper), that supports all the new address formats (AAAA records are the old format for a IPv6 address; the new format is an A6 record) and does not have any of the behavioral peculiarities that nslookup exhibited (nslookup doesn't know what an A6 record is):
root@hpeos004[dns] dig hpeos004.maabof.com a6

; <<>> DiG named 9.2.0 <<>> hpeos004.maabof.com a6
;; global options:  printcmd
;; Got answer:
;; ->>HEADER<<- opcode: QUERY, status: NOERROR, id: 33475
;; flags: qr aa rd ra; QUERY: 1, ANSWER: 4, AUTHORITY: 1, ADDITIONAL: 6

;; QUESTION SECTION:
;hpeos004.maabof.com.           IN      A6

;; ANSWER SECTION:
hpeos004.maabof.com.    86400   IN      A6      0 fec0:0:0:2::2
hpeos004.maabof.com.    86400   IN      A6      0 fe80::230:6eff:fe5c:4f4f
hpeos004.maabof.com.    86400   IN      A6      0 fe80::a00:9ff:febb:bbbb
hpeos004.maabof.com.    86400   IN      A6      0 fec0:0:0:1::2

;; AUTHORITY SECTION:
maabof.com.             86400   IN      NS      hpeos004.maabof.com.

;; ADDITIONAL SECTION:
hpeos004.maabof.com.    86400   IN      A       192.168.0.66
hpeos004.maabof.com.    86400   IN      A       192.168.0.35
hpeos004.maabof.com.    86400   IN      AAAA    fec0:0:0:1::2
hpeos004.maabof.com.    86400   IN      AAAA    fec0:0:0:2::2
hpeos004.maabof.com.    86400   IN      AAAA    fe80::230:6eff:fe5c:4f4f
hpeos004.maabof.com.    86400   IN      AAAA    fe80::a00:9ff:febb:bbbb

;; Query time: 2 msec
;; SERVER: 192.168.0.35#53(192.168.0.35)
;; WHEN: Mon Oct 21 19:53:45 2003
;; MSG SIZE  rcvd: 311

root@hpeos004[dns]
You don't need to supply a record type on the command line if you don't want to because it will default to a record type A=Address:
root@hpeos004[dns] dig hpeos004.maabof.com

; <<>> DiG named 9.2.0 <<>> hpeos004.maabof.com
;; global options:  printcmd
;; Got answer:
;; ->>HEADER<<- opcode: QUERY, status: NOERROR, id: 353
;; flags: qr aa rd ra; QUERY: 1, ANSWER: 2, AUTHORITY: 1, ADDITIONAL: 8

;; QUESTION SECTION:
;hpeos004.maabof.com.           IN      A

;; ANSWER SECTION:
hpeos004.maabof.com.    86400   IN      A       192.168.0.66
hpeos004.maabof.com.    86400   IN      A       192.168.0.35

;; AUTHORITY SECTION:
maabof.com.             86400   IN      NS      hpeos004.maabof.com.

;; ADDITIONAL SECTION:
hpeos004.maabof.com.    86400   IN      A6      0 fec0:0:0:1::2
hpeos004.maabof.com.    86400   IN      A6      0 fec0:0:0:2::2
hpeos004.maabof.com.    86400   IN      A6      0 fe80::230:6eff:fe5c:4f4f
hpeos004.maabof.com.    86400   IN      A6      0 fe80::a00:9ff:febb:bbbb
hpeos004.maabof.com.    86400   IN      AAAA    fe80::230:6eff:fe5c:4f4f
hpeos004.maabof.com.    86400   IN      AAAA    fe80::a00:9ff:febb:bbbb
hpeos004.maabof.com.    86400   IN      AAAA    fec0:0:0:1::2
hpeos004.maabof.com.    86400   IN      AAAA    fec0:0:0:2::2

;; Query time: 70 msec
;; SERVER: 192.168.0.35#53(192.168.0.35)
;; WHEN: Mon Oct 21 19:54:29 2003
;; MSG SIZE  rcvd: 311

root@hpeos004[dns]
It is a powerful tool, but some of the more esoteric features do take a little bit of getting used to.
As we can see, regardless of which tool we use, hostname lookup via DNS seems to be working as expected. We would now set up the resolver configuration files on all of our network clients to reference our new name server.
Finally, let me make a quick mention of the rndc utility again. The sig_named command allowed us to extract statistics and dump the name server cache using options like stats and dump. The rndc utility has similar functionality. I won't bore you with all the details except to direct you to the man pages and to point out that rndc will create appropriately named files in the running directory (/etc/dns in our case), as specified in the /etc/named.conf file.
root@hpeos004[dns] rndc stats
root@hpeos004[dns] ll named.stats
-rw-r--r--   1 root       root           140 Oct 21 19:55 named.stats
root@hpeos004[dns] more named.stats
+++ Statistics Dump +++ (1066722959)
success 406
referral 0
nxrrset 2
nxdomain 1
recursion 4
failure 4
--- Statistics Dump --- (1066722959)
root@hpeos004[dns]
Having a single name server on a network is never a good idea because you immediately have a Single Point Of Failure (SPOF). In fact, when setting up a registered domain, if you are specifying your own name servers, you need to supply at least two name servers, at least one of which will probably be a backup or slave server. A slave server has resource records, which it receives initially from the master server. There is an option for a slave server to keep those resource records in local files. This will speed up the time it takes the slave to get up and running instead of performing a zone transfer from the master every time it starts up. This is my preferred option, because it doesn't take much to promote a slave server to a master server if you have the database files already located on the slave. The configuration files we need for the slave servers are already located on the master. We created them with the –z|Z options in the master's parameter file. The files I am interested in are the conf* files:
root@hpeos004[dns] ll
total 56
-rw-------    1 root       sys      111 Oct 21 15:26 Krndc.+157+65409.key
-rw-------    1 root       sys      145 Oct 21 15:26 Krndc.+157+65409.private
-rw-rw-r--   1 root       sys     146 Oct 20 15:54 boot.cacheonly
-rw-rw-r--   1 root       sys     296 Oct 20 17:49 boot.sec
-rw-rw-r--   1 root       sys     328 Oct 20 17:49 boot.sec.save
-rw-rw-r--   1 root       sys     180 Oct 20 17:49 conf.cacheonly
-rw-rw-r--   1 root       sys     457 Oct 20 17:49 conf.sec
-rw-rw-r--   1 root       sys     498 Oct 20 17:49 conf.sec.save
-rw-rw-r--   1 root       sys     277 Oct 20 15:54 db.127.0.0
-rw-rw-r--   1 root       sys    2138 Oct 20 17:49 db.192.168
-rw-rw-r--   1 root       sys    1361 Oct 20 17:49 db.IP6.INT
-rw-rw-r--   1 root       sys    2499 Oct 20 15:54 db.cache
-rw-rw-r--   1 root       sys    6884 Oct 20 17:49 db.maabof
-rw-rw-r--   1 root       sys     247 Oct 20 15:54 named.boot
-rw-r--r--   1 root       root    140 Oct 21 08:55 named.stats
-rw-rw-r--   1 root       sys     108 Oct 20 15:46 param.conf
root@hpeos004[dns]
The conf.sec and conf.sec.save files should be the same, except the conf.sec.save files specifies a filename in the zone definition allowing the slave to store the resource records in a disk file:
root@hpeos004[dns] cat conf.sec.save
#
# type domain source file
#

options {
        directory "/etc/dns";
};

zone "0.0.127.IN-ADDR.ARPA" {
        type master;
        file "db.127.0.0";
};

zone "IP6.INT" {
        type slave;
        file "db.IP6.INT";
        masters {
                192.168.0.35;
                192.168.0.66;
        };
};

zone "maabof.com" {
        type slave;
        file "db.maabof";
        masters {
                192.168.0.35;
                192.168.0.66;
        };
};

zone "168.192.IN-ADDR.ARPA" {
        type slave;
        file "db.192.168";
        masters {
                192.168.0.35;
                192.168.0.66;
        };
};

zone "." {
        type hint;
        file "db.cache";
};
root@hpeos004[dns]
I need to copy this file onto my slave server along with the file db.127.0.0 and db.cache. It makes sense to use the same running directory /etc/dns:
root@hpeos002[dns] # ll
total 4
-rw-rw-r--   1 root       sys            498 Oct 22 02:16 conf.sec.save
-rw-rw-r--   1 root       sys            277 Oct 22 02:16 db.127.0.0
-rw-rw-r--   1 root       sys            134 Oct 22 02:16 db.cache
root@hpeos002[dns] #
I am going to set up TSIG keys as we did on the master:
root@hpeos002[dns] # dnssec-keygen -a hmac-md5 -b 512 -n user -r /dev/random rndc
Krndc.+157+23025
root@hpeos002[dns] # ll K*
-rw-------   1 root       sys       111 Oct 22 02:18 Krndc.+157+23025.key
-rw-------   1 root       sys       145 Oct 22 02:18 Krndc.+157+23025.private
root@hpeos002[dns] #
I will update the conf.sec.save file with the key and controls directives as I did on the master. Once it's complete, I will rename this file /etc/named.conf. I need to remember to set up the /etc/rndc.conf file as well:
root@hpeos002[dns] # cat /etc/named.conf
#
# type domain source file
#

options {
        directory "/etc/dns";
        listen-on { any; };
        listen-on-v6 { any; };
        random-device "/dev/random";
};

key TSIGkey {
        algorithm "hmac-md5";
        secret "GqiPdwKUww6VdZoJFmYSR8bFlQEuwtZL5PQ6UwCs39n/maNFpBCZPu8QJmL8Ncpad5g4HlSCHNh4QYNDISs0zg==";
        };

controls {
        inet 127.0.0.1 allow { 127.0.0.1; } keys { TSIGkey; };
        };

zone "0.0.127.IN-ADDR.ARPA" {
        type master;
        file "db.127.0.0";
};

zone "IP6.INT" {
        type slave;
        file "db.IP6.INT";
        masters {
                192.168.0.35;
                192.168.0.66;
        };
};

zone "maabof.com" {
        type slave;
        file "db.maabof";
        masters {
                192.168.0.35;
                192.168.0.66;
        };
};

zone "168.192.IN-ADDR.ARPA" {
        type slave;
        file "db.192.168";
        masters {
                192.168.0.35;
                192.168.0.66;
        };
};

zone "." {
        type hint;
        file "db.cache";
};
root@hpeos002[dns] #
root@hpeos002[dns] # named-checkconf
root@hpeos002[dns] #
root@hpeos002[dns] # cat /etc/rndc.conf
options {
        default-server  localhost;
        default-key     TSIGkey;
        };

server localhost {
        key TSIGkey;
        };

key TSIGkey {
        algorithm "hmac-md5";
        secret "GqiPdwKUww6VdZoJFmYSR8bFlQEuwtZL5PQ6UwCs39n/maNFpBCZPu8QJmL8Ncpad5g4HlSCHNh4QYNDISs0zg==";
        };

root@hpeos002[dns] #
I will check for the existence of the /dev/ip6 device that plagued my efforts to start up the named daemon on my master server.
root@hpeos002[dns] # ll /dev/ip6
crw-rw-rw-   1 root       root        72 0x00003a Oct 21 18:58 /dev/ip6
root@hpeos002[dns] # mv /dev/ip6 /dev/ip6.old
root@hpeos002[dns] #
This should have sorted out that problem. When I start up the named daemon, a zone transfer should start whereby the slave will receive all the resource records and store them in local files. This may take a few minutes to complete, depending on the speed of the network, the speed of the machines, and the number of queries being sent to the master currently.
root@hpeos002[dns] # vi /etc/rc.config.d/namesvrs
unset UNIX95
PRE_U95=true;export PRE_U95;

##############################################
# named (BIND) configuration. See named(1m). #
##############################################
#
#  Name server using the Domain Name System (DNS) protocol (RFC 1034/1035)
#
# @(#)B.11.11_LR
#
# NAMED:      Set to 1 to start nameserver daemon.
# NAMED_ARGS: Arguments to the nameserver daemon
#
#  Configuration of a named boot file (e.g., /etc/named.boot) is needed
#  for successful operation of the name server.
#
NAMED=1
NAMED_ARGS=""
...
root@hpeos002[dns] # /sbin/init.d/named start
named  root@hpeos002[dns] #
I will check that named started up okay, ensuring that it is listening on all the appropriate interfaces:
root@hpeos002[dns] # more /var/adm/syslog/netdaemon.log
...
Oct 22 02:11:50 hpeos002 named[4287]: starting BIND 9.2.0
Oct 22 02:11:50 hpeos002 named[4287]: using 1 CPU
Oct 22 02:11:50 hpeos002 named[4287]: loading configuration from '/etc/named.conf'
Oct 22 02:11:50 hpeos002 named[4287]: no IPv6 interfaces found
Oct 22 02:11:50 hpeos002 named[4287]: listening on IPv4 interface lan0, 192.168.0.34#53
Oct 22 02:11:50 hpeos002 named[4287]: listening on IPv4 interface lo0, 127.0.0.1#53
Oct 22 02:11:51 hpeos002 named[4287]: command channel listening on 127.0.0.1#953
Oct 22 02:11:51 hpeos002 named[4287]: zone 0.0.127.IN-ADDR.ARPA/IN: loaded serial 1
Oct 22 02:11:51 hpeos002 named[4287]: zone 168.192.IN-ADDR.ARPA/IN: loaded serial 1
Oct 22 02:11:51 hpeos002 named[4287]: zone maabof.com/IN: loaded serial 1
Oct 22 02:11:51 hpeos002 named[4287]: zone IP6.INT/IN: loaded serial 1
Oct 22 02:11:51 hpeos002 named[4287]: running
Oct 22 02:11:51 hpeos002 named[4287]: zone 168.192.IN-ADDR.ARPA/IN: sending notifies (serial 1)
Oct 22 02:11:51 hpeos002 named[4287]: zone maabof.com/IN: sending notifies (serial 1)
Oct 22 02:11:51 hpeos002 named[4287]: zone IP6.INT/IN: sending notifies (serial 1)
Oct 22 02:11:51 hpeos002 named[4287]: zone 168.192.IN-ADDR.ARPA/IN: transfered serial 2
Oct 22 02:11:51 hpeos002 named[4287]: transfer of '168.192.IN-ADDR.ARPA/IN' from 192.168.0.35#53: end of transfer
Oct 22 02:11:51 hpeos002 named[4287]: zone 168.192.IN-ADDR.ARPA/IN: sending notifies (serial 2)
Oct 22 02:11:52 hpeos002 named[4287]: zone maabof.com/IN: transfered serial 2
Oct 22 02:11:52 hpeos002 named[4287]: transfer of 'maabof.com/IN' from 192.168.0.35#53: end of transfer
Oct 22 02:11:52 hpeos002 named[4287]: zone maabof.com/IN: sending notifies (serial 2)
Oct 22 02:11:52 hpeos002 named[4287]: zone IP6.INT/IN: transfered serial 2
Oct 22 02:11:52 hpeos002 named[4287]: transfer of 'IP6.INT/IN' from 192.168.0.35#53: end of transfer
Oct 22 02:11:52 hpeos002 named[4287]: zone IP6.INT/IN: sending notifies (serial 2)
root@hpeos002[dns] #
The zone transfer should have taken place:
root@hpeos002[dns] #
root@hpeos002[dns] # ll
total 34
-rw-------   1 root       sys   111 Oct 22 02:18 Krndc.+157+23025.key
-rw-------   1 root       sys   145 Oct 22 02:18 Krndc.+157+23025.private
-rw-rw-r--   1 root       sys   277 Oct 22 02:16 db.127.0.0
-rw-------   1 root       sys  2138 Oct 22 02:30 db.192.168
-rw-------   1 root       sys  1361 Oct 22 02:30 db.IP6.INT
-rw-rw-r--   1 root       sys  2499 Oct 22 02:16 db.cache
-rw-------   1 root       sys  6884 Oct 22 02:30 db.maabof
root@hpeos002[dns] #
NOTE: At this time, it may be prudent to update all clients on the network to reference the slave server so that we can, if necessary, take down the master server without affecting resolver capabilities:
root@hpeos002[dns] # cat /etc/resolv.conf
domain maabof.com
search maabof.com
nameserver 192.168.0.34 # slave
nameserver 192.168.0.35 # master
root@hpeos002[dns] #
root@hpeos002[dns] # cat /etc/nsswitch.conf
ipnodes: dns [ NOTFOUND=continue ] files
hosts: dns [ NOTFOUND=continue ] files
root@hpeos002[dns] #
root@hpeos002[dns] # nsquery hosts frog001

Using "dns [ NOTFOUND=continue ] files" for the hosts policy.
Searching dns for frog001
Hostname: frog001.maabof.com
Aliases:
Address: 192.168.0.1
Switch configuration: Terminates Search
root@hpeos002[dns] #
This slave server is now authoritative for the domain maabof.com. When we registered this domain, we had to supply the names and IP addresses of at least two name servers. If we knew this up front, it would have made a difference to the parameter file /etc/dns/param.conf that we created on the master server. I have left out this part of the configuration until now. In the database files we created, there is only one NS (name server) record for this domain when, in fact, there are at least two servers that are authoritative.
root@hpeos004[dns] more db.maabof
$TTL    86400
@       IN      SOA     hpeos004.maabof.com. root.hpeos004.maabof.com. (
                                        1       ; Serial
                                        10800   ; Refresh every 3 hours
                                        3600    ; Retry every hour
                                        604800  ; Expire after a week
                                        86400 ) ; Minimum ttl of 1 day
        IN      NS      hpeos004.maabof.com.

localhost       IN      A       127.0.0.1
hpeos001        IN      A       192.168.0.67
...
root@hpeos004[dns]
We need to register only two servers with the Internet authorities. It is these servers that will receive queries from sources external to our domain. We can have many more slave servers within our domain, possibly to alleviate the pressure from our two official servers. We can list in our param.conf file all servers that are authoritative for this zone. In this way, we will create database files that have an NS record referencing them all. Here's what my new param.conf file will look like on my master server:
root@hpeos004[dns] cat param.conf
-d maabof.com
-n 192.168
-Z 192.168.0.35
-Z 192.168.0.66
-z 192.168.0.35
-z 192.168.0.66
-m 10:hpeos003
-s hpeos004
-s hpeos002
-b /etc/named.conf
root@hpeos004[dns]
All my authoritative servers are now listed. When I come to rebuild my database files, I will see both servers listed.
root@hpeos004[dns] hosts_to_named -f param.conf
Translating /etc/hosts to lower case ...
Collecting network data ...
        192.168
Creating list of multi-homed hosts ...
Creating "A" data (name to address mapping) for net 192.168 ...
Creating "PTR" data (address to name mapping) for net 192.168 ...
Creating "MX" (mail exchanger) data ...
Building default boot.sec.save for secondary servers ...
Building default boot.sec for secondary servers ...
done
root@hpeos004[dns]
root@hpeos004[dns] more db.192.168
$TTL    86400
@       IN      SOA     hpeos004.maabof.com. root.hpeos004.maabof.com. (
                                        2       ; Serial
                                        10800   ; Refresh every 3 hours
                                        3600    ; Retry every hour
                                        604800  ; Expire after a week
                                        86400 ) ; Minimum ttl of 1 day
        IN      NS      hpeos004.maabof.com.
        IN      NS      hpeos002.maabof.com.

67.0    IN      PTR     hpeos001.maabof.com.
34.0    IN      PTR     hpeos002.maabof.com.
65.0    IN      PTR     hpeos003.maabof.com.
33.0    IN      PTR     hpeos003.maabof.com.
35.0    IN      PTR     hpeos004.maabof.com.
66.0    IN      PTR     hpeos004.maabof.com.
67.0    IN      PTR     hpeos001.maabof.com.
34.0    IN      PTR     hpeos002.maabof.com.
65.0    IN      PTR     hpeos003.maabof.com.
33.0    IN      PTR     hpeos003.maabof.com.
35.0    IN      PTR     hpeos004.maabof.com.
66.0    IN      PTR     hpeos004.maabof.com.
...
root@hpeos004[dns]
Now we just need to reload the named daemon on both machines with the new database files. (I will use the good old-fashioned sig_named command. You could find an option to rndc to do this.)
root@hpeos004[dns] sig_named restart
Name server restarted
root@hpeos004[dns]
...
root@hpeos002[dns] sig_named restart
Name server restarted
root@hpeos002[dns]
Now we can see that both servers are listed with an NS record. Now we can say that hpeos002 is authoritative for this zone:
root@hpeos002[dns] # dig maabof.com NS

; <<>> DiG named 9.2.0 <<>> maabof.com NS
;; global options:  printcmd
;; Got answer:
;; ->>HEADER<<- opcode: QUERY, status: NOERROR, id: 22690
;; flags: qr aa rd ra; QUERY: 1, ANSWER: 2, AUTHORITY: 0, ADDITIONAL: 15

;; QUESTION SECTION:
;maabof.com.                    IN      NS

;; ANSWER SECTION:
maabof.com.             86400   IN      NS      hpeos004.maabof.com.
maabof.com.             86400   IN      NS      hpeos002.maabof.com.

;; ADDITIONAL SECTION:
hpeos002.maabof.com.    86400   IN      A       192.168.0.34
hpeos002.maabof.com.    86400   IN      A6      0 fec0:0:0:2::3
hpeos002.maabof.com.    86400   IN      A6      0 fe80::a00:9ff:fec2:69c6
hpeos002.maabof.com.    86400   IN      AAAA    fec0:0:0:2::3
hpeos002.maabof.com.    86400   IN      AAAA    fe80::a00:9ff:fec2:69c6
hpeos004.maabof.com.    86400   IN      A       192.168.0.35
hpeos004.maabof.com.    86400   IN      A       192.168.0.66
hpeos004.maabof.com.    86400   IN      A6      0 fec0:0:0:1::2
hpeos004.maabof.com.    86400   IN      A6      0 fec0:0:0:2::2
hpeos004.maabof.com.    86400   IN      A6      0 fe80::230:6eff:fe5c:4f4f
hpeos004.maabof.com.    86400   IN      A6      0 fe80::a00:9ff:febb:bbbb
hpeos004.maabof.com.    86400   IN      AAAA    fec0:0:0:1::2
hpeos004.maabof.com.    86400   IN      AAAA    fec0:0:0:2::2
hpeos004.maabof.com.    86400   IN      AAAA    fe80::230:6eff:fe5c:4f4f
hpeos004.maabof.com.    86400   IN      AAAA    fe80::a00:9ff:febb:bbbb

;; Query time: 112 msec
;; SERVER: 192.168.0.34#53(192.168.0.34)
;; WHEN: Tue Oct 22 02:52:32 2003
;; MSG SIZE  rcvd: 464

root@hpeos002[dns] #
The changes I made to the database files could have been performed by hand as long as I remembered to update the Serial number to signify that a change has occurred and ensure that I updated all the database files:
root@hpeos002[dns] # more db.IP6.INT
$ORIGIN .
$TTL 86400      ; 1 day
IP6.INT                 IN SOA  hpeos004.maabof.com. root.hpeos004.maabof.com. (
                                2          ; serial
                                10800      ; refresh (3 hours)
                                3600       ; retry (1 hour)
                                604800     ; expire (1 week)
                                86400      ; minimum (1 day)
                                )
                        NS      hpeos002.maabof.com.
                        NS      hpeos004.maabof.com.
$ORIGIN IP6.INT.
$ORIGIN e.f.IP6.INT.
$ORIGIN 0.0.0.0.0.0.0.0.0.0.0.0.0.0.8.e.f.IP6.INT.
$ORIGIN e.f.f.f.e.6.0.3.2.0.0.0.0.0.0.0.0.0.0.0.0.0.0.8.e.f.IP6.INT.
0.f.b.7.6.4             PTR     hpeos003.maabof.com.
$ORIGIN c.5.e.f.f.f.e.6.0.3.2.0.0.0.0.0.0.0.0.0.0.0.0.0.0.8.e.f.IP6.INT.
8.f.f.3                 PTR     hpeos003.maabof.com.
f.4.f.4                 PTR     hpeos004.maabof.com.
$ORIGIN 0.0.0.0.0.0.0.0.0.0.0.0.0.0.8.e.f.IP6.INT.
$ORIGIN e.f.f.f.9.0.0.0.a.0.0.0.0.0.0.0.0.0.0.0.0.0.0.8.e.f.IP6.INT.
$ORIGIN b.e.f.f.f.9.0.0.0.a.0.0.0.0.0.0.0.0.0.0.0.0.0.0.8.e.f.IP6.INT.
b.1.4.8.a               PTR     hpeos001.maabof.com.
..
root@hpeos002[dns] #
This type of server will not load any zone records from the master but will simply build up a cache of resource records whenever it is asked to resolve a query. Consequently, the named.conf file is simple; we use the conf.cacheonly file from the master server:
root@hpeos004[dns] cat conf.cacheonly
#
# type domain source file
#

options {
        directory "/etc/dns";
};

zone "0.0.127.IN-ADDR.ARPA" {
        type master;
        file "db.127.0.0";
};

zone "." {
        type hint;
        file "db.cache";
};
root@hpeos004[dns]
We would take these files, the db.cache file and the db.127.0.0 file, onto our caching-only server and then start named as before. Whenever a query was made, the caching-only server would have no other choice but to query a root name server and eventually be bounced down to our own master/slave servers themselves.
Delegation is the process whereby a name server relinquishes responsibility for the resource records for a zone. Responsibility is delegated to another name server, which becomes authoritative for that zone. The name server(s) performing the delegation needs to know the name server(s) that will be authoritative for the delegated zone. I say name server(s) because, like any other domain, this delegated subdomain should have at least two name servers configured, a master and at least one slave. The process of delegation can be summarized as follows:
Help the new master name server set up an appropriate hosts file.
Set up the delegated master name server.
Set up the delegated slave server.
Configure delegated clients to reference delegated name servers.
Make alias (CNAME) names for all delegated hostnames (optional).
Reference the delegated name server(s) in the name server database files.
Consider setting up a
forwardersentry in the delegated domains/etc/named.conffile.
Let's go through this process of delegating responsibility for all machines in the HQ subdomain of maabof.com.
What I am thinking here is to copy all the hostname/IP addresses for the HQ domain into a separate file. We could forward that on to the new master name server:
root@hpeos004[dns] cat /etc/hosts.hq
# @(#)B.11.11_LRhosts $Revision: 1.9.214.1 $ $Date: 96/10/08 13:20:01 $
#
# The form for each entry is:
# <internet address>    <official hostname> <aliases>
#
# For example:
# 192.1.2.34    hpfcrm  loghost
#
# See the hosts(4) manual page for more information.
# Note: The entries cannot be preceded by a space.
#       The format described in this file is the correct format.
#       The original Berkeley manual page contains an error in
#       the format description.
#

192.168.0.67    hpeos001.maabof.com     hpeos001   #[no smtp]
192.168.0.65    hpeos003.maabof.com     hpeos003 hp003_lan1  #[no smtp]
192.168.0.33    hpeos003.maabof.com     hpeos003 hp003_lan0  #[no smtp]

::ffff:192.168.0.67     hpeos001.maabof.com     hpeos001   #[no smtp]
::ffff:192.168.0.65     hpeos003.maabof.com     hpeos003 hp003_lan1  #[no smtp]
::ffff:192.168.0.33     hpeos003.maabof.com     hpeos003 hp003_lan0  #[no smtp]

fec0:0:0:1::3   hpeos001.maabof.com     hpeos001 hp1v6  #[no smtp]
fec0:0:0:1::1   hpeos003.maabof.com     hpeos003 hp3v6 hp3v6_lan0 #[no smtp]
fec0:0:0:2::1   hpeos003.maabof.com     hpeos003 hp3v6 hp3v6_lan1 #[no smtp]

fe80::a00:9ff:feba:841b hpeos001.maabof.com     hpeos001 hp1v6  #[no smtp]
fe80::230:6eff:fe46:7bf0        hpeos003.maabof.com     hpeos003 hp3v6 hp3v6_lan1 #[no smtp]
fe80::230:6eff:fe5c:3ff8        hpeos003.maabof.com     hpeos003 hp3v6 hp3v6_lan0 #[no smtp]

192.168.0.21    hq021.maabof.com        hq021   #[no smtp]
192.168.0.22    hq022.maabof.com        hq022   #[no smtp]
192.168.0.23    hq023.maabof.com        hq023   #[no smtp]
192.168.0.24    hq024.maabof.com        hq024   #[no smtp]
192.168.0.25    hq025.maabof.com        hq025   #[no smtp]
192.168.0.26    hq026.maabof.com        hq026   #[no smtp]
192.168.0.27    hq027.maabof.com        hq027   #[no smtp]
192.168.0.28    hq028.maabof.com        hq028   #[no smtp]
192.168.0.29    hq029.maabof.com        hq029   #[no smtp]
192.168.0.30    hq030.maabof.com        hq030   #[no smtp]
127.0.0.1       localhost.maabof.com    localhost       loopback #[no smtp]
root@hpeos004[dns]
The delegated master server will need to work with this file to change the domain name to be hq.maabof.com. We need to establish the delegated name servers before proceeding any further.
We need to go through the entire process of setting up the master server as we did for the parent domain. I won't go through the entire process here because it's similar to setting up the parent master server. Initially, I would take the /etc/hosts.hq file and transform the domain name into hp.maabof.com. From there, I would continue to set up the master server as before. I used the same process to set up this master server as before: I even used the same running directory: /etc/dns, although this is obviously not necessary. Here is the parameter file for my delegated master server:
root@hpeos003[dns] cat param.conf
-d hq.maabof.com
-n 192.168
-Z 192.168.0.65
-Z 192.168.0.33
-z 192.168.0.65
-z 192.168.0.33
-m 10:hpeos003
-s hpeos003
-s hpeos001
-b /etc/named.conf
root@hpeos003[dns]
Here's the resulting /etc/named.conf file updated with my key information so I can use Transaction Signatures:
root@hpeos003[dns] cat /etc/named.conf
#
# type domain source file
#

options {
        directory "/etc/dns";
        listen-on { any; };
        listen-on-v6 { any; };
        random-device "/dev/random";
};

key TSIGkey {
        algorithm "hmac-md5";
        secret "1vK7G+mGTOLFCrBCqpIq6A5lLOqf3A1u9MFJ6+5ih/dCDgoIkyc+oa0d2N36LgoA
OZIKnUEOSBAj/krrFgiOAw==";
        };

controls {
        inet 127.0.0.1 allow { 127.0.0.1; } keys { TSIGkey; };
        };

zone "0.0.127.IN-ADDR.ARPA" {
        type master;
        file "db.127.0.0";
zone "0.0.127.IN-ADDR.ARPA" {
        type master;
        file "db.127.0.0";
};

zone "IP6.INT" {
        type master;
        file "db.IP6.INT";
};

zone "hq.maabof.com" {
        type master;
        file "db.hq";
};

zone "168.192.IN-ADDR.ARPA" {
        type master;
        file "db.192.168";
};

zone "." {
        type hint;
        file "db.cache";
};
root@hpeos003[dns]
As you can see, the process is very similar to setting up our parent master server. Once it has been set up, we should have a fully functioning name server.
root@hpeos003[dns] dig hq.maabof.com NS
; <<>> DiG named 9.2.0 <<>> hq.maabof.com NS
;; global options:  printcmd
;; Got answer:
;; ->>HEADER<<- opcode: QUERY, status: NOERROR, id: 9317
;; flags: qr aa rd ra; QUERY: 1, ANSWER: 2, AUTHORITY: 0, ADDITIONAL: 15

;; QUESTION SECTION:
;hq.maabof.com.                 IN      NS

;; ANSWER SECTION:
hq.maabof.com.          86400   IN      NS      hpeos001.hq.maabof.com.
hq.maabof.com.          86400   IN      NS      hpeos003.hq.maabof.com.

;; ADDITIONAL SECTION:
hpeos001.hq.maabof.com. 86400   IN      A       192.168.0.67
hpeos001.hq.maabof.com. 86400   IN      A6      0 fe80::a00:9ff:feba:841b
hpeos001.hq.maabof.com. 86400   IN      A6      0 fec0:0:0:1::3
hpeos001.hq.maabof.com. 86400   IN      AAAA    fec0:0:0:1::3
hpeos001.hq.maabof.com. 86400   IN      AAAA    fe80::a00:9ff:feba:841b
hpeos003.hq.maabof.com. 86400   IN      A       192.168.0.33
hpeos003.hq.maabof.com. 86400   IN      A       192.168.0.65
hpeos003.hq.maabof.com. 86400   IN      A6      0 fec0:0:0:1::1
hpeos003.hq.maabof.com. 86400   IN      A6      0 fec0:0:0:2::1
hpeos003.hq.maabof.com. 86400   IN      A6      0 fe80::230:6eff:fe46:7bf0
hpeos003.hq.maabof.com. 86400   IN      A6      0 fe80::230:6eff:fe5c:3ff8
hpeos003.hq.maabof.com. 86400   IN      AAAA    fec0:0:0:2::1
hpeos003.hq.maabof.com. 86400   IN      AAAA    fe80::230:6eff:fe46:7bf0
hpeos003.hq.maabof.com. 86400   IN      AAAA    fe80::230:6eff:fe5c:3ff8
hpeos003.hq.maabof.com. 86400   IN      AAAA    fec0:0:0:1::1

;; Query time: 7 msec
;; SERVER: 192.168.0.65#53(192.168.0.65)
;; WHEN: Wed Oct 22 12:57:31 2003
;; MSG SIZE  rcvd: 467
root@hpeos003[dns]
We need to remember to follow the same process as before; here is a quick reminder of some of the additional files involved:
I won't go through the detail here; I'll simply remind you to ensure that you have fully tested the functionality of your slave servers. This includes updating the master server and ensuring that the updates get propagated to the slave server.
This is the simple process of updating /etc/resolv.conf to reference the new domain name:
root@hpeos003[] cat /etc/resolv.conf
domain hq.maabof.com
search hq.maabof.com maabof.com
nameserver 192.168.0.33
root@hpeos003[]
Notice that I have used both the old and the new domain names in my searchlist. I want to make the transition to the new domain as simple and straightforward as possible for my users. With this searchlist, users can still enter the simple hostname and resolve it to an IP address. It is a good idea to have a similar searchlist on my parent domain as well, except with the searchlist referencing the domain names in the other order:
root@hpeos004[] cat /etc/resolv.conf
domain maabof.com
search maabof.com hq.maabof.com
nameserver 192.168.0.35
root@hpeos004[]
Here's a nice-to-do task. Many users will still know the delegated hosts via their old hostnames:
root@hpeos004[dns] nslookup hq021
Name Server:  hpeos004.maabof.com
Address:  192.168.0.35

Trying DNS
Name:    hq021.maabof.com
Address:  192.168.0.21

root@hpeos004[dns]
By setting up aliases for the old hostnames, we can send all users an email detailing the upcoming changes. In the interim, users can still use the old name if they wish. In the future, we can exclude these hostnames from the parent domain resource records. First, we need to replace all the old hostname references for the delegated servers with references to the new domain name. We could use the /etc/hosts.hq file we created earlier to help the administrator in the delegate subdomain. Eventually, we want to end up with an /etc/hosts file that references the IP addresses for the delegate hosts, using their new hq.maabof.com domain name.
root@hpeos004[dns] tail /etc/hosts
192.168.0.21    hq021.hq.maabof.com     hq021   #[no smtp]
192.168.0.22    hq022.hq.maabof.com     hq022   #[no smtp]
192.168.0.23    hq023.hq.maabof.com     hq023   #[no smtp]
192.168.0.24    hq024.hq.maabof.com     hq024   #[no smtp]
192.168.0.25    hq025.hq.maabof.com     hq025   #[no smtp]
192.168.0.26    hq026.hq.maabof.com     hq026   #[no smtp]
192.168.0.27    hq027.hq.maabof.com     hq027   #[no smtp]
192.168.0.28    hq028.hq.maabof.com     hq028   #[no smtp]
192.168.0.29    hq029.hq.maabof.com     hq029   #[no smtp]
192.168.0.30    hq030.hq.maabof.com     hq030   #[no smtp]
root@hpeos004[dns]
We can proceed in one of two ways. We can make a relatively simply change to the parameter file on the master server. We can add an option –c hq.maabof.com. This creates CNAME entries in the database file. Because we already have entries in the database files, simply using our existing parameter file does this job just as well. In fact, I much prefer it. While we are considering making changes to the parameter file, we should update the MX records for all hosts. In our case, our email server hpeos003 is moving to the delegated subdomain. We may still send emails to this machine, so we need to update only the hostname for the MX records parameter in param.conf. If we decide to separate the email services for this domain, we need to supply the new name of the mail hub:
root@hpeos004[dns] cat param.conf
-d maabof.com
-n 192.168
-Z 192.168.0.35
-Z 192.168.0.66
-z 192.168.0.35
-z 192.168.0.66
-m 10:hpeos003.hq.maabof.com
-s hpeos004
-s hpeos002
-b /etc/named.conf
root@hpeos004[dns]
root@hpeos004[dns] hosts_to_named -f param.conf
Translating /etc/hosts to lower case ...
Creating "CNAME" data for the hq.maabof.com domain ...
Collecting network data ...
        192.168
Creating list of multi-homed hosts ...
Creating "A" data (name to address mapping) for net 192.168 ...
Creating "PTR" data (address to name mapping) for net 192.168 ...
New "PTR" data is the same as the old.  Removing new version ...
Creating "MX" (mail exchanger) data ...
Building default boot.sec.save for secondary servers ...
Building default boot.sec for secondary servers ...
done
root@hpeos004[dns]
root@hpeos004[dns] sig_named restart
Name server restarted
root@hpeos004[dns]
root@hpeos004[dns] dig frog001.maabof.com MX

; <<>> DiG named 9.2.0 <<>> frog001.maabof.com MX
;; global options:  printcmd
;; Got answer:
;; ->>HEADER<<- opcode: QUERY, status: NOERROR, id: 20760
;; flags: qr aa rd ra; QUERY: 1, ANSWER: 1, AUTHORITY: 2, ADDITIONAL: 15

;; QUESTION SECTION:
;frog001.maabof.com.            IN      MX

;; ANSWER SECTION:
frog001.maabof.com.     86400   IN      MX      10 hpeos003.hq.maabof.com.

;; AUTHORITY SECTION:
maabof.com.             86400   IN      NS      hpeos002.maabof.com.
maabof.com.             86400   IN      NS      hpeos004.maabof.com.

;; ADDITIONAL SECTION:
hpeos003.hq.maabof.com. 86400   IN      A6      0 fec0:0:0:2::1
hpeos003.hq.maabof.com. 86400   IN      A6      0 fe80::230:6eff:fe46:7bf0
hpeos003.hq.maabof.com. 86400   IN      A6      0 fe80::230:6eff:fe5c:3ff8
hpeos003.hq.maabof.com. 86400   IN      A6      0 fec0:0:0:1::1
hpeos003.hq.maabof.com. 86400   IN      AAAA    fe80::230:6eff:fe5c:3ff8
hpeos003.hq.maabof.com. 86400   IN      AAAA    fec0:0:0:1::1
hpeos003.hq.maabof.com. 86400   IN      AAAA    fec0:0:0:2::1
hpeos003.hq.maabof.com. 86400   IN      AAAA    fe80::230:6eff:fe46:7bf0
hpeos002.maabof.com.    86400   IN      A       192.168.0.34
hpeos002.maabof.com.    86400   IN      A6      0 fe80::a00:9ff:fec2:69c6
hpeos002.maabof.com.    86400   IN      A6      0 fec0:0:0:2::3
hpeos002.maabof.com.    86400   IN      AAAA    fe80::a00:9ff:fec2:69c6
hpeos002.maabof.com.    86400   IN      AAAA    fec0:0:0:2::3
hpeos004.maabof.com.    86400   IN      A       192.168.0.35
hpeos004.maabof.com.    86400   IN      A       192.168.0.66

;; Query time: 6 msec
;; SERVER: 192.168.0.35#53(192.168.0.35)
;; WHEN: Wed Oct 22 13:51:57 2003
;; MSG SIZE  rcvd: 500

root@hpeos004[dns]
By restarting the daemon on the master server, this should have initiated a transfer of resource records to all the slave servers.
root@hpeos002[dns] # nslookup hq021
Name Server:  hpeos002.maabof.com
Address:  192.168.0.34

Trying DNS
Name:    hq021.hq.maabof.com
Address:  192.168.0.21
Aliases:  hq021.maabof.com

root@hpeos002[dns] #
root@hpeos002[dns] #
This allows existing users to continue to use the hostname hq021 and still be resolved to an IP address. Obviously, if the IP address of this node changes, we would need to reflect those changes in our /etc/hosts file. At that point, it may be time to rid all the HQ hosts from the parent's database files.
This is where we will probably update the database files by hand. Here are the changes I made to the db.maabof file:
root@hpeos004[dns] vi db.maabof
$TTL    86400
@       IN      SOA     hpeos004.maabof.com. root.hpeos004.maabof.com. (
                                        3       ; Serial
                                        10800   ; Refresh every 3 hours
                                        3600    ; Retry every hour
                                        604800  ; Expire after a week
                                        86400 ) ; Minimum ttl of 1 day
        IN      NS      hpeos004.maabof.com.
        IN      NS      hpeos002.maabof.com.

hq.maabof.com.      IN      NS      hpeos001.hq.maabof.com.
hq.maabof.com.      IN      NS      hpeos003.hq.maabof.com.

hpeos001.hq.maabof.com. IN      A       192.168.0.67
hpeos003.hq.maabof.com. IN      A       192.168.0.35

localhost       IN      A       127.0.0.1
hp003_lan0      IN      CNAME   hp003_lan0.hq.maabof.com.
hp003_lan1      IN      CNAME   hp003_lan1.hq.maabof.com.
hpeos001        IN      CNAME   hpeos001.hq.maabof.com.
hpeos003        IN      CNAME   hpeos003.hq.maabof.com.
Once I had restarted my named daemon, I could try some resolutions.
root@hpeos004[] dig hq.maabof.com NS

; <<>> DiG named 9.2.0 <<>> hq.maabof.com NS
;; global options:  printcmd
;; Got answer:
;; ->>HEADER<<- opcode: QUERY, status: NOERROR, id: 51240
;; flags: qr rd ra; QUERY: 1, ANSWER: 2, AUTHORITY: 0, ADDITIONAL: 15

;; QUESTION SECTION:
;hq.maabof.com.                 IN      NS

;; ANSWER SECTION:
hq.maabof.com.          86400   IN      NS      hpeos001.hq.maabof.com.
hq.maabof.com.          86400   IN      NS      hpeos003.hq.maabof.com.

;; ADDITIONAL SECTION:
hpeos001.hq.maabof.com. 86400   IN      A       192.168.0.67
hpeos001.hq.maabof.com. 86400   IN      A6      0 fe80::a00:9ff:feba:841b
hpeos001.hq.maabof.com. 86400   IN      A6      0 fec0:0:0:1::3
hpeos001.hq.maabof.com. 86400   IN      AAAA    fe80::a00:9ff:feba:841b
hpeos001.hq.maabof.com. 86400   IN      AAAA    fec0:0:0:1::3
hpeos003.hq.maabof.com. 86400   IN      A       192.168.0.33
hpeos003.hq.maabof.com. 86400   IN      A       192.168.0.65
hpeos003.hq.maabof.com. 86400   IN      A6      0 fe80::230:6eff:fe5c:3ff8
hpeos003.hq.maabof.com. 86400   IN      A6      0 fec0:0:0:1::1
hpeos003.hq.maabof.com. 86400   IN      A6      0 fec0:0:0:2::1
hpeos003.hq.maabof.com. 86400   IN      A6      0 fe80::230:6eff:fe46:7bf0
hpeos003.hq.maabof.com. 86400   IN      AAAA    fe80::230:6eff:fe5c:3ff8
hpeos003.hq.maabof.com. 86400   IN      AAAA    fec0:0:0:1::1
hpeos003.hq.maabof.com. 86400   IN      AAAA    fec0:0:0:2::1
hpeos003.hq.maabof.com. 86400   IN      AAAA    fe80::230:6eff:fe46:7bf0

;; Query time: 9 msec
;; SERVER: 192.168.0.35#53(192.168.0.35)
;; WHEN: Wed Oct 22 16:55:23 2003
;; MSG SIZE  rcvd: 467

root@hpeos004[]
What might be a better idea for this special delegation data is to put it into a file in the directory /etc/dns. The file should be called spcl.maabof. In this way, we don't need to include it directly in the db.maabof file, and every time we run hosts_to_named, it will insert a $INCLUDE spcl.maabof directive into the db.maabof file.
root@hpeos004[dns] cat spcl.maabof
hq.maabof.com.      IN      NS      hpeos001.hq.maabof.com.
hq.maabof.com.      IN      NS      hpeos003.hq.maabof.com.

hpeos001.hq.maabof.com. IN      A       192.168.0.67
hpeos003.hq.maabof.com. IN      A       192.168.0.35

root@hpeos004[dns]
root@hpeos004[dns] tail db.maabof
it144           IN      MX      10      hpeos003.hq.maabof.com.
it145           IN      MX      10      hpeos003.hq.maabof.com.
it146           IN      MX      10      hpeos003.hq.maabof.com.
it147           IN      MX      10      hpeos003.hq.maabof.com.
it148           IN      MX      10      hpeos003.hq.maabof.com.
it149           IN      MX      10      hpeos003.hq.maabof.com.
it150           IN      MX      10      hpeos003.hq.maabof.com.
it151           IN      MX      10      hpeos003.hq.maabof.com.
ntpdc1          IN      MX      10      hpeos003.hq.maabof.com.
$INCLUDE        spcl.maabof
root@hpeos004[dns]
Whenever we delegate another domain or the HQ domain adds another server, we can just update the spcl.maabof file.
We have looked at delegating hostname to a subdomain. Our parent name servers will receive requests from outside our domain for hostnames within our domain. If we think about reverse lookups, i.e., IP address back to hostname, we may need to consider delegating responsibility for that zone as well. Remember, IP addresses are seen as just names within the DNS. All IP addresses are linked to the IN-ADDR.ARPA domain, so it is the responsibility of the Internet Assigned Numbers Authority (http://www.iana.org) to delegate responsibility of that zone. If you obtained a new network address from an ISP, you should talk to the ISP's representatives about delegating what is effectively a new network number and hence a new domain number under IN-ADDR.ARPA. If you obtained a new network number via the IANA (most TLDs for IPv4 addresses are already assigned), then you should talk to the relevant regional authority. See http://www.iana.org/ipaddress/ip-addresses.htm for more details about your regional authority.
The idea behind forwarders is that we don't want every name server going out onto the Internet to find IP addresses for URLs. We may have one or two machines that are allowed access (through a firewall) to the Internet, while all other servers are barred. The forwarders directive will allow an internal server to forward unanswerable requests to the server with external access. In this way, the servers with external access can build up a large cache of previously requested data. The setup of forwarders is relatively straightforward. There is nothing, as such, to change on the servers with external access. The change in configuration is to all other name servers in the network. We need to include a forwarders directive in the /etc/named.conf file and restart the named daemon. Here is an example from hpeos001, where nodes hpeos002 and hpeos004 are acting as the forwarders:
root@hpeos001[] # more /etc/named.conf
#
# type domain source file
#

options {
        directory "/etc/dns";
        listen-on { any; };
        listen-on-v6 { any; };
        random-device "/dev/random";
        forwarders { 192.168.0.66; 192.168.0.34; };
};

key TSIGkey {
        algorithm "hmac-md5";
        secret "1vK7G+mGTOLFCrBCqpIq6A5lLOqf3A1u9MFJ6+5ih/dCDgoIkyc+oa0d2N36LgoA
OZIKnUEOSBAj/krrFgiOAw==";
        };

controls {
        inet 127.0.0.1 allow { 127.0.0.1; } keys { TSIGkey; };
        };

zone "0.0.127.IN-ADDR.ARPA" {
...
root@hpeos001[] #
The servers with external access can have a forwarders directive as well, if they need to forward their queries to a machine in a DMZ/bastion host (as is the case here). This is the entry from node hpeos004:
root@hpeos004[dns] more /etc/named.conf
#
# type domain source file
#

options {
        directory "/etc/dns";
        listen-on { any; };
        listen-on-v6 { any; };
        random-device "/dev/random";
        forwarders { 213.1.119.101; 213.1.119.102; };
};
...
root@hpeos004[dns]
The result is that unanswerable queries will be forwarded until either someone can come up with an answer or the request times out.
root@hpeos001[] # nslookup www.keenan-consultants.co.uk
Name Server:  hpeos001.hq.maabof.com
Address:  192.168.0.67

Trying DNS
Non-authoritative answer:
Name:    www.keenan-consultants.co.uk
Address:  212.85.249.130

root@hpeos001[] #
There are two parts to this configuration. First, we need to update the DHCP server to inform it of the address of where to send Dynamic DNS updates. This is the address of the master server. Updates happen only on the DNS master server.
The DHCP server and the DNS server should exist on the same machine. In our case, both the master DNS and DHCP server are on node hpeos004. I updated the /etc/dhcptab file with the following three lines (underlined):
root@hpeos004[dns] vi /etc/dhcptab
dhcp_pool_group:
        pool-name=64Subnet:
        addr-pool-start-address=192.168.0.82:
        addr-pool-last-address=192.168.0.94:
        lease-time=604800:
        lease-policy=accept-new-clients:
        allow-bootp-clients=FALSE:
        hn:
        subnet-mask=255.255.255.224:
        gw=192.168.0.66:
        sr=192.168.0.32 192.168.0.65 :
        dn=maabof.com:
        ds=192.168.0.34:
        nt=192.168.0.34:
        pcsn:
        sp:
        ddns-address=192.168.0.35:
root@hpeos004[dns]
The Boolean tag pcsn: is used to assign a name for every IP address. When this tag is set, the DHCP server gives priority to the name (if any) provided by the client. The name must be a fully qualified domain name (FQDN). If an FQDN is not specified, then the DHCP server appends the domain name (if set using the dn tag) to the client's hostname; otherwise, it appends a . (period) and updates the Dynamic DNS server (DDNS). The tag sp: is a Boolean tag; if set, it causes bootpd to not use the prerequisite section in the update request when an update request is to be sent to DNS (it can add new entries to the DNS when an entry has never existed before). The tag ddns-address specifies the address of the DDNS server. The ddns-address must be the IP address of a local DHCP server; it cannot be the IP address of a remote system. I can check the changes I made to my /etc/dhcptab file:
root@hpeos004[dns] dhcptools -v
The validate operation was successful.
Results were written to the file /tmp/dhcpvalidate.
root@hpeos004[dns] cat /tmp/dhcpvalidate
# /tmp/dhcpvalidate:dhcp validation output.
#
# generated on Tue Oct 23 12:23:31 2003
/etc/dhcptab validated, no errors found.
/etc/bootptab validated, no errors found.
No inconsistencies found in the data store.
root@hpeos004[dns]
I am now ready to update my DNS master server.
We need to configure the DNS server to allow updates from a remote location. The fact is, the IP address of the remote location is the IP address of this node. Remember, the DHCP server and the DNS master server should be located on the same node. Here are the changes (underlined) I made to the /etc/named.conf file:
root@hpeos004[dns] cat /etc/named.conf
#
# type domain source file
#

options {
        directory "/etc/dns";
        listen-on { any; };
        listen-on-v6 { any; };
        random-device "/dev/random";
        forwarders { 213.1.119.101; 213.1.119.102; };
};

key TSIGkey {
        algorithm "hmac-md5";
        secret
        secret
"L4Et2wOlxj6CYKIf8g2AbOjBaa+DSDhmGoDOARdsx4WfBbkbiwyKT+BFZ5dFBNrPY7XBDa/uSluKmfyB3kUPeQ==";
        };

controls {
        inet 127.0.0.1 allow { 127.0.0.1; } keys { TSIGkey; };
        };

zone "0.0.127.IN-ADDR.ARPA" {
        type master;
        file "db.127.0.0";
};

zone "IP6.INT" {
        type master;
        file "db.IP6.INT";
        allow-update { 192.168.0.35 ; 192.168.0.66 ; };
};

zone "maabof.com" {
        type master;
        file "db.maabof";
        allow-update { 192.168.0.35 ; 192.168.0.66 ; };
};

zone "168.192.IN-ADDR.ARPA" {
        type master;
        file "db.192.168";
        allow-update { 192.168.0.35 ; 192.168.0.66 ; };
};

zone "." {
        type hint;
        file "db.cache";
};

root@hpeos004[dns]
As you can see, I am using the allow-update policy, specifying my own IP addresses as the hosts allowed to update resource records on this machine (I could have used the keyword localhost to denote all IPv4 addresses on local interfaces). By default, no addresses are allowed to perform Dynamic DNS updates.
To make these changes effective, I need to reload the /etc/named.conf configuration file.
root@hpeos004[dns] named-checkconf
root@hpeos004[dns] rndc reload
root@hpeos004[dns]
I can check for daemon messages in syslog to ensure that the reload has worked. Here is an extract from my netdaemon.log file showing the syslog daemon messages relating to the recent rndc reload:
Oct 23 12:51:42 hpeos004 named[782]: loading configuration from '/etc/named.conf'
Oct 23 12:51:42 hpeos004 named[782]: zone 'IP6.INT' allows updates by IP address, which is insecure
Oct 23 12:51:42 hpeos004 named[782]: zone 'maabof.com' allows updates by IP address, which is insecure
Oct 23 12:51:42 hpeos004 named[782]: zone '168.192.IN-ADDR.ARPA' allows updates by IP address, which is insecure
The comments relating to insecure are because I am not using DNS Security signatures for performing updates. That's a homework assignment for you! I started talking about signatures, and so on, when I mentioned the dnssec-keygen command. From there, we can make keysets and sign them. Have a look at the man page for dnssec-keygen if you are interested.
Let's see if I can renew a DHCP lease on one of my PC clients (used the C:>ipconfig /renew command). Here's the output from syslog:
Oct 23 13:14:47 hpeos004 bootpd[5292]: Received DHCPDISCOVER creating DHCPOFFER.
 Request data: ci = 01000874E586BE, req IP 192.168.0.88, ciaddr 0.0.0.0, giaddr 0.0.0.0, broadcast reply off, server id not sent.
Oct 23 13:14:50 hpeos004 bootpd[5292]: client 192.168.0.88 requested unknown/unservable option.tag = f9
Oct 23 13:14:50 hpeos004 bootpd[5292]: sending reply to 192.168.0.88 on port 68
Oct 23 13:14:50 hpeos004 bootpd[5292]: Received DHCPREQUEST creating DHCPACK. Request data: ci = 01000874E586BE, req IP 192.168.0.88, ciaddr 0.0.0.0, giaddr 0.0.0.0, broadcast reply off, server id 192.168.0.66.
Oct 23 13:14:50 hpeos004 bootpd[5292]: allocated ip: udpated dhcpdb and hash tables.
Oct 23 13:14:50 hpeos004 bootpd[5292]: copying options from 64Subnet
Oct 23 13:14:50 hpeos004 named[5264]: client ::ffff:192.168.0.35#50171: update 'maabof.com/IN' denied
Oct 23 13:14:50 hpeos004 bootpd[5292]: ADD operation for 192.168.0.88 to DDNS failed
Oct 23 13:14:50 hpeos004 bootpd[5292]: ADD operation for 88.0.168.192.in-addr.arpa. to DDNS failed
Oct 23 13:14:50 hpeos004 bootpd[5292]: copying options from default client group
Oct 23 13:14:50 hpeos004 bootpd[5292]: client 192.168.0.88 requested unknown/unservable option.tag = f9
Oct 23 13:14:50 hpeos004 bootpd[5292]: sending reply to 192.168.0.88 on port 68
Oct 23 13:14:50 hpeos004 bootpd[5292]: offer freed
I have underlined the most important lines. The DHCP part of the configuration has worked insofar as the PC now has an IP configuration:
C:>ipconfig /all

Windows IP Configuration

        Host Name . . . . . . . . . . . . : CKPC2
        Primary Dns Suffix  . . . . . . . :
        Node Type . . . . . . . . . . . . : Mixed
        IP Routing Enabled. . . . . . . . : No
        WINS Proxy Enabled. . . . . . . . : No
        DNS Suffix Search List. . . . . . : MSHOME.NET

Ethernet adapter Local Area Connection:

        Connection-specific DNS Suffix  . : maabof.com
        Description . . . . . . . . . . . : 3Com 3C920 Integrated Fast Ethernet Controller (3C905C-TX Compatible)
        Physical Address. . . . . . . . . : 00-08-74-E5-86-BE
        Dhcp Enabled. . . . . . . . . . . : Yes
        Autoconfiguration Enabled . . . . : Yes
        IP Address. . . . . . . . . . . . : 192.168.0.88
        Subnet Mask . . . . . . . . . . . : 255.255.255.224
        Default Gateway . . . . . . . . . : 192.168.0.66
        DHCP Server . . . . . . . . . . . : 192.168.0.66
        DNS Servers . . . . . . . . . . . : 213.1.119.101
                                            213.1.119.102
        Lease Obtained. . . . . . . . . . : 23 October 2003 13:15:13
        Lease Expires . . . . . . . . . . : 30 October 2003 13:15:13

Ethernet adapter {3C3B014F-91F6-483A-BC9E-36734E8AD7B1}:

        Connection-specific DNS Suffix  . :
        Description . . . . . . . . . . . : Nortel IPSECSHM Adapter - Packet Sch
eduler Miniport
        Physical Address. . . . . . . . . : 44-45-53-54-42-00
        Dhcp Enabled. . . . . . . . . . . : No
        IP Address. . . . . . . . . . . . : 0.0.0.0
        Subnet Mask . . . . . . . . . . . : 0.0.0.0
        Default Gateway . . . . . . . . . :

Ethernet adapter Bluetooth Network:

        Media State . . . . . . . . . . . : Media disconnected
        Description . . . . . . . . . . . : Bluetooth LAN Access Server Driver
        Physical Address. . . . . . . . . : 00-80-98-34-D0-47
C:>
The PC has a hostname of CKPC2. This should have been updated in the DNS. However, the underlined output from named above shows you that it has failed. There seems to be something strange going on here. The problem is caused by the inclusion of IPv6 on this machine. If you look carefully, there is a message in the output above. I will separate it out for you here:
Oct 23 13:14:50 hpeos004 named[5264]: client ::ffff:192.168.0.35#50171: update 'maabof.com/IN' denied
The IP address of ::ffff:192.168.0.35 seems a little strange. This is known as an IPv4-mapped IPv6 address. This is documented in RFC2372 (IPv6 Addressing Architecture: the first 80 bits as zeros, then 16 bits of FFFF, and then the 32-bit IPv4 address). It is usually used when you have an IPv6-enabled node that is using only IPv4 addresses. To spot whether your system is using such addresses, ensure that inetd has logging enabled and using a utility such as telnet, to your own machine is using an IPv4 address. Here's the output I got from syslog (the netdaemon.log file in my case):
root@hpeos004[dns] telnet 192.168.0.35
Trying...
Connected to ::ffff:192.168.0.35.
Escape character is '^]'.
Local flow control on
Telnet TERMINAL-SPEED option ON

HP-UX hpeos004 B.11.11 U 9000/800 (ta)

login:
telnet> quit
Connection closed.
root@hpeos004[dns]
root@hpeos004[dns] tail -1 /var/adm/syslog/netdaemon.log
Oct 23 13:27:06 hpeos004 inetd[5302]: telnet/tcp: Connection from unknown (::ffff:192.168.0.35) at Tue Oct 23 13:27:06 2003
root@hpeos004[dns]
You can even see it in the output from telnet itself. The output from syslog shows a hostname of unknown because we do not have these addresses in our /etc/hosts file. I will update my /etc/hosts file with these addresses. Because they are neither a pure IPv4 nor an IPv6 address, I have found that hosts_to_named is not able to handle them; it doesn't know whether they are IPv4 or IPv6 addresses. I will leave them in my /etc/hosts file and hope that my /etc/nsswitch.conf file will be sufficient to continue resolving the addresses.
I need to update my /etc/named.conf with these IPv4-mapped IPv6 addresses. I am going to set up an Access Control List, which is a shorthand way of specifying all addresses pertaining to a particular name:
root@hpeos004[dns] more /etc/named.conf
#
# type domain source file
#

options {
        directory "/etc/dns";
        listen-on { any; };
        listen-on-v6 { any; };
        random-device "/dev/random";
        forwarders { 213.1.119.101; 213.1.119.102; };
};

acl MASTER {
        localhost;
        ::ffff:192.168.0.35;
        ::ffff:192.168.0.66;
        };

key TSIGkey {
        algorithm "hmac-md5";
        secret "L4Et2wOlxj6CYKIf8g2AbOjBaa+DSDhmGoDOARdsx4WfBbkbiwyKT+BFZ5dFBNrP
Y7XBDa/uSluKmfyB3kUPeQ==";
        };

controls {
        inet 127.0.0.1 allow { 127.0.0.1; } keys { TSIGkey; };
        };

zone "0.0.127.IN-ADDR.ARPA" {
        type master;
        file "db.127.0.0";
};

zone "IP6.INT" {
        type master;
        file "db.IP6.INT";
        allow-update { MASTER;};
};

zone "maabof.com" {
        type master;
        file "db.maabof";
        allow-update { MASTER;};
};

zone "168.192.IN-ADDR.ARPA" {
        type master;
        file "db.192.168";
        allow-update { MASTER;};
};

zone "." {
        type hint;
        file "db.cache";
};

root@hpeos004[dns] named-checkconf
root@hpeos004[dns] rndc reload
root@hpeos004[dns]
Now that I have updated my /etc/named.conf file with the appropriate entries, I can proceed to perform a Dynamic DNS update. I will renew my DHCP lease on my PC again. Here's the resulting output that I received in netdaemon.log file:
root@hpeos004[dns] more /var/adm/syslog/netdaemon.log
...
Oct 23 14:03:25 hpeos004 bootpd[5292]: Received DHCPDISCOVER creating DHCPOFFER.
 Request data: ci = 01000874E586BE, req IP 192.168.0.88, ciaddr 0.0.0.0, giaddr 0.0.0.0, broadcast reply off, server id not sent.
Oct 23 14:03:25 hpeos004 bootpd[5292]: Probing IP address 192.168.0.88:01000874E586BE:000874E586BE
Oct 23 14:01:41 hpeos004 bootpd[5292]: not ICMP packet
Oct 23 14:03:25 hpeos004 above message repeats 450 times
Oct 23 14:03:25 hpeos004 bootpd[5292]: hash_Delete found no host pointer to delete.
Oct 23 14:03:25 hpeos004 bootpd[5292]: saved offer.
Oct 23 14:03:25 hpeos004 bootpd[5292]: copying options from 64Subnet
Oct 23 14:03:25 hpeos004 bootpd[5292]: copying options from default client group
Oct 23 14:03:25 hpeos004 bootpd[5292]: not ICMP packet
Oct 23 14:03:28 hpeos004 bootpd[5292]: copying options from 64Subnet
Oct 23 14:03:28 hpeos004 bootpd[5292]: copying options from default client group
Oct 23 14:03:28 hpeos004 bootpd[5292]: Received DHCPDISCOVER creating DHCPOFFER.
 Request data: ci = 01000874E586BE, req IP 192.168.0.88, ciaddr 0.0.0.0, giaddr 0.0.0.0, broadcast reply off, server id not sent.
Oct 23 14:03:28 hpeos004 above message repeats 2 times
Oct 23 14:03:28 hpeos004 bootpd[5292]: assigned IP address 192.168.0.88:01000874E586BE:000874E586BE
Oct 23 14:03:28 hpeos004 bootpd[5292]: copying options from 64Subnet
Oct 23 14:03:28 hpeos004 bootpd[5292]: client 192.168.0.88 requested unknown/unservable option.tag = f9
Oct 23 14:03:28 hpeos004 bootpd[5292]: saved offer.
Oct 23 14:03:28 hpeos004 bootpd[5292]: sending reply to 192.168.0.88 on port 68
Oct 23 14:03:28 hpeos004 bootpd[5292]: Received DHCPDISCOVER creating DHCPOFFER.
 Request data: ci = 01000874E586BE, req IP 192.168.0.88, ciaddr 0.0.0.0, giaddr 0.0.0.0, broadcast reply off, server id not sent.
Oct 23 14:03:28 hpeos004 bootpd[5292]: Received DHCPREQUEST creating DHCPACK. Request data: ci = 01000874E586BE, req IP 192.168.0.88, ciaddr 0.0.0.0, giaddr 0.0.0.0, broadcast reply off, server id 192.168.0.66.
Oct 23 14:03:28 hpeos004 bootpd[5292]: allocated ip: udpated dhcpdb and hash tables.
Oct 23 14:03:28 hpeos004 bootpd[5292]: copying options from 64Subnet
Oct 23 14:03:28 hpeos004 named[12156]: client ::ffff:192.168.0.66#50307: updating zone 'maabof.com/IN': adding an RR
Oct 23 14:03:28 hpeos004 bootpd[5292]: ADD operation for 192.168.0.88 to DDNS succeeded
Oct 23 14:03:28 hpeos004 named[12156]: client ::ffff:192.168.0.35#50310: updating zone '168.192.IN-ADDR.ARPA/IN': adding an RR
Oct 23 14:03:28 hpeos004 bootpd[5292]: ADD operation for 88.0.168.192.in-addr.arpa. to DDNS succeeded
Oct 23 14:03:28 hpeos004 bootpd[5292]: client 192.168.0.88 requested unknown/unservable option.tag = f9
Oct 23 14:03:28 hpeos004 bootpd[5292]: offer freed
As you can see from the underlined text above, the Dynamic DNS updates did work this time:
root@hpeos004[dns] nslookup 192.168.0.88
Name Server:  hpeos004.maabof.com
Address:  192.168.0.35

Trying DNS
Name:    CKPC2.maabof.com
Address:  192.168.0.88

root@hpeos004[dns]
NOTE: This particular configuration was set up to show peculiarities when IPv6 is installed but not configured or used. The problems experienced with the IPv4-mapped IPv6 addresses are unique to this situation. It may be that such problems will be experienced in the field where customers install IPv6 but don't utilize it. Where a pure IPv6 or a truly mixed environment is in use, such problems are not normally experienced.
Now that we have configured a Dynamic DNS server, we should not manually update the database files. If we get it wrong, we are in big trouble. We have a utility called nsupdate that will perform updates for us. It's relatively straightforward to use. It is an interactive command. Once you have become familiar with the options, variables, and commands you need to supply to nsupdate, you could automate this process by constructing a shell “hear-script” to pass the relevant information to nsupdate using input redirection. Here I am adding a record for a node called frog021.maabof.com (the –d option is only to show you all the output from nsupdate):
root@hpeos004[dns] nsupdate -d
> server 192.168.0.35
> update add frog021.maabof.com 86400 A 192.168.0.21
>
> show
Outgoing update query:
;; ->>HEADER<<- opcode: UPDATE, status: NOERROR, id:      0
;; flags: ; ZONE: 0, PREREQ: 0, UPDATE: 0, ADDITIONAL: 0
;; UPDATE SECTION:
frog021.maabof.com.     86400   IN      A       192.168.0.21

> send
Reply from SOA query:
;; ->>HEADER<<- opcode: QUERY, status: NXDOMAIN, id:  60749
;; flags: qr aa rd ra ; QUESTION: 1, ANSWER: 0, AUTHORITY: 1, ADDITIONAL: 0
;; QUESTION SECTION:
;frog021.maabof.com.            IN      SOA

;; AUTHORITY SECTION:
maabof.com.             0       IN      SOA     hpeos004.maabof.com. root.hpeos004.maabof.com. 18 10800 3600 604800 86400

Found zone name: maabof.com
The master is: hpeos004.maabof.com

Reply from update query:
;; ->>HEADER<<- opcode: UPDATE, status: NOERROR, id:  46015
;; flags: qr ra ; ZONE: 0, PREREQ: 0, UPDATE: 0, ADDITIONAL: 0

> quit
root@hpeos004[dns]
root@hpeos004[dns] nslookup frog021
Name Server:  hpeos004.maabof.com
Address:  192.168.0.35

Trying DNS
Name:    frog021.maabof.com
Address:  192.168.0.21

root@hpeos004[dns]
The TTL value (86400) is a required field. If I had multiple updates, I would add/delete them and then perform one send operation.
This update does not make use of the TSIG security features. To perform a secure update, we must use the key files that we created some time ago with the dnssec-keygen command:
root@hpeos004[dns] ll K*
-rw-------   1 root       sys       110 Oct 21 15:26 Krndc.+157+65409.key
-rw-------   1 root       sys       145 Oct 21 15:26 Krndc.+157+65409.private
root@hpeos004[dns]
The domain name (really a key name) that we used to create these keys was rndc. This is listed in the .key file:
root@hpeos004[dns] cat Krndc.+157+65409.key
rndc. IN KEY 0 2 157 L4Et2wOlxj6CYKIf8g2AbOjBaa+DSDhmGoDOARdsx4WfBbkbiwyKT+BFZ5d
FBNrPY7XBDa/uSluKmfyB3kUPeQ==
root@hpeos004[dns]
This key was given a name in the /etc/rndc.conf file of TSIGkey. It's the same as the key name we referenced in the /etc/named.conf file. We need to update the Krndc.+157+65409.key file to reflect this key name.
root@hpeos004[dns] vi Krndc.+157+65409.key
TSIGkey. IN KEY 0 2 157 L4Et2wOlxj6CYKIf8g2AbOjBaa+DSDhmGoDOARdsx4WfBbkbiwyKT+BF
Z5dFBNrPY7XBDa/uSluKmfyB3kUPeQ==
root@hpeos004[dns]
As long as we have this updated key file, we can perform an authenticated update using Transaction Signatures. Even though we have updated the .key file, we specify the .private file on the nsupdate command line:
root@hpeos004[dns] nsupdate -d -k Krndc.+157+65409.private
Creating key...
> server 192.168.0.35
> update add frog022.maabof.com 86400 A 192.168.0.22
> show
Outgoing update query:
;; ->>HEADER<<- opcode: UPDATE, status: NOERROR, id:      0
;; flags: ; ZONE: 0, PREREQ: 0, UPDATE: 0, ADDITIONAL: 0
;; UPDATE SECTION:
frog022.maabof.com.     86400   IN      A       192.168.0.22

>
> send
Reply from SOA query:
;; ->>HEADER<<- opcode: QUERY, status: NXDOMAIN, id:   6083
;; flags: qr aa rd ra ; QUESTION: 1, ANSWER: 0, AUTHORITY: 1, ADDITIONAL: 0
;; QUESTION SECTION:
;frog022.maabof.com.            IN      SOA

;; AUTHORITY SECTION:
maabof.com.             0       IN      SOA     hpeos004.maabof.com. root.hpeos004.maabof.com. 20 10800 3600 604800 86400


Found zone name: maabof.com
The master is: hpeos004.maabof.com

Reply from update query:
;; ->>HEADER<<- opcode: UPDATE, status: NOERROR, id:  38968
;; flags: qr ra ; ZONE: 0, PREREQ: 0, UPDATE: 0, ADDITIONAL: 1
;; TSIG PSEUDOSECTION:
tsigkey.                0       ANY     TSIG    hmac-md5.sig-alg.reg.int. 1066758248 300 16 LpgrzhaPjrkqSpSo5nfnnw== 38968 NOERROR 0

> quit
root@hpeos004[dns] nslookup frog022.maabof.com
Name Server:  hpeos004.maabof.com
Address:  192.168.0.35

Trying DNS
Name:    frog022.maabof.com
Address:  192.168.0.22

root@hpeos004[dns]
We can see the update transaction in netdaemon.log:
root@hpeos004[dns] tail -1 /var/adm/syslog/netdaemon.log
Oct 23 14:44:08 hpeos004 named[12156]: client ::ffff:192.168.0.35#50523: updating zone 'maabof.com/IN': adding an RR
root@hpeos004[dns]
This seems to be working fine.
We can use the same idea of authentication for zone transfers between master and slave servers. The configuration relies on the same key and the same secret being known on both servers, i.e., configured in the /etc/named.conf file.
root@hpeos002[dns] # cat /etc/named.conf
#
# type domain source file
#

options {
        directory "/etc/dns";
        listen-on { any; };
        listen-on-v6 { any; };
        random-device "/dev/random";
};

key TSIGkey {
        algorithm "hmac-md5";
        secret
"L4Et2wOlxj6CYKIf8g2AbOjBaa+DSDhmGoDOARdsx4WfBbkbiwyKT+BFZ5dFBNrPY7XBDa/uSluKmfyB3kUPeQ==";
        };

controls {
        inet 127.0.0.1 allow { 127.0.0.1; } keys { TSIGkey; };
        };

server 192.168.0.35 {
        transfer-format many-answers;
        keys { TSIG-key; };
        };

zone "0.0.127.IN-ADDR.ARPA" {
        type master;
        file "db.127.0.0";
};

zone "IP6.INT" {
        type slave;
        file "db.IP6.INT";
        masters {
                192.168.0.35;
        };
};

zone "maabof.com" {
        type slave;
        file "db.maabof";
        masters {
                192.168.0.35;
        };
};

zone "168.192.IN-ADDR.ARPA" {
        type slave;
        file "db.192.168";
        masters {
                192.168.0.35;
        };
};

zone "." {
        type hint;
        file "db.cache";
};
root@hpeos002[dns] #
You will need to ensure that your /etc/rndc.conf file has the same key to ensure that the nsupdate command works. You will also notice that I have included the key in the definition of our master server. I now update my master server to specify which hosts are allowed to perform transfers and which key to use:
root@hpeos004[dns] cat /etc/named.conf
#
# type domain source file
#

options {
        directory "/etc/dns";
        listen-on { any; };
        listen-on-v6 { any; };
        random-device "/dev/random";
        forwarders { 213.1.119.101; 213.1.119.102; };
};

acl MASTER {
        localhost;
        ::ffff:192.168.0.35;
        ::ffff:192.168.0.66;
        };

key TSIGkey {
        algorithm "hmac-md5";
        secret "L4Et2wOlxj6CYKIf8g2AbOjBaa+DSDhmGoDOARdsx4WfBbkbiwyKT+BFZ5dFBNrPY7XBDa/uSluKmfyB3kUPeQ==";
        };

controls {
        inet 127.0.0.1 allow { 127.0.0.1; } keys { TSIGkey; };
        };

zone "0.0.127.IN-ADDR.ARPA" {
        type master;
        file "db.127.0.0";
};

zone "IP6.INT" {
        type master;
        file "db.IP6.INT";
        allow-update { MASTER; };
        allow-transfer { 192.168.0.34; key KSIGkey; } ;
};

zone "maabof.com" {
        type master;
        file "db.maabof";
        allow-update { MASTER; };
        allow-transfer { 192.168.0.34;  key KSIGkey; } ;
};

zone "168.192.IN-ADDR.ARPA" {
        type master;
        file "db.192.168";
        allow-update { MASTER; };
        allow-transfer { 192.168.0.34; key KSIGkey; } ;
};

zone "." {
        type hint;
        file "db.cache";
};

root@hpeos004[dns]
On restarting, the named daemon, we should monitor the netdaemon.log file to ensure transfers are occurring as normal.
Oct 22 23:27:41 hpeos004 named[21538]: client 192.168.0.34#50363: transfer of 'IP6.INT/IN': AXFR started
Oct 22 23:27:41 hpeos004 named[21538]: client 192.168.0.34#50365: transfer of '168.192.IN-ADDR.ARPA/IN': AXFR started
Oct 22 23:27:41 hpeos004 named[21538]: client 192.168.0.34#50364: transfer of 'maabof.com/IN': AXFR started
root@hpeos004[dns]
If you see a transfer being refused, a common problem will be that the servers are not in time synchronization; they must be; ensure that NTP is set up, running, and synchronized with a reliable time source.
We have looked at various aspects of DNS. We started with what I hope was a recap of how DNS works; I assumed that as a CSA you have experienced DNS before. We moved on to look at some techniques for delegation. Next we moved on to the thorny problem of having DHCP clients automatically updated in the DNS. This takes a little work if you have IPv6 installed on your system. Finally, we touched on aspects of security in DNS, namely Transaction SIGnatures (TSIG). We could take this discussion further by looking at a number of other directives, such as update-policy and DNSSEC: A DNS Security Extension, which involves authenticating DNS information in a zone. I hope that the discussions we have had up to now give you the confidence to try such things in your own time.