
Chapter Syllabus
3.1 An Introduction to Virtual Partitions
3.2 Obtaining the Virtual Partitions Software
3.3 Setting Up an Ignite-UX Server to Support Virtual Partitions
3.4 Planning Your Virtual Partitions
3.5 Creating the vPar Database
3.6 Booting a Newly Created vPar from an Ignite-UX Server
3.7 Managing Hardware within a Virtual Partition
3.8 Rebooting vpmon
3.9 Interfacing with the Virtual Partition Monitor: vpmon
3.10 Changing Partition Attributes
3.11 Resetting a Virtual Partition
3.12 Removing a Virtual Partition
In Chapter 2, we introduced the idea of partitioning and discussed Node Partitions (nPars). If you are joining this discussion without the prior knowledge of nPars, I will reiterate that partitioning is not a new concept in the computing industry. Many vendors have provided some form of partitioning as a software and/or a hardware solution for some years. The basic idea of partitioning is to create a configuration of hardware and software components that support the running of an independent instance of an operating system. HP currently supports two types of partitioning:
An nPar, or Node Partition
A vPar, or Virtual Partition
This chapter deals with Virtual Partitions.
A Virtual Partition is a collection of hardware components that support the running of an independent instance of an Operating System. A major difference between a vPar and an nPar is that a vPar is considered to be software partitioning with no reliance or dependence on a specific hardware architecture. On the other hand, an nPar is considered a hardware as well as a software solution, as an nPar relies on a cell-based hardware architecture.
The flexibility in configuration makes partitioning a very popular configuration tool. Some key benefits of Virtual Partitions include:
Increasing server utilization
Isolating Operating System and Application Faults
Providing flexibility through multiple but independent Operating System instances
Providing flexibility through dynamic CPU allocation
The hardware components that constitute a Virtual Partition can come from an existing server, e.g., an rp7400/N4000 server, or from a Node Partition configured from a partitionable server complex. During our discussion in this chapter, I utilize an existing node partition, which I created in Chapter 2 within a Superdome complex. The initial hardware could just as easily be an existing rp7400/N4000 server, for example.
At the moment, HP supports Virtual Partitions running only HP-UX. In the future, there is the possibility of running various versions of HP-UX, Windows, and Linux simultaneously within different Virtual Partitions.
We start by taking an existing Node Partition, installing the Virtual Partition software, and then creating a number of vPars from the nPar. Be sure to check the HP documentation (for more details, see http://docs.hp.com/hpux/hplex/index.html#C.%20vPars%20%28 software-based%20partitioning%29) as to which servers and Operating Systems support Virtual Partitions. We also discuss day-to-day management tasks involved with Virtual Partitions including dynamically adding and removing CPUs from a Virtual Partition to cope with changing processing demands. I would suggest having access to your own system configuration while reading through this chapter as well as access to the excellent HP documentation: for example, Installing and Managing HP-UX Virtual Partitions (vPars) available from http://docs.hp.com/hpux/pdf/T1335-90018.html.
A Virtual Partition (vPar) is an independent instance of an Operating System running on a subset of hardware components taken from an existing server or Node Partition. Each Operating System instance runs completely independently of other instances, and as such, a primary reason for using vPars is to offer application and Operating System software fault isolation. Additional benefits include:
Increased system utilization by partitioning previously unused portions of the server. Typically, a non-vPars server is only using 50 percent of its capacity.
Greater flexibility of resources through:
Multiple but independent operating environments per server (with as low as one CPU granularity per partition)
The dynamic movement of CPU power between virtual partitions depending on workload requirements.
Increased isolation of applications, their operating systems, and assigned resources (CPU, memory, and I/O) with individual reconfiguration and rebooting of the individual partitions without affecting other partitions and their applications.
Increased product integration with other HP-UX offerings that includes iCOD, Partition Manager, Online Diagnostics, and Virtual Partition Manager.
Currently, we cannot dynamically add memory to a vPar without rebooting it. While performance is one criterion, security may be another with each vPar being isolated from other partitions on the system. Virtual partitions are implemented as a software solution. Initially we take an existing installation of HP-UX and install the Virtual Partition software. We then define the number of Virtual Partitions we require in the Virtual Partition Database (/stand/vpdb) using commands such as vparcreate (or via the vparmgr GUI). At system boot time, the Virtual Partition Monitor (/stand/vpmon) is executed instead of the normal HP-UX kernel /stand/vmunix. The vpmon reads the Virtual Partition Database (vpdb), which details the hardware components belonging to respective vPars. The vpmon then boots the appropriate HP-UX kernel located on a boot disk within each vPar (Figure 3-1).
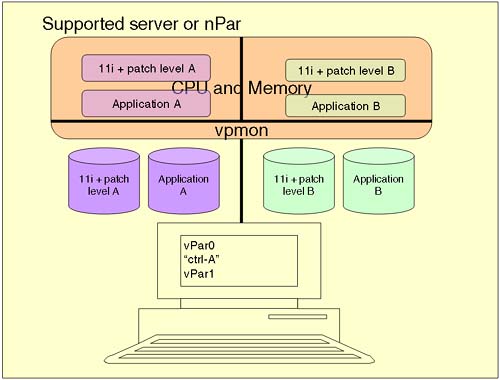
The console interface for the original server/nPar is used to manage all vPars. By using the key sequence ctrl-a, the administrator can switch between the virtual consoles for each vPar.
To make my life easy, I simply visualize a Virtual Partition as a minimal server configuration:
At least 1 CPU
The minimum amount of memory to support HP-UX
IO capability to support a boot device
A LAN card (probably) to support networking
Most vPar solutions will use 1GB of memory per active CPU. Technically this is not an absolute requirement; it just seems to work better. What we need to do is to work out how many vPars we need to configure based on our application/user needs as well as some limitations imposed by the vPar software (check the documentation Installing and Managing HP-UX Virtual Partitions (vPars) available at http://docs.hp.com/hpux/pdf/T1335-90018.html for server specific limitations as to the maximum supported number of Virtual Partitions).
In reality, we need to consider other criteria as well as the number of vPars to consider. Other considerations include:
Will we want to configure multiple paths to IO devices? If so, this will limit the overall number of IO devices available to vPars.
Will we want to configure floating CPUs? A floating CPU is known as an unbound CPU. This has limitations as to what the CPU can process, i.e., unbound CPUs do not process IO interrupts. These limitations are offset by the ability of unbound CPUs to be added and removed to existing vPars without requiring a reboot. Consequently, the overall number of CPUs available to the initial vPar configuration may be considerably less, as we may want to configure a pool of unbound CPUs in order to allocate them as we see fit.
Applications that perform a significant amount of IO will need to be configured with more bound CPUs. Unbound CPUs do not process IO interrupts. This can affect the number of floating CPUs in your overall vPar configuration.
The Virtual Partitions product (T1335AC) is a purchasable product and comes on CD. Details of how to purchase the product online as well as a run-down of features and benefits can be found at http://software.hp.com/portal/swdepot/displayProductInfo.do?productNumber=T1335AC.
We use our Superdome nPar created in Chapter 2 as a basis for creating a number of vPars. We need to analyze the configuration in order to establish how many vPars we can actually configure, based on the available hardware in the nPar.
On our first Virtual Partition, we can utilize the existing HP-UX Operating System. On subsequent Virtual Partitions, we need to have a means of installing HP-UX onto the intended boot disks. This may be an Ignite-UX Server (hence the need for a LAN card in our configuration) that contains the full Operating System software, patches, the vPar bundle, and any associated applications (see Chapter 13, Installing Software with Software Distributor and Ignite-UX). The only issue with setting up an Ignite-UX Server is the Ignite-UX kernel itself. The WINSTALL file supplied by newer versions of Ignite-UX is perfectly vPar-enabled. However, if our version of Ignite-UX on the Ignite server is B.3.4.XX (September 2001), B.3.5.XX (December 2001), or B.3.6.XX (Match 2002), we need to obtain the new version of the /opt/ignite/boot/WINSTALL file. A script called WINSTALL_script, located under the root directory of the CD in a sub-directory called vParsWINSTALL, will copy the WINSTALL file to the correct location on the Ignite-UX server.
root@hpeos003[] bdf /cdrom
Filesystem          kbytes    used   avail %used Mounted on
/dev/dsk/c2t2d0     112014  112014       0  100% /cdrom
root@hpeos003[] ll /cdrom/vParsWINSTALL/
total 101289984
-r-xr-xr-x   1 4294967295 4294967295 16935056 May 20  2002 WINSTALL.Dec01
-r-xr-xr-x   1 4294967295 4294967295 17050784 May 20  2002 WINSTALL.Mar02
-r-xr-xr-x   1 4294967295 4294967295 16644896 May 20  2002 WINSTALL.Sep01
-r-xr-xr-x   1 4294967295 4294967295    9711 May 20  2002 WINSTALL_script
root@hpeos003[]
Once you locate the script, simply run it and the new WINSTALL file will prompt you for any additional information it needs.
One of the first tasks with Virtual Partitions is to establish how much hardware you have in your current non Virtual Partition server. This can be a process of running various ioscan commands and probably drawing a schematic diagram of what hardware you have available. Here is a diagram of what we have in our Superdome nPar in Figure 3-2.
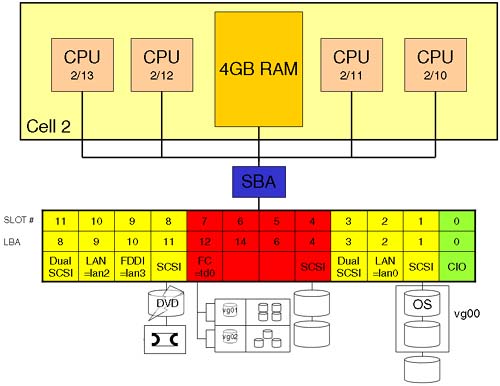
Drawing this schematic diagram is a good exercise, as we need to plan the configuration VERY carefully. When you have lots more hardware, sometimes it becomes obvious which divisions to make when creating multiple vPars; e.g., with a 2-cell partition, it might be obvious to create 2 vPars using CPUs from a specific cells to be members of a particular vPar. The unused (unbound) CPUs could float between either vPar, although it would be better for performance to localize CPU/memory IO to within a single cell.
What I need to do is assign LBAs (specific interface cards) to individual vPars. I need to remember to create in each vPar enough hardware to support a basic server:
At least 1 CPU
The minimum amount of memory to support HP-UX (1GB per CPU works better)
IO capability to support a boot device
A LAN card (probably) to support networking
I have spent some time considering how to divide up this nPar. The solution I have come up with is to create two vPars (I currently don't have enough disks to configure any more vPars). I have split the 12-slot IO cardcage and RAM into separate chunks just to allow us to visualize each vPar as a separate server. Here's my plan, see Figure 3-3.
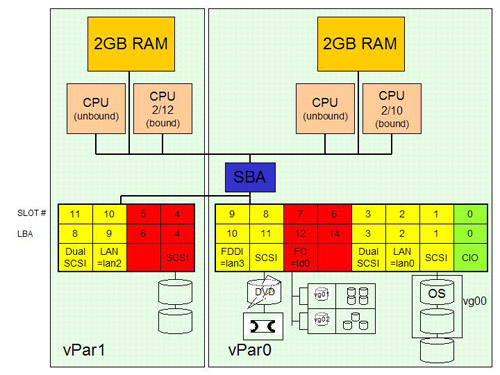
We can summarize the hardware details of each Virtual Partition as follows:
vPar0
Physical Memory: 2GB
Total Number of CPU: 2
Total number of Bound CPU: 1 (2/10)
Total Number of Unbound CPU: 1
Assigned LBA:
2/0/0
2/0/1
2/0/2
2/0/3
2/0/10
2/0/11
2/0/12
2/0/14
Boot device: 2/0/1/0/0.0.0
Alternate Boot device: 2/0/11/0/0.3.0
vPar0
Physical Memory: 2GB
Total Number of CPU: 2
Total number of Bound CPU: 1 (2/12)
Total Number of Unbound CPU: 1
Assigned LBA:
2/0/4
2/0/6
2/0/9
2/0/8
Boot device: 2/0/4/0/0.8.0
Once our plan has been finalized, we can start to consider creating the vPars themselves.
The first part of creating Virtual Partitions is to install the software onto our original Operating System (this requires a reboot). I an installing the Virtual Partition product as well as the vPar GUI; VPARMGR, which is not installed by default:
root @uksd3 #swinstall -s hpwin050:/depot/sept_2002_vpar -x autoreboot=true T1335AC VPARMGR
=======  11/06/03 00:01:46 GMT  BEGIN swinstall SESSION
         (non-interactive) (jobid=uksd3-0015)

       * Session started for user "root@uksd3".

       * Beginning Selection
       * Target connection succeeded for "uksd3:/".
       * Source connection succeeded for
         "hpwin050:/depot/sept_2002_vpar".
NOTE:    One or more patch filesets were automatically selected or
         deselected to maintain patch integrity. Please refer to the
         swinstall.log logfile for details.
WARNING: The software specified contains a kernel fileset.  It will be
         necessary to reconfigure and reboot the system to make the
         kernel software functional.
       * Source:                 hpwin050:/depot/sept_2002_vpar
       * Targets:                uksd3:/
       * Software selections:
             T1335AC,r=A.02.01.00,a=HP-UX_B.11.11_64,v=HP
             VPARMGR,r=B.11.11.01.01,a=HP-UX_B.11.11_32/64,v=HP
           + B6826AA,r=B.11.11.01.05,a=HP-UX_B.11.11_32/64,v=HP
           + FEATURE11-11,r=B.11.11.0209.5,a=HP-UX_B.11.11_32/64,v=HP
           + GOLDBASE11i,r=B.11.11.0206.4,a=HP-UX_B.11.11_32/64,v=HP
           + HWEnable11i,r=B.11.11.0209.5,a=HP-UX_B.11.11_32/64,v=HP
           + OBAM.OBAM-BIN,r=B.11.00.05.3.06,a=HP-UX_B.11.00_32/64,v=HP,fr=B.11.00.05.3.06,fa=HP-UX_B.11.00_32/64
           + OBAM.OBAM-JVM,r=B.11.00.05.3.06,a=HP-UX_B.11.00_32/64,v=HP,fr=B.11.00.05.3.06,fa=HP-UX_B.11.00_32/64
           + OBAM.OBAM-WEB,r=B.11.00.05.3.06,a=HP-UX_B.11.00_32/64,v=HP,fr=B.11.00.05.3.06,fa=HP-UX_B.11.00_32/64
           + OS-Core.C-KRN,r=B.11.11,a=HP-UX_B.11.11_32/64,v=HP,fr=B.11.11,fa=HP-UX_B.11.11_32/64
...
       * A "+" indicates an automatic selection due to dependency or
         the automatic selection of a patch or reference bundle.
       * Selection succeeded.


       * Beginning Analysis and Execution
       * Session selections have been saved in the file
         "/.sw/sessions/swinstall.last".
       * "uksd3:/":  18 filesets have the selected revision already
         installed.
       * "uksd3:/":  1 filesets have a version with a higher revision
         number already installed.
       * "uksd3:/":  17 filesets were determined to be skipped in the
         analysis phase.
       * "uksd3:/":  The software dependencies for 3 products or
         filesets cannot be resolved.
       * "uksd3:/":  1 bundles have the selected revision already
         installed.
ERROR:   "uksd3:/":  1 bundles have a version with a higher revision
         number already installed.
       * "uksd3:/":  3 bundles cannot be installed because none of
         their filesets can be installed.
       * The analysis phase failed for "uksd3:/".
ERROR:   "uksd3:/":  42 filesets were determined to be skipped in the
         analysis phase.
       * The execution phase failed for "uksd3:/".
       * Analysis and Execution had errors.


NOTE:    More information may be found in the agent logfile using the
         command "swjob -a log uksd3-0015 @ uksd3:/".


        *** FINAL System shutdown message (uksd3) ***

System going down IMMEDIATELY

=======  11/06/03 00:04:28 GMT  END swinstall SESSION (non-interactive)
         (jobid=uksd3-0015)

root @uksd3 #swlist T1335AC VPARMGR
# Initializing...
# Contacting target "uksd3"...
#
# Target:  uksd3:/
#

# T1335AC                       A.02.01.00     HP-UX Virtual Partitions
  T1335AC.VirtualPartition      A.02.01.00     HP-UX Virtual Partitions Function
ality
  T1335AC.PHNE_25084            1.0            Cumulative STREAMS Patch
  T1335AC.PHNE_25644            1.0            cumulative ARPA Transport patch
  T1335AC.PHKL_23374            1.0            Fix close(2) data corruption
  T1335AC.PHKL_23337            1.0            Side effect of madvise() call fixed.
  T1335AC.PHKL_23335            1.0            solve inode deadlock with mmap and
pagefault
  T1335AC.PHKL_23280            1.0            signal race condition patch
  T1335AC.PHKL_23250            1.0            Fix for memory driver bug
  T1335AC.PHKL_23242            1.0            VxFS mmap(2) performance improvement
  T1335AC.PHKL_23239            1.0            getmount_entry() performance improvement
  T1335AC.PHKL_23225            1.0            Fix for dqput() data page fault panic
  T1335AC.PHKL_23196            1.0            Fix for locking problem in I/O (GIO)
  T1335AC.PHKL_23154            1.0            dflush() panic
  T1335AC.PHSS_22535            1.0            ld(1) and linker tools cumulative
 patch
  T1335AC.PHKL_27172            1.0            vPars panic; Syscall cumulative
  T1335AC.PHKL_26847            1.0            console,chassis code,crash/dump,reboot-RvPar
  T1335AC.PHKL_26979            1.0            vPar enablement patch with kwdb support
  T1335AC.PHKL_26039            1.0            callout migration race condition
  T1335AC.PHKL_26037            1.0            vPar enablement patch, callout migration
  T1335AC.PHKL_25080            1.0            vPar enablement patch
  T1335AC.PHKL_24960            1.0            vPar enablement patch
  T1335AC.PHKL_24585            1.0            Psets & vPar enablement patch
  T1335AC.PHKL_24582            1.0            iCOD Support, Psets Enablement Patch
  T1335AC.PHKL_24566            1.0            Kernel Memory allocation, Psets Enablement
  T1335AC.PHKL_24565            1.0            vPar Enablement patch
  T1335AC.PHKL_24564            1.0            vPar enablement patch
  T1335AC.PHKL_24563            1.0            vPar enablement patch
  T1335AC.PHKL_24562            1.0            vPar enablement patch
  T1335AC.PHKL_24561            1.0            Psets & vPar Enablement
  T1335AC.PHKL_24560            1.0            vPar enablement patch
  T1335AC.PHKL_24558            1.0            vPar enablement patch
  T1335AC.PHKL_24556            1.0            vPar enablement patch
  T1335AC.PHKL_24554            1.0            vPar enablement patch
  T1335AC.PHKL_24552            1.0            vPar enablement patch
  T1335AC.PHKL_24551            1.0            thread nostop, vPar, Psets, load
averages
  T1335AC.PHKL_27054            1.0            early boot,Psets,vPar,Xserver,T60
0 HPMC
  T1335AC.PHKL_24548            1.0            vPar enablement patch
  T1335AC.PHCO_26682            1.0            shutdown(1m) patch
  T1335AC.PHCO_26681            1.0            reboot(1m) patch
  T1335AC.PHCO_25013            1.0            for vpars Q4 version B.11.20f
  T1335AC.PHCO_25130            1.0            vPar manpage cumulative patch
  T1335AC.PHCO_26896            1.0            vPar commands man pages patch
# VPARMGR                       B.11.11.01.01  Virtual Partition Manager - HP-UX

  VPARMGR.vParManager           B.11.11.01.01  Virtual Partition Manager for HP-
UX
root @uksd3 #
We are now ready to create our first partition. There are a couple of points we should understand before proceeding:
Each Virtual Partition needs to be assigned a unique name. Unlike nPars, which are assigned a partition number as well as a name, vPars do not have an associated partition number; they need to be explicitly assigned a partition name.
The first partition created MUST have assigned the LBA that supports the system console (the Core IO card on a node Partition).
We should document the hardware paths for all devices before proceeding in order to devise a consistent plan of how our partitions will be configured.
Armed with these pieces of information, we can proceed. We can create all of the Virtual Partitions while the original partition is running HP-UX as normal:
root @uksd3 #vparcreate -p vPar0 –a cpu::2 -a cpu:::1:2 -a cpu:2/10 -a mem::2048
-a io:2/0/0 -a io:2/0/1 -a io:2/0/2 -a io:2/0/3 -a io:2/0/10 -a io:2/0/11 -a
io:2/0/12 -a io:2/0/14 -a io:2/0/1/0/0.0.0:BOOT -a io:2/0/11/0/
0.3.0:ALTBOOT
root @uksd3 #
root @uksd3 #vparstatus
vparstatus: Warning: Virtual partition monitor not running, Requested resources shown.
[Virtual Partition]
                                                                          Boot
Virtual Partition Name       State Attributes Kernel Path               Opts
============================ ===== ========== ========================= =====
vPar0                          N/A   Dyn,Auto   /stand/vmunix

[Virtual Partition Resource Summary]
                                           CPU    Num        Memory (MB)
                                  CPU     Bound/   IO   # Ranges/
Virtual Partition Name          Min/Max  Unbound  devs  Total MB    Total MB
==============================  ================  ====  ====================
vPar0                             1/  2    1   1    10    0/  0         2048
root @uksd3 #
root @uksd3 #ll /stand/vp*
-rw-------   1 root       sys           4136 Nov  6 00:59 /stand/vpdb
-r-xr-xr-x   1 bin        bin        1062320 Jun 27  2002 /stand/vpmon
root @uksd3 #
We have now created our first partition. It has not booted yet. I should explain the options to vparcreate (see Table 3-1).
Table 3-1. Options Used with vparcreate
Option | Description |
|---|---|
-p vPar0 | Specifies the partition name. The vPar name can be a maximum of 239 characters and contain [aA-zZ],[0-9], underscore and dot. |
-a cpu::2 | We are specifying the total number of CPUs to be allocated to this partition. If we do not further specify which CPUs to allocate, the monitor will choose which CPUs to allocate for each partition. |
-a cpu:::1:2 | Specifies the minimum (1) and maximum (2) number of CPUs available to the partition. This option does not allocate CPUs but specifies the limits for other tasks. This option is optional. |
-a cpu:2/10 | We are stipulating a specific CPU to be allocated to this partition. By doing so, this CPU is a bound CPU. An unbound CPU cannot be explicitly specified. |
-a mem::2048 | We are specifying an amount of memory (in MB) to be allocated to this partition. There is the possibility of specifying a specific address range within the global pool of memory available: -a mem:::base:range starting at "base" bytes and extending for “range” megabytes. When vPars are supported on systems that implement NUMA features (Integrity servers, hp sx1000 chipset and beyond), the use of this option will become more apparent; i.e., in an nPar utilizing Cell Local Memory, we can localize the memory for a vPar by specifying an explicit address space within memory. As such, the use of this option with current supported technology is VERY limited. |
-a <hw path> | We are adding a particular hardware path (LBA) to the partition. All devices connected to the LBA will be made available to the partition. |
-a 2/0/1/0/0.0.0:BOOT | We are specifying the Primary Boot Path for this partition. The vPar Database (/stand/vpdb) holds the boot paths for Virtual Partition. For the first partition, this should match the Primary Boot Path for the server/nPar. |
-a 2/0/11/0/0.3.0:ALTBOOT | We are specifying an Alternate Boot Path for this partition, if appropriate. |
We can choose to boot the new Virtual Partition and then continue configuring additional Virtual Partitions, or we can continue to configure additional Virtual Partitions right now. The decision will probably be based on whether the intended boot devices for our additional Virtual Partitions have been installed with HP-UX already (as well as the Virtual Partitions software, appropriate patches, and any additional application software). If they have, I would probably create all my partitions now and then boot all my Virtual Partitions straight away.
One last thing we need to configure is the AUTO file on the Primary boot path for our original server/nPar. The AUTO file needs to be altered in order to flag the hpux Secondary Loader to execute the Virtual Partition Monitor (vpmon) instead of the HP-UX kernel. Most of the time we will want to boot all of the configured Virtual Partitions once the server/nPar itself has booted. In such a situation, we update the AUTO file to look like this:
root @uksd3 #mkboot -a "hpux /stand/vpmon -a" /dev/rdsk/c0t0d0
root @uksd3 #
The –a option to vmpon activates all of the configured Virtual Partitions. Later we will see other ways to boot individual Virtual Partitions from the vpmon interface.
Now that my AUTO file will execute vpmon, I will test my preliminary configuration by rebooting this server:
root @uksd3 #shutdown -ry now

SHUTDOWN PROGRAM
11/06/03 01:31:28 GMT

Broadcast Message from root (console) Thu Nov  6 01:31:28...
SYSTEM BEING BROUGHT DOWN NOW ! ! !


/sbin/auto_parms: DHCP access is disabled (see /etc/auto_parms.log)


     System shutdown in progress
     ___________________________
...

Duplex Console IO Dependent Code (IODC) revision 1
   --------------------------------------------------------------------------
     (c) Copyright 1995-2002, Hewlett-Packard Company, All rights reserved
   --------------------------------------------------------------------------


          Cab/      Cell      ------- Processor --------    Cache Size
    Cell  Slot      State      #    Speed       State      Inst    Data
    ----  ----  ------------  ---  --------  -----------  ------  ------
      2   0/2   Active         0   552  MHz  Active       512 KB  1 MB
                               1   552  MHz  Idle         512 KB  1 MB
                               2   552  MHz  Idle         512 KB  1 MB
                               3   552  MHz  Idle         512 KB  1 MB


     Primary Boot Path:  2/0/1/0/0.0
          Boot Actions:  Boot from this path.
                         If unsuccessful, go to next path.

HA Alternate Boot Path:  2/0/4/0/0.8
          Boot Actions:  Boot from this path.
                         If unsuccessful, go to BCH.

   Alternate Boot Path:  2/0/4/0/0.8
          Boot Actions:  Skip this path.
                         Go to BCH.

          Console Path:  2/0/0/0/0.0


Attempting to boot using the primary path.
-------------------------------------------------------------


 To discontinue, press any key within 10 seconds.

 10 seconds expired.
 Proceeding...


Initializing boot Device.


Boot IO Dependent Code (IODC) Revision 0


Boot Path Initialized.


HARD Booted.

ISL Revision A.00.43  Apr 12, 2000

ISL booting  hpux /stand/vpmon -a

Boot
: disk(2/0/1/0/0.0.0.0.0.0.0;0)/stand/vpmon
614400 + 168736 + 16898800 start 0x23000
[MON] Booting vPar0...
[MON] Console client set to vPar0
[MON] Console server set to vPar0

[vPar0]

[MON] vPar0 loaded
gate64: sysvec_vaddr = 0xc0002000 for 2 pages
NOTICE: nfs3_link(): File system was registered at index 3.
NOTICE: autofs_link(): File system was registered at index 6.
NOTICE: cachefs_link(): File system was registered at index 7.
td: claimed Tachyon TL/TS Fibre Channel Mass Storage card at 2/0/12/0/0
fddi4: INITIALIZING: 0150 PCI FDDI card in slot 2/0/10/0/0
Entering cifs_init...
Initialization finished successfully... slot is 9

    Host is virtual System Console slave
Logical volume 64, 0x3 configured as ROOT
Logical volume 64, 0x2 configured as SWAP
...
     Start CDE login server .............................................. OK

The system is ready.

uksd3 [HP Release B.11.11] (see /etc/issue)
Console Login:
Now that I have created and tested my first Virtual Partition, I may take a little time to view the IO devices available to this Operating System:
root @uksd3 #vparstatus -vp vPar0
[Virtual Partition Details]
Name:         vPar0
State:        Up
Attributes:   Dynamic,Autoboot
Kernel Path:  /stand/vmunix
Boot Opts:

[CPU Details]
Min/Max:  1/2
Bound by User [Path]:  2.10
Bound by Monitor [Path]:
Unbound [Path]:  2.11

[IO Details]
   2.0.0
   2.0.1
   2.0.2
   2.0.3
   2.0.10
   2.0.11
   2.0.12
   2.0.14
   2.0.1.0.0.0.0  BOOT
   2.0.11.0.0.3.0  ALTBOOT

[Memory Details]
Specified [Base  /Range]:
          (bytes) (MB)
Total Memory (MB):  2048
root @uksd3 #
root @uksd3 #dmesg | grep Physical
    Physical: 2086912 Kbytes, lockable: 1565196 Kbytes, available: 1803724 Kbytes
root @uksd3 #
root @uksd3 #rad -q
                                                                     Driver(s)
Slot        Path        Bus   Speed   Power   Occupied    Suspended   Capable
0-1-1-0     2/0/0       0     33      On      Yes         No          No
0-1-1-1     2/0/1/0     8     33      On      Yes         No          Yes
0-1-1-2     2/0/2/0     16    33      On      Yes         No          Yes
0-1-1-3     2/0/3/0     24    33      On      Yes         No          Yes
0-1-1-6     2/0/14/0    112   33      On      No          N/A         N/A
0-1-1-7     2/0/12/0    96    33      On      Yes         No          Yes
0-1-1-8     2/0/11/0    88    33      On      Yes         No          Yes
0-1-1-9     2/0/10/0    80    33      On      Yes         No          Yes
root @uksd3 #
As you can see, this server is behaving as if it were completely oblivious to the fact it exists in a Virtual Partition. The vpmon has allocated the necessary resource to the partition and then booted HP-UX within that configuration. The only slight problem I have here is with the ioscan command.
root @uksd3 #ioscan -fnkC processor
Class       I  H/W Path  Driver    S/W State H/W Type  Description
===================================================================
processor   0  2/10      processor CLAIMED   PROCESSOR Processor
processor   1  2/11      processor CLAIMED   PROCESSOR Processor
processor   2  2/12      processor CLAIMED   PROCESSOR Processor
processor   3  2/13      processor CLAIMED   PROCESSOR Processor
root @uksd3 #
As you can see, ioscan seems to be reporting more processors than it should for this partition. The fact is that ioscan is reporting all of my bound processors as well as all of the unbound processors, even the ones not allocated to me. We can be assured that vpmon has only allocated the correct number of active processors to this vPar by using commands like glance, top, and mpshed:
root @uksd3 #mpsched -s
System Configuration:
=====================
Locality Domain Count: 1
Processor Count: 2
Domain    Processors
------    ----------
   0        0   1
root @uksd3 #
root @uksd3 #vparstatus -vp vPar0
[Virtual Partition Details]
Name:         vPar0
State:        Up
Attributes:   Dynamic,Autoboot
Kernel Path:  /stand/vmunix
Boot Opts:

[CPU Details]
Min/Max:  1/2
Bound by User [Path]:  2.10
Bound by Monitor [Path]:
Unbound [Path]:  2.11

[IO Details]
   2.0.0
   2.0.1
   2.0.2
   2.0.3
   2.0.10
   2.0.11
   2.0.12
   2.0.14
   2.0.1.0.0.0.0  BOOT
   2.0.11.0.0.3.0  ALTBOOT

[Memory Details]
Specified [Base  /Range]:
          (bytes) (MB)
Total Memory (MB):  2048
root @uksd3 #
It is interesting to note that this vPar has allocated the next available processor as the unbound processor for this partition. If this had been intended for another partition, we would have had to revise our overall configuration. The issue here is that, with the current software, we can't specify which processors will be selected as unbound processors.
When we configure our second partition, I will expect ioscan to report fewer processors, as at least one of the current processors will become bound to the new vPar.
I am now going to create my second Virtual Partition using the design specifications I created earlier:
root @uksd3 #vparcreate -p vPar1 -a cpu::2 -a cpu:::1:2 -a cpu:2/12 -a mem::2048
-a io:2/0/4 -a io:2/0/6 -a io:2/0/9 -a io:2/0/8 -a io:2/0/4/0/0.8.0:BOOT
root @uksd3 #vparstatus
[Virtual Partition]
                                                                          Boot
Virtual Partition Name       State Attributes Kernel Path               Opts
============================ ===== ========== ========================= =====
vPar0                          Up    Dyn,Auto   /stand/vmunix
vPar1                          Down  Dyn,Auto   /stand/vmunix

[Virtual Partition Resource Summary]
                                           CPU    Num        Memory (MB)
                                  CPU     Bound/   IO   # Ranges/
Virtual Partition Name          Min/Max  Unbound  devs  Total MB    Total MB
==============================  ================  ====  ====================
vPar0                             1/  2    1   1    10    0/  0         2048
vPar1                             1/  2    1   1     5    0/  0         2048
root @uksd3 #
We can see that this Virtual Partition is currently down. This is to be expected, as the next task I need to perform is to install the software onto the boot disk for this vPar. The problem that may become apparent is that there is no BCH interface for this vPar. The BCH interface pertains to the original server/nPar. Consequently, I need to use the vparboot command to boot the subsequent vPars from the Ignite-UX server. Once booted, we should navigate to the console for this partition (accessed via the system console and using the ctrl-a key sequence) and continue with the installation of HP-UX.
root @uksd3 #vparboot -p vPar1 -I hpwin050,/opt/ignite/boot/WINSTALL
vparboot: Booting vPar1.  Please wait...
root @uksd3 #
root @uksd3 #
[MON] vPar1 loaded
root @uksd3 # <ctrl-a>
[vPar1]
gate64: sysvec_vaddr = 0xc0002000 for 2 pages
NOTICE: nfs3_link(): File system was registered at index 4.
NOTICE: autofs_link(): File system was registered at index 6.
NOTICE: cachefs_link(): File system was registered at index 7.

    Host is virtual System Console slave
    Swap device table:  (start & size given in 512-byte blocks)
        entry 0 - auto-configured on root device; ignored - no room
WARNING: no swap device configured, so dump cannot be defaulted to primary swap.
WARNING: No dump devices are configured.  Dump is disabled.
read_ss_nvm: Cannot validate NVM - -2
Starting the STREAMS daemons-phase 1
Create STCP device files
Starting the STREAMS daemons-phase 2
       $Revision: vmunix:    vw: -proj    selectors: CUPI80_BL2000_1108 -c 'V
w for CUPI80_BL2000_1108 build' -- cupi80_bl2000_1108 'CUPI80_BL2000_1108'  Wed Nov  8 19:24:56 PST 2000 $
Memory Information:
    physical page size = 4096 bytes, logical page size = 4096 bytes
    Physical: 2013184 Kbytes, lockable: 1490464 Kbytes, available: 1727340 Kbytes

=======  11/05/03 21:19:27 EST  HP-UX Installation Initialization. (Wed Nov 05 21:19:27 EST 2003)
       @(#) Ignite-UX Revision B.4.4.29
       @(#) install/init (opt) $Revision: 10.277 $
     * Scanning system for IO devices...

    System Console is virtual
     * Querying disk device: 2/0/4/0/0.8.0 ...
     * Querying disk device: 2/0/4/0/0.10.0 ...
NOTE:  Default (boot) source does not appear to be a valid (or complete)
       install source, switching source to Network
     * Setting keyboard language.
NOTE:
       The console firmware terminal type is currently set to "vt100". If you
       are using any other type of terminal you will see "garbage" on the
       screen following this message.
       If this is the case, you will need to either change the terminal type
       set in the firmware via GSP (if your GSP firmware version supports
       this feature), or change your terminal emulation to match the
       firmware. In either case you will need to restart if your terminal and
       the firmware terminal type do not match.
       Press the 'b' key if you want to reboot now.


                        Welcome to Ignite-UX!

 Use the <tab> key to navigate between fields, and the arrow keys
 within fields.  Use the <return/enter> key to select an item.
 Use the <return/enter> or <space-bar> to pop-up a choices list.  If the
 menus are not clear, select the "Help" item for more information.

 Hardware Summary:         System Model: 9000/800/SD32000
 +---------------------+----------------+-------------------+ [ Scan Again  ]
 | Disks: 2  ( 67.8GB) |  Floppies: 0   | LAN cards:   1    |
 | CD/DVDs:        0   |  Tapes:    0   | Memory:    1966Mb |
 | Graphics Ports: 0   |  IO Buses: 3   | CPUs:        3    | [ H/W Details ]
 +---------------------+----------------+-------------------+

                       [      Install HP-UX       ]

                       [   Run a Recovery Shell   ]

                       [    Advanced Options      ]

          [  Reboot  ]                              [  Help  ]
We are using the vparboot command to instigate the installation of HP-UX. Subsequent boots for this vPar will normally be handled by vpmon. The other times we use vparboot are when a vPar is in a down state (after issuing a command such as shutdown –h) and we want to restart HP-UX.
As with any installation, setting up the Operating System and third party software on a Virtual Partition can take some considerable time. Once we have installed HP-UX, the Virtual Partition software, all relevant patches and all relevant third-party applications, each Virtual Partition will function in the same way as any standard HP-UX server.
root @uksd5 #vparstatus
[Virtual Partition]
                                                                          Boot
Virtual Partition Name       State Attributes Kernel Path               Opts
============================ ===== ========== ========================= =====
vPar0                          Up    Dyn,Auto   /stand/vmunix
vPar1                          Up    Dyn,Auto   /stand/vmunix

[Virtual Partition Resource Summary]
                                           CPU    Num        Memory (MB)
                                  CPU     Bound/   IO   # Ranges/
Virtual Partition Name          Min/Max  Unbound  devs  Total MB    Total MB
==============================  ================  ====  ====================
vPar0                             1/  2    1   1    10    0/  0         2048
vPar1                             1/  2    1   1     5    0/  0         2048
root @uksd5 #
As we can see, our second partition is now up and running. We can also check which processors are visible to this partition, as well as which processors have been allocated.
root @uksd5 #ioscan -fnkC processor
Class       I  H/W Path  Driver    S/W State H/W Type  Description
===================================================================
processor   0  2/11      processor CLAIMED   PROCESSOR Processor
processor   1  2/12      processor CLAIMED   PROCESSOR Processor
processor   2  2/13      processor CLAIMED   PROCESSOR Processor
root @uksd5 #
Again, this makes some kind of sense, as the kernel can see bound as well as all unbound processors.
root @uksd5 #vparstatus -vp vPar1
[Virtual Partition Details]
Name:         vPar1
State:        Up
Attributes:   Dynamic,Autoboot
Kernel Path:  /stand/vmunix
Boot Opts:

[CPU Details]
Min/Max:  1/2
Bound by User [Path]:  2.12
Bound by Monitor [Path]:
Unbound [Path]:  2.13

[IO Details]
   2.0.4
   2.0.6
   2.0.9
   2.0.8
   2.0.4.0.0.8.0  BOOT

[Memory Details]
Specified [Base  /Range]:
          (bytes) (MB)
Total Memory (MB):  2048
root @uksd5 #
Here we can confirm which processors have actually been allocated to this partition. We can now move on and discuss managing Virtual Partitions.
We now have two vPars up and running:
root @uksd5 #vparstatus
[Virtual Partition]
                                                                          Boot
Virtual Partition Name       State Attributes Kernel Path               Opts
============================ ===== ========== ========================= =====
vPar0                          Up    Dyn,Auto   /stand/vmunix
vPar1                          Up    Dyn,Auto   /stand/vmunix
[Virtual Partition Resource Summary]
                                           CPU    Num        Memory (MB)
                                  CPU     Bound/   IO   # Ranges/
Virtual Partition Name          Min/Max  Unbound  devs  Total MB    Total MB
==============================  ================  ====  ====================
vPar0                             1/  2    1   1    10    0/  0         2048
vPar1                             1/  2    1   1     5    0/  0         2048
root @uksd5 #
At present, the only hardware we can manage without forcing a reboot of a vPar or the underlying server/nPar are unbound CPUs. A bound CPU handles interrupts and as such cannot be moved from a running vPar. The process of moving an unbound CPU is not as difficult as it might at first seem. Here's a quick recap on where we are currently:
In our initial configuration, we stipulated a total number of CPUs for each vPar to = 2.
We specified a minimum and maximum number of CPUs we wanted to maintain for our vPar (this is optional, but allows us to maintain a minimum and a maximum configuration).
We specified the specific CPU(s) by hardware address that were bound CPUs. Currently we have no control over which unbound CPUs will be selected for inclusion in our vPar.
To remove an unbound CPU from a vPar, we can simply delete a specified number of CPUs.
root @uksd3 #vparstatus
[Virtual Partition]
                                                                          Boot
Virtual Partition Name       State Attributes Kernel Path               Opts
============================ ===== ========== ========================= =====
vPar0                          Up    Dyn,Auto   /stand/vmunix
vPar1                          Up    Dyn,Auto   /stand/vmunix

[Virtual Partition Resource Summary]
                                           CPU    Num        Memory (MB)
                                  CPU     Bound/   IO   # Ranges/
Virtual Partition Name          Min/Max  Unbound  devs  Total MB    Total MB
==============================  ================  ====  ====================
vPar0                             1/  2    1   1    10    0/  0         2048
vPar1                             1/  2    1   1     5    0/  0         2048
root @uksd3 #vparstatus -w
The current virtual partition is vPar0.
root @uksd3 #vparmodify –p vPar1 –d cpu::1
root @uksd3 #
root @uksd3 #vparstatus
[Virtual Partition]
                                                                          Boot
Virtual Partition Name       State Attributes Kernel Path               Opts
============================ ===== ========== ========================= =====
vPar0                          Up    Dyn,Auto   /stand/vmunix
vPar1                          Up    Dyn,Auto   /stand/vmunix

[Virtual Partition Resource Summary]
                                           CPU    Num        Memory (MB)
                                  CPU     Bound/   IO   # Ranges/
Virtual Partition Name          Min/Max  Unbound  devs  Total MB    Total MB
==============================  ================  ====  ====================
vPar0                             1/  2    1   1    10    0/  0         2048
vPar1                             1/  2    1   0     5    0/  0         2048
root @uksd3 #
The first thing to note is that we can manage any partition from any other partition.
We could have deleted a CPU by modifying the total number of CPUs assigned to the vPar (e.g., vparmodify –p vPar –m cpu::1). This would have effectively deleted 1 CPU. In our configuration, both commands are effectively equivalent. Deleting a CPU by hardware address implies removing a bound CPU, which requires the vPar to be down.
We can now view available resources that are not assigned to any vPar:
root @uksd3 #vparstatus -A
[Unbound CPUs (path)]:  2.13
[Available CPUs]:  1

[Available I/O devices (path)]:  <none>

[Unbound memory (Base  /Range)]:
                (bytes) (MB)
[Available memory (MB)]:  0
root @uksd3 #
In a similar fashion, we can modify the total number of CPUs in vPar0 to allow us to include the available CPU:
root @uksd3 #vparmodify -p vPar0 -m cpu::3
vparmodify Error: "-m cpu::3": Total CPUs would exceed configured maximum.
root @uksd3 #
This error message makes sense. As part of our configuration, we decided to specify a maximum and minimum number of processors per partition. That part of the configuration was optional. Here we can see the effect it has on future configuration changes. Now we need to modify the maximum number of processors before modifying the total number of processors for this partition. The problem with modifying the maximum number of processors is that it requires the partition to be down.
root @uksd3 #vparstatus -w
The current virtual partition is vPar0.
root @uksd3 #
root @uksd3 #vparmodify -p vPar0 -m cpu:::1:5
vparmodify: Error: Virtual partition vPar0 must be in the Down state.
root @uksd3 #
root @uksd3 #shutdown -h now

SHUTDOWN PROGRAM
11/07/03 02:13:32 GMT

Broadcast Message from root (console) Fri Nov  7 02:13:32...
SYSTEM BEING BROUGHT DOWN NOW ! ! !
...

root @uksd5 #vparstatus
[Virtual Partition]
                                                                          Boot
Virtual Partition Name       State Attributes Kernel Path               Opts
============================ ===== ========== ========================= =====
vPar0                          Down  Dyn,Auto   /stand/vmunix
vPar1                          Up    Dyn,Auto   /stand/vmunix

[Virtual Partition Resource Summary]
                                           CPU    Num        Memory (MB)
                                  CPU     Bound/   IO   # Ranges/
Virtual Partition Name          Min/Max  Unbound  devs  Total MB    Total MB
==============================  ================  ====  ====================
vPar0                             1/  2    1   1    10    0/  0         2048
vPar1                             1/  2    1   0     5    0/  0         2048
root @uksd5 #vparmodify -p vPar0 -m cpu:::1:5
root @uksd5 #vparstatus
[Virtual Partition]
                                                                          Boot
Virtual Partition Name         State Attributes Kernel Path               Opts
============================== ===== ========== ========================= =====
vPar0                          Down  Dyn,Auto   /stand/vmunix
vPar1                          Up    Dyn,Auto   /stand/vmunix

[Virtual Partition Resource Summary]
                                           CPU    Num        Memory (MB)
                                  CPU     Bound/   IO   # Ranges/
Virtual Partition Name          Min/Max  Unbound  devs  Total MB    Total MB
==============================  ================  ====  ====================
vPar0                             1/  5    1   1    10    0/  0         2048
vPar1                             1/  2    1   0     5    0/  0         2048
root @uksd5 #
root @uksd5 #vparboot -p vPar0
vparboot: Booting vPar0.  Please wait...
root @uksd5 # [MON] Console server set to vPar0

[vPar1]

[MON] vPar0 loaded

root @uksd5 #
root @uksd5 #vparstatus
[Virtual Partition]
                                                                          Boot
Virtual Partition Name       State Attributes Kernel Path               Opts
============================ ===== ========== ========================= =====
vPar0                          Up    Dyn,Auto   /stand/vmunix
vPar1                          Up    Dyn,Auto   /stand/vmunix

[Virtual Partition Resource Summary]
                                           CPU    Num        Memory (MB)
                                  CPU     Bound/   IO   # Ranges/
Virtual Partition Name          Min/Max  Unbound  devs  Total MB    Total MB
==============================  ================  ====  ====================
vPar0                             1/  5    1   1    10    0/  0         2048
vPar1                             1/  2    1   0     5    0/  0         2048
root @uksd5 #
root @uksd5 #
root @uksd5 #vparmodify -p vPar0 -m cpu::3
root @uksd5 #vparstatus
[Virtual Partition]
                                                                          Boot
Virtual Partition Name       State Attributes Kernel Path               Opts
============================ ===== ========== ========================= =====
vPar0                          Up    Dyn,Auto   /stand/vmunix
vPar1                          Up    Dyn,Auto   /stand/vmunix
[Virtual Partition Resource Summary]
                                           CPU    Num        Memory (MB)
                                  CPU     Bound/   IO   # Ranges/
Virtual Partition Name          Min/Max  Unbound  devs  Total MB    Total MB
==============================  ================  ====  ====================
vPar0                             1/  5    1   2    10    0/  0         2048
vPar1                             1/  2    1   0     5    0/  0         2048
root @uksd5 #
root @uksd3 #vparstatus -w
The current virtual partition is vPar0.
root @uksd3 #vparstatus -vp vPar0
[Virtual Partition Details]
Name:         vPar0
State:        Up
Attributes:   Dynamic,Autoboot
Kernel Path:  /stand/vmunix
Boot Opts:

[CPU Details]
Min/Max:  1/5
Bound by User [Path]:  2.10
Bound by Monitor [Path]:
Unbound [Path]:  2.11
                 2.13

[IO Details]
   2.0.0
   2.0.1
   2.0.2
   2.0.3
   2.0.10
   2.0.11
   2.0.12
   2.0.14
   2.0.1.0.0.0.0  BOOT
   2.0.11.0.0.3.0  ALTBOOT

[Memory Details]
Specified [Base  /Range]:
          (bytes) (MB)
Total Memory (MB):  2048
root @uksd3 #
The additional CPU allocated to vPar0 is now available to the scheduler to allocate to threads/processes. Similarly, vPar1 now has less processing power at its disposal. We need to understand the implications of such a change before we start, don't we?
We can manage other hardware in a Virtual Partition in a similar fashion except that for any changes to IO and memory requirements, the vPar must be in a down state. In this example, I ran shutdown –h now on vPar0 to take it to a down state:
root @uksd5 #vparstatus -w
The current virtual partition is vPar1.
root @uksd5 #vparstatus
[Virtual Partition]
                                                                          Boot
Virtual Partition Name       State Attributes Kernel Path               Opts
============================ ===== ========== ========================= =====
vPar0                          Down  Dyn,Auto   /stand/vmunix
vPar1                          Up    Dyn,Auto   /stand/vmunix

[Virtual Partition Resource Summary]
                                           CPU    Num        Memory (MB)
                                  CPU     Bound/   IO   # Ranges/
Virtual Partition Name          Min/Max  Unbound  devs  Total MB    Total MB
==============================  ================  ====  ====================
vPar0                             1/  5    1   2    10    0/  0         2048
vPar1                             1/  2    1   0     5    0/  0         2048
root @uksd5 #
root @uksd5 #vparstatus -vp vPar0
[Virtual Partition Details]
Name:         vPar0
State:        Down
Attributes:   Dynamic,Autoboot
Kernel Path:  /stand/vmunix
Boot Opts:

[CPU Details]
Min/Max:  1/5
Bound by User [Path]:  2.10
Bound by Monitor [Path]:
Unbound [Path]:  <no path>
                 <no path>

[IO Details]
   2.0.0
   2.0.1
   2.0.2
   2.0.3
   2.0.10
   2.0.11
   2.0.12
   2.0.14
   2.0.1.0.0.0.0  BOOT
   2.0.11.0.0.3.0  ALTBOOT

[Memory Details]
Specified [Base  /Range]:
          (bytes) (MB)
Total Memory (MB):  2048
root @uksd5 #
I can now remove an IO device (an LBA) using vparmodify:
root @uksd5 #vparmodify -p vPar0 -d io:2/0/14
root @uksd5 #
root @uksd5 #vparstatus -vp vPar0
[Virtual Partition Details]
Name:         vPar0
State:        Down
Attributes:   Dynamic,Autoboot
Kernel Path:  /stand/vmunix
Boot Opts:

[CPU Details]
Min/Max:  1/5
Bound by User [Path]:  2.10
Bound by Monitor [Path]:
Unbound [Path]:  <no path>
                 <no path>

[IO Details]
   2.0.0
   2.0.1
   2.0.2
   2.0.3
   2.0.10
   2.0.11
   2.0.12
   2.0.1.0.0.0.0  BOOT
   2.0.11.0.0.3.0  ALTBOOT

[Memory Details]
Specified [Base  /Range]:
          (bytes) (MB)
Total Memory (MB):  2048
root @uksd5 #
root @uksd5 #vparstatus -A
[Unbound CPUs (path)]:  2.11
                        2.13
[Available CPUs]:  0
[Available I/O devices (path)]:  2.0.14

[Unbound memory (Base  /Range)]:  0x8000000/64
                (bytes) (MB)      0x84000000/1984
[Available memory (MB)]:  0
root @uksd5 #
We can now add this IO device to vPar1 if we want, although this would require that we restart vPar0 (use the vparboot –p vPar0 command) and then take vPar1 to a down state.
root @uksd5 #vparboot -p vPar0
vparboot: Booting vPar0.  Please wait...
root @uksd5 #[MON] Console server set to vPar0

[MON] vPar0 loaded

root @uksd5 #
root @uksd5 #vparstatus -w
The current virtual partition is vPar1.
root @uksd5 #shutdown -h now

SHUTDOWN PROGRAM
11/07/03 02:41:59 GMT

Broadcast Message from root (console) Fri Nov  7 02:41:59...
SYSTEM BEING BROUGHT DOWN NOW ! ! !
...

root @uksd3 #vparstatus
[Virtual Partition]
                                                                          Boot
Virtual Partition Name       State Attributes Kernel Path               Opts
============================ ===== ========== ========================= =====
vPar0                          Up    Dyn,Auto   /stand/vmunix
vPar1                          Down  Dyn,Auto   /stand/vmunix

[Virtual Partition Resource Summary]
                                           CPU    Num        Memory (MB)
                                  CPU     Bound/   IO   # Ranges/
Virtual Partition Name          Min/Max  Unbound  devs  Total MB    Total MB
==============================  ================  ====  ====================
vPar0                             1/  5    1   2     9    0/  0         2048
vPar1                             1/  2    1   0     5    0/  0         2048
root @uksd3 #
root @uksd3 #vparmodify -p vPar1 -a io:2/0/14
root @uksd3 #
root @uksd3 #vparstatus -vp vPar1
[Virtual Partition Details]
Name:         vPar1
State:        Down
Attributes:   Dynamic,Autoboot
Kernel Path:  /stand/vmunix
Boot Opts:
[CPU Details]
Min/Max:  1/2
Bound by User [Path]:  2.12
Bound by Monitor [Path]:
Unbound [Path]:

[IO Details]
   2.0.4
   2.0.6
   2.0.9
   2.0.8
   2.0.4.0.0.8.0  BOOT
   2.0.14

[Memory Details]
Specified [Base  /Range]:
          (bytes) (MB)
Total Memory (MB):  2048
root @uksd3 #
root @uksd3 #vparboot -p vPar1
vparboot: Booting vPar1.  Please wait...
root @uksd3 #
[MON] vPar1 loaded

root @uksd3 #
The only issue we haven't discussed here is deleting a vPar. I will cover that toward the end of this section.
If we want to effect a change to an nPar that will change the underlying cell assignment, we can do so while vpmon is up and running. The tricky part of this configuration is being able to step back and realize that in fact we are running vPars from within an nPar:
root @uksd3 #parstatus -w
The local partition number is 2.
root @uksd3 #
root @uksd3 #parstatus -P
[Partition]
Par              # of  # of I/O
Num Status       Cells Chassis  Core cell  Partition Name (first 30 chars)
=== ============ ===== ======== ========== ===============================
 0  active         1      1     cab0,cell0 uksd1
 1  active         1      1     cab0,cell4 uksd2
 2  active         1      1     cab0,cell2 uksd3
root @uksd3 #
In our configuration, we are running two vPars within nPar = 2 (partition name = uksd3). From here we can effect changes to the nPar, i.e., adding and/or removing cells using standard nPar management techniques.
root @uksd3 #parstatus -AC
[Cell]
                        CPU     Memory                              Use
                        OK/     (GB)                        Core    On
Hardware   Actual       Deconf/ OK/                         Cell    Next Par
Location   Usage        Max     Deconf    Connected To      Capable Boot Num
========== ============ ======= ========= ================= ======= ==== ===
cab0,cell1 absent       -       -         -                   -       -    -
cab0,cell3 absent       -       -         -                   -       -    -
cab0,cell5 absent       -       -         -                   -       -    -
cab0,cell6 inactive     4/0/4    4.0/ 0.0 cab0,bay0,chassis3  yes     -    -
cab0,cell7 absent       -       -         -                   -       -    -

root @uksd3 #
root @uksd3 #parmodify -p 2 -a 6:::

In order to activate any cell that has been newly added,
reboot the partition with the -R option.
Command succeeded.
root @uksd3 #
As we can see, there is now a pending change in the SCCD and all the Virtual Partitions are up and running. If we were simply to reboot the current vPar, even with the –R option, the reboot-for-reconfig would not take effect until all other vPars had been halted. Only then will vpmon be rebooted allowing the nPar to be rebooted and the new SCCD pushed out by the GSP. As you can imagine, this needs to be planned well in advance. The process of rebooting all vPars can take some considerable time.
root @uksd3 #shutdown -R now

SHUTDOWN PROGRAM
11/07/03 03:20:02 GMT

Broadcast Message from root (console) Fri Nov  7 03:20:02...
SYSTEM BEING BROUGHT DOWN NOW ! ! !
..
[vPar1]
[MON] vPar0 has halted.


root @uksd5 #
root @uksd5 #shutdown -ry now

SHUTDOWN PROGRAM
11/07/03 03:24:02 GMT

Broadcast Message from root (console) Fri Nov  7 03:24:02...
SYSTEM BEING BROUGHT DOWN NOW ! ! !
...
Note: If this is a partitionable system, the requested reconfiguration will not
take place until all the virtual partitions on this hard partition are shut down
and the virtual partition monitor is rebooted.
...

Closing open logical volumes...
Done

Cells has been reset and are ready for reconfiguration (Boot Is Blocked (BIB) is
set).

 Please check Virtual Front Panel (VFP) for reset status.


Reboot for reconfiguration returned 2


Cells have been reset (Boot Is Blocked (BIB) is not set).


[MON]
[MON] vPar1 has halted.
All partitions have halted. System will now reboot for reconfiguration.
Once the nPar has rebooted, we have a new pool of available resources with which to manage our vPars.
Firmware Version  35.4

Duplex Console IO Dependent Code (IODC) revision 1
   --------------------------------------------------------------------------
     (c) Copyright 1995-2002, Hewlett-Packard Company, All rights reserved
   --------------------------------------------------------------------------


          Cab/      Cell      ------- Processor --------    Cache Size
    Cell  Slot      State      #    Speed       State      Inst    Data
    ----  ----  ------------  ---  --------  -----------  ------  ------
      2   0/2   Active         0   552  MHz  Active       512 KB  1 MB
                               1   552  MHz  Idle         512 KB  1 MB
                               2   552  MHz  Idle         512 KB  1 MB
                               3   552  MHz  Idle         512 KB  1 MB
      6   0/6   Idle           0   552  MHz  Idle         512 KB  1 MB
                               1   552  MHz  Idle         512 KB  1 MB
                               2   552  MHz  Idle         512 KB  1 MB
                               3   552  MHz  Idle         512 KB  1 MB


     Primary Boot Path:  2/0/1/0/0.0
          Boot Actions:  Boot from this path.
                         If unsuccessful, go to next path.

HA Alternate Boot Path:  2/0/4/0/0.8
          Boot Actions:  Boot from this path.
                         If unsuccessful, go to BCH.

   Alternate Boot Path:  2/0/4/0/0.8
          Boot Actions:  Skip this path.
                         Go to BCH.

          Console Path:  2/0/0/0/0.0


Attempting to boot using the primary path.
-------------------------------------------------------------


 To discontinue, press any key within 10 seconds.

 10 seconds expired.
 Proceeding...


Initializing boot Device.


Boot IO Dependent Code (IODC) Revision 0


Boot Path Initialized.


HARD Booted.

ISL Revision A.00.43  Apr 12, 2000

ISL booting  hpux /stand/vpmon -a

Boot
: disk(2/0/1/0/0.0.0.0.0.0.0;0)/stand/vpmon
614400 + 168736 + 16898800 start 0x23000
[MON] Booting vPar1...
[MON] Booting vPar0...
[MON] Console client set to vPar1

[MON] vPar1 loaded
[MON] Console server set to vPar0
...
root @uksd3 #vparstatus -A
[Unbound CPUs (path)]:  6.10
                        6.11
                        6.12
                        6.13
[Available CPUs]:  4

[Available I/O devices (path)]:  6.0
                                 6.0.0
                                 6.0.1
                                 6.0.2
                                 6.0.3
                                 6.0.4
                                 6.0.6
                                 6.0.8
                                 6.0.9
                                 6.0.10
                                 6.0.11
                                 6.0.12
                                 6.0.14

[Unbound memory (Base  /Range)]:  0x0/64
                (bytes) (MB)      0xc000000/4032
[Available memory (MB)]:  4096
root @uksd3 #
We have seen in the previous section that we can shut down and restart vPars independent of each other. The shutdown and restarts are all occurring while vpmon is still loaded in memory, managing all existing vPars. There are times when we want to restart the vmpon itself. The main reason for restarting vpmon is to perform maintenance on the underlying server/nPar, e.g., you want to add additional hardware to an existing server/nPar. In such a situation, we will need to shut down all vPars to a down state (shutdown –h now on all vPars). This will leave us interacting directly with vpmon; at the MON> prompt on the console. From here we can reboot/halt vpmon itself.
root @uksd3 #vparstatus
[Virtual Partition]
                                                                          Boot
Virtual Partition Name       State Attributes Kernel Path               Opts
============================ ===== ========== ========================= =====
vPar0                          Up    Dyn,Auto   /stand/vmunix
vPar1                          Down  Dyn,Auto   /stand/vmunix

[Virtual Partition Resource Summary]
                                           CPU    Num        Memory (MB)
                                  CPU     Bound/   IO   # Ranges/
Virtual Partition Name          Min/Max  Unbound  devs  Total MB    Total MB
==============================  ================  ====  ====================
vPar0                             1/  5    1   2     9    0/  0         2048
vPar1                             1/  2    1   0     6    0/  0         2048
root @uksd3 #shutdown -h now

SHUTDOWN PROGRAM
11/07/03 02:51:52 GMT

Broadcast Message from root (console) Fri Nov  7 02:51:52...
SYSTEM BEING BROUGHT DOWN NOW ! ! !
...
System shutdown time has arrived


[MON]
[MON] vPar0 has halted.
MON>
MON> ?

Supported Commands:

?                Print list of commands
cat              Dump contents of file to screen
cbuf             Dump contents of console buffer
getauto          Print the AUTO file
help             Print list of commands
lifls            List files in LIF directory
log              View the event log
ls               List files in a directory
readdb           Read a partition DB
reboot           Reboot system
scan             Scan the system
toddriftreset    Reset the TOD drift of all vpars
vparload         Load vPar
vparinfo         Display vPar info
bootpath         Display monitor boot path

MON>
A REBOOT will reboot vpmon. This would give us the opportunity to interact with the boot-up of the server/n-Par via the system console. At that time, we could interrupt the boot sequence in order to manage the server/n-Par (power-cycle the server or PE the necessary hardware components) to implement the changes that required us to reboot vpmon. To restart an nPar, we will need to use the GSP BO command.
MON> vparload -all
[MON] Booting vPar1...
[MON] Booting vPar0...
Normally, we don't interact directly with vpmon; it is loaded in memory, managing all vPar resources, but ostensibly not a visible resource within an individual partition. In some instances, we may want to interact with vpmon in order to boot individual vPars to investigate a problem that is not allowing a specific vPar to boot. We can interact with vpmon by either halting all of our existing vPars or by interacting with ISL and stipulating that hpux should only load vpmon and nothing else:
Main Menu: Enter command or menu > bo pri

     Primary Boot Path:  2/0/1/0/0.0


 Do you wish to stop at the ISL prompt prior to booting? (y/n) >> y

Initializing boot Device.


Boot IO Dependent Code (IODC) Revision 0


Boot Path Initialized.


HARD Booted.

ISL Revision A.00.43  Apr 12, 2000

ISL>
ISL> hpux /stand/vpmon

Boot
: disk(2/0/1/0/0.0.0.0.0.0.0;0)/stand/vpmon
614400 + 168736 + 16898800 start 0x23000

Welcome to VPMON (type '?' for a list of commands)

MON> ?

Supported Commands:

?                Print list of commands
cat              Dump contents of file to screen
cbuf             Dump contents of console buffer
getauto          Print the AUTO file
help             Print list of commands
lifls            List files in LIF directory
log              View the event log
ls               List files in a directory
readdb           Read a partition DB
reboot           Reboot system
scan             Scan the system
toddriftreset    Reset the TOD drift of all vpars
vparload         Load vPar
vparinfo         Display vPar info
bootpath         Display monitor boot path

MON>
From here we can issue commands such as vparinfo and ls to investigate the underlying vPar configuration.
MON> vparinfo

Resources not assigned to any partition
-------------------------------------
2           0xfffffffffc200000      1       0  TYPE=14  SV_MODEL=170
2/0         0xfffffff848000000      1       0  TYPE= 7  SV_MODEL= 12
2/5         0xfffffffffc205000      1       0  TYPE= 1  SV_MODEL=  9
2/11        0xfffffffffc27a000      1       0  TYPE= 0  SV_MODEL=  4
2/13        0xfffffffffc27e000      1       0  TYPE= 0  SV_MODEL=  4

Names of the partitions in the database:
----------------------------------------

vPar0 (down)
vPar1 (down)

Available Free Memory: 0 MB

Available MEM RANGE: 0x0000000000000000-0x00000000ffffffff (4194304 Kb)
MON>
MON> bootpath
disk(2/0/1/0/0.0.0.0.0.0.0)
MON> getauto
hpux /stand/vpmon -a

MON> ls -l
drwxr-xr-x    2 0            0                 65536 lost+found
-rw-r--r--    1 0            3                  4948 ioconfig
-rw-r--r--    1 0            3                    19 bootconf
-r--r--r--    1 0            3                  1063 system
drwxr-xr-x    2 0            3                  1024 krs
drwxr-xr-x    2 0            3                  1024 system.d
drwxr-xr-x    4 0            3                  2048 build
-rwxr-xr-x    1 0            0              28133624 vmunix
drwxrwxrwx    5 0            0                  1024 dlkm
-r--r--r--    1 0            3                    82 kernrel
-rw-------    1 0            0                    12 rootconf
drwxr-xr-x    2 0            0                  1024 krs_tmp
drwxr-xr-x    2 0            0                  1024 krs_lkg
-r--r--r--    1 0            3                  1058 system.prev
drwxrwxrwx    5 0            3                  1024 dlkm.vmunix.prev
-rwxr-xr-x    1 0            3              27239144 vmunix.prev
-r-xr-xr-x    1 2            2               1062320 vpmon
-rw-------    1 0            0              17813008 vpmon.dmp
-rw-------    1 0            0                  8232 vpdb

MON>
We can decide to load a specific vPar from vpmon using the vparload command. If we want to boot a Virtual Partition using a specific boot method, e.g., single user mode, we use the –o <boot option> option to vparload; these are effectively the options we would pass to the hpux secondary loader. Should we need to boot from a different kernel, we use the –b <kernel> option to vparload:
MON> vparload -p vPar0 -o "-is" -b /stand/vmunix
[MON] Booting vPar0...
[MON] Console client set to vPar0
[MON] Console server set to vPar0

[vPar0]

[MON] vPar0 loaded
gate64: sysvec_vaddr = 0xc0002000 for 2 pages
NOTICE: nfs3_link(): File system was registered at index 3.
NOTICE: autofs_link(): File system was registered at index 6.
NOTICE: cachefs_link(): File system was registered at index 7.
td: claimed Tachyon TL/TS Fibre Channel Mass Storage card at 2/0/12/0/0
fddi4: INITIALIZING: 0150 PCI FDDI card in slot 2/0/10/0/0
Entering cifs_init...
Initialization finished successfully... slot is 9

    Host is virtual System Console slave
Logical volume 64, 0x3 configured as ROOT
Logical volume 64, 0x2 configured as SWAP
Logical volume 64, 0x2 configured as DUMP
    Swap device table:  (start & size given in 512-byte blocks)
        entry 0 - major is 64, minor is 0x2; start = 0, size = 8388608
read_ss_nvm: Cannot validate NVM - -2
Starting the STREAMS daemons-phase 1

    System Console is virtual
Checking root file system.
log replay in progress
replay complete - marking super-block as CLEAN
Root check done.
Create STCP device files
Starting the STREAMS daemons-phase 2
                   $Revision: vmunix:    vw: -proj    selectors: CUPI80_BL2000_1108 -c 'Vw for CUPI80_BL2000_1108 build' -- cupi80_bl2000_1108
'CUPI80_BL2000_1108'  Wed Nov  8 19:24:56 PST 2000 $
Memory Information:
    physical page size = 4096 bytes, logical page size = 4096 bytes
    Physical: 2086912 Kbytes, lockable: 1565460 Kbytes, available: 1801848 Kbytes

/sbin/ioinitrc:
/sbin/krs_sysinit:


INIT: Overriding default level with level 's'
INIT: SINGLE USER MODE

INIT: Running /sbin/sh
#
Now that we are in single user mode, we can effect any changes as necessary, e.g., fixing a broken kernel or repairing a broken vg00 (use the option –o –lm to vparload to boot in maintenance mode).
The attributes we may consider changing include the dynamic nature of configuration changes to a partition as well as changes to the boot commands used to boot HP-UX.
The two configuration options we are considering can be seen in the Attributes field of vparstatus:
root @uksd3 #vparstatus
[Virtual Partition]
                                                                          Boot
Virtual Partition Name       State Attributes Kernel Path               Opts
============================ ===== ========== ========================= =====
vPar0                          Up    Dyn,Auto   /stand/vmunix
vPar1                          Up    Dyn,Auto   /stand/vmunix

[Virtual Partition Resource Summary]
                                           CPU    Num        Memory (MB)
                                  CPU     Bound/   IO   # Ranges/
Virtual Partition Name          Min/Max  Unbound  devs  Total MB    Total MB
==============================  ================  ====  ====================
vPar0                             1/  5    1   2     9    0/  0         2048
vPar1                             1/  2    1   0     6    0/  0         2048
root @uksd3 #
Dyn means that dynamic configuration changes to the hardware configuration of the partition are allowed (limited to adding/removing unbound CPUs at present). This can be changed to static with the vparmodify command:
root @uksd3 #vparmodify -p vPar1 -S static
root @uksd3 #
root @uksd3 #vparstatus
[Virtual Partition]
                                                                          Boot
Virtual Partition Name       State Attributes Kernel Path               Opts
============================ ===== ========== ========================= =====
vPar0                          Up    Dyn,Auto   /stand/vmunix
vPar1                          Up    Stat,Auto  /stand/vmunix

[Virtual Partition Resource Summary]
                                           CPU    Num        Memory (MB)
                                  CPU     Bound/   IO   # Ranges/
Virtual Partition Name          Min/Max  Unbound  devs  Total MB    Total MB
==============================  ================  ====  ====================
vPar0                             1/  5    1   2     9    0/  0         2048
vPar1                             1/  2    1   0     6    0/  0         2048
root @uksd3 #
Auto refers to the autoboot attribute for the partition. If the attribute is set to manual, the virtual partition halts after a vparreset and does not boot when vpmon is loaded. It must then be booted manually with the vparboot command.
root @uksd3 #vparmodify -p vPar1 -B manual
root @uksd3 #
root @uksd3 #vparstatus
[Virtual Partition]
                                                                          Boot
Virtual Partition Name       State Attributes Kernel Path               Opts
============================ ===== ========== ========================= =====
vPar0                          Up    Dyn,Auto   /stand/vmunix
vPar1                          Up    Stat,Manl  /stand/vmunix

[Virtual Partition Resource Summary]
                                           CPU    Num        Memory (MB)
                                  CPU     Bound/   IO   # Ranges/
Virtual Partition Name          Min/Max  Unbound  devs  Total MB    Total MB
==============================  ================  ====  ====================
vPar0                             1/  5    1   2     9    0/  0         2048
vPar1                             1/  2    1   0     6    0/  0         2048
root @uksd3 #
Let's see what effect that has made on vPar1:
root @uksd5 #
root @uksd5 #setboot
Primary bootpath : 2/0/4/0/0.8.0
Alternate bootpath : <none>

Autoboot is OFF (disabled)
Autosearch is OFF (disabled)

Note: The interpretation of Autoboot and Autosearch has changed for
systems that support hardware partitions. Please refer to the manpage.
root @uksd5 #
As you can see, the partition autoboot attribute has a direct effect on the setboot autoboot attribute. This is because the process of booting HP-UX is now controlled by vpmon, which reads boot related settings from the Virtual Partition Database (/stand/vpdb). Personally, I think the default configuration attributes for virtual partitions of –B auto and –S dynamic are, more often than not, appropriate defaults. This leads us to the next type of attribute change we may want to consider.
We may need to consider changing boot-related attributes for individual vPars. The boot-related attributes I am thinking of include boot paths and the boot string used to boot a Virtual Partition.
The configuration of boot paths for Virtual Partitions is controlled by the setboot command.
root @uksd3 #setboot
Primary bootpath : 2/0/1/0/0.0.0
Alternate bootpath : 2/0/11/0/0.3.0

Autoboot is ON (enabled)
Autosearch is ON (enabled)

Note: The interpretation of Autoboot and Autosearch has changed for
systems that support hardware partitions. Please refer to the manpage.
root @uksd3 #
A Virtual Partition has only two boot paths: the Primary and Alternate Boot Path. As with any other server, we should consider configuring the Alternate Boot Path to be the mirror of our root disk. When considering things like mirroring, we should automatically consider the boot string issued by vpmon to boot HPUX. This is normally stored in the AUTO file on our boot disk. The boot string for a Virtual Partition is stored in /stand/vpdb (remember the AUTO file on our boot disk is configured to boot /stand/vpmon when the server/nPar is booted). To change the boot string for a Virtual Partition, we use the vparmodify command:
root @uksd3 #vparmodify -p vPar1 -o "-lq"
root @uksd3 #
root @uksd3 #vparstatus -vp vPar1
[Virtual Partition Details]
Name:         vPar1
State:        Up
Attributes:   Dynamic,Autoboot
Kernel Path:  /stand/vmunix
Boot Opts:    -lq

[CPU Details]
Min/Max:  1/2
Bound by User [Path]:  2.12
Bound by Monitor [Path]:
Unbound [Path]:

[IO Details]
   2.0.4
   2.0.6
   2.0.9
   2.0.8
   2.0.4.0.0.8.0  BOOT
   2.0.14

[Memory Details]
Specified [Base  /Range]:
          (bytes) (MB)
Total Memory (MB):  2048
root @uksd3 #
The –o option effectively stores the options we would pass to the hpux secondary loader. To change the name of the default kernel to boot, we can use the –b option to vparmodify:
root @uksd3 #vparmodify -p vPar1 -b "/stand/vmunix.test"
root @uksd3 #
root @uksd3 #vparstatus -vp vPar1
[Virtual Partition Details]
Name:         vPar1
State:        Up
Attributes:   Dynamic,Autoboot
Kernel Path:  /stand/vmunix.test
Boot Opts:    -lq

[CPU Details]
Min/Max:  1/2
Bound by User [Path]:  2.12
Bound by Monitor [Path]:
Unbound [Path]:

[IO Details]
   2.0.4
   2.0.6
   2.0.9
   2.0.8
   2.0.4.0.0.8.0  BOOT
   2.0.14

[Memory Details]
Specified [Base  /Range]:
          (bytes) (MB)
Total Memory (MB):  2048
root @uksd3 #
It is not inconceivable that an instance of HP-UX will hang, possibly due to a software or hardware fault. On a non-vPar server/n-Par, we can deal with this in two ways: We can issue a hard reset (the RS command from the GSP/console) or a soft reset (the TC command from the GSP/console, invoking a system crashdump). If we perform either of these tasks on a vPar-enabled server/n-Par, we will reset all vPars and vpmon … not a good idea. If we want to issue a hard or soft reset on an individual vPar, we use the vparreset command. The –h option is a hard reset (the RS command). The –t option is a soft reset (the TC command).
root @uksd3 #vparreset -p vPar1 -t
Reset virtual partition vPar1? [n]  y
******** TOC -- Processor 2: HPA 0xfffffffffc27c000  Entity ID: 10 *********
General Registers 0 - 31
00-03  0000000000000000  000000000401521c  00000000043d3950  0000000000000000
04-07  0000000001540790  000000000153a000  000000000153a9b0  0000000004c48fd0
08-11  0000000004c74430  0000000004a87080  0000000004b7a080  0000000004b7c080
12-15  0000000004b7a080  0000000004b7c080  0000000004b7c080  0000000004ada1a0
16-19  0000000000000064  000000004008fd00  0000000000000000  0000000000000002
20-23  0000000000000000  0000000007ae04e0  0000000700000000  00000000049dcb80
24-27  fffffff000000000  0000000000000040  fffffff0ffffffff  0000000004b84080
28-31  fffffff0ffffffff  0000000007ae0350  0000000007ae0310  0000000004156c08

Control Registers 0 - 31
00-03  000000007d3c35f0  0000000000000000  0000000000000000  0000000000000000
04-07  0000000000000000  0000000000000000  0000000000000000  0000000000000000
08-11  000000000000ba0f  000000000000945c  00000000000000c0  0000000000000038
12-15  0000000000000000  0000000000000000  000000000400a000  fffffff0ffffffff
16-19  00000140924adab5  0000000000000000  00000000043d3950  00000000e81f1d05
20-23  000000001034001e  00000000b82e1300  000000000804021f  0000000000000000
24-27  000000000153a000  000000000465d1d6  000000004008fd00  000000004006cd80
28-31  000000000153a000  00000140921e233e  0000000000007c37  0000000007ae0310

Space Registers 0 - 7
00-03  000000000b049000  00000000024f8000  000000000a30a400  0000000000000000
04-07  0000000000000000  00000000ffffffff  0000000009886000  0000000000000000

IIA Space                    = 0000000000000000
IIA Offset                   = 00000000043d3954
CPU State                    = 0x9e000001

root @uksd3 #
The hex data is gathered from the Processor Information Module (PIM). This will be displayed whenever we perform a hard or soft reset of a vPar. After a TOC, we will find the crashdump under the directory configured to store crashdumps, /var/adm/crash by default. It should be noted that any root user logged into a vPar within a server/n-Par is able to reset any other vPar within the same server/n-Par.
root @uksd3 #vparstatus
[Virtual Partition]
                                                                          Boot
Virtual Partition Name       State Attributes Kernel Path               Opts
============================ ===== ========== ========================= =====
vPar0                          Up    Dyn,Auto   /stand/vmunix
vPar1                          Up    Dyn,Auto   /stand/vmunix

[Virtual Partition Resource Summary]
                                           CPU    Num        Memory (MB)
                                  CPU     Bound/   IO   # Ranges/
Virtual Partition Name          Min/Max  Unbound  devs  Total MB    Total MB
==============================  ================  ====  ====================
vPar0                             1/  5    1   1     9    0/  0         2048
vPar1                             1/  2    1   1     5    0/  0         2048
root @uksd3 #
In order to remove a virtual partition, it must be in a down state. After shutdown, we can remove the partition quite simply with vparremove:
root @uksd3 #vparremove -p vPar1
Remove virtual partition vPar1? [n]  y
vparremove: Error: Specified virtual partition vPar1 not in Down state. Cannot remove the virtual partition.
root @uksd3 #
...
root @uksd5 #shutdown -h now

SHUTDOWN PROGRAM
11/07/03 05:11:46 GMT

Broadcast Message from root (console) Fri Nov  7 05:11:46...
SYSTEM BEING BROUGHT DOWN NOW ! ! !
...
root @uksd3 #vparstatus
[Virtual Partition]
                                                                          Boot
Virtual Partition Name       State Attributes Kernel Path               Opts
============================ ===== ========== ========================= =====
vPar0                          Up    Dyn,Auto   /stand/vmunix
vPar1                          Down  Dyn,Auto   /stand/vmunix

[Virtual Partition Resource Summary]
                                           CPU    Num        Memory (MB)
                                  CPU     Bound/   IO   # Ranges/
Virtual Partition Name          Min/Max  Unbound  devs  Total MB    Total MB
==============================  ================  ====  ====================
vPar0                             1/  5    1   1     9    0/  0         2048
vPar1                             1/  2    1   1     5    0/  0         2048
root @uksd3 #
root @uksd3 #vparremove -p vPar1
Remove virtual partition vPar1? [n]  y
root @uksd3 #
root @uksd3 #vparstatus
[Virtual Partition]
                                                                          Boot
Virtual Partition Name       State Attributes Kernel Path               Opts
============================ ===== ========== ========================= =====
vPar0                          Up    Dyn,Auto   /stand/vmunix

[Virtual Partition Resource Summary]
                                           CPU    Num        Memory (MB)
                                  CPU     Bound/   IO   # Ranges/
Virtual Partition Name          Min/Max  Unbound  devs  Total MB    Total MB
==============================  ================  ====  ====================
vPar0                             1/  5    1   1     9    0/  0         2048
root @uksd3 #
The resources that were used by vPar1 are now available to be used by other partitions, or that's what you thought.
root @uksd3 #vparstatus -A
[Unbound CPUs (path)]:  2.12
                        2.13
[Available CPUs]:  2

[Available I/O devices (path)]:  2.0.4
                                 2.0.6
                                 2.0.8
                                 2.0.9
                                 2.0.14

[Unbound memory (Base  /Range)]:  0x0/128
                (bytes) (MB)      0xc000000/1920
[Available memory (MB)]:  2048
root @uksd3 #
As we can see, there are now two processors available, as a result of removing vPar1. If I were to attempt to use these two processors in an existing partition, the task would fail:
root @uksd3 #vparmodify -p vPar0 -m cpu::4
vparmodify Error: "-m cpu::4": One or more unbound CPUs was not available when
virtual partition vPar0 was booted. You must shut down the partition to add them.
root @uksd3 #
You might be able to deduce the reason for the error from the error message itself. What's this, a UNIX error message that actually means something? The reason for this is that when a Virtual Partition is booted, it creates an in-core table of all unbound CPUs. When vPar0 was booted, this constituted the two unbound CPUs: one in vPar0 and one in vPar1. Even though I have removed vPar1, the in-core table of unbound CPUs in vPar0 still only lists the two original unbound CPUs.
While I can allocate one of the available CPUs to vPar0, to be able to allocate the originally bound CPU from vPar1, I would have to reboot vPar0. Worth knowing I think.
root @uksd3 #vparmodify -p vPar0 -m cpu::3
root @uksd3 #vparstatus
[Virtual Partition]
                                                                          Boot
Virtual Partition Name         State Attributes Kernel Path               Opts
============================== ===== ========== ========================= =====
vPar0                          Up    Dyn,Auto   /stand/vmunix

[Virtual Partition Resource Summary]
                                           CPU    Num        Memory (MB)
                                  CPU     Bound/   IO   # Ranges/
Virtual Partition Name          Min/Max  Unbound  devs  Total MB    Total MB
==============================  ================  ====  ====================
vPar0                             1/  5    1   2     9    0/  0         2048
root @uksd3 #vparstatus -A
[Unbound CPUs (path)]:  2.12
[Available CPUs]:  1

[Available I/O devices (path)]:  2.0.4
                                 2.0.6
                                 2.0.8
                                 2.0.9
                                 2.0.14

[Unbound memory (Base  /Range)]:  0x0/128
                (bytes) (MB)      0xc000000/1920
[Available memory (MB)]:  2048
root @uksd3 #
There may be a time when we want to temporarily turn off Virtual Partition functionality. What I mean by this is to return a server/n-Par to run pure HP-UX without vpmon being loaded and giving the server/n-Par access to all of its available hardware. It may be that we have an urgent need to have access to the complete compliment of CPU and memory in order to perform some critical processing. The steps I am going to outline do not uninstall Virtual Partitions but simply turns off the functionality temporarily.
First, we changed the default boot string on the boot disk for the server/nPar:
root @uksd3 #parstatus -w
The local partition number is 2.
root @uksd3 #parstatus -Vp 2
[Partition]
Partition Number       : 2
Partition Name         : uksd3
Status                 : active
IP address             : 0.0.0.0
Primary Boot Path      : 2/0/1/0/0.0.0
Alternate Boot Path    : 2/0/4/0/0.8.0
HA Alternate Boot Path : 2/0/4/0/0.8.0
PDC Revision           : 35.4
IODCH Version          : 5C70
CPU Speed              : 552 MHz
Core Cell              : cab0,cell2

[Cell]
                        CPU     Memory                              Use
                        OK/     (GB)                        Core    On
Hardware   Actual       Deconf/ OK/                         Cell    Next Par
Location   Usage        Max     Deconf    Connected To      Capable Boot Num
========== ============ ======= ========= ================= ======= ==== ===
cab0,cell2 active core  4/0/4    4.0/ 0.0 cab0,bay1,chassis1  yes     yes  2

[Chassis]
                                 Core Connected  Par
Hardware Location   Usage        IO   To         Num
=================== ============ ==== ========== ===
cab0,bay1,chassis1  active       yes  cab0,cell2 2

root @uksd3 #
root @uksd3 #lifcp /dev/rdsk/c0t0d0:AUTO -
hpux /stand/vpmon -a
root @uksd3 #
root @uksd3 #mkboot -a "hpux" /dev/rdsk/c0t0d0
root @uksd3 #
root @uksd3 #lifcp /dev/rdsk/c0t0d0:AUTO -
hpux
root @uksd3 #
We are now in a position to reboot vpmon. Once we reboot the server/n-Par, the AUTO file will load pure HP-UX.
root @uksd3 #shutdown -h now

SHUTDOWN PROGRAM
11/07/03 05:40:18 GMT

Broadcast Message from root (console) Fri Nov  7 05:40:19...
SYSTEM BEING BROUGHT DOWN NOW ! ! !
...

        *** FINAL System shutdown message from root@uksd3 ***
System going down IMMEDIATELY

System shutdown time has arrived


[MON]
[MON] vPar0 has halted.
MON>
MON> reboot


Firmware Version  35.4

Duplex Console IO Dependent Code (IODC) revision 1
   --------------------------------------------------------------------------
     (c) Copyright 1995-2002, Hewlett-Packard Company, All rights reserved
   --------------------------------------------------------------------------

          Cab/      Cell      ------- Processor --------    Cache Size
    Cell  Slot      State      #    Speed       State      Inst    Data
    ----  ----  ------------  ---  --------  -----------  ------  ------
      2   0/2   Active         0   552  MHz  Active       512 KB  1 MB
                               1   552  MHz  Idle         512 KB  1 MB
                               2   552  MHz  Idle         512 KB  1 MB
                               3   552  MHz  Idle         512 KB  1 MB


     Primary Boot Path:  2/0/1/0/0.0
          Boot Actions:  Boot from this path.
                         If unsuccessful, go to next path.

HA Alternate Boot Path:  2/0/4/0/0.8
          Boot Actions:  Boot from this path.
                         If unsuccessful, go to BCH.

   Alternate Boot Path:  2/0/4/0/0.8
          Boot Actions:  Skip this path.
                         Go to BCH.

          Console Path:  2/0/0/0/0.0


Attempting to boot using the primary path.
-------------------------------------------------------------
 To discontinue, press any key within 10 seconds.

 10 seconds expired.
 Proceeding...


Initializing boot Device.


Boot IO Dependent Code (IODC) Revision 0


Boot Path Initialized.


HARD Booted.

ISL Revision A.00.43  Apr 12, 2000

ISL booting  hpux

Boot
: disk(2/0/1/0/0.0.0.0.0.0.0;0)/stand/vmunix
10125312 + 1949784 + 1347720 start 0x81d7868
...
root @uksd3 #vparstatus
vparstatus: Warning: Virtual partition monitor not running, Requested resources
shown.
[Virtual Partition]
                                                                          Boot
Virtual Partition Name         State Attributes Kernel Path               Opts
============================== ===== ========== ========================= =====
vPar0                          N/A   Dyn,Auto   /stand/vmunix

[Virtual Partition Resource Summary]
                                           CPU    Num        Memory (MB)
                                  CPU     Bound/   IO   # Ranges/
Virtual Partition Name          Min/Max  Unbound  devs  Total MB    Total MB
==============================  ================  ====  ====================
vPar0                             1/  5    1   2     9    0/  0         2048
root @uksd3 #
root @uksd3 #ll /stand/vp*
-rw-------   1 root       root          4136 Nov  7 05:36 /stand/vpdb
-r-xr-xr-x   1 bin        bin        1062320 Jun 27  2002 /stand/vpmon
-rw-------   1 root       root       17813008 Nov  6 01:50 /stand/vpmon.dmp
root @uksd3 #
As we can see, Virtual Partitions functionality has been temporarily turned off. To reinstate it, we would simply reinstate the AUTO file to include the boot string “hpux /stand/vpmon –a” and reboot the server/n-Par.
It should be noted that while the server/n-Par has access to its full compliment of hardware, there is nothing stopping an administrator from accessing the data on the disks that belonged to a previous vPar.
We have now looked at two of HPs solutions to partitioning: hard or node Partitions in Chapter 2 and Virtual Partitions in this chapter. These two solutions are part of HPs partitioning continuum initiative (see http://www.hp.com/products1/unix/operating/manageability/partitions/index.html). This initiative focuses on the different technologies that may be used in order to achieve a number of key benefits to an organization:
Saving on cost of ownership
Maximizing performance
Optimizing availability
Enhanced flexibility
The technologies used to achieve these goals include:
HyperPlex: Hard partitions with multiple server nodes deliver the optimum capacity at all levels by supporting the complete HP 9000 product line. A hard partition can theoretically range in size from two HP 9000 rp2400 nodes, up to hundreds of Superdome servers, resulting in extreme capacity. These partitions operate in such a manner that they can be totally isolated from other hard partitions. Multiple applications can run in these partitions, and these applications are completely isolated from the other nodes and their respective operating environments.
nPartitions: Hard partitions within a node are called nPartitions. They are uniquely available for a number of PA-RISC and Itanium2 based servers, the most powerful HP 9000 high-end server nodes. Superdome can support anywhere from one to sixteen nPartitions. It offers hard partitions with cell granularity, each supporting its own operating system with complete software isolation.
Virtual Partitions: The need exists not only to isolate operating environments so that multiple customers' applications can co-exist in the same server or cluster, but also many instances require that a number of isolated operating environments can be dynamically created on, modified on, and even deleted from a running server without interrupting non-related partitions. For this requirement, HP has developed virtual partitions—a unique technology that provides application and operating systems, and isolation that runs on single server nodes or nPartitions. Available for rp5470, rp7400, rp8400, and PA-RISC Superdome. Each virtual partition runs its own image of the HP-UX 11i operating system and can fully host its own applications, offering complete software isolation. The capability of CPU migration allows you to add and delete CPUs dynamically (without rebooting) from one virtual partition to another. It is ideal to ensure a high degree of flexibility in the fast moving Internet age.
Resource Partitions: HP's resource partitions are unique partitions created for workload management purposes. Resource partitions run within hard partitions and within virtual partitions. They are controlled by HP's Workload Management functions. Very often, many applications run on one server at the same time, but each application has different resource needs. HP-UX Workload Manager (WLM) and Process Resource Manager (PRM) software are used to create resource partitions dynamically for applications that need guaranteed dedicated resources, such as CPU, memory, or disk I/O. Applications with specific goals, such as response time, can use HP's goal-based HP-UX WLM to allocate automatically and dynamically the necessary resources to applications or user groups within hard partitions or virtual partitions. Unique service level objectives can be met every time.
Processor Set: Psets are a standalone product, but when integrated with PRM, processor sets allow the system administrator to group CPUs on your system in a set and assign a PSET PRM group. Once these processors are assigned to a PSET PRM group, they are reserved for use by the applications and users assigned to that group. Using processor sets allows the system administrator to isolate applications and users that are CPU-intensive, or that need dedicated, on-demand CPU resources.
I think that's about it.