Everything up to this point has been preamble—by now you’re familiar enough with Final Cut Express that you can jump in and start the actual work of editing. But there’s more to it than just slicing and rearranging clips.
In this chapter, you’ll learn not only basic procedures for performing edits in FCE, including how to use the seven edit types available, but also the underlying concepts and protocols that govern editing: sequences, three-point editing, and multiple media tracks.
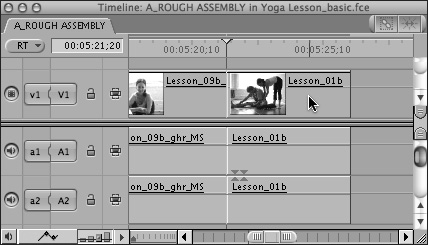
You assemble an edited sequence in the Timeline window, which displays a chronological view of a sequence. All the media elements you’ve assembled to create a sequence appear in the Timeline as elements that diagram the sequencing and layering of audio and video tracks. As you drag the playhead along the Timeline ruler, the current frame of the sequence updates in the Canvas window. The Canvas window is the viewer you use to play back the edited sequence you’ve assembled in the Timeline. (A more detailed discussion of Timeline and Canvas window operations appears in Chapter 10, “Editing in the Timeline and the Canvas.”)
Once you’ve assembled a first draft of an edited sequence, known as a rough cut (isn’t that a great expression?), you’ll probably want to go back and trim (fine-tune) your edits. Final Cut Express’s edit trimming tools and techniques are outlined in Chapter 11, “Fine Cut: Trimming Edits.”
If you need a review of FCE’s project structure and media elements basics before the clips start flying, see Chapter 4, “Projects, Sequences, and Clips.”
Figure 9.1 summarizes the steps for performing a drag-and-drop-style edit that uses the Canvas overlay. The next section offers a step-by-step breakdown of the same edit.

Here’s a step-by-step breakdown of a simple rough-assembly-style edit in Final Cut Express. After you’ve reviewed this basic editing procedure, find out how to perform more specific types of edits in the sections that follow.
To add the first clip to your sequence:
In the Browser, press Command-N to create a new sequence.
Double-click the new sequence to open it in the Canvas and the Timeline (Figure 9.2).
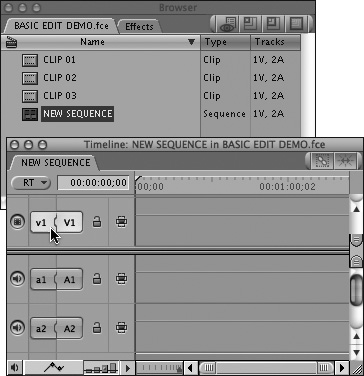
Figure 9.2. Double-click the new sequence’s icon in the Browser to open it for editing. Examine the open sequence in the Timeline to check that destination tracks are assigned correctly and that the playhead is positioned at the beginning of the sequence.
The new, empty sequence opens in the Timeline window. The Timeline’s playhead is positioned at the beginning of the sequence.
Before you insert a clip in a sequence, you need to check the target tracks (the destination tracks for your clip in the sequence).
In the Timeline, check the destination track assignment for your first clip. In a new sequence, default destination tracks will already be assigned to V1, A1, and A2. If necessary, you can target different destination tracks by clicking the target track controls.
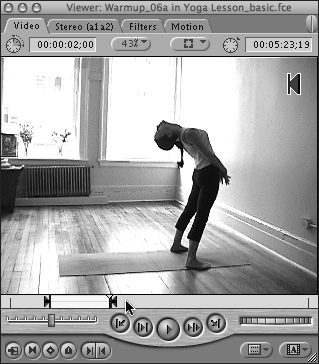
In the Browser, double-click the first clip you want to insert in your new sequence; that clip opens in the Viewer.
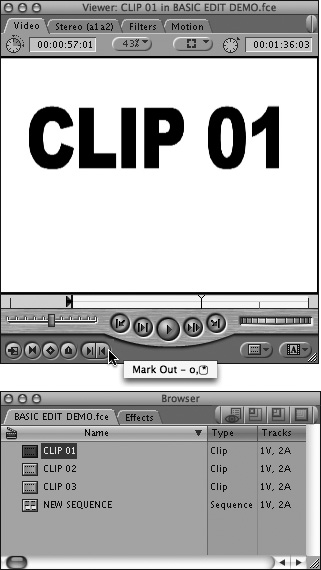
In the Viewer, select the portion of the clip you want to use in the sequence by setting In and Out points (Figure 9.3). (See “Working with In and Out Points” in Chapter 8.)
Click the Viewer’s image area and drag the clip to the Canvas window.
The Canvas edit overlay menu appears.
Drop the clip on the Overwrite edit area (Figure 9.4). (Overwrite is the default edit type in FCE unless you specify another type.)
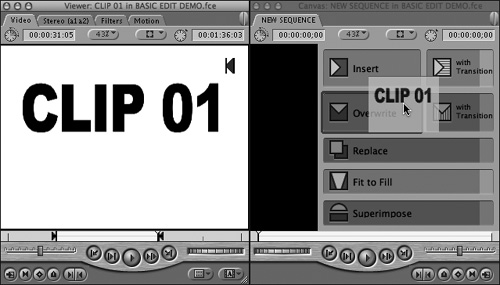
Figure 9.4. Drag the source clip from the Viewer to the Canvas edit overlay; then drop the clip on the Overwrite edit area.
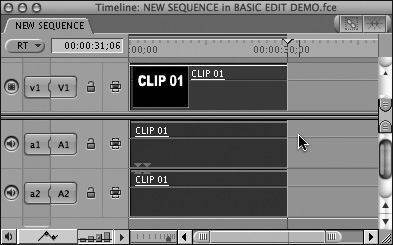
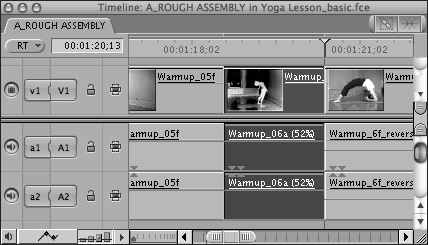
The clip will be inserted at the beginning of your new sequence (Figure 9.5).
Many Ways to Make an Edit
Dragging your source clip to the Canvas edit overlay is just one way to execute an edit. Once you have defined your edit points, you can also do the following:
Drag the clip directly from the Viewer to the Timeline (Figure 9.6).
Drag one or more clips directly from the Browser to the Timeline (now that’s a rough edit).
Use a keyboard shortcut to perform the edit. The keyboard shortcut for each edit type is listed in Appendix B.
To insert additional clips:
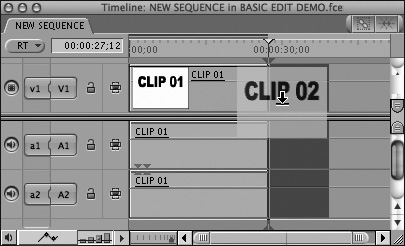
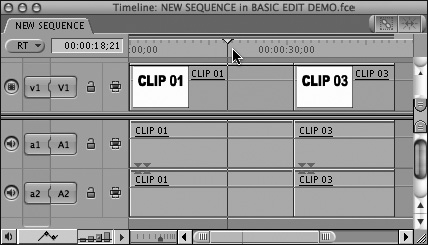
In the Timeline, park the playhead on the frame where you want your new clip to start. You can press I to set a sequence In point on that frame, but it’s not required (Figure 9.7).
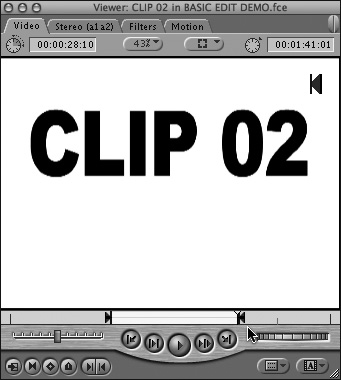
In the Viewer, set In and Out points on your second clip (Figure 9.8).
Drag the clip from the image area of the Viewer to the Canvas window.
The Canvas edit overlay menu will appear.
Drop the clip on the Overwrite edit area (Figure 9.9).
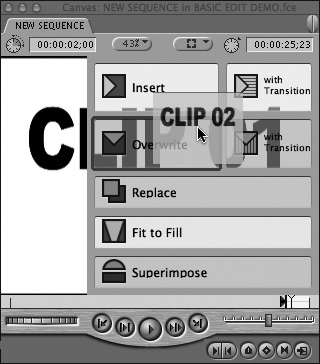
Figure 9.9. Drag the second source clip to the Canvas edit overlay; then drop the clip on the Overwrite edit area.
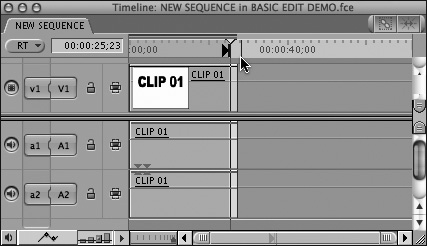
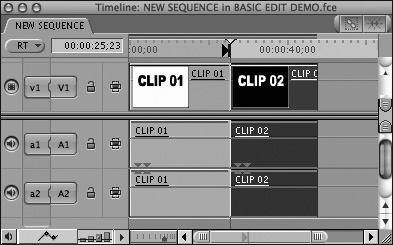
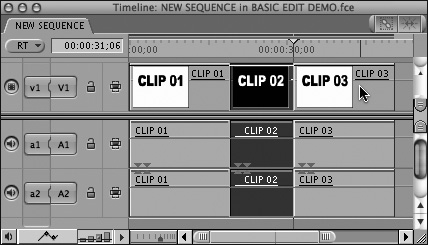
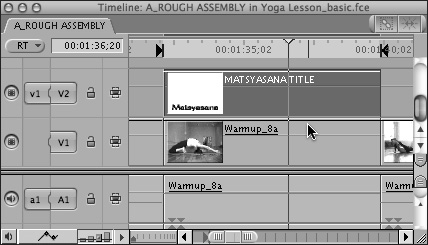
The second clip will be inserted starting where you set the sequence In point (Figure 9.10).
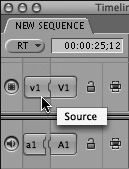
Each time you add clips to a sequence, you can specify which tracks the media will occupy. You specify target tracks using the Timeline’s target track controls (Figure 9.11): the lozenge-shaped icons located on the left in the Timeline. The Destination (right) side of the control identifies the track. Set the Source control (the left side of the control) to specify which source track is assigned to that destination track and whether the track is enabled to receive a source clip. You can target one video target track plus one audio target track for each audio track in your source clip.
Figure 9.11. The target track controls in the Timeline. A control’s left side identifies which source clip track is assigned to this destination track; the right side identifies the destination track by number. Timeline base tracks are enabled by default; you can click either side of the control to disconnect (disable) a track.
For more information on targeting and mapping track assignments, see “Mapping Timeline target track assignments” in Chapter 10.
To select target tracks in the Timeline:
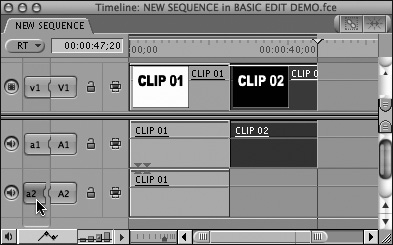
In the Timeline, click the target track control on the left side of the track you want to use.
The Source control is connected to the Destination track indicator when a track is targeted (Figure 9.12).
To use audio only from an audio+video clip:
Click the left (Source) side to disconnect the target indicator of the video track before you perform your edit (Figure 9.13).

To use one channel of two-channel audio from the source clip:
Click the left (Source) side to disconnect the target indicator of the track you want to exclude (Figure 9.14).
Tips
Once you’ve used the target track controls to route your source clips to their proper tracks, you might want to lock the tracks to prevent further changes to edited clips on those tracks. See “FCE Protocol: Lock vs. Target” in Chapter 10 to learn the hows and whys of track locking.
When you are ready for big-time multitrack editing, be aware that FCE offers a raft of keyboard shortcuts for target track selection. Check them out in Appendix B, “Keyboard Shortcuts.”
You can jump the playhead to the edit point of your choice with a single keystroke or mouse click. Most of these shortcuts work in the Viewer as well.
To move the playhead to the In point:
To move the playhead to the Out point:
To jump the playhead to an adjacent edit point:
Do one of the following:
Click the Previous Edit or the Next Edit button in the transport controls.
Press the Up or the Down Arrow key.
Open the Mark menu and choose from the Next or Previous submenu.
Press Option-E (to go to the previous edit point) or Shift-E (to go to the next edit point).
Tip
If you need to define the edit points for a clip, you’ll find information on marking In and Out points on a source clip in Chapter 8, “Working with Clips in the Viewer.”
One powerful editing option unique to Final Cut Express is the Canvas edit overlay. When you drag a clip directly into the Canvas image area, the Canvas edit overlay appears with fields for each type of edit (Figure 9.15). Select the type of edit you want to perform by dropping your clip on the corresponding overlay area. The default type is an Overwrite edit.
Final Cut Express offers many types of edits and many ways to perform those edits. Keep reading to find a rundown of the types of edits you can perform in FCE, along with variations they impose on the basic editing procedure.
When you perform an Insert edit, the sequence clips at the In point move to the right to make room for the new source clip.
Tips
Insert edits can also be performed by dragging the source clip directly to the Timeline. See “Performing Edits in the Timeline,” later in this chapter.
Heads up! When you perform an insert edit, any sequence clips that span the In point are automatically split to accommodate the new clip.
To perform an Insert edit:
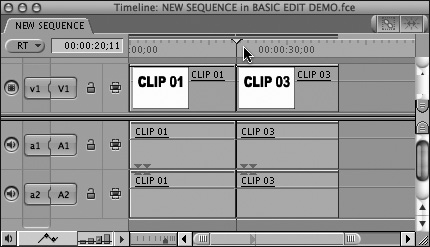
Set the sequence In point by positioning the Timeline (or Canvas) playhead where you want the edit to occur (Figure 9.16).
Drag the source clip from the Viewer to the Insert edit area in the Canvas overlay (Figure 9.17); or press F9.
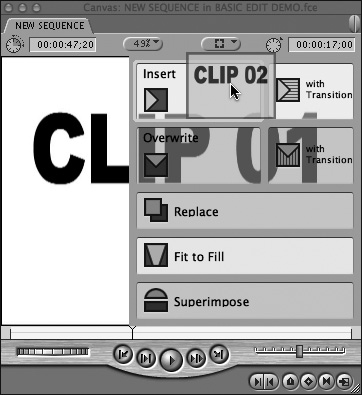
Figure 9.17. Drag the source clip from the Viewer to the Canvas edit overlay; then drop the clip on the Insert edit area.
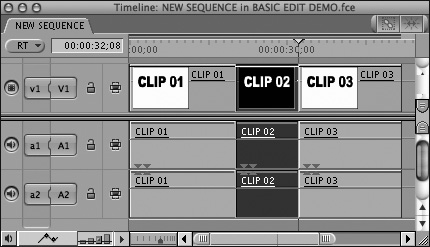
The source clip is inserted into the sequence (Figure 9.18).
In an Overwrite edit, the source clip overwrites sequence clips past the sequence In point. Overwrite edits use the source In and Out points to calculate the edit duration, replacing sequence material with the incoming source clip, with no time shift in the existing sequence.
Tip
You can also perform Overwrite edits by dragging the source clip directly to the Timeline. See “Performing Edits in the Timeline,” later in this chapter.
To perform an Overwrite edit:
Set the sequence In point by positioning the Timeline (or Canvas) playhead where you want the edit to occur (Figure 9.19).
Drag the source clip from the Viewer to the Overwrite edit area in the Canvas overlay (Figure 9.20); or press F10.
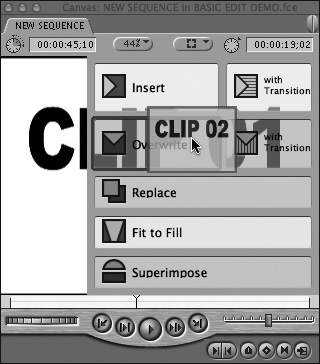
Figure 9.20. Drag the source clip from the Viewer to the Canvas edit overlay; then drop the clip on the Overwrite edit area.
The source clip is added to the sequence, overwriting any existing sequence material on the targeted tracks that falls between the sequence In and Out points (Figure 9.21).
A Replace edit replaces the contents of a sequence clip with source clip material.
The Replace edit uses the playhead position in the Viewer, not the source In and Out points, to calculate the Replace edit; your source In and Out points will be ignored. If you don’t set sequence In and Out points, FCE uses the boundaries of the clip under the Timeline playhead.
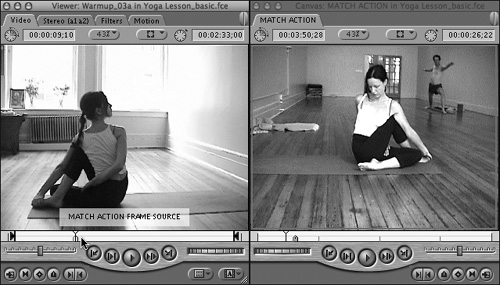
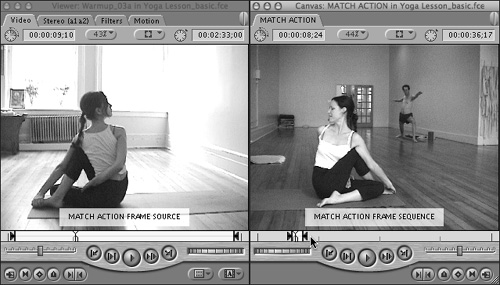
You can use a Replace edit to simply replace a shot in a sequence with footage from another shot with the same duration. Replace editing can also be a powerful tool for matching action: for example, when you’re cutting between multiple-camera coverage of different angles on the same action (in your big-budget dreams). Park the Canvas playhead at the point in the action that you want to match in your source clip. Find the source clip frame that matches the action in the sequence frame. Mark In and Out points in the Canvas to select the section of the sequence you want to replace with the new material. The material between the sequence In and Out points is replaced by correspond-ing material from the source clip on either side of the frame that was matched.
To perform a Replace edit:
Position the Viewer playhead on the frame you want to match with a frame in the Canvas (Figure 9.22).
Position the Canvas playhead on the frame you want to match with the one selected in the Viewer. If you want to specify the duration of the replacement clip, set sequence In and Out points (Figure 9.23).
Drag the source clip from the Viewer to the Replace edit area in the Canvas overlay; or press F11.
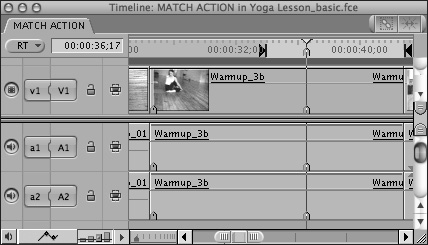
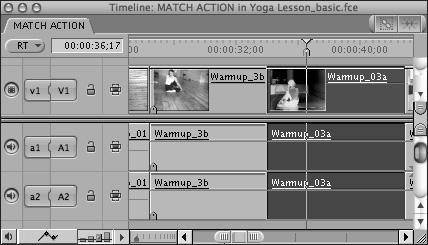
Figure 9.24 shows the Timeline before the Replace edit; Figure 9.25 shows the Timeline after the Replace edit.
In a Fit to Fill edit, the speed of the source clip adjusts to fill the duration specified by the sequence In and Out points; you must render the clip before you can play it back.
To perform a Fit to Fill edit:
In the Timeline, set sequence In and Out points to define the sequence section you want to fill (Figure 9.26).
In the Viewer, set source In and Out points to define the part of the source clip you want to speed-modify so it fits between your edit points in the sequence (Figure 9.27).
Drag the source clip in the Viewer to the Fit to Fill edit area in the Canvas overlay; or press Shift-F11.
The source clip is speed-modified to fit between the sequence In and Out points (Figure 9.28).
Tip
You’ve just added a clip to your sequence—but it’s too short to fill the gap you’re trying to fill. Here’s a slick trick: Perform Fit to Fill on a clip that’s already edited into your sequence by double-clicking the clip to open it in the Viewer and then dragging it to the Fit to Fill edit area. Voilà! Perfect fit.
In a Superimpose edit, the source clip is placed on a new track above the target track, starting at the sequence In point. The target track does not change. If the clip has audio, the source audio is added to new tracks below the target audio track.
To perform a Superimpose edit:
Position the Canvas playhead or set a sequence In point where you want the source clip to start (Figure 9.29).
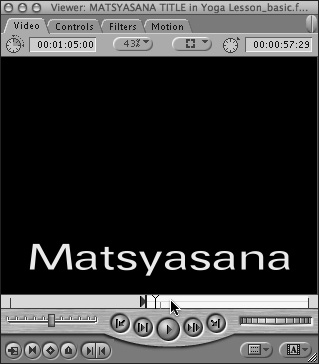
In the Viewer, set a source In or Out point to define the part of the source clip you want to add to the sequence (Figure 9.30).
Drag the source clip from the Viewer to the Superimpose edit area in the Canvas overlay (Figure 9.31); or press F12.
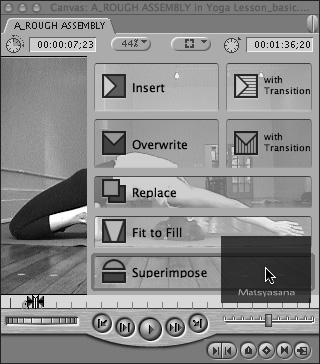
Figure 9.31. Drag the source clip from the Viewer to the Canvas edit overlay; then drop the clip on the Superimpose edit area.
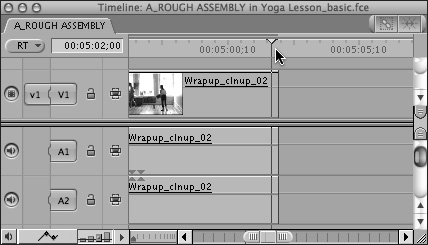
The source clip is placed on a new track above the target track, starting at the sequence In point (Figure 9.32).

FCE offers two types of edits that incorporate transitions: Insert with Transition and Overwrite with Transition. A transition edit automatically places a cross-dissolve (FCE’s default transition) at the head of the edit. When using either of the transition edit types, you’ll need at least 15 extra frames in each clip at the edit point where the transition is applied in order to create the transition. (The additional frames necessary are equal to half of the default transition’s 30-frame duration; see Chapter 13, “Creating Transitions,” for more on using transitions.)
To perform a Transition edit:
Set the sequence In point by positioning the Timeline (or Canvas) playhead where you want the edit to occur (Figure 9.33).
In the Viewer, set source In and Out points to define the part of the source clip you want to add to the sequence (Figure 9.34).
Drag the source clip from the Viewer to either the Insert with Transition or the Overwrite with Transition edit area in the Canvas overlay (Figure 9.35).
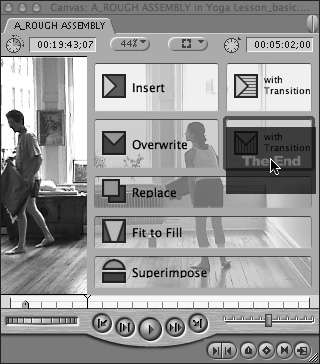
Figure 9.35. Drag the source clip from the Viewer to the Canvas edit overlay; then drop it on either of the Transition edit areas.
The source clip is inserted in the sequence with the default transition applied at the sequence In point (Figure 9.36).
Tips
You’ll find a few transitions that will play in real time, but you must render most Transition edits before you can play them back. Real-time transitions appear in the Effects menu with their names in bold type.
If you’ve customized a transition in your sequence that you want to reuse, you can select it in the Timeline and drag it to your Favorites folder on the Effects tab in the Browser. You can copy a Favorite transition from the folder and paste it into a sequence wherever you want it. Setting up a customized Favorite transition is easy, so it’s worth doing even if you’re building a fairly short sequence.
Two types of edits can be used to remove material from a sequence:
Lift removes the selected material, leaving a gap.
Ripple Delete removes the selected material and closes the gap.
To perform a Lift edit:
Do one of the following:
Select the clip in the Timeline and press Delete.
Select the clip in the Timeline; then choose Sequence > Lift.
Select the clip in the Timeline and press Command-X (Cut).
Control-click the selected clip in the Timeline; then choose Cut from the shortcut menu. (Cut also lets you paste the deleted clip in another location in the sequence.)
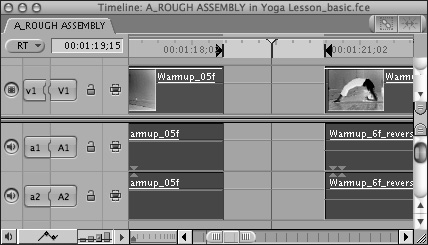
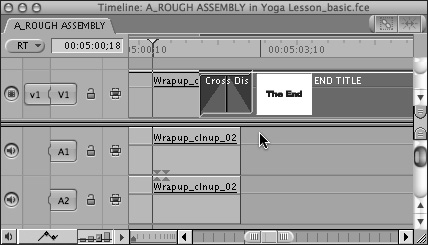
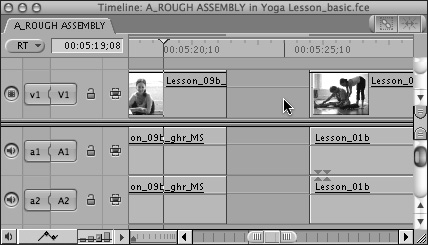
Figure 9.37 shows a sequence in the Timeline before a Lift edit; Figure 9.38 shows the same sequence after a Lift edit.

To perform a Ripple Delete edit:
Do one of the following:
Select the clip in the Timeline and press Shift-Delete.
Select the clip in the Timeline; then choose Sequence > Ripple Delete.
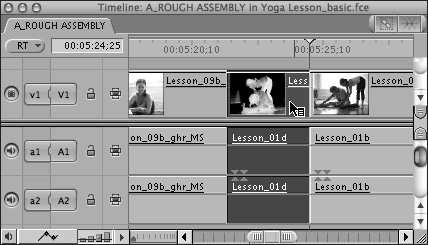
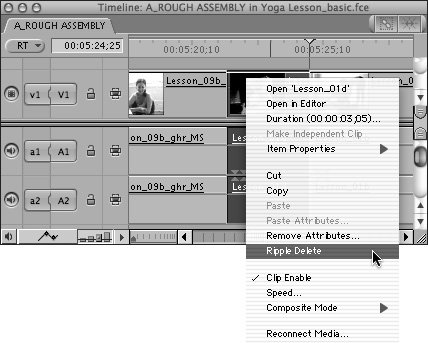
Control-click the selected clip in the Timeline (Figure 9.39); then choose Ripple Delete from the shortcut menu (Figure 9.40).
The clip is deleted from the sequence, and the material on all unlocked tracks to the right of the sequence pulls up to close the gap (Figure 9.41).
Editing in the Timeline can be a faster way to go, particularly when you’re in the early stages of assembly.
You have a number of ways to control the size and time scale of the Timeline window. You need the Timeline’s big-picture view when you deploy multiple tracks of visual or sound effects, but you can also zoom way in when performing precise work. See Chapter 10, “Editing in the Timeline and the Canvas,” for details.
You can assemble a sequence by dragging clips directly to the Timeline from the Browser or Viewer.
You can use the Browser Sort function to sort your takes by timecode or by shot number and then drag a whole group of clips from the Browser directly to the Timeline. FCE will place the clips in the Timeline based on your Browser sort order.
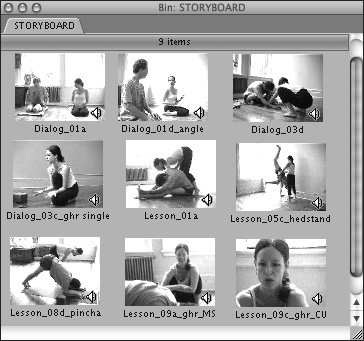
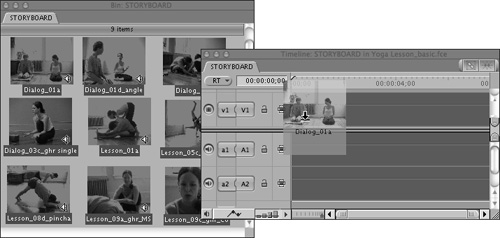
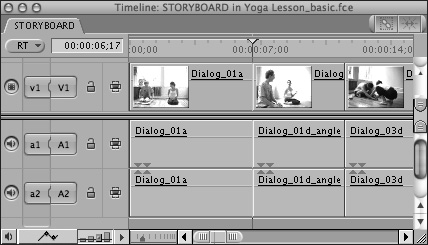
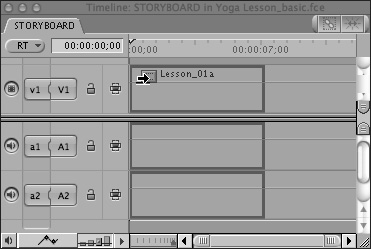
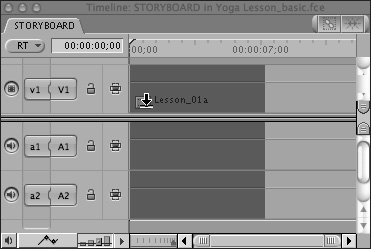
You can construct a storyboard in the Browser’s Large Icon view (Figure 9.42) and then drag all the clips into the Timeline (Figure 9.43). If the Browser tab from which you drag the clips is in Icon mode, the clips are placed in storyboard order, from left to right and top to bottom (Figure 9.44).
You can designate target tracks in an edit just by dragging a source clip directly to the destination track.
Drag a source clip to the space above your existing tracks, and FCE will automatically create a new track.
Drag the source clip from the Viewer or Browser to the upper third of the Timeline track (Figure 9.45).
The pointer changes to indicate the type of edit.
To perform an Overwrite edit:
Drag the source clip from the Viewer or Browser to the lower two-thirds of the Timeline track (Figure 9.46).
Tips
If you drag a clip to the Timeline when it is set to the smallest timeline track size, you’ll perform an Overwrite edit. Hold down the Option key to perform an Insert edit.
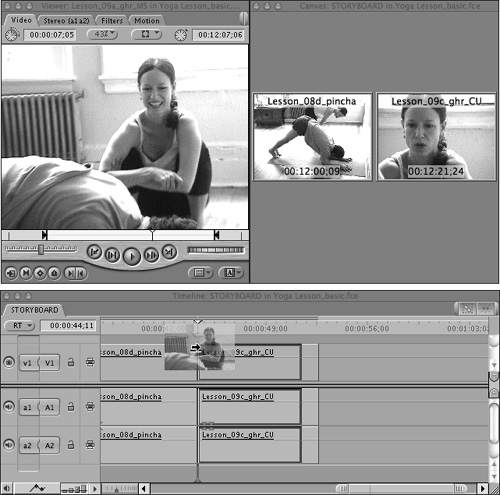
When you drag a clip from the Browser onto a clip or transition in the Timeline, a two-up display appears in the Canvas. This two-up display shows the frame just before your insert on the left, and it shows the frame just after your insert on the right. The names of the sequence clips adjacent to your edit point appear at the top of each display, and the timecode of the displayed frames appears at the bottom (Figure 9.47).
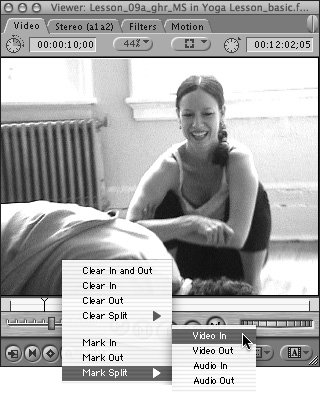
A split edit sets different In and Out points for video and audio in a single clip (Figure 9.48). Split edits are commonly used in cutting synchronized dialogue scenes.
To mark a split edit:
With the clip open in the Viewer, position the playhead where you want the video to begin.
Control-click the Scrubber bar; then choose Mark Split > Video In from the shortcut menu (Figure 9.49).
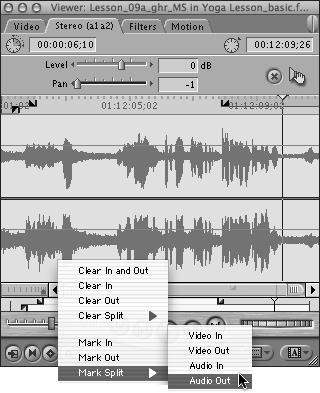
Reposition the playhead at your desired Out point and choose Mark Split > Video Out from the shortcut menu.
Repeat the process to set your Audio In and Out points (Figure 9.50). You could also switch to your clip’s Audio tab and mark the audio there.
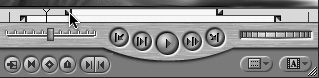
Open the clip in the Viewer. In the Scrubber bar, drag either the In points or the Out points to a new position.
The video and audio edit points move in tandem in a split edit (Figure 9.51).
To slip all split edit points at once:
In the Scrubber bar, press Shift while dragging any of the edit points.
All the edit points slip, or move in unison (Figure 9.52).
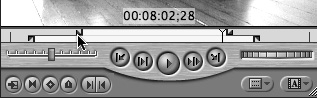
Figure 9.52. Shift-dragging moves all four points at once. The timecode readout in the Viewer displays the current In point location of the point that you drag.
The respective video and audio durations specified in the split edit don’t change, but the frames that are included in the marked clip shift.
Tip
As you slip a split edit, the updated In point frame with the timecode for the edit point you selected is displayed on the Viewer image, and the edit’s Out point frame with timecode is displayed on the Canvas. Awesome.
To move only one edit point in a split edit:
In the Scrubber bar, press Option while dragging the edit point you want to modify (Figure 9.53).
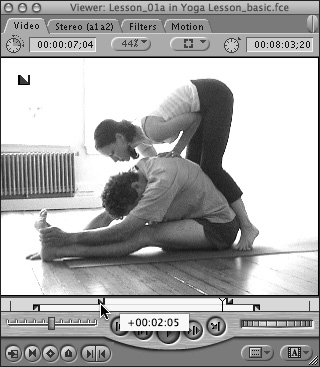
Figure 9.53. Option-click and drag to shift only one edit point in a split edit. The pop-up display shows the offset duration between Video and Audio In points.
A display pops up as you drag to indicate the duration of the offset between Video In and Audio In, or Video Out and Audio Out. The Scrubber bar in the Viewer updates to reflect the new edit points.
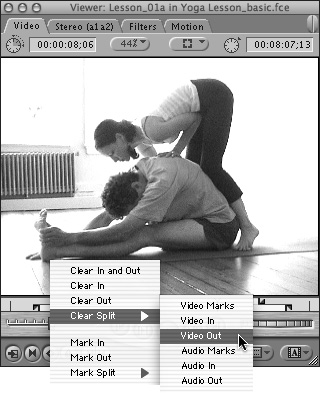
To remove a split edit point:
Do one of the following:
In the Scrubber bar, Control-click; then choose Clear Split and, from the shortcut submenu, select the point you want to clear (Figure 9.54).
Drag the edit point above or below the Scrubber bar until it disappears.
Press Option I to remove both Audio and Video In points; press Option-O to remove both Audio and Video Out points.
Use the same commands and keyboard shortcuts that you use to mark In and Out points in the Viewer to mark your sequence In and Out points in the Timeline and the Canvas.
FCE also offers a couple of handy commands specifically for marking edit points in a sequence:
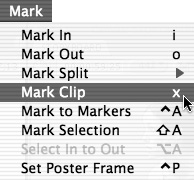
Use the Mark Clip command to set the sequence In and Out points to match the edit points of a particular clip in the sequence.
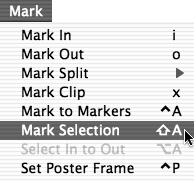
Use Mark Selection to set the sequence In and Out points to match a multiple-clip selection or a selection that includes only part of a clip.
To use the Mark Clip command:
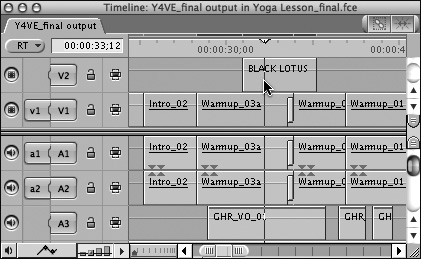
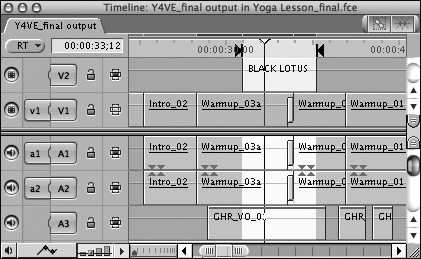
Place the playhead over a clip in the Timeline (Figure 9.55).
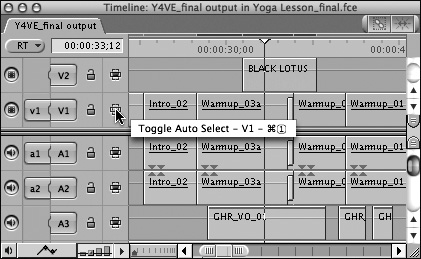
Check that your selected clip’s track is the lowest-numbered auto-selected track (Figure 9.56).
Choose Mark > Mark Clip (Figure 9.57); or press X.
The sequence In and Out points are set to match the boundaries of the clip (Figure 9.58).
Tips
Mark Clip is a quick way to mark sequence In and Out points if you want to superimpose something over a particular clip.
Turn on the Auto Select controls added to Timeline tracks, and FCE automatically selects sequence material between sequence In and Out points. For more information, see “To use Auto Select to select items between In and Out points” in Chapter 10.
To use the Mark Selection command:
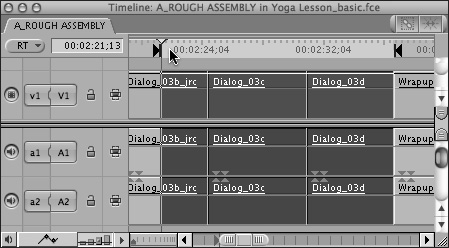
Make a selection in the Timeline. The selection can range from an entire sequence to a part of a single clip (Figure 9.59). See Chapter 10, “Editing in the Timeline and the Canvas,” for information on using the Tool palette’s selection tools.
Choose Mark > Mark Selection (Figure 9.60).
The sequence In and Out points are set to the boundaries of the selection (Figure 9.61).

Final Cut Express offers two commands you can use to locate the source clip for any frame in your sequence. Match Frame quickly locates the source for a clip you’ve used, which is convenient when you’d like to select another part of that clip for use elsewhere in your sequence.
View > Match Frame > Master Clip locates the master clip affiliated with your sequence clip in the Browser and opens it in the Viewer. The playhead is positioned on the frame matching the sequence frame, and the master clip’s In and Out points are matched to those in the sequence copy of the clip.
View > Match Frame > Source File locates the original source clip in the Browser and opens it in the Viewer, but does not set matching In and Out points. Use Match Frame > Source File when you’re looking for footage that’s located in the original source file on disk, but outside the boundaries of your master clip.
To find a source frame of video matching a sequence clip frame:
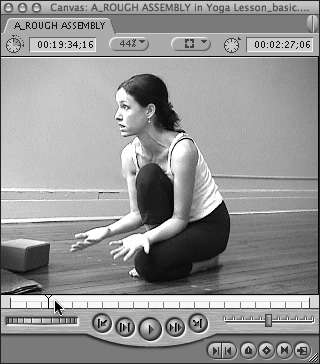
In the Canvas or the Timeline, park the playhead on the frame for which you want to locate the source clip (Figure 9.62).
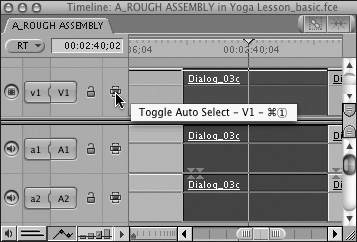
Set the track containing the clip to be the lowest-numbered Auto Select-enabled track (Figure 9.63).
Do one of the following:
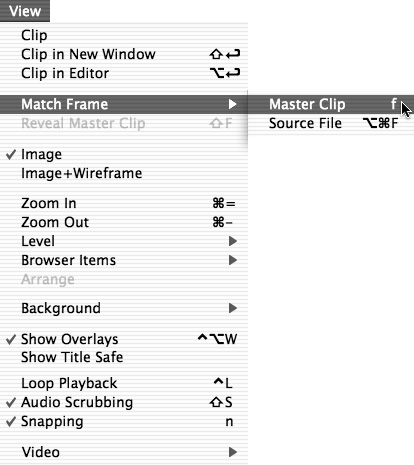
Choose View > Match Frame > Master Clip (Figure 9.64). or press F to locate the master clip affiliated with your sequence clip.
Choose View > Match Frame > Source File; or press Command-Option-F to locate the original source clip for your sequence clip.
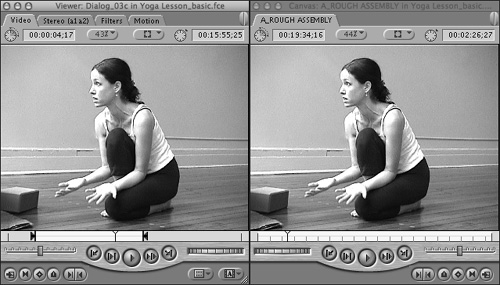
The matching clip opens in the Viewer. The current frame in the Viewer matches the current frame on the target track in the Canvas (Figure 9.65).