
Chapter 5. .NET Assemblies
The mere mention of the word “assembly” takes me back to my days as a high school freshman. The assembly was actually held in the school gym, with 2000 screaming adolescents filling the bleachers around the basketball court. Because this was a school function, I naturally thought of an experience packed with fresh educational opportunities. School, education—the words just seem to go together. But then came the marching band, and the football players, and the cheerleaders, and the school mascot (a horse). For the next 30 minutes, the principal whipped the students into a controlled frenzy, attempting to prove the institution’s place as the number-one school in the city. I still don’t know what area we were supposed to be number one in, but it was all very exciting.
.NET assemblies are not that exciting. In fact, they’re just files, EXE and DLL files, and without you to activate them, they just sit there taking up disk space. And as they are not doing anything else, let’s take a moment to examine what they are and what they contain.
What Is an Assembly?
As I already mentioned in Chapter 1, “Introducing.NET,” an assembly is a “unit of deployment,” which in most cases is just a file. An assembly is a repository for compiled .NET application code; any code you write will eventually be stored in some EXE file (if it is an application) or DLL file (for code libraries or extensions to an application). Everything that .NET needs to know to load and run your application is stored in the assembly.
Assemblies are either private or public. Private assemblies are designed for use in a single application only. If there aren’t any DLLs, then an EXE assembly is the application. Private assemblies appear in their own directory, the installation directory of the application or library. You can run two different private assemblies at the same time, and they won’t bother each other. This is true even if each assembly uses the same combination of namespace and class names for its coded elements. If two application assemblies each implement a class named WindowsApplication1.Class1, they will not interfere with each other when running; they are private, and private means private.
Public assemblies are designed for shared use among multiple .NET applications. Public assemblies differ from private assemblies in two major ways.
- Public assemblies have a strong name, an encrypted digital signature that is attached to an assembly to guarantee that it came from its named vendor or source. It’s built from the assembly’s name, version number, culture information, a “public key,” and a digital signature generated from the assembly file that contains the manifest (described later). The .NET Framework includes a Strong Name generation tool (sn.exe) that assists in this process, and Visual Studio includes options that let you add a digital signature during the compilation process. (It’s on the Signing tab of the project’s properties.)
The strong name of an assembly should be (and better be) unique; if two assemblies share a common strong name, they are copies of the same assembly. You can add a strong name to any assembly, even private assemblies.
- Public assemblies are stored in the global assembly cache (GAC). Although you can put a copy of your shared component in your application’s install directory, it will only truly be shared once it reaches the GAC directory. The GAC lives in a directory named “assembly” within the computer’s Windows directory. (On my system, it’s in c:windowsassembly.) Once a .NET assembly has a strong name applied, you can add it to the GAC by either dragging the file into the assembly directory, or by using the Global Assembly Cache Tool (gacutil.exe). Don’t worry about your file being lonely if it’s not communing with your other installed files. On my freshly installed copy of .NET, I found over 500 files already in the GAC directory, including all of the DLLs for the Framework Class Libraries.
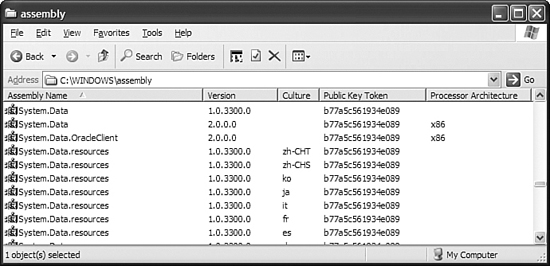
.NET lets you install multiple versions of an assembly on a system and use them at the same time (a process called versioning). This applies both to applications (EXE) and libraries (DLL), and to private assemblies and shared assemblies in the GAC. Don’t believe me? Open up the GAC’s assembly folder, set the Explorer folder to a Details view, and then sort by Assembly Name. If you scroll down, you’ll see the same file show up multiple times. Figure 5-1 shows a part of the cache. There are two copies of System.Data listed (from the System.Data.dll file), one for version 2.0 of the .NET Framework, and one for an older version. There are also several related System.Data.resources files, each one for a different language.
Figure 5-1. The GAC has this duplication under control.
Although there is usually a one-to-one relationship between files and assemblies, there may be cases when an assembly is made up of multiple files. For instance, an application might include an external graphics file in its assembly view. .NET keeps a close watch on these files. If any of the files are modified, deleted, or otherwise maimed, you will hear about it. For the purposes of discussion, the rest of this chapter only considers single-file assemblies.
What’s Inside of an Assembly?
An assembly’s EXE or DLL file is a standard “Portable Execution” (PE) file, the same file format used for non-.NET executables and code libraries (pretty much any Windows EXE or DLL file). What makes .NET PE files different is all the extra stuff found inside. As a general word, “assembly” indicates a gathering together of various parts into a single unit. In a .NET assembly, these “various parts” are specifically designed for use with .NET. A .NET PE file contains three main parts.
- A PE header. Required of all PE files, this section identifies the locations of the other sections of the file.
- The MSIL code section. The actual code associated with the assembly is stored as semi-compiled Microsoft Intermediate Language (MSIL or IL) code. Unfortunately, the Intel or AMD chip in your computer is apparently too brainless to process MSIL code directly (what were they thinking?), so the .NET Framework includes a just-in-time compiler that can convert MSIL to native x86 code at a moment’s notice.
- The Metadata section. All of the extra detail that .NET needs to rummage through to know about your assembly appears in this essential section. Some of these items, when taken together, make up the assembly’s manifest, a type of document that completely describes the assembly to the world. In the following list of metadata elements, I’ve noted which items appear in the manifest.
• The name of the assembly. (Part of the manifest.) This is defined on the Application tab of the project’s properties.
• The version number of the assembly. (Part of the manifest.) That’s the four-part version number, as in 1.2.3.4. You’ve probably been wondering all day how you could set this number in your own projects. Your patience will be rewarded in this chapter’s Project section, where I will demonstrate not just one, but two ways to set the assembly version number.
• Strong name content. (Part of the manifest.) This includes the publisher’s public key.
• Culture and language settings.(Part of the manifest.) This is especially useful when you need to create language-specific resource files.
• Assembly file listing. (Part of the manifest.) Single-file assemblies will show only the EXE or DLL file name, but some assemblies may include several files in this section. All files in an assembly must appear within the same directory, or in a directory subordinate to the assembly file that contains the manifest.
• Exported type information. (Part of the manifest.) Some assemblies “export” some of their types for use outside of the application. The details of those types appear here.
• References. (Part of the manifest, but in multi-file assemblies, each file will contain its own list of references.) The metadata includes a listing of all external assemblies referenced by your application, whether they are private or appear in the GAC. This list indicates which specific version, culture, and platform-target of the external assembly your assembly expects.
• Internal type information. (Not part of the manifest.) All types used in your assembly are fully described within the metadata. Also, any additional metadata you added to your types through Visual Basic’s attribute feature appear here.
In multi-file assemblies, the manifest-specific elements only appear in the “main” file of the assembly.
The manifest is a subset of the metadata within your assembly. I hate to say that it’s the most important part of the metadata—but it is. The manifest is the public expression of your assembly, and the only way that .NET knows whether it is legit. It’s sort of like the “Nutrition Facts” label put on American food packaging (see Figure 5-2).
Figure 5-2. Is that really good for me?
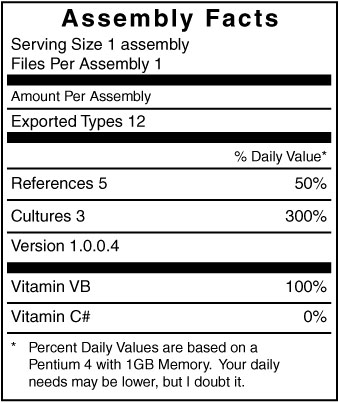
When you look at the food label, you know what the food package contains—although no one really knows what riboflavin is. When you look at the manifest for an assembly, you know at a glance what the assembly contains, and what requirements it has before it can be loaded and run.
Even before .NET burst onto the scene, executables and libraries already contained some “metadata,” such as the version number of the file. But this data wasn’t used to manage access between software components, nor was it organized in a generic and extensible way. The metadata in .NET embodies all of these attributes.
The presence of both the MSIL and metadata in each assembly make these files very readable and understandable. With the right tools, even I seem to understand them. And if I can, then anyone can, which leads to a big problem. Companies invest a lot of time and money in their software development efforts, and they don’t want any rinky-dink two-bit startup reverse engineering their code and getting all of their algorithmic secrets. To prevent this casual reading of any .NET application, Microsoft and other third parties include obfuscators, software programs that scramble the contents of an assembly just enough so that it’s hard for humans to understand, but not for the .NET Framework. I’ll talk more about obfuscation in Chapter 21, “Licensing Your Application.”
Reflection
It may be a bad thing for people to access the content of an assembly, but it’s great when the code in an assembly can access itself. .NET includes a feature called reflection that lets you examine the contents of an assembly. You generally use this feature to access metadata in your own assembly, but it also works with any available assembly. All reflection-related code appears in the System.Reflection namespace.
Through reflection, you can extract pretty much anything stored in the metadata of an assembly, including details on all types, their members, and even the parameters included with function members. This is why obfuscation is so important to vendors; between the compiled MSIL and the metadata, you can virtually regenerate the entire source code for an application from just its executable. The source code would be in MSIL, but it wouldn’t be that tough for someone to massage much of it back into Visual Basic or C#.
Assemblies and Applications
.NET applications (EXE files) are an instance of an assembly. But a single application can include multiple assemblies; in fact, it almost always does. I wrote a little program that uses reflection to list all assemblies actively being used by the program itself. When I ran the program against itself, it generated the following list.
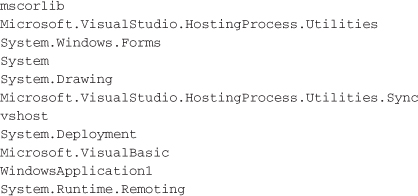
Wow! Twelve assemblies, including WindowsApplication1, the main program. Most of the assemblies are Framework-supplied DLLs. For Microsoft.Visual Basic, it’s the Microsoft.VisualBasic.dll assembly; for System, it’s the System.dll assembly. All of the assemblies (except the main program assembly) are shared libraries from the GAC. The application can also support private assemblies loaded from local DLL files.
The .NET Framework automatically loaded these assemblies for me when WindowsApplication1 started up; it figured out which ones needed to be loaded by looking in the manifest for WindowsApplication1. When the Framework loaded each assembly, it checked to see if those assemblies in turn needed additional assemblies loaded, and so on. Pretty soon, your once simple application becomes a dumping ground for assemblies all over the GAC. But that’s OK, because the purpose of .NET is to manage it all.
The ’My’ Namespace and Assemblies
The .NET Framework, with its thousands of classes, contains a lot of packaged logic that I can use in my own programs. But I don’t have all of the many assemblies and their classes memorized (yet), and it takes time to wander around the FCL documentation. With so many classes available, I sometimes shudder when I think of the effort it will take me to find just the right class or feature I need to accomplish some development task.
Fortunately, I’m not the only one who thinks this way; Microsoft agrees with me. Historically, Visual Basic programmers were sheltered from the complexities of Windows application development. Not that they needed to be; we all know that Visual Basic developers are generally a cut above the rest. But there was “the Visual Basic motto” to contend with: Make Windows Development Fast and Easy. And calling some esoteric method deep within the bowels of the System namespace just to get a minor piece of data is neither easy nor fast.
To bring back some semblance of the pleasant experience previously available in Visual Basic development, Microsoft introduced the My pretend namespace in its 2005 release of the language. The My pretend namespace collects a lot of useful features from all around the Framework Class Library, and organizes them in a much smaller hierarchy for simple and direct access. I briefly mentioned My in Chapter 1, but it’s a good time to take a closer look at what it does.
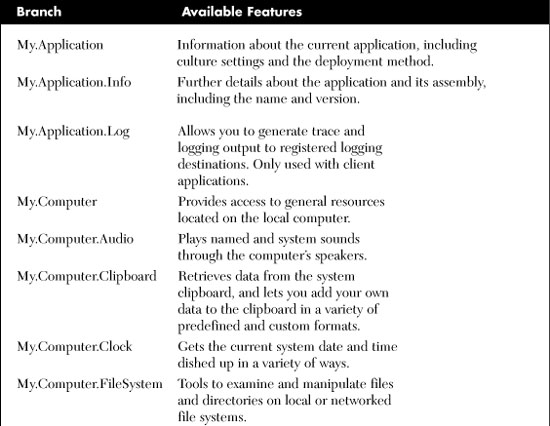
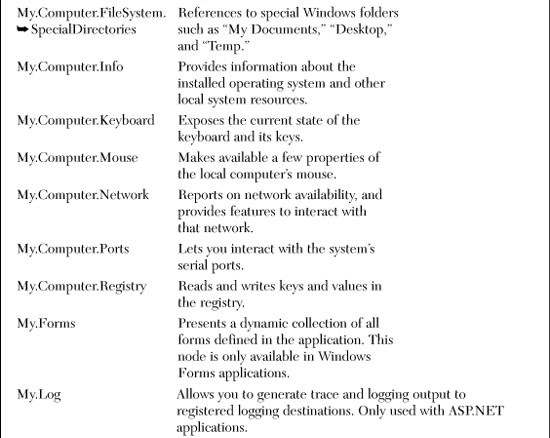
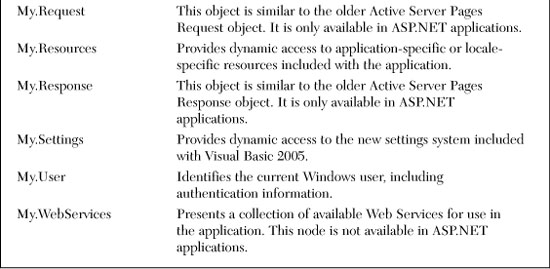
The My pretend namespace looks a lot like other namespaces, such as System, System.Reflection, or System.Windows.Forms. But it’s not really a namespace—it’s pretend! For one thing, you can’t use the Imports keyword to create a shortcut to branches within its hierarchy. Also, some sections of the hierarchy are dynamic; they change as your source code changes. Table 5-1 lists the major nodes of the hierarchy.
Table 5-1. Major Nodes in the My Namespace Hierarchy
The My namespace includes a lot of features you will use regularly, including access to the version number of the application. Instead of typing System.Reflection.whatever to get to the version number’s “major” component, you can now just type:
My.Application.Info.Version.Major
Need a list of assemblies, but you’re too lazy to type the word “Reflection?” Try:
My.Application.Info.LoadedAssemblies
Need to know the time right now in England?
My.Computer.Clock.GmtTime
Can you communicate over the local area network?
My.Computer.Network.IsAvailable
Who is running this computer anyway?
My.User.Name
There isn’t much in the My namespace that you can’t already do with standard FCL libraries. There are even a few parts of My that are repeats of features already included in the Visual Basic language, although with some enhancements. For instance, Visual Basic includes a Kill command that lets you delete files. The new My.Computer.FileSystem.DeleteFile method also removes files, but it includes new options, including one that lets you send the file to the Recycle Bin instead of just losing it forever.
Directives and Assemblies
Directives are Visual Basic statements—but then again, they’re not. The two key directives—#Const and #If—provide instructions to the compiler on how to handle a block of Visual Basic source code. (There is a third directive, #Region, that helps to visually present source code within Visual Studio, but it has no impact on the compiler or the final compiled application.) By using directives, you can tell the compiler to include or exclude specific chunks of source code from the final project. So, they aren’t really Visual Basic source code statements, but they are only available in Visual Basic.
Why would you want to include or exclude code in an application? Well, I can think of several good reasons, some of which involve the CIA and former Federal Reserve chairman Alan Greenspan. But the most common use is when you want to produce two different versions of your application, based on some condition. For example, you may sell an “express” version and a “professional” version of a product. Much of the code is identical for the two versions, but the professional version would include features not available in the express version. Also, the express version may include a simplified presentation for a feature that has a more complex usage in the professional edition.
Some software products fulfill this need by using standard Visual Basic conditions.
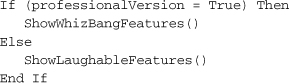
This, of course, works just fine. But the express application still contains all of the enhanced features. But it can’t access any of that code, so why even include it on the installation CD? If you use directives, you can mark down that problem as solved. Directives used conditional expressions, much like the professionalVersion = True condition in the previous block of code. But they are defined with the #Const statement, and are called compiler constants.
#Const fullVersion = True
This statement defines a Boolean compiler constant. It can only be used with directives; if you try to use fullVersion in a standard Visual Basic statement, the compiler will complain. But it will work just fine in the #If directive.
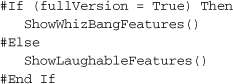
This code looks a lot like the previous code block, but with the added “#” signs. It looks the same but it’s not. With the plain If statement, the code that gets compiled into the final application is the following:

Yeah, the whole block of code. But with the directives, what gets included in the compiled application depends on the value of fullVersion. If fullVersion is True, then this gets compiled into the compiled application:
ShowWhizBangFeatures()
The other four lines are gone; they’ve vanished . . . into thin air, as if they never existed. But in this case, it’s a good thing. The goal was to have a version of the assembly completely devoid of the undesired code, and that’s what happened.
To set the fullVersion compiler constant to generate the full version, you include this line at the top of each source code file that includes conditional #If code blocks:
#Const fullVersion = True
When you’re ready to generate the “express” version, just change each of these lines to their False counterpart:
#Const fullVersion = False
Somehow, changing this line in every source code file that needs it seems like a lot of work, and it is. And what happens if I forget to set one of them to the right version? No good, I can tell you.
To keep Visual Basic developers from running down the halls screaming more than they normally would, Visual Studio provides a few different ways to set compiler constants once, and have them apply to every part of the application. The most common way to do this is through the project properties’ Compile panel (see Figure 5-3). Click on the Advanced Compile Options button, and then add your global compiler constants to the Custom constants field.
Figure 5-3. This is a whole lot easier than all that typing.
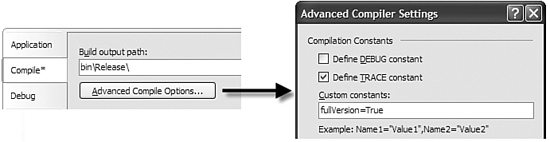
Now, by adding either fullVersion=True or fullVersion=False to this field, you can build different versions of the application. The Visual Basic compiler also provides features that let you set up different compile scripts for your project. I won’t talk about it in this book, but you can read up on the MSBuild tool in the Visual Studio documentation if you need this level of control.
Besides Booleans, compiler constants can be numbers and strings. The Visual Studio environment also defines some compiler constants for you. The DEBUG and TRACE constants are True or False based on the Define DEBUG constant and Define TRACE constant checkboxes that appear in Figure 5-3. The VBC_VER constant identifies the version of the Visual Basic compiler being used; it is set to 8.0 in Visual Basic 2005.
Summary
Assemblies aren’t just souped-up EXE or DLL files; they contain gobs of metadata, including the manifest, that make .NET applications self-describing. The compiler uses this information to correctly configure and process the managed MSIL code in each assembly. In later chapters, I’ll show you how you can add your own content to the metadata area of the file assembly.
Although not actually parts of an assembly, this chapter also discussed the My namespace and directives, two Visual Basic features that impact what gets included in your assembly.
Project
This chapter’s project officially kicks off the coding of the Library Project (muted applause). We’ll start off with something simple: building the “About” form that provides basic information about the application, including its version number.
Project Access
Load the “Chapter 5 (Before) Code” project, either through the New Project templates, or by accessing the project directly from the installation directory. To see the code in its final form, load “Chapter 5 (After) Code” instead.
Our goal is a pleasant form that conveys basic information about the program, a form that looks something like Figure 5-4.
Figure 5-4. Everything you wanted to know about the program
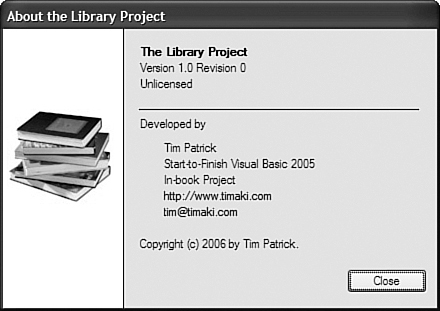
Like any Visual Basic application for Windows, the creation of this form involves two steps: (1) adding controls to the form; and (2) writing the related code.
Adding Controls
If there is one area where Visual Basic excels, it is form creation. Codeless programs can be created by the simple dragging and dropping of pre-built controls onto the surface of a pre-built form. It’s all done from within the comfort and convenience of the Visual Studio Integrated Development Environment (IDE), as shown in Figure 5-5.
Figure 5-5. The Visual Studio environment
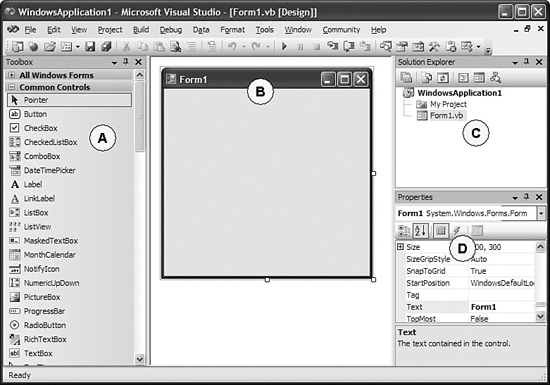
The displayed environment includes four key areas, which I’ve labeled with letters in Figure 5-5.
A. The toolbox. This listing of controls includes not only display controls, but controls that expose no specific user interface, such as the Timer. (If you don’t see the toolbox, select the View ![]() Toolbox menu command.) To add a control to a form, double-click the control in the toolbox, drag it from the toolbox to the form, or draw the control on the form after first selecting it from the list.
Toolbox menu command.) To add a control to a form, double-click the control in the toolbox, drag it from the toolbox to the form, or draw the control on the form after first selecting it from the list.
B. The form surface. Place any control that exposes a user interface here. The form is WYSIWYG, so you can see the final result as you design the form.
C. The Solution Explorer. All files related to your project appear here. For the current project, you will only see the My Project entry and an entry for the form, Form1.vb. There are actually more files. If you click the second button from the left at the top of the Solution Explorer, it will show you additional files, most of which are managed by Visual Studio on your behalf.
D. The Properties panel. When you select a control on your form surface, or the form surface itself, or an item in the Solution Explorer, the properties of the selected item appear in this area. You can alter the settings of many properties by typing in the new setting. Some properties include special tools to assist you in setting the property value.
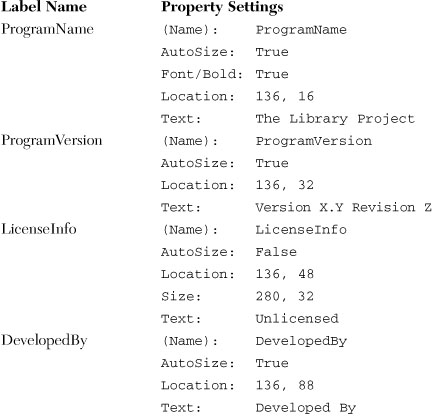
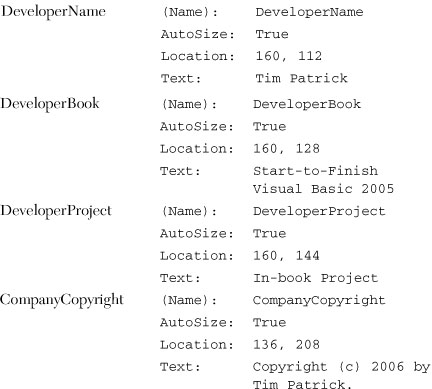
If you haven’t done so already, open the form Form1.vb in design view by double-clicking it in the Solution Explorer. We’ll add eight text labels, three shape and line elements, two web-style hyperlinks, a command button, and a picture to the form’s surface. I’ve already added the picture to the form for you, with an image of some books, naming it SideImage.
Set up the form by adjusting the following properties from their defaults. Click on the form surface, and then modify these property values using the Properties panel.
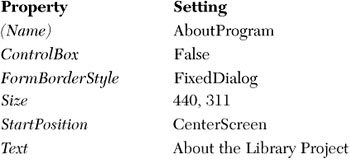
Next, add the eight basic text labels to the form’s surface using the Label control. You’ll find this control in the toolbox. As you add each Label control, use the following list of settings to set the properties for each label. The included text matches my situation, but feel free to modify the content as needed.
Let’s add some lines and colored sections to the form. Visual Basic 6.0 included distinct shape controls for lines, rectangles, and ellipses that you could apply directly to the form surface. .NET no longer includes these items; you have to add them by hand using source code-specified drawing commands. But you can simulate lines and rectangles using the standard Label control, sans the text.

If the BackgroundSide label obscures the graphic, right-click on the label, and select Send To Back from the shortcut menu that appears.
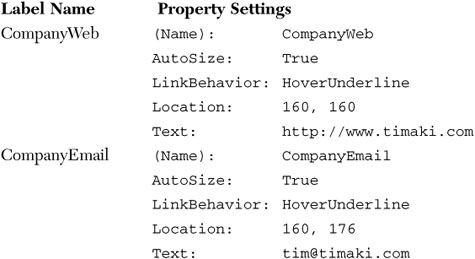
The LinkLabel control is similar to the more basic Label control, but you can include “links” in the text, clickable sections that are similar to the links on a web page. We’ll use these to display the web site and email address. Add two LinkLabel controls to the form and use the following settings to configure each control’s properties.
The final control to add is a button that lets the user close the form. Add a Button control to the form with the following properties.

Forms can be configured so that a press of the Escape key triggers a Button control on the form. To do this, click on the form surface, and then set its CancelButton property to “ActClose.” We had to delay this step until the button was actually added to the form; the CancelButton property would not have allowed a setting for a non-existent button.
Well, the form should look pretty good by now. The last thing I like to do is to set up the tab order, the order in which the user accesses each field on the form when pressing the Tab key on the keyboard. To edit the tab order, select the form surface, and then select the View ![]() Tab Order menu command. Each control on the form that can be given a tab order value will suddenly have a tab order number next to it. Click on each number or control in order until you get the arrangement you want. (See Figure 5-6 to view how I ordered the controls.) Finally, select the View
Tab Order menu command. Each control on the form that can be given a tab order value will suddenly have a tab order number next to it. Click on each number or control in order until you get the arrangement you want. (See Figure 5-6 to view how I ordered the controls.) Finally, select the View ![]() Tab Order menu command again, or press the Escape key, to leave the tab ordering process.
Tab Order menu command again, or press the Escape key, to leave the tab ordering process.
Figure 5-6. Nice and orderly

You can also set the tab order for each control by modifying its TabIndex property using a zero-based numbering system. However, it’s usually faster to set these values by clicking on each control in order.
Adding the Code to the Form
Now it’s time to add some real Visual Basic code. Not that we haven’t added any until now. Everything we did on the form, although we didn’t see it happen, was converted into Visual Basic source code. Let’s take a quick look. In the Solution Explorer, click on the Show All Files button, the second button from the left. When all the files appear, click on the “plus sign” next to Form1.vb, and finally double-click on the Form1.Designer.vb file (see Figure 5-7).
Figure 5-7. Accessing the hidden, secret, forbidden code. Yeah, it’s out there.

Because it’s over 200 lines of source code bliss, I won’t be printing it here. But look it over; it’s all pretty interesting. As you dragged-and-dropped controls on the form, and modified its properties, Visual Studio edited this file on your behalf. It’s part of your form’s class (all forms are classes that derive from System.Windows.Forms.Form). You can tell by the “Partial” keyword at the top.
Partial Public Class AboutProgram
Inherits System.Windows.Forms.Form
Most of the action happens in the InitializeComponent procedure. When you are finished looking it all over, close up the designer code, and return to the form surface. To make our form a real and interesting form, we need it to do three things.
- Show the actual version number of the application. This should be determined and displayed right when the form first appears.
- Jump to the appropriate web site or email recipient when clicking on the link labels. This event gets processed in response to a user action.
- Close the form when the user clicks the Close button. This is also a user-driven event.
Let’s start with the easy one, closing the form. I’m sure you remember about events from Chapter 1. Events are blocks of code that are processed in response to something happening, most often a user action like a mouse click. All of the actions we want to perform on this form will be in response to a triggered event (lucky us). The easiest way to get to the “default” event for a control is to double-click the control. Try it now; double-click the Close button. When you do, the IDE opens the source code view associated with the form, and adds an empty event handler (the ActClose_Click subroutine).

Every forms-based event (and in fact, most other types of events) in .NET have pretty much the same arguments: (1) a sender argument that indicates which object triggered this event; and (2) the e argument, which allows sender to supply any additional information that may be useful in the event. In this case, the sender argument will be a reference to the ActClose button, because that’s the object that will generate the Click event. A button’s Click event doesn’t have any more useful information available, so e is the default object type, System.EventArgs, which is pretty much just a placeholder, and the object from which all of the more interesting e argument types derive.
The name of this event handler is ActClose_Click, but if you want to change it to FredAndWilma, that’s fine; it won’t mess up anything. But you must keep the Handles ActClose.Click clause intact. This is the part that links the event handler to the actual event.
The code to close the form is extremely simple. Enter it now, either by using the first code snippet for this chapter, or by typing it directly.
Insert Snippet
Insert Chapter 5, Snippet Item 1.
'----- Close the form.
Me.Close()
This statement says, “I’m the AboutProgram form/object, and I command myself to close.” If you run the program right now (press the F5 key), you close the form by clicking on the Close button. Because the AboutProgram form was the only form in the application, closing it automatically ended the entire application, no questions asked.
Okay, back up to the second item, the web-style links. You could go back to the form surface and double-click on each link label to create an event handler for each label’s default event (in this case, the LinkClicked event). But you can also add the event handler subroutines right in the editor, either by typing the code yourself (which is no fun), or by using the two drop-down lists just above the editor window (see Figure 5-8).
Figure 5-8. The Class Name and Method Name fields

The Class Name list appears on the left side. Selecting an entry from this list updates the right-hand list, the Method Name list. To add an event handler template for the CompanyWeb’s LinkClicked event, first select “CompanyWeb” from the Class Name list, and then select “LinkClicked” from the Method Name list. The following code block appears in the code window.
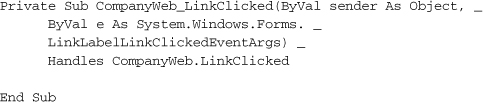
This template’s argument list is a little more interesting, because its e argument is an object of type System.Windows.Forms.LinkLabelLinkClickedEventArgs. The LinkLabel control allows you to have multiple web-style links in a single control, interspersed among regular text. The e argument has a Link property that tells you which of the links in the control was clicked by the user. Because our labels have only a single link, we won’t bother to check it. We’ll just show the web page immediately anytime the link is clicked.
Insert Snippet
Insert Chapter 5, Snippet Item 2.
' ----- Show the company web page.
Process.Start("http://www.timaki.com")
The Process object is part of the System.Diagnostics namespace, and Start is one of its shared members that lets you start up external applications and resources. You pass it any valid URL, and it will run. Let’s try it again with the CompanyEmail’s LinkClicked event. Add in the template any way you choose, and then type or insert the code that starts a new message to an email address.
Insert Snippet
Insert Chapter 5, Snippet Item 3.
![]()
The last event to design is one of the first events called in the lifetime of the form: the Load event. It’s called just before the form appears on the screen. Double-clicking on the surface of the form creates an event handler template for the Load event. If you prefer to use the Class Name and Method Name drop-down lists instead, select “(AboutProgram Events)” from the Class Name list before using the Method Name list.

Let’s add code to this event handler that displays the correct version number, using the version information found in My.Application.Info.Version, an instance of the System.Version class.
Insert Snippet
Insert Chapter 5, Snippet Item 4.

This code uses a With statement to reduce the amount of typing needed in the main assignment statement. Inside of the With . . . End With statement, you aren’t required to retype the object name that appears just after the With keyword—in this case, My.Application.Info.Version. You can just refer to that object’s members by typing a dot (“.”) followed by the name of the member. You could forgo the With statement and type the full object name each time you wanted to use one of the version values, but this way keeps the code cleaner and less overwhelming.
Setting the Version Number
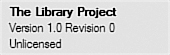
If you run the program, it will display the currently defined version number, “1.0 Revision 0,” as shown in Figure 5-9.
Figure 5-9. The version number from the AboutProgram form
My question—and I hope I can answer it before the paragraph is finished—is, “Where is that version number defined, and how can it be changed?” It turns out that I do know the answer: The version values are stored as metadata within the assembly. Visual Studio includes a form that let’s you modify the basic informational metadata stored in the assembly. To access the form, display the project’s properties (double-click on “My Project” in the Solution Explorer), select the Application tab, and then click on the Assembly Information button (see Figure 5-10).
Figure 5-10. The Assembly Information form, filled out with some relevant values
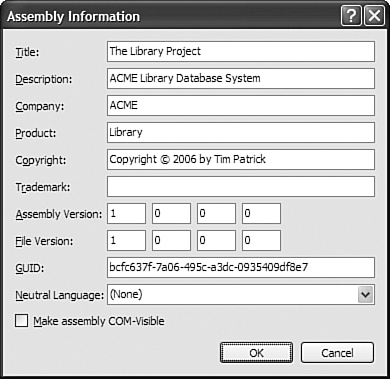
Our AboutProgram form displays the assembly’s version number, which is set using the four text fields next to the Assembly Version label. Those four fields represent the Major, Minor, Build, and Revision numbers of the assembly. Go ahead, set them to some other values, click OK, and run the program again.
Although this form is convenient, it’s just another example of Visual Studio writing some of your project’s code on your behalf. Every field on this form gets saved in a source code file included with your project. To view it, make sure you have the Show All Files button still selected in the Solution Explorer. Expand the My Project item using its “plus sign,” and then double-click on the AssemblyInfo.vb item. This file defines several assembly-specific attributes (which we’ll explore in Chapter 17, “GDI+”), including the following informational entries.
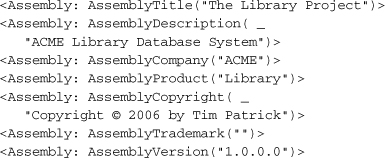
As you can see, this file has been updated with the values I typed into the Assembly Information form. Thank you, Visual Studio! You see the “AssemblyVersion” attribute defined here. If you modify these values, the changes will be reflected in the Assembly Information form, and also in your running application and final compiled assembly.
The last thing we will do for now to the AboutProgram form is to give it a meaningful file name. Currently, it is named “Form1.vb,” but “AboutProgram.vb” would be much more descriptive. To change the name, select Form1.vb in the Solution Explorer, and modify the File Name property to “AboutProgram.vb” in the Properties panel. If you still have all the files showing, you will see Visual Studio also update the names of the file’s two subordinate files, the designer file (AboutProgram.Designer.vb) and the resource file (AboutProgram.resx).
Now would be a great time to save your work (File ![]() Save All).
Save All).
Adding the Main Form
As useful and full featured as the AboutProgram form is, such forms are seldom the core focus of an application. In the Library Project, this form will only be displayed when triggered from the “Main” form, so let’s add a simple Main form now. In Visual Studio, select the Project ![]() Add Windows Form menu command. When the Add New Item form appears, select “Windows Form” from the list of available forms, and give it a name of “MainForm.vb” before clicking the Add button.
Add Windows Form menu command. When the Add New Item form appears, select “Windows Form” from the list of available forms, and give it a name of “MainForm.vb” before clicking the Add button.
When the new form appears, adjust the following properties as indicated.
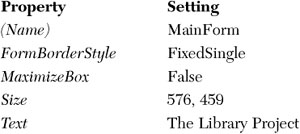
From the toolbox, add a Button control to the form with the following properties.
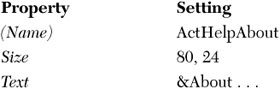
If you’re familiar with Visual Basic development from its pre-.NET days, you will recognize the “&” characters in the button’s text. This special character sets the “shortcut” for the button. When you press the Alt key and the letter that follows “&” (in this case, “A”), the program acts as if you clicked on the button with the mouse.
Double-click on the button and add the following code to the click event procedure.
Insert Snippet
Insert Chapter 5, Snippet Item 5.
' ----- Show the About form.
AboutProgram.ShowDialog()
Here we specify a direct reference to the AboutProgram form. Before the 2005 version of Visual Basic, showing a new form required that you create an instance of the form class before showing it.
(New AboutProgram).ShowDialog()
That syntax still works, and is the way to do if you need to display multiple copies of the same form on-screen at the same time. However the “AboutProgram.ShowDialog()” syntax is much cleaner for single-use forms, and more closely reflects how form presentation was done in Visual Basic since its initial release. Actually, this statement is using the My namespace. The full statement looks like this.
My.Forms.AboutProgram.ShowDialog()
The My.Forms collection allows you to reference any form within it without having to say “My.Forms” first. The members of the My.Forms collection represent default instances of each form in the project.
That’s all the code we need for now, but if you run the program, it will still only show the AboutProgram form. That’s because the AboutProgram form is set as the “startup” form. To alter this, open the project properties window, select the Application tab, and set the Startup Form field to “MainForm.”
Because the AboutProgram form is now being shown as a “dialog” form (through the call to the ShowDialog method), its behavior is somewhat different. Each form includes a DialogResult property whose value is returned by the ShowDialog method when the form closes. Each button on your form can be configured to automatically set this property and close the form. The Close button on the AboutProgram form does just that; its own DialogResult property is set to Cancel, which is assigned to the form when the user clicks the Close button.
The upshot of that drawn-out paragraph is that you can now delete the event handler for the Close button’s Click event, and the button will still close the form. Delete the ActClose_Click procedure from the AboutProgram’s source code, run the program, and see what happens. The Close button still closes the form, even without the event handler.
You could also have left the procedure there, cleared the Close button’s DialogResult, and added the following statement to that button’s event handler.
Me.DialogResult = Windows.Forms.DialogResult.Cancel
That brings to three the total different ways we can use to close the AboutProgram form. It’s the flexibility of .NET at work; there are many different ways to accomplish the same task. So be creative!
Extra Credit: Adding an Icon
If you’ve still got a little energy left, we can make one more change before this chapter runs out of paper: adding a custom icon to the main form. Just follow these step-by-step instructions:
- Display the main form by double-clicking on the MainForm.vb item in the Solution Explorer.
- Select the form’s surface.
- Select the form’s Icon property in the Properties panel.
- Click the “...” button in this property, and search for the Book.ico file in the “Chapter 5 Before” subdirectory of the book’s installation directory. You can also use any other “.ico” file.
Save Your Work
Make sure you always save changes. By default, Visual Studio is configured to save your changes every time you run your program, but I like to save often just in case.
This chapter included a lot of manual instruction because there were just so many cool Visual Studio features to play with; I just couldn’t help myself. We’ll probably keep up this pace somewhat for a few chapters, but eventually there will be so much code that a lot of it will come from the code snippets.