
Chapter 16. Generics
When I was in high school, my family sometimes shopped at a local grocery warehouse named Fedmart. Signs on the window clearly stated that there was “no connection between Fedmart and the Federal government,” but people continued to shop there anyway. They had these small one-dollar frozen cheese pizzas that my mom would buy in bulk for me and my friends, teenage boys who didn’t care much about what went down the esophagus.
Most of the store stocked the typical grocery products, but there was one aisle near the south border of the store that only sold “generic” products. Walking into this section was like walking into a black-and-white television; all of the product labels were plain clear or white, with simple black lettering. And they were cheap. They did the job, but just barely. You would never want to run out of name-brand ketchup in the middle of a celebratory barbeque with your friends, and offer up a bottle of generic ketchup as a replacement. Somehow I remember clearly reading the black lettering on the white label of that watery ketchup substitute, about how it met the requirements for federal ketchup standards. At that moment I had an epiphany, a sudden realization that would change the way I thought about life in these United States forever: The government has a federal ketchup standard!
Sadly, Fedmart closed down before I finished my senior year, leaving a vacuum in the generic ketchup and aluminum foil marketplace. But as a Visual Basic programmer, you can still gain access to generics, through .NET’s generics technology. Generics—the ability to use placeholders for data types—is new in Visual Basic 2005 and the related .NET Framework 2.0. This chapter provides you with the “specifics” on generics.
What Are Generics?
In .NET, “generics” is a technology that lets you define data type placeholders within types or methods. Let’s say you needed to define a class to track customer data, but you didn’t want to enforce a specific format on the customer “ID” value. Part of your code needs to interact with customer objects using an Integer ID value, while another part of the code will use an alphanumeric key for the customer. You might ask, “Why don’t you just include both types of identifiers as distinct fields in your customer record?” That wouldn’t work because I am trying to come up with a reasonably simple example and answering that question would just distract me. So, here’s the numeric version of the class.
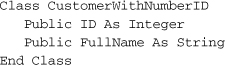
Here’s the variation that uses a string ID.
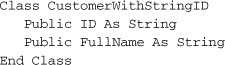
Of course, you could define ID as System.Object, and stick anything you wanted in that field. But System.Object is considered “weakly typed,” and there is nothing to stop you from mixing in Integer and String ID values for different instances in an array of customer objects.
What you want is a system that lets you define the class generically, and hold off on specifying the data type of ID until you actually create an instance of the class, or a complete collection of related class instances. With such a system, you could define a general-purpose version of the customer class.
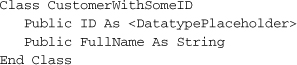
Later, when it was time to create an instance, you could tell the language which data type to use for the placeholder.
Dim oneCustomer As CustomerWithSomeID(replacing _
<DatatypePlaceholder> with Integer)
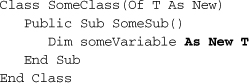
This is what generics let you do. Here’s the actual Visual Basic syntax that defines the non-specific customer class.
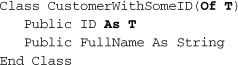
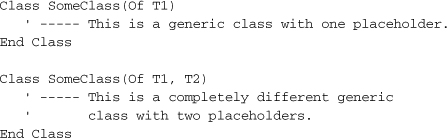
The general placeholder, T, appears in a special Of clause, just after the class name. (You don’t have to name the placeholder T, but it’s become a tradition when presenting sample code using generics.) As a data type, T can be used anywhere within the class definition where you don’t want to define the data type up front. The class, and its ID member, are now ready for instantiation with an actual replacement data type for T. To create a new instance, try this code:
Dim numberCustomer As CustomerWithSomeID(Of Integer)
By attaching “(Of Integer)” to the end of the class definition, Visual Basic acts as if you had actually declared a variable for a class that had an Integer member named ID. In fact, you did. When you create an instance of a generic class, the compiler defines a separate class that looks like a non-generic class with all of the placeholders replaced.
![]()
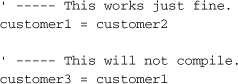
These lines define two instances of CustomerWithSomeID(Of Integer), and one instance of CustomerWithSomeID(Of String). customer1 and customer2 are truly instances of the same data type, but customer3 is an instance of a completely different data type. Assignments between customer1 and customer2 will work, but you can’t mix either of them with customer3 without performing an explicit conversion.
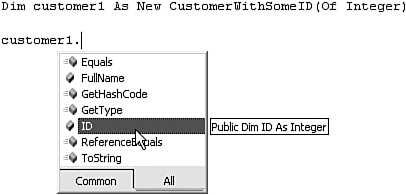
As true compile-time data types generated automatically by the compiler, they exhibit all of the personality of other non-generic classes. Even Visual Studio’s IntelliSense properly detects the substituted data type. Figure 16-1 includes a tool tip, just to the right of the instance member selection list, which properly identifies the customer1.ID member as Integer.
Figure 16-1. Congratulations, Mr. and Mrs. Generic: It’s an Integer
Within the class definition, the T placeholder can appear anywhere, even within argument lists and local variable declarations.
Generics work with structures and interfaces as well.
Variations of Generic Declaration
If there were a minimum federal government data type placeholder requirement, the implementation of generics just described would certainly meet it. It’s kind of nice to postpone the definition of data types until the last minute. But .NET generics don’t stop there.
Multiple Placeholders
Generic placeholders—also known as type parameters—are like those knives you buy on late-night TV. You don’t get one; you get more! As many as you need, it turns out. Each generic class can include multiple placeholders by adding them to the initial Of clause.
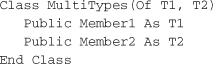
As before, you aren’t required to use the boring names T1 and T2. Whatever names you choose, include them as a comma-separated list just after the Of keyword. When you’re ready to create an instance, replicate the comma-delimited list in the same order, but using actual types. In this statement, Integer replaces T1, while String replaces T2.
Dim useInstance As MultiTypes(Of Integer, String)
Data Type and Interface Constraints
The type parameters you included in a generic, such as T, accept any valid data type, including Integer, String, System.Windows.Forms.Form, or your own custom types. That is, T can be replaced by anything that derives from System.Object, which is everything. You can even imagine the statement:
Class SomeClass(Of T)
being replaced by:
Class SomeClass(Of T As System.Object)
adding the As clause to make it look like other Visual Basic declarations. Well, you can stop imagining and start acting: Placeholders support the As clause. If you don’t include an As clause, Visual Basic assumes you mean As System.Object, but you can follow As with any type you want.
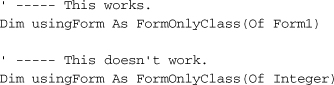
Class FormOnlyClass(Of T As System.Windows.Forms.Form)
By adding a specific class with the As clause, you enforce a constraint on the generic type, a limitation that must be met to use the type. In this case, the constraint says, “You may supply any class value for T as long as it is or it derives from System.Windows.Forms.Form. This means you can create an instance of FormOnlyClass using one of your application’s forms, but not using non-Form classes.
When you add a constraint to a type parameter, it impacts the features you can use with that type parameter. Consider this generic class destined to work with forms, but not declared that way.

In this class, the assignment to whichForm.Text will fail because the WorkWithForms class does not know that you plan to use it with forms. It only knows that you plan to use T, and T is, by default, of type System.Object. There’s no Text property in the System.Object class; I checked.
If we change the definition of WorkWithForms to accept Form objects, the outlook for compiling this code changes dramatically.
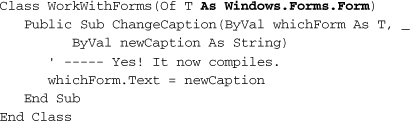
Becaue T has to be a Form type or something derived from Form, Visual Basic knows that all the members of the Form class, including Text, are available to all things T. Therefore, the assignment to whichForm.Text works.
In addition to classes, you can also use interfaces to constrain your generic types.
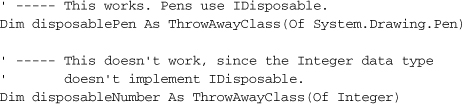
Class ThrowAwayClass(Of T As IDisposable)
Instances of ThrowAwayClass can be created as needed, but only if the type supplied with the declaration implements the IDisposable interface.
But wait, there’s more! See, I told you it was like shopping for knives on TV. Besides your run-of-the-mill types and interfaces, you can also follow the As clause on the generic placeholder with the New keyword.
Class SomeClass(Of T As New)
The As New clause says to the generic type, “Accept any type for T, but only if that type includes a constructor that requires no arguments.” That is, T must include a default constructor. Once defined, you’ll be able to create new instances of T—whatever type it actually turns out to be—in your generic type.
If your generic class includes multiple type parameters, each parameter can include its own As class with a distinct type or interface constraint.
Simultaneous Constraints
It’s nice that each of those knives you purchased can slice a watermelon, but what if you want to chop wood with that same knife, or use it to upgrade that electrical work you’ve been postponing? You’re looking for a multi-functional tool, just like you find in each generic placeholder. If you need one placeholder to include a constraint for a specific class, an interface, and “New” all at once, you can do it. After the As keyword, include the multiple constraints in curly braces.
Class SomeClass(Of T As {Windows.Forms.Form, _
IDisposable, New})
Now, any type you supply in the Of clause when creating an instance of this class must meet all of the constraints, not just one of them. And here’s something new: You can include more than one interface constraint at a time.
Class SomeClass(Of T As {ISerializable, IDisposable})
And you can still include a class constraint and the New constraint, even with those multiple interfaces. (You can’t include more than one class constraint for a single placeholder.) If your generic type includes multiple type parameters, each of them can have their own multiple constraints set.
Nesting Generic Types
Generic types can include their own nested types.
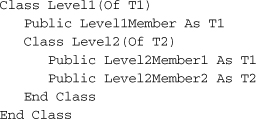
You can nest the generics as deeply as you need.
Non-Generic Types with Generic Members
If generic types seem a little scary or overwhelming, don’t fret. You don’t have to create a full generic type to use the new generic features. You can add generic support to just a single method within an otherwise normal class.
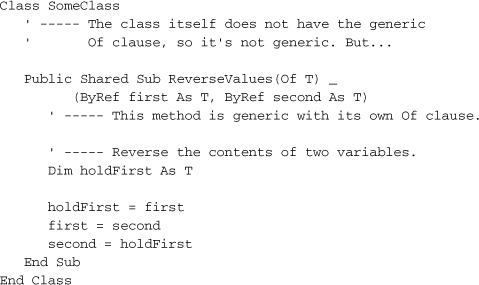
Generic methods are useful when you need to have a local variable of the placeholder’s type within the method (as is done with holdFirst here), but you don’t know the type in advance. Using this shared ReverseValues method works like any other method, with the extra Of clause stuck in.
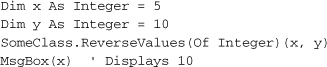
If you will be using the placeholder for one or more of the method arguments, Visual Basic will infer the type based on the passed value. If Visual Basic is able to guess the type in this way, you don’t even need the Of clause when calling the generic method.
SomeClass.ReverseValues(x, y)
As with generic types, generic methods allow you to add constraints to the placeholders.
Overloading Generic Types and Members
Earlier I mentioned how the compiler essentially creates separate classes for each instance variation of a generic class that you create. This means that these two instances actually use completely different and generally unrelated classes.
Dim numberVersion As SomeClass(Of Integer)
Dim textVersion As SomeClass(Of String)
So SomeClass(Of Integer) and SomeClass(Of String) are completely different classes, even though they have the same base name. In a way, Visual Basic is overloading the class name for you, letting you use it in two (or more) different ways.
Generics also let you get involved in the class-overloading game. Normally, you can only create a single class with a given name (inside of a particular namespace, that is). But with generics, you can reuse a class name, as long as the placeholders used among the classes are different enough, either in their number or in their applied constraints.
Visual Basic will figure out which version to use based on the Of clause you include with the instance declaration.
Dim simpleVersion As SomeClass(Integer)
Dim complexVersion As SomeClass(Integer, String)
Generics and Collections
Generics really shine in the area of collections. The initial release of .NET had, among the thousands of possibly useful classes, a set of “collection” classes, all in the System.Collections namespace. Each collection lets you stuff as many other object instances as you want inside of that collection, and retrieve them later. The collections differ in how you stuff and retrieve, but they all allow you to stick any type of object in the collection.
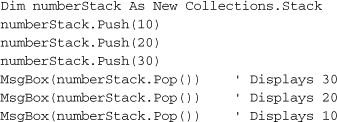
One of the collection classes is the System.Collections.Stack class. Stacks let you store objects like pancakes: the first object you add to the stack goes on the bottom, and each one you add goes on top of the previous object. When you’re ready to eat a pancake—I mean, remove an item—it comes off the top. The Push and Pop methods manage the addition and removal of objects. (There is also a Peek method that looks at the top-most item, but doesn’t remove it from the stack.)
The thing with stacks (and other similar collections) is that you don’t have to put just one type of object into the stack. You can mix any ol’ type of objects you want.

The stack doesn’t care, because it’s just treating everything as System.Object. But what if you needed to ensure that only integers were put into the stack? What if you wanted to limit a stack to any specific data type, but didn’t want to write separate stack classes for each possible type?
This sure sounds like a job for generics to me. It sounded that way to Microsoft, too. So they added a bunch of new generic collections to the Framework. They appear in the System.Collections.Generic namespace. There are a few different classes in this namespace, including classes for linked lists, queues, chocolate chip cookies, and dictionaries. And hey, there’s a class called Stack(Of T). That’s just what we need.

Now, if we try to add anything other than an Integer to numberStack, an error occurs.
' ----- This won't work.
numberStack.Push("I'll try again.")
Summary
Adding generics to .NET development is really the next logical step in providing a flexible and general use programming system. You always had the ability to use placeholders for data—they’re called variables. Generics provide that same placeholder functionality, but with data types instead of just plain data.
When you control all development aspects of an application, you might think that generics aren’t for you. After all, you’re not going to let an Integer variable slip into a collection of dates. But they are quite handy for enforcing standards within your code, which is always good.
Project
This chapter’s project code adds two major features to the application. The first task adds holidays to the system. When a patron checks out a book or other library item, the due date is automatically calculated based on a number of days stored in the CodeMediaType.CheckoutDays database field. But what happens if that calculated date is a holiday, and the library is closed? The patron might not be able to return the book until the next day, and would incur a fine. This fine, though small, could start a chain reaction in the patron’s life that would lead to poverty, despair, and an addiction to soap operas. Fortunately, this can all be avoided by adding a list of holidays to the project. If an item’s return date falls on a documented holiday, the program adjusts the date forward until it finds a non-holiday date.
In the second part of the project code, we finally add what many consider to be the heart of a library system: the lookup of books and other library items by patrons.
Project Access
Load the “Chapter 16 (Before) Code” project, either through the New Project templates, or by accessing the project directly from the installation directory. To see the code in its final form, load “Chapter 16 (After) Code” instead.
Managing Holidays
As a small, stand-alone application that fully manages its own data, there isn’t necessarily a pressing need for generics in the Library application. However, generics provide more advantages than just limiting the types of data stored in a class or collection. They also enhance data conversion and IntelliSense support, because Visual Basic can tell immediately, for instance, what type of data will appear in a collection.
We’ll store all holidays managed by the Library Project in the Holiday database table. The contents of this table will seldom change, and will be frequently accessed during the checkout process. To speed things up, we’ll cache the data inside of the application. And to simplify management of that cache, we’ll store the holidays in a generic collection.
First, let’s create the class that holds a single holiday entry. Add a new class to the project through the Project ![]() Add Class menu command, and give it the name HolidaySet.vb. The familiar structure of an empty class appears.
Add Class menu command, and give it the name HolidaySet.vb. The familiar structure of an empty class appears.
![]()
The Holiday database table includes two main fields used in calculating holidays: EntryType and EntryDetail. Let’s store these as members of the class, and add a flag that ensures the entry is valid.
Insert Snippet
Insert Chapter 16, Snippet Item 1.
![]()
We’ll populate these private members through the class constructor.
Insert Snippet
Insert Chapter 16, Snippet Item 2.
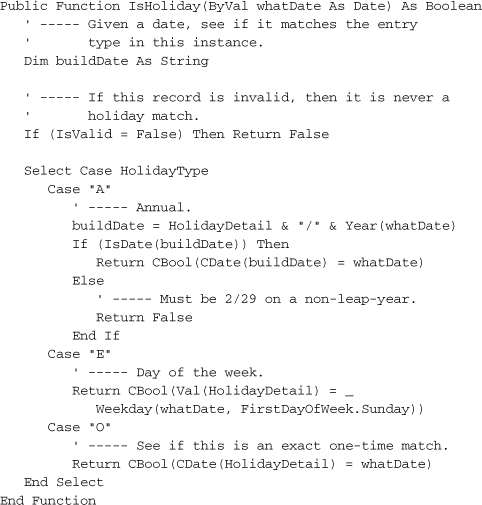
Clearly, the holiday entries have a coding system all their own, and it wouldn’t be fair to force code elsewhere in the application to deal with all of the complexities of holiday date comparisons. So let’s add a public method to the class that indicates whether or not a given date matches the holiday stored in an instance.
Insert Snippet
Insert Chapter 16, Snippet Item 3.
We’re done with that class. Now we just need a place to keep our cached holiday records. The System.Collections.Generic namespace includes a few different collection classes that we could use. Because the only thing we really need to do with the holidays once they are in the collection is scan through them, looking for matches, the standard no-frills list seems best. Its class name is List(Of T), and its primary feature, according to the .NET documentation, is that it lets you access members by index. That’s fine.
Open up the General.vb file and find where the global variables appear, somewhere near the top. Then add a definition for the global collection that will store all of the holidays.
Insert Snippet
Insert Chapter 16, Snippet Item 4.
Public AllHolidays As Collections.Generic.List( _
Of Library.HolidaySet)
There it is! There it is! The Of clause. This is a generic collection. Yeah! Okay, party’s over; let’s move on.
Locate the InitializeSystem method, still in the General.vb file, and add the code that will initialize the global holiday cache.
Insert Snippet
Insert Chapter 16, Snippet Item 5.
AllHolidays = New Collections.Generic.List(Of HolidaySet)
That’s it for infrastructure. Let’s add some routines that access this generic list. We need a routine that will tell us, True or False, whether a given date (the planned due date of a library item) matches any of the holidays or not. Add the function IsHolidayDate to General.vb.
Insert Snippet
Insert Chapter 16, Snippet Item 6.
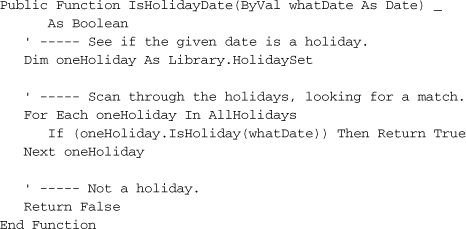
This routine, IsHolidayDate, shows where generics really come in handy. It’s all in the For Each statement that the magic occurs. In a normal collection, we wouldn’t be sure what type of items were stored in the collection, be they HolidaySet or String or Integer. Well, we would know because we are the developer, but Visual Basic plays dumb in this area, and assumes you mixed up the data types in one collection.
But because we tied the AllHolidays collection to the HolidaySet class using the Of HolidaySet clause, Visual Basic now understands that we are only going to store items of HolidaySet in the AllHolidays collection. That means that we don’t have to explicitly convert items retrieved from the collection to the HolidaySet data type. If we weren’t using a generic class, the code would look something like this.
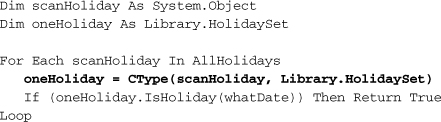
Because non-generic collections boil everything down to System.Object, we would have to explicitly convert each collection object to HolidaySet using CType or similar conversion function. But with a generic collection, Visual Basic takes care of it for us.
We still need to cache the holidays from the database, so add a RefreshHolidays method to General.vb that does this.
Insert Snippet
Insert Chapter 16, Snippet Item 7.
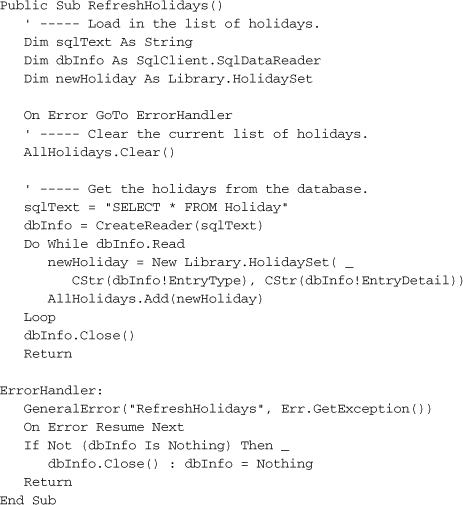
You’ve seen a lot of code like this already, code that loads records from a database table into the program. I won’t sport with your intelligence by explaining it to you line by line.
There are two places where we need to call RefreshHolidays: when the program first starts up, and later whenever changes are made to the list of holidays. We won’t worry about other users changing the list; we’ll just focus on when the local application updates the list. First, open the sometimes-hidden ApplicationEvents.vb file, and add this code to the MyApplication_Startup event handler, just after the existing call to LoadDatabaseSettings().
Insert Snippet
Insert Chapter 16, Snippet Item 8.
RefreshHolidays()
One down, and one to go. Open the MainForm.vb file, and locate the AdminLinkHolidays_LinkClicked event handler. This is the handler that lets the user edit the list of holidays. Add the same RefreshHolidays() line to the end of this routine.
Insert Snippet
Insert Chapter 16, Snippet Item 9.
' ----- Reload the holidays if they changed.
RefreshHolidays()
As you can see right in this routine, we already added the editor to manage the list of holidays. The only thing left to do is to actually access the holiday list when checking out items. We’ll do that in a future chapter.
Looking Up Library Items
When we built the main Library form back in Chapter 7, “Windows Forms,” we included fields that allowed a patron to search for library items. But that’s about all we did; we didn’t enable the fields or make them usable. We also didn’t include any place to display a list of matching items. Let’s complete those components in this chapter. We’ll start with the matching items list.
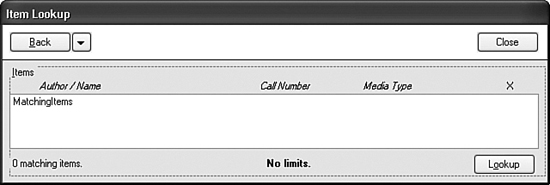
I’ve added a form to the project named ItemLookup.vb that displays the results of a search for library items. It includes a few buttons at the top of the form, and three main display panels.
- PanelMatches. Contains a large list box that displays non-item matches. For instance, it displays a list of matching author or publisher names as searched for by the patron. When this panel appears, the patron selects a match from the MatchingGeneral list, and clicks the Lookup button to display items tied to that selected author, publisher, or other entry.
- PanelItems. Contains a large list box that displays items from the NamedItem database table. That is, it displays a list of library items matching some criteria. Selecting an item from the MatchingItems list and clicking the Lookup button displays the details of that item.
- PanelOneItem. Contains a WebBrowser control that displays details about a single library item. The detail content is built using standard HTML, and may contain links that return you to the PanelItems panel with a new set of matching items displayed. For instance, if you are viewing the details of an award-winning (one can hope) Visual Basic 2005 programming book and click on the publisher name for that item, the PanelItems panel appears, listing all items made by that publisher.
The form also includes a set of Back buttons (in the upper-left corner) that work like the Back button in your web browser, a Close button that returns to the main form, and a menu (BackMenu), used to support the Back button feature. Figure 16-2 shows the form with the PanelItems panel out in front, since it looks a little more interesting than the other two panels.
Figure 16-2. The panel of matching items, with column headings
The associated source code weighs in at around 1,000 lines, much of it focused on filling in the two list boxes and the HTML detail content. The search performed on the main form calls into this lookup form through the InitiateSearch method. The actual database search for matching items occurs in the PerformLookup method, which is called by InitiateSearch. PerformLookup includes distinct SQL queries for each type of search: title, author, subject, keyword, publisher, series, barcode, and some ID number searches, mostly for internal use. The type of search performed determines which of the three panels gets displayed (via the resultType variable). An author search displays PanelMatches with a list of matching author names; a title lookup displays matching items on the PanelItems panel. Here’s the code that performs a lookup by publisher name based on a patron-supplied searchText.
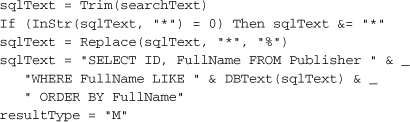
This code ensures that a wildcard character appears somewhere within the search text; if the user doesn’t supply it, the code appends one to the end of searchText. Recall that SQL Server uses the percent (%) character for its wildcard, although the program lets the user enter the more familiar asterisk (*) character.
After processing this query through a data reader, the resultType = “M” flag moves the code to fill in the MatchingGeneral list.
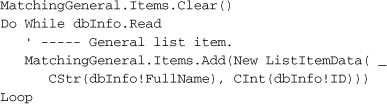
This is just more of the same code you’ve seen in previous chapters. It loads the ListBox control with ListItemData objects, each containing a display name and an ID number from the database. That’s fine for a list with simple display requirements. But if you look back to Figure 16-2, it’s clear we want something a little more interesting for the list of matching items. We want columns, and columns require reasonable data for each column.
To store this data, we’ll make up a new class, called MatchingItemData, which works just like ListItemData, but has more data fields.

Because this class will be used only to display matching items on this form, I’ve made it a subordinate class within the larger ItemLookup form class. The ToString method outputs the text that appears in the list. We won’t generate the actual columnar output until the next chapter. For now, we’ll just display the title and author.
The PanelMatches and PanelItems panels each include a Lookup button that initiates a new call to PerformLookup based on the item selected in the list. The Lookup button on the PanelItems panel retrieves the selected MatchingItemData object from the list, and performs the new search.
The call to PerformLookup starts the process all over again.
Maintaining Search History
Let’s say you have a patron with a lot of time on his hands, and he wants to look up the book War and Peace.
- Starting from InitiateSearch and moving on to the PerformLookup code, the initial title search (“War and Peace”) displays a list of matching titles on the PanelItems panel.
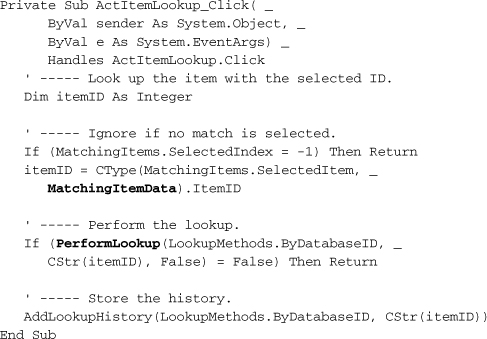
- The patron locates the book in this list, and clicks the Lookup button, which calls the ActItemLookup_Click event handler.
- This event handler in turn calls PerformLookup again, this time doing a precise lookup based on a database ID within the NamedItem table.
- The detail of the item appears on the PanelOneItem panel. (I’ll discuss how it’s done later in this chapter.)
- The detail includes a link to “Tolstoy, Leo,” the long-suffering author of the book. When the patron clicks on this link, it initiates another call to PerformLookup, this time by author ID.
- We’re back to the PanelItems panel, viewing a list of books and other items by Tolstoy, assuming he had time to write anything else.
So the patron now has an experience with three search panels: (1) titles matching the name “War and Peace;” (2) the detail for the selected “War and Peace” item; and (3) items written by Leo Tolstoy. The history feature included in this form lets the patron return to any previous search page, just like the feature in your web browser.
It’s possible that some of the searches performed could return hundreds of results. We don’t want to store all of that content in memory, because it’s possible the patron will never use the Back button. Instead, we will do just what your web browser does: store the minimum information needed to perform the query again. Your web browser maintains just the name and URL of visited paths in its “back” list. (File and image caching is not part of the history feature.) The ItemLookup.vb form needs to store only those values needed by PerformLookup to do the search again: the type of search, and the numeric or text criteria used in the search.
Patron history is accessed on a “last in, first out” basis. The most recent page viewed is the one the patron wants to see first when using the Back button. We discussed just such a last-in, first-out, or LIFO, structure earlier in this chapter: the stack. Each time the user views a panel, we’ll make note of it, pushing just those values we will need later onto the stack. Later, when the user wants to view history, we will pop the most recent panel off the stack and update the display.
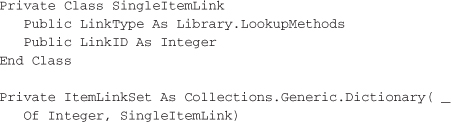
The ItemLookupHistory class, another subordinate class within the ItemLookup class, stores the values we need to manage history in the stack.
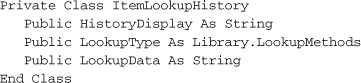
HistoryDisplay provides a short display name to help the user scan through history. LookupType and LookupData are the values that get passed to PerformLookup. It’s all nice and neat. To make things even neater, we’ll use a generic stack for actual storage. It’s declared as a field of the ItemLookup class.
Private LookupHistorySet As _
Collections.Generic.Stack(Of ItemLookupHistory)
As the patron visits each panel, calls to the AddLookupHistory method populate the stack with each new visited item.
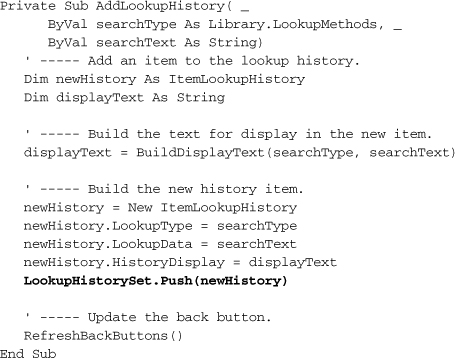
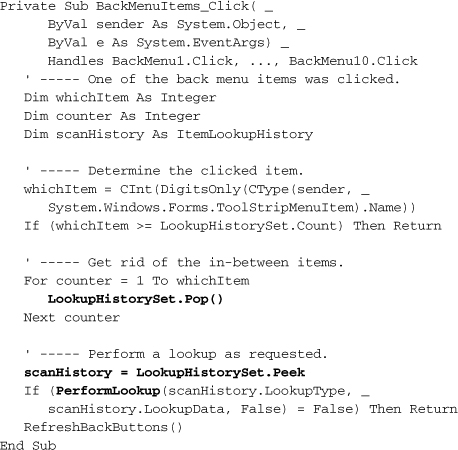
Later, when the patron clicks one of the Back buttons, the BackMenuItems_Click event handler examines the history stack, and calls PerformLookup as needed. And because we stored the ItemLookupHistory objects in a generic stack, we don’t have to specifically convert them from System.Object; the program just knows what data type they are.
Showing Item Detail
The BuildHTMLAndLinks function builds the HTML content that appears on the PanelOneItem panel. This panel includes SingleItemDetail, a WebBrowser control included with .NET. It’s basically a version of Internet Explorer that you embed in your applications. Normally, you supply it with a URL to display, but you can also provide custom content through the control’s DocumentText property. The resultType = “S” branch of the PerformLookup method assigns this property with content returned from BuildHTMLAndLinks.
SingleItemDetail.DocumentText = BuildHTMLAndLinks(itemID)
The content supplied by this routine is standard HTML, but with some specially crafted links that let the library program perform additional lookups based on the details of the displayed library item.
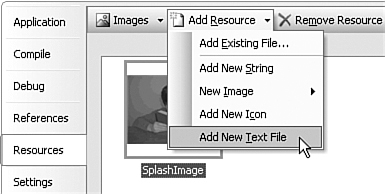
Most of the HTML is boilerplate, and it seems a shame to waste brain cells doing string concatenation just to include it. So instead, I stored much of the HTML as a text file resource through the Resources panel of the project properties. On that panel, I clicked the Add Resource button, selected Add New Text File (see Figure 16-3), and gave it the name ItemLookupBody.
Figure 16-3. Adding a new text file resource
In the text editor window that appeared, I added the following HTML content.
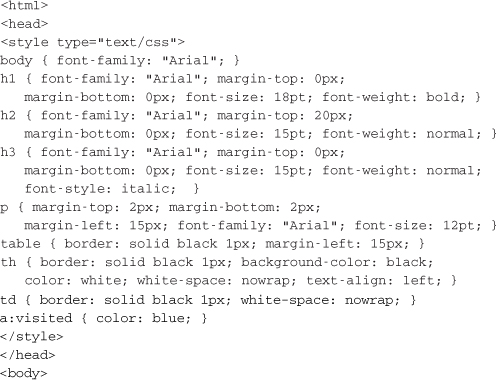
If you’re familiar with HTML, you recognize most of the content as an embedded Cascading Style Sheet. Its various formatting rules will bring a specific and consistent look and feel to the browser content that appears within the item lookup form. This is not a book on Cascading Style Sheets, but there are some good books at your local bookstore that can talk you through the rules and syntax if you’re interested.
You can find the HTML content portion in the Solution Explorer, within the Resources branch. You’ve probably already noticed that the closing </body> and </html> tags aren’t included. We’ll attach those in the BuildHTMLAndLinks method. Because string concatenation is notoriously slow, I choose to use a StringBuilder class, a special string-like class that is custom designed for speed when repeatedly adding content to a base string. You attach content to the end of the StringBuilder using its Append and AppendLine methods, and retrieve the entire string through the standard ToString method.
We’ll begin the content with the boilerplate HTML listed previously. Because we added it as a resource, it already appears in the My.Resources object under the name we gave it.
Dim detailBody As New System.Text.StringBuilder
detailBody.Append(My.Resources.ItemLookupBody)
Most of the code adds plain text to the detailBody string builder using its AppendLine method. Here’s the code that adds the main book title.
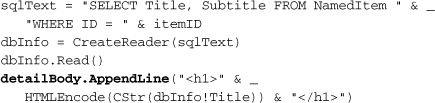
The HTMLEncode function, called in this block, is included in the ItemLookup class. It does some simple modification of special characters as required by HTML. It’s called repeatedly throughout BuildHTMLAndLinks.
So that’s the HTML, but what about the links? If I put a standard link to, say, http://www.microsoft.com, the embedded browser will jump to that page when the link is clicked. But that doesn’t help me do database lookups. The WebBrowser control doesn’t really expose a “link clicked” event, but it has a Navigating event that is close. This event fires whenever the browser is about to move to a new page. Fortunately, one of the data values passed to the event handler is the target URL. So all we have to do is build a link that contains the information we need to perform the database lookup.
I decided to store the relevant database lookup details as a collection (similar to the history stack), and create fake URL-like links that indicate which item in the collection to use. After a lot of thought and contemplation, I decided on the format of my fake URL links:
library://x
where x gets replaced by an index into the collection of links. It’s simple, and it works. The collection of search details is a generic dictionary collection stored as a field within the form class.
Then back in the HTML-building code, I add fake URLs and SingleItemLink objects in tandem. Here’s some of the code used to add in author links, given a data reader with author name fields. (The entryID value supplies the x in library://x.)
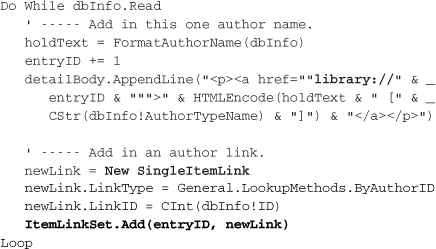
When the user clicks on a link in the embedded web browser, it triggers the Navigating event handler.
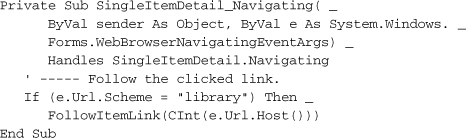
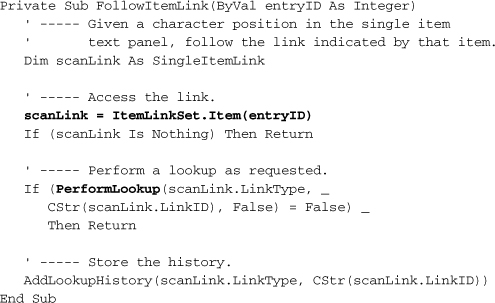
The e.Url.Scheme property returns the portion of the URL before the “://” characters, while e.Url.Host returns the first slash-delimited component just after these characters. That’s where we stored the index into the ItemLinkSet dictionary. The FollowItemLink method extracts the lookup details from ItemLinkSet, and calls our trusty PerformLookup method, resulting in a new search that gets stored in the search history. Once again, generics come to our aid, letting us assign scanLink in this code block without explicit data type conversion.
Enabling the Search Features
The ItemLookup form is ready to use. We just need to call it from the search fields on the main form. The PanelLibraryItem panel in MainForm.vb includes several ComboBox selection controls, but there is no code to fill them in. Let’s add that code now. Access the source code for MainForm.vb, and locate the MainForm_Load event. There’s already some code there that adjusts the form elements. Append the new list-filling code to the end of this routine.
Insert Snippet
Insert Chapter 16, Snippet Item 10.
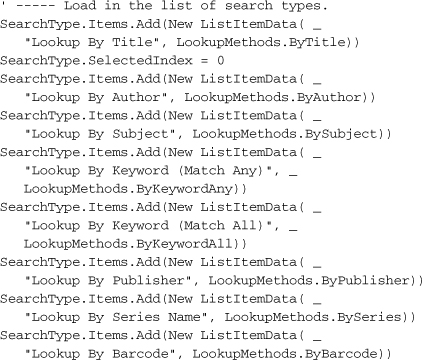
Here’s the portion of that new code that fills in the list of search methods.
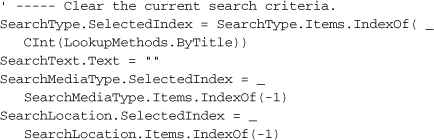
The Clear button on the search panel resets all of the search fields and prepares them for a new search. Add a new ActSearchClear_Click event handler either by using the method selection fields just above the code editor window, or by double-clicking on the Clear button on the form itself. Then add the following code to the handler.
Insert Snippet
Insert Chapter 16, Snippet Item 11.
Because the Library application will probably be used by many different patrons throughout the day, we should assume that a different person is using the program each time they return to the search panel. Let’s simulate a click on the Clear button whenever the user returns to the search panel. Locate the existing TaskLibraryItem method, and add the following code to the end of the routine, just before the SearchText.Focus() statement.
Insert Snippet
Insert Chapter 16, Snippet Item 12.
![]()
In the interest of being as user friendly as possible, let’s add some “help text” to the search panel that varies based on the search type selected in the Search Type drop-down list. Add a new SearchType_SelectedIndexChanged event handler, and then add its code.
Insert Snippet
Insert Chapter 16, Snippet Item 13.
I won’t list it all here because it’s rather repetitive. The code simply examines the current selection in the SearchType control, and sets the LabelSearchHintsData label to some helpful descriptive text.
We’re getting close. The only thing left to do is to perform the search when the user clicks the Lookup button. Add an event handler for ActSearch_Click, and then add its code.
Insert Snippet
Insert Chapter 16, Snippet Item 14.
Most of this routine checks for valid input before calling the ItemLookup form through its InitiateSearch public method.
![]()
You’ve done it, doctor. You’ve added a heart to the patient. The program is ready to run and use for item lookups! If you’ve already added some named items, you can locate them using any of the relevant search methods. Try doing a title search, using just the “*” wildcard character for the search criteria.
Although the search feature works, you will find that some of the display elements on the ItemLookup form don’t work perfectly. We never did get those columns working on the item results panel. Improvements are coming soon. With the next chapter’s focus on GDI+, we’ll soon be able to customize the display to our heart’s content.