
Chapter 9. The Visual Basic Editor, Part II
In this chapter, we conclude our discussion of the Visual Basic Editor. Again, I remind the reader that she may want to read quickly through this chapter and refer to it later as needed.
Navigating the IDE
If you prefer the keyboard to the mouse (as I do), then you may want to use keyboard shortcuts. Here are some tips.
General Navigation
The following keyboard shortcuts are used for navigating the IDE:
|
| ||
|
| ||
|
| ||
|
| ||
|
|
Navigating the code window at design time
Within the code window, the following keystrokes are very useful:
Tracing code
The following keystrokes are useful when tracing through code (discussed later):
Bookmarks
It is also possible to insert bookmarks within code. A bookmark marks a location to which we can return easily. To insert a bookmark, or to move to the next or previous bookmark, use the Bookmarks submenu of the Edit menu. The presence of a bookmark is indicated by a small blue square in the left margin of the code.
Getting Help
The simplest way to get help on any particular item is to place the cursor on that item and hit the F1 key. This works not only for VBA language keywords but also for portions of the VBA IDE.
Note that Microsoft provides multiple help files for Access, the VBA language, and the Access object model. While this is quite reasonable, occasionally the help system gets a bit confused and refuses to display the correct help file when I strike the F1 key.
Note also that a standard installation of Microsoft Office does not install the VBA help files for the various applications. Thus, you may need to run the Office setup program and install Access VBA help by selecting that option in the appropriate setup dialog box. (Do not confuse Access help with Access VBA help.)
Creating a Procedure
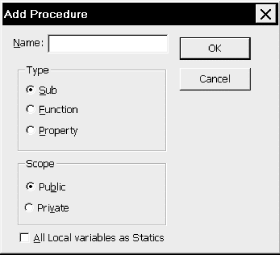
There are two ways to create a new procedure (that is, a subroutine or a function) within a code module. First, after selecting the correct project in the Project Explorer, we can select the Procedure option from the Insert menu. This will produce the dialog box shown in Figure 9-1. Just type in the name of the procedure, and select Sub or Function (the Property choice is used with custom objects in a class module). We will discuss the issue of Public versus Private procedures and static variables later in this chapter.
A simpler alternative is to begin typing:
SubSubNameor:
FunctionFunctionNamein any code window (following the current End Sub
or End Function statement, or in the general
declarations section). As soon as the Enter key is struck, Access will
move the line of code to a new location and thereby create a new
subroutine. (It will even add the appropriate ending—End Sub or End Function.)
Run Mode, Break Mode, and Design Mode
The VBA IDE can be in any one of three modes: run mode , break mode, or design mode. When the IDE is in design mode, we can write code.
Run mode occurs when a procedure is running. To run (or execute) a procedure, just place the cursor anywhere within the procedure code, and hit the F5 key (or select Run from the Run menu). If for some reason a running procedure seems to be hanging, we can usually stop the procedure by hitting Ctrl+Break (hold down the Control key and hit the Break key).
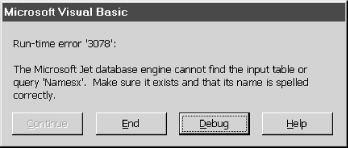
Break mode is entered when a running procedure stops because of either an error in the code or a deliberate act on our part (described a bit later). In particular, if an error occurs, Access will stop execution and display an error dialog box, an example of which is shown in Figure 9-2.
Error dialog boxes offer a few options: end the procedure, get help (such as it may be) with the problem, or enter break mode to debug the code. In the latter case, Access will stop execution of the procedure at the offending code and highlight that code in yellow. We will discuss the process of debugging code a bit later.
Aside from encountering an error, there are several ways we can deliberately enter break mode for debugging purposes:
Hit the Ctrl+Break keys, and choose Debug from the resulting dialog box.
Include a
Stopstatement in the code, which causes Access to enter break mode.Insert a breakpoint on an existing line of executable code. This is done by placing the cursor on that line and hitting the F9 function key (or using the Toggle Breakpoint option on the Debug menu). Access will place a red dot in the left margin in front of that line and stop execution when it reaches the line. You may enter more than one breakpoint in a procedure. This is generally preferred over using the
Stopstatement, because breakpoints are automatically removed when we close down the Visual Basic Editor; therefore, we don’t need to remember to remove them, as we do withStopstatements.Set a
watchstatement that causes Access to enter break mode if a certain condition becomes true. We will discuss watch expressions a bit later.
To exit from break mode, choose Reset from the Run menu.
Note that the caption in the title bar of the VBA IDE indicates which mode is currently active. The caption contains the word “[running]” when in run mode and “[break]” when in break mode.
Errors
In computer jargon, an error is referred to as a bug . In case you are interested in the origin of this word, the story goes that when operating the first large-scale digital computer, called the Mark I, an error was traced to a moth that had found its way into the hardware. Incidentally, the Mark I (circa 1944) had 750,000 parts, was 51 feet long, and weighed over 5 tons. How about putting that on your desktop? It also executed about one instruction every 6 seconds, as compared to over 200 million instructions per second for a Pentium!
Errors can be grouped into three types based on when they occur — design time, compile time, or runtime.
Design-Time and Compile-Time Errors
As the name implies, a design-time error occurs during the writing of code. Perhaps the nicest feature of the Visual Basic Editor is that it can be instructed to watch as we type code and stop us when we make a syntax error. This automatic syntax checking can be enabled or disabled in the Options dialog box shown in Figure 9-3, but I strongly suggest that you keep it enabled.
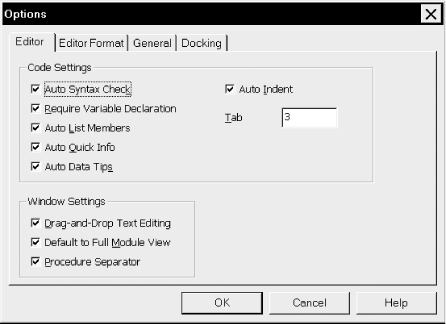
Notice also that there are other settings related to the design-time environment, such as how far to indent code in response to the Tab key. We will discuss some of these other settings a bit later.
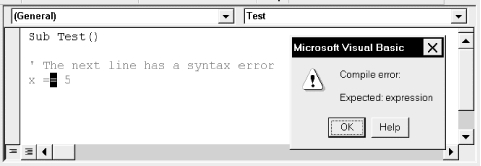
Illustrating automatic syntax checking, Figure 9-4 shows what
happens when we deliberately enter the syntactically incorrect
statement x == 5
and then attempt to move to another line. Note that Microsoft refers
to this type of error as a compile error
in the dialog box, and perhaps we should as well.
However, it seems more descriptive to call it a design-time error or
just a syntax error.
Before a program can be executed, it must be compiled—or translated into a language that the computer can understand. The compilation process occurs automatically when we request that a program be executed. We can also specifically request compilation by choosing the Compile Project item under the Debug menu. If Access encounters an error while compiling code, it displays a compile-error message.
Runtime Errors
An error that occurs while a program is running is called a runtime error . Figure 9-2 illustrates a runtime error message that occurred in response to the line:
Set rs = CurrentDb.OpenRecordset("Namesx")because no table named Namesx exists.
Logical Errors
There is one more type of error that we should discuss, since it is the most insidious type of all. A logical error can be defined as the production of an unexpected and incorrect result. As far as Access is concerned, there is no error, because Access has no way of knowing what we intend. (Thus, a logical error is not a runtime error in the traditional sense, even though it does occur at runtime.)
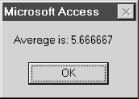
To illustrate, the following code purports to compute the average of some numbers:
Dim x(3) As Integer
Dim Ave As Single
x(0) = 1
x(1) = 3
x(2) = 8
x(3) = 5
Ave = (x(0) + x(1) + x(2) + x(3)) / 3
MsgBox "Average is: " & Ave
The result is the message box shown in Figure 9-5. Unfortunately, it is incorrect. The penultimate line in the preceding program should be:
Ave = (x(0) + x(1) + x(2) + x(3)) / 4
Note the 4 in the denominator, since there are 4 numbers to average. The correct average is 4.25. Of course, Access will not complain because it has no way of knowing whether we really want to divide by 3.
Precisely because Access cannot warn us about logical errors, they are the most dangerous, because we think that everything is correct.
Debugging
Invariably, you will encounter errors in your code. Design-time and compile-time errors are relatively easy to deal with because Access helps us out with error messages and by indicating the offending code. Logical errors are much more difficult to detect and fix. This is where debugging plays a major role. The Access IDE provides some very powerful ways to find bugs.
Debugging can be quite involved, and we could include a whole chapter on the subject. There are even special software applications designed to assist in complex debugging tasks. However, for most purposes, a few simple techniques are sufficient. In particular, Access makes it easy to trace through a program, executing one line at a time, watching the effect of each line as it is executed.
Let us discuss some of the tools that Access provides for debugging code.
Tracing
The process of executing code one line at a time is referred to as tracing or code stepping . Access provides three options related to tracing: stepping into, stepping over, and stepping out of. The difference between these methods refers to handling calls to other procedures.
To illustrate the difference, consider the code shown in Example 9-1. In ProcedureA, the first line of code adds a
new record to a recordset denoted by rs. The second line calls ProcedureB, and the third line updates
the recordset. ProcedureB sets
the value of the LastName and FirstName fields for the current
record. Don’t worry about the exact syntax of this code. The
important thing to notice is that the second line of ProcedureA calls ProcedureB.
Sub ProcedureA(  )
   rs.AddNew              ' Add a new record
   Call ProcedureB
   rs.Update              ' Update recordset
End Sub

Sub ProcedureB(  )
   rs!LastName = "Smith"
   rs!FirstName = "John"
End Sub
Step Into (F8 or choose Step Into from the Debug menu)
Step Into executes code one statement (or instruction) at a time. If the statement being executed calls another procedure, stepping into that statement simply transfers control to the first line in the called procedure. For instance, with reference to the previous code, stepping into the line:
Call ProcedureB
in ProcedureA transfers
control to the first line of ProcedureB:
rs!LastName = "Smith"
Further tracing proceeds in ProcedureB. Once all of the lines of
ProcedureB have been traced,
control returns to ProcedureA
at the line immediately following the call to ProcedureB, that is, at the
line:
rs.Update
Step Into has another important use. If we choose Step Into while still in design mode—that is, before any code is running—execution begins, but break mode is entered before the first line of code is actually executed. This is the proper way to begin tracing a program.
Step Over (Shift+F8 or choose Step Over from the Debug menu)
Step Over is similar to Step Into, except that if the current statement being traced is a call to another procedure, the entire called procedure is executed without stopping (rather than tracing through the called procedure). Thus, for instance, stepping over the line:
Call ProcedureB
in the previous procedure executes ProcedureB and stops at the next
line:
rs.Update
in ProcedureA. This is
useful if we are certain that ProcedureB
is not the cause of the problem and we don’t want to
trace through that procedure line by line.
Step Out (Ctrl+Shift+F8 or choose Step Out from the Debug menu)
Step Out is intended to be used within a called procedure
(such as ProcedureB). Step
Out executes the remaining lines of the called procedure and
returns to the calling procedure (such as ProcedureA). This is useful if we are
in the middle of a called procedure, and we decide that we don’t
need to trace any more of that procedure but want to return to the
calling procedure. (If you trace into a called procedure by
mistake, just do a Step Out to return to the calling
procedure.)
Run to Cursor (Ctrl+F8 or choose Run To Cursor from the Debug menu)
If the Visual Basic Editor is in break mode, we may want to execute several lines of code at one time. This can be done using the Run To Cursor feature. Simply place the cursor on the statement immediately following the last line you want to execute and then execute.
Set Next Statement (Ctrl+F9 or choose Set Next Statement from the Debug menu)
We can also change the flow of execution while in break mode by placing the cursor on the next statement that we want to execute and selecting Set Next Statement from the Debug menu. This will set the selected statement as the next statement to execute, but not execute it until we continue tracing.