
Chapter 5. Networking
Hacks 49-58
XP is the most network-savvy of Microsoft’s operating systems. Not only does it automatically recognize your network when you first install it, but it also includes a variety of wizards and other features that make it easy to connect to new networks and devices. Plus, it includes a variety of built-in command-line tools that help you diagnose and troubleshoot network problems.
In this chapter, you’ll get networking hacks, including command-line tools for troubleshooting networks, tweaking settings for faster Internet access, and optimizing a home network, among others.
Tweak DNS Settings for Faster Internet Access
Here’s a handful of DNS hacks for speeding up access to web sites.
You use the Web by typing in hostnames such as http://www.oreilly.com, but web servers and Internet routers can’t understand plain English words, so they need those letters translated into numeric IP addresses. Whenever you type in a hostname, such as http://www.oreilly.com, it needs to be resolved to its IP address, such as 208.201.239.37. DNS servers provide that name resolution automatically and behind the scenes as you surf the Web.
There are several ways you can hack your DNS settings so that you can get faster web access.
Speed Up Web Access with a HOSTS File
It takes time to send your request to a DNS server, have the server look up the proper IP address to resolve the name, and then send the IP address back to your PC. You can eliminate that delay by creating or editing a local HOSTS file on your own PC that contains hostnames and their corresponding IP addresses. When you create a HOSTS file, XP will first look in that to see if there’s an entry for the hostname, and if it finds it, it will resolve the address itself. That way, you won’t have to go out to a DNS server and wait for the response before visiting a web site. The HOSTS file is a plain-text file you can create or edit with a text editor like Notepad.
You’ll find an existing HOSTS file in C:WindowsSystem32DriversEtcHOSTS (in Windows XP Professional, it’s located in C:WinntSystem32DriversHOSTS). The file has no extension; it is named only HOSTS. Open it in Notepad and enter the IP addresses and hostnames of your commonly visited web sites, like this:
208.201.239.37       oreilly.com
216.92131.107        simtel.net
Each entry in the file should be on one line. The IP address should
be in the first column, and the corresponding hostname in the next
column. At least one space should separate the two columns. You can
add
comments to the file by preceding the
line with a #, in which case the entire line will
be ignored by the file, or by putting a # after
the hostname, in which case only the comment after will be ignored.
You might want to comment on individual entries—for example:
130.94.155.164 gralla.com #still in beta
When you’re finished editing the file, save it to its existing location.
Warning
Make sure to check your HOSTS file regularly and keep it up-to-date, or else you might deny yourself access to certain web sites. For example, if the http://www.gralla.com web site were to change its IP address but your HOSTS file kept the old, incorrect address, your browser would not be able to find the site because it would be given the wrong addressing information.
Adjust XP’s DNS Cache Settings
As a way of speeding up DNS, when you visit a site XP puts the DNS information into a local DNS cache on your PC. So, when you want to go to a site, XP first looks in its local DNS cache, called the resolve cache, to see whether the DNS information is contained there. That way, if it finds the information locally, it doesn’t have to query a remote DNS server to find IP information. The cache is made up of recently queried names and entries taken from your HOSTS file.
The cache contains both negative and positive entries. Positive entries are those in which the DNS lookup succeeded, and you were able to connect to the web site. When XP looks in the cache, if it finds a positive entry it immediately uses that DNS information and sends you to the requested web site.
Negative entries are those in which no match was found, and you end up getting a “Cannot find server or DNS” error in your browser. Similarly, when XP looks in the cache and finds a negative entry, it gives you the error message without bothering to go out to the site.
Negative entries can lead to problems. When you try to make a connection to a site that has a negative entry in your cache, you’ll get an error message, even if the site’s problems have been resolved and it’s now reachable.
You can solve this problem, though, using a Registry hack. By
default, XP caches negative entries for five minutes. After five
minutes, they’re cleared from your cache. But if
you’d like, you can force XP not to cache these
negative entries so that you’ll never run into this
problem. Run the Registry Editor
[Hack #83]
and go to
HKEY_LOCAL_MACHINESYSTEMCurrentControlSetServicesDnscacheParameters.
Create a new DWORD value with the name
NegativeCacheTime and give it a value of
0. (The value might already exist. If it does,
edit its value to 0.) The DWORD
determines how much time, in seconds, to keep negative entries in the
DNS cache. If you like, you can have the entries stay alive for one
second by giving the DWORD a value of
1.
After you’re done editing, exit the Registry. To
make the change take effect, restart your computer, or
flush your cache by issuing the command
ipconfig
/flushdns at a command
prompt.
Tip
For more information about using ipconfig, see
[Hack #51]
.
That command will flush your DNS cache—all the entries, both
positive and negative, will be flushed, and it will be empty until
you start visiting web sites. Negative entries, however, will not be
added to the cache if you’ve given the
DWORD a value of 0.
You can also use the Registry to control the amount of time positive
entries are kept in the DNS cache. By default, they are kept for 24
hours. To change the default, go to
HKEY_LOCAL_MACHINESYSTEMCurrentControlSetServicesDnscacheParameters
again and create a DWORD value called
MaxCacheEntryTtlLimit. (If it’s
already present, just edit the value.) For the value, enter the
amount of time you want the entry to remain, in seconds, making sure
to use Decimal as the base.
Fix DNS Problems
Sometimes, when you
can’t connect to a web site, the cause is a DNS
problem. There are things you can do to solve these problems, though.
If you’re having trouble connecting to a site, to
find out if DNS is a potential culprit first ping
[Hack #51]
the site to which you
can’t connect by issuing the ping
command at the command prompt or in the Run box, like this:
ping www.zdnet.com
If the site is live, you’ll get an answer like this:
Pinging www.zdnet.com [206.16.6.252] with 32 bytes of data:

Reply from 206.16.6.252: bytes=32 time=119ms TTL=242
Reply from 206.16.6.252: bytes=32 time=79ms TTL=242
Reply from 206.16.6.252: bytes=32 time=80ms TTL=242
Reply from 206.16.6.252: bytes=32 time=101ms TTL=242

Ping statistics for 206.16.6.252:
    Packets: Sent = 4, Received = 4, Lost = 0 (0% loss),
Approximate round trip times in milli-seconds:
    Minimum = 79ms, Maximum = 119ms, Average = 94ms
If it’s not, you’ll get a response like this:
Ping request could not find host. Please check the name and try again.
If you ping a site and it’s live, but you can’t connect to it with your browser, a DNS problem might be the reason. If you suspect you’re having a DNS problem, take the following actions:
Check your HOSTS file
If your HOSTS file contains an incorrect or outdated listing, you won’t be able to connect. Even if you don’t recall adding listings to a HOSTS file, it still might contain listings because some Internet accelerator utilities edit them without telling you. Open your HOSTS file with Notepad and see if the site you can’t connect to is listed there. If it is, delete the entry, and you should be able to connect.
Check your DNS settings
Make sure your DNS settings are correct for your ISP or network. Find out from your ISP or network administrator what yours are supposed to be. Then, to find out your current DNS settings, double-click the problem connection in the Network Connections folder, choose Support → Details, and look at the bottom of the tab to find your DNS servers. If they don’t match what they’re supposed to be, right-click the problem connection and choose Properties. Then, highlight Internet Protocol (TCP/IP) and choose Properties. Change the DNS servers to the proper ones, or choose “Obtain DNS server address automatically” if your ISP or network administrator tells you to.
Flush your DNS cache
The problem might be related to your DNS
cache, so flush it out. To flush the cache, type ipconfig
/flushdns at a command prompt.
Find out if your ISP is having DNS problems
The cause might be your ISP. One possibility is that one of its DNS servers is down, and you’re trying to access the down server. Ping each of your ISP’s DNS servers and, if any of them don’t respond, remove them from your DNS list, as outlined earlier in this hack.
Optimize Your Home Router
Home routers let you share broadband Internet access and build a home network. Here’s how to get the most out of your router.
It’s quite easy to set up an inexpensive router for a home network. But the default settings aren’t always optimal because no network is one-size-fits-all. And frequently, the documentation for the routers is so poor that it’s hard to tell what the settings are and what options you have.
Home router options differ somewhat from model to model. Here’s advice for how to customize the most common and most important settings:
- Connect on Demand and Maximum Idle Time settings
Depending on your ISP, you might become disconnected from the Net after you haven’t used the Internet for a certain amount of time. To solve the problem, if your router has a Connect on Demand setting, enable it; that will automatically reestablish your Internet connection when you use an Internet service, even if your ISP has cut you off. If there is a Maximum Idle Time setting, set it to 0 so that your router will always maintain an Internet connection, no matter how long you haven’t used the Internet. As a practical matter, you should need to use only one of these two settings; either one will maintain a constant Internet connection for you.
- Keep Alive setting
Use this setting to maintain a constant Internet connection, even if your PC is idle. It’s similar to the Connect on Demand and Maximum Idle Time settings, except that it doesn’t let your connection disconnect, so it is an even better setting to enable, if your router has it.
- Router Password
Your router requires a password for you to use its administrator account. It comes with a default password. For example, Linksys routers come with a default password of
admin. Change the password for maximum security.- Enable Logging
For security reasons, it’s a good idea to enable logging so that you can view logs of all outgoing and incoming traffic. Depending on your router, it might save permanent logs to your hard disk or allow only the viewing of temporary logs. You might also be able to download extra software from the manufacturer to help keep logs. For example, Linksys routers use temporary logs, but if you want to save permanent logs, you can download the Linksys Logviewer software from http://www.linksys.com. You can view logs using a text editor, like Notepad, or a log analysis program, such as the free AWStats (http://awstats.sourceforge.net).
Special Hub/Router Settings for DSL Access
If you have DSL access, you might need to customize your router’s settings to provide your network with Internet access; sometimes the router’s settings block Internet access. Here are the settings you’ll need to change so that you can get onto the Internet:
- PPPoE (Point to Point Protocol over Ethernet)
Some DSL ISPs use this protocol when offering Internet access. By default, this protocol is disabled on routers because it’s normally not required for Internet access. However, if you have DSL access, you might need to enable it in your router.
- Keep Alive setting
Some DSL ISPs will automatically disconnect your connection if you haven’t used it for a certain amount of time. If your router has a Keep Alive setting, enable it by clicking the radio button next to it; this will ensure that you are never disconnected.
- MTU (Maximum Transmission Unit)
As a general rule, DSL users should use a value of 1492 for their MTU. The MTU sets the maximum size of packets a network can transmit. Any packets larger than the MTU setting will be broken into smaller packets. DSL ISPs often set the MTU to 1492, so if you set a packet size larger or smaller than that, you might slow down Internet access.
Settings for Using a VPN
If you use a Virtual Private Network (VPN) [Hack #82] to connect to your corporate network from home and you use a router, you might run into difficulties and not be able to connect to the VPN. Some routers, such as those from Linksys, are specifically designed to work with VPNs and have specific setup screens for them; if you have one of those, you shouldn’t have any problems. Make sure to get the proper encryption, authentication, and similar information about the VPN from your network administrator, and then use those settings for the VPN setup screen in your router.
However, you might run into problems running a VPN with a router that doesn’t have specific VPN settings, even if the device claims it will work with VPNs. In particular, one default setting, hidden fairly deeply in most router setup screens, can disable VPN access; some routers, such as those made by Linksys, include an option called Block WAN Request. By default, this option is enabled and blocks requests into the network from the Internet; for example, it stops ping requests into the network. However, enabling this option also blocks VPN access. VPN access requires that requests get into the network from the Internet, so if you block those requests the VPN won’t work. If you have a Linksys router, disable this setting by logging into your administrator’s screen, choosing Advanced → Filters, selecting Disable Block WAN Request, and clicking Apply. For other routers, check the documentation.
VPNs use a variety of protocols for tunneling through the Internet, such as IPSec and the Point-to-Point Tunneling Protocol (PPTP). Make sure these settings are enabled on your router if you want to use it in concert with a VPN.
Enable Specific Internet Services: Port Forwarding
Residential routers often use Network Address Translation (NAT), in which the router’s single, external IP address is shared among all the computers on the network, but each computer has its own internal IP address, invisible to the Internet. For example, to the Internet each computer looks as if it has the address of 66.32.43.98, but internally they have different addresses, such as 192.168.1.100, 192.168.1.101, and so on. The routers have built-in Dynamic Host Configuration Protocol (DHCP) servers that assign the internal IP address. These internal IP addresses allow the PCs to communicate with each other and to connect to the Internet, and they also offer protection to PCs on the network. To the rest of the Internet, each PC has the IP address of the router, so each PC’s resources can’t be attacked or hijacked—they’re invisible. The router itself doesn’t have resources that can be used to attack your PCs, so you’re safe.
But if you have servers on your network that need to provide Internet-related services (perhaps you have an FTP or web server), or if you need to allow certain PCs to be connected to the Internet for specific purposes (such as for playing multiplayer games), you’ll run into trouble because they don’t have IP addresses that can be seen by the rest of the Internet.
However, with this trick, you can use your router to forward incoming requests to the right device on your network. For example, if you have a web server, FTP server, or mail server and you want people to be able to connect to them, you’ll be able to route incoming requests directly to those servers. PCs on the Internet will use your router’s IP address, and your router will then route the requests to the proper device on your network. Normally, the devices would not be able to be connected to because the IP addresses they are assigned by the router are internal LAN addresses, unreachable from the Internet.
Not all routers include this capability.To use this feature in a Linksys router, log into your administrator’s screen and choose Advanced → Forwarding to get to the screen shown in Figure 5-1.

When this feature is enabled, the router examines incoming requests, sees what port they’re directed to (for example, port 80 for HTTP), and then routes the request to the proper device.
Fill in each device’s IP address, the protocol used to connect to it, and the port or port range you want forwarded to it. It’s also a good idea to disable DHCP on each device to which you want to forward requests and instead give them static internal IP addresses. If you continue to use DHCP instead of assigning them a static IP address, the IP addresses of the servers or devices might change and would therefore become unreachable. Check your router’s documentation on how to force it to assign static IP addresses to specific devices.
Table 5-1 lists port addresses for common Internet services. For a complete list of ports, go to http://www.iana.org/assignments/port-numbers.
|
Port number |
Service |
|
7 |
Echo |
|
21 |
FTP |
|
22 |
PCAnywhere |
|
23 |
Telnet |
|
25 |
SMTP |
|
42 |
Nameserv, WINS |
|
43 |
Whois, nickname |
|
53 |
DNS |
|
70 |
Gopher |
|
79 |
Finger |
|
80 |
HTTP |
|
81 |
Kerberos |
|
101 |
HOSTNAME |
|
110 |
POP3 |
|
119 |
NNTP |
|
143 |
IMAP |
|
161 |
SNMP |
|
162 |
SNMP trap |
|
1352 |
Lotus Notes |
|
3389 |
XP’s Remote Desktop |
|
5010 |
Yahoo! Messenger |
|
5190 |
America Online Instant Messenger (AIM) |
|
5631 |
PCAnywhere data |
|
5632 |
PCAnywhere |
|
7648 |
CU-SeeMe |
|
7649 |
CU-SeeMe |
Cloning a MAC Address for Your Router
There once was a time when cable companies banned home networks, or when they charged extra when you ran one at home. The theory was that because you were using so much extra bandwidth for multiple computers, you should be charged extra.
Thankfully, those days are gone—or at least they should be. If you’re one of the unlucky few who has a cable or DSL company that charges extra for a home network, there’s something you can do to get around the problem.
This hack will help with that, and it will help if you have a cable or DSL provider that requires that you provide the Media Access Control (MAC) address of your network adapter for your connection to work. If you had a single PC when you began your broadband service, but you’ve since installed a router at home to set up a network and share Internet access among several PCs, you’ll have to provide the ISP with your new router’s MAC address.
There is a way to use your existing MAC address with your new router by cloning the address. To your ISP, it looks as if your MAC address hasn’t changed. You might want to do this even if your cable provider doesn’t charge extra for several PCs because it will save you from having to call up the cable company’s tech-support line to provide a new MAC address.
Note that not all routers have this capability, so yours might not be able to do it. Most Linksys routers let you do this, so if you have a Linksys, do the following to clone your MAC address. Depending on your model, the exact steps might vary:
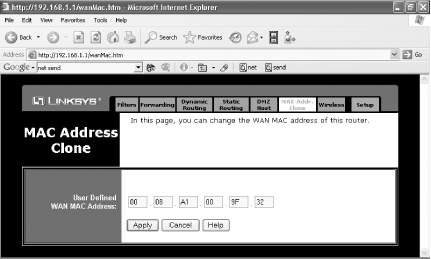
Find out your current network adapter’s MAC address (the MAC address your broadband provider already has) by opening a command prompt, typing
ipconfig /all, and looking under the entry for “Ethernet adapter Local Area Connection.” You’ll see an entry like this:Physical Address. . . . . . . . . : 00-08-A1-00-9F-32
That’s your MAC address.
Log into your administrator’s screen for the Linksys router and choose Advanced → MAC Addr. Clone. A screen similar to Figure 5-2 appears.
Type in the name of the MAC address you’ve obtained from your network adapter and click Apply. Your router will now be recognized by your ISP. Note that you might have to power down your cable modem and then power it back up for the router to be recognized.
Warning
If your ISP requires a MAC address and you don’t clone an existing one, you’ll have to provide your ISP with your router’s address. Make sure you give them the right one. Your router typically has two MAC addresses, a LAN MAC address and a WAN MAC address. The LAN address is used only for the internal network, so make sure to provide your ISP with the device’s WAN MAC address. If you give the LAN address, you won’t be able to access the Internet.
Manage Your Network’s Bandwidth
There’s one problem with home networks that share a single Internet connection: one PC can hog all the bandwidth. For example, if someone in your house uses file-sharing software, that can suck up just about all of a network’s spare bandwidth, and everyone else who’s connected might see their connections slow to a crawl.
There’s a simple answer for the problem. Use software that will limit the bandwidth that any single PC on your network can use. So, if you have a 3-megabit-per-second connection, you could limit any PCs to .5 megabits per second, for example. That way, anyone can still share files with others at a reasonable rate, but still let others get high-speed connections.
NetLimiter (http://www.netlimiter.com), shown in action in Figure 5-3, is a great program for doing this.

Not only will you be able to set bandwidth limits per PC, but you’ll also be able set upload and download transfer rates for individual programs on a PC. So, you could give more of an individual PC’s bandwidth to file sharing, for example, and less to email. NetLimiter is shareware; you can try it out for free, but after 28 days, you’re expected to pay $29.95 to the developer.
Troubleshoot Network Connections with ping, tracert, and pathping
When you need help tracking down network connection problems, the command line is the place to go.
If you’re
having problems with your network and network connections and you
need troubleshooting help, forget XP’s GUI; it
doesn’t offer you enough help. To get to the root of
the problems, you’re going to have to get down and
dirty with command-line tools. ping and
tracert are familiar tools that you might have
used on occasion, but you might not know the depth of their power or
the switches available to use with them. And you probably
haven’t heard of pathping, a
quasi-combination of the two commands.
Troubleshoot TCP/IP Problems with ping
The quickest, most commonly
used, and, frequently, most helpful TCP/IP troubleshooting tool is
the command-line tool ping. Use
ping to find out whether the resource or server
you’re trying to connect to on your network or the
Internet is active, and to see if there are any problems with the
hops along the way to that resource or server.
ping sends Internet Control Message Protocol
(ICMP) Echo Request messages to the destination
you’re checking on, receives responses in return,
and reports to you information about the connection path between you
and the destination and how quickly the packets made their trip. For
example, if you are having trouble getting email from a server, your
first step in troubleshooting should be to ping the server to see
whether the server is live, and to see how responsive it is. To use
ping, get to a command prompt and type:
ping targetwhere target is either a hostname or an IP
address—for example, pop3.catalog.com, http://zdnet.com, or 209.217.46.121. In response,
you’ll get information in this format:
Pinging zdnet.com [206.16.6.208] with 32 bytes of data:

Reply from 206.16.6.208: bytes=32 time=83ms TTL=242
Reply from 206.16.6.208: bytes=32 time=73ms TTL=242
Reply from 206.16.6.208: bytes=32 time=91ms TTL=242
Reply from 206.16.6.208: bytes=32 time=72ms TTL=242

Ping statistics for 206.16.6.208:
    Packets: Sent = 4, Received = 4, Lost = 0 (0% loss),
Approximate round trip times in milli-seconds:
    Minimum = 72ms, Maximum = 91ms, Average = 79ms
If the host isn’t active, instead of getting this report you’ll get the message “Request timed out.”
If you enter a hostname, ping reports back with
its IP address and then gives details about its four attempts to
contact the host, a measurement of how long (in milliseconds) the
packet took to make the round trip between your PC and the host, the
Time To Live (TTL) information
about each packet, and a summary of its findings.
The TTL field can tell you how many hops the packets took to get from
your PC to its destination. TTL initially specified the amount of
time a packet could live, in seconds, before it expired, as a way to
make sure packets didn’t simply bounce around the
Internet forever and create traffic jams. However, it has been
reinterpreted to mean the maximum number of hops a packet will be
allowed to take before it reaches its destination. The default number
is 255. Each time a packet takes another hop, its TTL is reduced by
one. The TTL number that ping reports is the
packet’s final TTL when it reaches its destination.
To find out the number of hops a packet takes, subtract its initial
TTL (by default, 255) from the TTL reported by
ping. In our example, the packets took 13 hops to
get to their destination.
You can use ping with switches, like so:
ping -a -l 45 208.201.239.237
This command changes the packet size sent from its default size of 32 bytes to 45 bytes, and resolves the IP address to a hostname—in other words, it lists the IP address’s hostname.
ping
has a wide variety of useful
switches that you can use for all kinds of troubleshooting. You use
the basic ping command to check whether an
Internet or network resource is live and to see if there are any
delays in reaching it. But, as Table 5-2 shows,
you can use ping and its switches for many other
purposes as well—for example, to find out the IP address of a
hostname, and vice versa.
|
Switch |
What it does |
|
|
Resolves an IP address to a hostname. |
|
|
Turns on the Don’t Fragment flag for a packet. This lets you send packets that don’t get broken up, and it can be useful for when you want to test whether packets of a certain size are getting through. |
|
|
Sets the value of the TTL field, using a number from
|
|
|
Pings using the value specified, in number of bytes. |
|
|
Specifies the number of ICMP Echo Request messages sent, instead of
the default number of |
|
|
Displays the IP addresses of the hops taken along the route to the
destination. Specify a number between |
|
|
Displays a timestamp for the Echo Request and the Echo Reply Request
for hops along the route. Specify a number between
|
|
|
Keeps sending the Echo Request message continually until stopped by pressing Ctrl-Break, Pause, or Ctrl-C. |
|
|
The maximum amount of time (in milliseconds) to wait for an Echo
Reply message for each Echo Request message before issuing a timeout
message. The default is |
Trace Your Network and Internet Data Path with tracert
Frequently, you have a connection
problem over your network or the Internet not because your final
destination is down, but because there’s a problem
with a router somewhere between you and your final destination. For
troubleshooting those kinds of problems, use
tracert. It displays the path that data takes en
route to the server or service you’re trying to
reach, either on your network or across the Internet. As with
ping, it does this by sending ICMP Echo Request
messages to the destination you’re checking on. To
use it, type tracert
destination at a command prompt, where
destination can be either an IP address or
a hostname. Following is a typical response from a
tracert command:
Tracing route to redir-zdnet.zdnet.com [206.16.6.208]
over a maximum of 30 hops:

  1    9 ms  11 ms    10 ms  10.208.128.1
  2    8 ms   8 ms     7 ms  bar02-p0-1.cmbrhe1.ma.attbb.net [24.128.8.53]
  3    9 ms   *       32 ms  bar03-p7-0.wobnhe1.ma.attbb.net [24.147.0.193]
  4    8 ms  14 ms     9 ms  12.125.39.213
  5   12 ms  10 ms     9 ms  gbr2-p70.cb1ma.ip.att.net [12.123.40.102]
  6   25 ms  26 ms    24 ms  gbr4-p80.cb1ma.ip.att.net [12.122.5.65]
  7   36 ms  39 ms    64 ms  gbr4-p40.cgcil.ip.att.net [12.122.2.49]
  8   33 ms  33 ms    48 ms  gbr3-p60.cgcil.ip.att.net [12.122.1.125]
  9   72 ms  80 ms    78 ms  gbr3-p30.sffca.ip.att.net [12.122.2.150]
 10   72 ms  77 ms    73 ms  idf26-gsr12-1-pos-6-0.rwc1.attens.net
  [12.122.255.222]
 11   76 ms  78 ms    79 ms  mdf3-bi4k-2-eth-1-1.rwc1.attens.net
   [216.148.209.66]
 12   73 ms  72 ms    74 ms  63.241.72.150
 13   72 ms  74 ms    71 ms  redir-zdnet.zdnet.com [206.16.6.208]
If the destination can’t be reached, you will get the message “Destination unreachable.”
As you can see, tracert shows the IP address and
hostname address of each hop, along with timing data for each hop. If
you’re having problems on your network, this can
help you locate the source of the problem; if a hop has a
particularly long delay, you know that’s the cause.
You can use several switches with tracert, like
this:
Tracert -d -h 45 zdnet.com
This command traces to http://zdnet.com, displaying only the IP addresses
of each router and specifying a maximum number of 45 hops en route to
the destination. Table 5-3 shows the most useful
tracert switches.
Troubleshoot Network Problems with pathping
The pathping command
works like a combination of ping and
tracert. Type pathping from the
command line, like this:
pathping targetwhere target is either a hostname or an IP
address—pop3.catalog.com or
209.217.46.121, for example. You
then get a two-part report: first a list of every hop along the route
to the destination, and then statistics about each hop, including the
number of packets lost at each hop. It uses switches—for
example:
pathping -n -w 1000 oreilly.com
This command tells pathping not to resolve the IP
addresses of routers, and to wait one second (1,000 milliseconds) for
an Echo Reply message. Table 5-4 lists the most
important pathping switches.
|
Switch |
What it does |
|
|
Does not display the hostname of each router. |
|
|
Sets a maximum number of hops for the trace to the destination. The
default is |
|
|
Sets the maximum amount of time (in milliseconds) to wait for a reply. |
|
|
Sets the amount of time (in milliseconds) to wait before a new
|
|
|
Sets the number of ICMP Echo Request messages to transmit. The
default is |
See Also
Troubleshoot Network Connections with netsh, netstat, and ipconfig
Here are a few more command-line tools for tracking down problems with your network connection.
In addition to well-known command-line network utilities such as
ping, tracert, and pathping
[Hack #51]
, three additional all-purpose
utilities can help you troubleshoot network connections:
netsh, netstat, and
ipconfig.
Use netsh to Troubleshoot Network and Internet Connections
netsh
is a wide-ranging command-line
diagnostic tool that has an exceedingly large number of commands
available. (For a complete list of available commands, use Windows XP
Help and Support and search for netsh.) Here
you’ll learn the most interesting.
Perhaps the most useful of the netsh commands are
the netsh
diag commands. Use
them to find out information about your PC’s network
setup, such as finding the IP address of its mail server, newsgroup
server, DNS server, and similar resources.
There are two ways to use
netsh
: directly from the command line
with all its switches, or first getting to the
netsh console by typing netsh
at the command line and then typing the command from the
netsh> prompt that appears. For example, you
could type netsh diag show adapter at the command
line, which lists every network adapter on your PC, or you could get
to the netsh> prompt and type diag
show adapter.
Use the netsh command to connect to the resources
and then get information about them. For example, to find out the
IP
address of your DNS servers, type netsh
diag show dns; to find out the IP address of your
mail server, type netsh diag connect mail.
Table 5-5 lists the most useful of the
netsh
diag
commands. Precede each of them with netsh
diag. Note that they each have many switches associated
with them. For more details, use Windows XP Help and Support and
search for netsh.
|
Command |
What it does |
|
|
Establishes a connection to Internet Explorer’s proxy server, if one exists |
|
|
Establishes a connection to the default Outlook Express mail server |
|
|
Establishes a connection to the default Outlook Express newsgroup server |
|
|
Establishes a connection with the named adapter |
|
|
Establishes a connection with a DHCP server |
|
|
Lists all the adapters on the PC |
|
|
Lists all the network objects defined for the local PC, such as adapters, network clients, servers, modems, and other objects |
|
|
Lists all the DHCP servers for the specified adapter |
|
|
Lists all the DNS servers for the specified adapter |
|
|
Lists all the gateways for the specified adapter |
Use netstat to Get Information About Open Network Connections
If you want to get a snapshot of all
incoming and outgoing network connections, use the
netstat command. At a command prompt, type
netstat. It lists all connections, including the
protocol being used, the local and Internet addresses, and the
current state of the connection, like this:
Active Connections
Proto  Local Address       Foreign Address        State
TCP    PrestonGralla:1031  localhost:2929         ESTABLISHED
TCP    PrestonGralla:2887  192.168.1.103:netbios-ssn  TIME_WAIT
TCP    PrestonGralla:2899  www.oreillynet.com:http  ESTABLISHED
TCP    PrestonGralla:2900  www.oreillynet.com:http  ESTABLISHED
TCP    PrestonGralla:2932  mail.attbi.com:pop3    ESTABLISHED
TCP    PrestonGralla:2936  vmms2.verisignmail.com:pop3  ESTABLISHED
It will help you know whether connections are live, the network or
Internet device to which they’re connected, and
which local resource is making the connection. It’s
best suited for when you’re troubleshooting network
problems and want to find out whether certain ports are open, why
certain computers on the network are having connection problems, and
similar issues. You can use command-line switches with
netstat. For example, display open ports and open
connections with this syntax: netstat
-a. Table 5-6 lists
netstat switches.
|
Switch |
What it does |
|
|
Displays all open connections and ports. |
|
|
Displays Ethernet statistics about packets transmitted and received.
Can be combined with the |
|
|
Displays the addresses and ports in numeric, IP address form. |
|
|
Displays the process identifier (PID) that owns each connection. |
|
|
Displays the connections used by the protocol, which can be IP, IPv6, ICMP, ICMPv6, TCP, TCPv6, UDP, or UDPv6. |
|
|
Displays the network’s routing table. |
|
|
Displays statistics for each protocol. It lists all statistics for
all protocols, but you can list only those for a specified protocol
if you combine it with the |
|
|
Runs |
Use ipconfig to Troubleshoot TCP/IP
One of the most powerful tools
for analyzing and troubleshooting TCP/IP problems is the
ipconfig command-line utility. It provides
information about each of your adapters, including the assigned IP
address, subnet mask, default gateway, MAC address, DNS servers,
whether DHCP is enabled, and a variety of other data. To see basic
information about your adapters, type ipconfig at
a command prompt, and you’ll see information like
this:
Windows IP Configuration
Ethernet adapter Local Area Connection:
        Connection-specific DNS Suffix  . : ne1.client2.attbi.com
        IP Address. . . . . . . . . . . . : 192.168.1.100
        Subnet Mask . . . . . . . . . . . : 255.255.255.0
        Default Gateway . . . . . . . . . : 192.168.1.1
PPP adapter {6A724E76-AB59-4ABC-BBF5-41CA4410EB8D}:
        Connection-specific DNS Suffix  . :
        IP Address. . . . . . . . . . . . : 172.165.155.106
        Subnet Mask . . . . . . . . . . . : 255.255.255.255
        Default Gateway . . . . . . . . . :
As you can see, ipconfig provides basic
information about your IP address, subnet mask, default gateway, and
a connection-specific DNS suffix, if any. However, you can get much
more detailed information by using the /all
switch, like this: ipconfig /all. For most
troubleshooting purposes, use the /all switch. You
get a much more comprehensive listing, as shown here:
Windows IP Configuration
        Host Name . . . . . . . . . . . . : PrestonGralla
        Primary Dns Suffix  . . . . . . . :
        Node Type . . . . . . . . . . . . : Hybrid
        IP Routing Enabled. . . . . . . . : No
        WINS Proxy Enabled. . . . . . . . : No
Ethernet adapter Local Area Connection:
        Connection-specific DNS Suffix  . : ne1.client2.attbi.com
        Description . . . . . . . . . . . : CNet PRO200WL PCI Fast Ethernet
 Adapter
        Physical Address. . . . . . . . . : 00-08-A1-00-9F-32
        Dhcp Enabled. . . . . . . . . . . : Yes
        Autoconfiguration Enabled . . . . : Yes
        IP Address. . . . . . . . . . . . : 192.168.1.100
        Subnet Mask . . . . . . . . . . . : 255.255.255.0
        Default Gateway . . . . . . . . . : 192.168.1.1
        DHCP Server . . . . . . . . . . . : 192.168.1.1
        DNS Servers . . . . . . . . . . . : 204.127.202.19
                                            216.148.227.79
        Lease Obtained. . . . . . . . . . : Saturday, December 28, 2002
   8:53:40 AM
        Lease Expires . . . . . . . . . . : Sunday, December 29, 2002 8:53:40 AM

PPP adapter {6A724E76-AB59-4ABC-BBF5-41CA4410EB8D}:
        Connection-specific DNS Suffix  . :
        Description . . . . . . . . . . . : WAN (PPP/SLIP) Interface
        Physical Address. . . . . . . . . : 00-53-45-00-00-00
        Dhcp Enabled. . . . . . . . . . . : No
        IP Address. . . . . . . . . . . . : 172.165.155.106
        Subnet Mask . . . . . . . . . . . : 255.255.255.255
        Default Gateway . . . . . . . . . :
        DNS Servers . . . . . . . . . . . : 64.12.104.134
        NetBIOS over Tcpip. . . . . . . . : Disabled
You can also use ipconfig
to release and renew IP addresses, and to perform other
troubleshooting functions as well. For example, to renew an
adapter’s IP address, use this command:
ipconfig /renew "adapter name"where adapter name is the name of the
adapter whose IP address you want to renew. Make sure to put quotes
around the adapter name and use spaces if there is more than one word
in the adapter name. Table 5-7 lists other
switches you can use with ipconfig.
|
Switch |
What it does |
|
|
Displays complete TCP/IP configuration information |
|
|
Displays information from the DNS resolver cache [Hack #49] |
|
|
Clears the DNS resolver cache [Hack #49] |
|
|
Refreshes all DHCP leases and reregisters DNS names |
|
|
Releases the IP address for the specified adapter |
|
|
Renews the IP address for the specified adapter |
|
|
Resets the DHCP Class ID for the specified adapter |
|
|
Displays the DHCP Class ID for the specified adapter |
See Also
Speed Up Network Browsing
Speed up your network browsing by tweaking your Registry.
When you use My Network Places to browse for other machines on your network, it usually takes a long time to display the list of shared resources for the target machine. This is because Windows XP first checks for the scheduled tasks on the target machine before listing the shared resources present on the computer.
Tip
To schedule a task using Windows XP’s Scheduled Tasks, choose Start → Programs → Accessories → System Tools → Scheduled Tasks.
This unnecessary checking can easily add 30 seconds of delay. You can decrease the time browsing takes by modifying the Registry to turn off this checking:
Invoke the Registry Editor by typing
regedit[Hack #83] at the command line.Open the following Registry key:
HKEY_LOCAL_MACHINESOFTWAREMicrosoftWindowsCurrentVersionExplorer
Remote ComputerNameSpace
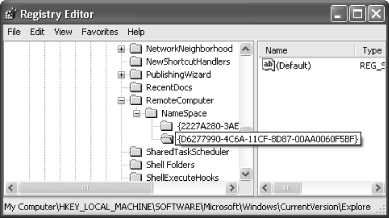
Delete the following key (the value for it is the Scheduled Tasks, as shown in Figure 5-4):
{D6277990-4C6A-11CF-8D87-00AA0060F5BF}Close the Registry and reboot.
That’s it! You should now be able to browse to another computer on the network without much delay.
—Wei-Meng Lee
Control Another PC with Remote Access
You can control a computer—virtually moving its mouse and typing on its keyboard—over the Internet, using either Windows XP’s built-in features or a third-party program.
When you are at work, wouldn’t it be nice if you could log on to your home computer to check your email or find a file you took home? How about using your home or office desktop computer from your laptop on the road? You can use a remote control program to use another computer over the Internet, viewing its screen on your screen and giving commands via your mouse and keyboard. Windows XP comes with a feature called Remote Desktop, or you can use a third-party program. Windows Messenger [Hack #97] also enables people who are chatting to share control of each other’s computers.
The computer you will control is called the remote server , and the computer you are actually sitting in front of is the remote client. Windows XP comes with a remote client program (Remote Desktop Connection), and Windows XP Professional comes with a remote server (Remote Desktop) that works with one client at a time—that is, one computer can “take over” your computer remotely (with luck, it’ll be you doing the takeover!).
Tip
Remote Access Server (RAS) on Windows NT or 2000 servers and the Routing and Remote Access utility on Windows Server 2003 both act as remote servers that allow multiple remote clients to connect.
Windows XP Home Edition can’t act as a remote server; if you need to be able to access a Home Edition system remotely, you need to upgrade to Windows XP Professional or use a third-party program. We recommend VNC, the small, free, open source program available at http://www.realvnc.com.
Configuring the Windows XP Remote Server
If you want to be able to control your Windows XP Professional system remotely, set it up as a remote server. Using an administrator user account, choose Start → Control Panel → Performance and Maintenance → System (or press the Windows-Break key), click the Remote tab, select the “Allow users to connect remotely to this computer” checkbox in the Remote Desktop section of the tab to enable incoming connections, and click Select Remote Users if you want to control which user accounts can be used by remote clients. (Windows automatically allows connections from the current user, along with all user accounts in the local Administrators and Remote Desktop Users groups.)
Normally, remote clients connect to the server via a local area network or a permanent Internet connection. However, you can also configure the remote server to accept incoming phone calls if you have a dial-up modem. Create a dial-up connection that accepts incoming calls by running the New Connection Wizard (click “Create a new connection” from the task pane in the Network Connections window). Choose “Set up an advanced connection” as the Network Connection Type, choose “Accept incoming connections,” choose your modem, choose whether to accept VPN connections [Hack #82] , and choose which user accounts the incoming connection can connect to.
Firewalls usually refuse remote access connections [Hacks #Section 8.4 and Section 8.5], so if you want your remote server to be accessible from the Internet, you need to open a port in your computer’s firewall. Remote Desktop uses port 3389. If you use Windows XP’s built-in Windows Firewall, display the Network Connections window, right-click the Internet connection, choose Properties from the shortcut menu, click the Advanced tab, and click Settings to display the Advanced Settings dialog box. Click the Remote Desktop checkbox; if the Service Settings dialog box appears, just click OK.
Tip
If you want to change the Remote Desktop server port to a number other than 3389 (perhaps to decrease the likelihood of hackers breaking through it), see the Microsoft Knowledge Base Article Q187623 (at http://support.microsoft.com, type the article number in the “Search the Knowledge Base” box).
When you connect from your remote client (described later in this hack), you need to provide a domain name or IP address. If your computer connects via a dial-up, DSL, or cable connection, its IP address changes each time you connect, and the computer doesn’t have a domain name. One solution is to have someone at the remote server display the Network Connections window, right-click the Internet connection, choose Status from the shortcut menu, click the Support tab, and call, IM, or email you with the IP address that appears. However, this solution is no good if no one is available to do this. Instead, you can sign up for a dynamic DNS service [Hack #55] at http://www.dyndns.org or http://www.tzo.com. The dynamic DNS service at DynDNS.org gives you a free domain name in the form <yourname>.dyndns.org (they offer several dozen domain names to which you can add your name). TZO.com provides a subdomain at <yourname>.tzo.com for $25 per year. You install a small utility on your computer that automatically tells the dynamic DNS whenever your computer’s IP address changes.
One final configuration note: when a client connects to your server via Remote Desktop, the user logs into one of the Windows XP user accounts. You can’t log into accounts that have no password. Choose which account you plan for remote users to log into, and give it a password.
Setting Up the Remote Client
To set up the remote client software that comes with Windows XP, connect to the Internet and then choose Start → All Programs → Accessories → Communications → Remote Desktop Connection. (If it’s not there, you need to install it from your Windows CD.) In the Remote Desktop Connection window, type the domain name or IP address of the server computer and click Connect. Log on with the Windows XP user account and password for the remote server. Your computer screen now shows what’s on the screen of the server computer. A connection bar appears as a button on the screen, showing the IP address of the remote server, along with Minimize, Restore, and Maximize buttons you can use to resize the remote client window.
Once you’re connected, you can cut and paste information from the remote client window to other windows. You can also use local files in your remote session; your local disk drives appear in My Computer (Windows Explorer). When you print from the remote client, the print job goes to your default local printer, not to the printer on the server.
—Margaret Levine Young
Make Servers Always Available by Mapping a Hostname to a Dynamic IP Address
Make sure the web site or other kind of Internet server you run at home is always available to the world.
If you run your own web server, mail server, or other kind of server at home and are connected to the Internet via a cable modem or DSL modem, people frequently might not be able to connect to your server. That’s because, typically, broadband ISPs assign you a dynamic IP address that changes regularly, even if you don’t turn off your PC. Because your IP address constantly changes, there is no way for people to connect to you. One day its IP address might be 66.31.42.96, the next it might be 66.41.42.136, and if people don’t know your server’s current IP address they won’t be able to find it. You won’t be able to solve the problem by getting your own domain (such as www.gralla.com) and publishing that because DNS servers won’t be able to keep track of your changing IP address either. If people type in your domain name, the servers won’t be able to report on your IP address—and again, your server won’t be able to be reached.
There is a way to solve the problem, however: you can map your server’s hostname to a dynamic IP address. When you do this, it doesn’t matter that your IP address changes; when people type in your web site’s URL, they will be forwarded to your new IP address automatically.
You can do this for free by signing up with a service that provides automatic mapping. A number of services will do it for free, such as No-IP.com (http://www.no-ip.com). When you sign up for the service, you choose a hostname for your server and give that hostname out to people who want to connect to the server. Whatever name you choose will end in .no-ip.com—for example, grallasite.no-ip.com.
After you get your hostname, you download client software that continually monitors your IP address. It reports on your server’s current IP address to the No-IP.com site. Whenever the IP address changes, it reports that new IP address to the site. The client checks your IP address every three seconds.
Whenever a PC tries to connect to your server, it first goes to a No-IP.com server, which looks up your server’s current address and then redirects the PC to your server, based on your current IP address. The person contacting your site will not have to do anything different from what he normally does; he just types in your URL and is connected to your site.
If you own a domain and want to map that hostname to a dynamic IP address instead of using a No-IP.com address, you’ll have to sign up for No-IP.com’s No-IP Plus service for $24.95 a month.
If you’re using a router at home to share Internet access among several PCs, you might run into problems using the service. Many routers use NAT, in which all PCs on the network share a single external Internet address but are assigned internal network addresses. The No-IP.com client will track your external address, but because that single address is used by all PCs on the network, not just the server, incoming traffic won’t be routed to your server. You can fix the problem by using the port forwarding feature of your router to send the incoming traffic to the server [Hack #50] .
You might run into another problem as well: when you try to test your server by connecting to it from a PC inside your network, you might not be able to connect to it. That’s because you might not be able to connect to the external IP address from inside the network. If this happens, the only solution is to connect to the site from a PC outside your network or ask a friend to connect to it.
One more thing to watch out for: if you’re behind a firewall, the No-IP.com client might have trouble connecting back to the No-IP.com site to report on your changing IP address. If you’re using a firewall like ZoneAlarm [Hack #78] or a similar one that blocks outbound connections, tell it to allow the client to make outbound connections. Also, depending on the firewall you use, you might need to configure it to open TCP port 8245 because that’s the port the client uses to contact No-IP.com with your new IP address.
See Also
Renew Your DHCP-Assigned IP Address
Sometimes, while assigned an IP address by a DHCP server, your PC doesn’t appear to be on the network and you can’t get Internet or network access. Renewing your IP address often solves the problem.
If you’re on a network but you can’t send or receive data, use any network resources, or visit the Internet, the culprit might be a problem with your DHCP-assigned IP address. The simplest way to fix it is to renew the IP address—get rid of the old one, and ask the DHCP server to send along a new one.
Before trying this, first make sure you’re using a DHCP-assigned IP address rather than a static one. Right-click My Network Places and choose Properties to get to the Network Connections folder. Right-click your current network connection and choose Properties. On the General tab, select Internet Protocol (TCP/IP) and choose Properties. On the General tab, the radio button next to “Obtain an IP address automatically” will be selected if you’re using DHCP.
After you’ve confirmed you’re using
DHCP,
release your current IP address by
typing ipconfig /release at a command prompt. The
ipconfig command is an all-purpose command that
lets you solve many network-related problems
[Hack #52]
. To renew the address and get
a new IP address from the DHCP server, type ipconfig
/renew at a command prompt. Your new IP address should fix
the problem.
To find your new IP address, type ipconfig at a
command prompt. You can also select your connection in the Network
Connections folder, click “View status of this
connection,” and click the Support tab.
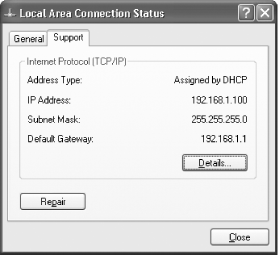
You’ll see the screen shown in Figure 5-5, which shows your new IP address and confirms
that it was assigned by a DHCP server.
Repair a Broken TCP/IP Connection
Get back onto the Internet fast if you have TCP/IP woes.
TCP/IP problems can be exceedingly difficult to troubleshoot, and at times your TCP/IP connection appears to break for no apparent reason. Everything looks like it should be working, but you’re not able to connect using the protocols. If you have a broken connection, try the following:
Try automated repair
Right-click the broken connection in the Network Connections folder and choose Repair.
It walks you step by step through TCP/IP and network configuration and will correct any errors you might have introduced inadvertently.
Reset your router
If you have a home network, the problem might lie with the router or in the connection between the router and your broadband provider. Follow the directions for resetting the router.
Reset your cable modem or DSL modem
If you have a broadband connection, the problem might lie in the assignment of your IP address by your ISP. Power off your cable modem or DSL modem, unplug its Ethernet cable, and leave it powered off for five minutes. Then restart it. This is also a good time to reset your router. You can also try releasing and renewing after you’ve turned the connection back on.
Reset TCP/IP to its original configuration
If all else fails, you can try to reset your
TCP/IP stack to the same state
that it was in when XP was first installed on the computer. Use the
NetShell utility
[Hack #52]
. Issue
this command: netsh int ip reset
[log_file_name], where
log_file_name is the name of a file where
the actions taken by NetShell will be recorded.
Get a new Ethernet cable
Your old cable might be nicked, the connector might be loose, or mice might have nibbled on it.
VoIP Hacks
The Voice over Internet Protocol (VoIP) lets you make phone calls over the Internet for less money than the normal phone system. But VoIP services can sometimes be flaky. Here’s a grab bag of hacks for getting more out of your VoIP service.
VoIP technology has been around for several years, but only recently has it begun to take off and be available directly to consumers. With a VoIP service, you pay a monthly fee, just as you do to your normal telephone provider, and you get services such as call waiting, caller ID, and similar features. Typically, VoIP phone plans are less expensive than traditional phone plans, and they’re often much less expensive for when you make overseas calls. They also offer low-priced “all-you-can-eat” plans for making phone calls in the U.S. They require that you have a broadband Internet connection such as a DSL modem or cable modem because lower-speed service doesn’t have a high enough bandwidth to deliver good enough voice quality.
When you use a VoIP service, you plug a special VoIP phone into your home router, DSL modem, or cable modem via an Ethernet cable.
Tip
If you plug the phone into your DSL modem or cable modem, you then plug your PC into a port on your phone via an Ethernet cable so that your PC can also get Internet access.
Calls made over VoIP travel over the Internet, as do any other Internet packets. They are then transferred to the normal phone system via a gateway so that you can call any phone in the world as you would with any telephone. You receive calls in the same way. Someone makes a call on a normal telephone, and that call travels over the normal telephone system, then is sent to a gateway where the call is broken into IP packets and delivered over the Internet to your telephone. With this type of VoIP service, you get your own phone number, just like any phone number. In fact, you might even be able to keep your existing phone number.
There are also software-only VoIP services, in which you don’t use any special hardware or equipment. Instead, you download a piece of software and use your PC’s speakers and microphone to talk, or else plug a headset into your PC’s microphone jack. Generally, these only let you call others who use the same software that you do; in other words, you can’t make calls to normal telephones, but can make them to those who also use the same VoIP software you’re using. In this scenario, the phone call travels over the Internet. It never actually travels to the normal phone system because the calls aren’t made to normal telephones.
These VoIP services are typically free. They don’t offer full service plans, and so don’t have caller ID, call waiting, and similar features. In fact, instant messenger programs such as AOL Instant Messenger, Yahoo! Messenger, and Windows Messenger let you make calls this way. Some of these services let you make phone calls to regular telephones as well, although for that they charge you a fee. And for now, anyway, you can’t receive normal phone calls on them; you can make phone calls only. But that is expected to change.
The best-known full-featured VoIP service that lets you make phone calls to anyone and receive phone calls is Vonage (http://www.vonage.com). It offers a variety of service plans—for example, $14.99 per month for 500 minutes of calls per month to anywhere in the U.S or Canada, or $24.99 per month for unlimited calls per month to anywhere in the U.S. or Canada. All plans include a variety of free services, such as voicemail, caller ID, call waiting, call forwarding, call transfer, and three-way calling. And international calls are as low as 2 cents per minute to London, Paris, Rome, and Hong Kong. A variety of other companies are entering the VoIP market, including ISPs and AT&T. The best-known software-only VoIP service is Skype (http://www.skype.com), which is available for free when you make calls to other Skype users.
But using VoIP can sometimes be a frustrating experience. So, use these hacks to solve some common VoIP woes.
Troubleshoot VoIP Phone/Home Router Problems
Some people have had problems when using Vonage VoIP service with their home routers. Instead of incoming calls being sent to their phones, the calls go directly to voicemail. How you solve this varies from router to router, but here’s how to do it with the popular Linksys router line. Other routers should have similar fixes.
You’re going to set up your router so that it uses its port forwarding feature to send calls directly to your IP telephone. First, turn off your cable modem or DSL modem, all the computers on your network, your router, and your IP telephone. Then, turn your cable modem or DSL modem and your router back on. Turn on your IP telephone, and make sure that turn it on before turning on any PCs on your network. This will make sure it is given the network’s first IP address via DHCP.
Warning
Your caller ID service on either your normal telephone or VoIP phone can easily be subject to caller ID spoofing so that the caller ID number you see before you pick up the phone isn’t really the person calling you. Normally, in caller ID, whenever someone makes a phone call his Calling Party Number (CPN) is sent along with it. Sent along with the CPN is a privacy flag; if the caller has requested that his number not be shared, the flag tells the phone network to block the CPN from being sent.
Note
But VoIP changes all that. Using the open source Linux-based PBX software Asterisk with certain VoIP providers, someone can change the CPN sent along with his call, making it appear to come from any number he wants. So, keep in mind that increasingly, caller ID is being subject to spoofing and hacks.
Once you’ve turned on your IP telephone and your
PCs, log into the Linksys administrator’s setup
screen by opening your browser, typing
http://192.168.1.1, and pressing Enter. Leave the
username blank, and use the password admin and
press Enter. (That’s the default password for the
router; if you’ve changed it, use the password
you’ve changed it to.)
From the setup screen, choose Advanced → Forwarding. You’ll come to the port forwarding screen. Set up port forwarding to route these port ranges to your IP telephone. Forward each port to the IP address of your IP phone, such as 192.168.1.101. (The IP address will be the first one assigned by your network.) Set the protocol to UDP. Use the port settings in Table 5-8.
|
Port range |
Protocol |
IP address |
|
53 to 53 |
UDP |
Your phone’s IP address |
|
5060 to 5061 |
UDP |
Your phone’s IP address |
|
123 to 123 |
UDP |
Your phone’s IP address |
|
69 to 69 |
UDP |
Your phone’s IP address |
|
10000 to 20000 |
UDP |
Your phone’s IP address |
Your screen will look like Figure 5-6.

Tip
If you’re not sure of your Vonage phone’s IP address, it’s easy to find out. Take the phone off the hook. The red function button on the top of the phone will light up. Press the illuminated red button and then dial 80#. Your IP address will be displayed.
When you’re done, click Apply. The port forwarding will take effect immediately, so your problems should be solved.
Get Your Vonage IP Phone to Work with DSL
The nature of some DSL services cause conflicts with Vonage IP telephones, so when you use DSL, you might not be able to get your IP phone to work. Even if the phone previously worked with a cable modem, when you switch to DSL it might stop working.
The problem is that DSL services often require the use of PPPoE, but if you don’t also turn on PPoE in your Vonage phone, the phone won’t work. To turn on PPPoE in your Vonage phone, open a web browser in the computer that has the phone connected to it. Go to http://192.168.102.1 and press Enter. (That’s the default address for configuring Vonage phones. If you have another type of phone, or if your Vonage phone has a different configuration address, use that instead.)
The phone’s Basic Configuration screen will appear. Select the Enable PPPoE option, and type the DSL service name, username, and password that your DSL provider gave to you. Click Save Changes. You’ll get the message “This will require a reboot of the unit. Are you sure?” Click OK. Your phone will reboot. Wait five minutes, and pick up your phone. It will now work.
Cut Your DSL Costs with VoIP
Many DSL services let you make phone calls as well as get high-speed Internet access over the same telephone line. So, if you use VoIP in concert with DSL, you’re paying double for your phone service—once for DSL, and the second time for VoIP.
There’s a solution: get a DSL service that offers only Internet access, not phone service. It’s sometimes called Naked DSL. Qwest and Verizon both offer Naked DSL, and other DSL providers might follow suit.
Tip
A federal law says that when you switch telephone providers, you should be allowed to keep your existing phone number. But you’ll have to ask for it; it doesn’t happen automatically. And there might be circumstances in which you can’t keep your existing phone number. If you’re switching to Vonage, go to http://www.vonage.com/identity/vonage/includes/lnploa.pdf and fill out the form online. You’ll be told whether you can transfer your phone, as well as the steps you have to take to have it switched. The change might not take effect immediately, and you might get a temporary phone number that you can use with your Vonage phone while the changeover happens.
Make Skype Calls at Work
If you try to make Skype calls at work, you might get a “Skype error #1102” and be unable to make a connection. If that happens, it means your business’s firewall won’t let you through. To make the calls, you’ll have to tell the system administrator to open up unrestricted outgoing TCP access to all destination ports above 1024, or to port 80. (Destination ports above 1024 is a better bet, however.) That will let you make the connection. If you want better voice quality, tell the administrator to also open up outgoing UDP traffic to all ports above 1024, and to allow UDP replies to come back in.