
Welcome to Day 5! Today, we're going to continue the work we started yesterday—working with HTML controls and HTTP requests. You'll also learn how to deal with check boxes, radio buttons, and select controls, as well as many other topics. These are primary HTML controls that users expect to see in the pages we'll send them.
Besides these controls, we'll also take a look at working with image controls, which let you determine where the user has clicked an image. That's great for image maps—those clickable images with “hotspots” that perform various actions—which we'll also see today. To implement image maps, we'll look at the <jsp:forward> action, which lets you navigate to new URLs in your JSP code. Using <jsp:forward>, you can navigate to a new URL when the user clicks a hotspot in the image map corresponding to that URL (for example, our image map is going to contain a hotspot marked “Weather,” and when the user clicks it, we'll open a page on the weather). Here's an overview of today's topics:
Working with check boxes
Working with radio buttons
Selecting and deselecting check boxes and radio buttons in code
Working with select controls (creating drop-down lists)
Handling image controls and image maps
Forwarding requests to other pages.
Let's start with the HTML controls we're going to see today, beginning with HTML check boxes.
You create check boxes with the <INPUT TYPE="CHECKBOX"> element, and you can use the NAME attribute of this element to give the check box a name. In your code, you can see whether a check box has been checked by passing its name to request.getParameter.
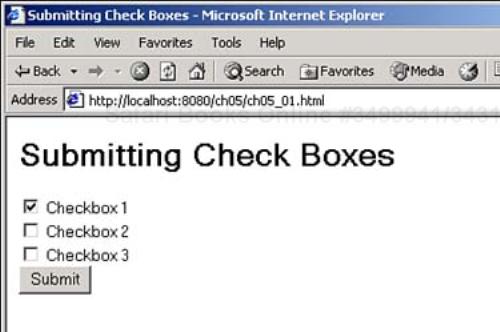
Here's an example; in this case, the code will add three check boxes to a Web page and name them check1, check2, and check3 (note that the first check box, check1, will appear checked when the page first appears, because the code uses the standalone CHECKED attribute for that check box). You can see the code in Listing 5.1.
Example 5.1. Submitting Check Boxes (ch05_01.html)
<HTML>
    <HEAD>
        <TITLE>Submitting Check Boxes</TITLE>
    </HEAD>

    <BODY>
        <H1>Submitting Check Boxes</H1>
        <FORM ACTION="ch05_02.jsp" METHOD="post">
             <INPUT TYPE="CHECKBOX" NAME="check1" VALUE="check1" CHECKED>
             Checkbox 1
            <BR>
            <INPUT TYPE="CHECKBOX" NAME="check2" VALUE="check2">
            Checkbox 2
            <BR>
            <INPUT TYPE="CHECKBOX" NAME="check3" VALUE="check3">
            Checkbox 3
            <BR>
            <INPUT TYPE="SUBMIT" VALUE="Submit">
        </FORM>
    </BODY>
</HTML>
You can see this Web page with the check boxes in Figure 5.1.
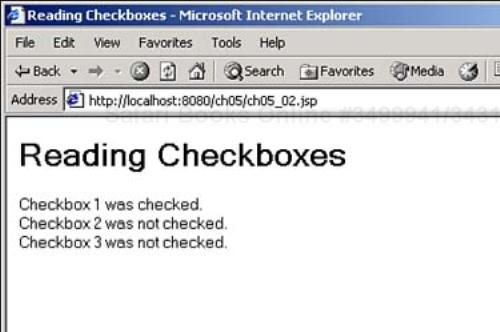
In the JSP code, you can examine each check box by passing its name to request.getParameter to see whether it has been checked—if a check box is checked, request.getParameter will return the text in the check box's VALUE attribute (which is check1, check2, or check3 in this example, as you see in the VALUE attributes in Listing 5.1), or null if the check box was not checked, as you see in Listing 5.2.
Example 5.2. Reading Check Boxes (ch05_02.jsp)
<HTML>
    <HEAD>
        <TITLE>Reading Checkboxes</TITLE>
    </HEAD>

    <BODY>
        <H1>Reading Checkboxes</H1>
        <%
            if(request.getParameter("check1") != null) {
                out.println("Checkbox 1 was checked.<BR>");
            }
            else {
                out.println("Checkbox 1 was not checked.<BR>");
            }

            if(request.getParameter("check2") != null) {
                out.println("Checkbox 2 was checked.<BR>");
            }
            else {
                out.println("Checkbox 2 was not checked.<BR>");
            }

            if(request.getParameter("check3") != null) {
                out.println("Checkbox 3 was checked.<BR>");
            }
            else {
                out.println("Checkbox 3 was not checked.<BR>");
            }
        %>
    </BODY>
</HTML>
Now you can see the results in Figure 5.2.
That's all it takes to see whether a check box was checked or not. You'll see more about checking and unchecking check boxes in code in a few pages.
Radio buttons operate in groups, and only one radio button in a group can be selected at a time. To create a radio button group, you give a set of radio buttons the same name (using the HTML NAME attribute). How do you tell the radio buttons apart? You use the VALUE attribute, giving them different values.
Tip
You can have multiple radio groups, which will operate independently, in the same Web page. Just give all the radio buttons in each group the same name, using a different name for each group.
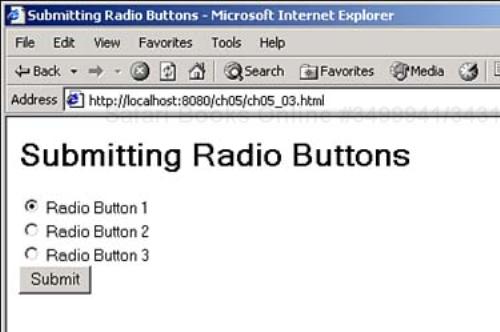
You can see an example in Listing 5.3, in which the code is adding three radio buttons to a Web page and naming them all radios to group them together, and giving them different values (radio1, radio2, and radio3).
Example 5.3. Submitting Radio Buttons (ch05_03.html)
<HTML>
    <HEAD>
        <TITLE>Submitting Radio Buttons</TITLE>
    </HEAD>

    <BODY>
        <H1>Submitting Radio Buttons</H1>
        <FORM ACTION="ch05_04.jsp" METHOD="post">
             <INPUT TYPE="radio" NAME="radios" VALUE="radio1" CHECKED>
             Radio Button 1
            <BR>
            <INPUT TYPE="radio" NAME="radios" VALUE="radio2">
             Radio Button 2
            <BR>
            <INPUT TYPE="radio" NAME="radios" VALUE="radio3">
             Radio Button 3
            <BR>
            <INPUT TYPE="submit" VALUE="Submit">
        </FORM>
    </BODY>
</HTML>
You can see the results in Figure 5.3, which shows the three radio buttons.
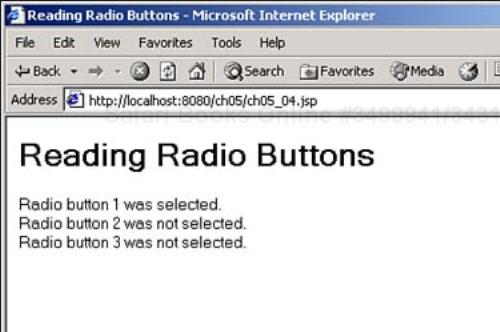
You can see whether a radio button has been selected by passing the name radios to request.getParameter. If the request.getParameter returns radio1, the first radio button was selected; if it returns radio2, the second radio button was selected, and so on. You can see how to determine which radio buttons were selected in Listing 5.4.
Example 5.4. Reading Radio Buttons (ch05_04.jsp)
<HTML>
    <HEAD>
        <TITLE>Reading Radio Buttons</TITLE>
    </HEAD>

    <BODY>
        <H1>Reading Radio Buttons</H1>
        <%
            if(request.getParameter("radios") != null) {
                if(request.getParameter("radios").equals("radio1")) {
                    out.println("Radio button 1 was selected.<BR>");
                }
                else {
                    out.println("Radio button 1 was not selected.<BR>");
                }
                if(request.getParameter("radios").equals("radio2")) {
                    out.println("Radio button 2 was selected.<BR>");
                }
                else {
                    out.println("Radio button 2 was not selected.<BR>");
                }
                if(request.getParameter("radios").equals("radio3")) {
                    out.println("Radio button 3 was selected.<BR>");
                }
                else {
                    out.println("Radio button 3 was not selected.<BR>");
                }
            }
        %>
    </BODY>
</HTML>
You can see the results in Figure 5.4, where we see that in this case, only the first radio button was selected.
As you can see, it's easy to determine which check box or radio button the user has selected. But what if you want to select or deselect these controls yourself in code? That's coming up next.
Using the standalone CHECKED attribute, you have control over whether check boxes and radio buttons appear selected when their containing Web page first appears. Using this attribute, you can select and deselect check boxes and radio buttons in code.
Here's an example, which you can see in Figure 5.5. This example lets users select which sandwich they want, as you can see in the figure. The user can select a sandwich using the radio buttons on the left, and our program will check the corresponding ingredient check boxes on the right when the user clicks the Submit button. The code also determines which radio button was selected, and makes sure the same radio button is selected when a new page is sent back to the browser.
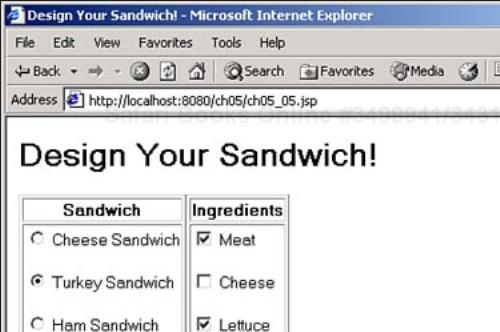
Selecting and deselecting check boxes and radio buttons in JSP code is simply a matter of using the CHECKED attribute. In this example, we want to set the check boxes to match which radio button was selected. To do that, you can declare three variables for each of the three check boxes, check1, check2, and check3, setting each to an empty string ("") at first:
String check1 = "", check2 = "", check3 = "";
If a particular radio button is selected, such as the one for turkey sandwiches, we can set the corresponding check boxes' variable to "CHECKED":
if(request.getParameter("radios").equals("turkey")){
    check1 = "CHECKED";
    check3 = "CHECKED";
}
Then when we display each check box, we can simply indicate whether or not the check box should be checked:
<INPUT TYPE="CHECKBOX" NAME="check3" VALUE="check3"
    <%= check3%>
>
You can see the full code for this example in Listing 5.5.
Example 5.5. Design Your Sandwich (ch05_05.jsp)
<HTML>
    <HEAD>
        <TITLE>Design Your Sandwich!</TITLE>
    </HEAD>

    <BODY>
    <%
        String cheese = "", turkey = "", ham = "";
        String check1 = "", check2 = "", check3 = "";
        if(request.getParameter("radios") != null) {
           if(request.getParameter("radios").equals("cheese")){
               cheese = "CHECKED";
               check2 = "CHECKED";
           }
           if(request.getParameter("radios").equals("turkey")){
               turkey = "CHECKED";
               check1 = "CHECKED";
               check3 = "CHECKED";
           }
           if(request.getParameter("radios").equals("ham")){
               ham = "CHECKED";
               check1 = "CHECKED";
               check2 = "CHECKED";
               check3 = "CHECKED";
           }
       }
    %>

        <H1>Design Your Sandwich!</H1>
        <FORM METHOD="POST">
            <TABLE BORDER="1" ALIGN="LEFT">
                <TR>
                    <TH>
                        Sandwich
                    </TH>
                </TR>
                <TR>
                    <TD>
                        <INPUT TYPE="radio" NAME="radios" VALUE="cheese"
                            <%= cheese %>
                        >
                       Cheese Sandwich
                       <BR>
                       <INPUT TYPE="RADIO" NAME="radios" VALUE="turkey"
                           <%= turkey %>
                       >
                       Turkey Sandwich
                       <BR>
                       <BR>
                       <INPUT TYPE="RADIO" NAME="radios" VALUE="ham"
                            <%= ham %>
                       >
                       Ham Sandwich
                       <BR>
                   </TD>
               </TR>
            </TABLE>

            <TABLE BORDER="1" ALIGN="LEFT">
                <TR>
                    <TH>
                        Ingredients
                    </TH>
                </TR>
                <TR>
                    <TD>
                        <INPUT TYPE="CHECKBOX" NAME="check1" VALUE="check1"
                            <%= check1 %>
                        >
                        Meat
                        <BR>
                        <BR>
                        <INPUT TYPE="CHECKBOX" NAME="check2" VALUE="check2"
                            <%= check2 %>
                        >
                        Cheese
                        <BR>
                        <BR>
                        <INPUT TYPE="CHECKBOX" NAME="check3" VALUE="check3"
                            <%= check3%>
                        >
                        Lettuce
                    </TD>
                </TR>
            </TABLE>
            <BR CLEAR="ALL">
            <BR>
            <INPUT TYPE="SUBMIT" VALUE="Submit">
        </FORM>
    </BODY>
</HTML>
We've got a lot of power over check boxes and radio buttons now, and can determine whether the user has selected them, and we can also select and deselect them in code. Next, our discussion will cover the use of select controls.
Select controls display scrollable lists and drop-down lists. These kinds of controls come in two varieties—those that let you select one item at a time, and those that let you select multiple items. We'll look at single-selection select controls first.
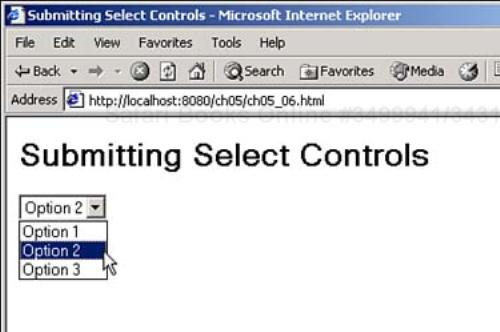
You create a select control with the <SELECT> element, enclosing the items you want to appear in the select control in <OPTION> elements. Here's an example in which the code is creating a select control named select1 with three items in it: Option 1, Option 2, and Option 3:
<SELECT NAME="select1">
    <OPTION>Option 1</OPTION>
    <OPTION SELECTED>Option 2</OPTION>
    <OPTION>Option 3</OPTION>
</SELECT>
Listing 5.6 shows how you can use this control in a sample HTML document.
Example 5.6. Submitting a Select Control (ch05_06.html)
<HTML>
    <HEAD>
        <TITLE>Submitting Select Controls</TITLE>
    </HEAD>

    <BODY>
        <H1>Submitting Select Controls</H1>
        <FORM ACTION="ch05_07.jsp" METHOD="POST">
            <SELECT NAME="select1">
                <OPTION>Option 1</OPTION>
                <OPTION SELECTED>Option 2</OPTION>
                <OPTION>Option 3</OPTION>
            </SELECT>
            <INPUT TYPE="SUBMIT" VALUE="Submit">
        </FORM>
    </BODY>
</HTML>
You can see what this Web page looks like in Figure 5.6.
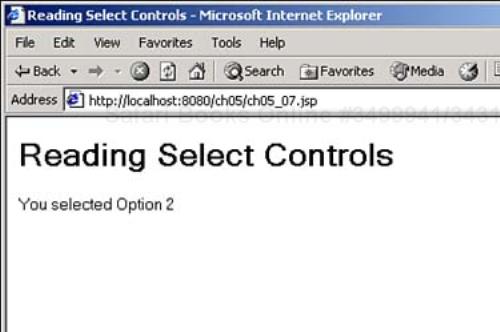
You can read the selected option in single-selection select controls in your JSP code by passing the name of the control to request.getParameter. Listing 5.7 shows the code that determines which item the user selected in the select control.
You can see the results in Figure 5.7, where we learn that we've selected Option 2.
And that's how you use single-selection select controls. Multiple selection select controls are coming up next.
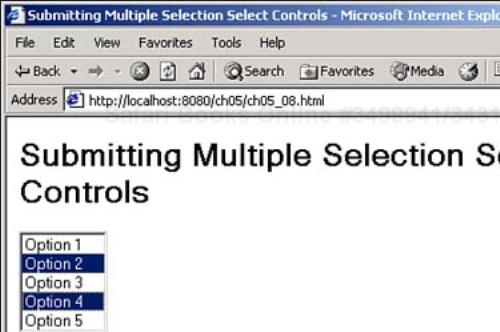
If you use the MULTIPLE standalone HTML attribute in a select control, that control can accept multiple selections:
<SELECT NAME="select1" SIZE="5" MULTIPLE>
    <OPTION>Option 1</OPTION>
    <OPTION SELECTED>Option 2</OPTION>
    <OPTION>Option 3</OPTION>
    <OPTION>Option 4</OPTION>
    <OPTION>Option 5</OPTION>
</SELECT>
Listing 5.8 shows how you can display a multiple-selection select control.
Example 5.8. Using Multiple-Selection Select Controls (ch05_08.html)
<HTML>
    <HEAD>
        <TITLE>Submitting Multiple Selection Select Controls</TITLE>
    </HEAD>

    <BODY>
        <H1>Submitting Multiple Selection Select Controls<H1>
        <FORM ACTION="ch05_09.jsp" METHOD="POST">
            <SELECT NAME="select1" SIZE="5" MULTIPLE>
                <OPTION>Option 1</OPTION>
                <OPTION SELECTED>Option 2</OPTION>
                <OPTION>Option 3</OPTION>
                <OPTION>Option 4</OPTION>
                <OPTION>Option 5</OPTION>
           </SELECT>
           <BR>
           <INPUT TYPE="SUBMIT" VALUE="Submit">
       </FORM>
    </BODY>
</HTML>
Caution
Note that this code is using the SIZE attribute here to display a number of items in the select control at once. If you don't use the SIZE attribute (as we didn't in the previous single-selection example), you get a drop-down list, but drop-down lists don't support multiple selections.
You can see this Web page in Figure 5.8, in which the user is selecting two items. (How you select multiple items in a select control like this varies by operating system—for example, in Windows, you can use the Ctrl key together with the mouse to select multiple items by clicking them, or the Shift key with the mouse to select a range of items.)
The next step is to determine which items were selected when the Submit button was clicked and the form's data was sent to us on the server. This is the first time a control has sent us multiple values, and the getParameter method isn't going to work here (it would simply return the first selected item). Instead, you use the request object's getParameterValues method in this case.
As you can see in Table 4.1, the getParameterValues method returns an array of strings corresponding to all the values associated with a control. That's exactly what you need here to get all the selected items in the select control. You can loop over the items in the returned string array and display them as you see in Listing 5.9.
Example 5.9. Reading Multiple-Selection Select Controls (ch05_09.jsp)
<HTML>
<HEAD>
<TITLE>Reading Multiple Selection Select Controls</TITLE>
</HEAD>
<BODY>
<H1>Reading Multiple Selection Select Controls</H1>
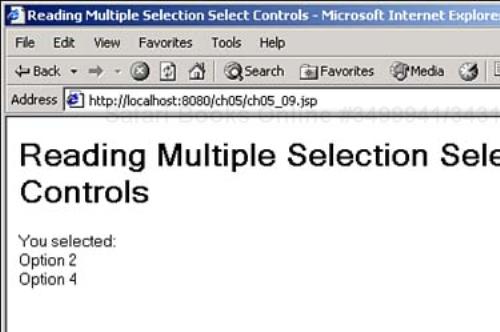
You selected:
<BR>
<% String[] items = request.getParameterValues("select1");
for(int loopIndex = 0; loopIndex < items.length; loopIndex++){
out.println(items[loopIndex] + "<BR>");
}
%>
</BODY>
</HTML>
Now you can determine which items the user has selected in a multiple-selection select control, as you see in Figure 5.9.
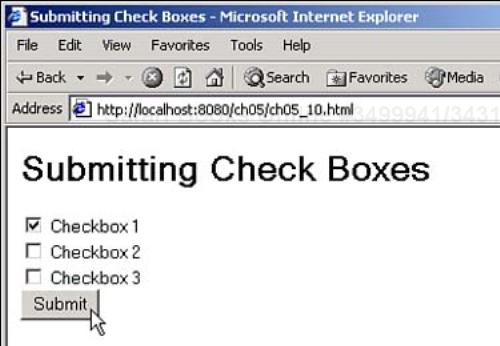
We've seen that you can create radio button groups by giving radio buttons the same name; in the same way, you can create check box groups. However, check box groups are different from radio button groups, because multiple check boxes can be checked at the same time in the same group. Listing 5.10 illustrates how to create a check box group with three check boxes, all named checks, but with different values.
Example 5.10. Submitting Check Boxes (ch05_10.html)
<HTML>
    <HEAD>
        <TITLE>Submitting Check Boxes</TITLE>
    </HEAD>

    <BODY>
        <H1>Submitting Check Boxes</H1>
        <FORM action="ch05_11.jsp" method="post">
            <INPUT TYPE="CHECKBOX" NAME="checks" VALUE="check1" CHECKED>
            Checkbox 1
            <BR>
            <INPUT TYPE="checkbox" NAME="checks" VALUE="check2">
            Checkbox 2
            <BR>
            <INPUT TYPE="checkbox" NAME="checks" VALUE="check3">
            Checkbox 3
            <BR>
            <INPUT TYPE="submit" VALUE="Submit">
        </FORM>
    </BODY>
</HTML>
You can see this Web page in Figure 5.10.
To determine which check boxes were checked, you can use request.getParameterValues and loop over the array that method returns, as you see in Listing 5.11.
You can see the results in Figure 5.11. Using getParameterValues in this way, you can support check box groups and determine which check boxes in the group were checked.

Another HTML control is the file upload control (<INPUT TYPE="FILE">), but here the Tomcat server isn't going to help us out much. To upload files you'll use multipart forms, which you create with the <FORM> element's ENCTYPE attribute:
<FORM ACTION="ch05_13.jsp" METHOD="POST" ENCTYPE ="multipart/form-data">
    <INPUT TYPE="FILE" NAME="filer">
    <BR>
    <INPUT TYPE="SUBMIT" VALUE="Submit">
</FORM>
However, Tomcat doesn't support multipart forms yet, so you have to use a standard form, as you see in Listing 5.12.
Figure 5.12 shows the file control created by this Web page.

This file upload control isn't going to do much for us. Listing 5.13 shows you how to recover the information it sends you.
You can see the results in Figure 5.13, where we see that the file upload control has given us only the name of the file we had wanted to upload in this case. Presumably, file upload controls will be supported in later versions of the server software.
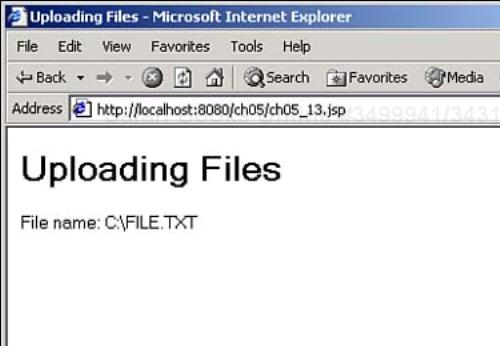
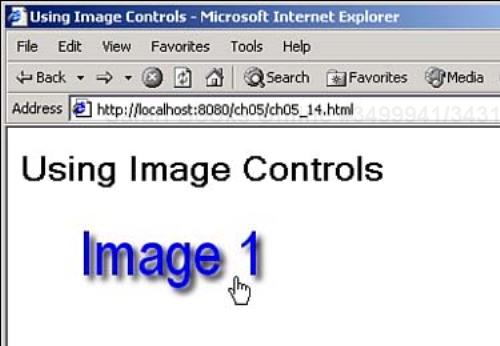
Image controls (<INPUT TYPE="IMAGE">) act much like submit buttons, except they display images the user can click. The location that the user clicked in the image is also sent to the server with the rest of the data from the form.
Here's an example showing how this works. Here, the code will use an image control to display a clickable image, and when the user clicks it, the mouse location is sent to the server automatically, with no submit button needed. In the JSP code, we can determine and display the mouse location. Listing 5.14 details the HTML page that displays the image and the image control—note that this code names the image control images.
You can see this page at work in Figure 5.14, where the user is about to click the image.
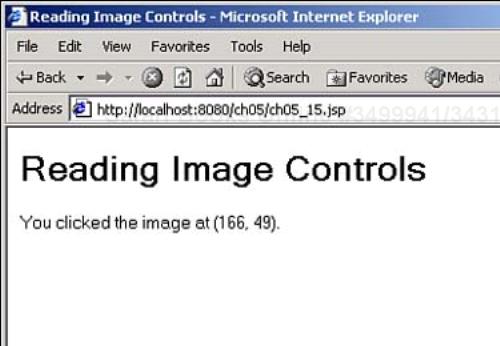
The name of our image control is images, which means that the (x, y) mouse location is passed to us as the request parameters images.x and images.y. You can see how to display that mouse location when you get it in Listing 5.15.
The results appear in Figure 5.15, where we see the location at which the user clicked the image.
Because they can report mouse locations, image controls are often used for image maps, those clickable images with hotspots that will take you to different URLs. In fact, there is a way to send the browser to a new URL—you can use the <jsp:forward> action. You'll see <jsp:forward> first, then put it to work in an image map with hotspots that the user can click to navigate to new URLs.
You can use the <jsp:forward> action to forward an HTTP request to another Web page:
<jsp:forward page="relativeURL" />
Note the XML-style tag terminator here, />, which you'll see a lot in JSP action elements. This is just a shortcut that lets you omit a closing tag; the previous line of code is the same as this version, which uses the closing tag </jsp:forward>:
<jsp:forward page="relativeURL" ></jsp:forward>
Here, relativeURL is the URL of another page accessible as part of the same Web application. For example, relativeURL can hold the name of another HTML or JSP file in the same server directory as the current document.
You can also change or add new parameters to the request being forwarded to the new URL with <jsp:param> elements:
<jsp:forward page="relativeURL" >
    <jsp:param name="parameterName1" value="parameterValue1" />
    <jsp:param name="parameterName2" value="parameterValue2" />
        .
        .
        .
</jsp:forward>
Here, parameterName1 is the name of the first parameter you want to set a value for, and parameterValue1 is the value you want to give that parameter, and so on. We'll see how to pass new parameters on to new URLs this way in Day 9, “Using Custom JSP Tags.”
To create our image map, all we'll need to do is use <jsp:forward> to send the browser to a new URL, and that's coming up next.
Tip
Here's another way to redirect a browser, this time using JavaScript. You can set the href property of the location object to redirect the browser to a new URL. For example, if you want to send the browser to http://www.sun.com, you could send this HTML back to the browser: <HTML><SCRIPT LANGUAGE = "JavaScript">location.href = "http://www.sun.com"</SCRIPT></HTML>.
This new image map will be based on an image control named imagemap; the code for the Web page that contains it appears in Listing 5.16.
You can see the image map we'll be using in Figure 5.16 (this image is included in the code you can download for this book). The user is about to click the Weather hotspot in this figure.
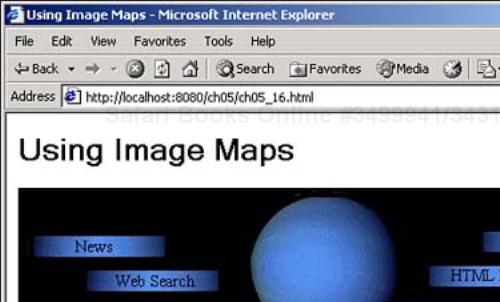
All the user has to do is click one of the hotspots you see in Figure 5.16, and the mouse location will be sent to our JSP page, ch05_17.jsp. There we determine the mouse location with the following code fragment. (Note that the code is using the Integer.parseInt method to convert the string text we get from request.getParameter into an integer; see the next topic “Using Named Targets” for all the details on converting text to numeric format, including the Integer.parseInt method.)
<%
    int x = Integer.parseInt(request.getParameter("imagemap.x"));
    int y = Integer.parseInt(request.getParameter("imagemap.y"));
%>
You can determine which hotspot the user clicked by checking the mouse location; here the code is checking whether the Weather hotspot was clicked, and if so, forwarding the browser to the Weather page (ch05_19.html):
<%
    if(x > 98 && x < 209
        && y > 104 && y < 126) {
%>
    <jsp:forward page="ch05_19.html" />
<%
    }
%>
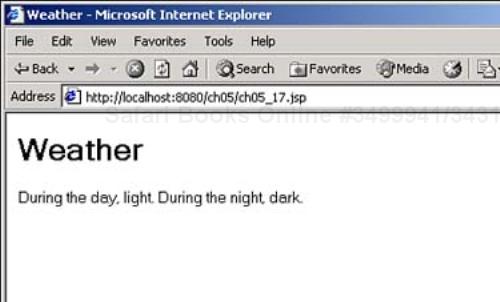
Here's what the HTML for ch05_19.html looks like:
<HTML>
    <HEAD>
        <TITLE>Weather</TITLE>
    </HEAD>

    <BODY>
        <H1>Weather</H1>
        During the day, light. During the night, dark.
    </BODY>
</HTML>
Figure 5.17 depicts what ch05_19.html looks like in the browser after the user clicks the Weather link in the image map.
And that's all it takes—now we're redirecting browsers based on image maps. The full code appears in Listing 5.17.
Note
Note that this example also includes ch05_18.html up to ch05_23.html, so the next example in the following topic will be ch05_24.jsp.
Example 5.17. Reading an Image Map (ch05_17.jsp)
<HTML>
    <HEAD>
        <TITLE>Reading Image Controls</TITLE>
    </HEAD>

    <BODY>
        <% int x = Integer.parseInt(request.getParameter("imagemap.x"));
           int y = Integer.parseInt(request.getParameter("imagemap.y"));
        %>

        <% if(x > 16 && x < 127
           && y > 39 && y < 61) {
        %>
        <jsp:forward page="ch05_18.html" />
        <%
        }
        %>

        <% if(x > 98 && x < 209
           && y > 104 && y < 126) {
        %>
        <jsp:forward page="ch05_19.html" />
        <%
        }
        %>

        <% if(x > 62 && x < 173
           && y > 71 && y < 93) {
        %>
        <jsp:forward page="ch05_20.html" />
        <%
        }
        %>

        <% if(x > 411 && x < 522
           && y > 35 && y < 57) {
        %>
        <jsp:forward page="ch05_21.html" />
        <%
        }
        %>

        <% if(x > 360 && x < 471
           && y > 67 && y < 89) {
        %>
        <jsp:forward page="ch05_22.html" />
        <%
        }
        %>

        <% if(x > 328 && x < 439
           && y > 98 && y < 120) {
        %>
        <jsp:forward page="ch05_23.html" />
        <%
        }
        %>
    </BODY>
</HTML>
Here's another important aspect about HTML forms—you can use the <FORM> element's TARGET attribute to indicate where to send the output of your JSP code. We saw yesterday that there are various predefined settings for this attribute, such as _blank when you want the page sent back from your JSP code to open a new window. You can also use the TARGET attribute to send output from JSP code to another frame in the same browser window, and that's coming up next.
In this example, you can create the JSP Calculator, shown in Figure 5.18. In the top frame, you enter two numbers to add, click the = button, and the server will send the results back to the bottom frame as you see in the figure. (This example is also specifically designed to show how to convert the text you read from HTML controls into numeric data types, such as integers—something that's frustrated a lot of JSP programmers.)
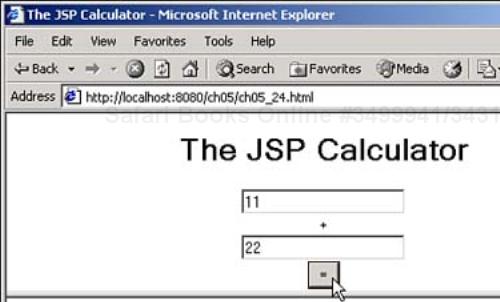
You can see the main Web page that displays the two frames in Figure 5.18 in Listing 5.18—note that the code names the bottom frame frame2.
You can see the calculator part of the application, which goes in the top frame, in Listing 5.19. Note that the code is using the form's TARGET attribute to indicate that the results of our JSP code should go into frame2, the bottom frame (the code sets the caption of the = button to " = ", where is the HTML code for a nonbreaking space, to widen that button instead of just giving it the narrow caption =).
Example 5.19. The JSP Calculator (ch05_25.html)
<HTML> <HEAD> </HEAD> <BODY> <FORM NAME="form1" ACTION="ch05_26.jsp" TARGET="frame2" METHOD="POST"> <CENTER> <H1>The JSP Calculator</H1> <INPUT TYPE="TEXT" NAME="op1" VALUE=""> <BR> + <BR> <INPUT TYPE="TEXT" NAME="op2" VALUE=""> <BR> <INPUT TYPE="SUBMIT" VALUE=" = "> </CENTER> </FORM> </BODY> </HTML>
Finally, you can see the JSP code that will add the two numbers and display the result in the bottom frame of the application in Listing 5.20.
Note that the values we get from request.getParameter are strings, and in Java, you can't just assign strings to integer variables (and you can't use a type cast here, either). Instead, you must use the Integer class's parseInt method, which reads string text and returns an integer like int integer1 = Integer.parseInt(request.getParameter("op1")). Other methods to convert strings into numbers include Float.parseFloat, Double.parseDouble, and so on. You convert the text you read from HTML controls into numbers by using these methods.
Tip
How do you convert a number to a text string? You can use the String class's valueOf method like this: String string1 = String.valueOf(number), where number is a number of data type int, float, double, and so on.
Our calculator is fully functional (as long as the only math operation you want to perform is adding integers, that is). Using named frames like this is a cool technique to know—the HTML in the top frame here doesn't change, but the HTML in the bottom frame can be updated from the server whenever you want.
We've seen a lot about request objects yesterday and today. There are two more powerful methods we should take a look at—getParameterNames and getHeaderNames—to add even more power to our JSP arsenal. You'll see getParameterNames here, and getHeaderNames in the next section.
The getParameterNames method returns a Java Enumeration object holding the names of the parameters being passed to your JSP code. Enumeration objects are like arrays in that they hold collections of items, but you use two methods to move through an enumeration, rather than using an array index (these are the only two methods that enumerations support):
boolean hasMoreElements()—. Returnstrueif this enumeration contains more elements that you haven't accessed yet.Object nextElement()—. Returns the next element of this enumeration if this enumeration object has at least one more element you haven't accessed yet.
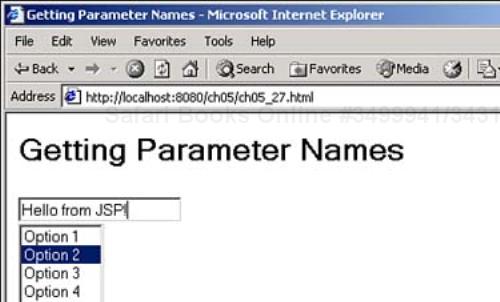
Here's a look at an example to see how to use getParameterNames to determine the names of all the parameters sent to our code. Listing 5.21 shows a sample Web page with a text field named text1 and a select control named select1 that you can use to test getParameterNames.
Example 5.21. Getting Parameter Names (ch05_27.html)
<HTML>
    <HEAD>
        <TITLE>Getting Parameter Names</TITLE>
    </HEAD>

    <BODY>
        <H1>Getting Parameter Names<H1>
        <FORM ACTION="ch05_28.jsp" METHOD="POST">
            <INPUT TYPE="TEXT" NAME="text1">
            <BR>
            <SELECT NAME="select1" SIZE="5" MULTIPLE>
                <OPTION>Option 1</OPTION>
                <OPTION selected>Option 2</OPTION>
                <OPTION>Option 3</OPTION>
                <OPTION>Option 4</OPTION>
                <OPTION>Option 5</OPTION>
            </SELECT>
            <BR>
            <INPUT TYPE="SUBMIT" VALUE="Submit">
        </FORM>
    </BODY>
</HTML>
You can see this page in Figure 5.19.
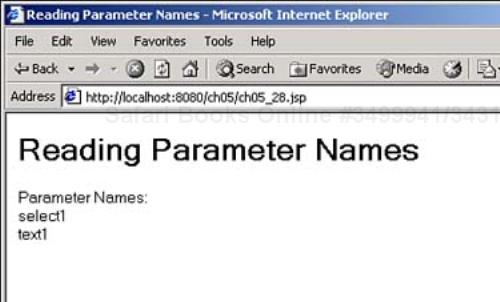
You can see the JSP page that will accept the request parameters we send it and use the getParameterNames method to display the names of those parameters in Listing 5.22. Note that we're using a Java Enumeration object here, using the hasMoreElements method in a while loop, and the nextElement method to recover successive elements from that Enumeration.
You can see the results in Figure 5.20, where we see that the parameters we've sent to the server are select1 and text1, as they should be.
Next, you can take a look at the request headers passed to your code to see what they are and what they can offer you. Listing 5.23 shows a simple Web page with just a form and a submit button that you can use.
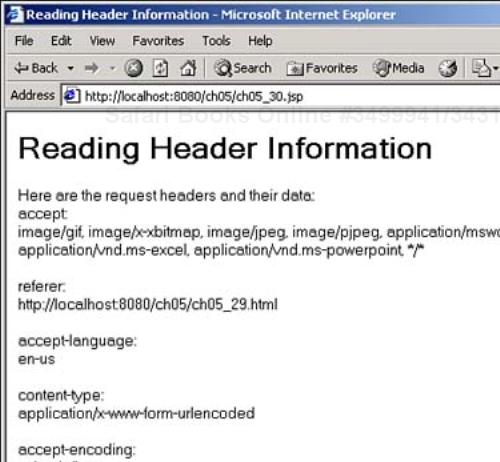
You can see the JSP page that will read and display the request headers you send to it from ch05_29.html in Listing 5.24.
Example 5.24. Reading Header Information (ch05_30.jsp)
<HTML>
    <HEAD>
        <TITLE>Reading Header Information</TITLE>
    </HEAD>

    <BODY>
        <H1>Reading Header Information</H1>
        Here are the request headers and their data:
        <BR>
        <% java.util.Enumeration names = request.getHeaderNames();
        while(names.hasMoreElements()){
            String name = (String) names.nextElement();
            out.println(name + ":<BR>" + request.getHeader(name) + "<BR><BR>");
        }
        %>
    </BODY>
</HTML>
You can see the results in Figure 5.21. As you see in that figure, the accept header informs you what kinds of data the browser can accept, the user-agent header tells you what browser the user has, the referer header tells you that the URL of the Web page that the user was just looking at was http://localhost:8080/ch05/ch05_29.html, and so on—all useful information.
No discussion on HTML forms would be complete without adding reset buttons, and it's appropriate to end our discussion on forms with this control. The user can click a reset button to clear all the data in the control in the form and reset them to their default values. You usually add a reset button to a form next to the submit button:
<HTML>
    <HEAD>
        <TITLE>Using a Reset Button</TITLE>
    </HEAD>

    <BODY>
        <H1>Using a Reset Button</H1>
        <FORM ACTION="ch04_05.jsp" METHOD="POST">
            Please enter your name:
            <INPUT TYPE="TEXT" NAME="text1">
            <BR>
            <INPUT TYPE="SUBMIT" value="Submit">
            <INPUT TYPE="RESET" value="Reset">
        </FORM>
    </BODY>
<HTML>
You can see the reset button in Figure 5.22.
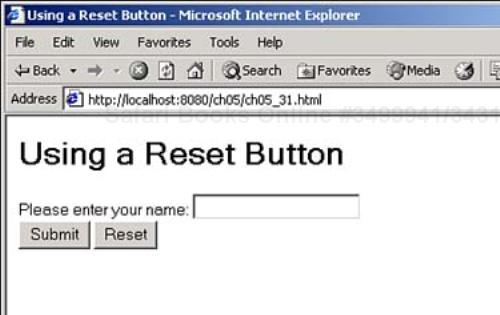
And that's all it takes—now the user can reset all the data in the form just by clicking this button. Although not mandatory, it's a nice convenience to have a reset button available in your forms.
We've seen a great deal today. We took a look at working with some primary HTML controls here—check boxes, radio buttons, and select controls.
Check boxes usually operate independently, and it's easy to recover the data from a named check box with the getParameter method. Radio buttons operate in groups, where you give them the same name, but different values; and it's easy to find which radio button is selected by using that name with getParameter to get the value of the selected radio button. We've also seen how to select and deselect both check boxes and radio buttons in code.
Check boxes can work in groups, where you give all check boxes the same name but different values. In that case, you use the getParameterValues method, not getParameter, to determine which check boxes are checked.
We took a look at using drop-down select controls, as well as multiple-selection select controls, letting the user select various items in those controls and determining which items are selected in code.
We've also seen how to use image controls and create server-side image maps. To create an image map, you use the JSP action <jsp:forward>, which lets you forward a request to another Web page. Image controls act like submit buttons, except that they also pass the mouse location on to the server, which is what makes it possible to implement image maps.
We've seen that you can use the <FORM> element's TARGET attribute to send the output from your JSP code to another frame in a Web page, and we learned how to convert the text data we got from the getParameter method into numbers.
We took a look at dissecting the information in a request by getting all the parameter names sent to our JSP code using the getParameterNames method, as well as deciphering the information in the request headers with the getHeaderNames methods.
At this point, you've gained a solid foundation in working with requests and HTML controls. You know how to handle data the user sends, and how to return your own Web pages. Now that your code is actually doing something substantial, it's time to start learning how to organize that code using JavaBeans.
This workshop tests whether you understand all the concepts you learned today. It's a good idea to master today's concepts by honing your knowledge here before starting tomorrow's material. You can find the answers to the quiz questions in Appendix A.
1: | Put what you've learned to work now by enhancing the create-your-own sandwich example (Listing 5.5) to read what check boxes are checked and display a total price for the sandwich (use $1.00 for each check box checked, for example). |
2: | Develop a JSP page that displays seven radio controls that let the user display the day of the week (Monday, Tuesday, and so on)—and make sure that the current day of the week's radio button is already selected when the page first appears. You can do that with the |