
Chapter 9 Printing Services
In this chapter, we examine how SLES provides services for printing. Historically, printer support on the various flavors of Unix was inconsistent. Manufacturers created drivers for their printers, but often only on a select number of operating systems. This meant that certain printers were supported only on specific platforms.
The Line Printer Daemon (LPD) was used to control the printing of requests on specific queues. Running this application would define the local server as being a print server. Local queues could then be made available to other systems. Clients could then use the LPR application to submit print jobs to a target print server and queue.
The Common UNIX Printing System (CUPS) is designed to be a replacement for the LPD and LPR environments present on these older systems. In SUSE LINUX Enterprise Edition 9 and higher, these older printer environments have been deprecated. Because of this, this chapter focuses only on the features available through CUPS.
All the aspects of producing printed output are tightly related. For purposes of this chapter, we subdivide the printing process into the following sections:
![]() Printer configuration
Printer configuration
![]() Job lifecycle
Job lifecycle
![]() Queue management
Queue management
Each of these categories will be examined using YaST, command-line tools, and the CUPS web interface.
Printer Configuration
Before information can be printed, the system must be made aware of devices available to produce the required output. When a system knows of the existence of a valid output device, it can make that device available to applications. Printers can be subdivided into two main categories depending on how they are made available to the system: local and network. The following two sections look at each.
Local Printers
Local printers are dependent on physical hardware present within the server. Typical hardware-specific interfaces include parallel, serial, infrared (IrDA), and USB.
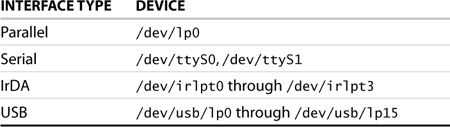
Each interface type has a corresponding device file in the /dev directory through which it is accessed. Table 9.1 lists the different interface types and their corresponding device files.
Table 9.1. Printer Interface Types and Their Device Files
Because the interface hardware is resident within the server, the number of local devices that can attach to a single server is limited. An average server comes preconfigured with two serial ports, a single parallel port, and two USB busses spread over four ports. Expansion beyond this requires the purchase of additional hardware.
All these technologies restrict the location of the printing device. The physical length of cable supported by the various protocols forces the printing device to be located within a few yards of the server. Though it is possible to trade off baud rate for distance in the case of serial protocols, this trade-off has serious performance implications. Newer, high-speed printers do not receive data fast enough to maintain their printing speed if they are at the end of a long, low baud rate cable.
The other drawback to co-locating printers with the server is access. In a normal data center environment, users do not have access to the room hosting the server. Access to short-range protocol printers is therefore not possible.
The solution to many of these drawbacks is to push the printer interface hardware outside the data center. This converts the short-range printer technologies discussed here into network-aware solutions.
Network Printers
Network printers, as their name suggests, are accessible only through the network. Such printers are attached through various mechanisms to remote print servers. CUPS supports a number of different network protocols for accessing such printers.
A CUPS server can be configured in either a client or a server role. As a server, it can present a number of local print queues to the network for access by various clients. When configured as a client, CUPS listens to service broadcasts on the network and acquires a list of valid printer destinations.
A Linux server running CUPS also understands LPD, SMB, and IPX network protocols. In such cases, a local printer definition can be made to point to a network server’s printer using the appropriate network transport protocols. LPD can be used for accessing queues on non–CUPS-compatible Unix systems as well as a number of commercial print server appliances. The SMB protocol is used to access Samba or Windows server environments, while IPX is used by older Novell networks. In the case of SMB and IPX printing, the local configuration may require a username and password for accessing the remote queues.
Adding a Local Printer
You can add printers to a server using either command-line tools or YaST. The following example shows how to add a local parallel printer to a server using YaST. In YaST, the printer configuration icon can be found under the Hardware menu option. After you select this icon, you are presented with the window displayed in Figure 9.1.
Figure 9.1. YaST Printer Configuration screen.
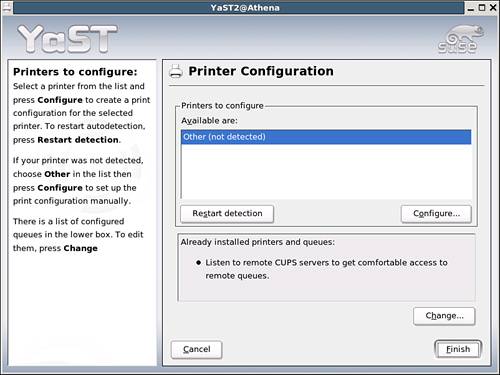
In Figure 9.1, you can see that no printers are currently defined on the server. To create a new printer definition, ensure that the Other (Not Detected) option is highlighted and click the Configure button. This brings you to the next window, as shown in Figure 9.2, where you can choose the type of printer you want to configure. In the current example, add a Canon Bubble Jet 200 to the configuration as a label printer. This device requires a parallel port connection to the host. The local interfaces are shown at the top of the list, and the network-aware protocols are grouped in the lower portion.
Figure 9.2. Printer type definitions.
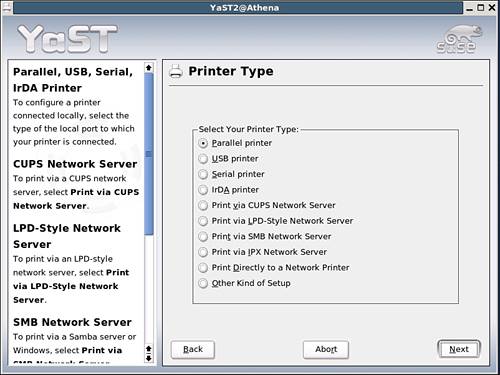
Because you are configuring a parallel printer, select the appropriate option shown in Figure 9.2 and click the Next button. In the next window, you can select which parallel port the printer is connected to. Because a typical server has only one parallel port, /dev/lp0, highlight that option and click Next. In the case of a serial, IrDA, or USB printer, you would have to choose the appropriate device.
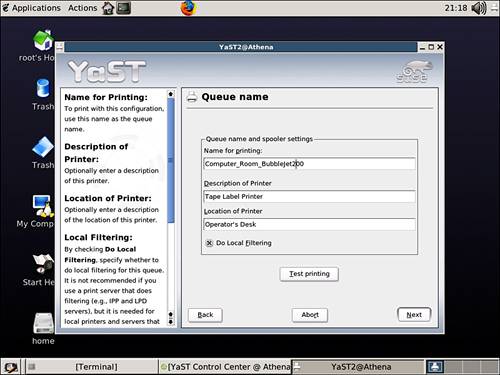
Figure 9.3 displays an example of the next screen that will appear. On this screen, you define the name users will select to gain access to the queue. The use of a good naming standard will prevent a number of lost or misdirected print jobs. This is especially important when some printers are used with special forms such as shipping labels or multipart forms.
Figure 9.3. Defining the print queue name and description.
After defining the human-visible characteristics of the printer, you must identify to the server what type of printer is present on the selected port. A sample of this window is shown in Figure 9.4. Each printer has specific capabilities and limitations. Selecting the appropriate printer model will ensure that CUPS can properly translate the user document into a format that can be rendered by the printer.
Figure 9.4. Defining the printer model.
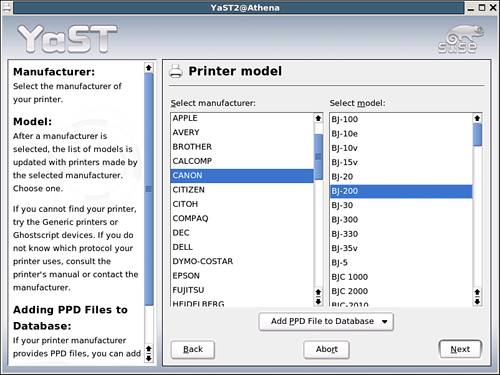
In Figure 9.4, a large list of manufacturers is shown in the left column. Selecting the appropriate manufacturer presents, in the right column, a list of supported models for that manufacturer. When you select the printer, you are letting CUPS know what your printer is capable of doing. Using this information, CUPS can translate various types of documents into a format compatible with your printer.
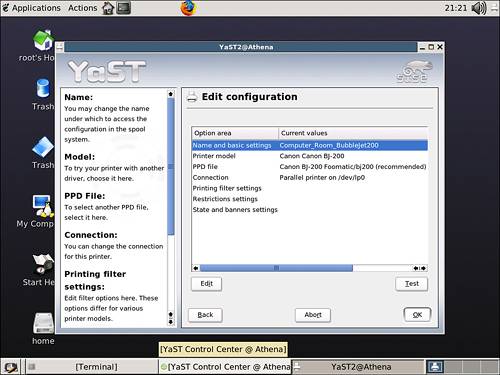
After you choose the appropriate printer model, you are presented with the configuration summary page, shown in Figure 9.5. At this point, clicking the OK button saves the defined configuration into the various files used by CUPS. After the configuration is saved, the printer will become available to the system’s users. We explore the fine-tuning of queue restrictions later in this chapter. First, though, let’s look at how defining a network-based printer is different.
Figure 9.5. The YaST edit printer configuration window.
Adding a Network Printer
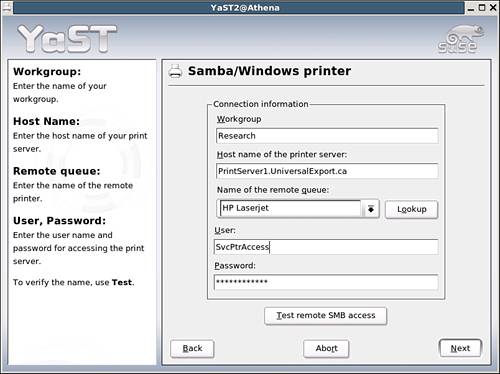
In YaST, adding a queue definition on a local server for a network printer is almost identical to setting up a local printer. The main difference encountered in selecting a network-based printer in Figure 9.2 is that the local interface selection option is replaced with a network configuration screen. For an SMB queue, you are presented with a window similar to that shown in Figure 9.6.
Figure 9.6. Configuration options for an SMB printer.
NOTE
A workgroup is a collection of machines in a Windows/Samba environment. When a system is configured, it can be placed within a specific workgroup. When you are searching the network for computers, only systems in the same workgroup will be discovered. This permits the segregation of machines based on function.
The drawback to this classification is that, unlike a domain, usernames and passwords are machine specific. Users needing access to multiple machines have to maintain their passwords separately on each.
In this configuration screen, the environment and access rights for the target queue must be defined. If required, a username and password must also be included. Because you do not want queue access to terminate should a particular employee leave, you should configure an appropriately hardened service account in the target environment to allow printer-only access from specific hosts.
An additional consideration that must be factored in when configuring remote network printing is access for the appropriate ports through firewalls.
The remainder of the configuration for a network-attached printer is identical to that of local printers.
NOTE
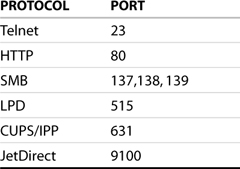
Each printer protocol discussed here requires a distinct TCP/IP port. If the protocol is to be used, allowances have to be made with the server firewall configuration. The Telnet and HTTP protocols are generally used to grant access to the local printer’s configuration settings. The following table lists the more common ports used for communication purposes with printers.
Print Job Lifecycle
A number of events take place between the time a user requests a document to be printed and when it is sent to the physical device for output. In simplified terms, a print request can be broken down into three main stages:
![]() Saving all the print information locally for subsequent processing (spooling)
Saving all the print information locally for subsequent processing (spooling)
![]() Translating the information into a format compatible with the printer (filtering)
Translating the information into a format compatible with the printer (filtering)
![]() Providing the parsed output to the appropriate target device (printing)
Providing the parsed output to the appropriate target device (printing)
All these print job stages are executed without the knowledge of the user requesting the output. Each step, however, must be successful for the operation to produce valid output.
Job Spooling
Each request for a print copy of a document is tagged with a request number. This number allows the system to uniquely track the document data, the destination print queue and filters, as well as job accounting information.
The spooler places a snapshot copy of the requested document in a directory under /var/spool/cups. The document, as well as its various instances in the filtering process, reside in the directory until the job successfully prints. On servers that process a large volume of print jobs, a significant amount of disk space can be consumed by pending print requests.
The spooler is responsible for providing job status information upon request to users, as well as routing the data through the various stages of the printing process.
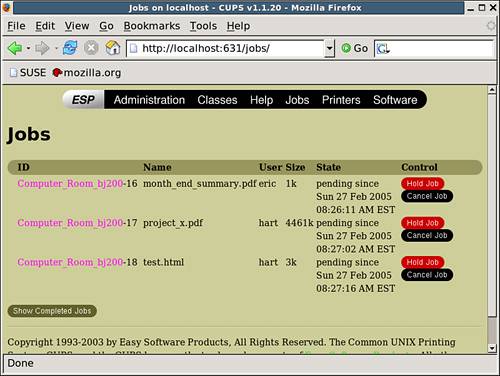
Job status can be verified either through the CUPS web interface (this is shown later in Figure 9.10) on the print server or through the lpstat command using a terminal interface.
Figure 9.10. The CUPS Job management page.
Applying Filters
Printing implementations using the LPR/LPD environment suffer from the lack of cross-platform driver support for various printers. In CUPS, many of the driver issues are solved through abstracting job requirements from the hardware. This is accomplished by a series of conversions that massage the various data formats contained within the print request into a single standard format.
After the data is converted into a standard format, the printing process is reduced to a simple translation from the standard format to one understood by the individual printer.
In CUPS, the standard format is PostScript. The filters used by CUPS are stored in /usr/lib/cups/filter. After a data stream is converted into PostScript, it can then be translated into the required format for the specific printer. Support for specific printers, or printer families, is therefore reduced to providing a single PostScript-aware driver. If the printer is PostScript capable, the file is forwarded to the next step. If it is not PostScript aware, as in the case of the sample Canon BJ200, the file is converted into a raster format compatible with the printer.
Printing the Information
After the data has been massaged into the appropriate format, it is ready to be printed. The last stage in the process involves invoking what is known as a back-end process. This process is responsible for moving the final document version to the printer itself.
In the case of a local printer, the back-end process reports progress, success, or failure of the print job back to the spooler process.
Network print jobs are handled slightly differently than local print jobs. With such jobs, the back-end process is constrained to handing off the document to the spooler service at the remote end. After this is accomplished, the spooler is notified and the local print job is marked as completed. After the hand-off has occurred, however, the local back-end process can no longer report on the status of the spooled job. The remote server also has a method for tracking the now “local” print request. Further tracking at the client end is not possible, but diagnostic information is available on the endpoint server.
Queue Management
CUPS provides for a very robust printing environment. To date, we have examined how to create queues to both local and remote printers. In this section, we concentrate on how these resources can be managed.
Before we delve into managing single queue characteristics, we need to explore some additional functionality available through CUPS.
The CUPS environment allows for additional flexibility when dealing with printers. Built into CUPS is the concept of a printer class. A class within CUPS is a collection of like printers. When a job is submitted to a class of printers, instead of a specific target, the first available printer in that class processes the output. In work areas where a number of similar printers are available, submitting a job to a class prevents small jobs from being queued behind slow printing jobs. As an example, emails could be printed to a class to avoid being stuck behind a large double-sided month-end report.
NOTE
As of the date this book was written, CUPS does not provide any indication of which printer within a class satisfies a print request. It is therefore imperative that like printers be grouped physically close to each other to reduce the amount of time spent going from printer to printer looking for output. This also means that sensitive documents should not sent to a printer class for printing. It is expected that CUPS version 1.2 will support such notifications.
CUPS extends the class construct to what it calls implicit classes. An implicit class is generated when a collection of servers is made to point to the same network printer using the same name. This also assumes that the printer is, in fact, a self-contained network printer, and not a local printer on a vulnerable server. In such environments, the failure of a single print server does not result in the loss of client access to the printer in question. CUPS further extends this concept to actual printer classes. If a job is submitted to a class, any server servicing that class can respond to the request.
An additional feature supported directly by CUPS is the possibility of defining multiple print queues that all point to the same physical printer. In many instances, software such as a web browser can force printout formatting. In some cases, such as with the command line, accessing double-sided print or two-up printing involves remembering a number of switches and parameters for the print command. It is possible to define distinct queues that have embedded in their configuration the desired formatting options. This alleviates the requirement of specifying option definitions in individual print requests.
YaST Queue Configuration
Figure 9.5 showed three items at the end of the Options list that do not have entries in the Current Values column. These options are actually placeholders for additional queue configuration options.
The first option is called Printing Filter Settings. Selecting this option allows you to configure how the output will be formatted, what media your output will be printed on, paper size, orientation, and so on. The options available vary from printer to printer. For a simple label printer, few options are available. High-end laser printers allow for the most section options.
When you are configuring multiple queues to point to a single printer, the Printing Filter Settings option allows you to define the default print options at the queue level. You can then present multiple queues to the users, each with its own characteristics.
The second option on the Edit Configuration window is Restriction Settings. By default, queues created on a system are available to all authenticated users. You can use this option to restrict access to specific users or, alternately, deny queue access to all but specific users.
The last option in Figure 9.5 is State and Banners Settings. With this option, you can control whether the printer is available to accept new printing jobs. In addition, if separation pages are required between printing jobs, you can configure pre- and post-job banner pages. For high-volume printing or in the case of the printing of sensitive information, banners can be used to separate jobs and facilitate their handling by the operations staff.
NOTE
Applications such as web browsers or editors often pass their own default printer configuration parameters to the target queue. These options override the configuration parameters set on the queue. The submitted job should print as expected by the software package even though the orientation and size of the output don’t match the queue specification.
Command-Line Queue Configuration
All the configuration options available through the YaST interface are available from the command line as well. Unlike the YaST interface, the command-line configuration options are split into two different verbs.
The first printer configuration command is lpadmin. This command configures both printers and printer class objects. You can grant access to a specific printer using a single command such as
Athena:~ # lpadmin –p Laserjet –u allow:hart,eric
Athena:~ # lpadmin –p Laserjet –u deny:ted,pol
In this example, Eric and Hart are granted explicit access to the LaserJet printer, while Ted and Pol are explicitly denied the use of this printer.
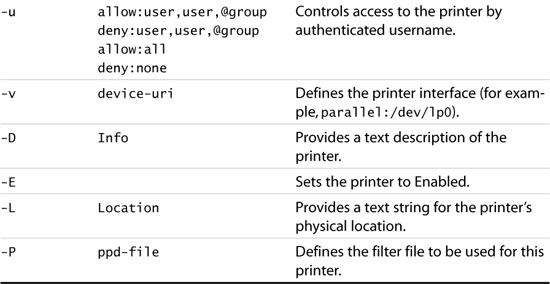
Table 9.2 summarizes the parameters that can be passed to lpadmin:
Table 9.2. lpadmin Parameters

After you configure a printer, you can use the lpoptions command to fine-tune the configuration. In contrast to the lpadmin command, the lpoptions command can also be used by an unprivileged user to save customized queue configuration parameters in a personal configuration file.
You can display configuration options for a particular printer by using the –l option on the command, as the following illustrates:
Athena:~ # lpoptions -d Computer_Room_bj200 -l
PageSize/Page Size: *A4 Letter 11x17 A3 A5 B5 Env10 EnvC5![]() EnvDL EnvISOB5 EnvMonarch Executive Legal
EnvDL EnvISOB5 EnvMonarch Executive Legal
PageRegion/PageRegion: A4 Letter 11x17 A3 A5 B5 Env10 EnvC5![]() EnvDL EnvISOB5 EnvMonarch Executive Legal
EnvDL EnvISOB5 EnvMonarch Executive Legal
Resolution/Resolution: 180x180dpi 180x360dpi 360x180dpi![]() *360x360dpi
*360x360dpi
Athena:~ #
Of course, the more advanced the printer, the larger number of configurable options. As an example, to set the default page size to letter format, you can use the following command:
Athena:~# lpoptions -d Computer_Room_bj200 -o PageSize=Letter
The lpoptions command sets the default queue characteristics for the local user. If the command is executed by the root account, the changes are made system-wide.
Printer Queue Basics
Above and beyond queue configuration verbs are the simple commands used to start, monitor, and stop queues. Though CUPS makes available a number of GUI tools for controlling queues, knowing the command-line versions can often save time and frustrations. This section offers a quick overview of some of the basics.
To submit a file to be printed, you use the lp or lpr commands. Both take a parameter –d to specify the destination queue name if it is other than the default. Additional parameters are available and documented in the man pages. These defaults override the selections defined on the queue. A sample print job could look like this:
Athena:~ # lp -d Laserjet -o landscape x-ray.log
request id is Laserjet-9 (1 file(s))
Athena:~ #
In the event of a printer malfunction, you often need to power-cycle the printer. If you do not do this correctly, or if the printer contains its own print server hardware, jobs could be inadvertently lost. To prevent this loss, it is often desirable to stop the queue from processing further jobs. To do this, you can use the disable command, which is documented in the man pages. The use of the –r option is recommended to provide users with a short text explanation of the reason the printer is unavailable. An example is shown here:
Athena:~ # disable -r "stuck label" Computer_Room_bj200
To check the status of a printer, you can use the lpstat command. If you specify the –t option, all the available status information for the print environment will be printed as well:
Athena:~ # lpstat -t
scheduler is running
system default destination: Computer_Room_bj200
device for Computer_Room_bj200: parallel:/dev/lp0
Computer_Room_bj200 accepting requests since Jan 01 00:00
printer Computer_Room_bj200 disabled since Jan 01 00:00 -
stuck label
printer Laserjet is idle. enabled since Jan 01 00:00
Computer_Room_bj200-4 root 1024 Sun Feb 27 06:14:41 2005
Computer_Room_bj200-5 root 1024 Sun Feb 27 06:15:20 2005
Computer_Room_bj200-6 root 1024 Sun Feb 27 06:15:44 2005
Athena:~ #
To allow printing to resume, you can use the enable command. You need to call the enable command using the fully qualified path to avoid shell confusion with the built-in enable command:
Athena:~ # /usr/bin/enable Computer_Room_bj200
When the preceding command is performed, printing on this device will resume.
NOTE
To avoid confusion between the different enable commands, it is suggested that an alias be created for the printer enable function. This can be done using the following syntax:
Athena:~ # alias penable=/usr/bin/enable
This allows you to use the synonym penable instead of having to specify the complete path to the enable command every time. Further, you can place it in your login shell to make this command available at all times. If you want to make this available to all, you can add the alias definition to /etc/bash.bashrc.
The CUPS Web Interface
We have seen that SLES offers both command-line tools and YaST for managing printers, queues, and jobs. Built into CUPS is the ability to manage the printing environment from a simple web browser. Through this web interface, all aspects of the printing environment can be addressed. Using a standard browser, CUPS can be accessed through http://localhost:631.
By default, the web interface provides read-only access to the classes, queues, and job information on a server. Before administrative tasks can be undertaken, a username/password pair must be created within the CUPS environment. Individuals who do not have any system management rights on the host can be readily made into CUPS administrators. You can do this by using the command-line verb lppasswd, as in the following example:
Athena:/etc/cups # lppasswd -g sys -a hart
Enter password:
Enter password again:
Athena:/etc/cups #
In this example, a username/password pair was created for managing the CUPS environment. This allows the user named Hart to create new printers and classes and manage print jobs, but only from the local server node. This implies that Hart would need to have a local account and X Windows System access on the server. To extend the management capabilities of the CUPS web interface beyond the local machine, you must make a change to the /etc/cups/cupsd.conf configuration files.
The cupsd.conf file uses a syntax similar to that used for the configuration of the Apache2 server. Administrative access is based on the access controls defined for the /admin portion of the CUPS website. In cupsd.conf, the default configuration looks like this:
<Location /admin>
#
AuthType BasicDigest
AuthClass Group
AuthGroupName sys
## Restrict access to local domain
Order Deny,Allow
Deny From All
Allow From 127.0.0.1
#Encryption Required
</Location>
Additional access can be granted to individual workstations or subnets by inserting additional Allow From clauses. Ease of access must be balanced against exposure of the CUPS environment. To add a complete subnet, you can simply add the fourth octect set to a *, as follows:
Allow From 192.168.1.*
When a user accesses CUPS through the web interface, he or she will be presented with a browser window similar to that shown in Figure 9.7.
Figure 9.7. The main page of the CUPS web interface.
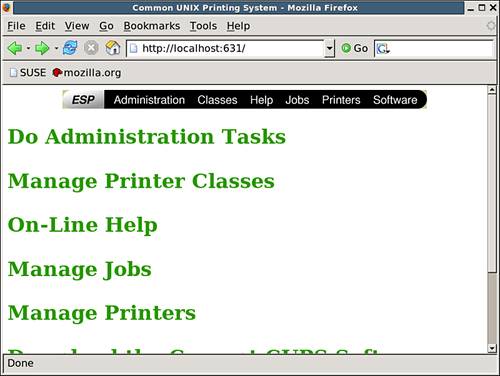
In Figure 9.7, the main menu breaks down the administration tasks into these main sections:
![]() Administration, for authorized users
Administration, for authorized users
![]() Classes
Classes
![]() Jobs
Jobs
![]() Printers
Printers
![]() Help
Help
![]() Software – access the CUPS web site
Software – access the CUPS web site
The Administration menu option presents a window similar to that shown in Figure 9.8. You must choose this menu option if you need to define new printers or printer classes. The Add function is not found on the various other CUPS menus. Again, the administration page is available only to users who can authenticate using credentials established through the lppasswd command.
Figure 9.8. The Administration menu for the CUPS web interface.

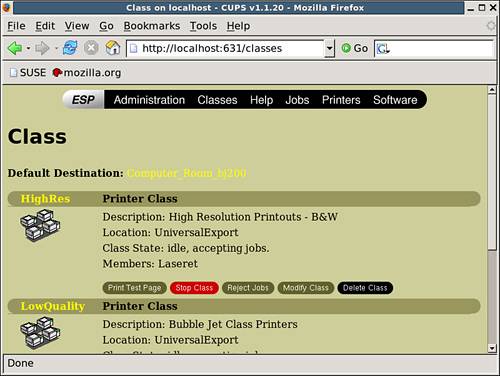
The Class page is shown in Figure 9.9. As with subsequent administration pages, the Delete and Modify options are shown. Access to these selections requires appropriate authentication. Unauthorized users are simply presented with an authorization failure (an HTTP 403 error).
Figure 9.9. The CUPS Class page.
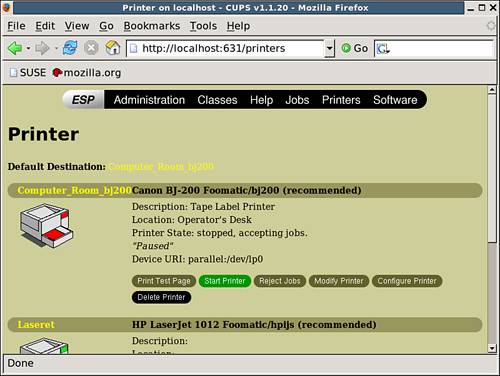
Figures 9.10 and 9.11 complete the series of menu options available under the CUPS web interface. Within the Jobs page, shown in Figure 9.10, you can see information on pending print jobs. Similarly, the Printer page, shown in Figure 9.11, presents configuration information on each printer, status information, as well as a number of management options.
Figure 9.11. The CUPS Printer management page.
The CUPS web interface into printer configuration management is an important step in easing the support of a distributed printing environment. The CUPS environment incorporates its own administration model. This permits the granting of administration rights to individuals outside the authentication scheme of the hosting server. Users who do not possess any privileges on the host server can therefore be granted administration rights directly within CUPS. This adds an additional layer of administrative burden when implementing an account management policy. It does, however, allow for the delegation of queue management to individuals such as helpdesk staff without the requirement of elevated user privileges on the server.
Summary
In this chapter, we examined the different aspects of printing. SLES provides for a number of different methods for creating and maintaining queues.
Using YaST, we created both a local and a network print queue. We used command-line tools to fine-tune characteristics of these queues and submit jobs.
Throughout this chapter, we saw how the CUPS printing environment has made queue management simpler. Additionally, we examined how the CUPS web interface can be used to remotely manage the printing environment without requiring local access to the print server itself.