
Chapter 5. Authentication, Authorization, and Accounting
Chapter 3, “Accessing a Router,” discussed some basic methods of securing access to your router, including using the username command to assign accounts to multiple administrators accessing your router. However, the authentication methods discussed in Chapter 3 do not scale well. If you have 100 routers, you probably do not want the hassle of maintaining all of these accounts on each of these routers.
Authentication, authorization, and accounting (AAA) enables you to centralize this process. Many companies centralize AAA functions by purchasing a security server that contains all of the security polices that define the list of users and what they are allowed to do. When authenticating or authorizing requests, routers forward these requests to the AAA server, which validates the requests. The AAA server then responds with its action, and the router either permits or denies the access or action.
This chapter focuses on using AAA to secure access to your router. It discusses how to use an AAA server to authenticate administrators when they access a router, authorize the commands they can execute, and keep an accounting record of their actions. The last part of this chapter discusses secure copy (SCP), which provides an encrypted and secure method of transferring files to and from a router (versus using TFTP, discussed in Chapter 3, which provides no security). SCP relies on AAA to assist in providing a secure connection.
Note
Many components actually make up AAA (enough to fill a book by itself). However, this chapter focuses only on the AAA components necessary to authenticate users accessing a router, restrict their actions on a router, and log information related to these processes.
AAA Overview
AAA provides a cohesive framework to control who can access a router, what services they can use on a router, and what they can do on a router. The following sections cover the functions of AAA, as well as how to enable it.
• Authentication
• Authorization
• Accounting
The authentication component of AAA is responsible for providing a method to identify (authenticate) users. This can include login access, as well as other types of access, such as PPP network access. With AAA authentication, you define one or more authentication methods that the router should use when authenticating a user. For example, you could specify two authentication methods: use an external security server, and, if this is not available, use the local username database on the router. As you will see later in the chapter, you can use many methods to perform authentication on your router.
When authentication for a user successfully has completed, AAA’s authorization is used to restrict what actions a user can perform or what services a user can access. For example, you might want a network administrator to have privileged EXEC access, but want him to use only the debug command. With AAA authorization, you can enforce this restriction.
AAA’s accounting component is responsible for keeping a record of events of authentication and authorization actions. This can be as simple as keeping track of who logs into a router and any status changes on the router (such as an interface going down or the router being reloaded), or something as complex as keeping track of each command that a user executes on a router. The accounting of AAA keeps a log of these events. One restriction of the accounting component is that it requires an external AAA security server to store the actual accounting records.
Note
AAA is the recommended Cisco solution for implementing access control. Note that other solutions exist, such as those that I discussed in Chapter 3, but AAA is the preferred one.
Enabling AAA
You need to configure many things to implement AAA. This book focuses on only the router configuration (configuring an AAA security server is beyond the scope of this book). To configure AAA, you need to perform the following steps:
Step 1 Enable AAA.
Step 2 Configure the parameters for an external AAA server, if used.
Step 3 Define the method or methods you will use to perform authentication.
Step 4 Optionally, configure authorization to restrict what the user can do on the router.
Step 5 Optionally, configure accounting to keep track of what and when events occur on the router.
By default, AAA is disabled on your Cisco router. To enable it, use the following command:
Router(config)# aaa new-model
As you can see, enabling AAA is a very simple process; however, this is only the first step in configuring AAA on your router.
Security Protocols
If you want to centralize your AAA implementation, you use one or more AAA security servers. Many products are available on the market, including the Cisco Secure Access Control Server (ACS). Centralizing AAA provides these benefits:
• Scalability
• Redundancy through multiple AAA servers
• Flexibility
If you decide to use an AAA server to centralize your AAA security policies, you need to use a security protocol between your router and the AAA server. This protocol is used to exchange AAA messages. In most situations, three security protocols are used:
• Terminal Access Controller Access Control System Plus (TACACS+)
• Remote Authentication Dial-In User Service (RADIUS)
• Kerberos
Of these three, TACACS+ and RADIUS are the more common. The following sections discuss and compare TACACS+ and RADIUS; Kerberos is not discussed in this book.
TACACS+
TACACS+ is a third-generation security protocol, with roots in XTACACS and, before that, TACACS. TACACS+ is a Cisco-proprietary protocol that facilities the use of AAA. Basically, it defines how a router and an external AAA server communicate. TACACS+ supports all three components of AAA. It enables you to modularize the AAA components for security purposes: One or more AAA servers can be used to handle these components. For example, you could have one AAA server handle authentication and another handle authorization for a router using TACACS+.
TACACS+ provides an additional layer of security by authenticating access to the security server, as well as encrypting messages between the router and the server, protecting your AAA transactions from prying eyes.
To use TACACS+, you need a router that supports it (Cisco IOS 10.3 and later) and an AAA server with the TACACS+ daemon software. Even though TACACS+ is Cisco proprietary, Cisco has pushed its acceptance in the network marketplace by placing it in an RFC draft state with IETF. This allows other vendors to implement TACACS+ in their AAA security server solution. Cisco provides two commercial products that support TACACS+ (Cisco Secure ACS for Windows and UNIX), as well as a freeware version of TACACS+ that runs on Linux.
Note
Note that Cisco Secure ACS for UNIX is scheduled to be end-of-life shortly and no longer will be available. If you want to deploy Cisco Secure ACS, I recommend that you purchase the Windows version.
If you will be using TACACS+ on your router, you need to perform the following AAA tasks:
Step 1 Enable AAA with the aaa new-model command (required).
Step 2 Specify the location and authentication/encryption key of the TACACS+ server or servers with the tacacs-server host and tacacs-server key commands, respectively (required).
Step 3 For authentication, specify the use of the external security server using TACACS+ with the aaa authentication command (required).
Step 4 For authorization, specify the use of the external security server using TACACS+ with the aaa authorization command (optional).
Step 5 For accounting, specify the use of the external security server using TACACS+ with the aaa accounting command (optional).
When you have enabled AAA with the aaa new-model command, you are ready to set up TACACS+ so that you can communicate, through TACACS+, with your external security server. You can use two commands to set up this communication link:
Router(config)# tacacs-server host IP_address [single-connection]
[port port_#] [timeout seconds] [key encryption_key]
Router(config)# tacacs-server key encryption_key
Of these two commands, only the first is required. The tacacs-server host command specifies the location of the server. You can specify either an IP address or a host name (that DNS resolves to an IP address or statically resolves with the router’s ip host commands) for the location of the server. The single-connection parameter causes the router to set up a dedicated TCP connection that TACACS+ will use between the router and AAA server. This option should be used to limit the number of TCP connections that the router opens to the AAA server. As long as traffic is being passed between the router and the AAA server, the single connection remains up; however, it is brought down when the connection is idle and must be re-established when new traffic needs to be sent. Note that this option does not provide any real performance advantage, but it slightly decreases the amount of time that it takes to handle multiple successive AAA requests to the server.
The default port number that an AAA server uses for TACACS+ is TCP 49. If you change this on the security server, you also need to reflect that change with the port parameter. Optionally, you can change the timeout for the TACACS+ server communication with the timeout parameter. If this value is reached and you have other TACACS+ servers configured, your router will try using one of the other servers.
Tip
If you specify more than one AAA server for redundancy, the first server configured is used, by default. If this fails, the second server that was configured is used, and so on. Therefore, the order in which you enter the tacacs-server host commands is important.
Also, if you have an inbound ACL restricting traffic on the interface on which the TACACS+ server is located, you need to permit TCP port 49 in the ACL.
If you have more than one TACACS+ server and each server uses a different encryption key, you need to use the tacacs-server host command, along with the encryption key in the key parameter. However, if all your TACACS+ servers use the same encryption key, you can omit this from all your tacacs-server host commands and specify it once with the tacacs-server key command. If you have both specified, the key configured in the tacacs-server host command takes precedence for the specified host over the key configured in the tacacs-server key command.
Note
The encryption key that you specify on the router must match the one found on the AAA server; otherwise, the two devices will not be capable of decrypting each other’s messages.
RADIUS
Like TACACS+, RADIUS is a security protocol used to communicate AAA information between a device and an external AAA security server. Many AAA products support RADIUS: Unlike TACACS+, RADIUS is an open standard, defined primarily in RFCs 2865–2869. The Cisco IOS supports RADIUS as of Cisco IOS 11.1, and Cisco continually enhances the Cisco IOS to add additional RADIUS features and functions.
Unlike TACACS+, RADIUS uses UDP to share information between a device and the security server in a client/server manner. One downside of using UDP is that it requires extra steps to ensure that information that was sent was received by the destination. Cisco networking devices function as a client component, whereas a security server, such as Cisco Secure ACS, functions as a server component. The client is responsible for passing all authentication information to the RADIUS server, and the RADIUS server is responsible for authenticating the user and returning all necessary information to the originating device. RADIUS uses a shared key to protect password information sent between two devices. Basically, the shared key is used to encrypt and decrypt the passwords (such as a user’s password for his account); password information never is sent across the network in clear text. This is different from TACACS+, which encrypts the entire AAA message, including the password information.
RADIUS typically is used in the following situations:
• You have networking devices from multiple vendors and need a single security protocol to communicate with them.
• You need to implement resource accounting, such as keeping track of how long a user was logged in to a networking device or dialed up to the network.
• Some smart card authentication systems support only RADIUS.
• You want to use preauthentication before allowing a user initial access to a device (I discuss this process in Chapter 14, “Authentication Proxy”).
RADIUS has its limitations, such as the use of UDP, the encryption of only password information, and additional limitations:
• It does not support AppleTalk’s Remote Access Protocol (ARAP), the NetBIOS Frame Control Protocol (NBFCP), NetWare’s Asynchronous Services Interface (NASI), and X.25 PAD connections (these are all dialup services).
• RADIUS sometimes cannot be modularized. In other words, your networking device sometimes must use RADIUS for all AAA functions, not just some specific ones.
• It supports only one-way authentication: It does not support two-way authentication, as with PPP’s CHAP authentication between two Cisco routers.
• Unlike TACACS+, RADIUS combines authentication/authorization functions into “authentication,” giving you less flexibility in modularizing your AAA processes.
The steps involved in setting up and using TACACS+ are basically the same as those configured to use RADIUS. The main difference is the specification of RADIUS communication instead of TACACS+ when communicating to an AAA security server. Here are the basic commands for specifying your AAA servers using RADIUS:
Router(config)# radius-server host IP_address
[auth-port port_#] [acct-port port_#] [timeout seconds] [retransmit retries]
[key key_value] [alias {hostname | IP_address}]
Router(config)# radius-server timeout seconds
Router(config)# radius-server retransmit retries
Router(config)# radius-server key key_value
As you can see from these commands, the configuration is not that much more complex than when setting up TACACS+. The radius-server host command specifies the location to the AAA server running RADIUS, including access parameters. You can specify either the IP address of the AAA server or its host name. The auth-port parameter specifies the UDP port that the server is using to listen for RADIUS authentication messages. This defaults to UDP 1645. RADIUS accounting messages use UDP 1646, but you can change this with the optional acct-port parameter.
Tip
Note that you can have more than two RADIUS services running on the same device. If this is the case, at least one of the services must be using different port numbers for authentication and authorization. This sometimes is done for redundancy or separation of AAA policies on the AAA server.
Also, if you have an inbound ACL restricting traffic on the interface where the RADIUS+ server is located, you need to permit UDP ports 1645 (authentication and authorization) and 1646 (accounting) in the ACL.
Note
In RFC 2026, RADIUS also uses UDP ports 1812 and 1813. Therefore, most newer RADIUS server implementations (and some client ones) listen on four UDP ports: 1645, 1646, 1812, and 1813. You need to be aware of this on intermediate routers that have ACL filters, as well as perimeter routers that have internal inbound filters. Be sure to allow the appropriate ports so that RADIUS traffic can travel between the clients and servers.
The default timeout for a RADIUS server connection is 5 seconds; this can be overridden with the timeout parameter (a specific AAA server) or globally with the radius-server timeout command. Typically, this does not need to be changed unless the traffic between the router and the AAA server must travel many hops and has packet manipulations performed on it, such as encryption or address translation.
By default, the router tries to contact the AAA server using RADIUS three times before giving up and trying another method. This can be changed with the retransmit parameter for a specific AAA server or globally with the radius-server retransmit command.
As with TACACS+, you can specify the encryption key (for passwords only) either globally or per server. If you are specifying the key globally, use the radius-server key command. To override the global setting for a specific server, use the optional key parameter in the radius-server host command.
You also can specify an alias or aliases for a RADIUS server—other names or IP addresses configured on it by using the alias parameter.
Note
You actually can use many more commands to set up RADIUS. Some of these are used when connecting to a server running a proprietary implementation of RADIUS; most are used for dialup functions. Because this book covers only basic AAA functions, such as login access control and command restriction, I do not go into the details of these additional commands.
Server Groupings
One of the limitations of using the previously mentioned TACACS+ and RADIUS commands is that the first server that you enter becomes the primary, and the rest are backups. In some situations, you want to divide your AAA servers into groups, with one group handling authentication and authorization functions, and another handling accounting. This can be accomplished through one of two methods:
• Set up your primary AAA server to redirect AAA requests to the appropriate AAA server.
• On your router, use server groupings to direct AAA messages to the correct group of servers.
This section focuses on the latter method.
Basically, a server grouping is a list of the AAA servers’ host names or IP addresses. You need to configure two things for grouping servers together:
• Your tacacs-server host and radius-server host commands
• Your server-grouping commands
To create a grouping of servers (after configuring your tacacs-server host and radius-server host commands), use the following configuration syntax:
Router(config)# aaa group server radius | tacacs+ group_name
Router(config-sg)# server IP_address | hostname
[auth-port port_#] [acct-port port_#]
The aaa group server command specifies the group of servers. Note that you cannot mix the security protocols within a group: The group contains either TACACS+ or RADIUS servers. Each server grouping must be assigned a unique name, which then is referenced in your AAA authentication, authorization, and accounting configuration. Executing the aaa group server command takes you into a subconfiguration mode, in which you use the server command to list the servers in the group. For your RADIUS configuration, if one AAA server is running multiple instances of RADIUS, with different port numbers, you need to differentiate the services by specifying the auth-port and acct-port parameters with the appropriate port numbers.
Troubleshooting TACACS+ and RADIUS
You can use a handful of commands to troubleshoot TACACS+ and RADIUS AAA problems. The following two subsections cover these commands.
Troubleshooting TACACS+
When troubleshooting TACACS+ connectivity problems, you use three commands:
• show tacacs
• debug tacacs
• debug tacacs events
The show tacacs command displays a summary status of the connections that it has to configured TACACS+ servers, as shown in Example 5-1.
Example 5-1 Using the show tacacs Command
Router# show tacacs
Tacacs+ Server : 10.0.0.10/49
Socket opens: 3
Socket closes: 3
Socket aborts: 0
Socket errors: 0
Socket Timeouts: 0
Failed Connect Attempts: 0
Total Packets Sent: 42
Total Packets Recv: 41
Expected Replies: 0
No current connection
For more detailed troubleshooting, use the debug tacacs and debug tacacs events commands. The debug tacacs command displays information related to TACACS+ operations. The main difference between this command and the debug tacacs events command is that the latter displays more detailed information, including information about the TACACS+ processes running on the router.
Caution
The debug tacacs events command is very CPU intensive. Take care to use it when the CPU utilization is low and during times of inactivity.
Example 5-2 demonstrates the debug tacacs command.
Example 5-2 Using the debug tacacs Command
Router# debug tacacs
15:32:22: TAC+: Opening TCP/IP connection to 10.0.0.10 using (1)
source 10.0.0.1
15:32:22: TAC+: Sending TCP/IP packet number 417383154-1 to (2)
10.0.0.10 (AUTHEN/START)
15:32:22: TAC+: Receiving TCP/IP packet number 417383154-2
from 10.0.0.10
15:32:22: TAC+ (417383154): received authen response (3)
status = GETUSER
15:32:24: TAC+: send AUTHEN/CONT packet
15:32:24: TAC+: Sending TCP/IP packet number 417383154-3
to 10.0.0.10 (AUTHEN/CONT)
15:32:24: TAC+: Receiving TCP/IP packet number 417383154-4
from 10.0.0.10
15:32:24: TAC+ (417383154): received authen response (4)
status = GETPASS
15:32:25: TAC+: send AUTHEN/CONT packet
15:32:25: TAC+: Sending TCP/IP packet number 417383154-5
to 10.0.0.10 (AUTHEN/CONT)
15:32:25: TAC+: Receiving TCP/IP packet number 417383154-6
from 10.0.0.10
15:32:25: TAC+ (417383154): received authen response (5)
status = FAIL
15:32:27: TAC+: Closing TCP/IP connection to 10.0.0.10 (6)
Here is an explanation of the output in Example 5-2. The numbers on the right side of Example 5-2 correspond to the numbers in the following list:
1. In this statement, the router opens a TACACS+ connection to the AAA server.
2. In the next two statements, the router sends and receives an authentication START message, telling the AAA server that more authentication information will be sent.
3. The AAA server responds and requests a username, which the router sends to the AAA server.
4. Next, the AAA server requests the user’s password, which the router sends to the AAA server.
5. In this instance, the user entered the wrong username/password combination, so the AAA server responds with a FAIL message.
6. Notice here that the router closes the TACACS+ connection, indicating that no more information needs to be transmitted.
Troubleshooting RADIUS
You can use two commands to troubleshoot RADIUS problems: show radius statistics and debug radius. The first command displays basic statistics about the packets sent and received for accounting and authentication, as displayed in Example 5-3.
Example 5-3 Using the show radius statistics Command
Router# show radius statistics
Auth. Acct. Both
Maximum inQ length: NA NA 1
Maximum waitQ length: NA NA 1
Maximum doneQ length: NA NA 1
Total responses seen: 5 0 5
Packets with responses: 5 0 5
Packets without responses: 0 0 0
Average response delay(ms): 1880 0 1880
Maximum response delay(ms): 6540 0 6540
Number of Radius timeouts: 0 0 0
Duplicate ID detects: 0 0 0
You can see that there are three columns of statistics. Remember that RADIUS combines authentication and authorization functions. In this example, you can see the total number of responses, as well as round-trip delays and timeouts.
For more detailed troubleshooting, use the debug radius [brief] command. The brief parameter creates similar output as the debug tacacs command; omitting this parameter creates output similar to that of the debug tacacs events command.
Server Protocol Example Configuration
Now you will take a look at how to set up the security protocols for AAA. In the example network in Figure 5-1, the TACACS+ servers handle authentication and authorization functions, and the RADIUS servers handle all accounting functions.
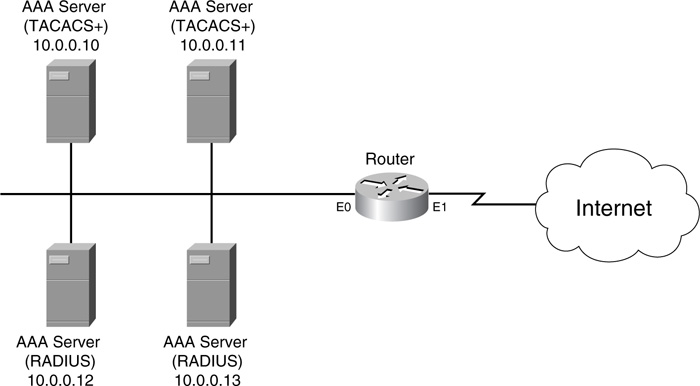
This example focuses only on enabling AAA, defining the AAA servers and setting up the server groupings. The later sections “Authentication,” “Authorization,” and “Accounting” discuss how to associate the server groups with the different AAA processes.
Example 5-4 shows the configuration for Figure 5-1.
Example 5-4 Setting up AAA Security Server Connectivity
Router(config)# aaa new-model
Router(config)# tacacs-server host 10.0.0.10 single-connection
key secret10
Router(config)# tacacs-server host 10.0.0.11 single-connection
key secret11
Router(config)# radius-server host 10.0.0.12 key secret12
Router(config)# radius-server host 10.0.0.13 key secret13
Router(config)# aaa group server tacacs aaatacgroup
Router(config-sg)# server 10.0.0.10
Router(config-sg)# server 10.0.0.11
Router(config-sg)# exit
Router(config)# aaa group server radius aaaradgroup
Router(config-sg)# server 10.0.0.12
Router(config-sg)# server 10.0.0.13
In this example, the aaa new-model command, listed first, enables AAA. The tacacs-server host and radius-server host commands specify the AAA server’s location and the encryption key used for communications. With the TACACS+ server configuration, the single TCP connection option is enabled. At the bottom of the configuration, two server groupings are created. In the TACACS+ server group aaatacgroup, 10.0.0.10 is the primary server and 10.0.0.11 is the backup. In the RADIUS server group aaaradgroup, 10.0.0.12 is the primary server and 10.0.0.13 is the backup. As you can see from this example, enabling AAA and setting up your security server connections are straightforward processes.
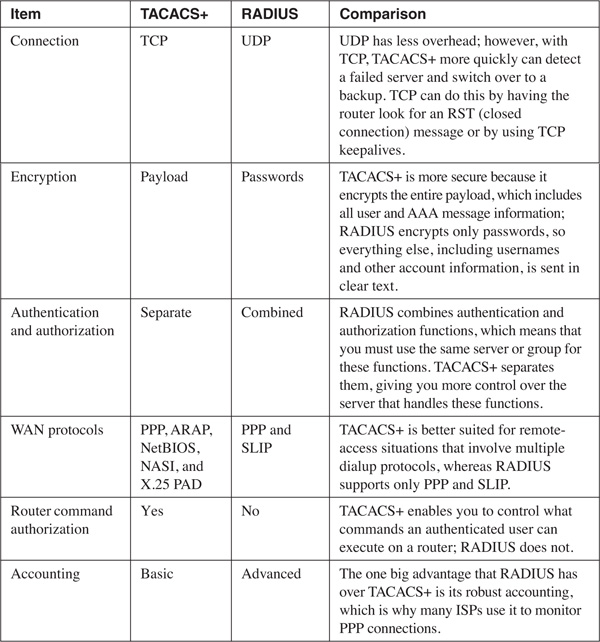
Comparison of TACACS+ and RADIUS
Now that you have a basic understanding of TACACS+ and RADIUS, as well as their configuration, take a closer look at them by comparing the two security protocols shown in Table 5-1.
Authentication
This section covers the setup of authentication using one of the supported methods. A router can authenticate two basic modes of access:
• Character mode
• Packet mode
With character mode access, a user gains EXEC access to the router. This can be accomplished using one of the four lines on the router: console, auxiliary, TTY, or VTY. In packet-mode access, the user establishes a data-link layer connection by using a remote-access protocol, such as PPP, SLIP, ARAP, NASI, NetBIOS, or X.25 PAD. Because this book focuses on using a router as a firewall solution, not as a remote-access solution, this section focuses only on securing character-mode access.
Methods of Authentication
One of the first things you need to determine is how you will authenticate the different types of character-mode access. This is accomplished by using a method list, which is a sequential list of one or more authentication methods. An authentication method defines how the character mode access will be authenticated. The router processes the entries in the list in the order that you enter them. When the router successfully can use a method in the list, the other remaining methods are ignored.
For example, assume that you define two methods in your list in the following order:
1. TACACS+ server group aaatacgroup
2. Local authentication database built with username commands
With this list, the router first attempts to use the AAA servers in the TACACS+ aaatacgroup group. If the router cannot contact any of these servers, it then uses the username commands configured locally. If no username commands exist on the router, the authentication fails. As you can see from this example, you can specify multiple types of authentication in your method list, providing redundancy.
With method lists, the router attempts to use the first entry in the list. If this is not successful, it proceeds to the second entry. It is important to point out here that “unsuccessful” is not a failed authentication. In other words, if you configured AAA servers for authentication, but the servers were not reachable (do not respond back), this is unsuccessful. However, if your router can contact the servers and send the authentication information, but the AAA server denies the authentication access request, this is considered a successful authentication request (even though the user is denied access). Likewise, if you include in your method list that the router should use a local means of verifying authentication, but these commands (such as username commands, or the enable secret or line password commands) do not exist on the router, then when the router tries to use these methods, it considers them unsuccessful and proceeds to the next method in the list.
Note
As with ACLs, if the router attempts to use all of the methods in the list but is unsuccessful, the router automatically denies the authentication request.
Now take a look at Figure 5-2, another example that clarifies the use of method lists.
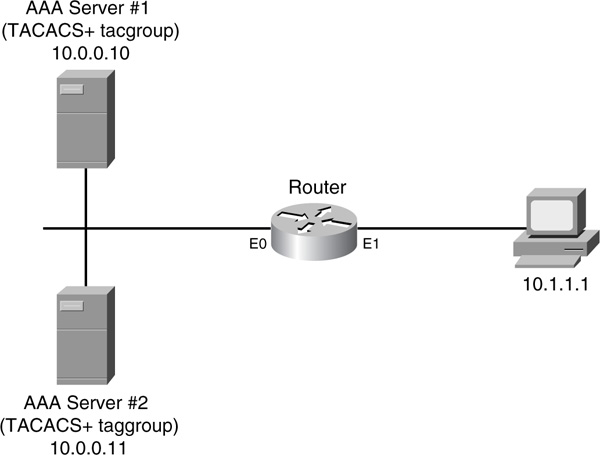
In this example, 10.1.1.1 is trying to gain EXEC access to the router. Here is the method list defined to perform authentication for EXEC access:
1. TACACS+ server group tacgroup.
2. Local authentication database built with the username richard secret quizware command.
In the first method, there are two AAA servers in the TACACS+ group tacgroup: 10.0.0.10 and 10.0.0.11. The second method defines one local username command for an account called richard.
When 10.1.1.1 tries to gain EXEC access, based on the methods configured on the router, the Cisco IOS first tries to contact AAA server 1 (10.0.0.10) to perform authentication. If this server is reachable, neither the other AAA server, nor the other method in this list, is used. Instead, 10.1.1.1 must put in a correct username/password combination that is found on the AAA server. If the user does not, the user fails authentication and is denied access to the router.
Assume that AAA server 1 has failed, though. In this situation, when 10.1.1.1 tries to access EXEC mode on the router, the Cisco IOS still uses the tacgroup method first. It attempts to contact the first AAA server; because this server is not reachable, it then attempts to contact the second server. If the second server is also not reachable, only then is the second method in the list used. In this example, because one username command is defined, the 10.1.1.1 user must put in this correct username/password combination to gain access to the router’s EXEC mode. If I had forgotten to configure any username commands, and the Cisco IOS was attempting to use the second method, the Cisco IOS would realize that because no username commands were configured, it should go to the third method in the list. Because there is no third method defined in this example, the user automatically is denied access.
Note
Basically three types of statuses are shown in the previous example:
• Success—The method was available, and the user was authenticated.
• Fail—The method was available, but the user was not able to authenticate.
• Error—One of two things occurred:
— The first AAA server in the group of the specified method was not reachable, so the next server in the group was used.
— The method specified either does not exist, or, with an AAA server group, all of the servers are not reachable.
Authentication Configuration
Now that you have a basic understanding of method lists, take a look at the command used to configure AAA authentication: aaa authentication. The following sections expand on the use of this command.
User EXEC Authentication
Two types of authentication are discussed in this chapter for AAA: gaining access to a user and privileged EXEC shell, commonly referred to as login authentication and enable authentication, respectively. This section and the next section cover these two types of authentication.
To secure user EXEC shell access, you need to use at least the first two commands listed:
Router(config)# aaa new-model
Router(config)# aaa authentication login {default | list_name}
method1 [method2...]
Router(config)# line [aux | console | tty | vty] start_line_# [end_line_#]
Router(config-line)# login authentication {default | list_name}
Router(config-line)# timeout login response seconds
As you already know, the aaa new-model command enables AAA. You must execute this command before you can configure any other AAA commands on the router. The aaa authentication login command is used to secure EXEC access to the router.
Following the login parameter is the name of the authentication reference. The Cisco IOS uses this parameter so that the appropriate aaa authentication login command is used for the type of access that a person is using to gain access to a line (an EXEC shell). The default parameter specifies that this default authentication method command should be used if a line does not specify which aaa authentication login command to use. You can create specific authentication methods by entering aaa authentication login, followed by a unique name to the authentication method, as in telnet-access. You then go into the appropriate line or lines, as shown in the bottom two commands in the previous syntax. Next, you specify the list name AAA authentication method that should be used with the login authentication command, followed by the list name found in the aaa authentication login command, as in telnet-access. Note that, on all lines, the default list is default, so the Cisco IOS uses the aaa authentication login default command’s method list to verify authentication.
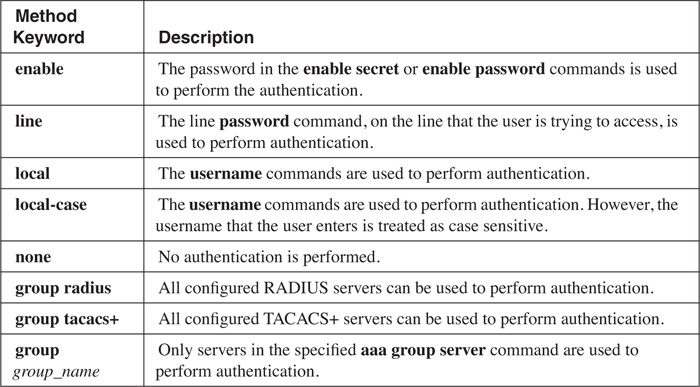
The last, and most important, part of the aaa authentication login command is the list of methods. Remember from the previous section that the method list defines how authentication should be done. You can list up to four methods. A list of valid methods is found in Table 5-2. These methods are processed in the order that you specify. Remember that if a method produces an error result, the next method in the list is used.
Caution
I highly recommend that you not use the none method for authentication, even if you list multiple methods and this is the last one, creating a back door into the router. Always perform some type of authentication, even if it is something as simple as using the enable or line passwords. Some hackers try to exploit a DoS attack against the router and AAA servers if you are using AAA servers as a method, hoping that your second method defined on the router is none. This would allow the hacker to sneak into your router by preventing the router and AAA servers from communicating with each other.
The timeout line command specifies the number of seconds that the Cisco IOS waits for login information before timing out the authentication. The default is 30 seconds, but this can range from 1 to 300 seconds.
Privileged EXEC Authentication
To secure privilege EXEC access, you need to use the following command:
Router(config)# aaa authentication enable default
method1 [method2...]
Unlike the aaa authentication login command, the aaa authentication enable command does not allow you to specify authentication lists—you can use only the keyword default. This makes sense because there is only one way to access privileged EXEC mode: Execute the enable command from user EXEC mode. With user EXEC mode access, a user can gain access in many ways, such as with the console, auxiliary, VTY, and TTY lines. With the aaa authentication login command, you can set up different authentication methods for these. However, this is not necessary for privileged EXEC access because there is only one way to access it.
You can list four AAA methods in your method list for securing privileged EXEC access. These are the same ones shown previously in Table 5-2; however, the local and local-case methods are not supported with privileged EXEC authentication.
Username and Password Prompts
By default, when the Cisco IOS prompts you for a username or password when you log in, you see the following prompts:
Username:
Password:
You can override these default prompts with the following two commands:
Router(config)# aaa authentication username-prompt prompt_string
Router(config)# aaa authentication password-prompt prompt_string
The aaa authentication username-prompt command overrides the username prompt and enables you to specify your own prompt for the username. The aaa authentication password-prompt command enables you to change the password prompt presented to the user. Remember to add the : to the end of the prompt; it is not included automatically.
Tip
Sometimes I set the username prompt to Password: and leave the password prompt as the same thing. At first, this looks confusing because, even though the first prompt states “password,” it actually wants the username. I do this to confuse hackers and users trying to gain unauthorized access. Just tell authorized users that no matter what they see in the prompts, they need to enter the username for the first prompt and the password for the second prompt.
Note
TACACS+ and RADIUS servers have the capability to override the username and password prompts. If you have configured the aaa authentication username-prompt and password-prompt commands, and have also configured these prompts on your AAA servers, the Cisco IOS uses the prompts from the AAA servers.
Login Banners
If you have enabled AAA, you can override the router’s default login banner with the following command:
Router(config)# aaa authentication banner stop_character
message stop_character
This command works the same as the banner command discussed in Chapter 3. The actual message can be up to 2996 characters in length. When you enter the aaa authentication banner command, the router displays this banner instead of the banner created with the banner command.
Optionally, you can display a message whenever a user enters an invalid username/password combination by configuring the following command:
Router(config)# aaa authentication fail-message stop_character
message stop_character
With this command, whenever the user enters an invalid username/password combination, the Cisco IOS displays the configured message. The actual message can be up to 2996 characters in length.
Login Attempts
By default, the Cisco IOS prompts you for username/password information up to three times so that you can enter the correct information. After three times, the Cisco IOS disconnects you and forces you to attempt to log in again. With AAA, you can change the number of login attempts before the router disconnects you with the following command (this is new in Cisco IOS 12.2T):
Router(config)# aaa authentication attempts login #_of_attempts
The number of login attempts can range from 1 to 25.
Tip
For a perimeter router, I recommend that you set this value to 1. This makes it more cumbersome for someone to execute an access attack against it, especially a brute-force password attack.
Authentication Troubleshooting
You use one basic command for troubleshooting AAA authentication problems: debug aaa authentication. Example 5-5 shows output from the debug aaa authentication command.
Example 5-5 Using the debug aaa authentication Command
Router# debug aaa authentication
13:21:20: AAA/AUTHEN: create_user user='' ruser='' port='tty6' (1)
rem_addr='10.0.0.32' authen_type=1 service=1 priv=1
13:21:20: AAA/AUTHEN/START (0): port='tty6' list='' (2)
action=LOGIN service=LOGIN
13:21:20: AAA/AUTHEN/START (0): using "default" list (3)
13:21:20: AAA/AUTHEN/START (70215483): Method=TACACS+
13:21:20: TAC+ (70215483): received authen response
status = GETUSER
13:21:20: AAA/AUTHEN (70215483): status = GETUSER
13:21:23: AAA/AUTHEN/CONT (70215483): continue_login
13:21:23: AAA/AUTHEN (70215483): status = GETUSER
13:21:23: AAA/AUTHEN (70215483): Method=TACACS+
13:21:23: TAC+: send AUTHEN/CONT packet
13:21:23: TAC+ (70215483): received authen response
status = GETPASS
13:21:23: AAA/AUTHEN (70215483): status = GETPASS
13:21:27: AAA/AUTHEN/CONT (70215483): continue_login
13:21:27: AAA/AUTHEN (70215483): status = GETPASS
13:21:27: AAA/AUTHEN (70215483): Method=TACACS+
13:21:27: TAC+: send AUTHEN/CONT packet
13:21:27: TAC+ (70215483): received authen response
status = PASS
13:21:27: AAA/AUTHEN (70215483): status = PASS (4)
The following is an explanation of Example 5-5. The numbers on the right side of Example 5-5 correspond to the numbers in the following list:
1. A remote user from 10.0.0.32 attempts to log in to the router.
2. The router checks to see if login authentication services are enabled; they are.
3. The router sees that the default list method is used, and the corresponding method is TACACS+ (the line below this).
4. After authentication takes place, the TACACS+ server responds with a successful authentication message (status = PASS).
Authentication Example
Now that you have a basic understanding of how to configure authentication for AAA, take a look at an authentication example in Example 5-6.
Example 5-6 AAA Authentication Example
Router(config)# aaa new-model (1)
Router(config)# tacacs-server host 10.0.0.10 single-connection (2)
key secret10
Router(config)# tacacs-server host 10.0.0.11 single-connection
key secret11
Router(config)# aaa group server tacacs aaatacgroup (3)
Router(config-sg)# server 10.0.0.10
Router(config-sg)# server 10.0.0.11
Router(config)# aaa authentication login console (4)
group aaatacgroup local
Router(config)# username admin1 secret cisco1
Router(config)# username admin2 secret cisco2
Router(config)# aaa authentication login default (5)
group aaatacgroup
Router(config)# aaa authentication enable default (6)
group aaatacgroup enable
Router(config)# enable secret OutKeep
Router(config)# aaa authentication username-prompt "Password: " (7)
Router(config)# aaa authentication password-prompt "Password: "
Router(config)# aaa authentication attempts login 1 (8)
Router(config)# line console 0
Router(config-line)# login authentication console (9)
The following is an explanation of Example 5-6. The numbers on the right side of Example 5-6 correspond to the numbers in the following list:
1. This command enables AAA.
2. These two commands specify the two TACACS+ servers used for authentication.
3. These three commands are not really necessary in this example, but I like to set up groupings for future use.
4. This command sets up a user EXEC authentication method called console, and it has two methods in its method list: Use the TACACS+ servers in the aaatacgroup (group aaatacgroup) and username commands (local). This statement is referenced in number 9, which authenticates console access. Note that I used the word console as a descriptive term; you can use anything that you want to describe this authentication method.
5. This command is the default authentication method for user EXEC access. It specifies that only the TACACS+ servers are used for authentication. If these servers are not available, the user is not allowed access to the router. This command can be used to authenticate VTY access because there is no reference to the type of authentication list that should be used on the VTY lines.
6. This command authenticates access to privileged EXEC mode. It has two methods for authentication: the TACACS+ server grouping and the enable command, listed below this statement.
7. These two statements are used to confuse or trick people performing access attacks: It changes the username prompt to match that of the password prompt.
8. This command restricts the number of access attempts to one for a session. If the user cannot successfully authenticate on the first try, the session is terminated, and the user must re-establish the session to try again.
9. This command references the aaa authentication login console command, which specifies how authentication should be done on the console line.
Authorization
Authorization occurs after authentication takes place. After a user successfully has authenticated, you can restrict what services and commands the user has access to. This section discusses how authorization works and how to configure it.
Note that authorization is optional. You need to configure authorization only if you want to have more control over what people do on your router after they have authenticated.
Methods of Authorization
As with authentication, AAA’s authorization can be used to restrict access to certain things. With authentication, I focus only on two: user and privileged EXEC access. Authorization is used to determine what resources the user has access to on the router. With AAA’s authorization, the Cisco IOS can be used to restrict the following services:
• Authentication proxy—Authentication proxy is used to open temporary holes in your router/firewall after a user successfully has authenticated. How much access the user is given is defined on the security server. This process is discussed in Chapter 14.
• Commands—You can restrict what commands a user can execute on the router. The “Authorization Configuration” section of this chapter focuses on this concept.
• EXEC—You can restrict EXEC access to the router. At first, this sounds confusing, but this method is used in dialup situations in which the user was authenticated through PPP’s PAP or CHAP. You can use the EXEC method to restrict the user’s access to an EXEC prompt.
• Network—After a user has authenticated and gained EXEC access to the router, he can establish PPP or SLIP connections on dialup links, if these exist on the router. With authorization, you can restrict the use of these network connections. Because this primarily occurs on a dialup server, and we are using a router as a perimeter router/firewall, I do not cover the configuration of this method.
• Reverse Telnet—After authentication, you can restrict a user from performing reverse Telnets. These are typically done on routers set up as terminal servers, with the router emulating console connections to various devices. Again, because this is not typically done on a perimeter router/firewall, I do not cover the configuration of this method.
For a specific authorization command, you can list up to four methods in your method list that define how authorization should occur. For example, your first method could be to use a RADIUS server, and the second method could be to use the local username database. As with authentication, many authorization methods are available to you, as discussed next in the configuration section.
Authorization Configuration
To set up authorization, you first need to perform the following steps:
Step 1 Enable AAA with the aaa new-model command.
Step 2 If you are using an AAA security server, set up its connection with the tacacs-server and radius-server commands.
Step 3 Configure your authentication methods with the aaa authentication command(s).
When you have completed these three steps, you are ready to set up AAA authorization.
Note
Actually, before you set up command authorization, you need to set up your commands and their restrictions. I briefly discussed this in Chapter 3 for using the privilege command. However, in most instances, you will be doing this on your AAA server. The configuration of command authorization on an AAA server is beyond the scope of this book.
Executing Commands
If you are concerned about what commands are executed on your perimeter router/firewall, you can use AAA authorization to restrict what commands the user can execute. To set up command authorization, use the following configuration syntax:
Router(config)# aaa authorization commands level_#
{default | list_name} [method1 [method2...]]
Router(config)# line [aux | console | tty | vty] start_line_# [end_line_#]
Router(config-line)# authorization commands level_#
{default | list_name}
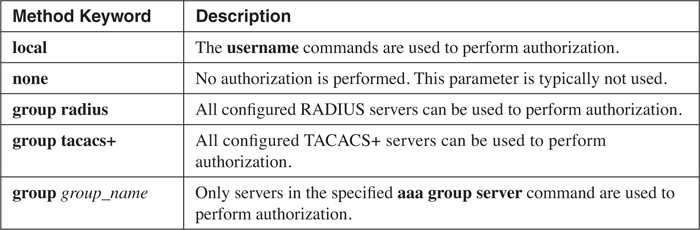
With the aaa authorization command, you can choose from many authorization methods. However, this chapter focuses on only one: commands that you can execute (commands). With the commands parameter, you must specify which command level (0–15) you want to set up authorization for. Following this, you specify what scope the authorization command has. With command authorization, you specify default or an authorization list name. A list name typically is given if you are setting up other types of authorization, such as a default one, and one for users accessing a specific line on the router. Following the default parameter is the list of authorization methods (how authorization should be performed). Table 5-3 lists the authorization parameters for your method list.
If you want to control on a per-line basis what does or does not get authorized, you can use the authorization command in line subconfiguration mode. For example, you might want to enforce authorization on commands for all remote users (VTY lines), but disable this function for an administrator accessing the router through the console port.
Executing Configuration Commands
When using the aaa authorization commands command, AAA is used to check whether a user can execute any command on a router in user and privileged EXEC mode, as well as configuration mode. This might cause problems in some cases, especially with global configuration mode, in which the same command appears at both global configuration mode and privileged EXEC mode. You can disable authorization for all configuration mode commands with the following command:
Router(config)# no aaa authorization config-commands
Authorization Troubleshooting
You use one basic command for troubleshooting AAA authorization problems: debug aaa authorization. Example 5-7 displays a sample of this command.
Example 5-7 Using the debug aaa authorization Command
Router# debug aaa authorization
2:23:21: AAA/AUTHOR (0): user='admin1' (1)
2:23:21: AAA/AUTHOR (0): send AV service=shell (2)
2:23:21: AAA/AUTHOR (0): send AV cmd* (3)
2:23:21: AAA/AUTHOR (342885561): Method=TACACS+ (4)
2:23:21: AAA/AUTHOR/TAC+ (342885561): user=admin1 (5)
2:23:21: AAA/AUTHOR/TAC+ (342885561): send AV service=shell
2:23:21: AAA/AUTHOR/TAC+ (342885561): send AV cmd*
2:23:21: AAA/AUTHOR (342885561): Post authorization status = FAIL (6)
The following is an explanation of Example 5-7. The numbers on the right side of Example 5-7 correspond to the numbers in the following list:
1. The user, admin1, is attempting to do something that requires authorization.
2. In this example, the user is attempting to gain an EXEC shell.
3. The cmd parameter specifies a command that the user is trying to execute. If it lists *, this refers to plain EXEC access.
4. The method used to authorize this access is TACACS+.
5. The router sends the necessary information through TACACS+ to the security server.
6. The security server verifies the authorization, determines that the user is not authorized to perform this function, and sends back a FAIL message.
Authorization Example
Now take a look at an example that uses authorization. I build upon Example 5-6 in the “Authentication Example” section. Here, I just list the authorization commands. In this example, I want to set up authorization for all privileged EXEC and configuration mode commands. Example 5-8 shows the configuration.
Example 5-8 Adding Authorization to the Example AAA Configuration
Router(config)# aaa authorization commands 15 default
group aaatacgroup
Router(config)# aaa authorization commands 15 conauthor
group aaatacgroup none
Router(config)# line console 0
Router(config-line)# authorization commands 15 conauthor
In this example, the first aaa authorization command defines a default method of authorization for all privileged EXEC and configuration mode commands; the AAA server group called aaatacgroup performs the authorization. If all the servers in the group are not reachable, the administrator’s command on the router is denied. To allow an administrator to execute commands in an emergency situation, the second aaa authorization command specifies that the aaatacgroup server group should be used if the servers are reachable; if they are not reachable, no authorization is to be performed. This second command is assigned an authorization name of conauthor. Notice that there is a restriction with this command: It is activated only on the console interface. Therefore, if the AAA servers are not reachable, you still can manage the perimeter router through its console port.
Caution
When using authorization to determine whether a user can or cannot execute commands, you should be aware of this issue: Before the user is allowed to execute a command with AAA authorization and an external security server, the Cisco IOS sends the authorization request to the security server, the security server validates the authorization request, and the security server sends back a response. As an administrator trying to execute a command while this is going on, you will notice a slight delay during this process for each command that you execute.
Also, you will want to make sure that, in a worst-case situation, you can execute any command from the console port. Therefore, if you are using an external AAA server for authorization, make sure that you have a second method, such as local, listed (and possibly a third, none). If you are using none as a method and want extra protection, you might want to enable accounting to keep track of the commands that your administrators execute on your perimeter router.
Tip
In the previous example, I recommend configuring first the console authorization and then the default method, to prevent lockouts.
Accounting
After you have configured authentication or authorization, you are ready to configure accounting. AAA accounting is used to keep track of AAA transactions and events that occur on your router, such as when a user logs in or out of the router, or what commands the user has executed. This can be used as an audit trail to enhance your security as a change-management system (keeping track of the changes that people are making on your router).
Note
Note that accounting is optional. You need to configure accounting only if you want to keep a log file of AAA transactions and events on your router.
Methods of Accounting
As with authentication and authorization, you need to specify two things when setting up AAA accounting: what you want to capture accounting information on and the method lists that define where to send it.
Here is a list of the types of things that you can create accounting records for:
• Commands—This accounting method provides information about what commands a user executed, including user and privileged EXEC and configuration mode commands.
• Connection—This accounting method provides information about connections made from the router, such as an administrator Telnetting from the router to another device. Connections include Telnet, LAT, TN32760, PAD, and rlogin. Accounting information captured includes the user’s username, the date and time that each command was executed, and the command executed.
• EXEC—This accounting method provides information about EXEC sessions started on the router. This information includes the user’s name, the date with start and stop times, and the IP address of the user’s device.
• Network—This accounting method provides information about dialup connections, such as PPP and SLIP (this is not covered in this book). The information captured includes the number of packets and bytes for the network connection.
• Resource—This accounting method is used for dialup connections and displays resource information about the phone calls (this is not covered in this book).
• System—This accounting method provides information about system-level events, such as an interface going up or down, the router being reloaded, or accounting being enabled or disabled.
Cisco’s implementation of RADIUS does not support command accounting; you must use TACACS+ for this function.
The previous list displays the kind of information that you can capture for accounting. What the router does with this information is defined by your method lists. With accounting, there are only two method lists:
• RADIUS
• TACACS+
Unfortunately, this means that you cannot log accounting information locally on the router or to a syslog server. Instead, the Cisco IOS uses an AAA security server to log the accounting information.
Accounting Configuration
Now take a look at setting up AAA accounting on your router. As mentioned in the last section, accounting requires the use of an external security server using either the TACACS+ or RADIUS communications security protocols. Therefore, you need to do the following things first:
Step 1 Enable AAA with the aaa new-model command.
Step 2 Set up your security server connection with the tacacs-server and radius-server commands.
Step 3 Set up authentication with the aaa authentication command.
Step 4 Set up authorization with the aaa authorization command (optional).
Enabling Accounting
After you have done these things, you are ready to set up accounting. Here is the command syntax to configure accounting:
Router(config)# aaa accounting {system | network | exec |
connection | commands level_#} {default | list_name}
{start-stop | stop-only | none} [method1 [method2...]]
Router(config)# line [aux | console | tty | vty] line_# [ending_line_#]
Router(config-line)# accounting {arap | commands level_# |
connection | exec} {default | list_name}
Router(config)# interface type [slot_#/]port_#
Router(config-if)# ppp accounting {default | list_name}
Enabling accounting requires the use of the aaa accounting command. Table 5-4 lists the six services that you can enable accounting for.
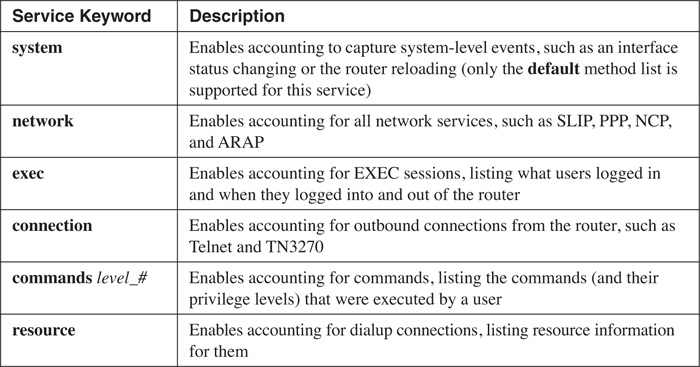
Following the service is the keyword default or the name of the method list. With the exception of system, all accounting services can be enabled or disabled on a line or interface basis. With these accounting services, you can specify a unique name for the method list and associate it with the appropriate line or interface, thereby restricting the accounting information that you gather. For example, you could enable the commands service for VTY connections, but not for other types of access.
After you have entered the default parameter or method list, you need to define how accounting records should be created. You can use these keywords:
• start-stop—Create an accounting record at the beginning and end of the event. For example, with an outbound Telnet, the Cisco IOS would create a starting accounting record when the user establishes a Telnet connection, and then an ending accounting record when the user terminates the connection.
• stop-only—Create an accounting record only at the end of the user process. For example, for an outbound Telnet connection, an accounting record is created only when the user terminates the Telnet connection.
• none—Disables accounting for the specified accounting service.
• wait-start—As with start-stop, an accounting record is generated at the beginning and end of the service; however, the service is not started until the router successfully can log the beginning accounting record with the AAA server. This is useful if you want extra protection and require a log of actions before the action takes place.
Note that the wait-start parameter was removed in Cisco IOS 12.1 and later, and no longer is supported.
As mentioned in the last section, only two listed methods are supported for accounting: RADIUS and TACACS+. You can use these keywords for these methods:
• group radius
• group tacacs+
• group AAA_server_group_name
These previously were discussed in the “Authentication” and “Authorization” sections.
Using a named method list, you can associate that list with either a line or an interface. On a line, use the accounting command, specifying the service that you want to create accounting information for, as well as the name of the accounting service. If you do not use this command, the default method list is used. On interfaces, only network PPP connection information can be gathered.
Suppressing Null Username Records
In some situations, accounting generates accounting records when no username is involved—a null username. For example, you might have configured AAA for login authentication (aaa authentication login) and specified two methods in your list: a TACACS+ AAA server and none. In this situation, the TACACS+ server is used to perform authentication; if it is not available, authentication is not performed. Assume that you have another AAA server running RADIUS that handles all accounting functions. When a user attempts to authenticate and the TACACS+ server is not available, the user is allowed access to the router (this probably was restricted to only the console port) because of the none method. In this situation, the user accessing the router did not have to supply a username for this method because no authentication is required (none method). However, accounting still generates an accounting record, using a null username. If you desire, you can suppress these accounting records with the following command:
Router(config)# aaa accounting suppress null-username
Enabling Broadcast Accounting
One of the initial limitations of AAA accounting is that all records were sent to the primary AAA server. If you wanted multiple AAA servers to receive the accounting information, the router would send the information to the primary AAA server, and the primary server would forward it to other AAA servers. As of 12.1(1)T, the Cisco IOS simultaneously can forward accounting information to up to four AAA servers. Imagine an AAA accounting server that must handle accounting information for 2000 or 3000 routers. Using the old method would place a heavy burden on the AAA server. The new broadcast solution is especially useful because it reduces the burden on the primary accounting server and places it on the routers sending accounting information.
Enabling the broadcast function is simple. First, create a list of AAA servers of the same type. Optionally, you can put them into an AAA server group, but this is not necessary. When configuring your aaa accounting commands, insert the broadcast parameter before your list of methods, like this:
Router(config)# aaa accounting {system | network | exec |
connection | commands level_#} {default | list_name}
{start-stop | stop-only | (none} broadcast [method1 [method2...]]
Accounting Troubleshooting
You use two basic commands for troubleshooting AAA accounting problems: show accounting and debug aaa accounting. Note that, depending on the Cisco IOS version, you have to use either the show accounting command or its replacement, the show aaa user all command.
The show accounting command lists a summarized view of each accounting record in the router’s buffer, as well as a summarization of the types of accounting records. For more detailed troubleshooting of accounting, use the debug aaa accounting command, as displayed in Example 5-9.
Example 5-9 Using the debug aaa accounting Command
Router# debug aaa accounting
Sep 17 14:48:33.011: AAA/ACCT/EXEC(00000005): Pick
method list 'default'
Sep 17 14:48:33.011: AAA/ACCT/SETMLIST(00000005): Handle 0,
mlist 81CA79CC, Name default
Sep 17 14:48:33.011: Getting session id for EXEC(00000005)
: db=82099258
Sep 17 14:48:33.011: AAA/ACCT/EXEC(00000005): add, count 2
Sep 17 14:48:33.011: AAA/ACCT/EVENT/(00000005): EXEC UP
In this example, the default method was used, as shown in the second line of output (‘default’). In the middle and bottom of the display, you can see that a user successfully gained access to the router’s EXEC shell.
Accounting Example
Now that you understand how to use basic AAA accounting commands, take a look at a simple configuration. This builds upon Example 5-6 and Example 5-8 used in the “Authentication Example” and “Authorization Example” sections. Example 5-10 shows a sample configuration for accounting.
Example 5-10 Adding Accounting to the AAA Example Configuration
Router(config)# aaa accounting commands 15 default
stop-only group aaatacgroup broadcast
Router(config)# aaa accounting system default
stop-only group aaatacgroup broadcast
Router(config)# aaa accounting connection default
stop-only group aaatacgroup broadcast
Router(config)# aaa accounting exec default
stop-only group aaatacgroup broadcast
In this example, aaatacgroup, which contains two TACACS+ servers, is handling the accounting functions. Notice that I used the broadcast parameter, ensuring that the AAA accounting information is sent from the router directly to both servers. In this configuration, accounting records are created when a user executes privilege level 15 commands, a system event occurs, a user tries to connect to a remote device, or a user tries to gain access to an EXEC shell.
Secure Copy
As mentioned in Chapter 3, if you need to move configuration files between a router and a host, it is preferable that they are encrypted. One solution mentioned in Chapter 3 was secure copy (SCP). SCP relies on SSH. Therefore, before you can set up and use SCP, you must configure SSH. SCP is also relatively new to the Cisco IOS; you need Cisco IOS 12.2(2)T to use it.
It seems that SCP is out of place in this chapter and really should be covered in Chapter 3. However, SCP requires the configuration of AAA to use it, so I have decided to cover it here instead of Chapter 3.
Preparation for SCP
The configuration of SSH was discussed in Chapter 3. You need to configure at least three things:
• A hostname: hostname.
• A domain name: ip domain-name.
• RSA encryption keys: crypto key generate rsa. (Your router must have the crypto-enabled feature set of the Cisco IOS to execute this command.)
SCP also requires the use of AAA authorization. Therefore, you need to use some of the commands discussed in this chapter to implement SCP.
Note
Note that not all routers support SCP. Here is a list of currently supported routers: 1700, 2600, 3600, 7200, 7500, and 12000 series models.
Step 1 Enable AAA: aaa new-model.
Step 2 Specify security servers, if used: tacacs-server and radius-server.
Step 3 Specify local accounts, if used: username.
Step 4 Configure login authentication: aaa authentication login.
Step 5 Configure authorization for EXEC access: aaa authorization exec.
The last step is to set up the router as an SCP server:
Router(config)# ip scp server enable
SCP Troubleshooting
After you have set up SCP, you can test it by copying files to and from the router. From the router, use the following syntax:
Router# copy source_file scp://user_name@IP_address_of_server/
Address or name of remote host [x.x.x.x]?
Destination username [username]?
Destination filename [file_name]
Writing file_name
Password:
Router#
As you can see, you need to use the scp keyword in the destination filename.
If you are having problems, use the following debug commands:
• debug ip ssh
• debug ip ssh client
• debug ip scp
Example 5-11 shows an example of the debug ip scp command and a successful copy.
Example 5-11 Troubleshooting SCP Connections
Router# debug ip scp
2d01h:SCP:[22 -> 10.0.0.100:1019] send <OK>
2d01h:SCP:[22 <- 10.0.0.100:1019] recv C0648 21 router.cfg
2d01h:SCP:[22 -> 10.0.0.100:1019] send <OK>
2d01h:SCP:[22 <- 10.0.0.100:1019] recv 21 bytes
2d01h:SCP:[22 <- 10.0.0.100:1019] recv <OK>
2d01h:SCP:[22 -> 10.0.0.100:1019] send <OK>
2d01h:SCP:[22 <- 10.0.0.100:1019] recv <EOF>
SCP Example
Example 5-12 shows a simple example of setting up SCP to use local authentication.
Router(config)# hostname bullmastiff
bullmastiff(config)# ip domain-name quizware.com
bullmastiff(config)# crypto key generate rsa
The name for the keys will be: bullmastiff.quizware.com
Choose the size of the key modulus in the range of 360 to 2048 for your
General Purpose Keys. Choosing a key modulus greater than 512 may take
a few minutes.
How many bits in the modulus [512]: 2048
% Generating 1024 bit RSA keys ...[OK]
00:02:25: %SSH-5-ENABLED: SSH 1.5 has been enabled
bullmastiff(config)# access-list 1 permit 10.0.0.50
bullmastiff(config)# line vty 0 4
bullmastiff(config-line)# login local
bullmastiff(config-line)# transport input ssh
bullmastiff(config-line)# transport output ssh
bullmastiff(config-line)# access-class 1 in
bullmastiff(config-line)# end
bullmastiff(config)# aaa new-model
bullmastiff(config)# aaa authentication login default local
bullmastiff(config)# aaa authorization exec default local
bullmastiff(config)# username admin1 privilege 15 secret cisco
bullmastiff(config)# ip scp server enable
In this example, the first part sets up SSH and restricts Telnet/SSH access to only one device: 10.0.0.50. Following this is the AAA configuration to allow SCP operations. In this example, local authentication/authorization is used, and one account has been created on the router: admin1.
Summary
This chapter showed you the basics of AAA. AAA enables you to authenticate users, authorize what services they can access, and account for what happened. AAA must be enabled with the aaa new-model command. Cisco supports external security servers for AAA; you can use RADIUS, TACACS+, and even Kerberos to provide for a secure connection and communications between your router and the security server. When you need to manage a large number of routers, using AAA with a security server is the most scalable solution.
Next up is Part III, “Nonstateful Filtering Technologies,” which shows you how to protect the router using standard and extended access control lists (ACLs).