
Chapter 3. Accessing a Router
This chapter focuses on the various methods by which you can access your Cisco router and how to provide a secure method of access without using an external security server. External security servers and authentication are discussed in Chapter 5, “Authentication, Authorization, and Accounting.” Remember that this book focuses on using a Cisco router as a firewall solution, so many of the ideas presented here have disadvantages in providing secure access to your router (and some I would never recommend). However, I discuss many of the options available to you so that you can understand their disadvantages and advantages, and choose the correct solution for your particular situation.
Because many people use a Cisco router as a perimeter firewall, that router serves as a first line of defense. Therefore, restricting access to it is very important. If a hacker gains access to your perimeter router, it eases his job of gaining access to resources behind it. As you will see in this chapter, you can secure access to your router in many ways: Some of them I recommend, and some of them I would never use.
Types of Authentication
When attempting to gain management access to a Cisco router, this can be done in a variety of ways, including the following:
• Console port
• Auxiliary port
• Telnet
• Hypertext Transfer Protocol (HTTP) and HTTP with Secure Socket Layer (HTTPS)
• Secure Shell (SSH)
• Simple Network Management Protocol (SNMP)
Each of these methods presents a certain level of security risk. However, you can secure each method by using password authentication. You can authenticate access in many ways, including the following:
• No passwords
• Static passwords
• One-time passwords (OTP)
• Token card services
Each of these authentication methods has advantages and disadvantages. The following sections cover these methods in more detail.
No Password Authentication
The worst type of authentication method is to not configure passwords on your device, whether on a Cisco router or even your PC. If some networking devices do not have passwords, they prevent remote access to the device. This is true of Cisco routers with Telnet. If a virtual type terminal (VTY) line and a privileged EXEC password have not been configured on a Cisco router, you cannot Telnet to it.
Caution
Note that it is possible to allow VTY access to a router without a line password by using the no login command. Never do this on a Cisco router because anyone then can remotely Telnet to your router without authenticating.
However, I would never leave this to chance. Always configure some method of authentication for every type of access in the device—or, if possible, disable methods of access that are not used. Some type of authentication method is better than nothing.
Static Password Authentication
The most common method of authentication is to use static passwords, with or without user accounts. This is probably one of the most popular methods of securing Cisco routers. However, static passwords have the following problems:
• If the account password becomes compromised, the device is compromised. You can fix this by changing the password, but you might not detect this for a period of time, if at all.
• How static passwords are chosen can create security risks. Using names, birthdays, and common words is popular among users. A good password should have a mixture of letters, numbers, and special characters.
• The most secure form of a static password is a random string of characters, but this presents another security issue: Users write down these passwords because they are hard to remember, and they tape them to the border of their monitors, available for everyone to see.
• Some methods of access require multiple people to perform the same tasks using the same account, such as root in UNIX or Administrator in Microsoft Windows. When the administrators use the same account, it becomes more difficult to manage: More people have access to the password, making the account less secure. It becomes a management headache to manage password changes because multiple people must be notified.
• Static passwords are susceptible to eavesdropping attacks if the password information is not encrypted (such as with Telnet connections).
• These passwords are susceptible to password-cracking programs if a hacker can gain access to your password file.
Typically, static passwords are used in small environments in which access attacks are not that much of a concern; however, they are, by no means, a secure method of authentication.
Tip
I highly recommend that you not use accounts that are required on a system, such as root in UNIX or Administrator in Windows, for management purposes. Instead, create a separate management account for each administrator, and let each user assign a password to the account that falls under the guidelines defined in your security policy concerning passwords. Then disable the default management account by assigning a random string of letters, numbers, and special characters. Lock up this password in case you ever need access to these accounts in emergency situations. Plus, you always should monitor attempted access to these disabled accounts: This indicates that a probable access attack is occurring.
Aging Password Authentication
To help overcome the issues that static passwords have, some administrators use aging passwords. With aging passwords, the password is valid for a predefined period of time. When the time period expires, the password is no longer valid. Typically, a password history file is used to ensure that when a user is forced to change his password, it isn’t changed to a password that the user previously used for the account.
Most administrators think that by using aging passwords, they have removed all the disadvantages of static password configurations. In reality, aging passwords are not that much more secure than static passwords. About the only advantage that aging passwords have over static passwords is that if an account was compromised and the user of the account was forced to change the passwords, the hacker then is locked out of the account.
Note
Most hackers are aware of this process and install keystroke-capturing programs that you install in the login script that is executed when the user logs in. In this situation, if the user is forced to change the password, the capturing script sees this information and sends it to the hacker.
Given the ingenuity of the hacker to use keystroke-capturing programs, aging password authentication does not have any real advantage over static passwords. Note that Cisco routers support static passwords, but they do not support aging passwords.
Caution
My main concern with static and aging password authentication is that they are susceptible to eavesdropping attacks for many types of remote-access connections, such as Telnet, FTP, HTTP, RCP, RSH, and others. Therefore, if you are using static or aging passwords, I highly recommend that you use some method that encrypts the authentication information between the user and the resource, to prevent eavesdropping attacks. Some remote-access tools that you can use include SSH, HTTPS, and Secure Copy (SCP).
Also be careful about backing up resources across the network, especially because their password files will be susceptible to eavesdropping. Chapter 5 discusses how you can centralize authentication functions and keep user and password information on a security server that you can back up locally. Chapter 5 also discusses how to securely back up a router’s configuration file, to prevent eavesdropping attacks.
One-Time Password Authentication
One-time passwords (OTPs) were developed specifically to deal with the limitations and security issues of static and aging passwords. Unlike static and aging passwords, OTPs can be used only once: After a password is used, it no longer is valid.
A password-generator program is used to generate a list of passwords, with the S/Key algorithm, which uses an MD5 hash function, generating the list. This process typically is accomplished through a password calculator program in which the user enters a secret key or phrase into the program. The program then generates a file containing a list of valid OTPs. The passwords can be used for authentication purposes for resources that use the S/Key algorithm. When a password is used, it becomes invalid.
OTP authentication has a few advantages over static and aging passwords:
• The applications that users employ do not have to be changed, easing the implementation of OTP.
• These passwords are typically secure from password-cracking programs because of the nature in creating these random passwords. However, if the hacker can guess the secret key that was used to generate the list of passwords, there is a chance that he can determine the OTPs that were generated.
• OTP defeats eavesdropping attacks. Even if a hacker sees the password, it is too late to use it because the user is authenticated and the password becomes invalid.
• If a hacker is lucky enough to guess a randomly generated OTP, he is granted access to the account one time; subsequent access requires the hacker to get lucky again guessing a randomly generated OTP.
OTPs have one main disadvantage: They generate a file with the random OTPs. Because the file might contain 10, 20, or even 100 passwords, the user has a tendency to print this file and keep it on or in his desk. The user then uses this printout to log in to a device, choosing one of the passwords in the list and crossing it off after it is used. Anyone who has access to the user’s desk can compromise his account.
In addition, if this file is printed to a network printer, it can be compromised through eavesdropping. Note that Cisco routers do not support OTP innately.
Note
The main weakness of OTPs is that they are susceptible to eavesdropping. When the hacker knows the passwords stored in the file, he easily can gain unauthorized access to this user’s account; from here, the hacker can install keystroke-capturing and backdoor programs to overcome the OTP authentication method for authorizing access to the user’s device or resource.
Token Card Services
Of all of the methods discussed so far, the most secure authentication method is to use token cards and token card services. When using a token card solution, a user uses a special hardware device called a token card. This card is about as small as a credit card or PCMCIA card, but it has integrated circuits and typically an LED display. This card is synchronized with a token card server by the time of day.
One of two methods is used to handle authentication with token card services:
• Time-based authentication
• Challenge-based authentication
With the first method, the user enters a password or PIN into the token card, which then is used on a one-way hash function along with the time of day. Note that the time of day is not an exact time, but it is based on a time period. Therefore, the card and the token card server must have a time defined on them that is not very different. This information, along with the account name, is sent to the service that the user is trying to log in to, as shown in Step 1 of Figure 3-1. In Step 2, the service forwards this information to a token card server. The token card server then looks up the user’s account name in a local database, along with the user’s password or PIN; it runs it through the same one-way hash function that the token card used, along with the time of day. The token card server authenticates the request and passes back the result, shown in Step 3. In Step 4, the service passes back the authentication success or failure to the user.

With the second method of handling authentication with token card services, instead of using the time of day, the token card solution uses a challenge, which is synchronized between the card and the token card authentication server. The challenge used with this kind of token card solution is similar to the challenge that PPP’s CHAP uses. Otherwise, the authentication process is the same as that shown in Figure 3-1 with the time of day token card solutions.
The main advantage of this solution over the OTP process described in the last section is that a token card solution does not generate a file of valid random passwords: A password is generated each time that the user needs to authenticate.
However, token card solutions have their own set of problems:
• Cost
• Additional software
• Synchronization between the token card and token card server
Probably the main disadvantage of token card servers is their cost: You need a token card for each server (they run about $50 to $75), and you need a server with token card software running on it to handle authentication requests. For many companies, this can be cost prohibitive.
Second, to use a token card solution, your resources must support integration of token card software. This is not always possible, based on your service or resource. For example, a Cisco IOS router does not support authentication directly to a token card server. Instead, it requires a central authentication server, such as Cisco Secure ACS, which handles the interoperability with the token card server (again, this increases your implementation cost). In some instances, some devices, services, or resources do not support token card integration.
Note
The Cisco Secure ACS authentication server supports integration with the following token card solutions:
• ActivCard Token Server 3.1
• CRYPTOCard CRYPTOAdmin 5.16
• PassGo (formerly AXENT) Defender version 5.16
• RSA ACE/Server version 5.0 and ACE/Client version 1.1.2 for Windows 2000
• Secure Computing PremierAccess Server version 3.1
• Vasco Vacman Server version 6.0.2
The third problem with token card solutions deals with the synchronization between the token card and the token card server. It is important to point out that because the random OTP that is generated by the token card uses the time of day or a challenge, the card and the token card server must be synchronized; otherwise, authentication will fail. This can present a manageability issue for aging cards because the battery process used on the cards might cause a synchronization problem. Troubleshooting this kind of problem is not easy. Plus, when the token card generates the random password, it is typically good for only a short period of time, such as 1 minute. Therefore, the user immediately must type in the OTP to authenticate or will have to re-enter his password or PIN on the token card to generate a new password. This can create a lot of headaches for your users, especially slow typists.
Token card servers typically are used in environments that need to use random passwords to prevent eavesdropping attacks in secure environments. In these situations, companies are very concerned about access attacks, and the additional cost of a token card solution is negligible compared with the repercussions of a hacker gaining unauthorized access to a critical resource. Also, if you need to access services and resources remotely across a public network on which passwords are susceptible to eavesdropping, a token card solution provides a secure authentication solution.
Methods of User EXEC Access
Now that you have a basic understanding of password authentication methods, this section discusses how you can secure your Cisco IOS router. This chapter focuses only on local solutions available on the router. Chapter 5 discusses how to centralize this using a security server, such as the Cisco Secure ACS security server product.
Two levels of access to a Cisco router exist:
• User EXEC—Used for basic troubleshooting processes
• Privileged EXEC—Used for detailed troubleshooting and configuration
Both of these methods support authentication. Within user EXEC access, however, the Cisco IOS differentiates between local and remote access. Local access is done through the console or auxiliary port, where you use the Cisco IOS command-line interface (CLI) to interact with the Cisco IOS and the device. Remote access can be performed in a multitude of ways. This section covers how to secure user EXEC access. Privileged EXEC access is covered in the section “Privileged EXEC Access,” later in this chapter.
Local Access: Console and Auxiliary
To assign a static password to the console line, use the following configuration:
Router(config)# line console 0
Router(config-line)# password password
The password that you enter in the password command is a clear-text password. When you examine the output from the show running-config command, you will see the actual password in the configuration:
line con 0
password cisco
logging synchronous
Obviously, this is a problem if someone is looking over your shoulder or if you back up your configuration to a TFTP server with the copy running-config tftp command. Two solutions discussed later remedy this problem: encrypting the clear-text password, and using a secure form of copying your configuration to an external server without having to use TFTP, which lacks any authentication and encryption method.
Most passwords that you configure on your router can be from 1 to 25 characters, and the first character cannot be a number. You can have leading spaces before the password, but they are ignored. However, any trailing spaces after the password become a part of the password. You can include a ? in a password by first using the Ctrl-V sequence and then typing in the ?, like this: alphaCtrl-V?987. This creates a password of alpha?987.
Caution
Remember that the password Line Configuration mode command does not encrypt passwords by default; it stores them in clear text. I highly recommend that you not use the password command as your authentication method because all administrators who access the line must use the same password. This makes accountability difficult. Typically, this is used as a last resort. I recommend either a local user and password database, discussed in the “Local Authentication Database” section later in this chapter, or a security server, discussed in Chapter 5.
If your router has an auxiliary line, you can assign it a password with basically the same configuration:
Router(config)# line aux 0
Router(config-line)# password password
Typically, this line is used for remote dial-in access for emergency situations. If you are using this line for dialup, you must implement security for dialup on your router, which is beyond the scope of this book. I recommend that you run PPP on your auxiliary port in this case, using CHAP for authentication and caller ID to restrict unauthorized access.
Login Authentication Methods
One main difference between the console line for user EXEC access and the auxiliary and VTY (discussed in the next section) lines is that a password on the console line is optional, whereas it is required on auxiliary and VTY lines. You must enable authentication on these two latter types of lines to allow access. If you do not, the Cisco IOS displays an error message and closes the connection:
Password required, but none set
[Connection to 192.168.1.254 closed by foreign host]
To allow access through the auxiliary or VTY lines, use one of the following two configurations:
Router(config)# line aux 0
Router(config-line)# [no] login [local]
or:
Router(config)# line vty 0 4
Router(config-line)# [no] login [local]
The login command, by itself, specifies the use of authentication. By default, it checks for a password configured with the password line-configuration command. If this does not exist, the user is not allowed access. To disable authentication checking, use the no login command. Note that this never is recommended for any type of connection, whether local or remote access.
Note
Even if the Cisco IOS does not check a password for user EXEC access, a password still must be configured for privileged EXEC access for remote-access connections. Otherwise, the user is not allowed access to user and privileged EXEC mode. This process is not true concerning the console line.
Optionally, you can override the use of the password configured on the line and use other methods, such as a local username and password database, by specifying login local (discussed later in this chapter in the “Local Authentication Database” section), or use external authentication using a security server (discussed in Chapter 5). Remember my earlier caution: Use either of these two methods (preferably the latter one, which is preferred for securing line access).
Tip
Always put some method of authentication on all your lines, even ones that you are not using, such as the auxiliary line. This ensures that later someone does not set up a new line connection inadvertently and forget to secure it.
Login Connection Timeouts
By default, console, auxiliary, and Telnet (VTY) sessions time out after 10 minutes of idling. You can override this with the exec-timeout command, shown here:
Router(config)# line type #
Router(config-line)# exec-timeout minutes seconds
You must specify the minutes and seconds for the timeout. Optionally, you can specify 0 and 0 for the minutes and seconds, specifying an infinite timeout. I never recommend this for a production router, but only for lab situations, such as practicing for the CCIE Router and Switch or Security lab exam.
This simple example sets the timeout to 5 minutes for Telnet sessions:
Router(config)# line vty 0 4
Router(config-line)# exec-timeout 5 0
To view your timeouts, use the show line command. Based on my previous configuration, Example 3-1 shows the partial output of this command.
Example 3-1 Example Line Configuration
Router# show line vty 0
Tty Typ Tx/Rx A Modem Roty AccO AccI Uses Noise Overruns Int
6 VTY - - - - - 2 0 0/0 -
Line 6, Location: "", Type: ""
Length: 24 lines, Width: 80 columns
Baud rate (TX/RX) is 9600/9600
Status: Ready, No Exit Banner
Capabilities: none
Modem state: Ready
Special Chars: Escape Hold Stop Start Disconnect Activation
^^x none - - none
Timeouts: Idle EXEC Idle Session Modem Answer Session Dispatch
00:05:00 never none not set
Idle Session Disconnect Warning
never
Login-sequence User Response
00:00:30
Autoselect Initial Wait
not set
←output omitted→
In Example 3-1, you can see that the idle timeout, below the Idle EXEC column, was set to 5 minutes. This is a common setting for Telnet sessions.
Remote Access
Compared to local access, in which you can access user EXEC mode only through the console or auxiliary line, you can access your router remotely in quite a few ways. These methods include Telnet, RSH, SSH, HTTP and HTTPS, and SNMP. The following sections cover the configurations and issues with these approaches.
VTY (Telnet)
Cisco uses VTY lines to handle incoming and outgoing Telnet connections. VTYs are basically logical lines: The Cisco IOS treats them as a physical line from a configuration and operation perspective, but they are not something that you physically can touch with your hands.
You already know how to set up basic authentication on a VTY. Here is a simple example:
Router(config)# line vty 0 4
Router(config-line)# password cisco
Router(config-line)# login
This sets up basic Telnet access to your router.
Now that you know how to set this up on your router, I recommend that you never use it. Why? Because Telnet sends user information across the network in clear text. Remember that if you are using this router as part of a firewall system, you want to keep it as secure as possible. You could get around the Telnet password issue by using token cards and a token card server, but all other information that you type in the Telnet router session is sent in clear text. I recommend that you use either SSH, discussed in the “Secure Shell” section later in this chapter, or a VPN, discussed in Part VIII, “Virtual Private Networks,” when gaining user and privileged EXEC CLI access to your router.
Given this previous caution, however, you want to configure one thing on your VTYs, whether the access method is Telnet, SSH, or a VPN. Way back in Cisco IOS 10.0, Cisco built in the capability to filter sessions that use the VTY lines. This is accomplished by creating a standard access control list (ACL), which specifies which source address or addresses are allowed access; then the standard ACL is applied to the VTY lines. Chapter 7, “Basic Access Lists,” discusses the details of standard ACLs. Figure 3-2 shows a simple example illustrating the usefulness of this feature. Here, a router is being used as a perimeter firewall. In this network, only two administrators should be allowed remote SSH access to the router. This is accomplished by setting up a standard ACL and applying it to the VTYs, as shown in Example 3-2.
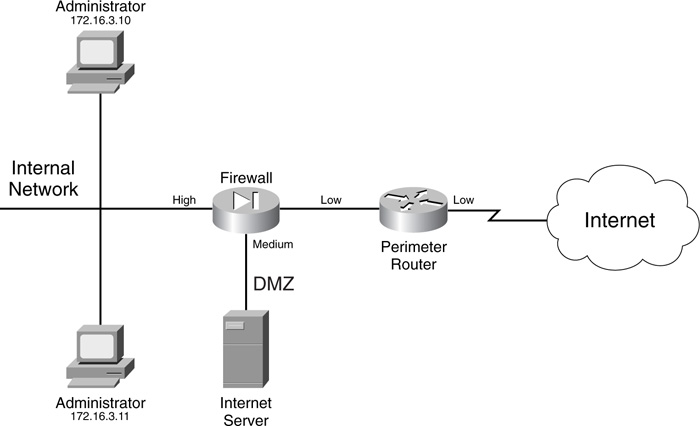
In this example, applying the standard ACL requires the use of the access-class command. This command requires that you specify the number of the standard ACL (1) and the direction of restriction (in or out). Using the in parameter restricts inbound VTY sessions; out restricts outbound VTY sessions. When using the out parameter, the addresses listed in the standard ACL are viewed as destination, not source, addresses. One note on Cisco ACLs applies: If you do not explicitly permit traffic in an ACL, it is implicitly denied.
Example 3-2 Restricting VTY Access
Router(config)# access-list 1 permit 172.16.3.10
Router(config)# access-list 1 permit 172.16.3.11
Router(config)# line vty 0 4
Router(config-line)# transport input ssh
Router(config-line)# transport output ssh
Router(config-line)# access-class 1 in
The syntax of the access-class command is as follows:
Router(config)# line vty beginning_# ending_#
Router(config-line)# access-class standard_ACL_# in | out
It is important to point out that you should apply the access-class command to all VTYs. For a router that has five VTYs, the beginning and ending numbers are 0 and 4. If you are not sure how many VTYs you have, use the show running-config or show lines commands.
Note
Remember that the access-class command applies to VTY sessions. Telnet is not the only type of connection that uses a VTY: So does SSH. This Cisco IOS feature helps you limit which devices can establish a VTY connection, reducing the likelihood of an access attack.
The main problem of the Cisco IOS VTYs is that they allow many different types of remote access, such as Telnet, rlogin, SSH, and others. The transport input ssh command limits access to the VTYs to SSH access only, whereas the transport output ssh command restricts remote access to other devices to SSH. The syntax of the transport command is as follows:
Router(config)# line vty beginning_# ending_#
Router(config-line)# transport {input | output} {all | none |
pad | rlogin | ssh | telnet | udptm}
If you want to use only SSH for remote access, use the transport commands displayed in Example 3-2.
Secure Shell
In the old days of UNIX when no real need existed for a secure environment, many administrators used the rexec and rsh tools to execute commands on remote systems without having to log into them. However, in today’s world, these tools offer no real security: They send information across the network in clear text, which is easy to eavesdrop on, and their authentication is based on the user’s source IP address, which is easy to spoof. Two versions of SSH are available: version 1 and version 2. In most Cisco IOS versions, Cisco supports an enhanced version of version 1, called 1.5; however, starting in Cisco IOS 12.3T and later versions of 12.1E, Cisco also supports SSHv2.
Two components are required for SSH to function:
• Server
• Client
The SSH server provides a secure connection, which is encrypted, to the Cisco IOS CLI. This connection is similar to an encrypted Telnet connection. The SSH client runs the SSH protocol to connect to an SSH server, and it must support the Data Encryption Standard (DES) or 3DES as well as password authentication. DES and 3DES are discussed in more depth in Chapter 19, “IPSec Site-to-Site Connections.” Authentication is performed in a normal fashion: Users can be authenticated using local mechanisms or by using an external security server. Cisco routers support both server and client connections. However, SSH on Cisco IOS routers has the following restrictions:
• You cannot use RSA authentication (discussed in Chapter 19).
• You must use a Cisco IOS image that supports DES or 3DES.
Tip
Many SSH commercial client packages are available on the market. One of my favorites is Teraterm, with the TTSSH extension. Actually, Teraterm is my preferred terminal software (it’s free) for console and Telnet connections as well. To download Teraterm and the TTSSH extension, visit http://www.zip.com.au/~roca/ttssh.html. I have experienced some problems with Teraterm’s SSH client with certain versions of the Cisco IOS. If you experience these problems, try PenguiNet SSH, a fully functional shareware client that I have had great success with. It is free to try and less than $30 to buy. You can download it from www.siliconcircus.com.
SSH Server Configuration
Before setting up SSH, you must install a Cisco IOS image that supports DES or 3DES (this requires the image to support IPSec). For both router client and server functions to work, you need at least Cisco IOS 12.1(3)T.
When you have installed the appropriate Cisco IOS software, you can begin your Cisco IOS configuration. You should perform these six steps:
Step 1 Assign a name to the router (required).
Router(config)# hostname router_name
Step 2 Assign a domain name to the router (required).
Router(config)# ip domain-name DNS_domain_name
Step 3 Generate your encryption keys (required).
Router(config)# crypto key generate rsa
You must assign a router and domain name before executing this command; otherwise, you will get an error message. Cisco recommends that you use a key size of at least 1024 bits. When you execute this command, it does not appear in the running or saved configuration. Also, if you need to generate a new key pair, first use the crypto key zeroize rsa command.
Step 4 Set up your VTY access for SSH (optional, but recommended):
Router(config)# username name secret password
Router(config)# line vty 0 4
Router(config-line)# transport input ssh
Router(config-line)# transport input ssh
Router(config-line) login local
For SSH access, you must use a username and password by setting up either a local authentication database (discussed later in the “Local Authentication Database” section) or an authentication server (see Chapter 5). The username and login local commands set up local authentication. This is true of most SSH clients that I have dealt with.
Step 5 Tune the SSH server (optional).
Router(config)# ip ssh {[timeout seconds] | [authentication-retries integer]}
Optionally, you can specify a timeout, in seconds, for initiating an SSH connection. If the connection cannot be established in this time period, the connection fails. You also can limit the number of authentication retries for a connection upon an invalid authentication attempt (the default is 3). Other parameters exist for this command, but these are the two most common ones. If you cannot execute this command, it is because you have not generated your encryption keys with the crypto key generate rsa command. After the user has authenticated and established an SSH connection to the router, the Cisco IOS uses the VTY idle timeout (exec-timeout command) to monitor the session.
Step 6 Verify SSH server operation (optional).
Router# show ssh
Router# show ip ssh
Tip
I highly recommend that you use the VTY access-class line configuration command to restrict SSH access to your router. Note that after you set up SSH, devices still can Telnet to the router, even with the configuration of the access-class command. Therefore, use the transport command to limit remote access to SSH. You also can create an ACL to filter unwanted remote-access traffic to the router. This is discussed in Chapter 7.
Also, SSH client connections connect to TCP port 22 on an SSH server, so you need to allow this port through your filter, if one exists.
SSH Server Example
To help illustrate how to set up an SSH server on a Cisco IOS router, this example uses the perimeter router shown previously in Figure 3-2. Example 3-3 shows the configuration.
Example 3-3 SSH Server Configuration Example
Router(config)# hostname bullmastiff
bullmastiff(config)# ip domain-name quizware.com
bullmastiff(config)# crypto key generate rsa
The name for the keys will be: bullmastiff.quizware.com
Choose the size of the key modulus in the range of 360 to 2048 for your
General Purpose Keys. Choosing a key modulus greater than 512 may take
a few minutes.
How many bits in the modulus [512]: 1024
% Generating 1024 bit RSA keys ...[OK]
00:02:25: %SSH-5-ENABLED: SSH 1.5 has been enabled
bullmastiff(config)# username richard secret bigXdogYlover
bullmastiff(config)# username natalie secret BIGxDOGyLOVER
bullmastiff(config)# access-list 1 permit 172.16.3.10
bullmastiff(config)# access-list 1 permit 172.16.3.11
bullmastiff(config)# line vty 0 4
bullmastiff(config-line)# login local
bullmastiff(config-line)# access-class 1 in
bullmastiff(config-line)# transport input ssh
bullmastiff(config-line)# transport output ssh
bullmastiff(config-line)# end
After the RSA encryption keys were generated, notice that the Cisco IOS displayed a message that SSH 1.5 has been enabled: The SSH server function is operating. Also, I used a standard ACL and the access-class statement to limit the devices that can access the router’s VTYs.
To verify that the SSH server is operating, as well as to verify its configuration, use the show ip ssh command, as shown in Example 3-4.
Example 3-4 Verifying Your SSH Configuration
bullmastiff# show ip ssh
SSH Enabled - version 1.5
Authentication timeout: 120 secs; Authentication retries: 3
To see the SSH client connections, use the show ssh command, as shown in Example 3-5.
Example 3-5 Viewing Your SSH Client Connections
bullmastiff# show ssh
Connection Version Encryption State Username
0 1.5 3DES Session started richard
In this example, you can see that someone logged into the richard account and that 3DES is being used for encryption.
SSH Client Connections
Besides functioning as a server, the Cisco IOS supports an SSH client. However, this option is available only after you have set the Cisco IOS as an SSH server (performed Steps 1 through 3 from the previous section). When you have completed these steps, you can initiate SSH client connections from your router. This is accomplished using the following EXEC command:
Router# ssh [-l username] [-c {des | 3des}] [-o numberofpasswdprompts #]
[-p port_#] {IP_Address | hostname} [command]
The ssh command has many parameters. When accessing a remote resource, you might be required to give a username for authentication; this is true if you used a local authentication database or an external security server. Use the –l option to specify the username. You also can specify the encryption algorithm to use with the –c option. To change the number of password prompts, use the –o numberofpasswordprompts option. SSH uses port 22 by default, but you can change it with the –p option. The one required parameter is the address or name of the destination SSH server. Following this are optional commands that you might want to have executed (this feature is not supported if you are logging into a Cisco IOS router).
Example 3-6 shows a sample of testing the connection by establishing an SSH client connection from a router to itself, using the code configuration shown in Example 3-6.
Example 3-6 SSH Client Connection Example
bullmastiff# ssh -l richard 192.168.1.254
Password: cisco
bullmastiff>
Caution
Many versions of the Cisco IOS, up through 12.2, are vulnerable to a specific kind of SSH DoS attack in which a hacker can affect greatly the performance of a Cisco IOS device. A complete description of this attack is available at http://www.cisco.com/warp/public/707/SSH-multiple-pub.html. For software updates to limit the effect of this kind of attack, visit http://www.cisco.com/warp/public/707/SSH-scanning.shtml#Software.
Also, SSH 1.5 is less secure than SSH 2.0. Information about security issues with SSH v1 (and Cisco 1.5) can be seen at http://lwn.net/2001/0322/a/ssh-analysis.php3. Because of some of the security issues that have cropped up lately with SSH, I recommend that this be used only for internal connections if you are using an older version of the Cisco IOS. The best approach is to upgrade your Cisco IOS to a version that supports SSH 2.0. For connections across a public network, I recommend using a remote-access VPN connection, discussed in Part VIII.
Web Browser
Cisco supports the use of a web browser to access and manage a Cisco router. This is a nice feature for administrators who find the Cisco IOS CLI intimidating. This section discusses how to set up your router as an HTTP server and details some issues with using HTTP.
Even though the GUI interface of a web browser presents a user-friendly front end to the router’s Cisco IOS, you cannot perform all configuration and management options from a web browser. Therefore, in many cases, you still need to access the Cisco IOS CLI to perform configuration and management tasks.
By default, the HTTP server function on the router is disabled. To configure HTTP access, use the following steps:
Step 1 Enable the HTTP server (required).
Router(config)# ip http server
The ip http server command enables the HTTP server function on the router. This is the only required command to enable the server function; however, you will want to implement the security features in Steps 2 and 3. If you are using HTTPS (discussed in the next section), you should disable the standard HTTP server with no ip http server.
Step 2 Define an authentication method (highly recommended).
Router(config)# ip http authentication {aaa | enable | local}
Most people use three basic methods to perform authentication with HTTP. The aaa parameter specifies that AAA should be used (AAA is discussed in Chapter 5). The enable parameter specifies that the privileged EXEC password is used to authenticate HTTP access (this is discussed in the later section “Privileged EXEC Access”). The local parameter specifies that the local authentication database of usernames and passwords should be used for authentication (this is discussed in the later section “Local Authentication Database”). Note that the user needs level 15 access, which is privileged EXEC level. Of the three methods, I don’t recommend the privileged EXEC password, and recommend either the local username database or an AAA server.
Step 3 Restrict access through HTTP (highly recommended).
Router(config)# ip http access-class standard_ACL_#
This command enables you to restrict, based on the source IP address of the client, which devices are allowed HTTP or HTTPS access to the router. The function of this command is the same as that described previously with VTY restrictions and the access-class command. With the ip http access-class command, you need to specify a standard ACL number or name that contains a list of permitted source addresses.
Step 4 Change the HTTP port number (optional).
Router(config)# ip http port port_#
By default, the Cisco IOS uses port 80 for HTTP connections; however, you can change this port to a different number with the ip http port command. By changing the port number to a nonstandard one, you make it more difficult for a hacker to determine that you are running a web server on the router. Most inept hackers never would figure out that you changed the HTTP port number; however, a smart hacker would scan all TCP ports to determine this, so changing the port number provides only a limited form of protection.
Step 5 Change the location of HTML files (optional).
Router(config)# ip http path URL_location
Typically, you will not use this command: It sets the base HTTP location path for HTML files on the router. By default, these files are located in Flash, but you can move them to a different location, such as a PCMCIA card, if you do not have enough space in Flash for your Cisco IOS. Here is a simple example of doing this: ip http path slot0:.
Step 6 Restrict the number of HTTP connections (recommended).
Router(config)# ip http max-connections #_of_connections
This command enables you to limit the maximum number of HTTP management connections to the HTTP server on the router. The default value is 5.
Step 7 Change the idle timeout for HTTP connections (optional).
Router(config)# ip http timeout policy idle seconds life seconds requests number
This command enables you to define how long an HTTP server connection to the router should remain open. The idle parameter specifies the maximum allowed idle time for an HTTP connection before it is torn down. The default is 180 seconds. The life parameter specifies the maximum amount of time that the connection is allowed to be established (busy or idle) before it is torn down. The default is 180 seconds, but this can be increased up to 86,400 (24 hours). The requests parameter restricts the maximum number of persistent requests (for the same information) before the connection is closed. This defaults to 1. Note that if the router’s HTTP server is busy, it can terminate HTTP client connections to free up resources.
When you have the HTTP server set up, from a web browser, access your router by using the following URL in the address bar:
http://router's_IP_address
Now that you have a basic understanding of the setup of an HTTP server on a Cisco IOS router, take a look at a simple example, using the network shown previously in Figure 3-2. In this example, only the two administrator devices should be allowed HTTP access to the router. Example 3-7 shows the basic configuration to accomplish this.
Example 3-7 HTTP Server Configuration
Router(config)# access-list 1 permit 172.16.3.10
Router(config)# access-list 1 permit 172.16.3.11
Router(config)# username richard privilege 15 secret bigXdogYlover
Router(config)# username natalie privilege 15 secret BIGxDOGyLOVER
Router(config)# ip http server
Router(config)# ip http authentication local
Router(config)# ip http access-class 1
In this example, only two devices are allowed HTTP access to the router: 172.16.3.10 and 172.16.3.11. Both administrators have accounts set up, and the router uses the local authentication database (username commands) to perform the authentication. One interesting thing to point out about the username commands is the privilege 15 reference. Remember that you need privileged EXEC access for HTTP server connections to the router. This command is discussed in much more depth in the later section “Local Authentication Database.”
Use the show ip http client all command to list all client connections on your router. Use the show ip http server all command to list all HTTP server functions on your router, including past client connections.
Caution
Some security issues arise when using HTTP access to manage your router. First, any usernames and passwords are sent across the wire in clear text, along with any operations or commands executed. This presents a serious problem if a hacker is implementing an eavesdropping attack. You could get around the HTTP password issue by using token cards and a token card server, but all other information that you enter in the HTTP router session is sent in clear text. Therefore, never use HTTP across a public network to manage your router. On internal networks, make sure that you use authentication and filtering to restrict HTTP access to the router itself.
Second, because of many of the issues with HTTP itself, as well as the first item, I recommend that if you want to use a web browser for management purposes, either use HTTPS (discussed in the next section) or protect the HTTP connection with a VPN (discussed in Part VIII).
HTTP with SSL
Because HTTP is susceptible to eavesdropping attacks, it is not a recommended tool for remote access management. Instead of using HTTP, you can use HTTPS, which is HTTP with Secure Socket Layer (SSL) support. Cisco supports SSL 3.0 for its router HTTP server functions. This feature is new in Cisco IOS 12.2(15)T, and it requires a Cisco IOS image that supports SSL.
RSA authentication is used to validate the identity of devices and uses certificates. The Cisco IOS image needs SSL support to sign these certificates digitally. Certificates are used for authentication purposes and, to my knowledge, never have been spoofed.
As you recall from the last section, you can use the ip http access-class command to restrict access to an HTTP server. However, the main limitation of this command is that because filtering is done on Layer 3 IP addresses, an ingenious hacker could spoof these and bypass the filter. Certificates are discussed in more depth in Part VIII.
HTTPS Components
Three main components play a role in an HTTPS connection:
• Server and client devices
• Cipher suites
• Certificate authority (commonly called a trustpoint)
With server and clients, HTTPS ensures that before any data is sent across the wire, it is protected through encryption and packet signing (commonly called packet authentication or integrity). This prevents all eavesdropping and session-hijacking attacks.
A cipher suite defines how the connection should be protected. Cisco commonly calls this a transform set. Minimally, an encryption algorithm is used to protect the confidentiality of the information being transmitted. Supported encryption algorithms include DES, RC4, and 3DES on Cisco routers. Each packet sent is signed digitally using a hashing function. The digital signature is used by the remote end of the connection to determine whether the encrypted packet contents were tampered with. Cisco supports MD5 and SHA to protect the integrity of packets and detect packet tampering.
A certificate authority (CA) is used to issue and manage certificates. CAs provide a trusted third-party solution to prevent repudiation attacks and to identify the parties in the transaction. HTTPS uses certificates and a CA to perform these functions. Cisco routers support two options in this regard: They can use an external CA to authenticate certificates, or they can function as the CA themselves (only for HTTPS connections, though). The first method is preferred because it is more secure. However, for small networks, setting up and maintaining a CA can be expensive and burdensome; therefore, using a router as the CA for HTTPS connections is a cost-effective solution.
Tip
If you are concerned about the amount of administration but still want to use a CA for an additional level of protection, you can purchase CA services from companies such as Verisign (see http://www.verisign.com).
Note that the details of protected connections are covered in more depth in Part VIII, which includes encryption algorithms, hash functions, and certificate authorities.
HTTPS Operation
HTTPS is based on a client/server model. When clients establish an HTTPS connection to a server, such as a Cisco router, they use TCP on port 443. To establish the connection, the client uses the following syntax in a web browser’s URL address bar:
https://IP_address_of_server
When the connection is established, the server (router) sends its own certificate to the client. The server has two keys that are used by this certificate: public and private. The public key encrypts data, and only the private key decrypts it (this process is discussed in more depth in Chapter 19). The private key is kept local on the router, and no one sees it. The public key is included on the certificate. Upon receipt of the certificate, the client generates an encryption key. It uses the server’s public key to encrypt it and sends this key to the server. Only the server’s private key can decode this encryption. At this point, only the client and the server know about the key that the client generated: This is the key used to encrypt data between the client and the server.
Note
HTTP with SSL uses TCP port 443. If you are filtering traffic as it comes into your router, you need to allow this port connection.
HTTPS Configuration: No CA
As I mentioned in the section on HTTPS components, you can implement an HTTPS server function on your router in two ways: Have the router itself generate its own certificate information (less secure), or have the router use a CA and obtain a certificate from it (much more secure). This section covers how you configure the first method: The router generates its own certificate.
The configuration is straightforward and uses some of the commands discussed previously in the “Web Browser” section. Here are the steps:
Step 1 Disable the HTTP server (highly recommended).
Router(config)# no ip http server
You do not want your router accepting both HTTP and HTTPS connections; therefore, disable the HTTP function on the router.
Step 2 Assign a host name and a domain name.
Router(config)# hostname router_name
Router(config)# ip domain-name domain_name
To generate certificate information, your router needs a host name and a domain name.
Step 3 Enable the HTTPS server.
Router(config)# ip http server-secure
The ip http server-secure command enables HTTP with SSL 3.0.
Here are some optional items that I highly recommend you use:
• Set up user authentication with the ip http authentication command. For local authentication, create a list of usernames and passwords with the username command, specifying privileged EXEC access with the privilege 15 parameter.
• Restrict HTTPS access to the router with the ip http access-class command, listing only the allowed IP addresses of administrator devices.
The following items enable you to tune your HTTPS server. The ip http secure-port command specifies which port clients will use for HTTPS:
Router(config)# ip http secure-port port_#
By default, the port number is 443.
You also can change which cipher suite(s) the router will use to protect the connection:
Router(config)# ip http secure-ciphersuite {[3des-ede-cbc-sha] [rc4-128-md5]
[rc4-128-sha] [des-cbc-sha]}
It is recommended that you allow the client and server to negotiate which suite to use for protection. However, if you are paranoid about protection, you can specify only the most secure suite (3des-ede-cbc-sha) to secure your HTTPS connection.
Now take a look at a simple configuration example to illustrate how to set up HTTPS on your router without a CA, using Figure 3-2 for the network. Example 3-8 shows the configuration.
Example 3-8 HTTPS Server Configuration with an Internal CA Function
Router(config)# hostname Bullmastiff
Bullmastiff(config)# ip domain-name quizware.com
Bullmastiff(config)# access-list 1 permit 172.16.3.10
Bullmastiff(config)# access-list 1 permit 172.16.3.11
Bullmastiff(config)# username richard privilege 15 secret bigXdogYlover
Bullmastiff(config)# username natalie privilege 15 secret BIGxDOGyLOVER
Bullmastiff(config)# no ip http server
Bullmastiff(config)# ip http secure-server
Bullmastiff(config)# ip http authentication local
Bullmastiff(config)# ip http access-class 1
When you are finished, access the router through a web browser using HTTPS. When you do this for the first time, the router automatically generates keying information for its certificate. Here is an example of the Cisco IOS message from the CLI:
00:49:41: %CRYPTO-6-AUTOGEN: Generated new 768 bit key pair
00:49:45: %CRYPTO-6-AUTOGEN: Generated new 768 bit key pair
00:49:46: %SSH-5-ENABLED: SSH 1.5 has been enabled
Notice that because RSA keys were generated, SSH can be used. If you want a more secure connection, use the crypto key generate rsa command and specify a longer number of bits than 768, such as 1024.
Also, your web browser client is presented with a pop-up window about the router’s certificate. You must click the Yes button to accept the certificate.
You can see the web server’s status with the show ip http server all command, discussed in the “Web Browser” section. You can limit the output to just HTTPS information with the command displayed in Example 3-9, taken from the previous configuration.
Example 3-9 Examining the Status of the Router’s HTTPS Server
Bullmastiff# show ip http server secure status
HTTP secure server status: Enabled
HTTP secure server port: 443
HTTP secure server ciphersuite: 3des-ede-cbc-sha des-cbc-sha rc4-128-md5
rc4-128-sha
HTTP secure server client authentication: Disabled
HTTP secure server trustpoint:
In this example, you can see that HTTPS is enabled, and you can see the cipher suite that it is using to protect the web browser connections.
HTTPS Configuration: CA
The configuration of HTTPS using a CA server is much more complicated than what was done in the previous section. The configuration is broken into two parts: setting up access to the CA to obtain your certificate, and setting up the HTTPS server function.
The first thing that you need to do is to set up your connection to the CA server and obtain a certificate. Follow these steps to accomplish this:
Step 1 Set the correct time and date on your router (recommended).
Router(config)# clock timezone name offset
Router(config)# exit
Router# clock set hh:mm:ss day month year
The clock timezone command specifies the time zone that your router is in. The name specifies the name of the time zone, such as EDT for Eastern Daylight Saving Time. The offset specifies the number of hours, plus or minus, from UTC time—for EDT, it would be –5. The privileged EXEC clock set command sets the time—the day of the month is a number from 1 to 31; the month is a name, such as June; and the year is a four-digit year, such as 2003. I discuss the use of the Network Time Protocol, which I recommend over the clock set command, in Chapter 18, “Logging Events.” Other clocking configurations are discussed here as well.
Step 2 Assign a host name and a domain name (required).
Router(config)# hostname router_name
Router(config)# ip domain-name domain_name
To generate certificate information, your router needs a host name and a domain name.
Step 3 Generate your RSA keys (optional).
Router(config)# crypto key generate rsa
This command generates your RSA keys for your router’s certificate. This is optional because the router does this when acquiring a certificate; using this command simply enables you to control how long the keys are.
Step 4 If you are not using DNS resolution, define a static DNS resolution entry for the CA server (recommended).
Router(config)# ip host CA_server's_name CA_server's_IP_address
Your router needs to know how to reach the CA to obtain and authenticate certificate information. This can be done through DNS or a static host entry with the ip host command. Remember that DNS is susceptible to DNS spoofing, so I recommend using static DNS resolution with the ip host command.
Step 5 Set up access to the CA server (required).
Router(config)# crypto ca trustpoint CA_server's_name
Router(config-trustpoint)# enrollment url URL_location
Router(config-trustpoint)# primary
Router(config-trustpoint)# enrollment http-proxy
HTTP_server's_name port_#
The crypto ca trustpoint command defines the name of the CA (what you defined in the ip host command) and takes you into a subconfiguration mode for further configuration. Before 12.2.8(T), you used the crypto ca identity command instead of the crypto ca trustpoint command—both do the same thing. The enrollment url command specifies the URL to use to access the certificate information on the CA. For example, Microsoft’s CA product for Windows Server 2000 uses http://CA_server’s_name/certsrv/mscep/mscep.dll. You need to contact the administrator of the CA to determine what URL to use. If you are specifying more than one CA server, use the primary command to specify which one has precedence. If you are using a proxy server to access the CA, the enrollment http-proxy command specifies the name or IP address of the proxy server, along with the port number. Note that the only two required commands are the first two in the previous code listing: crypto ca trustpoint and enrollment url.
Step 6 Obtain the CA’s personal certificate (required).
Router(config)# crypto ca authenticate CA_server's_name
This command obtains the CA’s certificate from the CA. When your router receives the certificate, it asks you whether you want to accept the certificate. Before accepting it, call the CA administrator to verify the fingerprint message that was sent to the router. If a man-in-the-middle attack occurred, validating the fingerprint can determine this.
Step 7 Obtain the router’s personal certificate (required).
Router(config)# crypto ca enroll CA_server's_name
After obtaining the CA’s certificate, use the crypto ca enroll command to have the CA generate a certificate for the router itself. You are prompted for a few pieces of information. First, you must enter a challenge password; this is used if you ever need to revoke your certificate on the CA because the CA administrator will ask for it. Next, you are prompted for what information you want to include in the certificate, such as the router’s serial number and its IP addresses. After answering these questions, you are asked to obtain a certificate from the CA. The Cisco IOS displays a message with the appropriate success status. When obtaining a certificate, a delay (in seconds, minutes, or hours, depending upon how the CA is configured to respond) might occur before the router obtains its certificate.
Upon completion, save your configuration: This saves your certificate information as well as your commands. Part VIII discusses certificates and their setup in much more depth.
Now that you have configured access to the CA, you need to prepare your router as an HTTPS server. This is similar to what I described in the previous section. Here are the steps to follow:
Step 1 Disable the HTTP server (highly recommended).
Router(config)# no ip http server
You want to ensure that only the HTTPS server function is operating on your router.
Step 2 Enable the HTTPS server (required).
Router(config)# ip http secure-server
Step 3 Specify the HTTPS port and cipher suite to use (optional). This is accomplished with the ip http secure-port and ip http secure-ciphersuite commands, which were discussed in the last section.
Step 4 Configure verification of client’s certificate (highly recommended).
Router(config)# ip http secure-client-auth
This command has the server request the client’s certificate and validate the client’s identity. Use this option only if you know that your PCs have SSL certificates installed; otherwise, the router will prevent HTTPS access. I highly recommend this option because it adds more security to the connection, verifying both endpoints of the connection: client and server.
Step 5 Specify the CA server to use for HTTPS (required).
Router(config)# ip http secure-trustpoint CA_server's_name
This command specifies who the CA server is. Enter the same name that you used with the crypto ca trustpoint command.
Step 6 Authenticate and restrict access to the HTTP server (highly recommended). Use the ip http authentication and ip http access-class commands to accomplish these tasks. These commands were discussed earlier in the “Web Browser” section.
Step 7 Configure other optional HTTP server commands, such as ip http path, ip http max-connections, and ip http timeout-policy. These commands were discussed earlier in the “Web Browser” section.
When you are finished, open a web browser connection to your router, using this syntax in the web browser’s URL address bar:
https://Router's_IP_address
You must accept the router’s certificate by clicking the Yes button in the certificate pop-up window.
Use the show ip http server secure status and show ip http server all commands to see your server’s configuration and existing connections to it. For detailed troubleshooting of SSL connections, use the debug ip http ssl error command.
To illustrate how to set up HTTPS on a router so that it uses a CA for authentication, take a look at an example, using the same network shown in Figure 3-2. Example 3-10 shows the configuration.
Example 3-10 Configuring HTTPS Authentication Using a CA
Router(config)# clock timezone edt -5
Router(config)# exit
Router# clock set 16:15:00 16 sept 2003
Router# configure terminal
Router(config)# hostname bullmastiff
bullmastiff(config)# ip domain-name quizware.com
bullmastiff(config)# ip host I7500 172.16.4.253
bullmastiff(config)# crypto key generate rsa
The name for the keys will be: bullmastiff.quizware.com
Choose the size of the key modulus in the range of 360 to 2048 for your
General Purpose Keys. Choosing a key modulus greater than 512 may take
a few minutes.
How many bits in the modulus [512]: 1024
% Generating 1024 bit RSA keys ...[OK]
Sep 16 21:19:28.219: %SSH-5-ENABLED: SSH 1.5 has been enabled
bullmastiff(config)# crypto ca trustpoint I7500
bullmastiff(ca-trustpoint)# enrollment url
http://I7500/certsrv/mscep/mscep.dll
bullmastiff(ca-trustpoint)# exit
bullmastiff(config)# crypto ca authenticate I7500
Certificate has the following attributes:
Fingerprint: A6A5BFDD DCA6123F 30C04693 654C1024
% Do you accept this certificate? [yes/no]: yes
Trustpoint CA certificate accepted.
Fingerprint: 00BE96B7 5F4F08C2 C9281FA4 ABD2E422
Sep 16 21:42:40.859: %CRYPTO-6-CERTRET: Certificate received from Certificate Authority
Bullmastiff(config)# crypto ca enroll I7500
% Start certificate enrollment ..
% Create a challenge password. You will need to verbally provide this
password to the CA Administrator in order to revoke your certificate.
For security reasons your password will not be saved in the configuration.
Please make a note of it.
Password: MyI7500Cert6
Re-enter password: MyI7500Cert6
% The fully-qualified domain name in the certificate will be:
bullmastiff.quizware.com
% The subject in the certificate will be: bullmastiff.quizware.com
% Include the router serial number in the subject name? [yes/no]: no
% Include an IP address in the subject name? [no]: no
Request certificate from CA? [yes/no]: yes
% Certificate request sent to Certificate Authority
% The certificate request fingerprint will be displayed.
% The 'show crypto ca certificate' command will also show the fingerprint.
Fingerprint: 00BE96B7 5F4F08C2 C9281FA4 ABD2E422
Sep 16 21:42:40.859: %CRYPTO-6-CERTRET: Certificate received from Certificate Authority
bullmastiff(config)# no ip http server
bullmastiff(config)# ip http secure-server
bullmastiff(config)# ip http secure-trustpoint I7500
bullmastiff(config)# username richard privilege 15 secret cisco
bullmastiff(config)# ip http authentication local
bullmastiff(config)# access-list 1 permit 172.16.3.10
bullmastiff(config)# access-list 1 permit 172.16.3.11
bullmastiff(config)# ip http access-class 1
As you can see from this configuration, it is much more involved than the configuration that did not use a CA. The first part shows the setting of the date and time on the router with the clock timezone and clock set commands. Next, the router’s name and domain name are configured with the hostname and ip domain-name commands. The RSA keys then are generated. This is optional, but it adds another layer of security because you can specify a longer key length (in this example, I used 1024 bits).
After generating the keys, the configuration of the CA begins. Because this router is not using DNS, I statically resolved the CA server’s name (I7500) to an IP address (172.16.4.253). Next, I defined I7500 as the CA with the crypto ca trustpoint command. This takes you into a subconfiguration mode where you need to specify only the URL location to access the CA server. In this instance, I’m using Microsoft’s CA product, which is on a Windows 2003 server. After defining the CA, I can obtain the CA’s own certificate with the crypto ca authenticate command. Remember to verify the fingerprint of the CA’s certificate with the CA’s administrator, to make sure that a man-in-the-middle attack (in which a hacker’s computer pretends to be the CA) did not occur.
After verification, I obtained the router’s personal certificate with the crypto ca enroll command. Notice that I am asking for the challenge password as well as the information that I want to include in the router’s certificate. After answering these questions, the router asks me one more question: whether I am ready to acquire the router’s certificate from the CA. After I answer Yes, it might take a few seconds, to dozens of minutes to obtain the certificate from the CA server; this depends upon how the CA server is configured to respond to certificate requests. When the router has its own certificate, this completes the configuration process for the CA.
Now you’re ready to proceed with the configuration of the HTTPS server on your router. First, you need to disable the HTTP (nonprotected) server with the no ip http server command and enable the HTTPS server with the ip http secure-server command. Following this, you must tell the router which CA server it should use for authentication with the ip http secure-trustpoint command.
The last part of the configuration is not necessary, but I highly recommend it: The ip http authentication sets up local authentication with the use of the username commands. The username command is discussed later in the “Local Authentication Database” section. You also can use an external authentication server, which is discussed in Chapter 5. I restricted HTTP access to the server by using the ip http access-class command as well.
Now you can test your configuration by opening a web browser window and entering the following in the URL:
https://Router's_IP_address
Click Yes to accept the router’s certificate. Then the router prompts you for your username and password. Remember that the username commands must specify a privilege level of 15 to allow configuration access to the router.
As you can see from this example, setting up secure HTTPS with a CA server for authentication is not a trivial matter. A lot of planning and configuration must be done on your part to get this up and running on your router.
Note
For small networks, I recommend using the configuration from the last section (without an external CA). However, in large enterprise networks with a CA server already in use, I highly recommend using certificates with HTTPS because this practically removes any likelihood that a masquerading attack will occur.
Given this information, my preferred method of secure access to a router is through the console port or a VPN. Even with encrypted HTTPS, there have been exploits against HTTP servers, especially DoS attacks, that drastically have affected their performance. But if you really like using a web browser for configuration and management functions, make sure that you use either HTTPS or HTTP through a VPN connection.
SNMP
SNMP is an application that allows for communication of system events and information between devices. It is used for monitoring as well as management of devices. In SNMP, there is a manager (a workstation that gathers SNMP information), agents (devices such as routers that supply SNMP information to a manager), and MIBs (which define what information is available and in what format on an agent).
With SNMP, the agent can send unsolicited notifications, referred to as traps or informs, to the manager for when specific events occur. For example, a Cisco router can send a trap when an interface goes up or down, or when the router is rebooted. Traps are connectionless; informs are connection oriented. With traps, there is no acknowledgment that the trap on the management station has been received; with an inform, the management station replies with an acknowledgment that the agent has received the inform. The other method by which information can be shared is the manager accessing the agent and pulling data directly from the agent’s MIB(s).
Note
SNMP typically uses UDP 161. However, SNMP notifications are sent using UDP 162. Therefore, if you need to forward SNMP information through a filtering device, you must allow these protocols through your filter.
SNMP Versions
Three different versions of SNMP exist: v1, v2, and v3. The Cisco IOS supports all three, depending on the Cisco IOS version and platform. v1 is the least secure, and v3 is the most secure. Table 3-1 compares the three different versions of SNMP.

SNMP v1 and v2 use community strings to perform authentication: This is a simple mechanism similar to password checking. With Cisco routers, you can use ACLs to control SNMP access, similar to what you saw earlier in this chapter with VTY and HTTP/HTTPS access. Security-wise, there is no difference between these protocols. The main difference is how error conditions are handled: SNMP v2 has more intelligence in this regard.
SNMP v3 was developed because of the security limitations that SNMP v1 and v2 had. It is based on a security model that allows for authentication using both users and groups, and it can encrypt the packet contents. SNMP v3 is defined in RFC 2570 and provides three basic security functions:
• Authentication—Verifying that the SNMP message was received from a valid source, preventing masquerading attacks
• Integrity—Verifying that the SNMP message was not altered between two devices, preventing session-hijacking attacks
• Confidentiality—Encrypting the contents of SNMP packets, preventing eavesdropping attacks
The purpose of the next two sections is not to show you how to set up a full-blown SNMP configuration on your router. Instead, the configuration focuses only on the commands to provide the most secure form of SNMP access.
SNMP v1 and v2 Configuration
With any of the versions of SNMP, the first snmp-server command that you execute enables the agent on your router. Setting up and securing access for SNMP v1 and v2 is simple. Two basic commands are used for setting up SNMP v1 and v2 access on a Cisco router: snmp-server community and snmp-server host.
This is the syntax of the snmp-server community command:
Router(config)# snmp-server community string [view view-name]
[ro | rw] [number]
The snmp-server command is a generic command. First, notice that you do not specify the version of SNMP: You can specify only the string (password), the view that is allowed by devices that know the password, the type of access (ro is read-only and rw is read-write), and a standard ACL number, restricting which devices can access the router through SNMP. If you omit the read-only or read-write parameter, the SNMP string defaults to read-only.
To have a router generate traps or informs, you can use the following two commands:
Router(config)# snmp-server enable traps [notification_type]
Router(config)# snmp-server enable informs
With the snmp-server enable traps command, you can limit the traps that the router generates by listing them; omitting any traps enables all of them. No option exists to enable or disable specific informs. The main problem with these two commands is that you cannot restrict on a device-by-device basis what traps or informs are directed to specific SNMP management stations.
Because of the limitations of the snmp-server community and snmp-server enable commands, the snmp-server host command is preferred over the snmp-server community command. Here is the syntax of this command:
Router(config)# snmp-server host SNMP_manager_IP_address
[traps | informs][version {1 | 2c} ] community_string [udp-port port_number]
[notification_type]
If you do not configure at least one snmp-server host command, the router cannot send SNMP notifications to a management station. With this command, you specify the IP address of the management station as well as its own personal community string. You also can specify whether notifications are sent as traps or informs. Note that v1 does not support informs.
Following this comes the SNMP version; omitting it causes the version to default to SNMP v1. You optionally can specify a different port number to use for notifications; the default is UDP 162. Finally, you can limit the types of notifications sent to the SNMP management station; omitting this causes all notifications to be sent.
Of all of the IP protocols that exist, SNMP is one of the favorites of hackers because a hacker can learn a lot of information about your network and devices if he can compromise SNMP. With SNMP v1 and v2, this easily is accomplished by using an eavesdropping attack. Therefore, I highly recommend that if you are absolutely set on using SNMP v1 or v2 on your perimeter router firewall, you should filter all unnecessary SNMP traffic and change the UDP port number, to attempt to hide the fact that the router has SNMP enabled on it. I also highly recommend that you protect the SNMP traffic by sending it through an encrypted VPN connection from the management station to the router, and vice versa.
Caution
If you have not configured the snmp-server community command before configuring snmp-server host commands, the router automatically adds an snmp-server community command with a community string from the snmp-server host command. This happens automatically in Cisco IOS versions 12.0(3) and later.
Take a look at an example of securing SNMP v1, using the network shown in Figure 3-3. In this example, the router needs to provide SNMPv1 access, but for only management, not configuration, purposes. Example 3-11 shows the basic configuration.
Example 3-11 Simple SNMP Configuration Example
Router(config)# access-list 1 permit 172.16.3.2
Router(config)# access-list 1 deny any log
Router(config)# snmp-server community keep935out ro 1
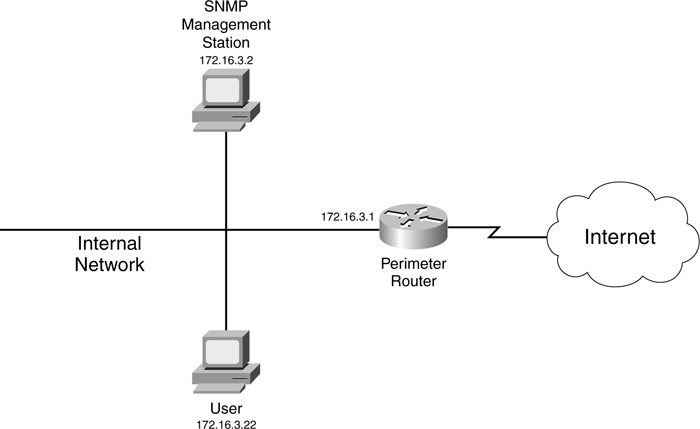
In this example, only the management station (172.16.3.2) is allowed SNMP read-only access; the ACL denies all others. One interesting thing to note about the deny statement in the ACL is that all unauthorized access is logged, internally as well as to a configured syslog server. If there is a deny on an SNMP packet trying to access the router, you will see the following Cisco IOS message:
%SEC-6-IPACCESSLOGS: list 1 denied 172.16.3.22 3 packet
In this example, three SNMP packets were denied from 172.16.3.22.
Configuring standard ACLs is discussed in Chapter 7, and configuring logging is discussed in Chapter 18.
If you want to allow your router to generate SNMP traps and informs, but you don’t want a management station polling or directly accessing your router, use the configuration in Example 3-12, based on Figure 3-3.
Example 3-12 Enabling SNMP Traps and Informs Only
Router(config)# snmp-server community traps3997only ro 1
Router(config)# snmp-server host 172.16.3.2 traps3997only
Router(config)# access-list 1 deny any
In this example, the router can send SNMP traps to 172.16.3.2, but 172.16.3.2 cannot poll or access the router through SNMP. This is accomplished with the ACL associated with the snmp-server community command that denies all source addresses.
Caution
SNMP v1 and v2 are insecure protocols. Hackers love to use SNMP to learn all kinds of information about your network and its devices. I recommend never using them, especially on a router that is acting as a firewall. If you need to use these versions internally, follow these recommendations. First, don’t use easy-to-guess community strings, such as public and private. Instead, make them a random string of numbers and letters. Second, use ACLs to restrict access through SNMP to the router. Third, use a VPN to protect the SNMP traffic between your agents and management devices, or use SNMP v3. Also make sure that you filter out any and all SNMP traffic from external networks; you don’t want your router responding to external queries.
SNMP v3 Configuration
The configuration of SNMP v3 is different from that of v1 and v2. You use three commands to secure SNMP v3 access:
• snmp-server group
• snmp-server host
The combination of these three commands enables you to secure SNMP access to your router.
The snmp-server group command maps SNMP users to SNMP views. A view enables you to restrict the MIB or MIBs that the group is allowed to access. Here is the syntax of this command:
Router(config)# snmp-server group groupname v3 {auth | noauth | priv}
[read readview] [write writeview] [notify notifyview ] [access standard_ACL_#]
First, you must specify the name of the group, which is configured on your management station or stations. This command actually supports all three versions of SNMP, but for the purpose of this section, I am using v3. With v3, you have three types of protection:
• noauth—Does not authenticate or encrypt the packet. This is the weakest form of security for SNMPv3.
• auth—Authenticates the packet but does not encrypt it.
• priv—Authenticates the packet and encrypts the packet contents. This is the strongest form of security for SNMPv3.
I highly recommend that you use the priv method of securing SNMP v3 traffic because the contents are not readable as they are traveling across the network.
Following the security information, you can specify the views (read, write, and notify) that you previously created, restricting the group to only certain MIB structures. Typically, you do not specify notify views in this command, but with the snmp-server host or snmp-server user commands, since the use of the snmp-server group command restricts notifications (notify views) for all users of the group. Finally, you can use a standard ACL to restrict which SNMP management devices can access the router.
To add a user to a group, use the snmp-server user command:
Router(config)# snmp-server user username groupname [remote IP_address]
[udp-port port_#] v3 [encrypted] [auth {md5 | sha} password [priv des56 password]
[access standard_ACL_#]
The username parameter specifies the username on the management station that will access the router and the group name associated with the group that the user belongs to (snmp-server group command). Following this is the IP address of the management station. If you omit this, the address in the snmp-server host command is used. You can change the port number for notifications, but it defaults to UDP 162. For the most secure access, you specify SNMP v3.
You have different options for securing the connection. The encrypted option specifies that any passwords are protected; that is, you cannot see the passwords in clear text when you execute the show running-config command. The auth parameter specifies that authentication should be used to verify the remote side’s identity by performing packet-integrity checking. You need to specify the hashing function to use—MD5 or SHA—and the key to use for the hashing function. This key cannot exceed 64 characters. The priv des56 parameter specifies that encryption should be performed using DES with 56-bit keys. Following this is the key value for the encryption algorithm, which cannot exceed 64 characters. For both passwords, Cisco recommends that they be at least eight characters long. The last part of the command enables you to specify a standard ACL to limit access to the router.
To specify the destination of SNMP traps, use the snmp-server host command:
Router(config)# snmp-server host IP_address [traps | informs]
version 3 [{auth | noauth | priv} community_string [udp-port port_#]
[notification_type]
This is the same command discussed with SNMP v1 and v2, but with some additions. In this example, the version is SNMP v3. The main difference is the security options: The noauth option specifies no security, the auth option specifies packet integrity checking only, and the priv option specifies both integrity checking and encryption for the SNMP connection.
Example 3-13 shows an insecure SNMPv3 configuration, using the network shown in Figure 3-3.
Example 3-13 Insecure SNMP v3 Configuration Example
Router(config)# snmp-server group group1 v3 noauth
Router(config)# snmp-server user user1 group1 remote 172.16.3.2 v3
Router(config)# snmp-server host 172.16.3.2 traps version 3 noauth user1
In this example, the management station is 172.16.3.2, and no SNMP v3 authentication is performed for user1 in group1.
Example 3-14 shows a more secure configuration.
Example 3-14 Secure SNMPv3 Configuration Example
Router(config)# snmp-server group group1 v3 priv
Router(config)# snmp-server user user1 group1 remote 172.16.3.2 v3
encrypt auth md5 secretpass1
priv des56 secretpass2
Router(config)# snmp-server host 172.16.3.2 traps version 3 priv user1
In this example, packet-integrity authentication is enabled, as is DES encryption. The two passwords are encrypted (using the encrypt parameter).
Caution
My personal preference is to not use any type of SNMP on a perimeter firewall router. This limits your management functions on it, but it provides for a more secure solution. In the worst case, I use a VPN to encrypt data between the management station and the router. I have found that SNMP v3 is not simple to set up and maintain across multiple platforms; I have found VPNs easier, but your mileage may vary.
Use the no snmp-server command to disable all SNMP functions on your router.
Privileged EXEC Access
Up to this point in the chapter, I have focused on user EXEC levels of access and remote access. The remainder of this chapter focuses on privileged EXEC access and how to secure it using static passwords, user accounts, and modification of privilege levels.
The second level of EXEC access on a router is privileged EXEC. By default, this level of access gives you complete access to all of the router’s functions, including configuration, troubleshooting, and management.
Passwords
You can use two commands to statically assign passwords to privileged EXEC mode:
Router(config)# enable password password
Router(config)# enable secret password
The enable password command does not encrypt the password, whereas the enable secret command does. This affects what you can see when executing a command such as show running-config. The enable secret command uses the MD5 hashing function to encrypt the password, which is a very secure method of protection.
Privilege Levels
Cisco has 16 different levels of access to the Cisco IOS: 0 through 15. By default, only two of these are used: 1 is for user EXEC access, and 15 is for privileged EXEC access. One problem with this approach is that if you want to give an administrator access to privileged EXEC mode to use debug commands for troubleshooting problems, you also give him configuration rights, by default. Unfortunately, with this two-level hierarchy, if a user has access to the privileged EXEC password, he has full access to the router.
One nice feature of the Cisco IOS, however, is that you can change the access level assigned to commands from both user and privileged EXEC modes. In the example of an administrator needing only access to user EXEC and debug functions, you could assign a privilege level of 7 to debug commands and then set up either a privileged EXEC password or an account for your administrator that is assigned a level of 7. Therefore, when the administrator logs into the router with his account or password, he can execute commands only at level 7 or lower—in this case, debug commands and all user EXEC commands.
The next section covers assigning privilege levels to commands. The following two sections cover how to set up authentication for these levels of access.
Restricting Levels
To assign privilege levels to commands, the privilege command is used. Here is its general syntax:
Router(config)# privilege mode [all] {level level | reset} command_string
The mode parameter specifies the mode from which the command is executed. Table 3-2 lists some of the more important modes that you can specify. New in Cisco IOS 12.0(22)S and 12.2(13)T, you can specify the all keyword. This keyword functions as a wildcard and includes all commands and parameters beginning with those described by the command_string parameter at the end of the command. Before this feature, you had to list each command separately, which could be a time-consuming process (especially for show and debug commands).
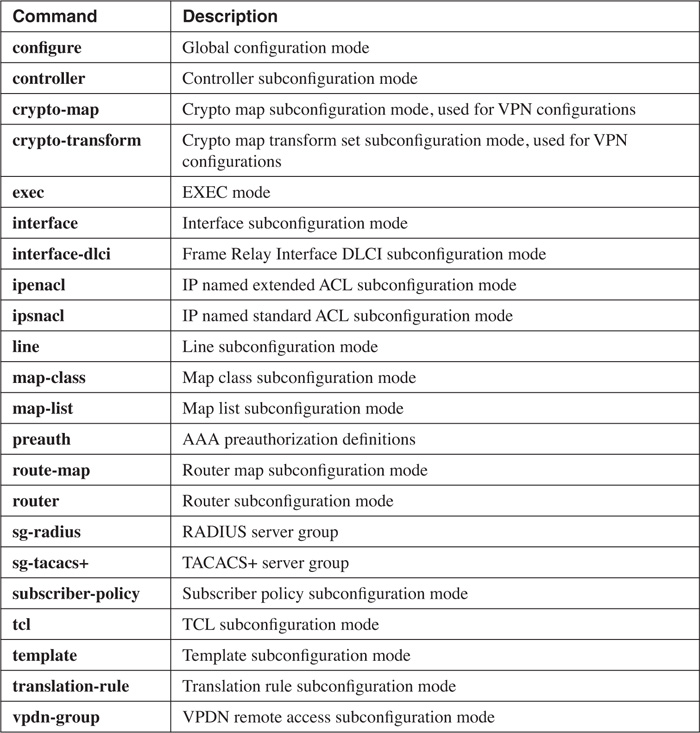
The level keyword specifies the level of access that you assign to the command(s). This can be from 0 to 15, where 1 is user EXEC and 15 is privileged EXEC, by default. Instead of specifying the level keyword, you can use reset; this keyword resets the privilege level of the command(s) to the default privilege level and removes the privilege command from the router’s configuration. Prefacing the privilege command with the no parameter resets the privilege level of the command(s) but does not remove it from the router’s configuration.
Note
Five commands are actually at level 0 instead of 1 or 15: disable, enable, exit, help, and logout.
In the last part of the command you enter your command or partial command. When entering a partial command, make sure that you use the all keyword to match on all commands that begin with this string.
Caution
Whenever you set the privilege level for a command that has multiple words, such as show ip access-list, all commands beginning with the first parameter also have their privilege level changed. This makes sense because, for this example, to execute the show ip access-list command, you first must be able to execute show ip; likewise, to execute show ip, you must be able to execute show. For example, if I set the level to 7 for show ip access-list, all show and show ip commands also would have their levels set to 7.
Therefore, the privilege-level restriction is what it describes: It typically can restrict a specific command (unless that command has no parameters), but it typically is used to restrict a group of commands, or all commands, for a specific method of access, such as EXEC or configuration mode.
Using the privilege command can be tricky, so take a look at a simple example to illustrate its usage. In this example, you want an administrator to be able to execute show and debug commands, and disable and enable an interface, but only these privileged EXEC commands. Example 3-15 shows the configuration to accomplish this.
Example 3-15 Command Restriction Example
Router(config)# privilege exec level 7 show
Router(config)# privilege exec level 7 debug
Router(config)# privilege exec level 7 configure
Router(config)# privilege configure level 7 interface
Router(config)# privilege interface level 7 shutdown
The first two commands are straightforward. To execute any show or debug command from EXEC mode, you must be at least logged into the router at level 7 or higher.
Caution
In Example 3-15, all show commands are assigned to privileged EXEC level 7. This means that if a user has access only to user EXEC mode, he will not be able to execute any show commands.
Restricting the administrator to only enabling and disabling interfaces is more difficult. To do this, the user must execute the [no] shutdown command within an interface from configuration mode. First, the administrator must be able to access configuration mode; this is the EXEC level 7 access for the configure command (third line). Next, the user needs access to interfaces on the router from configuration mode (fourth line). Finally, the user is restricted to just the shutdown command within the interfaces (last line).
Tip
As you can see from the previous example, setting up restrictions is not necessarily an easy process. Therefore, I highly recommend that you not configure these on a production router without first doing them on a test router, to make sure that you are not creating any inadvertent security problems. Plus, you definitely do not want to lock yourself out of the router because of a misconfiguration. To recover from this problem, you would have to perform the password-recovery procedure, and this requires a reboot of the router.
Note
The configuration discussed here has the router itself performing command authorization. One problem with this approach is scalability: If you have 100 routers on which you need to implement and maintain command execution restrictions, you have your work cut out for you. Chapter 5 discusses how to centralize AAA functions, such as command authorization, on an AAA security server such as Cisco Secure ACS.
Password Levels
Now that you have set up your privilege levels for access restrictions, you need to set up your authentication so that administrators can access these privilege levels. This can be done with one of two methods: privileged EXEC passwords assigned to a specific level or a local authentication database. This section covers the former, and the next section covers the latter.
Of the two authentication methods for privilege levels, using the enable command is the easiest to implement. Use the following command to associate a privileged EXEC password with a specific level:
Router(config)# enable secret level level_# password
All you need to do is specify the level number for access and then specify the password.
Note
You also can use the enable password command to do this. However, in Cisco IOS 12.3, when this command is executed, the router displays a warning message:
% Converting to a secret. Please use "enable secret" in the future.
The Cisco IOS then converts the enable password command to the enable secret command. This makes sense because the enable secret command uses an MD5 hash function to encrypt the password, which is very secure.
Also, using the enable password command stores the password on the router in clear text, which is susceptible to eavesdropping attacks. Therefore, do not use the enable password command; instead, use enable secret.
After you have set up your passwords, to test them, log out of the router and then log back in. From user EXEC mode, use this command:
Router> enable level_#
When you specify the level number with the enable command, the router uses the appropriate password configured with the enable secret level command. If you omit the level number, the Cisco IOS assumes level 15 access.
To view your privilege level after you have authenticated, use the show privilege command:
Router# show privilege
Current privilege level is 7
To exit to a specific level, use this command:
Router# disable level_#
Given the previous privilege command configuration, to set up level 7 authentication, use the following command:
Router(config)# enable secret level 7 hidden88secret
To test this access, use the process in Example 3-16 when logging in.
Example 3-16 Logging into a Specific Privileged EXEC Level
Router> enable 7
Password: hidden88secret
Router# show privilege
Current privilege level is 7
Router#
Local Authentication Database
The main problem of using the enable secret command to assign passwords to levels is that if multiple administrators need access to the same level, they all must use the same password, which is a security risk. A better approach is to create a local authentication database in which each user is assigned a different account name and password. Therefore, if an administrator leaves the company, you do not have to notify all the other administrators of the password change to the access level. Instead, you would just delete the old administrator’s account.
Tip
The local authentication database is used best when you need to maintain only a small number of Cisco IOS routers. If you have dozens or hundreds of routers, it is not practical to replicate account changes on each router. Instead, you will want to use AAA and an external security server to centralize your authentication and authorization functions, as discussed in Chapter 5.
To create a local authentication database, the username command is used:
Router(config)# username user's_name [privilege #]
{secret | password} password
The account name must be unique. If you omit the privilege level, it defaults to 1. Two options exist for specifying how the router treats the password. The secret parameter encrypts the password using MD5 (the same as the enable secret command). This option was introduced in Cisco IOS 12.0(18)S and was integrated fully into the Cisco IOS in versions 12.1(8a)E and 12.2(8)T. The password parameter does not encrypt the password.
Here is a simple example of creating a user with level 7 access that is encrypted with MD5:
Router(config)# username richard privilege 7 secret keepOUT
After you have built your authentication database, use the login local command on your lines, forcing them to use the local authentication database instead of the password command on the line. Example 3-17 shows a sample of setting up your lines to use the local authentication database.
Example 3-17 Setting up Your Lines to Use the Local Authentication Database
Router(config)# line con 0
Router(config-line)# login local
Router(config-line)# exit
Router(config)# line aux 0
Router(config-line)# login local
Router(config-line)# exit
Router(config)# line vty 0 4
Router(config-line)# login local
Based on the privilege level, the user immediately is placed in that level upon successfully logging in. You then can use the show privilege command to verify the privilege level.
After you have set up the connection, log into the router using the account name. Check the privilege level with the show privilege level command, and then test the commands allowed by this account to ensure that you have set up your privilege commands correctly.
Caution
If you configure the login local command on your lines and do not have any accounts defined with the username command, you have just locked yourself out of the router. I recommend setting up the login local command on the VTYs first; then test this and apply the command to the console line to prevent inadvertent lockouts.
Other Access Items
I want to discuss two other items concerning setting up basic authentication to various types of access to your router. The first item deals with unencrypted passwords, and the second deals with login banners. The following two sections cover this information.
Encrypting Passwords
Certain password commands, such as the password line subconfiguration mode command and the username password and enable password commands, do not encrypt their passwords. Unfortunately, this means that every time you view your configuration with the show running-config command or back up your configuration to a TFTP server, these clear-text passwords are susceptible to eavesdropping attacks. You can use a few solutions to limit your exposure to eavesdropping attacks for your passwords:
• Use commands that encrypt the passwords, such as username secret and enable secret.
• When backing up your configuration to a remote server, use a VPN that performs encryption, or, instead of using TFTP, use SCP (secure copy). VPNs are discussed in Part VIII, and SCP is discussed in Chapter 5.
• Encrypt the unencrypted passwords with the service password-encryption command.
This section focuses on the last point. The service password-encryption command is used to encrypt clear-text passwords in your configuration:
Router(config)# service password-encryption
Passwords are encrypted whenever you execute this command and any time after this when you enter a password in your router’s configuration. This applies to all clear-text passwords, including authentication key passwords, line passwords, privileged EXEC passwords, and routing protocol passwords. However, the encryption process used for the encryption is very weak and can be reversed.
The main purpose of the service password-encryption command is to provide some level of protection from eavesdroppers. However, it should be pointed out that passwords encrypted with this command can be decrypted with the correct tool. At one time, you could download freely this tool if you had CCO access.
As an example, you can go to the website http://www.oldach.net/ciscocrack.shtml and enter the full username password or enable password command, and the website will decrypt the password for you. Here’s an example of information that I entered and the output that it produced:
The line
username richard privilege 7 password 7 0822455D0A16
decodes to
username richard privilege 7 password cisco
That’s pretty cool, yet scary. If you use the secret parameter, which uses MD5 to encrypt the password, this nifty utility cannot decode the password. The one limitation of this link is that it decrypts passwords only from the username password command. Boson software has a similar utility that you can download and freely use on your desktop. It can be found at http://www.boson.com/promo/utilities/getpass/getpass_utility.htm. This utility decrypts any password that was encrypted with the service password-encryption command. Actually, I have never heard of anyone breaking an MD5-protected password, so I highly recommend that you use commands that use MD5 for password protection.
Banners
Even though this is a minor thing, you always should put a login banner on your router that is displayed before the username/password prompt. This might not seem like an important measure to take when securing your router; however, if you ever need to take someone to court over damages caused by hacking into your router, you will need proof that access to the router is limited to only authorized personnel.
Banner Guidelines
At a minimum, a good banner should contain the following:
• What company or person owns the router
• Who is authorized to use the router
• A statement that unauthorized use is illegal and in violation of state and federal laws
• A statement that users’ activities will be monitored while on the system
• A statement that actions will be prosecuted to the fullest extent of the law
From a legal standpoint, your banner should address two major issues:
• Display a message that would prove that a hacker’s actions were intentional, so that the hacker can’t argue that his actions were inadvertent or accidental. By going past the banner to log in, the hacker should be forewarned.
• Display a message regarding the law and repercussions for breaking the law. This tells any hacker that he cannot plead ignorance of the law if he breaks into your router.
Your warnings should be spelled out but general in nature as to what type of crime a hacker is committing by gaining unauthorized access, and that federal or state law-enforcement agencies will be used to prosecute the offense. What you don’t want to include in your banner are words such as welcome, greeting, and other types of friendly salutations. You want to make it distinctly clear to whom the router belongs, who is allowed to use it, and the repercussions of unauthorized access.
Here is a standard banner that I commonly see on U.S. government devices:
THIS UNITED STATES GOVERNMENT COMPUTING SYSTEM IS FOR AUTHORIZED
OFFICIAL USE ONLY. Unauthorized use or use for other than official
U.S. Government business is a violation of Federal Law (18 USC).
Individuals using this computing system are subject to having all
of their activities on this system monitored and recorded without
further notice. Auditing of users may include keystroke monitoring.
Any individual who uses this system expressly consents to such
monitoring and is advised that information about their use of the
system may be provided to Federal law enforcement or other authorities
if evidence of criminal or other unauthorized activity is found.
Of course, you should change this to fit your own company’s policies.
Caution
Each government institution has its own laws regarding illegal access and destruction. Therefore, you first should consult your legal department about your created banner so that you have a better chance of winning in court if you must prosecute someone.
Banner Configuration
You can up a login banner on a Cisco router in a few ways:
• banner motd creates a message of the day (MOTD) banner. This banner is displayed to all connected terminal users before they are prompted for the username/password information.
• banner login creates a login banner. This banner is displayed after the MOTD banner but before the user is prompted for the username/password information. This sometimes is used to list contact information.
• banner exec creates an EXEC banner. This banner is displayed before an EXEC process is started. This is typically after the user has authenticated but before the CLI prompt is presented to the user. This sometimes is used to display scheduled events, such as system downtime or maintenance.
• banner incoming creates an incoming banner. This is used in reverse Telnet connections. This typically displays instructions on the use of reverse Telnet, such as how to suspend a session.
• banner slip-ppp creates a banner for incoming SLIP and PPP dialup connections.
Of the banners listed, at a minimum, you should configure the banner motd command. Your main concern here is to ensure that no matter what method someone uses to gain access to your router—local through the console or auxiliary lines, or remote through VTY—a banner is always displayed.
Caution
I know of no way of making a banner appear on an HTTP login connection through a web browser to a Cisco IOS router. Therefore, you need to take very careful measures to prevent this kind of unauthorized access to your router.
The general syntax of the banner command is as follows:
Router(config)# banner banner_type stop_character message stop_character
The banner type can be motd, login, exec, incoming, or slip-ppp. Following this is the stop, or delimiting, character. This indicates that when you are typing in your message and this character appears, the Cisco IOS will terminate the banner. Next you type in your banner message. Note that the stop character, not the <ENTER> key, indicates the end of the banner; therefore, banners can span multiple lines. After you type in your stop character and then type in any other character, the Cisco IOS exits the banner creation.
Within the banner message, you can insert banner tokens. A banner token is basically a variable the Cisco IOS fills in with the appropriate information. Table 3-3 lists some of the banner tokens that you can insert into all but the incoming banner messages.
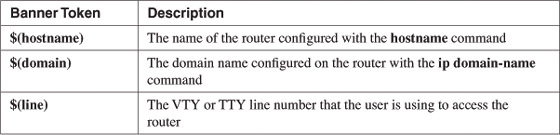
To illustrate the use of a login banner, Example 3-18 shows how to create a simple MOTD banner using the canned government banner shown in the previous section.
Example 3-18 Creating a Login Banner
Router(config)# banner motd $
THIS UNITED STATES GOVERNMENT COMPUTING SYSTEM IS FOR AUTHORIZED
OFFICIAL USE ONLY. Unauthorized use or use for other than official
U.S. Government business is a violation of Federal Law (18 USC).
Individuals using this computing system are subject to having all
of their activities on this system monitored and recorded without
further notice. Auditing of users may include keystroke monitoring.
Any individual who uses this system expressly consents to such
monitoring and is advised that information about their use of the
system may be provided to Federal law enforcement or other authorities
if evidence of criminal or other unauthorized activity is found.
$
Router(config)#
In this example, the stop character is the dollar sign ($). To test the banner, log out and back into your router.
Caution
In Cisco IOS 12.2 and earlier, there is an operational problem with Cisco routers: If a user attempts to log in and gives an invalid username, the router responds with a “% Login invalid” message instead of prompting the user for a password again. The problem with this message is that it tells the hacker that the account name that the hacker tried to use does not exist on the router. If the hacker does not get this message, he knows that he has found a valid account name. This greatly aids a hacker in gaining unauthorized access to your router. If you are concerned, upgrade to Cisco IOS 12.3.
Example Configuration
Now that you understand some of the basics of authentication and access, take a look at an example that uses some of the ideas discussed in this chapter. This example uses the network shown in Figure 3-4 to illustrate the configuration of the router called Skunk. In this example, there are two administrative machines: 192.168.3.10 and 192.168.3.11. Example 3-19 displays the configuration.
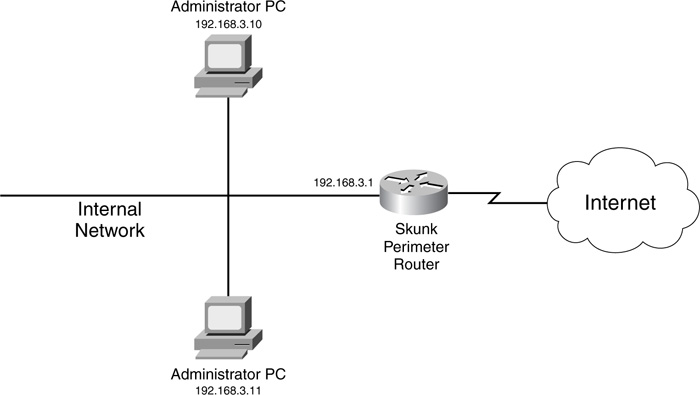
The two username commands at the beginning of the configuration use MD5 encryption to protect the passwords for the admin1 and techie1 accounts. Admin1 is given level 15 access, and techie1 is given only level 7 access. Notice that the privilege commands below this allow techie1 to execute show and debug commands and the shutdown command on an interface.
Example 3-19 Implementing Many Concepts Covered in This Chapter
Router(config)# username admin1 privilege 15 secret geekyadmin
Router(config)# username techie1 privilege 7 secret
underpaidoverworked
Router(config)# privilege exec level 7 show
Router(config)# privilege exec level 7 debug
Router(config)# privilege exec level 7 configure
Router(config)# privilege configure level 7 interface
Router(config)# privilege interface level 7 shutdown
Router(config)# line console 0
Router(config-line)# login local
Router(config-line)# exit
Router(config)# line aux 0
Router(config-line)# login local
Router(config-line)# exec-timeout 5 0
Router(config-line)# exit
Router(config)# access-list 1 permit 192.168.3.10
Router(config)# access-list 1 permit 192.168.3.11
Router(config)# line vty 0 4
Router(config-line)# access-class 1 in
Router(config-line)# login local
Router(config-line)# transport input ssh
Router(config-line)# transport output ssh
Router(config-line)# exec-timeout 5 0
Router(config-line)# exit
Router(config)# hostname Skunk
Skunk(config)# ip domain-name quizware.com
Skunk(config)# crypto key generate rsa
The name for the keys will be: Skunk.quizware.com
Choose the size of the key modulus in the range of 360 to 2048 for your
General Purpose Keys. Choosing a key modulus greater than 512 may take
a few minutes.
How many bits in the modulus [512]: 1024
% Generating 1024 bit RSA keys ...[OK]
00:02:25: %SSH-5-ENABLED: SSH 1.5 has been enabled
Skunk(config)# no ip http server
Skunk(config)# no ip http server-secure
Skunk(config)# no snmp-server
Skunk(config)# service password-encryption
Skunk(config)# banner motd $
THIS, THE DEAL GROUP, INC., COMPUTING SYSTEM IS FOR AUTHORIZED
OFFICIAL USE ONLY. Unauthorized use or use for other than official
THE DEAL GROUP, INC. business is a violation of State and Federal LAW
Individuals using this computing system are subject to having all
of their activities on this system monitored and recorded without
further notice. Auditing of users may include keystroke monitoring.
Any individual who uses this system expressly consents to such
monitoring and is advised that information about their use of the
system may be provided to State and Federal law enforcement or
other authorities if evidence of criminal or other unauthorized
activity is found.
$
Skunk(config)# do copy running-config startup-config
Below the last privilege command, I have set up authentication for the console, auxiliary, and VTY lines to use the local authentication database (login local). For both the auxiliary and VTY lines, I have limited their idle timeout to 5 minutes; for the VTY lines, I have restricted Telnet (and SSH) access to only the two administrative PCs. I also have restricted VTY access to SSH with the transport line commands.
Below this begins the configuration to allow SSH access, which gives the two administrators encrypted access to the Skunk router. Notice that you first must assign the router a name (hostname) and a domain name (ip domain-name). Next, you must generate your encryption keys with the crypto key generate rsa command. Even though ACLs are discussed later in the book, make sure that you set up an ACL that allows SSH (TCP 22) but denies Telnet (TCP 23) to the router.
Below the SSH configuration, I have disabled specific services: HTTP, HTTPS, and SNMP. Even though all the passwords I have used (username secret) are encrypted by MD5, I am providing an additional layer of protection by using the service password-encryption command for any other later passwords that I enter that are not encrypted. Finally, I set up a login banner using the banner motd command and saved the configuration.
As you can see, this example is simple and straightforward. However, as you will see throughout the rest of this book, you need to configure many more things on your router, especially a perimeter router, to make it more secure.
Summary
This chapter showed you a lot of basic tasks that you will perform to secure access to your router, including local (console and auxiliary) and remote (Telnet, SSH, web browser, and SNMP) access. Some of these access methods are more secure than others; carefully evaluate which method you want to use, and secure it appropriately. As an added measure of security, you can assign command levels and create accounts that correspond to those levels, restricting what an administrator can do on your router.
Next up is Chapter 4, “Disabling Unnecessary Services,” which shows you how disable applications and protocols that typically are not necessary on a firewall-hardened router, including those that present security risks.