
CHAPTER 28
Collecting Malware and Initial Analysis
Now that you have some basics skills in exploiting and reverse engineering, it is time to put them together and learn about malware. As an ethical hacker, you will surely find yourself from time to time looking at a piece of malware, and you may need to make some sort of determination about the risk it poses and the action to take to remove it. This chapter gives you a taste of this area of security by presenting the following topics. If you are interested in this subject, check out the resources cited in the “References” sections for more detailed information.
• Malware
• Latest trends in honeynet technology
• Catching malware: setting the trap
• Initial analysis of malware
Malware
Malware can be defined as any unintended and unsolicited installation of software on a system without the user knowing or wanting it.
Types of Malware
There are many types of malware, but for our purposes, the following list of malware will suffice.
Virus
A virus is a parasitic program that attaches itself to another program in order to infect that program and perform some unwanted function. Viruses range in severity and in the threat they pose. Some are easy to detect and remove from a system, whereas others are very difficult to detect and remove. Some viruses use polymorphic (changing) technology to morph as they move from system to system, thereby prolonging their detection. A virus requires users to assist it by launching the application or script that contains the virus. The users may not know they have executed a virus; they may instead think they are opening an image or a seemingly harmless application.
Trojan Horse
A Trojan horse is a malicious piece of software that performs a nefarious deed on behalf of an attacker without the user knowing it is there. As the name implies, some Trojan horses make their way onto a system embedded within another piece of software. Pirated software has been known to contain Trojan horse code.
Worms
Simply put, worms are self-propagating viruses. They require no action on the user’s part to execute and move from system to system. In recent years worms have been prevalent and have been used for many purposes, like distributing Trojan horses and other forms of malware.
Spyware/Adware
Spyware and adware describe the class of software that is installed without a user’s knowledge in order to report the behavior of the user to the attacker. The attacker in this case may be working under the guise of an advertiser, marketing specialist, or Internet researcher. Besides the obvious privacy issues here, in most cases, this class of software is not malicious. However, there are some forms of spyware that use key-logging technology to capture user keystrokes and siphon them off the machine into a central database. In that case, passwords and financial information may be gathered and that spyware should be considered a high threat to the user or organization.
Malware Defensive Techniques
One of the most important aspects of a piece of malware is its persistence after reboots and its longevity. To that end, great defensive measures are taken by attackers to protect a piece of malware from being detected.
Rootkits
The definition of “rootkit” has evolved some, but today it commonly refers to a category of software that hides itself and other software from system administrators in order to perform some nefarious task. A good rootkit will provide some form of reboot survivability and will hide processes, files, registry entries, network connections, and, most importantly, itself.
Packers
Packers are used to “pack” or compress the Windows PE file format. The most common packers are
• UPX
• ASPack
• tElock
Protective Wrappers with Encryption
Some hackers use tools such as the following to wrap their binary with encryption:
• Burneye
• Shiva
VM Detection
As could be expected, as more and more defenders have begun to use VMware to capture and study malware, many pieces of malware now employ some form of virtual machine (VM) detection. Later in this chapter, we will describe the state of this arms race (as of the writing of this book).
Latest Trends in Honeynet Technology
Speaking of arms races, as attacker technology has evolved, the technology used by defenders has evolved too. This cat and mouse game has been taking place for years as attackers try to go undetected and defenders try to detect the latest threats and to introduce countermeasures to better defend their networks.
Honeypots
Honeypots are decoy systems placed in the network for the sole purpose of attracting hackers. The systems are not valuable and contain no sensitive information, but they look like they are valuable. They are called “honeypots” because once the hackers put their hands in the pot and taste the honey, they keep coming back for more.
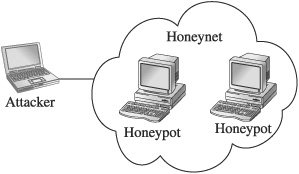
Honeynets
A honeypot is a single system serving as a decoy. A honeynet is a collection of systems posing as a decoy. Another way to think about it is that a honeynet contains two or more honeypots, as shown here:
Why Honeypots Are Used
There are many reasons to use a honeypot in the enterprise network, including deception and intelligence gathering.
Deception as a Motive
The American Heritage Dictionary defines deception as “1. The use of deceit; 2. The fact or state of being deceived; 3. A ruse; a trick.” A honeypot can be used to deceive attackers and trick them into missing the “crown jewels” and setting off an alarm. The idea here is to have your honeypot positioned near a main avenue of approach to your crown jewels.
Intelligence as a Motive
Intelligence has two meanings with regard to honeypots: indications and warnings, and research.
Indications and Warnings If properly set up, the honeypot can yield valuable information in the form of indications and warnings of an attack. The honeypot by definition does not have a legitimate purpose, so any traffic destined for or coming from the honeypot can immediately be assumed to be malicious. This is a key point that provides yet another layer of defense in depth. If there is no known signature of the attack for the signature-based IDS to detect, and there is no anomaly-based IDS watching that segment of the network, a honeypot may be the only way to detect malicious activity in the enterprise. In that context, the honeypot can be thought of as the last safety net in the network and as a supplement to the existing IDS.
Research Another equally important use of honeypots is for research. A growing number of honeypots are being used in the area of research. The Honeynet Project is the leader of this effort and has formed an alliance with many other organizations. Daily, traffic is being captured, analyzed, and shared with other security professionals. The idea here is to observe the attackers in a fishbowl and to learn from their activities in order to better protect networks as a whole. The area of honeypot research has driven the concept to new technologies and techniques.
We will set up a research honeypot later in this chapter to catch some malware for analysis.
Limitations of Honeypots
As attractive as the concept of honeypots sounds, there is a downside. The disadvantages of honeypots are as follows.
Limited Viewpoint
The honeypot will only see what is directed at it. It may sit for months or years and not notice anything. On the other hand, case studies available on the Honeynet Project home page describe attacks within hours of placing the honeypot online. Then the fun begins; however, if an attacker can detect that she is running in a honeypot, she will take her toys and leave.
Risk
Any time you introduce another system onto the network, you impose a new risk on the network. The degree of that risk depends on the type and configuration of the system, or honeypot in this case. The risk is greatest if the honeypot can be compromised, exposing the rest of your organization to attack. There is nothing worse than an attacker gaining access to your honeypot and then using that honeypot as a leaping-off point to further attack your network. The risk is also significant if the attacker can use the compromised honeypot to attack other organizations, exposing your organization to downstream liability. To assist in managing risk, there are two types of honeypots: low interaction and high interaction.
Low-Interaction Honeypots
Low-interaction honeypots emulate services and systems in order to fake out the attacker but do not offer full access to the underlying system. These types of honeypots are often used in production environments, where the risk of attack to other production systems is high. These types of honeypots can supplement intrusion detection technologies, as they offer a very low false-positive rate because everything that comes to them is unsolicited and thereby suspicious.
honeyd
honeyd is a set of scripts developed by Niels Provos and has established itself as the de facto standard for low-interaction honeypots. There are several scripts to emulate services from IIS, to telnet, to ftp, to others. The tool is quite effective at detecting scans and very basic malware. However, if the attacker or worm uses advanced techniques, the tool is not very effective.
Nepenthes
Nepenthes is another low interaction honeypot and was merged with the mwcollect project to form quite an impressive tool. The value in this tool over Honeyd is that it is more interactive and realistic. Nepenthes employs several techniques to better emulate services and thereby extract more information from the attacker or worm. The system is built to extract binaries from malware for further analysis and can even execute many common system calls that shellcode makes to download secondary stages, and so on. The system is built on a set of modules that process protocols and shellcode.
Dionaea
Dionaea is the successor to nepenthes and can be found at http://dionaea.carnivore.it/. It, too, is intended to trap malware as it exploits vulnerabilities and gains a copy of that malware for further analysis. The tool is written in python and can be easily extended. The tool listens on ports, interacts with the malware, and logs the process for analysis. It may also submit the malware payload to online services like CWSandbox, Norman Sandbox, or VirusTotal for further analysis.
High-Interaction Honeypots
High-interaction honeypots, on the other hand, are often actual virgin builds of operating systems with few to no patches and may be fully compromised by the attacker. High-interaction honeypots require a high level of supervision, as the attacker has full control over the honeypot and can do with it as he will. Often, high-interaction honey-pots are used in a research role instead of a production role.
Types of Honeynets
As previously mentioned, honeynets are simply collections of honeypots. They normally offer a small network of vulnerable honeypots for the attacker to play with. Honeynet technology provides a set of tools to present systems to an attacker in a somewhat controlled environment so that the behavior and techniques of attackers can be studied.
Gen I Honeynets
In May 2000, Lance Spitzner set up a system in his bedroom. A week later the system was attacked and Lance recruited many of his friends to investigate the attack. The rest, as they say, is history and the concept of honeypots was born. Back then, Gen I Honey-nets used routers to offer connection to the honeypots and offered little in the way of data collection or data control. Lance formed the organization honeynet.org, which serves a vital role to this day by keeping an eye on attackers and “giving back” to the security industry this valuable information.
Gen II Honeynets
Spitzner and Honeynet.org next developed Gen II Honeynets and released a paper on them in June 2003 on the honeynet.org site. The key difference from Gen I Honeynets is the use of bridging technology to allow the honeynet to reside on the inside of an enterprise network, thereby attracting insider threats. Further, the bridge serves as a kind of reverse firewall (called a “honeywall”) that offers basic data collection and data control capabilities.
Gen III Honeynets
In 2005, Gen III Honeynets were developed by honeynet.org. The honeywall evolved into a product called roo, which greatly enhanced the data collection and data control capabilities while providing a whole new level of data analysis through an interactive web interface called Walleye.
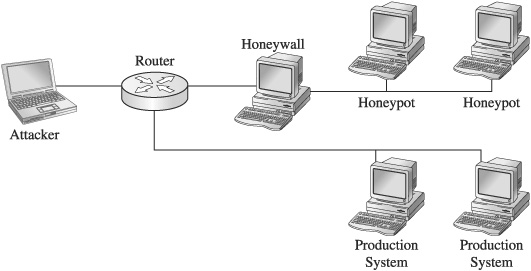
Architecture
The Gen III honeywall (roo) serves as the invisible front door of the honeynet. The bridge allows for data control and data collection from the honeywall itself. The honey-net can now be placed right next to production systems, on the same network segment, as shown here:
Data Control
The honeywall provides data control by restricting outbound network traffic from the honeypots. Again, this is vital to mitigate risk posed by compromised honeypots attacking other systems. The purpose of data control is to balance the need for the compromised system to communicate with outside systems (to download additional tools or participate in a command-and-control IRC session) against the potential of the system to attack others. To accomplish data control, iptable (firewall) rate-limiting rules are used in conjunction with snort-inline (intrusion prevention system) to actively modify or block outgoing traffic.

Data Collection
The honeywall has several methods to collect data from the honeypots. The following information sources are forged together into a common format called hflow:
• Argus flow monitor
• Snort IDS
• P0f—passive OS detection
• Sebek defensive rootkit data from honeypots
• Pcap traffic capture
Data Analysis
The Walleye web interface offers an unprecedented level of querying of attack and forensic data. From the initial attack, to capturing keystrokes, to capturing zero-day exploits of unknown vulnerabilities, the Walleye interface places all of this information at your fingertips.
As can be seen in Figure 28-1, the interface is an analyst’s dream. Although the author of this chapter served as the lead developer for roo, I think you will agree that this is “not your father’s honeynet” and really deserves another look if you are familiar with Gen II technology.
There are many other new features of the roo Gen III Honeynet (too many to list here), and you are highly encouraged to visit the honeynet.org website for more details and white papers.
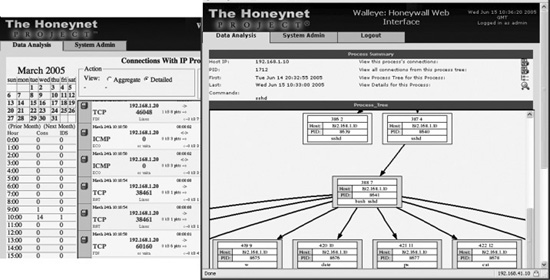
Figure 28-1 The Walleye web interface of roo
Thwarting VMware Detection Technologies
As for the attackers, they are constantly looking for ways to detect VMware and other virtualization technologies. As described by Liston and Skoudis (see the “References” section), several techniques are used.

As Liston and Skoudis briefed in a SANS webcast and later published, there are some undocumented features in VMware that are quite effective at eliminating the most commonly used signatures of a virtual environment.
Place the following lines in the VMX file of a halted virtual machine:
isolation.tools.getPtrLocation.disable = "TRUE"
isolation.tools.setPtrLocation.disable = "TRUE"
isolation.tools.setVersion.disable = "TRUE"
isolation.tools.getVersion.disable = "TRUE"
monitor_control.disable_directexec = "TRUE"
monitor_control.disable_chksimd = "TRUE"
monitor_control.disable_ntreloc = "TRUE"
monitor_control.disable_selfmod = "TRUE"
monitor_control.disable_reloc = "TRUE"
monitor_control.disable_btinout = "TRUE"
monitor_control.disable_btmemspace = "TRUE"
monitor_control.disable_btpriv = "TRUE"
monitor_control.disable_btseg = "TRUE"

CAUTION
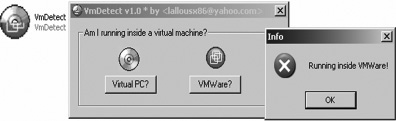
Although these commands are quite effective at thwarting Red Pill, Scoopy, Jerry, VmDetect, and others, they will break some “comfort” functionality of the virtual machine such as the mouse, drag and drop, file sharing, clipboard, and so on. These settings are not documented by VMware—use them at your own risk!
By loading a virtual machine with the preceding settings, you will thwart most tools like VmDetect.

References
Dionaea (successor to Nepenthes) dionaea.carnivore.it/
“Defeating Honeypots: System Issues, Part 1” (Thorsten Holz and Frederic Raynal) www.symantec.com/connect/articles/defeating-honeypots-system-issues-part-1
“Detect If Your Program Is Running Inside a Virtual Machine” [VmDetect tool] (Elias Bachaalany) www.codeproject.com/system/VmDetect.asp
Honeynet Project www.honeynet.org/
Honeypots: Tracking Hackers (Lance Spitzner) Addison-Wesley, 2002; www.tracking-hackers.com
“On the Cutting Edge: Thwarting Virtual Machine Detection” (Tom Liston and Ed Skoudis) handlers.sans.org/tliston/ThwartingVMDetection_Liston_Skoudis.pdf
“Virtual Machine Detection: Keeping Attackers Inside the Matrix” webcast (Ed Skoudis) www.sans.org/webcasts/virtual-machine-detection-keeping-attackers-matrix-ed-skoudis-90652
Catching Malware: Setting the Trap
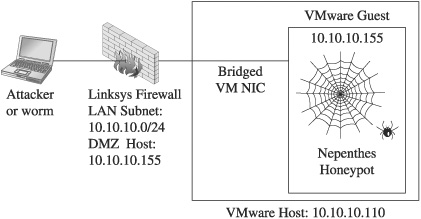
In this section, we will set up a safe test environment and go about catching some malware. We will run VMware on our host machine and launch Nepenthes in a virtual Linux machine to catch some malware. To get traffic to our honeypot, we need to open our firewall or, depending on the configuration, set the IP of the honeypot as the DMZ host on our firewall.
VMware Host Setup
For this test, we will use VMware on our host and set our trap using this simple configuration:
CAUTION
There is a small risk in running this setup; we are now trusting this honeypot within our network. Actually, we are trusting the Nepenthes program to not have any vulnerabilities that can allow the attacker to gain access to the underlying system. If this happens, the attacker can then attack the rest of our network. If you are uncomfortable with that risk, then set up a honeywall.
VMware Guest Setup
For our VMware guest, we will use the security distribution of Linux called BackTrack, which can be found at www.backtrack-linux.org. This build of Linux is rather secure and well maintained. What I like about this build is the fact that no services (except bootp) are started by default; therefore, no dangerous ports are open to be attacked.
Using Nepenthes to Catch a Fly
You may download the latest Nepenthes software from http://nepenthes.carnivore.it/. The Nepenthes software requires the adns package, which can be found at www.chiark.greenend.org.uk/~ian/adns/.
To install Nepenthes on BackTrack, download those two packages and then follow these steps:

NOTE
As of the writing of this chapter, Nepenthes 0.2.0 and adns 1.2 are the latest versions.
BT sda1 # tar -xf adns.tar.gz
BT sda1 # cd adns-1.2/
BT adns-1.2 # ./configure
BT adns-1.2 # make
BT adns-1.2 # make install
BT adns-1.2 # cd ..
BT sda1 # tar -xf nepenthes-0.2.0.tar.gz
BT sda1 # cd nepenthes-0.2.0/
BT nepenthes-0.2.0 # ./configure
BT nepenthes-0.2.0 # make
BT nepenthes-0.2.0 # make install
NOTE
If you would like more detailed information about the incoming exploits and Nepenthes modules, turn on debugging mode by changing Nepenthes’ configuration as follows: ./configure –enable-debug-logging
Now that you have Nepenthes installed, you may tweak it by editing the nepenthes .conf file.
BT nepenthes-0.2.0 # vi /opt/nepenthes/etc/nepenthes/nepenthes.conf
Uncomment the submit-norman plug-in as shown next. This plug-in will e-mail any captured samples to the Norman SandBox and the Nepenthes sandbox (explained later).
// submission handler
"submitfile.so", "submit-file.conf", "" // save to disk
"submitnorman.so", "submit-norman.conf", ""
// "submitnepenthes.so", "submit-nepenthes.conf", "" // send to download-
nepenthes
Now you need to add your e-mail address to the submit-norman.conf file,
BT nepenthes-0.2.0 # vi /opt/nepenthes/etc/nepenthes/submit-norman.conf
as follows:
submit-norman
{
// this is the address where norman sandbox reports will be sent
email "[email protected]";
urls ("http://sandbox.norman.no/live_4.html",
"http://luigi.informatik.uni-mannheim.de/submit.php?action=
verify");
};
Finally, you may start Nepenthes:
BT nepenthes-0.2.0 # cd /opt/nepenthes/bin
BT nepenthes-0.2.0 # ./nepenthes
...ASCII art truncated for brevity...
Nepenthes Version 0.2.0
Compiled on Linux/x86 at Dec 28 2006 19:57:35 with g++ 3.4.6
Started on BT running Linux/i686 release 2.6.18-rc5
[ info mgr ] Loaded Nepenthes Configuration from
/opt/nepenthes/etc/nepenthes/nepenthes.conf".
[ debug info fixme ] Submitting via http post to
http://sandbox.norman.no/live_4.html
[ info sc module ] Loading signatures from file
var/cache/nepenthes/signatures/shellcode-signatures.sc
[ crit mgr ] Compiled without support for capabilities, no way to run
capabilities
As you can see by the slick ASCII art, Nepenthes is open and waiting for malware. Now you wait. Depending on the openness of your ISP, this waiting period might take minutes to weeks. On my system, after a couple of days, I got this output from Nepenthes:
[ info mgr submit ] File 7e3b35c870d3bf23a395d72055bbba0f has type MS-DOS
executable PE for MS Windows (GUI) Intel 80386 32-bit, UPX compressed
[ info fixme ] Submitted file 7e3b35c870d3bf23a395d72055bbba0f to sandbox
http://luigi.informatik.uni-mannheim.de/submit.php?action=verify
[ info fixme ] Submitted file 7e3b35c870d3bf23a395d72055bbba0f to sandbox
http://sandbox.norman.no/live_4.html
Initial Analysis of Malware
Once you catch a fly (malware), you may want to conduct some initial analysis to determine the basic characteristics of the malware. The tools used for malware analysis can basically be broken into two categories: static and live. The static analysis tools attempt to analyze a binary without actually executing the binary. Live analysis tools study the behavior of a binary once it has been executed.
Static Analysis
There are many tools out there to do basic static malware analysis. You may download them by following the links in the “References” section. We will cover some of the most important ones and perform static analysis on our newly captured malware binary file.
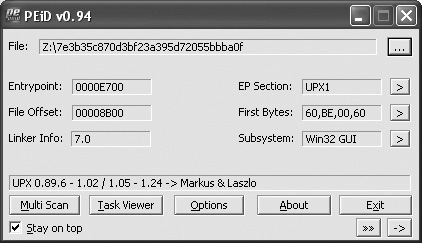
PEiD
The first thing you need to do with a foreign binary is determine what type of file it is. The PEiD tool is very useful in telling you if the file is a Windows binary and if the file is compressed, encrypted, or otherwise modified. The tool can identify 600 binary signatures. Many plug-ins have been developed to enhance its capability. We will use PEiD to look at our binary.
We have confirmed that the file is packed with UPX.
UPX
To unpack the file for further analysis, we use the UPX tool itself.

Now that the file is unpacked, we may continue with the analysis.
Strings
To view the ASCII strings in a file, run the strings command. Linux comes with the strings command; the Windows version can be downloaded from Windows Sysinternals (see the “References” section).
C:>strings.exe z:7e3b35c870d3bf23a395d72055bbba0f >foo.txt
C:>more foo.txt
<snip>
.text
.data
<snip>
InternetGetConnectedState
wininet.dll
USERPROFILE
%s%s
c:
Gremlin
Soft%sic%sf%sind%ss%sr%sVe%so%sun
wareM
<snip>
ww%sic%ss%s%so%c
<snip>
KERNEL32.DLL
ADVAPI32.dll
GetSystemTime
SetFileAttributesA
GetFileAttributesA
DeleteFileA
CopyFileA
CreateMutexA
GetLastError
<snip>
lstrlenA
Sleep
<snip>
ReadFile
CreateFileA
<snip>
RegOpenKeyExA
RegCloseKey
RegSetValueExA
wsprintfA
!"#&(+,-./0123456789=>?@ABCDPQ
As we can see in the preceding, the binary makes several windows API calls for directories, files, registries, network calls, and so on. We are starting to learn the basic functions of the worm, such as those marked in boldface:
• Network activity
• File activity (searching, deleting, and writing)
• Registry activity
• System time check and wait (sleep) for some period
• Set a mutex, ensuring that only one copy of the worm runs at a time
Reverse Engineering
The ultimate form of static analysis is reverse engineering; we will save that subject for the next chapter.
Live Analysis
We will now move into the live analysis phase. First, we need to take some precautions.
Precautions
Since we are about to execute the binary on a live system, we need to ensure that we contain the virus to our test system and that we do not contribute to the malware problem by turning our test system into an infected scanner of the Internet. We will use our trusty VMware to contain the worm. After we upload the binary and all the tools we need to a virgin build of Windows XP, we make the following setting changes to contain the malware to the system:

As another precaution, it is recommended that you change the local network settings of the virtual guest operating system to some incorrect network. This precaution will protect your host system from becoming infected while allowing network activity to be monitored. Then again, you are running a firewall and virus protection on your host, right?
Repeatable Process
During the live analysis, you will be using the snapshot capability of VMware and repeating several tests over and over until you figure out the behavior of the binary. The following represents the live analysis process:
1. Set up file, registry, and network monitoring tools (establish a baseline).
2. Save a snapshot with VMware.
3. Execute the suspect binary.
4. Inspect the tools for system changes from the baseline.
5. Interact with binary to fake DNS, e-mail, and IRC servers as required.
6. Revert the snapshot and repeat the process.
For the rest of this section, we will describe common tools used in live analysis.
NOTE
We had to place an .exe file extension on the binary to execute it.
Regshot
Before executing the binary, we will take a snapshot of the registry with Regshot.
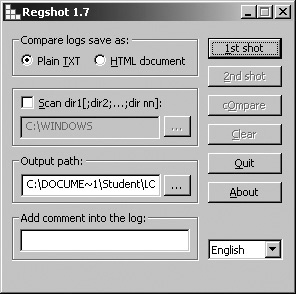
After executing the binary, we will take the second snapshot by clicking the 2nd shot button and then compare the two snapshots by clicking the cOmpare button. When the analysis was complete, we got results like this:
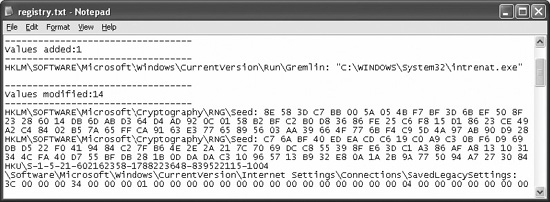
From this output, we can see that the binary will place an entry in the registry HKLMSOFTWAREMicrosoftWindowsCurrentVersionRun.
The key name Gremlin points to the file C:WINDOWSSystem32intrenat.exe. This is a method of ensuring the malware will survive reboots, because everything in that registry location will be run automatically on reboots.
FileMon
The FileMon program is very useful in finding changes to the file system. Additionally, any searches performed by the binary will be detected and recorded. This tool is rather noisy and picks up hundreds of file changes by a seemingly idle Windows system. Therefore, be sure to clear the tool prior to executing the binary, and “stop capture” about 10 seconds after launching the tool. Once you find the malware process in the logs, you may filter on that process to cut out the noise. In our case, after running the binary and scrolling through the logs, we see two files written to the hard drive: intrenat.exe and sync-src-1.00.tbz.
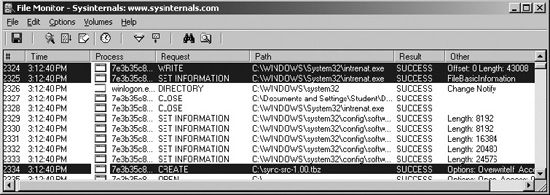
The number of file changes that a single binary can make in seconds can be overwhelming. To assist with the analysis, we will save the output to a flat text file and parse through it manually.
By searching for the CREATE tag, we were able to see even more placements of the file sync-src-1.00.tbz:
2334 3:12:40 PM 7e3b35c870d3bf2:276 CREATE C:sync-src-1.00.tbz
SUCCESS
Options: OverwriteIf Access: All
2338 3:12:41 PM 7e3b35c870d3bf2:276 CREATE C:WINDOWSsync-src-1.00.tbz
SUCCESS Options: OverwriteIf Access: All
2344 3:12:41 PM 7e3b35c870d3bf2:276 CREATE C:WINDOWSSystem32sync-src
1.00.tbz SUCCESS Options: OverwriteIf Access: All
2351 3:12:41 PM 7e3b35c870d3bf2:276 CREATE
C:DOCUME~1StudentLOCALS~1Tempsync-src-1.00.tbz SUCCESS
Options: OverwriteIf Access: All
2355 3:12:41 PM 7e3b35c870d3bf2:276 CREATE C:Documents and
SettingsStudentsync-src-1.00.tbz SUCCESS Options: OverwriteIf Access:
All
What is the sync-src-1.00.tbz file and why is it being copied to several directories? After further inspection, it appears to be source code for some program. Hmm, that is suspicious; why would the attacker want that source code placed all over the system, particularly in user profile locations?
Taking a look in that archive, we find inside the main.c file the following string: “sync.c, v 0.1 2004/01.” A quick check of Google reveals that these files are the source code for the MyDoom virus.
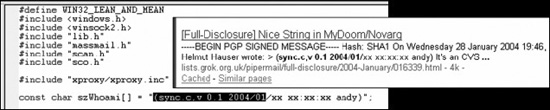
You can also see in the source code an include of the massmail.h library. Since we don’t see any e-mail messaging API calls, it appears that our binary is not compiled from the source; instead, it contains the source as a payload.
That’s really odd. Perhaps the attacker is trying to ensure that he is not the only one with the source code of this MyDoom virus. Perhaps he thinks that by distributing it with this second worm, it will make it harder for law enforcement agencies to trace the code back to him.
Process Explorer
The Process Explorer tool is very useful in examining running processes. By using this tool, we can see if our process spawns other processes. In this case, it does not. However, we do see multiple threads, which probably are used for network access, registry access, or file access.

Another great feature of this tool is process Properties dialog box, which includes a list of network sockets.

This tool is also useful for finding strings contained in the binary.

TCPView
The TCPView tool can be used to see network activity.
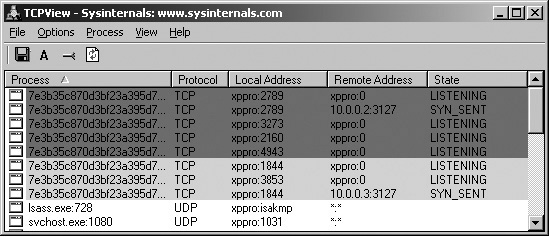
As you can see, the malware appears to be attempting to scan our subnet for other infected machines on port 3127. At this point, we can Google “TCP 3127” and find out that port 3127 is used by the MyDoom worm as a backdoor.
With our limited knowledge at this point, it appears that our malware connects to existing MyDoom-infected victims and drops a copy of the MyDoom source code on those machines.
Malcode Analysis Pack (iDefense)
iDefense Labs offer a great set of tools called the Malcode Analysis Pack (MAP). The following tools are contained in MAP:

Although they are not particularly useful for this malware, you may find these tools useful in the future. For example, if the malware you are analyzing tries to send e-mails, connect to an IRC server, or flood a web server, these tools can safely stimulate the malware and extract vital information.
Norman SandBox Technology
We have saved the best for last. As you saw earlier in the Nepenthes section, we set up Nepenthes to automatically report binaries to the Norman SandBox. The Norman SandBox site receives the binary and performs automated analysis to discover files contained, registry keys modified, network activity, and basic detection of known viruses. The SandBox actually simulates the execution of the binary in a sandbox (safe) environment to extract the forensic data. In short, sandboxes do everything we did, and more, in an automated fashion and provide us with a report in seconds. The report is quite impressive and offers unprecedented “first pass” information that will tell us some basic data about our captured binary within seconds.
As expected, after the earlier output from Nepenthes, we got the following e-mail from [email protected]:
Your message ID (for later reference): 20070112-3362
Hello,
Thanks for taking the time to submit your samples to the Norman Sandbox
Information Center.
<snip>
nepenthes-7e3b35c870d3bf23a395d72055bbba0f-index.html : W32/Doomjuice.A
(Signature: Doomjuice.A)
[ General information ]
* Decompressing UPX.
* File length: 36864 bytes.
* MD5 hash: 7e3b35c870d3bf23a395d72055bbba0f.
[ Changes to filesystem ] * Creates file C:WINDOWSSYSTEM32intrenat.exe.
* Deletes file C:WINDOWSSYSTEM32intrenat.exe.
* Creates file C:sync-src-1.00.tbz.
* Creates file N:sync-src-1.00.tbz.
* Creates file C:WINDOWSsync-src-1.00.tbz.
* Creates file C:WINDOWSSYSTEM32sync-src-1.00.tbz.
* Creates file C:WINDOWSTEMPsync-src-1.00.tbz.
* Creates file C:DOCUME~1SANDBOXsync-src-1.00.tbz.
[ Changes to registry ]
* Creates value "Gremlin"="C:WINDOWSSYSTEM32intrenat.exe" in key
HKLMSoftwareMicrosoftWindowsCurrentVersionRun".
[ Network services ] * Looks for an Internet connection.
* Connects to "192.168.0.0" on port 3127 (TCP).
* Connects to "CONFIGURED_DNS" on port 3127 (TCP).
* Connects to "192.168.0.2" on port 3127 (TCP).
* Connects to "192.168.0.3" on port 3127 (TCP).
* Connects to "192.168.0.4" on port 3127 (TCP).
<snip>
* Connects to "230.90.214.20" on port 3127 (TCP).
* Connects to "230.90.214.21" on port 3127 (TCP).
* Connects to "230.90.214.22" on port 3127 (TCP).
* Connects to "230.90.214.23" on port 3127 (TCP).
[ Process/window information ]
* Creates a mutex sync-Z-mtx_133.
* Will automatically restart after boot (I'll be back...).
[ Signature Scanning ]
* C:WINDOWSSYSTEM32intrenat.exe (36864 bytes) : Doomjuice.A.
<snip>
(C) 2004-2006 Norman ASA. All Rights Reserved.
The material presented is distributed by Norman ASA as an information source only.
Wow, this report has quite useful information, confirms all of our findings, and indicates that we have captured a variant of the Doomjuice.A worm (which exploits existing MyDoom victims). We can see the basic steps the worm performs. In fact, in many cases, the sandbox report will suffice and save us from having to manually analyze the malware.
NOTE
You might have noticed the Nepenthes configuration files also send a copy of the malware to the Nepenthes sandbox at luigi.informatik.unimannheim.de. You may remove that destination from the submit-norman.conf file if you like as it no longer exists.
What Have We Discovered?
It appears that the binary we captured was indeed a form of malware called a worm. The malware has been classified by the virus companies as the first of the Doomjuice family of worms (Doomjuice.A). The purpose of the worm appears to be to connect to already infected MyDoom victims. First, it creates a mutex to ensure that only one copy of the malware runs at a time. Next, it protects itself by making a registry entry for reboots. Then it drops a copy of the source code for the MyDoom virus in several locations on the system. Next, the worm begins a methodical scan to look for other infected MyDoom victims (which listen on port TCP 3127).
CAUTION
Without reverse engineering, you are not able to determine all the functionality of the binary. In this case, as can be confirmed on Google, it turns out there is a built-in denial-of-service attack on microsoft.com, but we were not able to discover it with static and live analysis alone. The DoS attack is only triggered in certain situations.
References
iDefense Malcode Analysis Pack labs.idefense.com/software/malcode.php
Norman SandBox www.norman.com/security_center/security_tools/
PE Tools www.uinc.ru/files/neox/PE_Tools.shtml
PEiD peid.has.it/
Regshot sourceforge.net/projects/regshot/
“Reverse-Engineering Malware” (Lenny Zeltser) www.zeltser.com/reverse-malware-paper/
Strings technet.microsoft.com/en-us/sysinternals/bb897439.aspx
Sysinternals Process Utilities technet.microsoft.com/en-us/sysinternals/bb795533.aspx
UPX sourceforge.net/projects/upx/files/