CHAPTER 7
Using the BackTrack Linux Distribution
This chapter shows you how to get and use BackTrack, a Ubuntu (Debian) Linux distribution for penetration testers that can run from DVD, USB thumb drive, or hard drive installation. In this chapter, we cover the following topics:
• BackTrack: the big picture
• Installing BackTrack to DVD or USB thumb drive
• Using the BackTrack ISO directly within a virtual machine
• Persisting changes to your BackTrack installation
• Exploring the BackTrack Boot Menu
• Updating BackTrack
BackTrack: The Big Picture
BackTrack is a free, well-designed penetration-testing Linux workstation built and refined by professional security engineers. It has all the tools necessary for penetration testing, and they are all configured properly, have the dependent libraries installed, and are carefully categorized in the start menu. Everything just works.
BackTrack is distributed as an ISO disk image that can be booted directly after being burned to DVD, written to a removable USB drive, booted directly from virtualization software, or installed onto a system’s hard drive. The distribution contains over 5GB of content but fits into a 1.5GB ISO by the magic of the LiveDVD system. The system does not run from the read-only ISO or DVD media directly. Instead, the Linux kernel and bootloader configuration live uncompressed on the DVD and allow the system to boot normally. After the kernel loads, it creates a small RAM disk, unpacks the root-disk image (initrd.gz) to the RAM disk and mounts it as a root file system, and then mounts larger directories (like /usr) directly from the read-only DVD. BackTrack uses a special file system (casper) that allows the read-only file system stored on the DVD to behave like a writable one. Casper saves all changes in memory.
BackTrack itself is quite complete and works well on a wide variety of hardware without any changes. But what if a driver, a pen-testing tool, or an application you normally use is not included? Or what if you want to store your home wireless access point encryption key so you don’t have to type it in with every reboot? Downloading software and making any configuration changes work fine while the BackTrack DVD is running, but those changes don’t persist to the next reboot because the actual file system is read-only. While you’re inside the “Matrix” of the BackTrack DVD, everything appears to be writable, but those changes really only happen in RAM.
BackTrack includes several different configuration change options that allow you to add or modify files and directories that persist across BackTrack LiveDVD reboots. This chapter covers different ways to implement either boot-to-boot persistence or one-time changes to the ISO. But now let’s get right to using BackTrack.
Installing BackTrack to DVD or USB Thumb Drive
You can download the free BackTrack ISO at www.backtrack-linux.org/downloads/. This chapter covers the bt4-final.iso ISO image, released on January 11, 2010. Microsoft’s newer versions of Windows (Vista and 7) include built-in functionality to burn an ISO image to DVD, but Windows XP by default cannot. If you’d like to make a BackTrack DVD using Windows XP, you’ll need to use DVD-burning software such as Nero or Roxio. One of the better free alternatives to those commercial products is ISO Recorder from Alex Feinman. You’ll find that freeware program at http://isorecorder.alex-feinman.com/isorecorder.htm. Microsoft recommends ISO Recorder as part of its MSDN program. After you download and install ISO Recorder, you can right-click ISO file and select the Copy Image to CD/DVD option, shown in Figure 7-1, and then click Next in the ISO Recorder Record CD/DVD dialog box (see Figure 7-2).
You might instead choose to make a bootable USB thumb drive containing the BackTrack bits. Booting from a thumb drive will be noticeably faster and likely quieter than running from a DVD. The easiest way to build a BackTrack USB thumb drive is to download and run the UNetbootin utility from http://unetbootin.sourceforge.net. Within the UNetbootin interface, shown in Figure 7-3, select the BackTrack 4f distribution, choose a USB drive to be written, and start the download by clicking OK. After downloading the ISO, UNetbootin will extract the ISO content to your USB drive, generate a syslinux config file, and make your USB drive bootable.

Figure 7-1 Open with ISO Recorder
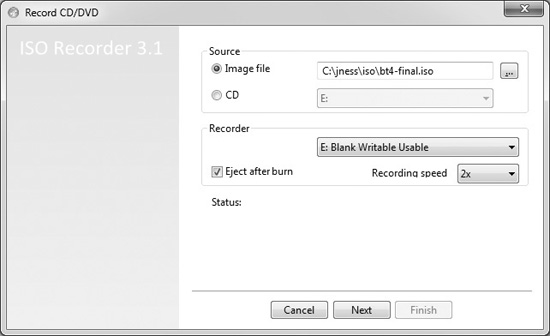
Figure 7-2 ISO Recorder main dialog box
References
BackTrack home page www.backtrack-linux.org
ISO Recorder http://isorecorder.alexfeinman.com/isorecorder.htm
UNetbootin http://unetbootin.sourceforge.net

Figure 7-3 UNetbootin interface
Using the BackTrack ISO Directly Within a Virtual Machine
VMware Player and Oracle’s VM VirtualBox are both free virtualization solutions that will allow you to boot up a virtual machine with the ISO image attached as a virtual DVD drive. This simulates burning the ISO to DVD and booting your physical machine from the DVD. This is an easy and quick way to experience BackTrack without “investing” a blank DVD or a 2+ GB USB thumb drive. You can also run BackTrack at the same time as your regular desktop OS. Both VMware Player and VirtualBox run BackTrack nicely, but you’ll need to jump through a few hoops to download VMware Player, so this chapter demonstrates BackTrack running within VirtualBox. If you prefer to use VMware, you may find it convenient to download BackTrack’s ready-made VMware image (rather than the ISO), saving a few of the steps discussed in this section.
Creating a BackTrack Virtual Machine with VirtualBox
When you first run VirtualBox, you will see the console shown in Figure 7-4. Click New to create a new virtual machine (VM). After choosing Linux (Ubuntu) and accepting all the other default choices, you’ll have a new BackTrack VM. To attach the ISO as a DVD drive, click Settings, choose Storage, click the optical drive icon, and click the file folder icon next to the CD/DVD Device drop-down list box that defaults to Empty (see Figure 7-5). The Virtual Media Manager that pops up will allow you to add a new disk image (ISO) and select it to be attached to the VM. Click Start back in the VirtualBox console and your new VM will boot from the ISO.

Figure 7-4 VirtualBox console
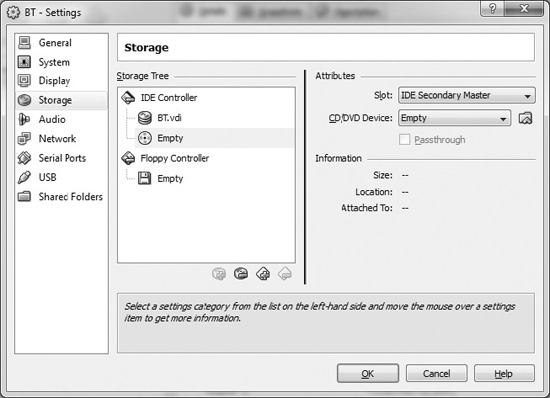
Figure 7-5 VirtualBox Settings window
Booting the BackTrack LiveDVD System
When you first boot from the BackTrack LiveDVD system (from DVD or USB thumb drive or from ISO under VMware or VirtualBox), you’ll be presented with a boot menu that looks like Figure 7-6.
The first choice should work for most systems. You can wait for 30 seconds or just press ENTER to start. We’ll discuss this boot menu in more detail later in the chapter. After the system boots, type startx and you will find yourself in the BackTrack LiveDVD X Window system.
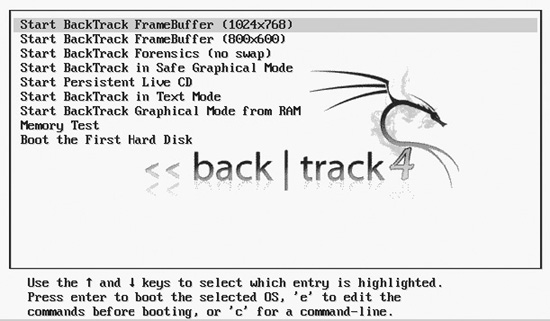
Figure 7-6 BackTrack boot menu
Exploring the BackTrack X Windows Environment
BackTrack is designed for security enthusiasts and includes hundreds of security testing tools, all conveniently categorized into a logical menu system. You can see a sample menu in Figure 7-7. We won’t cover BackTrack tools extensively in this chapter because part of the fun of BackTrack is exploring the system yourself. The goal of this chapter is to help you become comfortable with the way the BackTrack LiveDVD system works and to teach you how to customize it so that you can experiment with the tools yourself.
In addition to providing the comprehensive toolset, the BackTrack developers did a great job making the distribution nice to use even as an everyday operating system. You’ll find applications such as Firefox, XChat IRC, Liferea RSS reader, Kopete IM, and even Wine to run Windows apps. If you haven’t used Linux in several years, you might be surprised by how usable it has become. On the security side, everything just works: one-click Snort setup, Kismet with GPS support and autoconfiguration, unicornscan PostgreSQL support, Metasploit’s db_autopwn configured properly, and one-click options to start and stop the web server, SSH server, VNC server, database server, and TFTP server. The developers even included on the DVD the documentation for both the Information Systems Security Assessment Framework (ISSAF) and Open Source Security Testing Methodology Manual (OSSTMM) testing and assessment methodologies. If you find anything missing, the next several sections show you how you can customize the distribution any way you’d like.
Starting Network Services
Because BackTrack is a pen-testing distribution, networking services don’t start by default at boot. (BackTrack’s motto is “The quieter you become, the more you are able to hear.”) However, while you are exploring BackTrack, you’ll probably want to be connected to the Internet. Type the following command at the root@bt:~# prompt:
/etc/init.d/networking start
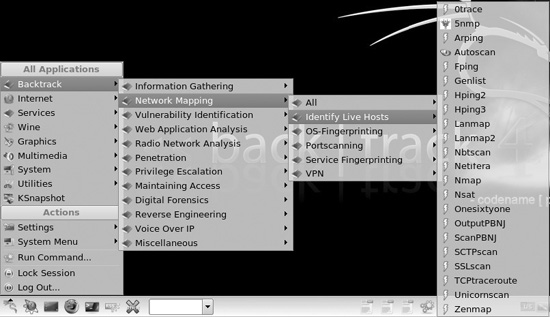
Figure 7-7 BackTrack menu
If you are running BackTrack inside a VM or have an Ethernet cable plugged in, this should enable your adaptor and acquire a DHCP address. You can then run the ifconfig command to view the adaptors and verify the configuration. If you prefer to use a GUI, you can launch the KDE Network Interfaces module from the Programs menu by choosing Settings | Internet & Network | Network Interfaces.
Wireless sometimes works and sometimes does not. BackTrack 4 includes all the default wireless drivers present in the 2.6.30 kernel, and the BackTrack team has included additional drivers with the distribution. However, connecting via 802.11 is trickier than using a wired connection for a number of reasons. First, you cannot get direct access to the wireless card if running BackTrack from within a virtual machine. VMware or VirtualBox can bridge the host OS’s wireless connection to the BackTrack guest OS to give you a simulated wired connection, but you won’t be able to successfully execute any wireless attacks such as capturing 802.11 frames to crack WEP. Second, some wireless cards just do not work. For example, some revisions of Broadcom cards in Mac-Books just don’t work. This will surely continue to improve, so check http://www.backtrack-linux.org/bt/wireless-drivers/ for the latest on wireless driver compatibility.
If your wireless card is supported, you can configure it from the command line using the iwconfig command or using the Wicd Network Manager GUI found within the Internet menu.
Reference
VirtualBox home page www.virtualbox.org
Persisting Changes to Your BackTrack Installation
If you plan to use BackTrack regularly, you’ll want to customize it. Remember that the BackTrack LiveDVD system described so far in this chapter is based on a read-only file system. Configuration changes are never written out to disk, only to RAM. Making even simple configuration changes, such as connecting to your home wireless access point and supplying the WPA key, will become tedious after the third or fourth reboot. BackTrack provides three methods to persist changes from boot to boot.
Installing Full BackTrack to Hard Drive or USB Thumb Drive
The easiest way to persist configuration changes, and the way most people will choose to do so, is to install the full BackTrack system to your hard drive or USB thumb drive. BackTrack then operates just like a traditional operating system, writing out changes to disk when you make changes. BackTrack includes an install.sh script on the desktop to facilitate the full install. Double-click install.sh to launch the Install GUI, answer a series of questions, and minutes later you can reboot into a regular Linux installation running from the hard drive or a USB thumb drive. One step in the installation is displayed in Figure 7-8.

Figure 7-8 BackTrack install-to-disk wizard
BackTrack Inside VirtualBox
Figure 7-8 shows that the full installer will help you partition and create a file system on a raw disk. However, if you would like to continue using BackTrack in LiveDVD mode and not perform the full install, you will probably want additional read-write disk space. In this case, you may need to partition the disk and create a file system. If you are running within the VirtualBox virtualization environment, you will also likely want to install VirtualBox’s Guest Additions for Linux. Installing this package will enable Shared Folder support between the host and guest OSs (and some other niceties). Following are the steps to configure the VirtualBox hard drive properly and then to install the VirtualBox Guest Additions for Linux:
1. Format and partition the /dev/hda disk provided by VirtualBox. The command to begin this process is fdisk /dev/hda. From within fdisk, create a new partition (n), make it a primary partition (p), label it partition 1 (1), accept the default start and stop cylinders (press ENTER for both prompts), and write out the partition table (w).
2. With the disk properly partitioned, create a file system and mount the disk. If you want to use the Linux default file system type (ext3), the command to create a file system is mkfs.ext3 /dev/hda1. The disk should then be available for use by creating a mount point (mkdir / mnt/vbox) and mounting the disk (mount /dev/hda1 /mnt/vbox).
3. Now, with read-write disk space available, you can download and install VirtualBox Guest Additions for Linux. You need to download the correct version of VirtualBox Guest Additions for your version of VirtualBox. The latest VirtualBox at the time of this writing is 3.1.6, so the command to download the VirtualBox Guest Additions is wget http://download.virtualbox.org/virtualbox/3.1.6/VBoxGuestAdditions_3.1.6.iso.
4. When the download completes, rename the file to something easier to type (mv VBoxGuestAdditions* vbga.iso), create a mount point for the ISO (mkdir /mnt/vbga), mount the ISO (mount –o loop vbga.iso /mnt/vbga), and run the installer (cd /mnt/vbga;./VBoxLinuxAdditions-x86.run). Here, you can see the result of installing the VirtualBox Guest Additions:

After you install VirtualBox Guest Additions, you can begin using Shared Folders between the Host OS and Guest OS. To test this out, create a Shared Folder in the VirtualBox user interface (this example assumes it is named “shared”), create a mount point (mkdir /mnt/shared), and mount the device using new file system type vboxsf (mount –t vboxsf shared /mnt/shared).
Creating a New ISO with Your One-time Changes
Installing the full BackTrack installation to disk and treating it as a regular Linux installation certainly allows you to persist changes. In addition to persisting changes boot to boot, it will improve boot performance. However, you’ll lose the ability to pop a DVD into any system and boot up BackTrack with your settings applied. The full BackTrack installation writes out 5+ GB to the drive, too much to fit on a DVD. Wouldn’t it be great if you could just boot the regular LiveDVD 1.5GB ISO, make a few changes, and create a new ISO containing the bt4.iso bits plus your changes? You could then write that 1.5+ GB ISO out to DVD, making your own version of BackTrack LiveDVD.
The BackTrack developers created a script that allows you to do just that. You’ll need 8+ GB of free disk space to use their bt4-customise.sh script, and it will run for a number of minutes, but it actually works! Here is the set of steps:
1. Download the customise script from the BackTrack web page (wget http://www.offensive-security.com/bt4-customise.sh).
2. Edit the script to point it to your bt4-final.iso. To do this, change the third line in the script assigning btisoname equal to the full path to your BackTrack ISO, including the filename.
3. Change to a directory with 8+ GB of free writable disk space (cd /mnt/vbox) and run the shell script (sh bt4-customise.sh).
Figure 7-9 shows the script having run with a build environment set up for you, dropping you off in a modifiable chroot. At this point, you can update, upgrade, add, or remove packages, and make configuration changes.
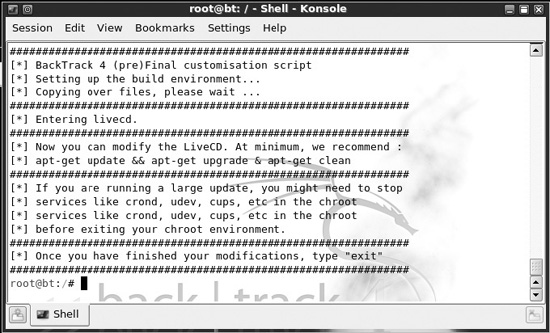
Figure 7-9 Customise script chroot environment
When you type exit in this shell, the script builds a modified ISO for you, including the updates, additions, and configuration changes you introduced. This process may take quite a while and will consume 8+ GB of free disk space. Figure 7-10 shows the beginning of this ISO building process.
The resulting custom BackTrack ISO can then be burned to DVD or written to a 2+ GB USB thumb drive.
Using a Custom File that Automatically Saves and Restores Changes
There is a third option to persist changes to BackTrack that combines the best of both previous options. You can maintain the (relatively) small 1.5GB LiveDVD without having to do the full 5+ GB hard drive install, and your changes are automatically persisted—no additional ISO is needed for each change. As an added bonus, this approach allows you to easily make differential-only backups of the changes from the BackTrack baseline. You can just copy one file to the thumb drive to roll back the entire BackTrack installation to a previous state. It’s very slick. The only downside is the somewhat tricky one-time initial setup.
For this approach, you’ll need to a 2+ GB thumb drive. Format the whole drive as FAT32 and use UNetbootin to extract the ISO to the thumb drive. Next, you need to create a specific kind of file at the root of the USB thumb drive with a specific name. You’ll need to create this file from within a Linux environment. Boot using your newly written thumb drive. BackTrack will have mounted your bootable USB thumb drive as /media/cdrom0. The device name is cdrom0 because BackTrack assumes the boot device is a LiveDVD, not a USB thumb drive. You can confirm this by typing the mount command. You’ll see something like the output in Figure 7-11.
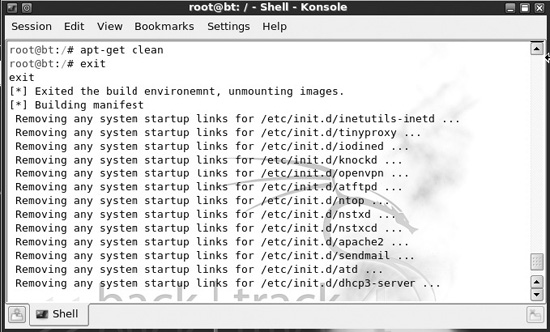
Figure 7-10 Building a modified BackTrack ISO

Figure 7-11 BackTrack mounted devices after booting from USB thumb drive
In this case, the USB thumb drive is assigned /dev/sdb1 and is mounted as read-only. To write a special file to the root of the thumb drive, you’ll need to remount the USB thumb drive read-write. Issue this command:
mount −o remount,rw /media/cdrom0
BackTrack will now allow you to write to the USB thumb drive.
This special file you are about to create will hold all the changes you make from the BackTrack baseline. It’s really creating a file system within a file. The magic that allows this to happen is the casper file system, the file system used by BackTrack alluded to earlier in the chapter. If BackTrack finds a file named casper-rw at the root of any mounted partition and is passed the special persistent flag at boot, BackTrack will use the casper-rw file as a file system to read and write changes from the BackTrack baseline. Let’s try it out.
After you have remounted the USB thumb drive in read-write mode, you can use the dd command to create an empty file of whatever size you would like to allocate to persisting changes. The following command creates a 500MB casper-rw file:
dd if=/dev/zero of=/media/cdrom0/casper-rw bs=1M count=500
Next, create a file system within that casper-rw file using the mkfs command:
mkfs.ext3 -F /media/cdrom0/casper-rw
Remember that you’ll need a writable disk for this to work. If you have booted from a DVD or from an ISO within virtualization software, BackTrack will not be able to create the casper-rw file and you will get the following error message:
dd: opening 'casper-rw': Read-only file system
Finally, if you have successfully created the casper-rw file and created a file system within the file, you can reboot to enjoy persistence. At the boot menu (refer to Figure 7-6), choose the fifth option, Start Persistent Live CD. Any changes that you make in this persistence mode are written to this file system inside the casper-rw file. You can reboot and see that changes you made are still present. To make a backup of all changes you have made at any point, copy the casper-rw file to someplace safe. Remember that the thumb drive is formatted as FAT32, so you can pop it into any PC and copy off the casper-rw file. To revert to the BackTrack baseline, delete the casper-rw file. To temporarily revert to the BackTrack baseline without impacting your persistence, make a different choice at the boot option.
References
BackTrack 4 Persistence www.backtrack-linux.org/forums/backtrack-howtos/819-backtrack-4-final-persistent-usb-***easiest-way***.html
BT4 customise script www.offensive-security.com/blog/backtrack/customising-backtrack-live-cd-the-easy-way/
Ubuntu Persistence https://help.ubuntu.com/community/LiveCD/Persistence
Exploring the BackTrack Boot Menu
We have now demonstrated two of the nine options in the default BackTrack boot menu. The first option boots with desktop resolution 1024×768, and the fifth option boots in persistent mode with changes written out to and read from a casper file system. Let’s take a closer look at each of the boot menu options and the configuration behind each option.
BackTrack uses the grub boot loader. Grub is configured by a file named menu.lst on the ISO or DVD or thumb drive within the bootgrub subdirectory. For most of the startup options, the menu.lst file will specify the title to appear in the menu, the kernel with boot options, and the initial RAM disk to use (initrd). For example, here is the configuration for the first choice in the BackTrack boot menu:
title Start BackTrack FrameBuffer (1024x768)
kernel /boot/vmlinuz BOOT=casper nonpersistent rw quiet vga=0x317
initrd /boot/initrd.gz
Referring to Figure 7-6, you can see that the title is displayed verbatim as the description in the boot menu. Most of the kernel boot options are straightforward:
• Use the casper file system (casper).
• Do not attempt to persist changes (nonpersistent).
• Mount the root device read-write on boot (rw).
• Disable most log messages (quiet).
The vga parameter assignment is not as obvious. Table 7-1 lists the VGA codes for various desktop resolutions.
Therefore, the first choice in the BackTrack boot menu having boot option vga=0x317 will start BackTrack with desktop resolution 1024×768 and 64k colors.
The second BackTrack boot menu option, Start BackTrack FrameBuffer (800x600), is similar to the first option with the primary difference being vga=0x314 instead of vga=0x317. Referring to Table 7-1, we can see that 0x314 means desktop resolution 800×600 with 64k colors.
The third BackTrack boot menu option, Start BackTrack Forensics (no swap), uses the same boot flags as the first boot option. The differences are only in the initial RAM disk. By default, BackTrack will automount any available drives and utilize swap partitions where available. This is not suitable for forensic investigations, where the integrity of the drive must absolutely be maintained. The initrdfr.gz initial RAM disk configures BackTrack to be forensically clean. The system initialization scripts will not look for or make use of any swap partitions on the system, and this configuration will not automount file systems. The BackTrack Forensics mode is safe to use as a boot DVD for forensic investigations.
The only difference in the fourth BackTrack boot menu option, Start BackTrack in Safe Graphical Mode, is the keyword xforcevesa. This option forces X Windows to use the VESA driver. If the regular VGA driver does not work for an uncommon hardware configuration, you can try booting using the VESA driver.
We discussed the fifth option, Start Persistent Live CD, earlier. You can see from the menu.lst file that the keyword persistent is passed as a boot option.
You can start BackTrack in text mode with the sixth boot option, Start BackTrack in Text Mode. The boot option to do so from the menu.lst file is textonly.
If you’d like the boot loader to copy the entire live environment to system RAM and run BackTrack from there, choose the seventh option, Start BackTrack Graphical Mode from RAM. The boot option for this configuration option is toram.
The final two boot menu options are less likely to be used. If you’d like to do a system memory test, you can choose the eighth option to “boot” the program /boot/ memtest86+.bin. Finally, you can boot from the first hard disk by choosing the ninth and final boot option.

Table 7-1 Grub Boot Loader VGA Codes
The default menu.lst file is a nice introduction to the commonly used boot configurations. If you have installed the full BackTrack installation or boot into a persistence mode, you can change the menu.lst file by mixing and matching boot options. For example, you might want to have your persistence mode boot into desktop resolution 1280×1024 with 16-bit color. That’s easy. Just add the value vga=0x31A as a parameter to the fifth option having the persistent keyword and reboot.
Reference
Linux kernel parameters www.kernel.org/doc/Documentation/kernel-parameters.txt
Updating BackTrack
The BackTrack developers maintain a repository of the latest version of all tools contained in the distribution. You can update BackTrack tools from within BackTrack using the Advanced Packaging Tool (APT). Here are three useful apt-get commands:

You can show all packages available, a description of each, and a version of each using the dpkg command dpkg -l. You can search for packages available via APT using the apt-cache search command. Here’s an example of a series of commands one might run to look for documents on snort.
root@bt:~# dpkg −l '*snort*'
dpkg shows airsnort 0.2.7e-bt2 and snort setup 2.8-bt3 installed on BackTrack 4 by default.
We can use apt-cache to show additional snort-related packages available in the repository:
root@bt:~# apt-cache search 'snort'
The APT cache has the following package:
snort-doc − Documentation for the Snort IDS [documentation]
Use apt-get to download and install this package:
root@bt:~# apt-get install snort-doc
The package is downloaded from http://archive.offensive-security.com and installed. To find where those documents were installed, run the dpkg command again, this time with –L:
root@bt:~# dpkg −L snort-doc
Bingo! We see that the docs were installed to /usr/share/doc/snort-doc.