
CHAPTER 29
Hacking Malware
Why are we bothering to discuss malware in a book about hacking? One reason is that malware is so pervasive today that it is all but impossible to avoid it. If you know anything at all about computer security, you are likely to be asked for advice on how to deal with some malware-related issue—from how to avoid it in the first place, to how to clean up after an infection.
In this chapter, we cover the following topics related to hacking malware:
• Trends in malware
• De-obfuscating malware
• Reverse-engineering malware
Trends in Malware
Like any other technology, malware is growing increasingly sophisticated. Malware authors seek to make their tools undetectable. Virtually every known offensive technique has been incorporated into malware to make it more difficult to defend against. While it is rare to see completely new techniques appear first in malware, malware authors are quick to adopt new techniques once they are made public, and quick to adapt in the face of new defensive techniques.
Embedded Components
Malware authors often seek to deliver several components in a single malware payload. Such additional components can include kernel-level drivers designed to hide the presence of the malware, and malware client and server components to handle data exfiltration or to provide proxy services through an infected computer. These additional components can be embedded within Windows malware in either a resource section or as overlay data in the PE file.
Resource sections within a Windows PE binary are designed to hold customizable data blobs that can be modified independently of the program code. Resource sections often include bitmaps for program icons, dialog box templates, and string tables that make it easier to internationalize a program via the inclusion of strings based on alternate character sets. Malware authors have taken advantage of this functionality to embed entire binaries, such as additional executables or device drivers, into the resource section. When the malware is run, it could use the LoadResource() function to extract the embedded resource and save it to the victim’s local hard drive.

NOTE
A freeware tool that you can use to explore resource sections is Resource Hacker, written by Angus Johnson (see the “References” section).
Trojans also could use overlay data in the PE file to store additional components needed for execution. Overlay data is simply data appended toward the end of the PE file. Because the malware knows exactly where the embedded component begins, it can easily extract each file and, again, save it to the victim’s local hard drive.
Use of Encryption
In the past, it was not uncommon to see malware that used no encryption at all to hinder analysis. Over time malware authors have jumped on the encryption bandwagon as a means of obscuring their activities, whether they seek to protect communications or seek to prevent disclosure of the contents of a binary. Encryption algorithms seen in the wild range from simple XOR encodings to compact ciphers such as the Tiny Encryption Algorithm (TEA), and occasionally more sophisticated ciphers such as DES. The need for self-sufficiency tends to restrict malware to the use of symmetric ciphers, which means that decryption keys must be contained within the malware itself. Malware authors often try to hide the presence of their keys by further encoding or splitting the keys using some easily reversible but (they hope) difficult-to-recognize process. Recovery of any decryption keys is an essential step for reverse-engineering any encrypted malware.
User Space Hiding Techniques
Malware has been observed to take any number of steps to hide its presence on an infected system. By hiding in plain sight within the clutter of the Windows system directory using names that a user might assume belong to legitimate operating system components, malware hopes to remain undetected. Alternatively, malware may choose to create its own installation directory deep within the install program’s hierarchy in an attempt to hide from curious users. Various techniques also exist to prevent installed antivirus programs from detecting a newly infected computer. A crude yet effective method is to modify a system’s hosts file to add entries for hosts known to be associated with antivirus updates.
NOTE
A hosts file is a simple text file that contains mappings of IP addresses to hostnames. The hosts file is typically consulted prior to performing a DNS lookup to resolve a hostname to an IP address. If a hostname is found in the hosts file, the associated IP address is used, saving the time required to perform a DNS lookup. On Windows systems, the hosts file can be found in the system directory under system32driversetc. On Unix systems, the hosts file can be found at /etc/hosts.
The modifications go so far as to insert a large number of carriage returns at the end of the existing host entries before appending the malicious host entries, in the hopes that the casual observer will fail to scroll down and notice the appended entries. By causing antivirus updates to fail, new generations of malware can go undetected for long periods. Typical users may not notice that their antivirus software has failed to automatically update, as warnings to that effect are either not generated at all or are simply dismissed by unwitting users.
Use of Rootkit Technology
Many malware authors turn to rootkit techniques to hide the presence of their malware. Rootkit components may be delivered as embedded components within the initial malware payload, as described earlier, or downloaded as secondary stages following initial malware infection. Services implemented by rootkit components include but are not limited to process hiding, file hiding, key logging, and network socket hiding.
Persistence Measures
Most malware authors take steps to ensure that their malware will continue to run even after a system has been restarted. Achieving some degree of persistence eliminates the requirement to reinfect a machine every time the machine is rebooted. As with other malware behaviors, the manner in which persistence is achieved has grown more sophisticated over time. The most basic forms of persistence are achieved by adding commands to system startup scripts that cause the malware to execute. On Windows systems, this evolved to making specific registry modifications to achieve the same effect.
NOTE
The Windows registry is a collection of system configuration values that details the hardware and software configuration for a given computer. A registry contains keys, which loosely equate to directories; values, which loosely equate to files; and data, which loosely equates to the content of those files. By specifying a value for the HKEY_LOCAL_MACHINESOFTWARE MicrosoftWindowsCurrentVersionRun registry key, for example, a program can be named to start each time a user logs in. Several similar keys exist in the registry and also on disk. Autoruns, a free tool from Microsoft, can enumerate each autostart extensibility point (ASEP) on any given system.
Other registry manipulations include installing malware components as extensions to commonly used software such as Windows Explorer or Microsoft Internet Explorer. More recently, malware has taken to installing itself as an operating system service or device driver so that components of the malware operate at the kernel level and are launched at system startup.
References
Autoruns for Windows technet.microsoft.com/en-us/sysinternals/bb963902.aspx
Resource Hacker www.angusj.com/resourcehacker/
“The Evolution of Self-Defense Technologies in Malware” (Alisa Shevchenko) www.net-security.org/article.php?id=1028
De-obfuscating Malware
One of the most prevalent features of modern malware is obfuscation. Obfuscation is the process of modifying something so as to hide its true purpose. In the case of malware, obfuscation is used to make automated analysis of the malware nearly impossible and to frustrate manual analysis to the maximum extent possible. There are two basic ways to deal with obfuscation. The first way is to simply ignore it, in which case your only real option for understanding the nature of a piece of malware is to observe its behavior in a carefully instrumented environment, as detailed in the previous chapter. The second way to deal with obfuscation is to take steps to remove the obfuscation and reveal the original “de-obfuscated” program, which can then be analyzed using traditional tools such as disassemblers and debuggers.
Of course, malware authors understand that analysts will attempt to break through any obfuscation, and as a result they design their malware with features designed to make de-obfuscation difficult. De-obfuscation can never be made truly impossible since the malware must ultimately run on its target CPU; it will always be possible to observe the sequence of instructions that the malware executes using some combination of hardware and software tools. In all likelihood, the malware author’s goal is simply to make analysis sufficiently difficult that a window of opportunity is opened for the malware in which it can operate without detection.
Packer Basics
Tools used to obfuscate compiled binary programs are generically referred to as packers. This term stems from the fact that one technique for obfuscating a binary program is simply to compress the program, as compressed data tends to look far more random, and certainly does not resemble machine language. For the program to actually execute on the target computer, it must remain a valid executable for the target platform. The standard approach taken by most packers is to embed an unpacking stub into the packed program and to modify the program entry point to point to the unpacking stub. When the packed program executes, the operating system reads the new entry point and initiates execution of the packed program at the unpacking stub. The purpose of the unpacking stub is to restore the packed program to its original state and then to transfer control to the restored program.
Packers vary significantly in their degree of sophistication. The most basic packers simply perform compression of a binary’s code and data sections. More sophisticated packers not only compress, but also perform some degree of encryption of the binary’s sections. Finally, many packers will take steps to obfuscate a binary’s import table by compressing or encrypting the list of functions and libraries that the binary depends upon. In this last case, the unpacking stub must be sophisticated enough to perform many of the functions of the dynamic loader, including loading any libraries that will be required by the unpacked binary and obtaining the addresses of all required functions within those libraries. The most obvious way to do this is to leverage available system API functions such as the Windows LoadLibrary() and GetProcAddress() functions. Each of these functions requires ASCII input to specify the name of a library or function, leaving the binary susceptible to strings analysis. More advanced unpackers utilize linking techniques borrowed from the hacker community, many of which are detailed in Matt Miller’s excellent paper Understanding Windows Shellcode (see the “References” section).
What is it that packers hope to achieve? The first, most obvious thing is to defeat strings analysis of a binary program.
NOTE
The strings utility is designed to scan a file for sequences of consecutive ASCII or Unicode characters and to display to the user strings that exceed a certain minimum length. strings can be used to gain a quick feel for the strings that are manipulated by a compiled program as well as any libraries and functions that the program may link to, since such library and function names are typically stored as ASCII strings in a program’s import table.
strings is not a particularly effective reverse-engineering tool, as the presence of a particular string within a binary in no way implies that the string is ever used. A true behavioral analysis is the only way to determine whether a particular string is ever utilized. As a side note, the absence of any strings output is often a quick indicator that an executable has been packed in some manner.
Unpacking Binaries
Before you can ever begin to analyze how a piece of malware behaves, you will most likely be required to unpack that malware. Approaches to unpacking vary depending upon your particular skill set, but usually a few questions are useful to answer before you begin the fight to unpack something.
Is This Malware Packed?
How can you identify whether a binary has been packed? There is no one best answer. Tools such as PEiD (see Chapter 28) can identify whether a binary has been packed using a known packer, but they are not much help when a new or mutated packer has been used. As mentioned earlier, strings can give you a feel for whether a binary has been packed. Typical strings output on a packed binary will consist primarily of garbage along with the names of the libraries and functions that are required by the unpacker. A partial listing of the extracted strings from a sample of the Sobig worm is shown next:
!This program cannot be run in DOS mode.
Rich
.shrink
.shrink
.shrink
.shrink
'!Vw@p
KMQlPD%
N2]B
<...>
cj}D
wQfYX
kernel32.dll
user32.dll
GetModuleHandleA
MessageBoxA
D}uL
:V&&
tD4w
XC001815d
XC001815d
XC001815d
XC001815d
XC001815d
These strings tell us very little. Things that we can see include section names extracted from the PE headers (.shrink). Many tools exist that are capable of dumping various fields from binary file headers. In this case, the section names are nonstandard for all compilers that we are aware of, indicating that some post-processing (such as packing) of the binary has probably taken place. The objdump utility can be used to easily display more information about the binary and its sections, as shown next:
$ objdump -fh sobig.bin
sobig.bin: file format pei-i386
architecture: i386, flags 0x0000010a:
EXEC_P, HAS_DEBUG, D_PAGED
start address 0x0041ebd6
Sections:
Idx Name Size VMA LMA File off Algn
0 .shrink 0000c400 00401000 00401000 00001000 2**2
CONTENTS, ALLOC, LOAD, DATA
1 .shrink 00001200 00416000 00416000 0000d400 2**2
CONTENTS, ALLOC, LOAD, DATA
2 .shrink 00001200 00419000 00419000 0000e600 2**2
CONTENTS, ALLOC, LOAD, DATA
3 .shrink 00002200 0041d000 0041d000 0000f800 2**2
CONTENTS, ALLOC, LOAD, DATA
Things worth noting in this listing are that all the sections have the same name, which is highly unusual, and that the program entry point (0x0041ebd6) lies in the fourth section (spanning 0x0041d000−0x0041f200), which is also highly unusual since a program’s executable section (usually .text) is most often the very first section within the binary. The fourth section probably contains the unpacking stub, which will unpack the other three sections before transferring control to an address within the first section.
Another thing to note from the strings output is that the binary appears to import only two libraries (kernel32.dll and user32.dll), and from those libraries imports only two functions (GetModuleHandleA and MessageBoxA). This is a surprisingly small number of functions for any program to import. Try running dumpbin on any binary and you will typically get several screens full of information regarding the libraries and functions that are imported. Suffice it to say, this particular binary appears to be packed and a simple tool like strings was all it took to make that fairly obvious.
How Was This Malware Packed?
Now that you have identified a packed binary and your pulse is beginning to rise, it is useful to attempt to identify exactly how the binary was packed. “Why?” you may ask. In most cases, you will not be the first person to encounter a particular packing scheme. If you can identify a few key features of the packing scheme, you may be able to search for and utilize tools or algorithms that have been developed for unpacking the binary you are analyzing. Many packers leave telltale signs about their identity. Some packers utilize well-known section names, while others leave identifying strings in the packed binary. If you are lucky, you will have encountered a packed file for which an automated unpacker exists.
The UPX packer is well known as a packer that offers an undo option. At least this option is well known to reverse engineers. Surprisingly, a large number of malware authors continue to utilize UPX as their packer of choice (perhaps because it is free and easy to obtain). The fact that UPX is easily reversed has spawned an entire aftermarket of UPX postprocessing utilities designed to modify files generated by UPX just enough that UPX will refuse to unpack them. Tools such as file (which has a rudimentary packer identification capability), PEiD, and Google are your best bet for identifying exactly which packing utility may have been used to obfuscate a particular binary.
How Do I Recover the Original Binary?
In an ideal world, once (if?) you were to identify the tool used to pack a binary, you would be able to quickly locate a tool or procedure for automatically unpacking that binary. Unfortunately, the world is a less than ideal place, and more often than you like, you will be required to battle your way through the unpacking process on your own. There are several different approaches to unpacking, each with its advantages and disadvantages.
Run and Dump Unpacking With most packed programs, the first phase of execution involves unpacking the original program in memory, loading any required libraries, and looking up the addresses of imported functions. Once these actions are completed, the memory image of the program closely resembles its original, unpacked version. If a snapshot of the memory image can be dumped to a file at this point, that file can be analyzed as if no packing had ever taken place. The advantage to this technique is that the embedded unpacking stub is leveraged to do the unpacking for you. The difficult part is knowing exactly when to take the memory snapshot. The snapshot must be made after the unpacking has taken place and before the program has had a chance to cover its tracks. This is one drawback to this approach for unpacking. The other, perhaps more significant drawback is that the malware must be allowed to run so that it can unpack itself. To do this safely, a sandbox environment should be configured as detailed in the “Live Analysis” section of Chapter 28.
Most operating systems provide facilities for accessing the memory of running processes. One of the better tools for Windows systems to dump process images from memory is called LordPE. It was built by yoda. LordPE displays a list of running processes. When a process is selected, LordPE displays a complete list of files associated with that process. To dump any of the files associated with the process, simply right-click the file and choose Dump Full (or Dump Partial if you are interested in only a subset of the process memory). You can see LordPE in action in Figure 29-1.
A discussion of PD, a similar, Linux-based tool by ilo, appears in Phrack 63.
Debugger-Assisted Unpacking Allowing malware to run free is not always a great idea. If we don’t know what the malware does, it may have the opportunity to wreak havoc before we can successfully dump the memory image to disk. Debuggers offer greater control over the execution of any program under analysis. The basic idea when using a debugger is to allow the malware to execute just long enough for it to unpack itself, and then to utilize the memory-dumping capabilities of the debugger to dump the process image to a file for further analysis. The problem here is determining how long is long enough.
A fundamental problem when working with self-modifying code in a debugger is that software breakpoints (such as the x86 int 3) are difficult to use since the saved breakpoint opcode (0xCC on the x86) may be modified before the program reaches the breakpoint location. As a result, the CPU will fetch something other than the breakpoint opcode and fail to break properly. Hardware breakpoints could be used on processors that support them; however, the problem of where to set the breakpoint remains. Without a correct disassembly, it is not possible to determine where to set a breakpoint. The only reasonable approach is to use single stepping until some pattern of execution such as a loop is revealed, and then to utilize breakpoints to execute the loop to completion, at which point you resume single stepping and repeat the process. This can be very time consuming if the author of the packer chooses to use many small loops and self-modifying code sections to frustrate your analysis.
Joe Stewart developed the OllyBonE plug-in for OllyDbg, a Windows debugger. The plug-in is designed to offer Break-on-Execute breakpoint capability. Break-on-Execute allows a memory location to be read or written as data but causes a breakpoint to trigger if that memory location is fetched from, meaning the location is being treated as an instruction address. The assumption here is that it is first necessary to modify the packed program data during the unpacking process before that code can be executed. OllyBonE can be used to set a Break-on-Execute breakpoint on an entire program section, allowing program execution to proceed through the unpacking phase but catching the transfer of control from the unpacking stub to the newly unpacked code. In the Sobig example (see the second listing under “Is This Malware Packed?”), using OllyBonE to set a breakpoint on section zero and then allowing the program to run will cause the program to be unpacked. But it will prevent it from executing the unpacked code, as the breakpoint will trigger when control is transferred to any location within section zero. Once the program has been unpacked, OllyDump and PE Dumper are two additional plug-ins for OllyDbg that are designed to dump the unpacked program image back to a file.
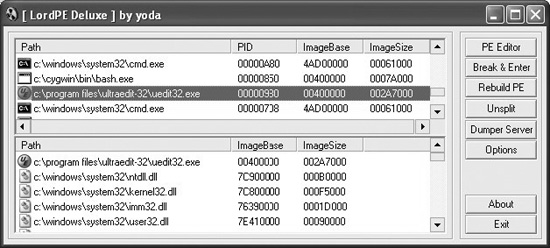
Figure 29-1 The LordPE process-dumping utility
IDA Pro-Assisted Unpacking Packer authors are well aware that reverse engineers make use of debuggers to unpack binaries. As a result, many current packers incorporate anti-debugging techniques to hinder debugger-assisted unpacking. These include
• Debugger detection The use of the IsDebuggerPresent function (Windows), timing tests to detect slower than expected execution, examination of the x86 timestamp counter, testing the CPU trace flag, and looking for debugger-related processes are just a few examples.
• Exception handling Debuggers rely on the ability to process specific CPU exceptions. To do this, debuggers register exception handlers for all exceptions that they expect to process, such as the breakpoint exception. Some packers register their own exception handlers to prevent a debugger from regaining control.
• Debug register manipulation Debuggers must keep close control of any hardware debugging registers that the CPU may have. To foil hardware-assisted debugging on Windows, some packers set up exception handlers and then intentionally generate an exception. Since the Windows exception-handling mechanism grants a process access to the x86 debug registers, the packer can clear any hardware breakpoints that may have been set by the debugger.
• Self-modifying code This makes it difficult to set software breakpoints as described previously.
• Debugging prevention To debug a process, a debugger must be able to attach to that process. Operating systems allow only one debugger to attach to a process at any given time. If a debugger is already attached to a process, a second debugger can’t attach. To prevent the use of debuggers, some programs will attach to themselves, effectively shutting out all debuggers. If a debugger is used to launch the program initially, the program will not be able to attach to itself (since the debugger is already attached) and will generally shut down.
In addition to anti-debugging techniques, many packers generate code designed to frustrate disassembly analysis of the unpacking stub. Some common anti-disassembly techniques include jumping into the middle of instructions and jumps to runtime-computed values.
An example of the first technique is shown in the following listing, which has clearly stopped IDA Pro in its tracks:

Here, the instruction at location 41D002 is attempting a call to location 41D009, which is in the middle of the 5-byte instruction that begins at location 41D007. IDA Pro can’t split the instruction at 41D007 into two separate instructions, so it gets stopped in its tracks.
Manually reformatting the IDA Pro display yields a more accurate disassembly, as shown in the following code, but adds significantly to the time required to analyze a binary:

This listing also illustrates the use of runtime values to influence the flow of the program. In this example, the operations at 41D00F and 41D01D effectively turn the conditional jumps at 41D012 and 41D01E into unconditional jumps. This fact can’t be known by a disassembler and further serves to frustrate generation of an accurate disassembly.
At this point, it may seem impossible to utilize a disassembler to unpack obfuscated code. IDA Pro is sufficiently powerful to make de-obfuscation possible in many cases. Two options for unpacking include the use of IDA Pro scripts and the use of IDA Pro plug-ins. The key concept to understand is that the IDA Pro disassembly database can be viewed as a loaded memory image of the file being analyzed. When IDA Pro initially loads an executable, it maps all of the bytes of the executable to their corresponding virtual memory locations. IDA Pro users can query and modify the contents of any program memory location as if the program had been loaded by the operating system. Scripts and plug-ins can take advantage of this to mimic the behavior of the program being analyzed.
To generate an IDC script capable of unpacking a binary, the unpacking algorithm must be analyzed and understood well enough to write a script that performs the same actions. This typically involves reading a byte from the database using the Byte function, modifying that byte the same way the unpacker does, then writing the byte back to the database using the PatchByte function. Once the script has executed, you will need to force IDA Pro to reanalyze the newly unpacked bytes. This is because scripts run after IDA Pro has completed its initial analysis of the binary. Following any action you take to modify the database to reveal new code, you must tell IDA Pro to convert bytes to code or to reanalyze the affected area. A sample script to unpack UPX binaries can be found on the book’s website in the Chapter 29 section. While script-based unpacking bypasses any anti-debugging techniques employed by a packer, a major drawback to script-based unpacking is that new scripts must be generated for each new unpacker that appears, and existing scripts must be modified for each change to existing unpackers. This same problem applies to IDA Pro plug-ins, which typically take even more effort to develop and install, making targeted unpacking plug-ins a less than optimal solution.
The IDA Pro x86 emulator plug-in (ida-x86emu) was designed by Chris Eagle to address this shortcoming. By providing an emulation of the x86 instruction set, idax86emu has the effect of embedding a virtual CPU within IDA Pro. When activated (ALT-F8 by default), ida-x86emu presents a debugger-like control interface, as shown in Figure 29-2.
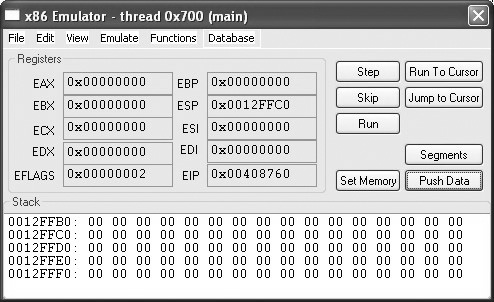
Figure 29-2 The IDA Pro x86emu control panel
When loaded, ida-x86emu allocates memory to represent the x86 registers, a stack, and a heap for use during program emulation. The user can manipulate the contents of the emulated x86 registers at any time via the emulator control console. Stepping the emulator causes the plug-in to read from the IDA Pro database at the location indicated by the eip register, decode the instruction that was read, and carry out the actions indicated by the instruction, including updating any registers, flags, or memory that may have changed. If a memory location being written to lies within the IDA database (as opposed to the emulated stack or heap), the emulator updates the database accordingly, thus transforming the database according to the instructions contained in the unpacker. After a sufficient number of instructions have been executed, the emulator will have transformed the IDA Pro database in the same manner that the unpacker would have transformed the program had it actually been running, and analysis of the binary can continue as if the binary had never been packed at all. The emulator plug-in contains a variety of features to assist in emulation of Windows binaries, including the following:
• Generation of SEH frames and transfer to an installed exception handler when an exception occurs.
• Automatic interception of library calls. Some library calls are emulated, including LoadLibrary, GetProcAddress, and others. Calls to functions for which ida-x86emu has no internal emulation generate a pop-up window (see Figure 29-3) that displays the current stack state and offers the user an opportunity to specify a return value and to define the behavior of the function.
• Tracking of calls to CreateThread, giving the user a chance to switch between multiple threads while emulating instructions.
The emulator offers a rudimentary breakpoint capability that does not rely on software breakpoints or debug control registers, preventing its breakpoint mechanism from being thwarted by unpackers. Finally, the emulator offers the ability to enumerate allocated heap blocks and to dump any range of memory out of the database to a file. Advantages of emulator-based unpacking include the fact that the original program is never executed, making this approach safe and eliminating the need to build and maintain a sandbox. Additionally, since the emulator operates at the CPU instruction level, it is immune to algorithmic changes in the unpacker and can be used against unknown unpackers with no changes. Finally, the emulator is immune to debugger and virtual machine detection techniques. Disadvantages include that the true behavior, such as network connections, of a binary can’t be observed, and at present the complete x86 instruction set is not emulated. As the emulator was primarily designed for unpacking, neither of these limitations tends to come into play.

Figure 29-3 Trapped library call in ida-x86emu
I Have Unpacked a Binary—Now What?
Once you have obtained an unpacked binary, you can employ more traditional analysis techniques. Remember, however, that if your goal is to perform black-box analysis of a running malware sample, unpacking was probably not necessary in the first place. Having gone to the trouble of unpacking a binary, the most logical next step is to perform analysis using a disassembler. It is worth noting that at this point a strings analysis should be performed on the unpacked binary to obtain a very rough idea of some of the things that the binary may attempt to do.
References
“Advances in remote-exec Antiforensics” [PD tool] (ilo) www.phrack.com/issues.html?issue=63&id=12#article
ida-x86emu plug-in sourceforge.net/projects/ida-x86emu/
LordPE www.woodmann.com/collaborative/tools/index.php/LordPE
OllyDump www.woodmann.com/collaborative/tools/index.php/OllyDump
PE Dumper www.woodmann.com/collaborative/tools/index.php/PE_Dumper
Understanding Windows Shellcode (Matt Miller, aka skape) www.hick.org/code/skape/papers/win32-shellcode.pdf
“Unpackng with OllyBonE” (Joe Stewart) www.joestewart.org/ollybone/tutorial.html
Reverse-Engineering Malware
Assuming that you have managed to obtain an unpacked malware sample via some unpacking mechanism, where do you go next? Chapter 28 covered some of the techniques for performing black-box analysis on malware samples. Is it any easier to analyze malware when it is fully exposed in IDA Pro? Unfortunately, no. Static analysis is a very tedious process and there is no magic recipe for making it easy. A solid understanding of typical malware behaviors can help speed the process.
Reverse-engineering malware can help you to understand the following:
• How the malware installs itself This may help you to develop de-installation procedures.
• Files associated with malware activity This may assist you in cleanup and detection.
• What hosts the malware communicates with This may assist you in tracking the malware to its source. This can include the discovery of passwords or other authentication mechanisms in use by the malware.
• Capabilities of the malware This may enable you to understand the current state of the art or to compare the malware with existing malware families.
• How to communicate with the malware This may help you to understand what information the malware has collected or detect additional infections.
• Vulnerabilities in the malware This may allow you to remotely terminate the malware on infected machines.
Malware Setup Phase
The first actions that most malware takes generally center on survival. Functions typically involved in the persistence phase often include file creation, registry editing, and service installation. Some useful information to uncover concerning persistence includes the names of any files or services that are created and any registry keys that are manipulated. An interesting technique for data hiding employed in some malware relies on the storage of data in nonstandard locations within a binary. We have previously discussed the fact that some malware has been observed to store data within the resource section of Windows binaries. This is an important thing to note, as IDA Pro does not typically load the resource section by default, which will prevent you from analyzing any data that might be stored there. Another nonstandard location in which malware has been observed to store data is at the end of its file, outside of any defined section boundaries. The malware locates this data by parsing its own headers to compute the total length of all the program sections. It can then seek to the end of all section data and read the extra data that has been appended to the end of the file. Unlike resources, which IDA Pro can load if you perform a manual load, IDA Pro will not load data that lies outside of any defined sections.
Malware Operation Phase
Once a piece of malware has established its presence on a computer, the malware sets about its primary task. Most modern malware performs some form of network communications. Functions to search for include any socket setup functions for client (connect) or server (listen, accept) sockets. Windows offers a large number of networking functions outside the traditional Berkeley sockets model. Many of these convenience functions can be found in the WinInet library and include functions such as Internet-Open, InternetConnect, InternetOpenUrl, and InternetReadFile.
Malware that creates server sockets is generally operating in one of two capacities. Either the malware possesses a backdoor connect capability, or the malware implements a proxy capability. Analysis of how incoming data is handled will reveal which capacity the malware is acting in. Backdoors typically contain some form of command processing loop in which they compare incoming commands against a list of valid commands. Typical backdoor capabilities include the ability to execute a single command and return results, the ability to upload or download a file, the ability to shut down the backdoor, and the ability to spawn a complete command shell. Backdoors that provide full command shells will generally configure a connected client socket as the standard input and output for a spawned child shell process. On Unix systems, this usually involves calls to dup or dup2, fork, and execve to spawn /bin/sh. On Windows systems, this typically involves a call to CreateProcess to spawn cmd.exe. If the malware is acting as a proxy, incoming data will be immediately written to a second outbound socket.
Malware that only creates outbound connections can be acting in virtually any capacity at all: worm, DDoS agent, or simple bot that is attempting to phone home. At a minimum, it is useful to determine whether the malware connects to many hosts (could be a worm) or a single host (could be phoning home), and to what port(s) the malware attempts to connect. You should make an effort to track down what the malware does once it connects to a remote host. Any ports and protocols that are observed can be used to create malware detection and possibly removal tools.
It is becoming more common for malware to perform basic encryption on data that it transmits. Encryption must take place just prior to data transmission or just after data reception. Identification of encryption algorithms employed by the malware can lead to the development of appropriate decoders that can, in turn, be utilized to determine what data may have been exfiltrated by the malware. It may also be possible to develop encoders that can be used to communicate with the malware to detect or disable it.
The number of communications techniques employed by malware authors grows with each new strain of malware. The importance of analyzing malware lies in understanding the state of the art in the malware community to improve detection, analysis, and removal techniques. Manual analysis of malware is a very slow process best left for cases in which new malware families are encountered, or when an exhaustive analysis of a malware sample is absolutely necessary.
Automated Malware Analysis
Automated malware analysis is a difficult problem. As a result, much malware analysis has been reduced to signature matching or the application of various heuristics, neither of which is terribly effective in the face of emerging malware threats. Several solutions do exist to perform dynamic analysis on malware samples. The term dynamic analysis implies that the sample is run in a live or emulated sandboxed environment, observing all behavior to determine if a sample performs malware-like activity. The most mature product in this space is Norman SandBox Analyzer. Competitors include GFI Sandbox from GFI Software (formerly CWSandbox) and SysAnalyzer from iDefense Labs. Most major antimalware companies also have developed in-house automated malware analysis systems similar to these offerings. Dynamic analysis has its drawbacks, however. Each of these sandbox solutions presents a signature to the malware that can be detected. If a sample detects it is running in a sandbox, it can simply terminate itself to prevent automated analysis.
References
GFI Sandbox www.sunbeltsoftware.com/Malware-Research-Analysis-Tools/Sunbelt-CWSandbox/
iDefense SysAnalyzer labs.idefense.com/software/malcode.php
Norman SandBox Analyzer www.norman.com/enterprise/all_products/malware_analyzer/norman_sandbox_analyzer/